《手把手教你》系列技巧篇(二十五)-java+ selenium自动化测试-FluentWait(详细教程)
1.简介
其实今天介绍也讲解的也是一种等待的方法,有些童鞋或者小伙伴们会问宏哥,这也是一种等待方法,为什么不在上一篇文章中竹筒倒豆子一股脑的全部说完,反而又在这里单独写了一篇。那是因为这个比较重要,所以宏哥专门为她量身定制了一篇。
FluentWait是Selenium中功能强大的一种等待方式,翻译成中文是流畅等待的意思。在介绍FluentWait之前,我们来讨论下为什么需要设置等待,我们前面介绍了隐式等待和显式等待。在现在很多软件产品为了加强前端的效果,采取了大量的AJAX 和Jquery技术,很多窗体内的数据,需要等待一会,才能加载完数据,才能出现一些元素,driver才能操作这些元素做一些事情。还有就是我们做一些操作,本身可能也需要等待一会才有数据显示。所以在自动化脚本开发过程,合理的设置时间等待是非常必要的,可以说百分之90以上的自动化测试用例执行失败,基本上是很时间等待有关系,造成元素没有及时在界面上显示,而报no such element子类的错误。
2.FluentWait的定义
简单来说,FluentWait就是一个普通的类,我们使用这个类能支持一直等待直到特定的条件出现。
1)是一个类而且是包org.openqa.selenium.support.ui的一部分
2)是Wait接口的一种实现
3)每个Fluent wait,我们可以设置等待最大时间,而且可以做设置等待的频率去检查一些特定的条件。
FluentWait 和 Explicit Wait的区别:简单来说就是Explicit Wait里有一些设定好了的前置条件的等待方式,而Fluent wait你可以设置自己的方法去处理各种等待的问题。
3.核心代码
3.1源码
宏哥先看一下FluentWait的源码,如何查看宏哥这里就不做赘述了。源码如下:
- // Licensed to the Software Freedom Conservancy (SFC) under one
- // or more contributor license agreements. See the NOTICE file
- // distributed with this work for additional information
- // regarding copyright ownership. The SFC licenses this file
- // to you under the Apache License, Version 2.0 (the
- // "License"); you may not use this file except in compliance
- // with the License. You may obtain a copy of the License at
- //
- // http://www.apache.org/licenses/LICENSE-2.0
- //
- // Unless required by applicable law or agreed to in writing,
- // software distributed under the License is distributed on an
- // "AS IS" BASIS, WITHOUT WARRANTIES OR CONDITIONS OF ANY
- // KIND, either express or implied. See the License for the
- // specific language governing permissions and limitations
- // under the License.
- package org.openqa.selenium.support.ui;
- import com.google.common.base.Throwables;
- import com.google.common.collect.ImmutableList;
- import org.openqa.selenium.TimeoutException;
- import org.openqa.selenium.WebDriverException;
- import org.openqa.selenium.internal.Require;
- import java.time.Clock;
- import java.time.Duration;
- import java.time.Instant;
- import java.util.ArrayList;
- import java.util.Collection;
- import java.util.List;
- import java.util.function.Function;
- import java.util.function.Supplier;
- /**
- * An implementation of the {@link Wait} interface that may have its timeout and polling interval
- * configured on the fly.
- *
- * <p>
- * Each FluentWait instance defines the maximum amount of time to wait for a condition, as well as
- * the frequency with which to check the condition. Furthermore, the user may configure the wait to
- * ignore specific types of exceptions whilst waiting, such as
- * {@link org.openqa.selenium.NoSuchElementException NoSuchElementExceptions} when searching for an
- * element on the page.
- *
- * <p>
- * Sample usage: <pre>
- * // Waiting 30 seconds for an element to be present on the page, checking
- * // for its presence once every 5 seconds.
- * Wait<WebDriver> wait = new FluentWait<WebDriver>(driver)
- * .withTimeout(30, SECONDS)
- * .pollingEvery(5, SECONDS)
- * .ignoring(NoSuchElementException.class);
- *
- * WebElement foo = wait.until(new Function<WebDriver, WebElement>() {
- * public WebElement apply(WebDriver driver) {
- * return driver.findElement(By.id("foo"));
- * }
- * });
- * </pre>
- *
- * <p>
- * <em>This class makes no thread safety guarantees.</em>
- *
- * @param <T> The input type for each condition used with this instance.
- */
- public class FluentWait<T> implements Wait<T> {
- protected static final long DEFAULT_SLEEP_TIMEOUT = 500;
- private static final Duration DEFAULT_WAIT_DURATION = Duration.ofMillis(DEFAULT_SLEEP_TIMEOUT);
- private final T input;
- private final java.time.Clock clock;
- private final Sleeper sleeper;
- private Duration timeout = DEFAULT_WAIT_DURATION;
- private Duration interval = DEFAULT_WAIT_DURATION;
- private Supplier<String> messageSupplier = () -> null;
- private List<Class<? extends Throwable>> ignoredExceptions = new ArrayList<>();
- /**
- * @param input The input value to pass to the evaluated conditions.
- */
- public FluentWait(T input) {
- this(input, Clock.systemDefaultZone(), Sleeper.SYSTEM_SLEEPER);
- }
- /**
- * @param input The input value to pass to the evaluated conditions.
- * @param clock The clock to use when measuring the timeout.
- * @param sleeper Used to put the thread to sleep between evaluation loops.
- */
- public FluentWait(T input, java.time.Clock clock, Sleeper sleeper) {
- this.input = Require.nonNull("Input", input);
- this.clock = Require.nonNull("Clock", clock);
- this.sleeper = Require.nonNull("Sleeper", sleeper);
- }
- /**
- * Sets how long to wait for the evaluated condition to be true. The default timeout is
- * {@link #DEFAULT_WAIT_DURATION}.
- *
- * @param timeout The timeout duration.
- * @return A self reference.
- */
- public FluentWait<T> withTimeout(Duration timeout) {
- this.timeout = timeout;
- return this;
- }
- /**
- * Sets the message to be displayed when time expires.
- *
- * @param message to be appended to default.
- * @return A self reference.
- */
- public FluentWait<T> withMessage(final String message) {
- this.messageSupplier = () -> message;
- return this;
- }
- /**
- * Sets the message to be evaluated and displayed when time expires.
- *
- * @param messageSupplier to be evaluated on failure and appended to default.
- * @return A self reference.
- */
- public FluentWait<T> withMessage(Supplier<String> messageSupplier) {
- this.messageSupplier = messageSupplier;
- return this;
- }
- /**
- * Sets how often the condition should be evaluated.
- *
- * <p>
- * In reality, the interval may be greater as the cost of actually evaluating a condition function
- * is not factored in. The default polling interval is {@link #DEFAULT_WAIT_DURATION}.
- *
- * @param interval The timeout duration.
- * @return A self reference.
- */
- public FluentWait<T> pollingEvery(Duration interval) {
- this.interval = interval;
- return this;
- }
- /**
- * Configures this instance to ignore specific types of exceptions while waiting for a condition.
- * Any exceptions not whitelisted will be allowed to propagate, terminating the wait.
- *
- * @param types The types of exceptions to ignore.
- * @param <K> an Exception that extends Throwable
- * @return A self reference.
- */
- public <K extends Throwable> FluentWait<T> ignoreAll(Collection<Class<? extends K>> types) {
- ignoredExceptions.addAll(types);
- return this;
- }
- /**
- * @param exceptionType exception to ignore
- * @return a self reference
- * @see #ignoreAll(Collection)
- */
- public FluentWait<T> ignoring(Class<? extends Throwable> exceptionType) {
- return this.ignoreAll(ImmutableList.<Class<? extends Throwable>>of(exceptionType));
- }
- /**
- * @param firstType exception to ignore
- * @param secondType another exception to ignore
- * @return a self reference
- * @see #ignoreAll(Collection)
- */
- public FluentWait<T> ignoring(Class<? extends Throwable> firstType,
- Class<? extends Throwable> secondType) {
- return this.ignoreAll(ImmutableList.of(firstType, secondType));
- }
- /**
- * Repeatedly applies this instance's input value to the given function until one of the following
- * occurs:
- * <ol>
- * <li>the function returns neither null nor false</li>
- * <li>the function throws an unignored exception</li>
- * <li>the timeout expires</li>
- * <li>the current thread is interrupted</li>
- * </ol>
- *
- * @param isTrue the parameter to pass to the {@link ExpectedCondition}
- * @param <V> The function's expected return type.
- * @return The function's return value if the function returned something different
- * from null or false before the timeout expired.
- * @throws TimeoutException If the timeout expires.
- */
- @Override
- public <V> V until(Function<? super T, V> isTrue) {
- Instant end = clock.instant().plus(timeout);
- Throwable lastException;
- while (true) {
- try {
- V value = isTrue.apply(input);
- if (value != null && (Boolean.class != value.getClass() || Boolean.TRUE.equals(value))) {
- return value;
- }
- // Clear the last exception; if another retry or timeout exception would
- // be caused by a false or null value, the last exception is not the
- // cause of the timeout.
- lastException = null;
- } catch (Throwable e) {
- lastException = propagateIfNotIgnored(e);
- }
- // Check the timeout after evaluating the function to ensure conditions
- // with a zero timeout can succeed.
- if (end.isBefore(clock.instant())) {
- String message = messageSupplier != null ?
- messageSupplier.get() : null;
- String timeoutMessage = String.format(
- "Expected condition failed: %s (tried for %d second(s) with %d milliseconds interval)",
- message == null ? "waiting for " + isTrue : message,
- timeout.getSeconds(), interval.toMillis());
- throw timeoutException(timeoutMessage, lastException);
- }
- try {
- sleeper.sleep(interval);
- } catch (InterruptedException e) {
- Thread.currentThread().interrupt();
- throw new WebDriverException(e);
- }
- }
- }
- private Throwable propagateIfNotIgnored(Throwable e) {
- for (Class<? extends Throwable> ignoredException : ignoredExceptions) {
- if (ignoredException.isInstance(e)) {
- return e;
- }
- }
- Throwables.throwIfUnchecked(e);
- throw new RuntimeException(e);
- }
- /**
- * Throws a timeout exception. This method may be overridden to throw an exception that is
- * idiomatic for a particular test infrastructure, such as an AssertionError in JUnit4.
- *
- * @param message The timeout message.
- * @param lastException The last exception to be thrown and subsequently suppressed while waiting
- * on a function.
- * @return Nothing will ever be returned; this return type is only specified as a convenience.
- */
- protected RuntimeException timeoutException(String message, Throwable lastException) {
- throw new TimeoutException(message, lastException);
- }
- }
3.2语法
宏哥从源码中的Sample usage提取FluentWait的使用语法如下:
- Wait wait = new FluentWait(WebDriver reference)
- .withTimeout(timeout, SECONDS)
- .pollingEvery(timeout, SECONDS)
- .ignoring(Exception.class);
- WebElement foo=wait.until(new Function<WebDriver, WebElement>() {
- public WebElement applyy(WebDriver driver) {
- return driver.findElement(By.id("foo"));
- }
- });
3.3例子
有了语法,按照语法写一个简单例子,如下:
- Wait wait = new FluentWait<WebDriver>(driver)
- .withTimeout(45, TimeUnit.SECONDS)
- .pollingevery(5, TimeUnit.SECONDS)
- .ignoring(NoSuchElementException.class);
FluentWait主要使用两个参数–超时值(withTimeout)和轮询频率(pollingevery)。在上面的语法中,我们将超时值设置为45秒,轮询频率设置为5秒。等待条件的最长时间(45秒)和检查指定条件成功或失败的频率(5秒)。如果元素在此时间范围内可以查找到,它将执行下一步操作,否则它将抛出“ElementNotVisibleException”。
3.4完整代码
简单例子的完整代码如下:
- package lessons;
- import java.util.concurrent.TimeUnit;
- import org.openqa.selenium.By;
- import org.openqa.selenium.NoSuchElementException;
- import org.openqa.selenium.WebDriver;
- import org.openqa.selenium.WebElement;
- import org.openqa.selenium.chrome.ChromeDriver;
- import org.openqa.selenium.support.ui.FluentWait;
- import org.openqa.selenium.support.ui.Wait;
- import com.google.common.base.Function;
- public class FluentWait {
- public static void main(String[] args) throws Exception {
- System.setProperty("webdriver.chrome.driver", ".\\Tools\\chromedriver.exe");
- WebDriver driver = new ChromeDriver();
- driver.get("www.test.com");
- driver.manage().window().maximize();
- Wait<WebDriver> wait = new FluentWait<WebDriver>(driver)
- .withTimeout(45, TimeUnit.SECONDS)
- .pollingEvery(5, TimeUnit.SECONDS)
- .ignoring(NoSuchElementException.class);
- WebElement ele1 = wait.until(new Function<WebDriver, WebElement>() {
- public WebElement apply(WebDriver driver) {
- return driver.findElement(By.id("xxxxxxx"));
- }
- });
- }
- }
4.项目实战
由于没有现成的网页或者网站以供宏哥进行演示,因此宏哥自己简单写了一个demo以便演示使用。
4.1测试网页代码
宏哥这个网页主要思想就是点击按钮后10s倒计时,倒计时结束出现元素(一段英文文字)。
测试网页test.html,参考代码如下所示:
- <html>
- <head>
- <meta http-equiv="Content-Type" content="text/html; charset=utf-8" />
- <title>北京-宏哥</title>
- </head>
- <style>
- #click {
- background-color: #4CAF50;
- border: none;
- color: white;
- padding: 15px 32px;
- text-align: center;
- text-decoration: none;
- display: inline-block;
- font-size: 16px;
- margin: 4px 2px;
- cursor: pointer;
- }
- .button {
- background-color: #f44336;
- border: none;
- color: white;
- padding: 15px 32px;
- text-align: center;
- text-decoration: none;
- display: inline-block;
- font-size: 28px;
- margin-bottom: 100px;
- }
- #myAnchor
- {
- text-decoration:none;
- color: white;
- }
- </style>
- <body>
- <div style=" text-align:center;">
- <div style="height: 100px;margin-top: 200px;">
- <button class="button"><a id="myAnchor" href="https://www.cnblogs.com/du-hong/">北京-宏哥</a></button></br>
- <input type="button" value="Click Me - Fluent Wait" id="click" onclick="foo(this, 10000);"/>
- <p style='color:red; font-family: verdana; font-size: 20;align="center";' id="demo">Click and Wait for <b>10 seconds</b> to view a message - "Software Testing Material - DEMO PAGE"</p>
- </div>
- </div>
- </body>
- <script>
- function foo(obj, time) {
- obj.disabled = true;
- setTimeout(function() {
- var x = setInterval(function(){
- time= time - 1000; //reduce each second
- obj.value = (time/1000)%60;
- if(time==0){
- clearInterval(x);
- obj.value = document.getElementById("demo").innerHTML = "Software Testing Material - DEMO PAGE";
- obj.disabled = false;
- }
- }, 1000);
- }, time-10000);
- }
- </script>
- </html>
下边宏哥编写java测试脚本。
4.2代码设计
设计思路:打开网页后,点击按钮开始5s频率的轮训查找元素,第一次没有找到,第二次10s刚好出现,代码也轮训查找也刚结束,没有找到,等到第三次英文文字出现了,代码也查找到,结束轮训,继续下一步操作。代码设计如下图所示:
4.3Java参考代码
宏哥首页用单元测试Junit测试一下写的方法有没有问题,没有问题,然后再调用。
4.3.1运行代码
1.运行代码,右键Run AS->JUnit Test,控制台输出,绿色的进度条证明写的方法没有问题,而且控制台也循环了2次(每次5s,一共10s),等待到了元素的出现并将其打印出来。如下图所示:

2.运行代码后电脑端的浏览器的动作,如下小视频所示:
4.4Java优化参考代码
通过上边的单元测试我们知道写的方法没有问题,那么下边我们直接调用该方法即可。优化后代码如下:
- package lessons;
- import org.junit.Test;
- import java.util.NoSuchElementException;
- import java.util.concurrent.TimeUnit;
- import org.openqa.selenium.By;
- import org.openqa.selenium.WebDriver;
- import org.openqa.selenium.WebElement;
- import org.openqa.selenium.chrome.ChromeDriver;
- import org.openqa.selenium.support.ui.FluentWait;
- import com.google.common.base.Function;
- /**
- * @author 北京-宏哥
- *
- *《手把手教你》系列技巧篇(二十五)-java+ selenium自动化测试-FluentWait(详细教程)
- *
- * 2021年8月31日
- */
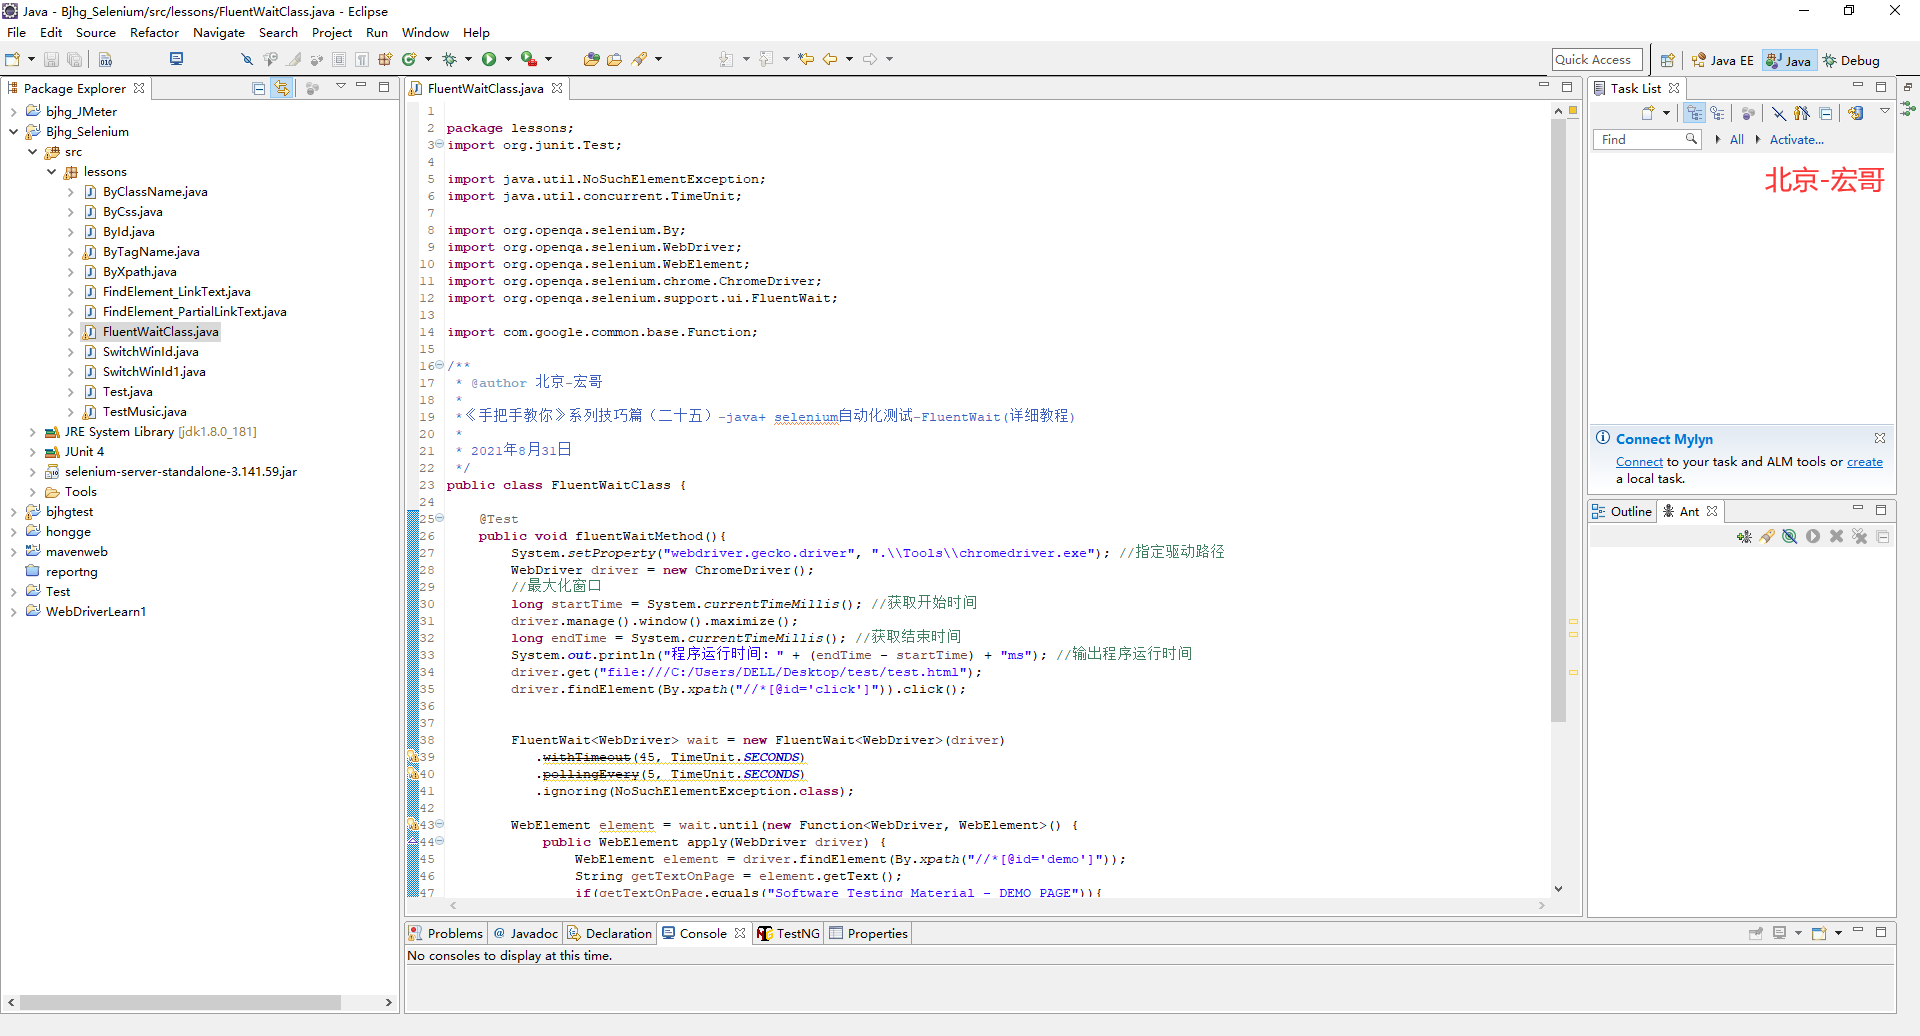
- public class FluentWaitClass {
- @Test
- public static void fluentWaitMethod(){
- System.setProperty("webdriver.gecko.driver", ".\\Tools\\chromedriver.exe"); //指定驱动路径
- WebDriver driver = new ChromeDriver();
- //最大化窗口
- long startTime = System.currentTimeMillis(); //获取开始时间
- driver.manage().window().maximize();
- long endTime = System.currentTimeMillis(); //获取结束时间
- System.out.println("程序运行时间1:" + (endTime - startTime) + "ms"); //输出程序运行时间
- driver.get("file:///C:/Users/DELL/Desktop/test/test.html");
- driver.findElement(By.xpath("//*[@id='click']")).click();
- FluentWait<WebDriver> wait = new FluentWait<WebDriver>(driver)
- .withTimeout(45, TimeUnit.SECONDS)
- .pollingEvery(5, TimeUnit.SECONDS)
- .ignoring(NoSuchElementException.class);
- long startTime1 = System.currentTimeMillis(); //获取开始时间
- WebElement element = wait.until(new Function<WebDriver, WebElement>() {
- public WebElement apply(WebDriver driver) {
- WebElement element = driver.findElement(By.xpath("//*[@id='demo']"));
- String getTextOnPage = element.getText();
- if(getTextOnPage.equals("Software Testing Material - DEMO PAGE")){
- System.out.println(getTextOnPage);
- return element;
- }else{
- System.out.println("FluentWait Failed");
- return null;
- }
- }
- });
- long endTime1 = System.currentTimeMillis(); //获取结束时间
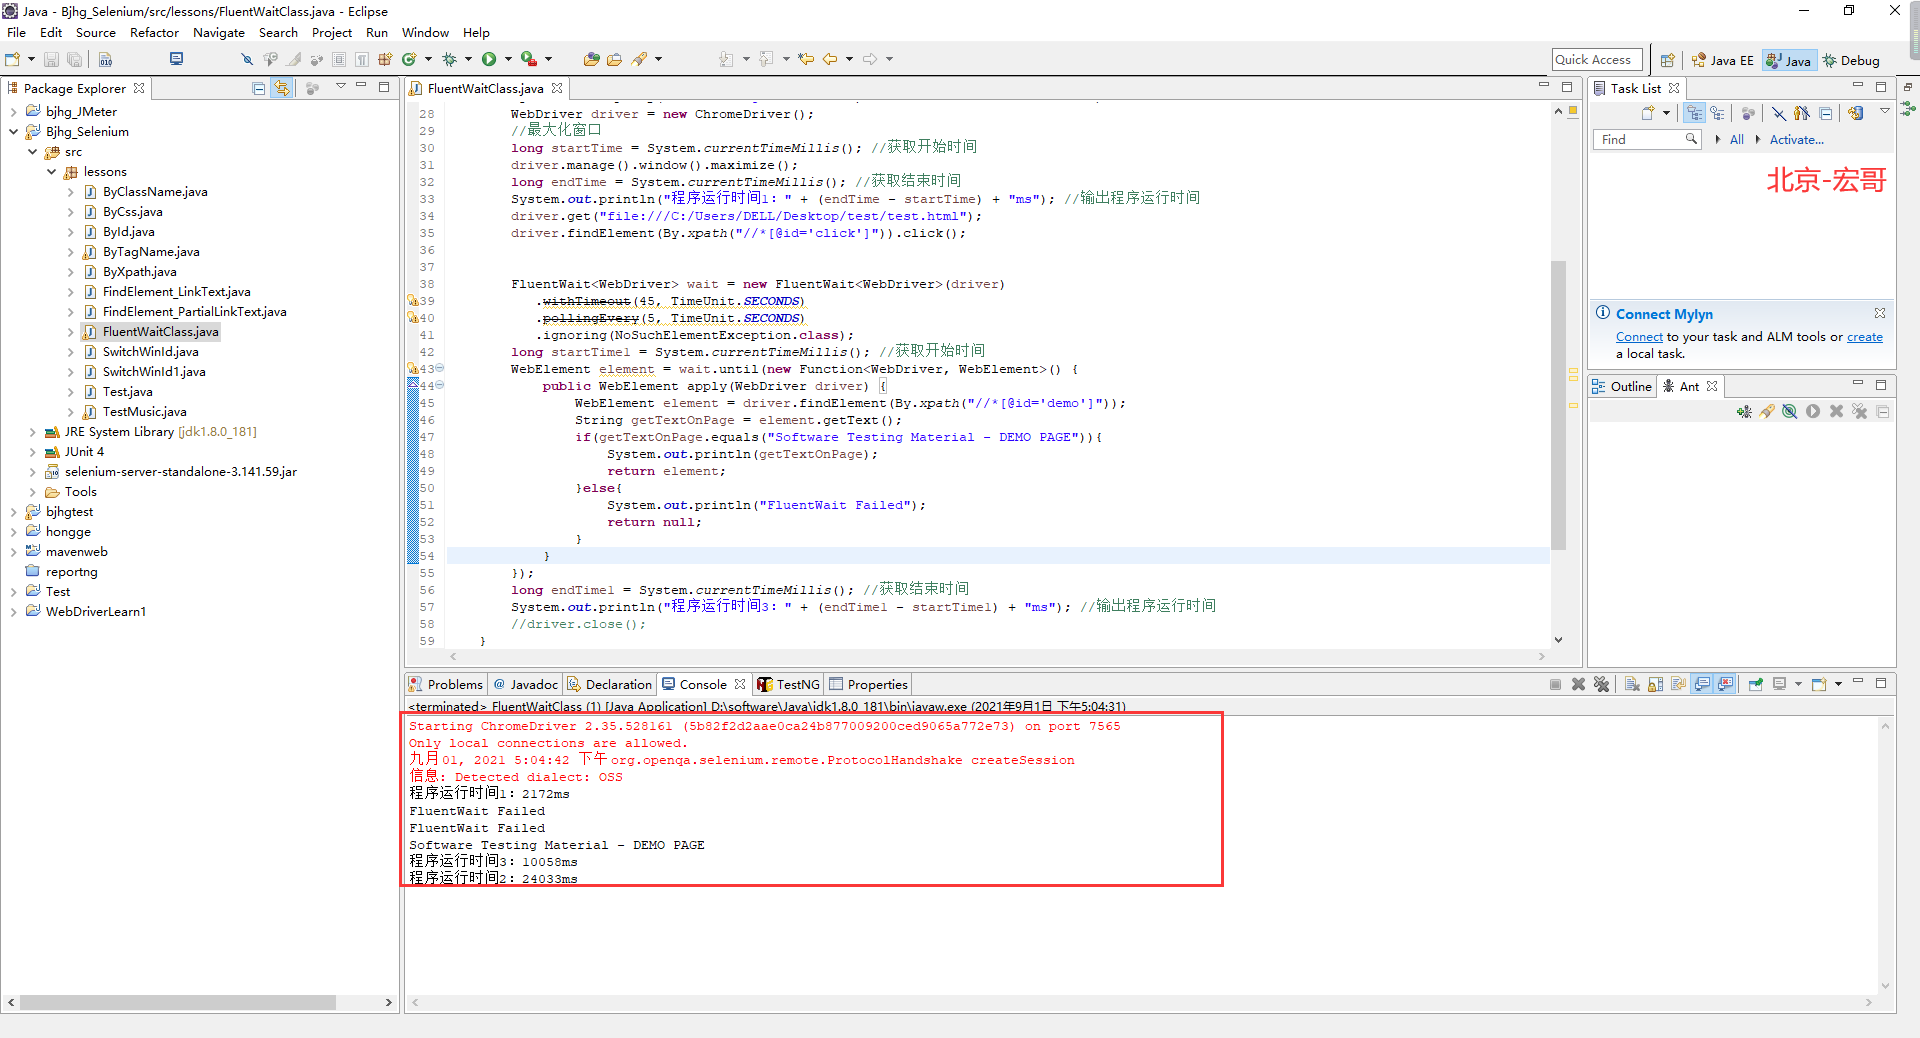
- System.out.println("程序运行时间3:" + (endTime1 - startTime1) + "ms"); //输出程序运行时间
- //driver.close();
- }
- public static void main(String [] args){
- long startTime = System.currentTimeMillis(); //获取开始时间
- fluentWaitMethod();
- long endTime = System.currentTimeMillis(); //获取结束时间
- System.out.println("程序运行时间2:" + (endTime - startTime) + "ms"); //输出程序运行时间
- }
- }
4.4.1运行代码
1.运行代码,右键Run AS->java Application,控制台输出,如下图所示:
2.运行代码后电脑端的浏览器的动作,如下小视频所示:
5.小结
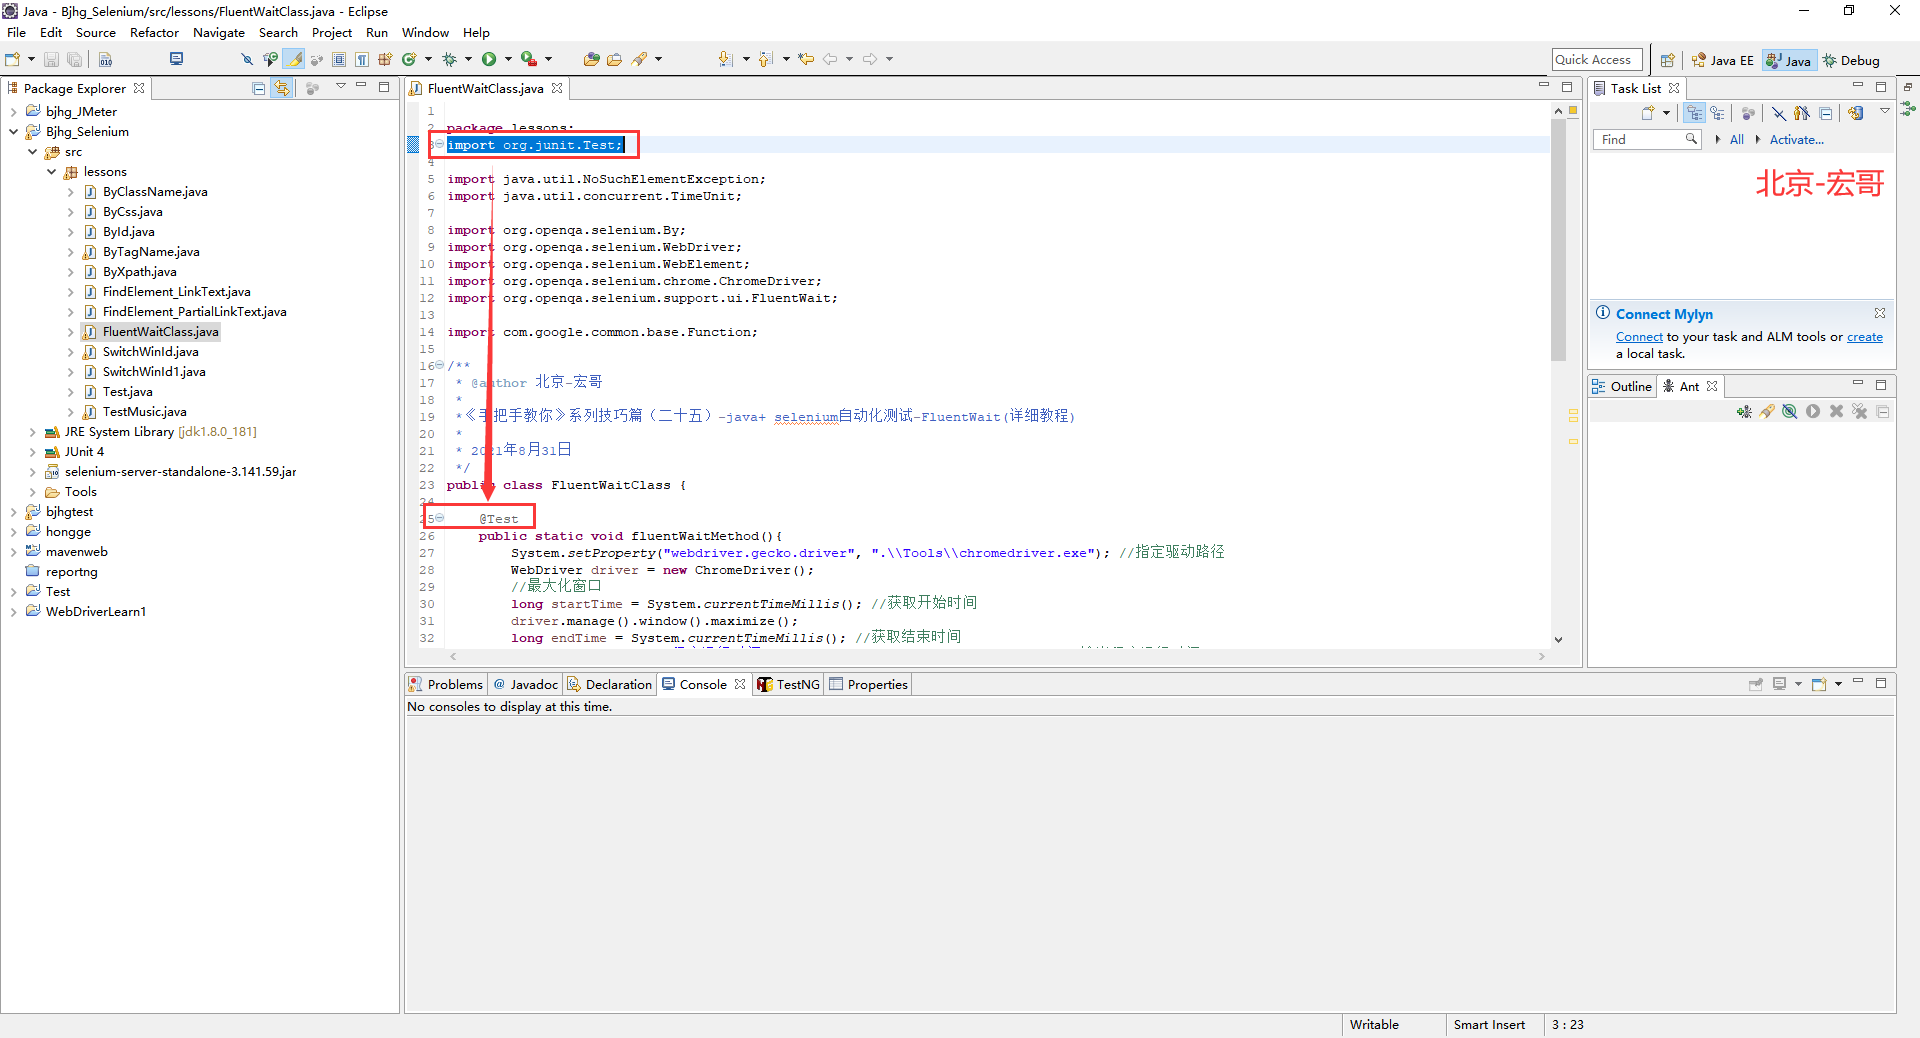
1.在设计代码过程中会报错:Type mismatch: cannot convert from Test to Annotation 如下图所示:

查了好多都说是:类名不能和注解名称相同的原因。后来宏哥检查了一下,不相同啊,但是宏哥为啥这里还会报这个错了。原来是宏哥没有导入单元测试的包,但是也没有提示导入包,因此宏哥将包导入,代码错误消失。如下图所示:
好了,今天就分享到这里了,感谢你耐心的阅读!
《手把手教你》系列技巧篇(二十五)-java+ selenium自动化测试-FluentWait(详细教程)的更多相关文章
- 《手把手教你》系列技巧篇(十)-java+ selenium自动化测试-元素定位大法之By class name(详细教程)
1.简介 按宏哥计划,本文继续介绍WebDriver关于元素定位大法,这篇介绍By ClassName.看到ID,NAME这些方法的讲解,小伙伴们和童鞋们应该知道,要做好Web自动化测试,最好是需要了 ...
- 《手把手教你》系列技巧篇(十七)-java+ selenium自动化测试-元素定位大法之By css上卷(详细教程)
1.简介 CSS定位方式和xpath定位方式基本相同,只是CSS定位表达式有其自己的格式.CSS定位方式拥有比xpath定位速度快,且比CSS稳定的特性.下面详细介绍CSS定位方式的使用方法.xpat ...
- 《手把手教你》系列技巧篇(六)-java+ selenium自动化测试-阅读selenium源码(详细教程)
1.简介 前面几篇基础系列文章,足够你迈进了Selenium门槛,再不济你也至少知道如何写你第一个基于Java的Selenium自动化测试脚本.接下来宏哥介绍Selenium技巧篇,主要是介绍一些常用 ...
- 《手把手教你》系列技巧篇(十一)-java+ selenium自动化测试-元素定位大法之By tag name(详细教程)
1.简介 按宏哥计划,本文继续介绍WebDriver关于元素定位大法,这篇介绍By ClassName.看到ID,NAME这些方法的讲解,小伙伴们和童鞋们应该知道,要做好Web自动化测试,最好是需要了 ...
- 《手把手教你》系列技巧篇(十三)-java+ selenium自动化测试-元素定位大法之By partial link text(详细教程)
1.简介 本文按计划就要开始介绍partial link text,顾名思义是通过链接定位的(官方说法:超链接文本定位).什么是partial link text呢,看到part这个单词我们就可以知道 ...
- 《手把手教你》系列技巧篇(七)-java+ selenium自动化测试-宏哥带你全方位吊打Chrome启动过程(详细教程)
1.简介 经过前边几篇文章和宏哥一起的学习,想必你已经知道了如何去查看Selenium相关接口或者方法.一般来说我们绝大多数看到的是已经封装好的接口,在查看接口源码的时候,你可以看到这个接口上边的注释 ...
- 《手把手教你》系列技巧篇(八)-java+ selenium自动化测试-元素定位大法之By id(详细教程)
1.简介 从这篇文章开始,要介绍web自动化核心的内容,也是最困难的部分了,就是:定位元素,并去对定位到的元素进行一系列相关的操作.想要对元素进行操作,第一步,也是最重要的一步,就是要找到这个元素,如 ...
- 《手把手教你》系列技巧篇(九)-java+ selenium自动化测试-元素定位大法之By name(详细教程)
1.简介 上一篇宏哥已经介绍了通过id来定位元素,今天继续介绍其他剩下的七种定位方法中的通过name来定位元素.本文来介绍Webdriver中元素定位方法之By name,顾名思义,就是我们想要定位的 ...
- 《手把手教你》系列技巧篇(十五)-java+ selenium自动化测试-元素定位大法之By xpath中卷(详细教程)
1.简介 按宏哥计划,本文继续介绍WebDriver关于元素定位大法,这篇介绍定位倒数二个方法:By xpath.xpath 的定位方法, 非常强大. 使用这种方法几乎可以定位到页面上的任意元素. ...
随机推荐
- ES读写数据的工作原理
es写入数据的工作原理是什么啊?es查询数据的工作原理是什么?底层的lucence介绍一下呗?倒排索引了解吗? 一.es写数据过程 1.客户端选择一个node发送请求过去,这个node就是coordi ...
- HashSet的add()方法源码解析(jdk1.8)
HashSet 实现了Set接口 实际上是HashMap 可以存null,但只能有一个 不保证元素是有序的,取决于hash后,在确定索引结果 add源码 //核心操作putVal final V pu ...
- Leaflet 操作OSM(OpenStreetMap) 设置地图style
Leaflet是一个开源的地图操作库,其中mapbox是其一个插件,这个插件可以自定义想要的地图格式.https://www.mapbox.com/mapbox-gl-js/api/这是其官网地址. ...
- CSS 是啥?前端小白入门级理解
What is CSS? CSS stands for Cascading Style Sheets CSS describes how HTML elements are to be display ...
- vue + WangEnduit
components 注册组件 <template lang="html"> <div class="editor"> <div ...
- Appium问题解决方案(6)- Java堆栈错误:java.lag.ClassNotFoundException:org.eclipse.swt.widets.Control
背景 运行脚本出现 SWT folder '..\lib\location of your Java installation.' does not exist. Please set ANDROID ...
- 【曹工杂谈】Maven IOC容器的下半场:Google Guice
Maven容器的下半场:Guice 前言 在前面的文章里,Maven底层容器Plexus Container的前世今生,一代芳华终落幕,我们提到,在Plexus Container退任后,取而代之的底 ...
- ClickOnce 获取客户端发布版本号
https://social.microsoft.com/Forums/es-ES/26786b8d-0155-4261-9672-11b786d8c1d6/clickonceandsetup /// ...
- vue-cookies使用
一.安装 vue-cookies npm install vue-cookies --save 二.引入并声明使用 import Vue form 'Vue' import VueCookies fr ...
- HDU1213How Many Tables(基础并查集)
HDU1213How Many Tables Problem Description Today is Ignatius' birthday. He invites a lot of friends. ...