[Tensorflow] 使用 tf.train.Checkpoint() 保存 / 加载 keras subclassed model
在 subclassed_model.py 中,通过对 tf.keras.Model 进行子类化,设计了两个自定义模型。
 import tensorflow as tf

 tf.enable_eager_execution()

 # parameters

 UNITS = 8

 class Encoder(tf.keras.Model):

     def __init__(self):

         super(Encoder, self).__init__()

         self.fc1 = tf.keras.layers.Dense(units=UNITS * 2, activation='relu')

         self.fc2 = tf.keras.layers.Dense(units=UNITS, activation='relu')

     def call(self, inputs):

         r = self.fc1(inputs)

         return self.fc2(r)

 class Decoder(tf.keras.Model):

     def __init__(self):

         super(Decoder, self).__init__()

         self.fc = tf.keras.layers.Dense(units=1)

     def call(self, inputs):

         return self.fc(inputs)
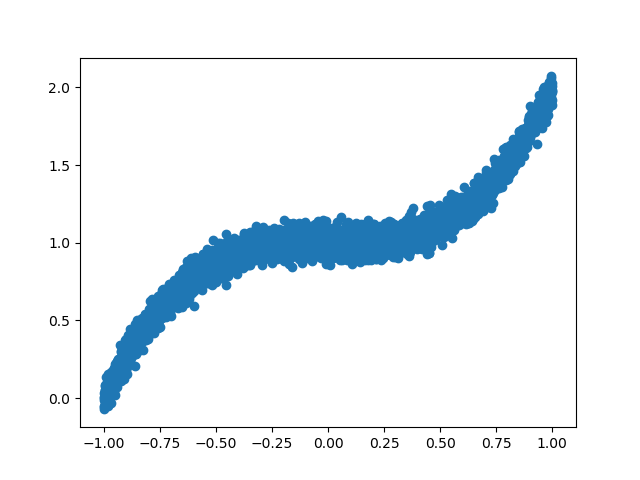
在 save_subclassed_model.py 中,创建了 5000 组训练数据集,实例化 Encoder()、Decoder() 模型,优化器采用 tf.train.AdamOptimizer(),以均方误差作为 Loss 函数。训练过程中,每 5 个 epoch 保存一次模型。
 from subclassed_model import *

 import numpy as np

 import matplotlib.pyplot as plt

 import os

 import tensorflow as tf

 tf.enable_eager_execution()

 # create training data

 X = np.linspace(-1, 1, 5000)

 np.random.shuffle(X)

 y = X ** 3 + 1 + np.random.normal(0, 0.05, (5000,))

 # plot data

 plt.scatter(X, y)

 plt.show()

 # training dataset

 BATCH_SIZE = 16

 BUFFER_SIZE = 128

 training_dataset = tf.data.Dataset.from_tensor_slices((X, y)).batch(BATCH_SIZE).shuffle(BUFFER_SIZE)

 # initialize subclassed models

 encoder = Encoder()

 decoder = Decoder()

 optimizer = tf.train.AdamOptimizer()

 # loss function

 def loss_function(real, pred):

     return tf.losses.mean_squared_error(labels=real, predictions=pred)

 # training

 EPOCHS = 15

 # checkpoint

 checkpoint_dir = './training_checkpoints'

 checkpoint_prefix = os.path.join(checkpoint_dir, 'ckpt')

 checkpoint = tf.train.Checkpoint(optimizer=optimizer,

                                  encoder=encoder,

                                  decoder=decoder)

 if not os.path.exists(checkpoint_dir):

     os.makedirs(checkpoint_dir)

 for epoch in range(EPOCHS):

     epoch_loss = 0

     for (batch, (x, y)) in enumerate(training_dataset):

         x = tf.cast(x, tf.float32)

         y = tf.cast(y, tf.float32)

         x = tf.expand_dims(x, axis=1)   # tf.Tensor([...], shape=(16, 1), dtype=float32)

         y = tf.expand_dims(y, axis=1)   # tf.Tensor([...], shape=(16, 1), dtype=float32)

         with tf.GradientTape() as tape:

             y_ = encoder(x)

             prediction = decoder(y_)

             batch_loss = loss_function(real=y, pred=prediction)

         grads = tape.gradient(batch_loss, encoder.variables + decoder.variables)

         optimizer.apply_gradients(zip(grads, encoder.variables + decoder.variables),

                                   global_step=tf.train.get_or_create_global_step())

         epoch_loss += batch_loss

         if (batch + 1) % 100 == 0:

             print('Epoch {} Batch {} Loss {:.4f}'.format(epoch + 1,

                                                          batch + 1,

                                                          batch_loss.numpy()))

     print('Epoch {} Loss {:.4f}'.format(epoch + 1, epoch_loss / len(X)))

     if (epoch + 1) % 5 == 0:

         checkpoint.save(file_prefix=checkpoint_prefix)
运行 save_subclassed_model.py。
2019-06-27 12:57:14.253635: I tensorflow/core/platform/cpu_feature_guard.cc:141] Your CPU supports instructions that this TensorFlow binary was not compiled to use: AVX2

2019-06-27 12:57:15.660142: I tensorflow/core/common_runtime/gpu/gpu_device.cc:1432] Found device 0 with properties:

name: GeForce GTX 1060 major: 6 minor: 1 memoryClockRate(GHz): 1.6705

pciBusID: 0000:01:00.0

totalMemory: 6.00GiB freeMemory: 4.97GiB

2019-06-27 12:57:15.660397: I tensorflow/core/common_runtime/gpu/gpu_device.cc:1511] Adding visible gpu devices: 0

2019-06-27 12:57:16.488227: I tensorflow/core/common_runtime/gpu/gpu_device.cc:982] Device interconnect StreamExecutor with strength 1 edge matrix:

2019-06-27 12:57:16.488385: I tensorflow/core/common_runtime/gpu/gpu_device.cc:988]      0

2019-06-27 12:57:16.488476: I tensorflow/core/common_runtime/gpu/gpu_device.cc:1001] 0:   N

2019-06-27 12:57:16.488772: I tensorflow/core/common_runtime/gpu/gpu_device.cc:1115] Created TensorFlow device (/job:localhost/replica:0/task:0/device:GPU:0 with 4722 MB memory) -> physical GPU (device: 0, name: GeForce GTX 1060, pci bus id: 0000:01:00.0, compute capability: 6.1)

Epoch 1 Batch 100 Loss 0.1120

Epoch 1 Batch 200 Loss 0.0179

Epoch 1 Batch 300 Loss 0.0347

Epoch 1 Loss 0.0111

Epoch 2 Batch 100 Loss 0.0144

Epoch 2 Batch 200 Loss 0.0097

Epoch 2 Batch 300 Loss 0.0141

Epoch 2 Loss 0.0012

Epoch 3 Batch 100 Loss 0.0060

Epoch 3 Batch 200 Loss 0.0037

Epoch 3 Batch 300 Loss 0.0054

Epoch 3 Loss 0.0007

Epoch 4 Batch 100 Loss 0.0088

Epoch 4 Batch 200 Loss 0.0038

Epoch 4 Batch 300 Loss 0.0093

Epoch 4 Loss 0.0004

Epoch 5 Batch 100 Loss 0.0039

Epoch 5 Batch 200 Loss 0.0044

Epoch 5 Batch 300 Loss 0.0031

Epoch 5 Loss 0.0003

Epoch 6 Batch 100 Loss 0.0025

Epoch 6 Batch 200 Loss 0.0038

Epoch 6 Batch 300 Loss 0.0027

Epoch 6 Loss 0.0002

Epoch 7 Batch 100 Loss 0.0026

Epoch 7 Batch 200 Loss 0.0032

Epoch 7 Batch 300 Loss 0.0041

Epoch 7 Loss 0.0002

Epoch 8 Batch 100 Loss 0.0022

Epoch 8 Batch 200 Loss 0.0031

Epoch 8 Batch 300 Loss 0.0026

Epoch 8 Loss 0.0002

Epoch 9 Batch 100 Loss 0.0040

Epoch 9 Batch 200 Loss 0.0014

Epoch 9 Batch 300 Loss 0.0040

Epoch 9 Loss 0.0002

Epoch 10 Batch 100 Loss 0.0023

Epoch 10 Batch 200 Loss 0.0030

Epoch 10 Batch 300 Loss 0.0038

Epoch 10 Loss 0.0002

Epoch 11 Batch 100 Loss 0.0028

Epoch 11 Batch 200 Loss 0.0020

Epoch 11 Batch 300 Loss 0.0025

Epoch 11 Loss 0.0002

Epoch 12 Batch 100 Loss 0.0027

Epoch 12 Batch 200 Loss 0.0045

Epoch 12 Batch 300 Loss 0.0021

Epoch 12 Loss 0.0002

Epoch 13 Batch 100 Loss 0.0016

Epoch 13 Batch 200 Loss 0.0033

Epoch 13 Batch 300 Loss 0.0024

Epoch 13 Loss 0.0002

Epoch 14 Batch 100 Loss 0.0034

Epoch 14 Batch 200 Loss 0.0028

Epoch 14 Batch 300 Loss 0.0033

Epoch 14 Loss 0.0002

Epoch 15 Batch 100 Loss 0.0019

Epoch 15 Batch 200 Loss 0.0030

Epoch 15 Batch 300 Loss 0.0037

Epoch 15 Loss 0.0002

Process finished with exit code 0
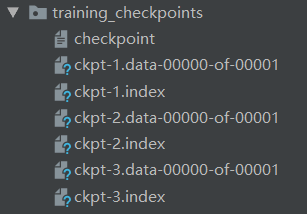
查看 checkpoint_dir 目录下的文件。
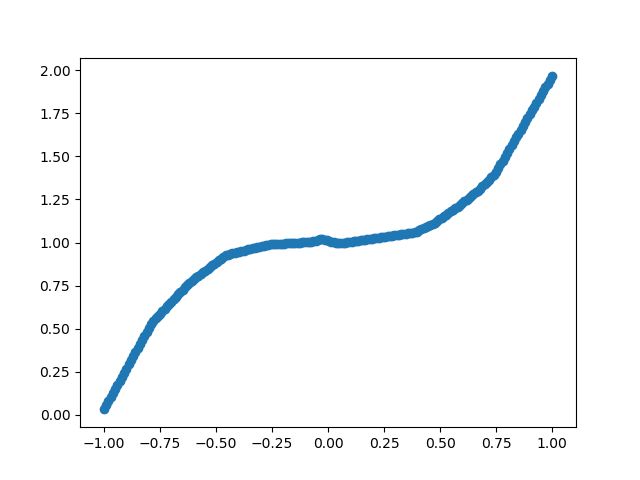
在 load_subclassed_model.py 中,创建了 200 组测试数据,加载了 the latest checkpoint 中保存的模型参数,对模型进行了测试。
 from subclassed_model import *

 import numpy as np

 import matplotlib.pyplot as plt

 import tensorflow as tf

 tf.enable_eager_execution()

 # load model

 encoder = Encoder()

 decoder = Decoder()

 optimizer = tf.train.AdamOptimizer()

 checkpoint_dir = './training_checkpoints'

 checkpoint = tf.train.Checkpoint(optimizer=optimizer,

                                  encoder=encoder,

                                  decoder=decoder)

 checkpoint.restore(tf.train.latest_checkpoint(checkpoint_dir))

 # build model

 BATCH_SIZE = 16

 encoder.build(input_shape=tf.TensorShape((BATCH_SIZE, 1)))

 decoder.build(input_shape=tf.TensorShape((BATCH_SIZE, UNITS)))

 encoder.summary()

 decoder.summary()

 # create validation data

 X_test = np.linspace(-1, 1, 200)

 # validation dataset

 val_dataset = tf.data.Dataset.from_tensor_slices(X_test).batch(1)

 # predict and plot

 results = []

 for (batch, x) in enumerate(val_dataset):

     x = tf.cast(x, tf.float32)

     x = tf.expand_dims(x, axis=1)

     y_ = encoder(x)

     prediction = decoder(y_)

     # print(prediction.numpy()[0][0])

     results.append(prediction.numpy()[0][0])

 # plot results

 plt.scatter(X_test, results)

 plt.show()
运行 load_subclassed_model.py。
2019-06-27 13:27:40.712260: I tensorflow/core/platform/cpu_feature_guard.cc:141] Your CPU supports instructions that this TensorFlow binary was not compiled to use: AVX2

2019-06-27 13:27:42.105938: I tensorflow/core/common_runtime/gpu/gpu_device.cc:1432] Found device 0 with properties:

name: GeForce GTX 1060 major: 6 minor: 1 memoryClockRate(GHz): 1.6705

pciBusID: 0000:01:00.0

totalMemory: 6.00GiB freeMemory: 4.97GiB

2019-06-27 13:27:42.106200: I tensorflow/core/common_runtime/gpu/gpu_device.cc:1511] Adding visible gpu devices: 0

2019-06-27 13:27:42.921364: I tensorflow/core/common_runtime/gpu/gpu_device.cc:982] Device interconnect StreamExecutor with strength 1 edge matrix:

2019-06-27 13:27:42.921510: I tensorflow/core/common_runtime/gpu/gpu_device.cc:988]      0

2019-06-27 13:27:42.921594: I tensorflow/core/common_runtime/gpu/gpu_device.cc:1001] 0:   N

2019-06-27 13:27:42.921777: I tensorflow/core/common_runtime/gpu/gpu_device.cc:1115] Created TensorFlow device (/job:localhost/replica:0/task:0/device:GPU:0 with 4722 MB memory) -> physical GPU (device: 0, name: GeForce GTX 1060, pci bus id: 0000:01:00.0, compute capability: 6.1)

_________________________________________________________________

Layer (type)                 Output Shape              Param #

=================================================================

dense (Dense)                multiple                  32

_________________________________________________________________

dense_1 (Dense)              multiple                  136

=================================================================

Total params: 168

Trainable params: 168

Non-trainable params: 0

_________________________________________________________________

_________________________________________________________________

Layer (type)                 Output Shape              Param #

=================================================================

dense_2 (Dense)              multiple                  9

=================================================================

Total params: 9

Trainable params: 9

Non-trainable params: 0

_________________________________________________________________

Process finished with exit code 0
版权声明:本文为博主原创文章,欢迎转载,转载请注明作者及原文出处!
[Tensorflow] 使用 tf.train.Checkpoint() 保存 / 加载 keras subclassed model的更多相关文章
- [Tensorflow] 使用 model.save_weights() 保存 / 加载 Keras Subclassed Model
在 parameters.py 中,定义了各类参数. # training data directory TRAINING_DATA_DIR = './data/' # checkpoint dire ...
- docker 保存 加载(导入 导出镜像
tensorflow 的docker镜像很大,pull一次由于墙经常失败.其实docker 可以将镜像导出再导入. 保存加载(tensorflow)镜像 1) 查看镜像 docker images 如 ...
- 优化tableView加载cell与model的过程
优化tableView加载cell与model的过程 效果图 说明 1. 用多态的特性来优化tableView加载cell与model的过程 2. swift写起来果然要比Objective-C简洁了 ...
- TensorFlow:tf.train.Saver()模型保存与恢复
1.保存 将训练好的模型参数保存起来,以便以后进行验证或测试.tf里面提供模型保存的是tf.train.Saver()模块. 模型保存,先要创建一个Saver对象:如 saver=tf.train.S ...
- tensorflow的tf.train.Saver()模型保存与恢复
将训练好的模型参数保存起来,以便以后进行验证或测试.tf里面提供模型保存的是tf.train.Saver()模块. 模型保存,先要创建一个Saver对象:如 saver=tf.train.Saver( ...
- tensorflow中 tf.train.slice_input_producer 和 tf.train.batch 函数(转)
tensorflow数据读取机制 tensorflow中为了充分利用GPU,减少GPU等待数据的空闲时间,使用了两个线程分别执行数据读入和数据计算. 具体来说就是使用一个线程源源不断的将硬盘中的图片数 ...
- tensorflow中 tf.train.slice_input_producer 和 tf.train.batch 函数
tensorflow数据读取机制 tensorflow中为了充分利用GPU,减少GPU等待数据的空闲时间,使用了两个线程分别执行数据读入和数据计算. 具体来说就是使用一个线程源源不断的将硬盘中的图片数 ...
- 【转载】 tensorflow中 tf.train.slice_input_producer 和 tf.train.batch 函数
原文地址: https://blog.csdn.net/dcrmg/article/details/79776876 ----------------------------------------- ...
- tensorflow之tf.train.exponential_decay()指数衰减法
exponential_decay(learning_rate, global_steps, decay_steps, decay_rate, staircase=False, name=None) ...
随机推荐
- Java锁--Condition
转载请注明出处:http://www.cnblogs.com/skywang12345/p/3496716.html Condition介绍 Condition的作用是对锁进行更精确的控制.Condi ...
- 控制warning信息在控制台的显示
在运行代码时,有时出现warning信息, 1.当你后台不需要warning信息的时候,可以直接把warning信息省略掉. 2.如果代码是循环,则会在控制台打印多次warning信息,这会使得war ...
- JQuery实践--实用工具函数
实用工具函数,$命名空间的一系列函数,但不操作包装集.它要么操作除DOM元素以外的Javascript对象,要么执行一些非对象相关的操作. JQuery的浏览器检测标志可在任何就绪处理程序执行之前使用 ...
- 017_linux驱动之_信号量
2. 信号量 信号量(semaphore)是用于保护临界区的一种常用方法,只有得到信号量的进程才能执行临界区代码. 当获取不到信号量时,进程进入休眠等待状态. 定义信号量 struct semap ...
- js字符串字母大小写转换
toLocaleUpperCase 方法 返回一个字符串,其中所有的字母字符都被转换为大写,同时适应宿主环境的当前区域设置. stringVar.tolocaleUpperCase( )必选的 str ...
- HTML5 本地数据库(SQLite) 示例
http://supercharles888.blog.51cto.com/609344/856071 http://www.sqlite.org/download.html
- redis数据存储--C++连接redis
一.下载的是Redis Windows版本:下载地址:https://github.com/microsoftarchive/redis:解压到:E:\Software\redis-3.0: 二.用V ...
- AtCoder Beginner Contest 128 F - Frog Jump
题意 有一只青蛙,有\(0, 1, \cdots, N - 1\)个荷叶.每个荷叶上有权值\(s_i\). 选定\(A\), \(B\),初始分数为\(0\). 当前位置为\(x\): 对于\(y = ...
- vue怎么引入echats并使用 (柱状图 字符云)
安装 npm install echarts --save 下面看一下如何简单的使用: 在main.js中引入(全局引入) // 引入echarts import echarts from 'echa ...
- python 监听键盘事件
#coding=utf- from tkinter import * root=Tk() def callback(event): print("点击键盘",repr(event. ...