恕我直言!!!对于Maven,菜鸟玩dependency,神仙玩plugin
打包是一项神圣、而庄严的工作。package意味着我们离生产已经非常近了。它会把我们之前的大量工作浓缩成为一个、或者多个文件。接下来,运维的同学就可以拿着这些个打包文件在生产上纵横四海了。
这么一项庄严、神圣的工作,却没有受到多数人的关注,大家习惯去网上随意copy一段pom的xml代码,往自己项目里面一扔,然后就开始执行package打包了。大多数只知道,Maven帮助我管理了JAR包的依赖,可以自动下载,很方便。确实,因为它太方便了,很多时候,我们几乎是没有感知它的存在。想起来某个功能的时候,直接去使用就可以了。
而构建的工作其实并不简单!例如:
- 打包后的程序,与生产环境JAR包冲突
- 依赖中有多个版本的依赖,如何选择、排除依赖
- 编译scala,某些JAR包的调用存在兼容问题
- 如何根据不同的环境来加载不同的配置,例如:本地环境、集群环境。
- 编译开源项目报错,根本无从下手解决。
- ...
其实,稍微离生产环境近一些,我们会发现很多的问题都暴露了出来。碰到这些问题的时候,当然可以第一时间百度。但为了能够更精准的定位问题、减少打包时候给别人挖坑,我们还是很有必要来了解一些关于Maven的细节。
目录
菜鸟玩dependency,神仙玩plugin
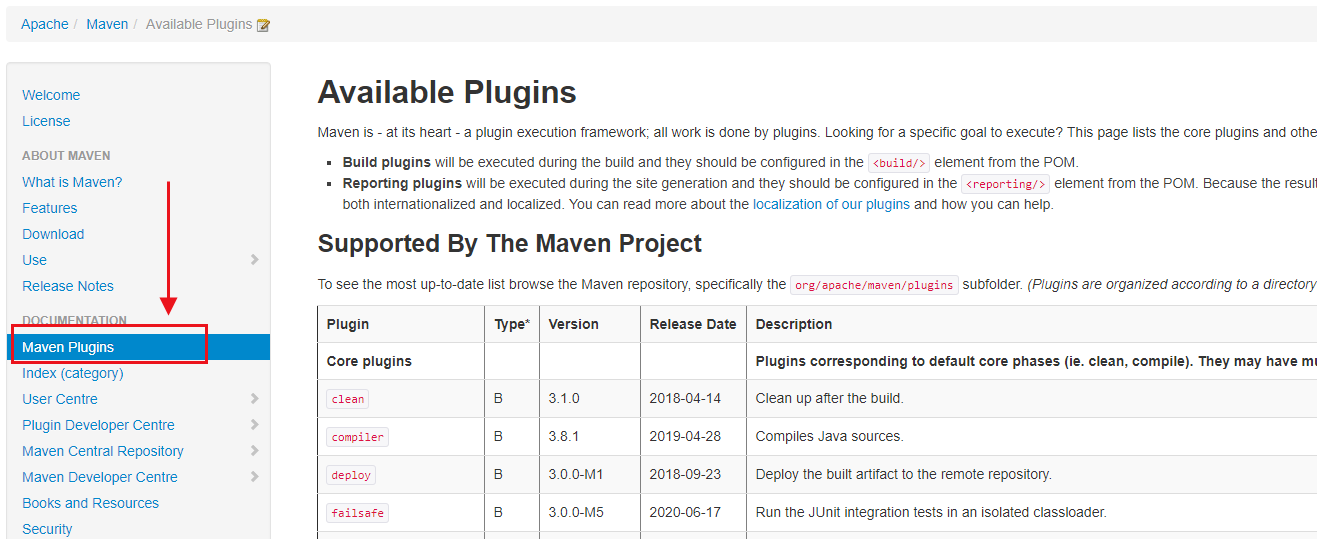
我们使用Maven的时候,95%的时候关注是dependency,而很少有人真正会花时间去研究Maven的plugin。但小猴要告诉大家,其实Maven工作的核心是plugin,而不是dependency。好吧!再直接一点,菜鸟玩dependency,神仙玩plugin。是不是拼命想要反驳我,大家看看官网Plugin在Maven文档的位置,这意味着什么?
灵魂拷问:大家留意过吗?是不是只去官网上下载Maven,然后随便百度一个教程就开始用Maven了?
分析Hadoop Example模块打包
学习的一种最好方式就是借鉴,借鉴优秀的开源项目。看看别人是怎么做的。所以,接下来,我们就来看看Hadoop是如何打包的。为了方便给大家演示,小猴特意用Maven给大家演示一遍编译、打包。这样效果会明显些。
操作步骤:
- 在github上找到Apahce/hadoop项目(https://github.com/apache/hadoop)
- 找到hadoop-mapreduce-project / hadoop-mapreduce-examples模块。
- 打开pom.xml文件。
<project xmlns="http://maven.apache.org/POM/4.0.0"

  xmlns:xsi="http://www.w3.org/2001/XMLSchema-instance"

  xsi:schemaLocation="http://maven.apache.org/POM/4.0.0

                      https://maven.apache.org/xsd/maven-4.0.0.xsd">

  <modelVersion>4.0.0</modelVersion>

  <parent>

    <groupId>org.apache.hadoop</groupId>

    <artifactId>hadoop-project</artifactId>

    <version>3.4.0-SNAPSHOT</version>

    <relativePath>../../hadoop-project</relativePath>

  </parent>

  <artifactId>hadoop-mapreduce-examples</artifactId>

  <version>3.4.0-SNAPSHOT</version>

  <description>Apache Hadoop MapReduce Examples</description>

  <name>Apache Hadoop MapReduce Examples</name>

  <packaging>jar</packaging>

  <properties>

    <mr.examples.basedir>${basedir}</mr.examples.basedir>

  </properties>

  <dependencies>

    <dependency>

      <groupId>commons-cli</groupId>

      <artifactId>commons-cli</artifactId>

    </dependency>

    <dependency>

      <groupId>commons-logging</groupId>

      <artifactId>commons-logging</artifactId>

    </dependency>

    <dependency>

      <groupId>org.apache.hadoop</groupId>

      <artifactId>hadoop-mapreduce-client-jobclient</artifactId>

      <scope>provided</scope>

    </dependency>

    <dependency>

      <groupId>org.apache.hadoop</groupId>

      <artifactId>hadoop-mapreduce-client-jobclient</artifactId>

      <scope>test</scope>

      <type>test-jar</type>

    </dependency>

    <dependency>

      <groupId>org.apache.hadoop</groupId>

      <artifactId>hadoop-common</artifactId>

      <scope>provided</scope>

    </dependency>

    <dependency>

      <groupId>org.apache.hadoop</groupId>

      <artifactId>hadoop-common</artifactId>

      <scope>test</scope>

      <type>test-jar</type>

    </dependency>

    <dependency>

      <groupId>org.apache.hadoop</groupId>

      <artifactId>hadoop-hdfs-client</artifactId>

      <scope>runtime</scope>

    </dependency>

    <dependency>

       <groupId>org.apache.hadoop</groupId>

       <artifactId>hadoop-hdfs</artifactId>

       <scope>test</scope>

       <type>test-jar</type>

     </dependency>

     <dependency>

       <groupId>org.apache.hadoop</groupId>

       <artifactId>hadoop-yarn-server-tests</artifactId>

       <scope>test</scope>

       <type>test-jar</type>

     </dependency>

     <dependency>

       <groupId>org.apache.hadoop</groupId>

       <artifactId>hadoop-mapreduce-client-app</artifactId>

       <scope>provided</scope>

     </dependency>

     <dependency>

       <groupId>org.apache.hadoop</groupId>

       <artifactId>hadoop-mapreduce-client-app</artifactId>

       <type>test-jar</type>

       <scope>test</scope>

     </dependency>

    <dependency>

      <groupId>com.sun.jersey.jersey-test-framework</groupId>

      <artifactId>jersey-test-framework-grizzly2</artifactId>

      <scope>test</scope>

    </dependency>

     <dependency>

       <groupId>org.apache.hadoop</groupId>

       <artifactId>hadoop-mapreduce-client-hs</artifactId>

       <scope>test</scope>

     </dependency>

     <dependency>

       <groupId>org.hsqldb</groupId>

       <artifactId>hsqldb</artifactId>

       <scope>provided</scope>

     </dependency>

     <dependency>

      <groupId>org.apache.hadoop.thirdparty</groupId>

      <artifactId>hadoop-shaded-guava</artifactId>

      <scope>provided</scope>

     </dependency>

    <dependency>

      <groupId>org.slf4j</groupId>

      <artifactId>slf4j-api</artifactId>

    </dependency>

    <dependency>

      <groupId>org.assertj</groupId>

      <artifactId>assertj-core</artifactId>

      <scope>test</scope>

    </dependency>

  </dependencies>

  <build>

   <plugins>

    <plugin>

    <groupId>org.apache.maven.plugins</groupId>

     <artifactId>maven-jar-plugin</artifactId>

      <configuration>

       <archive>

         <manifest>

           <mainClass>org.apache.hadoop.examples.ExampleDriver</mainClass>

         </manifest>

       </archive>

     </configuration>

    </plugin>

      <plugin>

        <groupId>org.codehaus.mojo</groupId>

        <artifactId>findbugs-maven-plugin</artifactId>

         <configuration>

          <findbugsXmlOutput>true</findbugsXmlOutput>

          <xmlOutput>true</xmlOutput>

          <excludeFilterFile>${mr.examples.basedir}/dev-support/findbugs-exclude.xml</excludeFilterFile>

          <effort>Max</effort>

        </configuration>

      </plugin>

      <plugin>

        <groupId>org.apache.rat</groupId>

        <artifactId>apache-rat-plugin</artifactId>

        <configuration>

          <excludes>

            <exclude>src/main/java/org/apache/hadoop/examples/dancing/puzzle1.dta</exclude>

          </excludes>

        </configuration>

      </plugin>

   </plugins>

   </build>

</project>
通过浏览hadoop example的xml文件,我们发现了以下几点:
所有的依赖都在父工程hadoop-project的pom.xml中定义好了。在hadoop example项目中,没有出现任何一个版本号。
Hadoop使用了三个插件,一个是maven-jar-plugin、一个是findbugs-maven-plugin、还有一个是apache-rat-plugin。
我们进入到example模块中pom.xml所在的目录中,直接执行mvn package试试看。
[root@compile hadoop-mapreduce-examples]# mvn package

[INFO] Scanning for projects...

[INFO]

[INFO] ------------< org.apache.hadoop:hadoop-mapreduce-examples >-------------

[INFO] Building Apache Hadoop MapReduce Examples 3.2.1

[INFO] --------------------------------[ jar ]---------------------------------

Downloading from apache.snapshots.https: https://repository.apache.org/content/repositories/snapshots/org/apache/hadoop/hadoop-mapreduce-client-app/3.2.1/hadoop-mapreduce-client-app-3.2.1-tests.jar

.....

[INFO]

[INFO] --- maven-antrun-plugin:1.7:run (create-testdirs) @ hadoop-mapreduce-examples ---

[INFO] Executing tasks

main:

[INFO] Executed tasks

[INFO]

[INFO] --- maven-resources-plugin:2.6:resources (default-resources) @ hadoop-mapreduce-examples ---

[INFO] Using 'UTF-8' encoding to copy filtered resources.

[INFO] skip non existing resourceDirectory /opt/hadoop-3.2.1-src/hadoop-mapreduce-project/hadoop-mapreduce-examples/src/main/resources

[INFO]

[INFO] --- maven-compiler-plugin:3.1:compile (default-compile) @ hadoop-mapreduce-examples ---

[INFO] Nothing to compile - all classes are up to date

[INFO]

[INFO] --- maven-resources-plugin:2.6:testResources (default-testResources) @ hadoop-mapreduce-examples ---

[INFO] Using 'UTF-8' encoding to copy filtered resources.

[INFO] skip non existing resourceDirectory /opt/hadoop-3.2.1-src/hadoop-mapreduce-project/hadoop-mapreduce-examples/src/test/resources

[INFO]

[INFO] --- maven-compiler-plugin:3.1:testCompile (default-testCompile) @ hadoop-mapreduce-examples ---

[INFO] Nothing to compile - all classes are up to date

[INFO]

[INFO] --- maven-surefire-plugin:3.0.0-M1:test (default-test) @ hadoop-mapreduce-examples ---

Downloading from central: http://maven.aliyun.com/nexus/content/groups/public/org/apache/maven/surefire/surefire-junit4/3.0.0-M1/surefire-junit4-3.0.0-M1.jar

..........

[INFO]

[INFO] -------------------------------------------------------

[INFO]  T E S T S

[INFO] -------------------------------------------------------

[INFO] Running org.apache.hadoop.examples.TestBaileyBorweinPlouffe

[INFO] Tests run: 2, Failures: 0, Errors: 0, Skipped: 0, Time elapsed: 0.536 s - in org.apache.hadoop.examples.TestBaileyBorweinPlouffe

..........

[INFO]

[INFO] Results:

[INFO]

[INFO] Tests run: 11, Failures: 0, Errors: 0, Skipped: 0

[INFO]

[INFO]

[INFO] --- maven-jar-plugin:2.5:jar (default-jar) @ hadoop-mapreduce-examples ---

[INFO]

[INFO] --- maven-site-plugin:3.6:attach-descriptor (attach-descriptor) @ hadoop-mapreduce-examples ---

[INFO] Skipping because packaging 'jar' is not pom.

[INFO] ------------------------------------------------------------------------

[INFO] BUILD SUCCESS

[INFO] ------------------------------------------------------------------------

[INFO] Total time:  01:11 min

[INFO] Finished at: 2021-02-06T10:49:18+08:00

[INFO] ------------------------------------------------------------------------
很快就编译成功了,我们来看看Maven做了什么:
1、执行maven-antrun-plugin插件的run create-testdirs任务。奇怪的是,Example模块中并没有引入该插件。一会来看看该插件在何处配置的。
[INFO] --- maven-antrun-plugin:1.7:run (create-testdirs) @ hadoop-mapreduce-examples ---

[INFO] Executing tasks
2、执行maven-resources-plugin插件的resources任务,这个插件应该是拷贝resource目录到target的。
[INFO] --- maven-resources-plugin:2.6:resources (default-resources) @ hadoop-mapreduce-examples ---

[INFO] Using 'UTF-8' encoding to copy filtered resources.

[INFO] skip non existing resourceDirectory /opt/hadoop-3.2.1-src/hadoop-mapreduce-project/hadoop-mapreduce-examples/src/main/resources
3、执行maven-compiler-plugin插件的compile任务,注意:现在才开始编译代码。因为发现我们之前已经编译过了,所以此处并没有重新编译class。
[INFO] --- maven-compiler-plugin:3.1:compile (default-compile) @ hadoop-mapreduce-examples ---

[INFO] Compiling 47 source files to /opt/hadoop-3.2.1-src/hadoop-mapreduce-project/hadoop-mapreduce-examples/target/classes
4、执行maven-resources-plugin插件的testResources任务,顾名思义,就是将单元测试相关的resource目录拷贝到target。
[INFO] --- maven-resources-plugin:2.6:testResources (default-testResources) @ hadoop-mapreduce-examples ---

[INFO] Using 'UTF-8' encoding to copy filtered resources.

[INFO] skip non existing resourceDirectory /opt/hadoop-3.2.1-src/hadoop-mapreduce-project/hadoop-mapreduce-examples/src/test/resources
5、执行maven-compiler-plugin插件的testCompile任务,同样,将单元测试的文件编译一遍。
[INFO] --- maven-compiler-plugin:3.1:testCompile (default-testCompile) @ hadoop-mapreduce-examples ---

[INFO] Compiling 7 source files to /opt/hadoop-3.2.1-src/hadoop-mapreduce-project/hadoop-mapreduce-examples/target/test-classes
6、执行maven-surefire-plugin插件的test任务,开始执行单元测试。确保编译的代码没有问题。
INFO] -------------------------------------------------------

[INFO]  T E S T S

[INFO] -------------------------------------------------------

[INFO] Running org.apache.hadoop.examples.TestBaileyBorweinPlouffe

[INFO] Tests run: 2, Failures: 0, Errors: 0, Skipped: 0, Time elapsed: 0.436 s - in org.apache.hadoop.examples.TestBaileyBorweinPlouffe

[INFO] Running org.apache.hadoop.examples.TestWordStats

[INFO] Tests run: 3, Failures: 0, Errors: 0, Skipped: 0, Time elapsed: 4.332 s - in org.apache.hadoop.examples.TestWordStats

[INFO] Running org.apache.hadoop.examples.pi.math.TestLongLong

[INFO] Tests run: 2, Failures: 0, Errors: 0, Skipped: 0, Time elapsed: 0.163 s - in org.apache.hadoop.examples.pi.math.TestLongLong

[INFO] Running org.apache.hadoop.examples.pi.math.TestModular

[INFO] Tests run: 1, Failures: 0, Errors: 0, Skipped: 0, Time elapsed: 0.164 s - in org.apache.hadoop.examples.pi.math.TestModular

[INFO] Running org.apache.hadoop.examples.pi.math.TestSummation

[INFO] Tests run: 1, Failures: 0, Errors: 0, Skipped: 0, Time elapsed: 0.091 s - in org.apache.hadoop.examples.pi.math.TestSummation

[INFO] Running org.apache.hadoop.examples.terasort.TestTeraSort

[INFO] Tests run: 2, Failures: 0, Errors: 0, Skipped: 0, Time elapsed: 4.449 s - in org.apache.hadoop.examples.terasort.TestTeraSort
7、执行maven-jar-plugin插件的jar任务,这个任务是打包成jar文件。
[INFO] --- maven-jar-plugin:2.5:jar (default-jar) @ hadoop-mapreduce-examples ---

[INFO] Building jar: /opt/hadoop-3.2.1-src/hadoop-mapreduce-project/hadoop-mapreduce-examples/target/hadoop-mapreduce-examples-3.2.1.jar
8、执行maven-site-plugin的attach-descriptor任务。该任务只有项目是pom打包时候才可用,将site.xml(site描述符)添加到部署的文件列表中。
[INFO] --- maven-site-plugin:3.6:attach-descriptor (attach-descriptor) @ hadoop-mapreduce-examples ---

[INFO] Skipping because packaging 'jar' is not pom.
由此,我们可以发现,当我们执行一个package、compile、或者clean命令时,其实背后都是执行Maven的一个插件。只不过有的插件是Maven自带的,直接可以使用,当我们需要自定义插件的行为时,就需要显示在pom.xml中显式配置插件了。
Maven中有大量的、丰富的插件供开发人员使用。
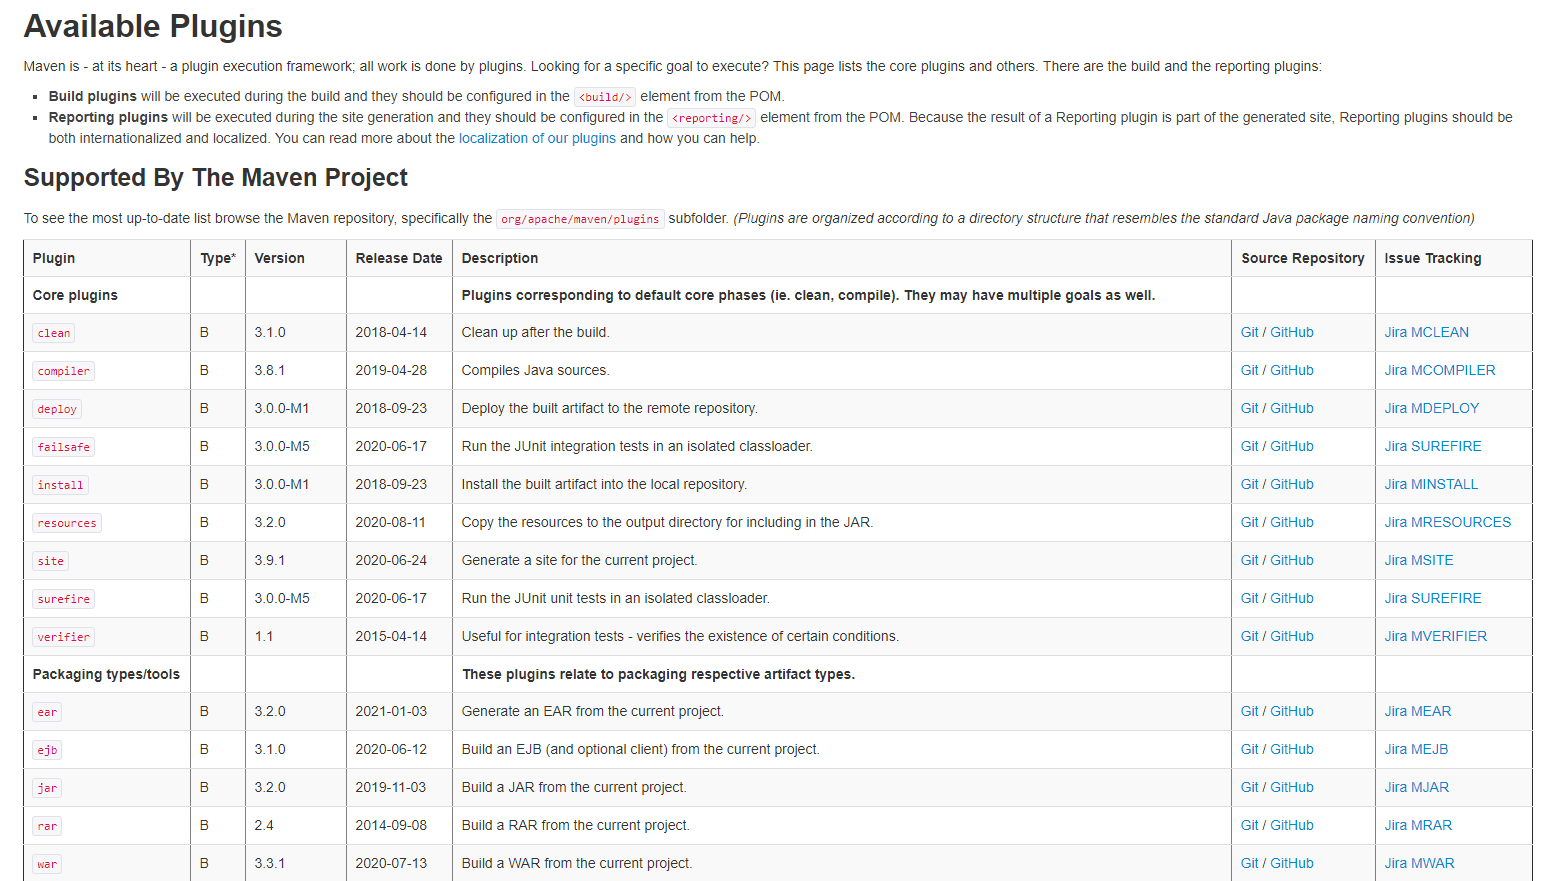
地址:https://maven.apache.org/plugins/
我们可以点击任意一个plugin,查看其具体的内容。
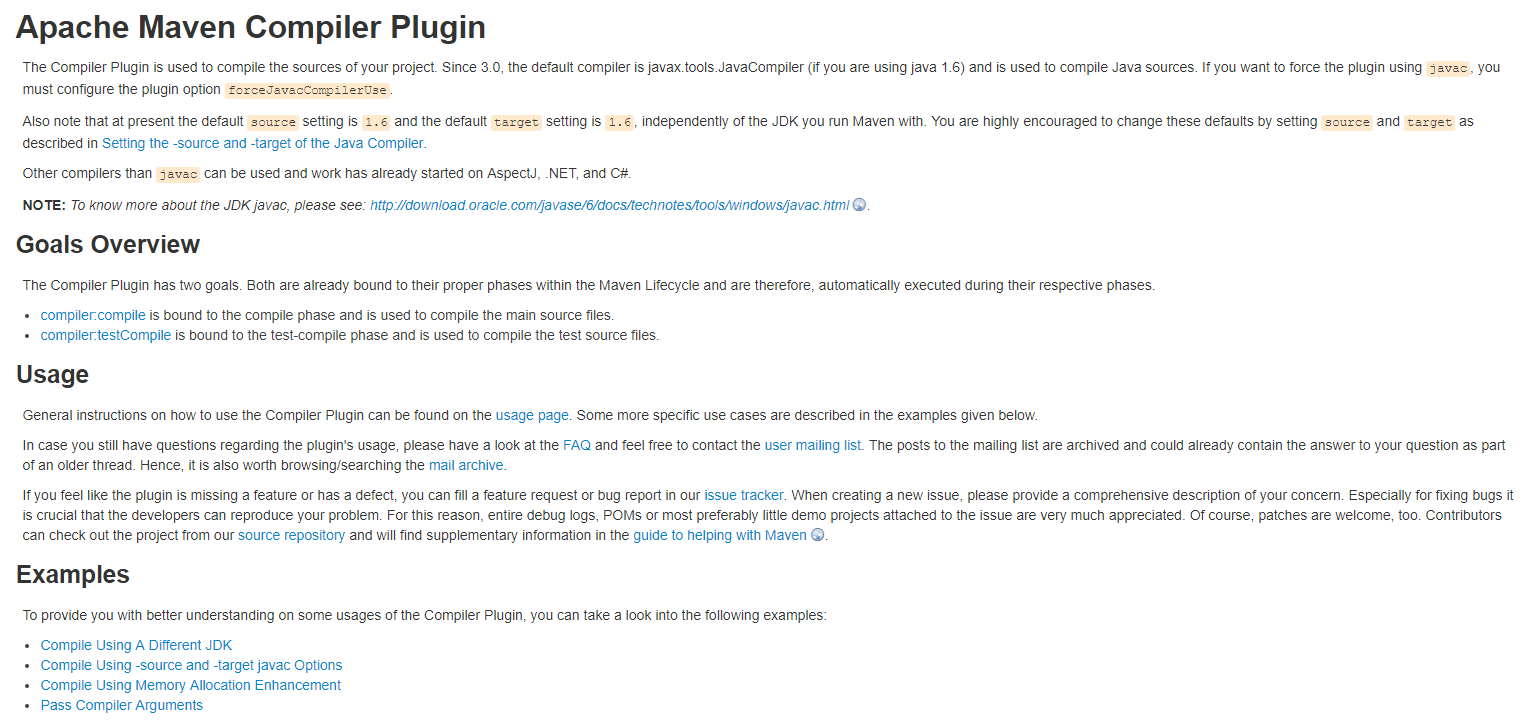
maven-antrun-plugin插件
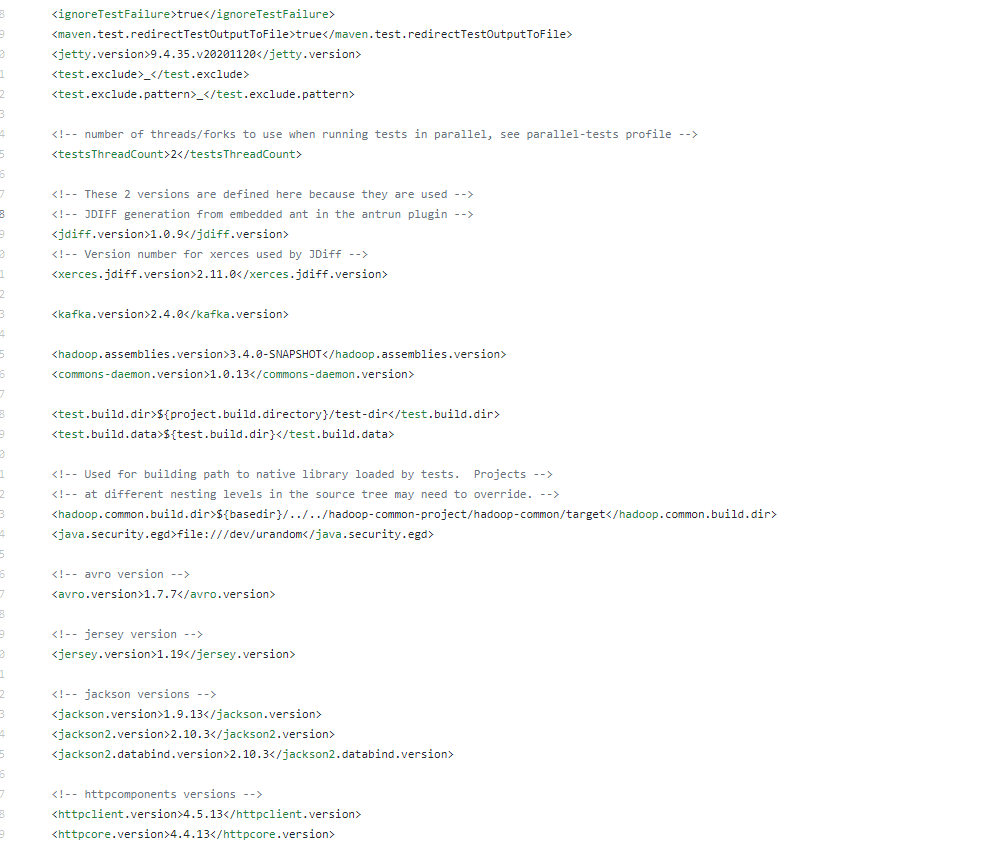
我们发现在example模块的父模块hadoop-project中有一个pom.xml。
 <plugin>

     <groupId>org.apache.maven.plugins</groupId>

     <artifactId>maven-antrun-plugin</artifactId>

     <executions>

         <execution>

             <id>create-testdirs</id>

             <phase>validate</phase>

             <goals>

                 <goal>run</goal>

             </goals>

             <configuration>

                 <target>

                     <mkdir dir="${test.build.dir}"/>

                     <mkdir dir="${test.build.data}"/>

                 </target>

             </configuration>

         </execution>

     </executions>

</plugin>
我们看到这里面有配置一些插件,其中就个maven-antrun-plugin。该插件会执行run#create-testdirs任务,并且在validate阶段执行。我们看到,该插件执行了两次mkdir。
maven-jar-plugin插件
插件配置如下:
<plugin>

    <groupId>org.apache.maven.plugins</groupId>

    <artifactId>maven-jar-plugin</artifactId>

    <configuration>

        <archive>

            <manifest>

                <mainClass>org.apache.hadoop.examples.ExampleDriver</mainClass>

            </manifest>

        </archive>

    </configuration>

</plugin>
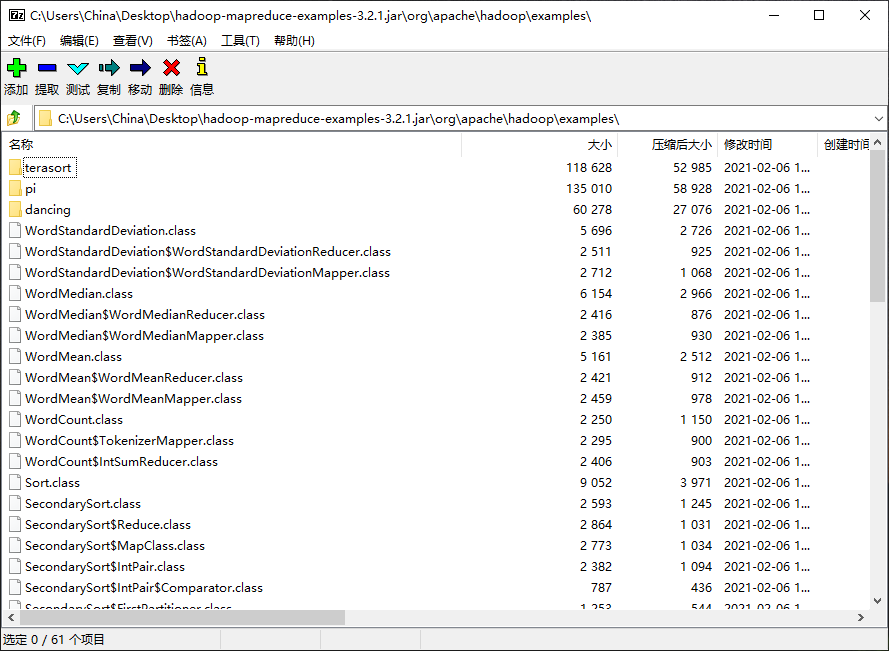
前面,我们看到了是在执行package阶段时自动执行的。并且指定了运行的主类是ExampleDriver。通过查看打包后的JAR文件,我们可以发现,JAR插件只会将项目中的class文件打包到JAR文件中,并不会打包其他的依赖。
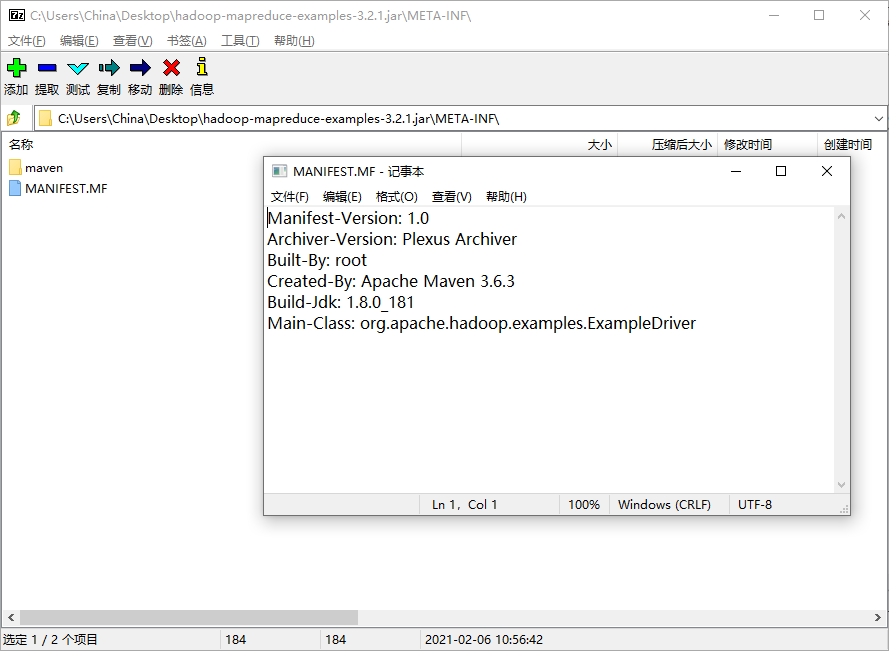
并且,在JAR包的META-INF(元数据中),可以看到MAINFEST.MF文件,已经生成了运行主类:
这个插件的相关说明,可以参看官网:https://maven.apache.org/plugins/maven-jar-plugin/
JAR包中的META-INF目录
在每个jar包中有一个META-INF目录,顾名思义。它肯定是包含了JAR文件的元数据相关。Java基于META-INF目录中的文件来配置Java应用程序、类加载器以及其他服务。它包含以下内容:
MANIFEST.MF
用于定义扩展名以及打包相关的清单。
Manifest-Version: 1.0

Archiver-Version: Plexus Archiver

Built-By: China

Created-By: Apache Maven 3.5.0

Build-Jdk: 1.8.0_241

Main-Class: cn.monkey.StreamingJob
该文件中显示了文件的版本、由哪个用户构建的、由哪个应用创建的、构建的JDK版本、以及非常重要的Main-Class。
INDEX.LIST
该文件由JAR工具的-i选项生成,包括了应用程序或者扩展中定义的包的位置。用于类加载器加速类加载过程。
xxx.SF
JAR包的签名文件
xxx.DSA
与SF文件关联的签名块文件。该文件存储了签名文件对应的数字签名。
Maven插件
Maven构建生命周期
Maven是一个项目管理工具,它把项目的构建主要分为了以下阶段:
- validate:验证项目是否正确,所有必要的信息是否均已经提供
- compile:编译项目的源代码。
- test:运行单元测试。
- package:打包已编译的代码。
- verify:对集成测试结果进行检查,确保符合质量标准。
- install:将软件包安装到本地仓库。
- deploy:将最终的软件包复制到远程仓库,方便和其他开发人员共享。
也就是说,只要是一个Maven项目,从源代码到一个可运行的程序,需要经历着一系列的构建阶段。而每个阶段的背后,是Maven提供了一个构建过程的核心执行引擎,这个核心的项目构建执行引擎是由大量的插件来执行具体的任务。
重新定义Maven
让我们从技术角度,重新定义Maven——一个包含了很多插件的框架。真正执行各种Maven操作的其实都是插件。例如:
- 构建JAR包
- 构建WAR包
- 编译代码
- 执行单元测试
- 创建项目文档
等等。只要是能够想到需要在项目上执行的所有操作,其背后都是插件实现的。
插件是Maven的核心功能,一旦定义好了插件,就可以在多个项目中重用。想想,我们是不是在每个pom.xml配置打包插件、编译插件等等。找到pom.xml的位置,然后执行 package、comile、clean等操作即可。当我们执行:
mvn compile
的时候,Maven得知道,哦!当前要执行编译了。由此可以知道,Maven的插件是由mvn的参数来驱动的。这些参数定义了插件的目标(或者Mojo)。
Mojo
Maven中最简单的插件是Clean Plugin。它只是负责删除Maven项目的target目录。但运行mvn clean时,Maven将执行Clean插件中定义的clean目标(Goal),并删除目标目录。Clean插件还定义了可用于自定义插件行为的参数,长概述为outputDirectory,默认为${project.build.directory}。
Mojo实际上是Maven插件中的一个目标(Goal),一个插件可以包含许多的Goal。我们可以用带注解的Java类或者BeanShell脚本来定义Mojo。它指定了Goal相关的元数据:Goal名称、以及Goal所运行的生命周期、以及参数。
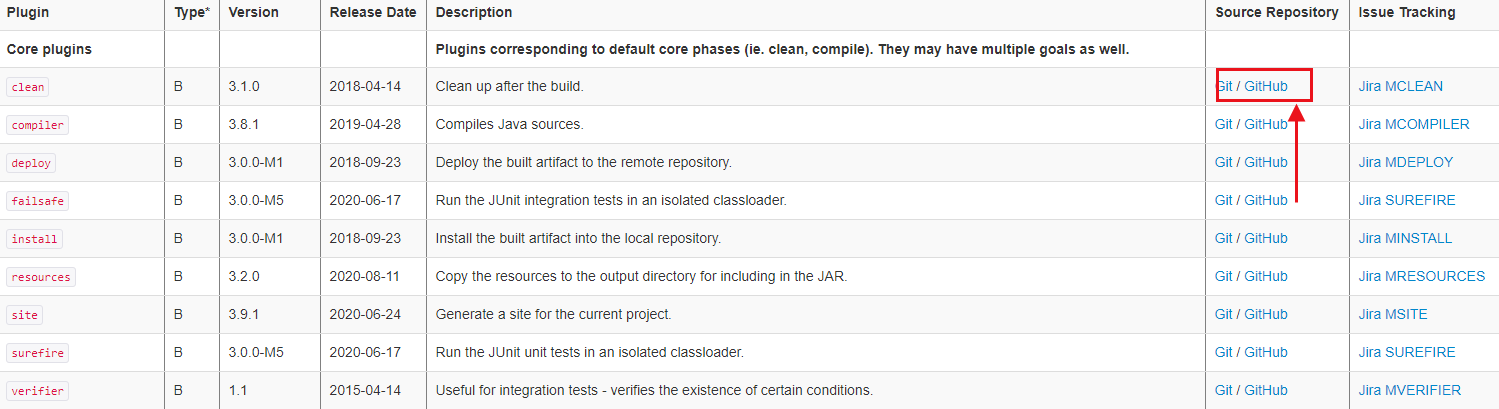
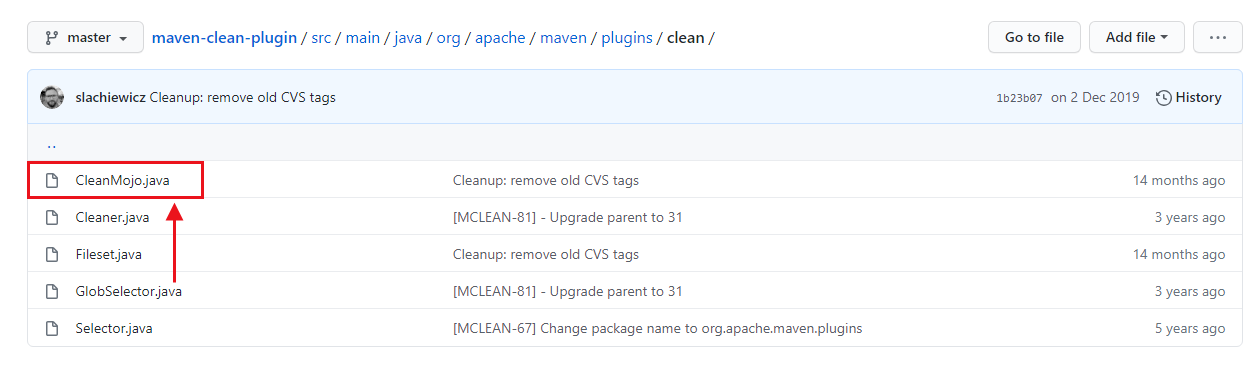
查看clean插件源码
通过Maven官网的plugins链接,我们可以找到clean插件在github的地址。
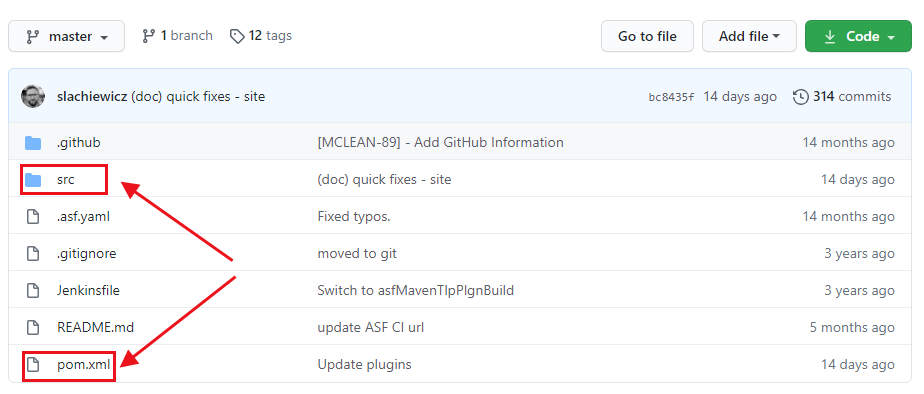
看到src目录和pom.xml,我们就可以知道,原来Maven的plugin也是一个Maven标准项目。先来看看pom.xml里面有什么。为了方便观察,我删除了一些代码。
<project>

  <modelVersion>4.0.0</modelVersion>

  <parent>

    <groupId>org.apache.maven.plugins</groupId>

    <artifactId>maven-plugins</artifactId>

    <version>34</version>

    <relativePath/>

  </parent>

  <properties>

    <mavenVersion>3.1.1</mavenVersion>

    <javaVersion>7</javaVersion>

    <surefire.version>2.22.2</surefire.version>

    <mavenPluginToolsVersion>3.6.0</mavenPluginToolsVersion>

    <project.build.outputTimestamp>2020-04-07T21:04:00Z</project.build.outputTimestamp>

  </properties>

  <dependencies>

    <dependency>

      <groupId>org.apache.maven</groupId>

      <artifactId>maven-plugin-api</artifactId>

      <version>${mavenVersion}</version>

    </dependency>

    <dependency>

      <groupId>org.apache.maven.shared</groupId>

      <artifactId>maven-shared-utils</artifactId>

      <version>3.2.1</version>

    </dependency>

    <!-- dependencies to annotations -->

    <dependency>

      <groupId>org.apache.maven.plugin-tools</groupId>

      <artifactId>maven-plugin-annotations</artifactId>

      <scope>provided</scope>

    </dependency>

  <build>

    <pluginManagement>

      <plugins>

        <!-- remove with next parent upgrade -->

        <plugin>

          <artifactId>maven-project-info-reports-plugin</artifactId>

          <version>3.1.1</version>

        </plugin>

        <plugin>

          <artifactId>maven-enforcer-plugin</artifactId>

          <version>3.0.0-M3</version>

        </plugin>

        <plugin>

          <artifactId>maven-javadoc-plugin</artifactId>

          <version>3.2.0</version>

        </plugin>

        <plugin>

          <artifactId>maven-site-plugin</artifactId>

          <version>3.9.1</version>

        </plugin>

      </plugins>

    </pluginManagement>

  </build>

  <profiles>

    <profile>

      <id>run-its</id>

      <build>

        <pluginManagement>

          <plugins>

            <plugin>

              <groupId>org.apache.maven.plugins</groupId>

              <artifactId>maven-invoker-plugin</artifactId>

              <configuration>

                <debug>true</debug>

                <addTestClassPath>true</addTestClassPath>

                <projectsDirectory>src/it</projectsDirectory>

                <cloneProjectsTo>${project.build.directory}/it</cloneProjectsTo>

                <pomIncludes>

                  <pomInclude>*/pom.xml</pomInclude>

                </pomIncludes>

                <preBuildHookScript>setup</preBuildHookScript>

                <postBuildHookScript>verify</postBuildHookScript>

                <localRepositoryPath>${project.build.directory}/local-repo</localRepositoryPath>

                <settingsFile>src/it/settings.xml</settingsFile>

                <goals>

                  <goal>clean</goal>

                </goals>

              </configuration>

            </plugin>

          </plugins>

        </pluginManagement>

      </build>

    </profile>

  </profiles>

</project>
我们看到,pom.xml中引入了一些必要的依赖、以及定义了一些其他插件的版本、在profile中,还定义了maven-invoker-plugin的配置。里面配置了
Invoker插件:用于运行一组Maven项目,该插件可以确定每个项目执行是否成功,并且可以选择验证从给定项目执行生成的输出。比较适合用于集成测试。
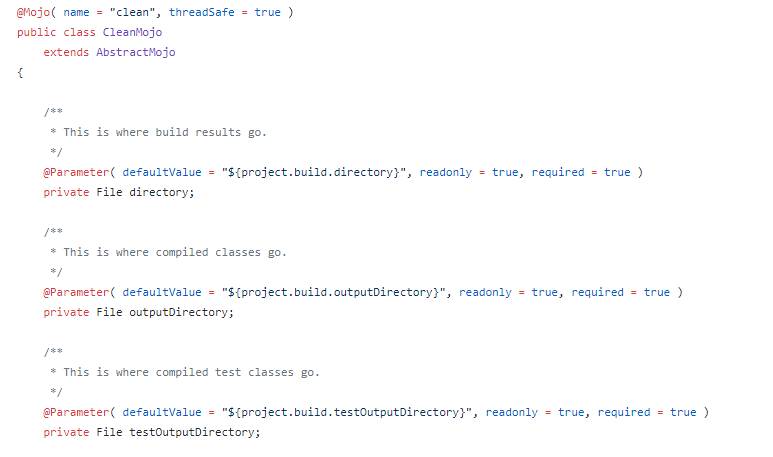
我们看到了源码中有一个CleanMojo的源文件,代码中使用了注解来定义插件的Goal和参数。
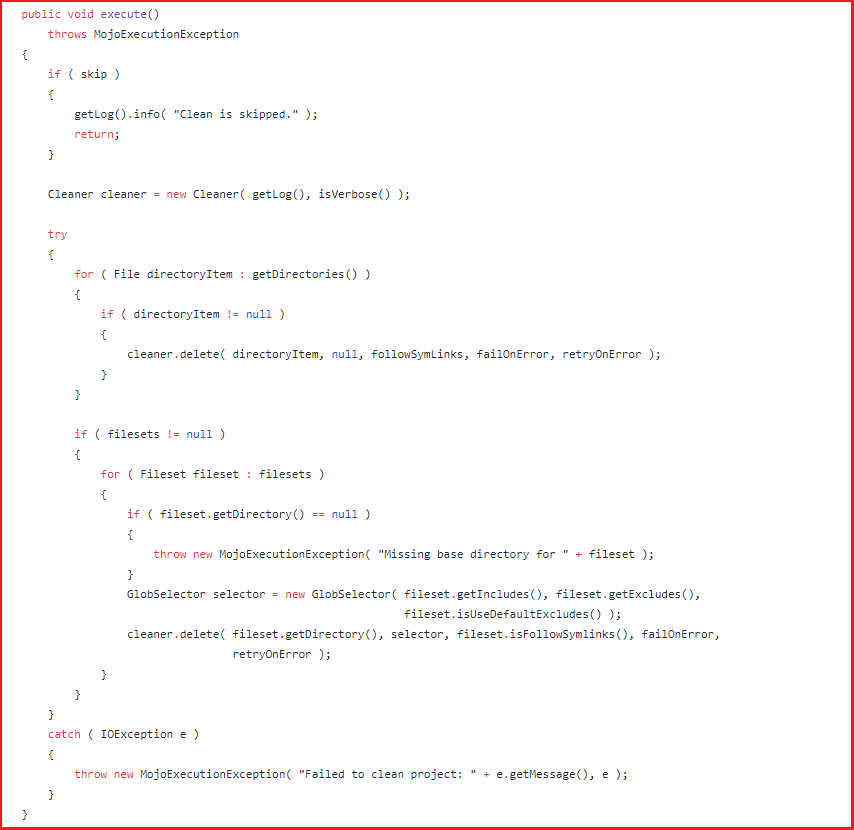
我们看到execute中就是执行clean目标,里面调用了Cleaner来清理文件。再查看下install插件的Mojo
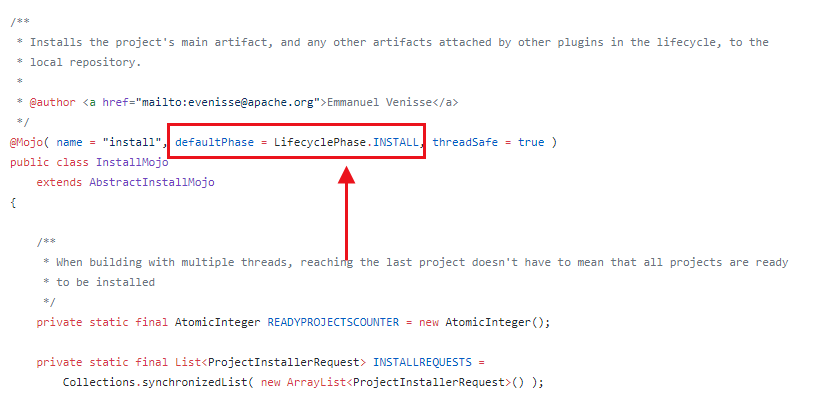
install默认绑定的是INSTALL阶段。
看完上面的源码,我们知道:以后使用插件,可以看看它的Mojo文件就知道它对应的目标是什么、参数是什么。我们还可以通过插件的源码来进行错误排查。
分析Flink Archetype中的pom.xml
scala版本的pom.xml依赖要比Java版本要复杂,因为Maven默认就是用于构建Java的。而针对scala的构建,需要进行额外配置Maven支持。
mvn archetype:generate \

-DarchetypeGroupId=org.apache.flink \

-DarchetypeArtifactId=flink-quickstart-scala \

-DarchetypeVersion=1.12.1
Flink自动生成的代码如下:
<project xmlns="http://maven.apache.org/POM/4.0.0"

         xmlns:xsi="http://www.w3.org/2001/XMLSchema-instance"

         xsi:schemaLocation="http://maven.apache.org/POM/4.0.0 http://maven.apache.org/xsd/maven-4.0.0.xsd">

	<modelVersion>4.0.0</modelVersion>

	<groupId>cn.monkey</groupId>

	<artifactId>flink_scala_demo_1.12.1</artifactId>

	<version>1.0-SNAPSHOT</version>

	<packaging>jar</packaging>

	<name>Flink Quickstart Job</name>

	<repositories>

		<repository>

			<id>apache.snapshots</id>

			<name>Apache Development Snapshot Repository</name>

			<url>https://repository.apache.org/content/repositories/snapshots/</url>

			<releases>

				<enabled>false</enabled>

			</releases>

			<snapshots>

				<enabled>true</enabled>

			</snapshots>

		</repository>

	</repositories>

	<properties>

		<project.build.sourceEncoding>UTF-8</project.build.sourceEncoding>

		<flink.version>1.12.1</flink.version>

		<scala.binary.version>2.11</scala.binary.version>

		<scala.version>2.11.12</scala.version>

		<log4j.version>2.12.1</log4j.version>

	</properties>

	<dependencies>

		<!-- Apache Flink dependencies -->

		<!-- These dependencies are provided, because they should not be packaged into the JAR file. -->

		<dependency>

			<groupId>org.apache.flink</groupId>

			<artifactId>flink-scala_${scala.binary.version}</artifactId>

			<version>${flink.version}</version>

			<scope>provided</scope>

		</dependency>

		<dependency>

			<groupId>org.apache.flink</groupId>

			<artifactId>flink-streaming-scala_${scala.binary.version}</artifactId>

			<version>${flink.version}</version>

			<scope>provided</scope>

		</dependency>

		<dependency>

			<groupId>org.apache.flink</groupId>

			<artifactId>flink-clients_${scala.binary.version}</artifactId>

			<version>${flink.version}</version>

			<scope>provided</scope>

		</dependency>

		<!-- Scala Library, provided by Flink as well. -->

		<dependency>

			<groupId>org.scala-lang</groupId>

			<artifactId>scala-library</artifactId>

			<version>${scala.version}</version>

			<scope>provided</scope>

		</dependency>

		<!-- Add connector dependencies here. They must be in the default scope (compile). -->

		<!-- Example:

		<dependency>

			<groupId>org.apache.flink</groupId>

			<artifactId>flink-connector-kafka_${scala.binary.version}</artifactId>

			<version>${flink.version}</version>

		</dependency>

		-->

		<!-- Add logging framework, to produce console output when running in the IDE. -->

		<!-- These dependencies are excluded from the application JAR by default. -->

		<dependency>

			<groupId>org.apache.logging.log4j</groupId>

			<artifactId>log4j-slf4j-impl</artifactId>

			<version>${log4j.version}</version>

			<scope>runtime</scope>

		</dependency>

		<dependency>

			<groupId>org.apache.logging.log4j</groupId>

			<artifactId>log4j-api</artifactId>

			<version>${log4j.version}</version>

			<scope>runtime</scope>

		</dependency>

		<dependency>

			<groupId>org.apache.logging.log4j</groupId>

			<artifactId>log4j-core</artifactId>

			<version>${log4j.version}</version>

			<scope>runtime</scope>

		</dependency>

	</dependencies>

	<build>

		<plugins>

			<!-- We use the maven-shade plugin to create a fat jar that contains all necessary dependencies. -->

			<!-- Change the value of <mainClass>...</mainClass> if your program entry point changes. -->

			<plugin>

				<groupId>org.apache.maven.plugins</groupId>

				<artifactId>maven-shade-plugin</artifactId>

				<version>3.1.1</version>

				<executions>

					<!-- Run shade goal on package phase -->

					<execution>

						<phase>package</phase>

						<goals>

							<goal>shade</goal>

						</goals>

						<configuration>

							<artifactSet>

								<excludes>

									<exclude>org.apache.flink:force-shading</exclude>

									<exclude>com.google.code.findbugs:jsr305</exclude>

									<exclude>org.slf4j:*</exclude>

									<exclude>org.apache.logging.log4j:*</exclude>

								</excludes>

							</artifactSet>

							<filters>

								<filter>

									<!-- Do not copy the signatures in the META-INF folder.

									Otherwise, this might cause SecurityExceptions when using the JAR. -->

									<artifact>*:*</artifact>

									<excludes>

										<exclude>META-INF/*.SF</exclude>

										<exclude>META-INF/*.DSA</exclude>

										<exclude>META-INF/*.RSA</exclude>

									</excludes>

								</filter>

							</filters>

							<transformers>

								<transformer implementation="org.apache.maven.plugins.shade.resource.ManifestResourceTransformer">

									<mainClass>cn.monkey.StreamingJob</mainClass>

								</transformer>

							</transformers>

						</configuration>

					</execution>

				</executions>

			</plugin>

			<!-- Java Compiler -->

			<plugin>

				<groupId>org.apache.maven.plugins</groupId>

				<artifactId>maven-compiler-plugin</artifactId>

				<version>3.1</version>

				<configuration>

					<source>1.8</source>

					<target>1.8</target>

				</configuration>

			</plugin>

			<!-- Scala Compiler -->

			<plugin>

				<groupId>net.alchim31.maven</groupId>

				<artifactId>scala-maven-plugin</artifactId>

				<version>3.2.2</version>

				<executions>

					<execution>

						<goals>

							<goal>compile</goal>

							<goal>testCompile</goal>

						</goals>

					</execution>

				</executions>

				<configuration>

					<args>

						<arg>-nobootcp</arg>

					</args>

				</configuration>

			</plugin>

			<!-- Eclipse Scala Integration -->

			<plugin>

				<groupId>org.apache.maven.plugins</groupId>

				<artifactId>maven-eclipse-plugin</artifactId>

				<version>2.8</version>

				<configuration>

					<downloadSources>true</downloadSources>

					<projectnatures>

						<projectnature>org.scala-ide.sdt.core.scalanature</projectnature>

						<projectnature>org.eclipse.jdt.core.javanature</projectnature>

					</projectnatures>

					<buildcommands>

						<buildcommand>org.scala-ide.sdt.core.scalabuilder</buildcommand>

					</buildcommands>

					<classpathContainers>

						<classpathContainer>org.scala-ide.sdt.launching.SCALA_CONTAINER</classpathContainer>

						<classpathContainer>org.eclipse.jdt.launching.JRE_CONTAINER</classpathContainer>

					</classpathContainers>

					<excludes>

						<exclude>org.scala-lang:scala-library</exclude>

						<exclude>org.scala-lang:scala-compiler</exclude>

					</excludes>

					<sourceIncludes>

						<sourceInclude>**/*.scala</sourceInclude>

						<sourceInclude>**/*.java</sourceInclude>

					</sourceIncludes>

				</configuration>

			</plugin>

			<plugin>

				<groupId>org.codehaus.mojo</groupId>

				<artifactId>build-helper-maven-plugin</artifactId>

				<version>1.7</version>

				<executions>

					<!-- Add src/main/scala to eclipse build path -->

					<execution>

						<id>add-source</id>

						<phase>generate-sources</phase>

						<goals>

							<goal>add-source</goal>

						</goals>

						<configuration>

							<sources>

								<source>src/main/scala</source>

							</sources>

						</configuration>

					</execution>

					<!-- Add src/test/scala to eclipse build path -->

					<execution>

						<id>add-test-source</id>

						<phase>generate-test-sources</phase>

						<goals>

							<goal>add-test-source</goal>

						</goals>

						<configuration>

							<sources>

								<source>src/test/scala</source>

							</sources>

						</configuration>

					</execution>

				</executions>

			</plugin>

		</plugins>

	</build>

</project>
这是一个标准Flink Maven脚手架,Flink清晰地告诉了我们,哪些依赖是需要设置为provided、哪些是runtime,如果需要使用connector,需要自己额外引入对应不同存储库的connector。我们重点来分析插件:
- maven-shade-plugin:可以看到,Flink是使用shade插件进行fat jar打包的。可以通过mainClass参数配置jar包的入口。
- maven-compiler-plugin:配置Java编译器。Flink默认使用1.8进行编译。
- scala-maven-plugin:配置Scala编译器。
- maven-eclipse-plugin:该插件定义了编译scala和java文件
我们重点来看shade插件。
注意:
如果多个插件配置的生命周期阶段为package,那么会按照pom.xml的顺序依次执行。
Shade插件
<plugin>

    <groupId>org.apache.maven.plugins</groupId>

    <artifactId>maven-shade-plugin</artifactId>

    <version>3.1.1</version>

    <executions>

        <!-- Run shade goal on package phase -->

        <execution>

            <phase>package</phase>

            <goals>

                <goal>shade</goal>

            </goals>

            <configuration>

                <artifactSet>

                    <excludes>

                        <exclude>org.apache.flink:force-shading</exclude>

                        <exclude>com.google.code.findbugs:jsr305</exclude>

                        <exclude>org.slf4j:*</exclude>

                        <exclude>org.apache.logging.log4j:*</exclude>

                    </excludes>

                </artifactSet>

                <filters>

                    <filter>

                        <!-- Do not copy the signatures in the META-INF folder.

         Otherwise, this might cause SecurityExceptions when using the JAR. -->

                        <artifact>*:*</artifact>

                        <excludes>

                            <exclude>META-INF/*.SF</exclude>

                            <exclude>META-INF/*.DSA</exclude>

                            <exclude>META-INF/*.RSA</exclude>

                        </excludes>

                    </filter>

                </filters>

                <transformers>

                    <transformer implementation="org.apache.maven.plugins.shade.resource.ManifestResourceTransformer">

                        <mainClass>cn.monkey.StreamingJob</mainClass>

                    </transformer>

                </transformers>

            </configuration>

        </execution>

    </executions>

</plugin>
Shade插件可以将打包所有的artifact到一个uber-jar(uber-jar表示在一个JAR文件中包含自身、以及所有的依赖)。Shade插件只有一个goal:shade:shade。
可以看到,该插件的生命周期配置在package,也就是执行package时,会自动运行。
在configuration中配置了要排除哪些artifacts。filter中配置了排除所有JAR包中的签名文件。我们可以在artifactSet、filter中来解决包冲突问题。
Assembly插件
简介
很多时候我们需要把项目打包成一个tar.gz包,就像Apache的一些组件一样。通过使用Assembly插件可以将程序、文档、配置文件等等打包成一个“assemblies”。使用一个assembly descriptor可以描述整个过程。使用该插件,可以把应用打包成以下类型:
zip

tar

tar.gz (or tgz)

tar.bz2 (or tbz2)

tar.snappy

tar.xz (or txz)

jar

dir

war
而如果要打包成user-jar,assembly插件提供了一些基本的支持。官方建议还是使用shade插件。Assembly插件的使用步骤如下:
- 选择或编写一个assembly descriptor
- 在pom.xml文件中配置assembly插件
- 运行mvn assembly:single
Assembly介绍
Assembly(程序集)指的是一组文件、目录以及相关的依赖,为了方便软件的安装、部署、以及分发,我们可以把Assembly组织成一个zip包、或者tar.gz这种类型的包。例如:一个Maven项目中包含了控制台应用和FX桌面客户端应用。可以定义两个Assembly,将应用和不同的脚本、依赖绑定到一起。
针对Assembly,需要有一个Assembly Descriptor(程序集描述符),通过assembly descripor文件可以描述将哪些文件复制到bin目录,并且可以修改目录中文件的权限。
Goal
每一个Maven插件都会有一个Goal,Assembly插件也有一个Goal,那就是single,表示创建所有的Assembly。
分析Hadoop项目的Assembly插件
Maven插件配置
我们来看一下Hadoop中如何使用该插件的。
<plugin>

    <groupId>org.apache.maven.plugins</groupId>

    <artifactId>maven-assembly-plugin</artifactId>

    <inherited>false</inherited>

    <executions>

        <execution>

            <id>src-dist</id>

            <phase>package</phase>

            <goals>

                <goal>single</goal>

            </goals>

            <configuration>

                <appendAssemblyId>false</appendAssemblyId>

                <attach>false</attach>

                <finalName>hadoop-${project.version}-src</finalName>

                <outputDirectory>hadoop-dist/target</outputDirectory>

                <!-- Not using descriptorRef and hadoop-assembly dependency -->

                <!-- to avoid making hadoop-main to depend on a module      -->

                <descriptors>

                    <descriptor>hadoop-assemblies/src/main/resources/assemblies/hadoop-src.xml</descriptor>

                </descriptors>

            </configuration>

        </execution>

    </executions>

</plugin>
解释下每个XML节点的意义:
| 配置项 | 说明 |
|---|---|
| appendAssemblyId | 设置为false表示从最终的输出程序集中排除src-dist名字 |
| attach | 控制Assembly插件是否将生成的assembly附加到项目中 |
| finalName | Assembly发行版最终的文件名 |
| outputDirectory | Assembly文件的最终输出目录 |
| descriptors | 默认会从bin、jar-with-dependencies、src、project中加载内置描述符。 |
内置的descriptors可以从assembly.jar中加载。
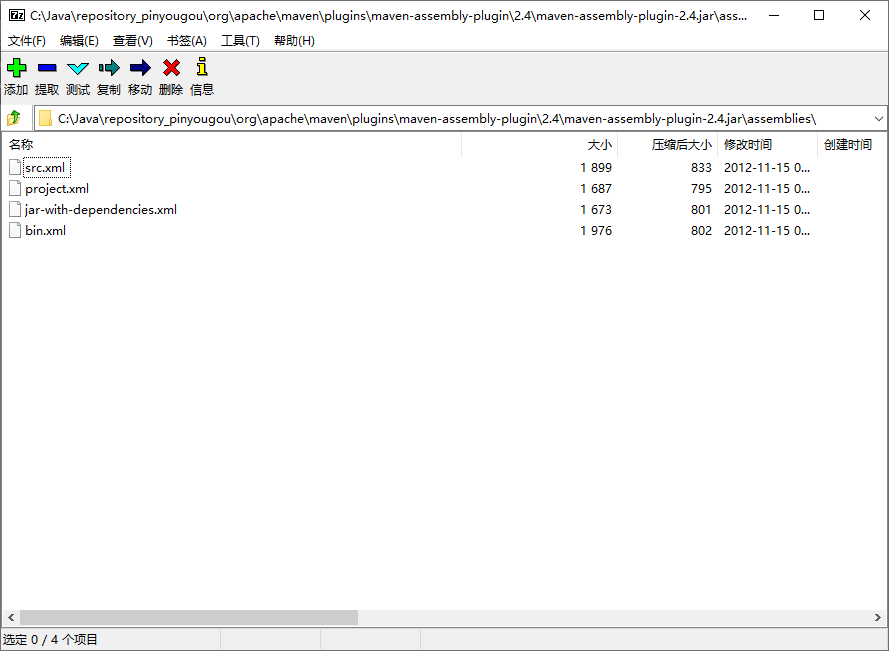
可以参考https://maven.apache.org/plugins/maven-assembly-plugin/descriptor-refs.html看到所有内置的descriptor中说明。这里Hadoop配置的是自己的descriptor。
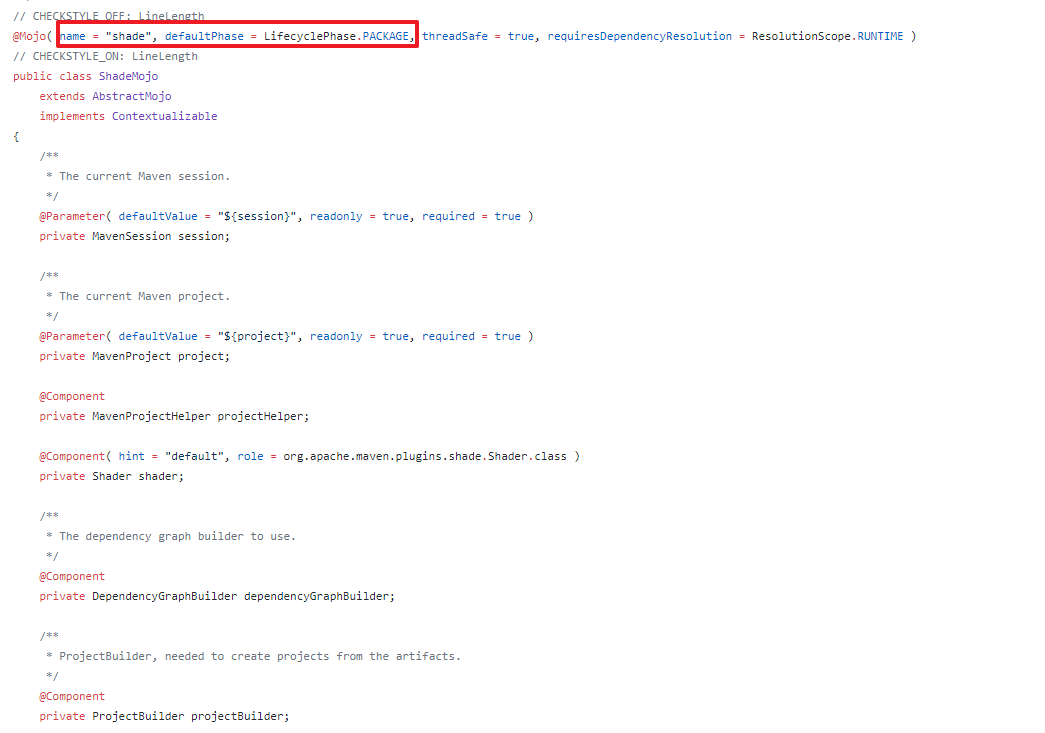
大家可以参考插件的AbstractAssemblyMojo.java中的定义。
hadoop-src.xml Assembly配置
<assembly xmlns="http://maven.apache.org/plugins/maven-assembly-plugin/assembly/1.1.3"

  xmlns:xsi="http://www.w3.org/2001/XMLSchema-instance"

  xsi:schemaLocation="http://maven.apache.org/plugins/maven-assembly-plugin/assembly/1.1.3 http://maven.apache.org/xsd/assembly-1.1.3.xsd">

  <id>hadoop-src</id>

  <formats>

    <format>tar.gz</format>

  </formats>

  <includeBaseDirectory>true</includeBaseDirectory>

  <fileSets>

    <fileSet>

      <directory>.</directory>

      <includes>

        <include>LICENCE.txt</include>

        <include>README.txt</include>

        <include>NOTICE.txt</include>

      </includes>

    </fileSet>

    <fileSet>

      <directory>./licenses</directory>

      <includes>

        <include>*</include>

      </includes>

    </fileSet>

    <fileSet>

      <directory>.</directory>

      <useDefaultExcludes>true</useDefaultExcludes>

      <excludes>

        <exclude>.git/**</exclude>

        <exclude>**/.gitignore</exclude>

        <exclude>**/.svn</exclude>

        <exclude>**/*.iws</exclude>

        <exclude>**/*.ipr</exclude>

        <exclude>**/*.iml</exclude>

        <exclude>**/.classpath</exclude>

        <exclude>**/.project</exclude>

        <exclude>**/.settings</exclude>

        <exclude>**/target/**</exclude>

        <!-- until the code that does this is fixed -->

        <exclude>**/*.log</exclude>

        <exclude>**/build/**</exclude>

        <exclude>**/file:/**</exclude>

        <exclude>**/SecurityAuth.audit*</exclude>

        <exclude>patchprocess/**</exclude>

      </excludes>

    </fileSet>

  </fileSets>

</assembly>
我们可以参考:https://maven.apache.org/plugins/maven-assembly-plugin/assembly.html看到assembly相关的所有配置。
| 配置项 | 配置 | 说明 |
|---|---|---|
| id | hadoop-src | 设置Assembly的id。 |
| formats/format* | tar.gz | 指定assembly的最终格式。这里hadoop配置的是tar.gz,表示最终打包出来一个tar.gz文件,当然可以配置多个。例如:zip、tar、jar等。 |
| includeBaseDirectory | true | 在tar.gz中包括一个base目录。就是tar.gz会包含一个文件夹。而不是直接把大量的文件直接放在tar.gz中。(这个一定要配置true,不然解压安装的时候会很蛋疼。) |
| fileSets | fileset | 指定要包含在Assembly中的模块文件。就是最终要将哪些文件复制到tar.gz中。 |
| fileset/useDefaultExcludes | true | 是否应使用标准排除模式。对于向后兼容性,默认值为true。 |
| fileset/directory | . | 设置模块目录中的绝对或相对位置。例如,“src/main/bin”将选择定义此依赖项的项目的子目录。该目录配置表示要打包哪个目录下的文件。 |
| includes/include* | LICENCE.txt | 定义一组要包含的文件和目录。如果没有配置,表示所有target内容 |
| excludes/exclude* | **/.settings | 定义一组要排除的文件和目录。 |
制作一个属于我们自己的打包程序
需求
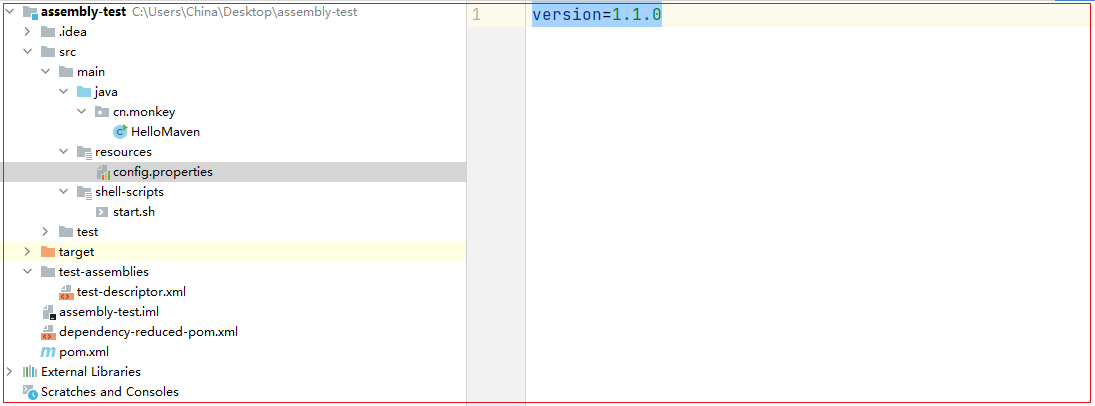
我们通过编写一个简单的代码,然后将代码打包成类似于Apache的软件包。代码非常简单:
public class HelloMaven {

    public static void main(String[] args) {

        System.out.println("Hello! Maven Assembly Plugin!");

    }

}
有一个配置文件,我们也需要打包:
version=1.1.0
添加一个测试依赖
在pom.xml中添加以下:
<dependencies>

    <dependency>

        <groupId>commons-cli</groupId>

        <artifactId>commons-cli</artifactId>

        <version>1.2</version>

    </dependency>

</dependencies>
一会我们会用shade插件,将该依赖直接打成uber-jar。
配置shade插件
<plugin>

    <groupId>org.apache.maven.plugins</groupId>

    <artifactId>maven-shade-plugin</artifactId>

    <version>3.1.1</version>

    <executions>

        <!-- Run shade goal on package phase -->

        <execution>

            <phase>package</phase>

            <goals>

                <goal>shade</goal>

            </goals>

            <configuration>

                <filters>

                    <filter>

                        <artifact>*:*</artifact>

                        <excludes>

                            <exclude>META-INF/*.SF</exclude>

                            <exclude>META-INF/*.DSA</exclude>

                            <exclude>META-INF/*.RSA</exclude>

                            <exclude>shell-scripts/*</exclude>

                        </excludes>

                    </filter>

                </filters>

                <transformers>

                    <transformer implementation="org.apache.maven.plugins.shade.resource.ManifestResourceTransformer">

                        <mainClass>cn.monkey.HelloMaven</mainClass>

                    </transformer>

                </transformers>

            </configuration>

        </execution>

    </executions>

</plugin>
执行package时,会先执行maven-jar-plugin。然后就会执行shade插件了。注意:因为我们一会要使用assembly打包,将shade打包的user-jar直接打进tar.gz。所以,shade要配置在assembly插件之前。
注意配置mainClass,也就是JAR的运行主类
配置Assembly插件
配置Maven pom.xml
<plugin>

    <groupId>org.apache.maven.plugins</groupId>

    <artifactId>maven-assembly-plugin</artifactId>

    <inherited>false</inherited>

    <executions>

        <execution>

            <id>assembly-test</id>

            <phase>package</phase>

            <goals>

                <goal>single</goal>

            </goals>

            <configuration>

                <appendAssemblyId>false</appendAssemblyId>

                <attach>false</attach>

                <finalName>${project.artifactId}-bin</finalName>

                <outputDirectory>${project.build.directory}</outputDirectory>

                <!-- Not using descriptorRef and hadoop-assembly dependency -->

                <!-- to avoid making hadoop-main to depend on a module      -->

                <descriptors>

                    <descriptor>test-assemblies/test-descriptor.xml</descriptor>

                </descriptors>

            </configuration>

        </execution>

    </executions>

</plugin>
- finalName为最终打包的文件名,此处为artifactId加上bin后缀
- outputDirectory配置为Maven默认的输出目录,也就是一会打包完会自动在target目录生成tar.gz
配置assembly descriptor
<assembly xmlns="http://maven.apache.org/ASSEMBLY/2.1.0"

          xmlns:xsi="http://www.w3.org/2001/XMLSchema-instance"

          xsi:schemaLocation="http://maven.apache.org/ASSEMBLY/2.1.0 http://maven.apache.org/xsd/assembly-2.1.0.xsd">

<id>assembly-test</id>

<formats>

    <format>tar.gz</format>

</formats>

<fileSets>

    <fileSet>

        <directory>${project.build.directory}</directory>

        <useDefaultExcludes></useDefaultExcludes>

        <outputDirectory>lib</outputDirectory>

        <includes>

            <include>*-shaded.jar</include>

        </includes>

    </fileSet>

    <fileSet>

        <directory>${project.build.directory}/classes</directory>

        <outputDirectory>conf</outputDirectory>

        <includes>

            <include>**/config.properties</include>

        </includes>

    </fileSet>

    <fileSet>

        <directory>${project.build.directory}/classes/shell-scripts</directory>

        <outputDirectory>bin</outputDirectory>

        <fileMode>755</fileMode>

        <includes>

            <include>**/start.sh</include>

        </includes>

    </fileSet>

</fileSets>

</assembly>
- 我们最终的文件以tar.gz方式打包
- 第一个fileset为打包lib,我们最终的程序以jar包形式存放在tar.gz的lib文件夹中
- 第二个fileset打包配置文件,这里直接打包config.properties
- 第三个fileset打包运行的shell脚本,并且配置了755可执行权限
创建运行脚本
在main目录中添加shell-scripts/start.sh,要执行程序直接执行start.sh即可
#!/bin/bash

java -jar lib/${artifact.name}
配置资源打包
<build>

    <resources>

        <resource>

            <directory>src/main/resources</directory>

            <includes>

                <include>**/*</include>

            </includes>

        </resource>

        <resource>

            <targetPath>${project.build.outputDirectory}/shell-scripts</targetPath>

            <directory>src/main/shell-scripts</directory>

            <filtering>true</filtering>

            <includes>

                <include>**/*</include>

            </includes>

        </resource>

    </resources>

    ....

</build>
我们需要对shell-scriptrs下的脚本进行变量替换。
配置profile
<project>

	<profiles>

        <profile>

            <id>pro</id>

            <properties>

                <artifact.name>${project.artifactId}-${project.version}-shaded.jar</artifact.name>

            </properties>

            <activation>

                <!-- 默认激活该profile -->

                <activeByDefault>true</activeByDefault>

            </activation>

        </profile>

    </profiles>

</project>
此处配置默认的Profile为pro,当打包时会用artifact.name属性直接对shell-script中的脚本进行替换。
执行打包
我把Maven的执行过程给大家解析一遍。
# 注意此处自动指定了profile为pro

C:\opt\jdk1.8.0_241\bin\java.exe -Dmaven.multiModuleProjectDirectory=C:\Users\China\Desktop\assembly-test -Dmaven.multiModuleProjectDirectory=$MAVEN_HOME -Dmaven.wagon.http.ssl.insecure=true -Dmaven.wagon.http.ssl.allowall=true -Dmaven.wagon.http.ssl.ignore.validity.dates=true -Dmaven.home=C:\Java\apache-maven-3.5.0 -Dclassworlds.conf=C:\Java\apache-maven-3.5.0\bin\m2.conf "-Dmaven.ext.class.path=C:\Program Files\JetBrains\IntelliJ IDEA Community Edition 2020.3.2\plugins\maven\lib\maven-event-listener.jar" "-javaagent:C:\Program Files\JetBrains\IntelliJ IDEA Community Edition 2020.3.2\lib\idea_rt.jar=58840:C:\Program Files\JetBrains\IntelliJ IDEA Community Edition 2020.3.2\bin" -Dfile.encoding=UTF-8 -classpath C:\Java\apache-maven-3.5.0\boot\plexus-classworlds-2.5.2.jar org.codehaus.classworlds.Launcher -Didea.version=2020.3.2 package -P pro

[INFO] Scanning for projects...

[INFO]

[INFO] ------------------------------------------------------------------------

[INFO] Building assembly-test 1.0-SNAPSHOT

[INFO] ------------------------------------------------------------------------

[INFO]

# 拷贝resoource资源文件

[INFO] --- maven-resources-plugin:2.6:resources (default-resources) @ assembly-test ---

[WARNING] File encoding has not been set, using platform encoding UTF-8, i.e. build is platform dependent!

[WARNING] Using platform encoding (UTF-8 actually) to copy filtered resources, i.e. build is platform dependent!

[INFO] Copying 1 resource

[INFO] Copying 1 resource to C:\Users\China\Desktop\assembly-test\target\classes/shell-scripts

[INFO]

# 执行编译插件

[INFO] --- maven-compiler-plugin:3.1:compile (default-compile) @ assembly-test ---

[INFO] Nothing to compile - all classes are up to date

[INFO]

# 执行test资源拷贝,当前为空

[INFO] --- maven-resources-plugin:2.6:testResources (default-testResources) @ assembly-test ---

[WARNING] Using platform encoding (UTF-8 actually) to copy filtered resources, i.e. build is platform dependent!

[INFO] skip non existing resourceDirectory C:\Users\China\Desktop\assembly-test\src\test\resources

[INFO]

# 执行编译测试用例代码

[INFO] --- maven-compiler-plugin:3.1:testCompile (default-testCompile) @ assembly-test ---

[INFO] Nothing to compile - all classes are up to date

[INFO]

# 执行单元测试

[INFO] --- maven-surefire-plugin:2.12.4:test (default-test) @ assembly-test ---

[INFO] No tests to run.

[INFO]

# 执行Maven的默认jar打包

[INFO] --- maven-jar-plugin:2.4:jar (default-jar) @ assembly-test ---

[INFO] Building jar: C:\Users\China\Desktop\assembly-test\target\assembly-test-1.0-SNAPSHOT.jar

[INFO]

# 执行shade插件打包

[INFO] --- maven-shade-plugin:3.1.1:shade (default) @ assembly-test ---

[INFO] Including commons-cli:commons-cli:jar:1.2 in the shaded jar.

[INFO] Replacing original artifact with shaded artifact.

[INFO] Replacing C:\Users\China\Desktop\assembly-test\target\assembly-test-1.0-SNAPSHOT.jar with C:\Users\China\Desktop\assembly-test\target\assembly-test-1.0-SNAPSHOT-shaded.jar

[INFO] Dependency-reduced POM written at: C:\Users\China\Desktop\assembly-test\dependency-reduced-pom.xml

[INFO]

# 执行assembly插件打包

[INFO] --- maven-assembly-plugin:2.2-beta-5:single (assembly-test) @ assembly-test ---

[INFO] Reading assembly descriptor: test-assemblies/test-descriptor.xml

[INFO] Building tar : C:\Users\China\Desktop\assembly-test\target\assembly-test-bin.tar.gz

[WARNING] Assembly file: C:\Users\China\Desktop\assembly-test\target\assembly-test-bin.tar.gz is not a regular file (it may be a directory). It cannot be attached to the project build for installation or deployment.

[INFO] ------------------------------------------------------------------------

[INFO] BUILD SUCCESS

[INFO] ------------------------------------------------------------------------

[INFO] Total time: 2.202 s

[INFO] Finished at: 2021-02-06T21:19:21+08:00

[INFO] Final Memory: 15M/491M

[INFO] ------------------------------------------------------------------------

Process finished with exit code 0
是不是一目了然?
一顿操作后,我们发现确实打包成了tar.gz了。
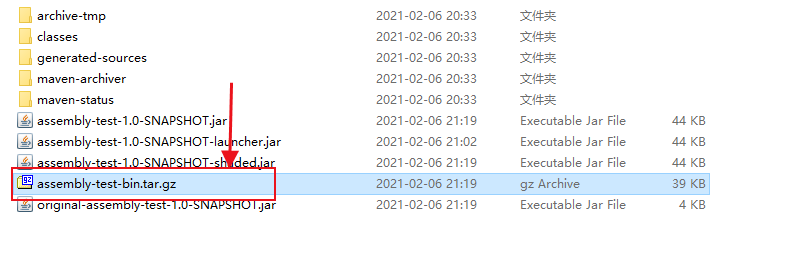
用压缩软件打开看一下:
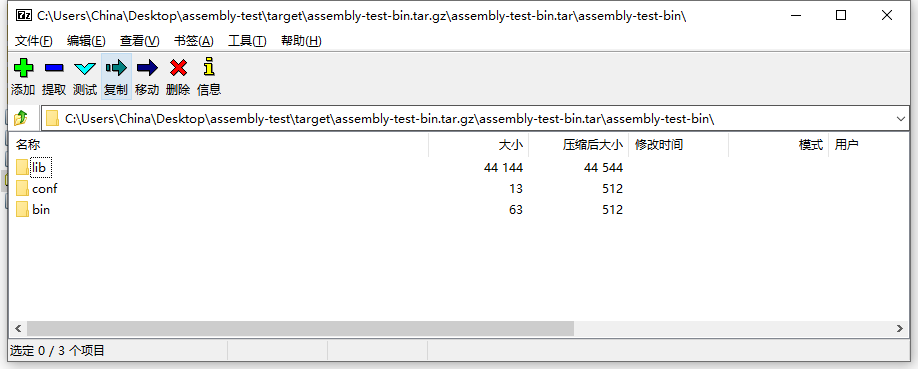
全部都已经打包好了。而且shell脚本已经进行了变量替换。
在Linux上部署
# 上传到Linux服务器

[root@compile assembly-test]# ll

总用量 40

-rw-r--r--. 1 root root 39611 2月   6 21:19 assembly-test-bin.tar.gz

# 解压

[root@compile assembly-test]# tar -xvzf assembly-test-bin.tar.gz

assembly-test-bin/lib/assembly-test-1.0-SNAPSHOT-shaded.jar

assembly-test-bin/conf/config.properties

assembly-test-bin/bin/start.sh

# 执行

[root@compile assembly-test-bin]# pwd

/root/assembly-test/assembly-test-bin

[root@compile assembly-test-bin]# bin/start.sh

Hello! Maven Assembly Plugin!
是不是很酷~这样的程序才是真正的、很正式的程序。
打包源代码
最后为了方便小伙伴们测试,我们把Maven项目的源码打包一份。还是使用assembly插件。
在Assembly中创建一个新的execution
<execution>

    <id>test-source-descriptor</id>

    <phase>compile</phase>

    <goals>

        <goal>single</goal>

    </goals>

    <configuration>

        <appendAssemblyId>false</appendAssemblyId>

        <attach>false</attach>

        <finalName>${project.artifactId}-source</finalName>

        <outputDirectory>${project.build.directory}</outputDirectory>

        <!-- Not using descriptorRef and hadoop-assembly dependency -->

        <!-- to avoid making hadoop-main to depend on a module      -->

        <descriptors>

            <descriptor>test-assemblies/test-source-descriptor.xml</descriptor>

        </descriptors>

    </configuration>

</execution>
注意:我当前配置的phase为compile,也就是编译阶段就会打包好maven的源代码.
为打包源码配置assembly descriptor
<assembly xmlns="http://maven.apache.org/ASSEMBLY/2.1.0"

          xmlns:xsi="http://www.w3.org/2001/XMLSchema-instance"

          xsi:schemaLocation="http://maven.apache.org/ASSEMBLY/2.1.0 http://maven.apache.org/xsd/assembly-2.1.0.xsd">

<id>test-source-descriptor</id>

<formats>

    <format>zip</format>

</formats>

<fileSets>

    <fileSet>

        <directory>${project.basedir}</directory>

        <useDefaultExcludes></useDefaultExcludes>

        <outputDirectory>.</outputDirectory>

        <includes>

            <include>src/**/*</include>

            <include>test-assemblies/**/*</include>

            <include>pom.xml</include>

        </includes>

    </fileSet>

</fileSets>

</assembly>
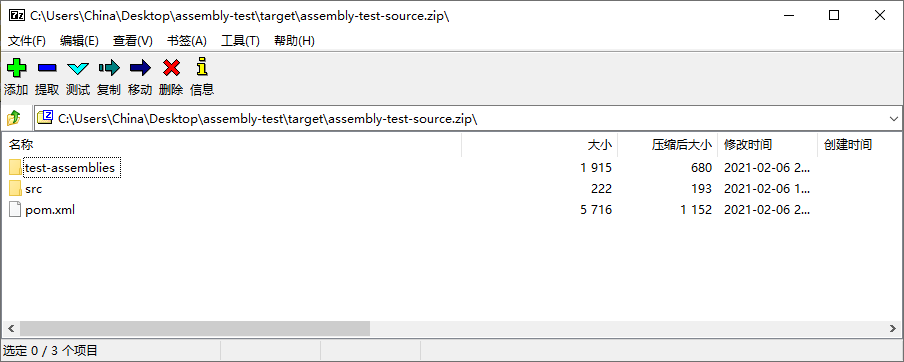
此处j将src源码目录、test-assemblies下的所有文件、以及pom.xml一块打包给小伙伴。
执行compile
[INFO] Scanning for projects...

[INFO]

[INFO] ------------------------------------------------------------------------

[INFO] Building assembly-test 1.0-SNAPSHOT

[INFO] ------------------------------------------------------------------------

[INFO]

[INFO] --- maven-resources-plugin:2.6:resources (default-resources) @ assembly-test ---

[WARNING] File encoding has not been set, using platform encoding UTF-8, i.e. build is platform dependent!

[WARNING] Using platform encoding (UTF-8 actually) to copy filtered resources, i.e. build is platform dependent!

[INFO] Copying 1 resource

[INFO] Copying 1 resource to C:\Users\China\Desktop\assembly-test\target\classes/shell-scripts

[INFO]

[INFO] --- maven-compiler-plugin:3.1:compile (default-compile) @ assembly-test ---

[INFO] Nothing to compile - all classes are up to date

[INFO]

[INFO] --- maven-assembly-plugin:2.2-beta-5:single (test-source-descriptor) @ assembly-test ---

[INFO] Reading assembly descriptor: test-assemblies/test-source-descriptor.xml

[INFO] Building zip: C:\Users\China\Desktop\assembly-test\target\assembly-test-source.zip

[INFO] ------------------------------------------------------------------------

[INFO] BUILD SUCCESS

[INFO] ------------------------------------------------------------------------

[INFO] Total time: 1.274 s

[INFO] Finished at: 2021-02-06T21:38:37+08:00

[INFO] Final Memory: 13M/491M

[INFO] ------------------------------------------------------------------------

Process finished with exit code 0
大家看到assembly插件已经执行,并将代码打包好了。
大家看到了,这才是我们做为一个开发应该玩的Maven。本次的案例代码在我公众号上回复:maven-plugin即可获取下载链接。大家自取之。
我们下期再见!
以上
参考文献
[1] https://maven.apache.org/plugins/
[2] https://github.com/apache/hadoop
[3] https://maven.apache.org/guides/introduction/introduction-to-plugins.html
[4] https://github.com/apache/spark
[5] https://stackoverflow.com/questions/11947037/what-is-an-uber-jar
[6] https://docs.oracle.com/javase/8/docs/technotes/guides/jar/jar.html
[7] https://maven.apache.org/plugins/maven-assembly-plugin/index.html
[8] https://github.com/cko/predefined_maven_properties/blob/master/README.md
恕我直言!!!对于Maven,菜鸟玩dependency,神仙玩plugin的更多相关文章
- 草根玩微博 中产玩微信 土豪玩什么?支持Yo的iWatch?
<中国新媒体发展报告(2014)>发布了一些新媒体的使用情况数据,25.6%无收入群体人数在玩微博,32.0%的微信用户属于月收入3000~5000元的中产阶层,那么土豪会玩什么新媒体呢? ...
- Maven手动添加dependency(以Oracle JDBC为例)
由于Oracle授权问题,Maven不提供Oracle JDBC driver,为了在Maven项目中应用Oracle JDBC driver,必须手动添加到本地仓库.首先需要到Oracle官网上下载 ...
- maven中,dependency 中的 classifier属性
classifier元素用来帮助定义构件输出的一些附属构件.附属构件与主构件对应,比如主构件是 kimi-app-2.0.0.jar 该项目可能还会通过使用一些插件生成 如 kimi-app-2.0. ...
- 【Maven】Select Dependency 无法检索
问题: 在 “pom.xml” 中,点击 “Dependencies” -> “Add” 添加依赖时,无法检索. 如下图所示: 解决办法: 依次点击 “Windows”->“Show ...
- maven error: element dependency can not have character children
就是Mavn pom.xml的解析错误,因为dependency这个标签中有不可见的垃圾字符,解决方法就是删掉重新打字进去就可以了. references: https://stackoverflow ...
- Maven中的dependency详解
<dependency> <groupId>junit</groupId> <artifactId>junit</artifactId> & ...
- 玩转PIL >>> 玩转photo
前:1.使用图片放在文件最后,需要的请自行下载 2.运行环境win10家庭版,已经安装好pillow库 一.学习总结 PIL库支持图像的储存,显示和处理,几乎能处理所有的图片格式,可以完成对图像的缩放 ...
- requests 模块入门玩法和高级玩法
1.安装 pip install requests 2. http://docs.python-requests.org/zh_CN/latest/user/quickstart.html http: ...
- Maven中的dependency的scope作用域详解
1.test范围指的是测试范围有效,在编译和打包时都不会使用这个依赖 2.compile范围指的是编译范围有效,在编译和打包时都会将依赖存储进去 3.provided依赖:在编译和测试的过程有效,最后 ...
随机推荐
- Databricks 第9篇:Spark SQL 基础(数据类型、NULL语义)
Spark SQL 支持多种数据类型,并兼容Python.Scala等语言的数据类型. 一,Spark SQL支持的数据类型 整数系列: BYTE, TINYINT:表示1B的有符号整数 SHORT, ...
- Connection Manager简称connman
ConnMan Connection Manager简称connman,connman是使用d-bus做为进程间通信机制来管理Linux网络链接的一种软件.在connman的d-bus接口中,有 ...
- logging philosophy 日志哲学
Go kit - Frequently asked questions https://gokit.io/faq/ Logging - Why is package log so different? ...
- 选出ip记录表最近的10行数据
w select * from wip where id>(select (select max(id)from wip)-10) ;
- mdns
mdns mdns_百度百科 https://baike.baidu.com/item/mdns 在计算机网络中 , 多播DNS ( mDNS )协议将主机名解析为不包含本地名称服务器的小型网络中的I ...
- 【c++小知识】static用法浅析
一.前言 C++的关键字static分两种用法,在面向过程程序设计(c语言中的普通变量和函数)中的使用和在面向对象程序设计(c++中的类)中的使用 二.面向过程程序设计中的static(静态变量.静态 ...
- 如何使用Set去重
let arr = [12,43,23,43,68,12]; let item = [...new Set(arr)]; console.log(item);//[12, 43, 23, 68]
- Java Socket InetAddress类 Socket DatagramPacket TCP、UDP示例
java.net :为实现网络应用程序提供类. InetAddress类 方法摘要 方法摘要 boolean equals(Object obj) : 将此对象与指定对象比较. byte[] getA ...
- LOJ10043
题目描述 原题来自:HNOI 2002 Tiger 最近被公司升任为营业部经理,他上任后接受公司交给的第一项任务便是统计并分析公司成立以来的营业情况. Tiger 拿出了公司的账本,账本上记录了公司成 ...
- Excel三个下拉互斥
Excel三个下拉互斥 描述:Excel有三个下拉列表,若选择了其中任意一个下拉,其他两个均不可以在选择. 尝试了很多种办法,级联,数据有效性等等,最后都没实现. 老大,最后用VBA实现. 附上代码: ...