【转】Setting up SDL 2 on MinGW
FROM: http://lazyfoo.net/tutorials/SDL/01_hello_SDL/windows/mingw/index.php
Setting up SDL 2 on MinGW
Last Updated 6/21/14
1)First thing you need to do is download SDL headers, libary and binaries. You will find them on the SDL website, specifically on this page.
You'll want to download the MinGW development libraries.
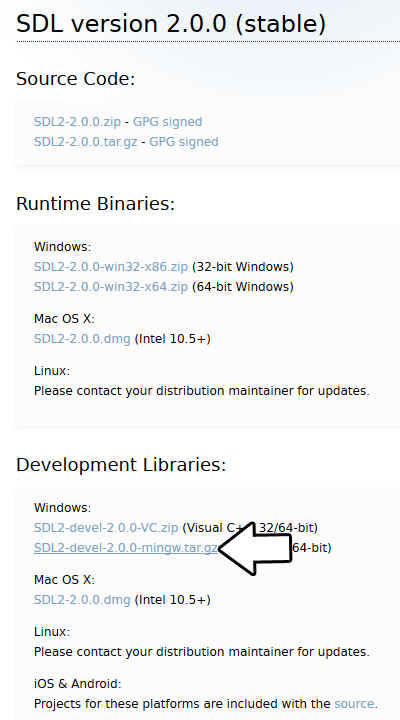
Open the gzip archive and there should be a tar archive. Open up the tar archive and the should be a folder called SDL2-2.something.something. Inside of that folder there should be a bunch of folders and files, most importantly i686-w64-mingw32 which contains the 32bit library and x86_64-w64-mingw32 which contains the 64bit library.
This is important: most compilers still compile 32bit binaries by default to maximize compatibility. We will be using the 32bit binaries for this tutorial set. It doesn't matter if you have a 64bit operating system, since we are compiling 32bit binaries we will be using the 32bit library.
Inside of i686-w64-mingw32 are the include, lib, and bin folders which contain everything we need compile and run SDL applications. Copy the contents of i686-w64-mingw32 to any directory you want. I recommend putting it in a folder that you dedicate to holding all your development libraries for MinGW. For these tutorials I'm putting it in a directory I created C:\mingw_dev_lib
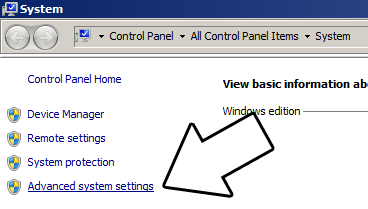
2)Next you're going to want to get up the path for mingw so you can run mingw commands in any directory. Open up the system menu either by A) right clicking My Computer and selecting Properties or B) going to the Control Panel and selecting the system menu. Once your in the system menu, click advanced system settings.
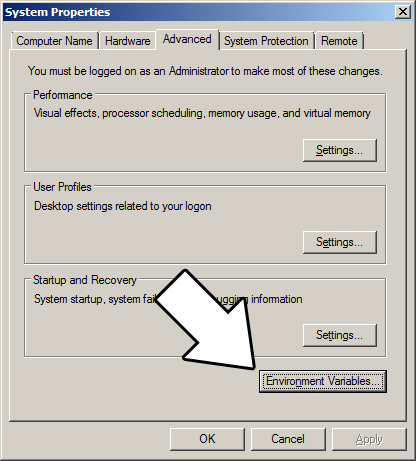
and then click environment variables
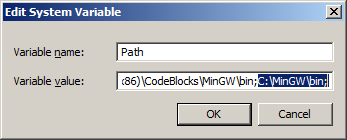
Under system variables, select the "Path" variable and click edit.

What the path variable does is tell the OS where to look when running an executable. What we want to do is whenever we run the g++ command, the OS should look in the MinGW bin directory where g++.exe is located. If you installed MinGW by itself, the MinGW bin directory should be
C:\MinGW\bin
Append it to the long list of paths with a semi-colon after it and click ok.
If you're using an IDE like Code::Blocks which uses MinGW, you can also set its MinGW bin directory which should be at
C:\Program Files (x86)\CodeBlocks\MinGW\bin
Now when ever you run a command that uses a MinGW executable, the OS will know to look in the MinGW bin directory.
If you run your program and it complains that it can't find SDL2.dll, it means you did not set the path correctly.
3)Now go download the source for lesson 01. Extract the source somewhere. Open up a command window in the directory by holding shift and right clicking.

Now compile by entering this big old command (This command assumed you have SDL 2 extracted at C:\mingw_dev_lib):
g++ 01_hello_SDL.cpp -IC:\mingw_dev_lib\include\SDL2 -LC:\mingw_dev_lib\lib -w -Wl,-subsystem,windows -lmingw32 -lSDL2main -lSDL2 -o 01_hello_SDL
Having to manually punch in this compilation command gets very tedious very quickly. This is why I recommend using Make.
4) MingGW Make allows you to make build scripts that'll automate the compilation process.
#OBJS specifies which files to compile as part of the project

OBJS = 01_hello_SDL.cpp

#OBJ_NAME specifies the name of our exectuable

OBJ_NAME = 01_hello_SDL

#This is the target that compiles our executable

all : $(OBJS)

    g++ $(OBJS) -IC:\mingw_dev_lib\include\SDL2 -LC:\mingw_dev_lib\lib -w -Wl,-subsystem,windows -lmingw32 -lSDL2main -lSDL2 -o $(OBJ_NAME)
Here we have a basic Makefile. At the top we declare and set the "OBJS" macro which specifies which files we're compiling. Then we set the "OBJ_NAME" macro that specifies the name of our executable.
After setting these two macros, we have the "all" target which compiles the program. It's followed by the dependencies which as you can see is the OBJS macro, because obviously you need the source files to compile the program.
After specifying the name of the target and its dependencies, the command to create the target is on the next line. The command to create the target must begin with a tab or Make will reject it.
As you would expect, the command to compile the program is largely the same as the command we would compile it off the command line. A key difference is that we have macros that we insert into the command which makes things like adding new files to the project must easier since you only have to change the macro as opposed to changing the whole command.
In future tutorials, we will be using more libraries. We should probably use more macros to make the process of adding them easier.
From Makefile
#OBJS specifies which files to compile as part of the project

OBJS = 01_hello_SDL.cpp

#CC specifies which compiler we're using

CC = g++

#INCLUDE_PATHS specifies the additional include paths we'll need

INCLUDE_PATHS = -IC:\mingw_dev_lib\include\SDL2

#LIBRARY_PATHS specifies the additional library paths we'll need

LIBRARY_PATHS = -LC:\mingw_dev_lib\lib

#COMPILER_FLAGS specifies the additional compilation options we're using

# -w suppresses all warnings

# -Wl,-subsystem,windows gets rid of the console window

COMPILER_FLAGS = -w -Wl,-subsystem,windows

#LINKER_FLAGS specifies the libraries we're linking against

LINKER_FLAGS = -lmingw32 -lSDL2main -lSDL2

#OBJ_NAME specifies the name of our exectuable

OBJ_NAME = 01_hello_SDL

#This is the target that compiles our executable

all : $(OBJS)

    $(CC) $(OBJS) $(INCLUDE_PATHS) $(LIBRARY_PATHS) $(COMPILER_FLAGS) $(LINKER_FLAGS) -o $(OBJ_NAME)
Now our compilation command is much more flexible.
Near the top we have the macros that define the files we're compiling and the compiler we're using.
Next we have the "INCLUDE_PATHS" macro which specifies the additional directories we're getting header files from. As you can see, we're using the include directory from the SDL2 folder we extacted earlier. The "LIBRARY_PATHS" sets the additional library file paths. Notice how there's a -I before every include directory and a -L before every library directory.
The "COMPILER_FLAGS" macro are the additional options we use when compiling. In this case we're disabling all warnings and disabling the console window. The "LINKER_FLAGS" macro specifies which libraries we're linking against. Here we're compiling against 32bit mingw, SDL2, and SDL2main. Notice how there's a -l flag before every library.
Finally at the bottom we have our target compiling using all of our macros. Thanks to macros we can very easily change the macros to add more files and libraries as we need them.
Save this Makefile code to a file named "Makefile" (case sensitive with no file extension) or you can use the one I premade here. Open a command line in the directory with the source files and run the command mingw32-make.exe. Make will search for a file named "Makefile" in the directory Make was called in and run the Makefile that will compile your code.
Now that you have SDL 2 compiling, it time to go onto part 2 of the tutorial.
【转】Setting up SDL 2 on MinGW的更多相关文章
- 【转】Setting up SDL Extension Libraries on MinGW
FROM:http://lazyfoo.net/tutorials/SDL/06_extension_libraries_and_loading_other_image_formats/windows ...
- 【转】Setting up SDL Extension Libraries on Code::Blocks 12.11
FROM: http://lazyfoo.net/tutorials/SDL/06_extension_libraries_and_loading_other_image_formats/window ...
- 【转】Setting up SDL Extension Libraries on Windows
FROM: http://lazyfoo.net/tutorials/SDL/06_extension_libraries_and_loading_other_image_formats/window ...
- 【转】Setting up SDL 2 on Code::Blocks 12.11
FROM: http://lazyfoo.net/tutorials/SDL/01_hello_SDL/windows/codeblocks/index.php Setting up SDL 2 on ...
- 【转】Setting up SDL on Windows
FROM: http://lazyfoo.net/tutorials/SDL/01_hello_SDL/windows/index.php Setting up SDL on Windows Last ...
- 【转】Setting up SDL 2 on Visual Studio 2010 Ultimate
from: Lazy Foo'Productions - Setting up SDL 2 on Visual Studio 2010 Ultimate 1)First thing you need ...
- 【转】Setting up SDL Extension Libraries on Visual Studio 2010 Ultimate
FROM:http://lazyfoo.net/tutorials/SDL/06_extension_libraries_and_loading_other_image_formats/windows ...
- 【转】Setting up SDL Extension Libraries on Visual Studio 2019 Community
FROM:http://lazyfoo.net/tutorials/SDL/06_extension_libraries_and_loading_other_image_formats/windows ...
- 【转】Setting up SDL 2 on Visual Studio 2019 Community
FROM: http://lazyfoo.net/tutorials/SDL/01_hello_SDL/windows/msvc2019/index.php Setting up SDL 2 on V ...
随机推荐
- spring Boot面试题(2020最新版)
概述 什么是 Spring Boot? Spring Boot 是 Spring 开源组织下的子项目,是 Spring 组件一站式解决方案,主要是简化了使用 Spring 的难度,简省了繁重的配置,提 ...
- 跟我一起学.NetCore之Swagger让前后端不再烦恼及界面自定义
前言 随着前后端分离开发模式的流行,接口对接.联调成为常事,前端同事会经常问:我需要调哪个接口?这个接口数据格式是啥?条件都传啥? 对于一些紧急接口可能会采取沟通对接,然后补文档,其他的都会回一句:看 ...
- Python-如何在一个for循环中迭代多个可迭代对象?
案例: 某班学生期末考试成绩,语文.数学.英语分别存储在3个列表中,同时迭代三个列表.,计算每个学生的总分(并行) 某年级有4个班,某次英语成绩分别记录在4个列表中,依次迭代每个列表,统计全年级高于9 ...
- ISP-OB, pedestal 以及ISP概述
网上的直接参考资料 1. https://zhuanlan.zhihu.com/p/36896537 2. https://blog.csdn.net/m0_38049850/article/deta ...
- 对do{ }while();一直以来的误解 -----如何理解do{ }while( );语句
在do{ }while( ); 语句中,我之前的理解是:先执行一次do{ },然后判断while( )中的内容,一般里面都是字符串或者数值作比较嘛,所以理解是:如果判断的这个东西,在这个范围中(等于这 ...
- OpenSSL加密系统简介
加密基本原理 OpenSSL移植到arm开发板参考 http://blog.chinaunix.net/uid-27717694-id-3530600.html 1.公钥和私钥: 公钥和私钥就是俗称 ...
- HTML常用标签(下)
HTML常用标签(下) 1. 表格标签 1.1 语法 <table> <!--table定义表格--> <tr> <!--tr定义表格中的行--> &l ...
- 从面试角度学完 Kafka
Kafka 是一个优秀的分布式消息中间件,许多系统中都会使用到 Kafka 来做消息通信.对分布式消息系统的了解和使用几乎成为一个后台开发人员必备的技能.今天码哥字节就从常见的 Kafka 面试题入手 ...
- 晋城6397.7539(薇)xiaojie:晋城哪里有xiaomei
晋城哪里有小姐服务大保健[微信:6397.7539倩儿小妹[晋城叫小姐服务√o服务微信:6397.7539倩儿小妹[晋城叫小姐服务][十微信:6397.7539倩儿小妹][晋城叫小姐包夜服务][十微信 ...
- day02 Pyhton学习
1.昨日内容回顾 1.python是一门解释型,弱类型的高级编程语言 优点: 1.优雅简单明确 2.短小快,代码短,代码量小,开发效率高 缺点: 1.运行效率低(相对) 2.python解释器 Cpy ...