通过注入DLL后使用热补丁钩取API
通过注入DLL后使用热补丁钩取API
0x00 对比修改API的前五个字节钩取API
对前一种方法钩取API的流程梳理如下:
- 注入相应的DLL
- 修改原始AI的函数的前五个字节跳往新函数(钩取API)
- 跳往新函数后需调用原始API的功能,所以先把那五个替换的字节换回来(脱钩)
- 调用原始API
- 再次注入dll
- 再次挂钩
所以每次进入新函数后就要反复进行挂钩脱钩,这是一个极度消耗cpu的工作,特别是对于要整个系统的进程都要注入dll时就更要命了。
现在有一种更好的方式来弥补这种方法的不足,这就是热补丁法,他利用的是更改API函数地址前的七个字节的无功能性,来实现的。
如下图:
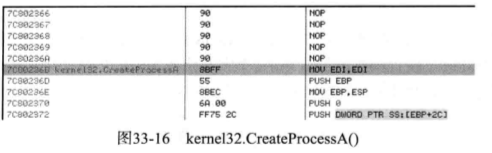
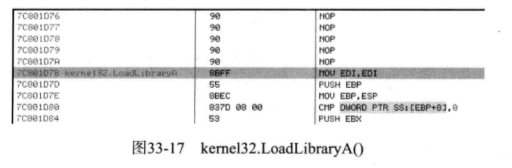
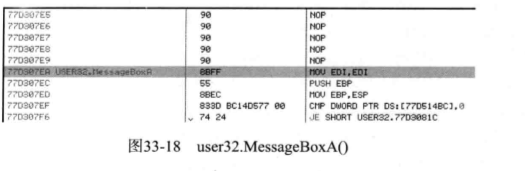

我们从上图可以知道这些API函数前面的七个字节都是
90 Nop
90 Nop
90 Nop
90 Nop
90 Nop
8BFF MOV EDI,EDI
这六句话共占7个字节,并没有实际意义而8BFF MOV EDI,EDI
是API的首地址。所以更改这里并不会对函数调用产生影响。所以这里跳转至新函数后,新函数再调用原始API时就不用脱钩。这样就给系统减小了负担,也减少了崩溃的风险。
0x01 实现代码
代码的与五字补丁不同的地方在于,找到原始API地址之后是对API首地址的后两个字节以及首地址前的五个字节进行修改,并且在新的函数中调用原始API时不用进行脱钩操作。
代码如下:
#include "windows.h"
#include "stdio.h"
#include "tchar.h"
#define STR_MODULE_NAME (L"stealth2.dll")
#define STR_HIDE_PROCESS_NAME (L"notepad.exe")
#define STATUS_SUCCESS (0x00000000L)
typedef LONG NTSTATUS;
//系统信息结构体
typedef enum _SYSTEM_INFORMATION_CLASS {
SystemBasicInformation = 0,
SystemPerformanceInformation = 2,
SystemTimeOfDayInformation = 3,
SystemProcessInformation = 5,
SystemProcessorPerformanceInformation = 8,
SystemInterruptInformation = 23,
SystemExceptionInformation = 33,
SystemRegistryQuotaInformation = 37,
SystemLookasideInformation = 45
} SYSTEM_INFORMATION_CLASS;
//进程信息结构体
typedef struct _SYSTEM_PROCESS_INFORMATION {
ULONG NextEntryOffset;
BYTE Reserved1[52];
PVOID Reserved2[3];
HANDLE UniqueProcessId;
PVOID Reserved3;
ULONG HandleCount;
BYTE Reserved4[4];
PVOID Reserved5[11];
SIZE_T PeakPagefileUsage;
SIZE_T PrivatePageCount;
LARGE_INTEGER Reserved6[6];
} SYSTEM_PROCESS_INFORMATION, *PSYSTEM_PROCESS_INFORMATION;
//PFZWQUERYSYSTEMINFORMATION是一个函数指针
/*
一个指向参数为
SYSTEM_INFORMATION_CLASS SystemInformationClass,
PVOID SystemInformation,
ULONG SystemInformationLength,
PULONG ReturnLength
的返回值类型为NTSTATUS的函数,这个函数其实就是ZwQuerySystemInformation()API函数,NTSTATUS是一个长整型数。
*/
typedef NTSTATUS (WINAPI *PFZWQUERYSYSTEMINFORMATION)(
SYSTEM_INFORMATION_CLASS SystemInformationClass,
PVOID SystemInformation,
ULONG SystemInformationLength,
PULONG ReturnLength);
/*
PFCREATEPROCESSA是一个函数指针
这个指针指向参数为:
LPCTSTR lpApplicationName,
LPTSTR lpCommandLine,
LPSECURITY_ATTRIBUTES lpProcessAttributes,
LPSECURITY_ATTRIBUTES lpThreadAttributes,
BOOL bInheritHandles,
DWORD dwCreationFlags,
LPVOID lpEnvironment,
LPCTSTR lpCurrentDirectory,
LPSTARTUPINFO lpStartupInfo,
LPPROCESS_INFORMATION lpProcessInformation
的返回值类型为BOOL的函数,这个函数其实就是CreateProcessA()API函数
*/
typedef BOOL (WINAPI *PFCREATEPROCESSA)(
LPCTSTR lpApplicationName,
LPTSTR lpCommandLine,
LPSECURITY_ATTRIBUTES lpProcessAttributes,
LPSECURITY_ATTRIBUTES lpThreadAttributes,
BOOL bInheritHandles,
DWORD dwCreationFlags,
LPVOID lpEnvironment,
LPCTSTR lpCurrentDirectory,
LPSTARTUPINFO lpStartupInfo,
LPPROCESS_INFORMATION lpProcessInformation
);
/*
PFCREATEPROCESSW是一个函数指针
这个指针指向参数为:
LPCTSTR lpApplicationName,
LPTSTR lpCommandLine,
LPSECURITY_ATTRIBUTES lpProcessAttributes,
LPSECURITY_ATTRIBUTES lpThreadAttributes,
BOOL bInheritHandles,
DWORD dwCreationFlags,
LPVOID lpEnvironment,
LPCTSTR lpCurrentDirectory,
LPSTARTUPINFO lpStartupInfo,
LPPROCESS_INFORMATION lpProcessInformation
的返回值类型为BOOL的函数,这个函数其实就是CreateProcessW()API函数
*/
typedef BOOL (WINAPI *PFCREATEPROCESSW)(
LPCTSTR lpApplicationName,
LPTSTR lpCommandLine,
LPSECURITY_ATTRIBUTES lpProcessAttributes,
LPSECURITY_ATTRIBUTES lpThreadAttributes,
BOOL bInheritHandles,
DWORD dwCreationFlags,
LPVOID lpEnvironment,
LPCTSTR lpCurrentDirectory,
LPSTARTUPINFO lpStartupInfo,
LPPROCESS_INFORMATION lpProcessInformation
);
BYTE g_pOrgCPA[5] = {0,};
BYTE g_pOrgCPW[5] = {0,};
BYTE g_pOrgZwQSI[5] = {0,};
//替换原API函数首地址的前五个字节为NewCreateProcessA和NewCreateProcessW
BOOL hook_by_code(LPCSTR szDllName, LPCSTR szFuncName, PROC pfnNew, PBYTE pOrgBytes)
{
FARPROC pFunc;
DWORD dwOldProtect, dwAddress;
BYTE pBuf[5] = {0xE9, 0, };
PBYTE pByte;
pFunc = (FARPROC)GetProcAddress(GetModuleHandleA(szDllName), szFuncName);
pByte = (PBYTE)pFunc;
if( pByte[0] == 0xE9 )
return FALSE;
VirtualProtect((LPVOID)pFunc, 5, PAGE_EXECUTE_READWRITE, &dwOldProtect);
memcpy(pOrgBytes, pFunc, 5);
dwAddress = (DWORD)pfnNew - (DWORD)pFunc - 5;
memcpy(&pBuf[1], &dwAddress, 4);
memcpy(pFunc, pBuf, 5);
VirtualProtect((LPVOID)pFunc, 5, dwOldProtect, &dwOldProtect);
return TRUE;
}
//将被替换的API函数前五个字节换回去
BOOL unhook_by_code(LPCSTR szDllName, LPCSTR szFuncName, PBYTE pOrgBytes)
{
FARPROC pFunc;
DWORD dwOldProtect;
PBYTE pByte;
pFunc = (FARPROC)GetProcAddress(GetModuleHandleA(szDllName), szFuncName);
pByte = (PBYTE)pFunc;
if( pByte[0] != 0xE9 )
return FALSE;
VirtualProtect((LPVOID)pFunc, 5, PAGE_EXECUTE_READWRITE, &dwOldProtect);
memcpy(pFunc, pOrgBytes, 5);
VirtualProtect((LPVOID)pFunc, 5, dwOldProtect, &dwOldProtect);
return TRUE;
}
//提权函数
BOOL SetPrivilege(LPCTSTR lpszPrivilege, BOOL bEnablePrivilege)
{
TOKEN_PRIVILEGES tp;
HANDLE hToken;
LUID luid;
if( !OpenProcessToken(GetCurrentProcess(),
TOKEN_ADJUST_PRIVILEGES | TOKEN_QUERY,
&hToken) )
{
printf("OpenProcessToken error: %u\n", GetLastError());
return FALSE;
}
if( !LookupPrivilegeValue(NULL, // lookup privilege on local system
lpszPrivilege, // privilege to lookup
&luid) ) // receives LUID of privilege
{
printf("LookupPrivilegeValue error: %u\n", GetLastError() );
return FALSE;
}
tp.PrivilegeCount = 1;
tp.Privileges[0].Luid = luid;
if( bEnablePrivilege )
tp.Privileges[0].Attributes = SE_PRIVILEGE_ENABLED;
else
tp.Privileges[0].Attributes = 0;
// Enable the privilege or disable all privileges.
if( !AdjustTokenPrivileges(hToken,
FALSE,
&tp,
sizeof(TOKEN_PRIVILEGES),
(PTOKEN_PRIVILEGES) NULL,
(PDWORD) NULL) )
{
printf("AdjustTokenPrivileges error: %u\n", GetLastError() );
return FALSE;
}
if( GetLastError() == ERROR_NOT_ALL_ASSIGNED )
{
printf("The token does not have the specified privilege. \n");
return FALSE;
}
return TRUE;
}
//注入函数,使用这个函数向新建的子进程注入stealth2.dll
BOOL InjectDll2(HANDLE hProcess, LPCTSTR szDllName)
{
HANDLE hThread;
LPVOID pRemoteBuf;
DWORD dwBufSize = (DWORD)(_tcslen(szDllName) + 1) * sizeof(TCHAR);
FARPROC pThreadProc;
pRemoteBuf = VirtualAllocEx(hProcess, NULL, dwBufSize,
MEM_COMMIT, PAGE_READWRITE);
if( pRemoteBuf == NULL )
return FALSE;
WriteProcessMemory(hProcess, pRemoteBuf, (LPVOID)szDllName,
dwBufSize, NULL);
pThreadProc = GetProcAddress(GetModuleHandleA("kernel32.dll"),
"LoadLibraryW");
hThread = CreateRemoteThread(hProcess, NULL, 0,
(LPTHREAD_START_ROUTINE)pThreadProc,
pRemoteBuf, 0, NULL);
WaitForSingleObject(hThread, INFINITE);
VirtualFreeEx(hProcess, pRemoteBuf, 0, MEM_RELEASE);
CloseHandle(hThread);
return TRUE;
}
//创建新的ZwQuerySystemInformation函数
NTSTATUS WINAPI NewZwQuerySystemInformation(
SYSTEM_INFORMATION_CLASS SystemInformationClass,
PVOID SystemInformation,
ULONG SystemInformationLength,
PULONG ReturnLength)
{
NTSTATUS status;
FARPROC pFunc;
PSYSTEM_PROCESS_INFORMATION pCur, pPrev;
char szProcName[MAX_PATH] = {0,};
//调用原始API前先脱钩
unhook_by_code("ntdll.dll", "ZwQuerySystemInformation", g_pOrgZwQSI);
//获取模块ntdll的函数ZwQuerySystemInformation的地址
pFunc = GetProcAddress(GetModuleHandleA("ntdll.dll"),
"ZwQuerySystemInformation");
//通过指针调用ZwQuerySystemInformation返回进程信息链表的首地址到SystemInformation。
status = ((PFZWQUERYSYSTEMINFORMATION)pFunc)
(SystemInformationClass, SystemInformation,
SystemInformationLength, ReturnLength);
//获取失败则退出
if( status != STATUS_SUCCESS )
goto __NTQUERYSYSTEMINFORMATION_END;
//当调用获取到的是进程信息时(SystemInformationClass这个参数可以是进程信息类,也可以是其他,具体的取MSDN上查询)
if( SystemInformationClass == SystemProcessInformation )
{
pCur = (PSYSTEM_PROCESS_INFORMATION)SystemInformation;
while(TRUE)
{
if(pCur->Reserved2[1] != NULL)
{
//找到notePad.exe后操作链表将其删除,这样就达到了隐藏的目的
if(!_tcsicmp((PWSTR)pCur->Reserved2[1], STR_HIDE_PROCESS_NAME))
{
if(pCur->NextEntryOffset == 0)
pPrev->NextEntryOffset = 0;
else
pPrev->NextEntryOffset += pCur->NextEntryOffset;
}
else
pPrev = pCur;
}
if(pCur->NextEntryOffset == 0)
break;
//让指针指向下一项
pCur = (PSYSTEM_PROCESS_INFORMATION)((ULONG)pCur + pCur->NextEntryOffset);
}
}
__NTQUERYSYSTEMINFORMATION_END:
//退出之前先钩取,为下次循环做准备
hook_by_code("ntdll.dll", "ZwQuerySystemInformation",
(PROC)NewZwQuerySystemInformation, g_pOrgZwQSI);
return status;
}
//新建的CreateProcessA函数
BOOL WINAPI NewCreateProcessA(
LPCTSTR lpApplicationName,
LPTSTR lpCommandLine,
LPSECURITY_ATTRIBUTES lpProcessAttributes,
LPSECURITY_ATTRIBUTES lpThreadAttributes,
BOOL bInheritHandles,
DWORD dwCreationFlags,
LPVOID lpEnvironment,
LPCTSTR lpCurrentDirectory,
LPSTARTUPINFO lpStartupInfo,
LPPROCESS_INFORMATION lpProcessInformation
)
{
BOOL bRet;
//FARPROC是一个指向far过程的指针JMP跳转至指定far过程用得着
FARPROC pFunc;
// 调用原始API之前先脱钩unhook
unhook_by_code("kernel32.dll", "CreateProcessA", g_pOrgCPA);
// 调用原始的API
pFunc = GetProcAddress(GetModuleHandleA("kernel32.dll"), "CreateProcessA");
bRet = ((PFCREATEPROCESSA)pFunc)(lpApplicationName,
lpCommandLine,
lpProcessAttributes,
lpThreadAttributes,
bInheritHandles,
dwCreationFlags,
lpEnvironment,
lpCurrentDirectory,
lpStartupInfo,
lpProcessInformation);
// 向生成的子进程注入stealth32.dll
if( bRet )
InjectDll2(lpProcessInformation->hProcess, STR_MODULE_NAME);
// 功能完成之后再次钩取APIhook,为下次循环做准备
hook_by_code("kernel32.dll", "CreateProcessA",
(PROC)NewCreateProcessA, g_pOrgCPA);
return bRet;
}
//新建的NewCreateProcessW函数
BOOL WINAPI NewCreateProcessW(
LPCTSTR lpApplicationName,
LPTSTR lpCommandLine,
LPSECURITY_ATTRIBUTES lpProcessAttributes,
LPSECURITY_ATTRIBUTES lpThreadAttributes,
BOOL bInheritHandles,
DWORD dwCreationFlags,
LPVOID lpEnvironment,
LPCTSTR lpCurrentDirectory,
LPSTARTUPINFO lpStartupInfo,
LPPROCESS_INFORMATION lpProcessInformation
)
{
BOOL bRet;
FARPROC pFunc;
//// 调用原始API之前先脱钩unhook
unhook_by_code("kernel32.dll", "CreateProcessW", g_pOrgCPW);
//调用原来的API
pFunc = GetProcAddress(GetModuleHandleA("kernel32.dll"), "CreateProcessW");
bRet = ((PFCREATEPROCESSW)pFunc)(lpApplicationName,
lpCommandLine,
lpProcessAttributes,
lpThreadAttributes,
bInheritHandles,
dwCreationFlags,
lpEnvironment,
lpCurrentDirectory,
lpStartupInfo,
lpProcessInformation);
// 向新生成的子进程注入stealth2.dll
if( bRet )
InjectDll2(lpProcessInformation->hProcess, STR_MODULE_NAME);
// 再次钩取API,为下次循环做准备
hook_by_code("kernel32.dll", "CreateProcessW",
(PROC)NewCreateProcessW, g_pOrgCPW);
return bRet;
}
BOOL WINAPI DllMain(HINSTANCE hinstDLL, DWORD fdwReason, LPVOID lpvReserved)
{
char szCurProc[MAX_PATH] = {0,};
char *p = NULL;
// 异常处理是注入不会发生在HideProc2.exe进程
GetModuleFileNameA(NULL, szCurProc, MAX_PATH);
p = strrchr(szCurProc, '\\');
if( (p != NULL) && !_stricmp(p+1, "HideProc2.exe") )
return TRUE;
// 提权
SetPrivilege(SE_DEBUG_NAME, TRUE);
switch( fdwReason )
{
case DLL_PROCESS_ATTACH :
// DLL载入后钩取三个API
hook_by_code("kernel32.dll", "CreateProcessA",
(PROC)NewCreateProcessA, g_pOrgCPA);
hook_by_code("kernel32.dll", "CreateProcessW",
(PROC)NewCreateProcessW, g_pOrgCPW);
hook_by_code("ntdll.dll", "ZwQuerySystemInformation",
(PROC)NewZwQuerySystemInformation, g_pOrgZwQSI);
break;
case DLL_PROCESS_DETACH :
// DLL卸载后对三个API脱钩
unhook_by_code("kernel32.dll", "CreateProcessA",
g_pOrgCPA);
unhook_by_code("kernel32.dll", "CreateProcessW",
g_pOrgCPW);
unhook_by_code("ntdll.dll", "ZwQuerySystemInformation",
g_pOrgZwQSI);
break;
}
return TRUE;
}
这里要注意的的是ZwQuerySystemInformation()API采用的是五字补丁法,故在新建的函数NewZwQuerySystemInformation()要先脱钩,至于原因,后面会讲到。而CreateProcessA()API函数以及CreateProcessW()API函数采用的是七字补丁法,所以我们在新函数调用NewCreateProcessA()以及NewCreateProcessW()调用原始API时不用脱钩就可以使用了。
0x02 七字补丁法的的缺点
相对于五字补丁法,七字补丁似乎完胜,即比它简单容易理解,还会减轻系统负担。但是事情往往没有那么简单。事实上五字补丁法几乎是万能的,只要找到API就可以进行钩取,而七字补丁法却不行。原因就在于很多API,特别是底层的API,比如ntdll中的API往往不能满足七字补丁法的使用条件,原因就是这些底层的API很短,没有足够的七个无用字节供你修改。比如前面的那个ZwQuerySystemInformation()API函数。所以使用七字补丁法前要确认API函数前面是否还有足够的空间。
通过注入DLL后使用热补丁钩取API的更多相关文章
- 通过注入DLL修改API代码实现钩取(一)
通过注入DLL修改API代码实现钩取(一) Ox00 大致思路 通过CreateRemoteThread函数开辟新线程,并将DLL注入进去 通过GetProcessAddress函数找到需钩取的API ...
- 【腾讯bugly干货分享】微信Android热补丁实践演进之路
本文来自于腾讯bugly开发者社区,非经作者同意,请勿转载,原文地址:http://bugly.qq.com/bbs/forum.php?mod=viewthread&tid=1264& ...
- 微信Android热补丁实践演进之路
版权声明:本文由张绍文原创文章,转载请注明出处: 文章原文链接:https://www.qcloud.com/community/article/81 来源:腾云阁 https://www.qclou ...
- 高级全局API钩取 - IE连接控制
@author: dlive @date: 2017/02/14 0x01 调试IE进程 常见网络连接库:ws2_32.dll(套接字),wininet.dll,winhttp.dll 使用Proce ...
- 《逆向工程核心原理》Windows消息钩取
DLL注入--使用SetWindowsHookEx函数实现消息钩取 MSDN: SetWindowsHookEx Function The SetWindowsHookEx function inst ...
- DLL注入之windows消息钩取
DLL注入之windows消息钩取 0x00 通过Windows消息的钩取 通过Windows消息钩取可以使用SetWindowsHookEx.该函数的原型如下: SetWindowsHookEx( ...
- 【腾讯Bugly干货分享】QFix探索之路—手Q热补丁轻量级方案
本文来自于腾讯bugly开发者社区,非经作者同意,请勿转载,原文地址:http://dev.qq.com/topic/57ff5832bb8fec206ce2185d 导语 QFix 是手Q团队近期推 ...
- Windows x86/ x64 Ring3层注入Dll总结
欢迎转载,转载请注明出处:http://www.cnblogs.com/uAreKongqi/p/6012353.html 0x00.前言 提到Dll的注入,立马能够想到的方法就有很多,比如利用远程线 ...
- Android 热补丁动态修复框架小结
一.概述 最新github上开源了很多热补丁动态修复框架,大致有: https://github.com/dodola/HotFix https://github.com/jasonross/Nuwa ...
随机推荐
- mysql数据库-mysql数据定义语言DDL (Data Definition Language)归类(六)
0x01 创建数据库并指定字符集和排序规则 -- 三种实例写法 create database temptab2 character set utf8 collate utf8_general_ci; ...
- SpringCloud多数据源实现
1.枚举多数据源-定义一一对应变量 /** * * 列出所有的数据源key(常用数据库名称来命名) * 注意: * 1)这里数据源与数据库是一对一的 * 2)DatabaseType中的变量名称就是数 ...
- CSS3弹性布局内容对齐(justify-content)属性使用详解
内容对齐(justify-content)属性应用在弹性容器上,把弹性项沿着弹性容器的主轴线(main axis)对齐. 该操作发生在弹性长度以及自动边距被确定后. 它用来在存在剩余空间时如何加以分配 ...
- 今天抠图,Python实现一键换底片!想换什么换什么(附源码)
前言 本文的文字及图片来源于网络,仅供学习.交流使用,不具有任何商业用途,版权归原作者所有,如有问题请及时联系我们以作处理. 生活中我们会拍很多的证件照,有的要求红底,有的是白底,有的是蓝底,今天不通 ...
- 用了那么多年的 Master 分支或因种族歧视而成为历史?
最近真的是活久见了...不知道你是否也有碰到之前Fork过的国外开源项目,最近突然崩了,原因居然是好多项目都把master分支改为了main分支!更可怕的是修改原因居然是涉及种族歧视.用了那么多年的m ...
- c++ UDP套接字客服端代码示范
c++ UDP套接字客服端代码示范 #include<winsock2.h> //包含头文件 #include<stdio.h> #include<windows.h&g ...
- 学习 SQL Server (5) :视图,索引,事务和锁+T_SQL
--=============== 视图的创建 =================. --create view 视图名 as 查询语句--注意:视图查询中的字段不能重名-- 视图中的数据是‘假数据’ ...
- python django 批量上传文件并绑定对应文件的描述
- Nginx具体配置(三)
一:Nginx配置实例 - 反向代理 实例一: 1.1:实现效果 在Windows浏览器地址栏中输入www.123.com,跳转到Linux系统中的tomcat主页面 访问Nginx:192.168. ...
- Java基本数据类型和包装类
一:八大基本类型 二:基本数据类型及包装类 三:基本类型和包装类的区别 1:定义不同.封装类是对象:基本类型不是. 2:使用方式不同.包装类需要先new初始化,再通过JVM根据具体情况实例化后赋值:基 ...