mysql数据库----Pymysql
本节重点:
pymysql下载和使用
sql注入
增、删、改:conn.commit()
查:fetchone、fetchmany、fetchall
一、pymysql的下载和使用
之前我们都是通过MySQL自带的命令行客户端工具mysql来操作数据库,那如何在python程序中操作数据库呢?这就用到了pymysql模块,该模块本质就是一个套接字客户端软件,使用前需要事先安装。
(1)pymysql模块的下载
pip3 install pymysql
下载好后在pycharm内设置setting  加入环境
(2)pymysql的使用
数据库和数据都已存在

# 实现:使用Python实现用户登录,如果用户存在则登录成功(假设该用户已在数据库中)

import pymysql

user = input('请输入用户名:')

pwd = input('请输入密码:')

# .连接

conn = pymysql.connect(host='127.0.0.1',
   port=,
   user='root',
   password='',
   db='db8',
     charset='utf8'

)

# .创建游标

cursor = conn.cursor()

#注意%s需要加引号

sql = "select * from userinfo where username='%s' and pwd='%s'" %(user, pwd)

print(sql)

# .执行sql语句

cursor.execute(sql)

result=cursor.execute(sql) #执行sql语句,返回sql查询成功的记录数目

print(result)

# 关闭连接,游标和连接都要关闭

cursor.close()

conn.close()

if result:

    print('登陆成功')

else:

    print('登录失败')
二、execute()之sql注入
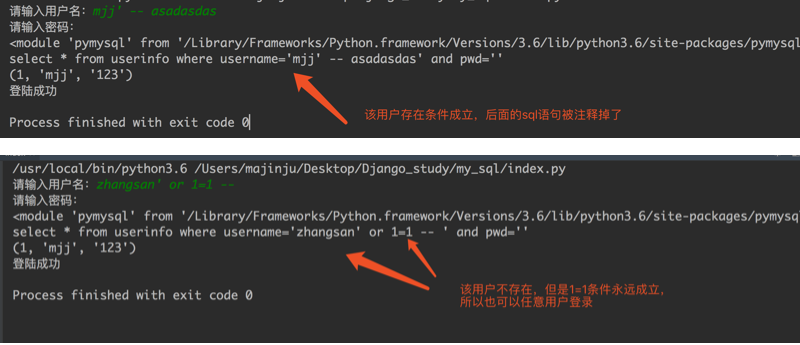
最后那一个空格,在一条sql语句中如果遇到select * from userinfo where username='mjj' -- asadasdas' and pwd='' 则--之后的条件被注释掉了(注意--后面还有一个空格)

#、sql注入之:用户存在,绕过密码

mjj' -- 任意字符

#、sql注入之:用户不存在,绕过用户与密码

xxx' or 1=1 -- 任意字符

解决方法;;;
# 原来是我们对sql进行字符串拼接

# sql="select * from userinfo where name='%s' and password='%s'" %(username,pwd)

# print(sql)

# result=cursor.execute(sql)


解决:

#改写为(execute帮我们做字符串拼接,我们无需且一定不能再为%s加引号了)

sql="select * from userinfo where name=%s and password=%s" #!!!注意%s需要去掉引号,因为pymysql会自动为我们加上

result=cursor.execute(sql,[user,pwd]) #pymysql模块自动帮我们解决sql注入的问题,只要我们按照pymysql的规矩来。
三、增、删、改:conn.commit()
commit()方法:在数据库里增、删、改的时候,必须要进行提交,否则插入的数据不生效。
username = input('请输入用户名:')

pwd = input('请输入密码:')

# .连接

conn = pymysql.connect(host='localhost', port=, user='root', password='', db='db8', charset='utf8')

# .创建游标

cursor = conn.cursor()

# 操作

# 增

# sql = "insert into userinfo(username,pwd) values (%s,%s)"

# effect_row = cursor.execute(sql,(username,pwd))

#同时插入多条数据

#cursor.executemany(sql,[('李四',''),('王五','')])

# print(effect_row)#

# 改

# sql = "update userinfo set username = %s  where id = 2"

# effect_row = cursor.execute(sql,username)

# print(effect_row)

# 删

sql = "delete from userinfo  where id = 2"

effect_row = cursor.execute(sql)

print(effect_row)

#一定记得commit

conn.commit()

# .关闭游标

cursor.close()

# .关闭连接

conn.close()
四、查:fetchone、fetchmany、fetchall
fetchone():获取下一行数据,第一次为首行;

fetchall():获取所有行数据源

fetchmany():获取4行数据
查看一下表内容:

mysql> select * from userinfo;

+----+----------+-----+

| id | username | pwd |

+----+----------+-----+

|  1 | mjj      | 123 |

|  3 | 张三     | 110 |

|  4 | 李四     | 119 |

+----+----------+-----+

3 rows in set (0.00 sec)

使用fetchone():

import pymysql

# 1.连接

conn = pymysql.connect(host='localhost', port=3306, user='root', password='', db='db8', charset='utf8')

# 2.创建游标

cursor = conn.cursor()

sql = 'select * from userinfo'

cursor.execute(sql)

# 查询第一行的数据

row = cursor.fetchone()

print(row) # (1, 'mjj', '123')

# 查询第二行数据

row = cursor.fetchone()

print(row) # (3, '张三', '110')

# 4.关闭游标

cursor.close()

# 5.关闭连接

conn.close()

使用fetchall():

import pymysql

# 1.连接

conn = pymysql.connect(host='localhost', port=3306, user='root', password='', db='db8', charset='utf8')

# 2.创建游标

cursor = conn.cursor()

sql = 'select * from userinfo'

cursor.execute(sql)

# 获取所有的数据

rows = cursor.fetchall()

print(rows)

# 4.关闭游标

cursor.close()

# 5.关闭连接

conn.close()

#运行结果

((1, 'mjj', '123'), (3, '张三', '110'), (4, '李四', '119'))

默认情况下,我们获取到的返回值是元组,只能看到每行的数据,却不知道每一列代表的是什么,这个时候可以使用以下方式来返回字典,每一行的数据都会生成一个字典:
cursor = conn.cursor(cursor=pymysql.cursors.DictCursor) #在实例化的时候,将属性cursor设置为pymysql.cursors.DictCursor
在fetchone示例中,在获取行数据的时候,可以理解开始的时候,有一个行指针指着第一行的上方,获取一行,它就向下移动一行,所以当行指针到最后一行的时候,就不能再获取到行的内容,所以我们可以使用如下方法来移动行指针:
cursor.scroll(1,mode='relative')  # 相对当前位置移动

cursor.scroll(2,mode='absolute') # 相对绝对位置移动

第一个值为移动的行数,整数为向下移动,负数为向上移动,mode指定了是相对当前位置移动,还是相对于首行移动
# .Python实现用户登录

# .Mysql保存数据

import pymysql

# .连接

conn = pymysql.connect(host='localhost', port=, user='root', password='', db='db8', charset='utf8')

# .创建游标

cursor = conn.cursor(cursor=pymysql.cursors.DictCursor)

sql = 'select * from userinfo'

cursor.execute(sql)

# 查询第一行的数据

row = cursor.fetchone()

print(row) # (, 'mjj', '')

# 查询第二行数据

row = cursor.fetchone() # (, '张三', '')

print(row)

cursor.scroll(-,mode='relative') #设置之后,光标相对于当前位置往前移动了一行,所以打印的结果为第二行的数据

row = cursor.fetchone()

print(row)

cursor.scroll(,mode='absolute') #设置之后,光标相对于首行没有任何变化,所以打印的结果为第一行数据

row = cursor.fetchone()

print(row)

# .关闭游标

cursor.close()

# .关闭连接

conn.close()

#结果如下

{'id': , 'username': 'mjj', 'pwd': ''}

{'id': , 'username': '张三', 'pwd': ''}

{'id': , 'username': '张三', 'pwd': ''}

{'id': , 'username': 'mjj', 'pwd': ''}
fetchall()

import pymysql

# .连接

conn = pymysql.connect(host='localhost', port=, user='root', password='', db='db8', charset='utf8')

# .创建游标

cursor = conn.cursor(cursor=pymysql.cursors.DictCursor)

sql = 'select * from userinfo'

cursor.execute(sql)

# 获取2条数据

rows = cursor.fetchmany()

print(rows)

# .关闭游标

# rows = cursor.fetchall()

# print(rows)

cursor.close()

# .关闭连接

conn.close()

#结果如下:

[{'id': , 'username': 'mjj', 'pwd': ''}, {'id': , 'username': '张三', 'pwd': ''}]
mysql数据库----Pymysql的更多相关文章
- 第二百七十九节,MySQL数据库-pymysql模块操作数据库
MySQL数据库-pymysql模块操作数据库 pymysql模块是python操作数据库的一个模块 connect()创建数据库链接,参数是连接数据库需要的连接参数使用方式: 模块名称.connec ...
- Django2.2使用mysql数据库pymysql版本不匹配问题的解决过程与总结
前置条件 django版本:2.2.1 python版本:3.6.6 mysql版本:mysql-community8.0.15 问题 在搭建django项目,配置mysql数据库时遇到无法迁移数据库 ...
- MySQL数据库-pymysql模块操作数据库
pymysql模块是python操作数据库的一个模块 connect()创建数据库链接,参数是连接数据库需要的连接参数使用方式: 模块名称.connect() 参数: host=数据库ip port= ...
- Python连接MySQL数据库(pymysql的使用)
本文Python版本3.5.3,mysq版本5.7.23 基本使用 # 导入pymysql模块 import pymysql #连接数据库 conn = pymysql.connect( databa ...
- 使用python连接mysql数据库——pymysql模块的使用
安装pymysql pip install pymysql 使用pymysql 使用数据查询语句 查询一条数据fetchone() from pymysql import * conn = conne ...
- python3.4怎么连接mysql pymysql连接mysql数据库
本文介绍了python3 4连接mysql数据库的方法,在python3 4中使用原来python2 7的mysqldb已不能连接mysql数据库了,可以使用pymysql. 在python3.4 ...
- python专题-Mysql数据库(python3._+ PyMysql)
之前写过一篇 Python使用MySQL数据库的博客,主要使用的是Python2和MySQLdb驱动. python使用mysql数据库 Python2 ---> Python3 MySQLdb ...
- Python连接MySQL数据库之pymysql模块使用
安装PyMySQL pip install pymysql PyMySQL介绍 PyMySQL是在python3.x版本中用于连接MySQL服务器的一个库,2中则使用mysqldb. Django中也 ...
- pymysql 使用twisted异步插入数据库:基于crawlspider爬取内容保存到本地mysql数据库
本文的前提是实现了整站内容的抓取,然后把抓取的内容保存到数据库. 可以参考另一篇已经实现整站抓取的文章:Scrapy 使用CrawlSpider整站抓取文章内容实现 本文也是基于这篇文章代码基础上实现 ...
随机推荐
- 【luogu P3375 KMP字符串匹配】 模板
题目链接:https://www.luogu.org/problemnew/show/P3375 精华:在每次失配后不从头匹配而是尝试找一个新的开始并且是新开始的位置最长的相同前缀和后缀. 实际上KM ...
- 用java语言编写的简单二叉树
package com.cjonline.foundation.evisa; public class TestTree { private int data=-1; private TestTree ...
- lucene&solr学习——分词器
下图是语汇单元的生成过程: 从一个Reader字符流开始,创建基于Reader的Tokenizer分词器,经过三个TokenFilter生成语汇单元Tokens. 要看分词器的分析效果,只需要看Tok ...
- .NET 小程序 wx.getUserInfo(OBJECT) 解密 encryptedData 来获取UnionId
在小程序中通过 wx.getUserInfo 获取用户信息,而UnionId 只有关主了公众号才会返回,不关注公众号想获取UnionId则需要我们从返回的 encryptedData 中解码从而获取U ...
- MVC5 模型 生成EF
在看本篇之前请先去了解一下EF以及如何利用模型生成数据库 https://i.cnblogs.com/posts?categoryid=1107227 看Code First就可以了. 等你了解了E ...
- AngularJS 控制器属性
<!DOCTYPE html><html><head><meta http-equiv="Content-Type" content=&q ...
- 使用两个嵌套的for循坏探测2-100的所有素数
只能被1和本身整除的整数才叫做素数 public class prime { public static void main(String[] args) { ; i <= ; i++) { ; ...
- SpringBoot非官方教程 | 第十四篇:在springboot中用redis实现消息队列
转载请标明出处: 原文首发于:https://www.fangzhipeng.com/springboot/2017/07/11/springboot14-redis-mq/ 本文出自方志朋的博客 这 ...
- IP检验字段为啥只检验地址部分
在首部中的错误比在数据中的错误更重 如:一个错误的地址可能导致分组被投递到错误的主机.许多主机并不检查投递给它们的分组是否 确定是要投递给它们,它们假定网络从来不会把别人的分组包传递给自己.数据不参加 ...
- iOS Xcode 小技巧,提升理解查询能力,Command + 点击鼠标右键 Jump to Definition等
前言: 介绍下Xcode 小技巧,以及一下快捷键,让你调试程序更加出类拔萃,安排! Command + 点击鼠标右键 Jump to Definition,可能你平时也在用,但是你明白全部的用法吗,试 ...
