源码分析--HashMap(JDK1.8)
在JDK1.8中对HashMap的底层实现做了修改。本篇对HashMap源码从核心成员变量到常用方法进行分析。
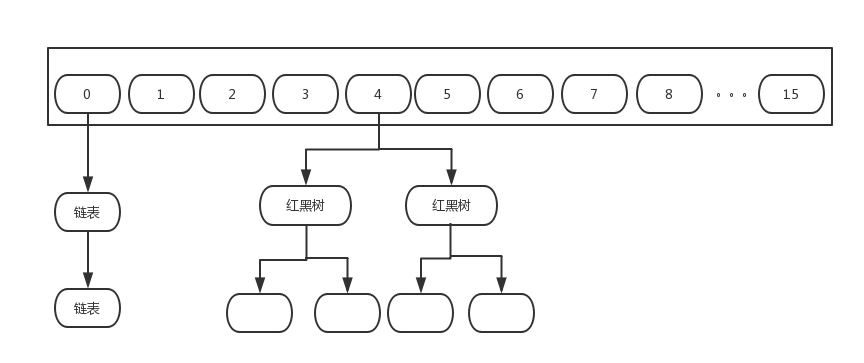
HashMap数据结构如下:
先看成员变量:
1、底层存放数据的是Node<K,V>[]数组,数组初始化大小为16。
/**

     * The default initial capacity - MUST be a power of two.

     */

    static final int DEFAULT_INITIAL_CAPACITY = 1 << 4; // aka 16
2、Node<K,V>[]数组最大容量
/**

     * The maximum capacity, used if a higher value is implicitly specified

     * by either of the constructors with arguments.

     * MUST be a power of two <= 1<<30.

     */

    static final int MAXIMUM_CAPACITY = 1 << 30;
3、负载因子0.75。也就是如果默认初始化,HashMap在size = 16*0.75 = 12时,进行扩容。
/**

     * The load factor used when none specified in constructor.

     */

    static final float DEFAULT_LOAD_FACTOR = 0.75f;
4、将链表转化为红黑数的阀值。
 /**

     * The bin count threshold for using a tree rather than list for a

     * bin.  Bins are converted to trees when adding an element to a

     * bin with at least this many nodes. The value must be greater

     * than 2 and should be at least 8 to mesh with assumptions in

     * tree removal about conversion back to plain bins upon

     * shrinkage.

     */

    static final int TREEIFY_THRESHOLD = 8;
5、红黑树节点转换为链表的阀值
/**

     * The bin count threshold for untreeifying a (split) bin during a

     * resize operation. Should be less than TREEIFY_THRESHOLD, and at

     * most 6 to mesh with shrinkage detection under removal.

     */

    static final int UNTREEIFY_THRESHOLD = 6;
6、转红黑树时,table的最小长度
/**

     * The smallest table capacity for which bins may be treeified.

     * (Otherwise the table is resized if too many nodes in a bin.)

     * Should be at least 4 * TREEIFY_THRESHOLD to avoid conflicts

     * between resizing and treeification thresholds.

     */

    static final int MIN_TREEIFY_CAPACITY = 64;
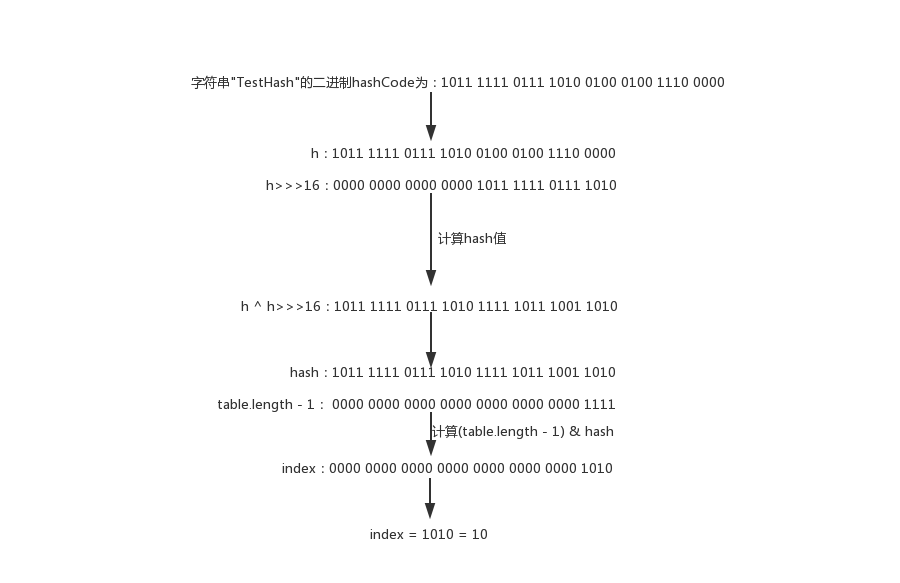
介绍一下HashMap用hash值定位数组index的过程:
//HahsMap中的静态方法
static final int hash(Object key) {

        int h;

        return (key == null) ?  : (h = key.hashCode()) ^ (h >>> );

    }

//定位计算
int index = (table.length - 1) & hash
- 先得到key的hashCode值
- 再将hashCode值与hashCode无符号右移16位的值进行按位异或运算。得到hash值
- 将(table.length - 1) 与 hash值进行与运算。定位数组index
给一个长度为16的数组,以"TestHash"为key,进行定位的过程实例:
HashMap中Node就是放入的数据节点,代码定义为:
  static class Node<K,V> implements Map.Entry<K,V> {

        final int hash;

        final K key;

        V value;

        Node<K,V> next;

}
Node节点保存key的hash值和K--V,借助next可实现链表。
红黑树封装为TreeNode节点:
static final class TreeNode<K,V> extends LinkedHashMap.Entry<K,V> {

        TreeNode<K,V> parent;  // red-black tree links

        TreeNode<K,V> left;

        TreeNode<K,V> right;

        TreeNode<K,V> prev;    // needed to unlink next upon deletion

        boolean red;

        TreeNode(int hash, K key, V val, Node<K,V> next) {

            super(hash, key, val, next);

        }
介绍get()方法:
final Node<K,V> getNode(int hash, Object key) {

        Node<K,V>[] tab; Node<K,V> first, e; int n; K k;

        if ((tab = table) != null && (n = tab.length) >  &&

            (first = tab[(n - ) & hash]) != null) {

            if (first.hash == hash && // always check first node

                ((k = first.key) == key || (key != null && key.equals(k))))

                return first;

            if ((e = first.next) != null) {

                if (first instanceof TreeNode)

                    return ((TreeNode<K,V>)first).getTreeNode(hash, key);

                do {

                    if (e.hash == hash &&

                        ((k = e.key) == key || (key != null && key.equals(k))))

                        return e;

                } while ((e = e.next) != null);

            }

        }

        return null;

    }
- index定位,得到该索引上的Node节点,赋值给first
- 对first节点进行判断,如果是要找的元素,直接返回
- first节点的next不为空,继续找
- 如果first节点是红黑树,调用getTreeNode()获取值。
- 不是红黑树,只能是链表。从头遍历,找到就返回。
上面对于红黑树取值的getTreeNode()方法,看一下红黑树的遍历做法:
final TreeNode<K,V> find(int h, Object k, Class<?> kc) {

            TreeNode<K,V> p = this;

            do {

                int ph, dir; K pk;

                TreeNode<K,V> pl = p.left, pr = p.right, q;

                if ((ph = p.hash) > h)

                    p = pl;

                else if (ph < h)

                    p = pr;

                else if ((pk = p.key) == k || (k != null && k.equals(pk)))

                    return p;

                else if (pl == null)

                    p = pr;

                else if (pr == null)

                    p = pl;

                else if ((kc != null ||

                          (kc = comparableClassFor(k)) != null) &&

                         (dir = compareComparables(kc, k, pk)) != )

                    p = (dir < ) ? pl : pr;

                else if ((q = pr.find(h, k, kc)) != null)

                    return q;

                else

                    p = pl;

            } while (p != null);

            return null;

        }
- 从do-while循环里的第一个if开始。如果当前节点的hash比传入的hash大,往p节点的左边遍历
- 如果当前节点的hash比传入的hash小,往p节点的右边遍历
- 如果key值相同,就找到节点了。返回
- 左节点为空,转到右边遍历
- 右节点为空,转到左边
- 如果传入key实现了Comparable接口。就将传入key与p节点key进行比较,根据比较结果选择向左或向右遍历
- 没有实现接口,直接向右遍历,找到就返回
- 没找到,向左遍历
介绍put()方法:
final V putVal(int hash, K key, V value, boolean onlyIfAbsent,

                   boolean evict) {

        Node<K,V>[] tab; Node<K,V> p; int n, i;

        if ((tab = table) == null || (n = tab.length) == )

            n = (tab = resize()).length;

        if ((p = tab[i = (n - ) & hash]) == null)

            tab[i] = newNode(hash, key, value, null);

        else {

            Node<K,V> e; K k;

            if (p.hash == hash &&

                ((k = p.key) == key || (key != null && key.equals(k))))

                e = p;

            else if (p instanceof TreeNode)

                e = ((TreeNode<K,V>)p).putTreeVal(this, tab, hash, key, value);

            else {

                for (int binCount = ; ; ++binCount) {

                    if ((e = p.next) == null) {

                        p.next = newNode(hash, key, value, null);

                        if (binCount >= TREEIFY_THRESHOLD - ) // -1 for 1st

                            treeifyBin(tab, hash);

                        break;

                    }

                    if (e.hash == hash &&

                        ((k = e.key) == key || (key != null && key.equals(k))))

                        break;

                    p = e;

                }

            }

            if (e != null) { // existing mapping for key

                V oldValue = e.value;

                if (!onlyIfAbsent || oldValue == null)

                    e.value = value;

                afterNodeAccess(e);

                return oldValue;

            }

        }

        ++modCount;

        if (++size > threshold)

            resize();

        afterNodeInsertion(evict);

        return null;

    }
- table为null,初始化
- 定位到数组index,若该位置为空,直接放
- 如果该位置上不为空,且hash和key与传入的值相同,说明key重复,直接将该节点赋值给e,结束循环
- 如果该index上的节点是红黑树,调用putTreeVal()方法
- 不是红黑树,只能是链表,遍历整个链表
- 找到最后一个节点,在这个节点后面以k--v新增一个节点。
- 判断链表长度,binCount达到7,也就是长度达到8。转为红黑树。
- 遍历过程中,如果找到了相同key,就跳出循环。
- 如果e不为空,说明遍历结束后存在key重复的节点。做值覆盖
- 扩容判断
分析红黑树插入方法putTreeVal():
final TreeNode<K,V> putTreeVal(HashMap<K,V> map, Node<K,V>[] tab,

                                       int h, K k, V v) {

            Class<?> kc = null;

            boolean searched = false;

            TreeNode<K,V> root = (parent != null) ? root() : this;

            for (TreeNode<K,V> p = root;;) {

                int dir, ph; K pk;

                if ((ph = p.hash) > h)

                    dir = -;

                else if (ph < h)

                    dir = ;

                else if ((pk = p.key) == k || (k != null && k.equals(pk)))

                    return p;

                else if ((kc == null &&

                          (kc = comparableClassFor(k)) == null) ||

                         (dir = compareComparables(kc, k, pk)) == ) {

                    if (!searched) {

                        TreeNode<K,V> q, ch;

                        searched = true;

                        if (((ch = p.left) != null &&

                             (q = ch.find(h, k, kc)) != null) ||

                            ((ch = p.right) != null &&

                             (q = ch.find(h, k, kc)) != null))

                            return q;

                    }

                    dir = tieBreakOrder(k, pk);

                }

                TreeNode<K,V> xp = p;

                if ((p = (dir <= ) ? p.left : p.right) == null) {

                    Node<K,V> xpn = xp.next;

                    TreeNode<K,V> x = map.newTreeNode(h, k, v, xpn);

                    if (dir <= )

                        xp.left = x;

                    else

                        xp.right = x;

                    xp.next = x;

                    x.parent = x.prev = xp;

                    if (xpn != null)

                        ((TreeNode<K,V>)xpn).prev = x;

                    moveRootToFront(tab, balanceInsertion(root, x));

                    return null;

                }

            }

        }
- 查找root根节点
- 从root节点开始遍历
- 如果当前节点p的hash大于传入的hash值,记dir为-1,代表向左遍历。
- 小于,记1,代表向右遍历
- 如果key相同,直接返回
- 如果key所属的类实现Comparable接口,或者key相等。先从p的左节点、右节点分别调用find(),找到就返回。
- 没找到,比较p和传入的key值,结果记为dir
- 根据dir选择向左或向右遍历
- 依次遍历,直到为null,表示达到最后一个节点,插入新节点
- 调整位置
分析HashMap扩容方法:
final Node<K,V>[] resize() {

        Node<K,V>[] oldTab = table;

        int oldCap = (oldTab == null) ?  : oldTab.length;

        int oldThr = threshold;

        int newCap, newThr = ;

        if (oldCap > ) {

            if (oldCap >= MAXIMUM_CAPACITY) {

                threshold = Integer.MAX_VALUE;

                return oldTab;

            }

            else if ((newCap = oldCap << ) < MAXIMUM_CAPACITY &&

                     oldCap >= DEFAULT_INITIAL_CAPACITY)

                newThr = oldThr << ; // double threshold

        }

        else if (oldThr > ) // initial capacity was placed in threshold

            newCap = oldThr;

        else {               // zero initial threshold signifies using defaults

            newCap = DEFAULT_INITIAL_CAPACITY;

            newThr = (int)(DEFAULT_LOAD_FACTOR * DEFAULT_INITIAL_CAPACITY);

        }

        if (newThr == ) {

            float ft = (float)newCap * loadFactor;

            newThr = (newCap < MAXIMUM_CAPACITY && ft < (float)MAXIMUM_CAPACITY ?

                      (int)ft : Integer.MAX_VALUE);

        }

        threshold = newThr;

        @SuppressWarnings({"rawtypes","unchecked"})

            Node<K,V>[] newTab = (Node<K,V>[])new Node[newCap];

        table = newTab;

        if (oldTab != null) {

            for (int j = ; j < oldCap; ++j) {

                Node<K,V> e;

                if ((e = oldTab[j]) != null) {

                    oldTab[j] = null;

                    if (e.next == null)

                        newTab[e.hash & (newCap - )] = e;

                    else if (e instanceof TreeNode)

                        ((TreeNode<K,V>)e).split(this, newTab, j, oldCap);

                    else { // preserve order

                        Node<K,V> loHead = null, loTail = null;

                        Node<K,V> hiHead = null, hiTail = null;

                        Node<K,V> next;

                        do {

                            next = e.next;

                            if ((e.hash & oldCap) == ) {

                                if (loTail == null)

                                    loHead = e;

                                else

                                    loTail.next = e;

                                loTail = e;

                            }

                            else {

                                if (hiTail == null)

                                    hiHead = e;

                                else

                                    hiTail.next = e;

                                hiTail = e;

                            }

                        } while ((e = next) != null);

                        if (loTail != null) {

                            loTail.next = null;

                            newTab[j] = loHead;

                        }

                        if (hiTail != null) {

                            hiTail.next = null;

                            newTab[j + oldCap] = hiHead;

                        }

                    }

                }

            }

        }

        return newTab;

    }
- 通过一系列判断,确认新table的容量
- 构造一个新容量的Node数组,赋值给table
- 遍历旧table数组
- 如果节点是单节点,直接定位到新数组对应的index位置下
- 如果是红黑树,调用split方法
- 遍历链表。
- 如果e的hash值与老数组容量取与运算,值为0。索引位置不变
- 如果e的hash值与老数组容量取与运算,值为1。这在新数组中索引的位置为老数组索引 + 老数组容量。
- 链表放置
简要分析多线程下HashMap死循环问题:
JDK1.7HashMap扩容时,对于链表位置变化,采用头插法进行操作。多线程下容易形成环形链表,造成死循环。
JDK1.8时,会对于链表hash值与容量的计算结果。分成两部分,并改为插入到链表尾部。1.8以后不会再有死循环问题,只是有可能重复放置导致数据丢失。HashMap本身线程不安全的特性并没有改变。
源码分析--HashMap(JDK1.8)的更多相关文章
- HashMap 源码分析 基于jdk1.8分析
HashMap 源码分析 基于jdk1.8分析 1:数据结构: transient Node<K,V>[] table; //这里维护了一个 Node的数组结构: 下面看看Node的数 ...
- 【JDK】JDK源码分析-HashMap(2)
前文「JDK源码分析-HashMap(1)」分析了 HashMap 的内部结构和主要方法的实现原理.但是,面试中通常还会问到很多其他的问题,本文简要分析下常见的一些问题. 这里再贴一下 HashMap ...
- HashMap实现原理及源码分析(JDK1.7)
转载:https://www.cnblogs.com/chengxiao/p/6059914.html 哈希表(hash table)也叫散列表,是一种非常重要的数据结构,应用场景及其丰富,许多缓存技 ...
- JAVA源码分析-HashMap源码分析(二)
本文继续分析HashMap的源码.本文的重点是resize()方法和HashMap中其他的一些方法,希望各位提出宝贵的意见. 话不多说,咱们上源码. final Node<K,V>[] r ...
- 【JDK】JDK源码分析-HashMap(1)
概述 HashMap 是 Java 开发中最常用的容器类之一,也是面试的常客.它其实就是前文「数据结构与算法笔记(二)」中「散列表」的实现,处理散列冲突用的是“链表法”,并且在 JDK 1.8 做了优 ...
- LinkedList源码分析(jdk1.8)
LinkedList概述 LinkedList 是 Java 集合框架中一个重要的实现,我们先简述一下LinkedList的一些特点: LinkedList底层采用的双向链表结构: LinkedL ...
- CopyOnWriteArrayList 源码分析 基于jdk1.8
CopyOnWriteArrayList 源码分析: 1:成员属性: final transient ReentrantLock lock = new ReentrantLock(); //内部是 ...
- HashMap源码分析-基于JDK1.8
hashMap数据结构 类注释 HashMap的几个重要的字段 hash和tableSizeFor方法 HashMap的数据结构 由上图可知,HashMap的基本数据结构是数组和单向链表或红黑树. 以 ...
- jdk1.8源码分析-hashMap
在Java语言中使用的最多的数据结构大概右两种,第一种是数组,比如Array,ArrayList,第二种链表,比如ArrayLinkedList,基于数组的数据结构特点是查找速度很快,时间复杂度为 O ...
随机推荐
- DispatcherServlet的工作原理
下面是DispatcherServlet的工作原理图,图片来源于网络. 下面是我从DispatcherServlet源码层面来分析其工作流程: 1.请求到达后,调用HandlerMapping来查找对 ...
- windows 安装 mysql 5.6
从官方网站下载安装包:mysql-5.6.33-winx64.zip,解压到d:\java,然后将解压后的bin目录加入系统环境变量Path中,进入mysql根目录,编辑my-default.ini, ...
- Python---基础---常用的内置模块
一. print(math.pow(4,3)) # 4的三次方 #幂运算 函数返回浮点型,幂运算返回整形 print(4**3) #fabs() 对一个数值获取他的绝对值 返回的也 ...
- mycat操作mysql示例之分库
准备工作: 服务器192.168.96.12,centos7, jdk,mysql5.7,mycat1.6.x,navicat 搭建步骤: 1.在服务器192.168.96.12服务器上安装mysql ...
- 浅谈MySQL优化
本文整理了一些MySQL的通用优化方法,做个简单的总结分享,旨在帮助那些没有专职MySQL DBA的企业做好基本的优化工作,至于具体的SQL优化,大部分通过加适当的索引即可达到效果,更复杂的就需要具体 ...
- BZOJ 2286: [Sdoi2011]消耗战 虚树
Description 在一场战争中,战场由n个岛屿和n-1个桥梁组成,保证每两个岛屿间有且仅有一条路径可达.现在,我军已经侦查到敌军的总部在编号为1的岛屿,而且他们已经没有足够多的能源维系战斗,我军 ...
- 【Java】JSONObject学习
介绍 JSONObject只是一种数据结构,可以理解为JSON格式的数据结构(key-value 结构),可以使用put方法给json对象添加元素.JSONObject可以很方便的转换成字符串,也可以 ...
- C#:XML操作类
写的一个XML操作类,包括读取/插入/修改/删除. using System; using System.Data; using System.Configuration; using System. ...
- java 将数据库中的每一条数据取出放入数组或者List中
1.如何将数据库中数据按照行(即一整条数据)取出来,存入到数组当中? public static String str = null; // 将StringBuffer转化成字符串 public st ...
- vue2.0 之 douban (七)APP 打包
在打包之前需要修改一个地方,那就是config->index.js文件,修改assetsPublicPath: '/'为assetsPublicPath: './',截图如下 上面文件改好后,开 ...