linux系统安装Oracle11g详细步骤
快速安装指引
■Reviewing Information About This Guide
■Logging In to the System as root 以root用户登录系统
■Checking the Hardware Requirements 检查硬件需求
■Checking the Software Requirements 检查软件需求
■Creating Required Operating System Groups and Users创建用户和组
■Configuring Kernel Parameters 配置内核参数
■Creating Required Directories 创建所需目录
■Configuring the oracle User’s Environment 配置用户环境
■Mounting the Product Disc 装载安装盘
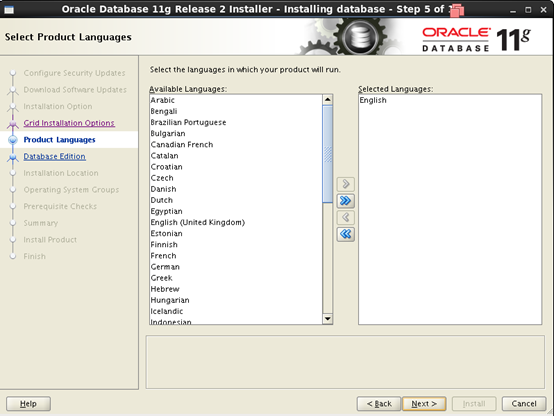
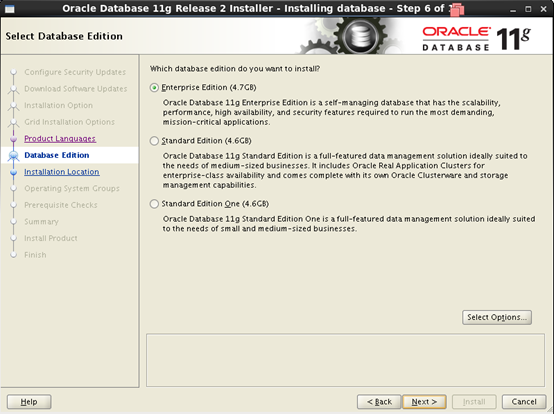
■Installing Oracle Database 安装数据库
■Installing Oracle Database Examples 安装数据库样例
■What to Do Next?
■Additional Information
■Documentation Accessibility
■Logging In to the System as root
[root@OCP Desktop]# xhost +
access control disabled, clients can connect from any host
配置IP 地址和主机名的映射
[root@OCP Desktop]# vi /etc/hosts
加入下面内容
本机IP(172.16.40.41) + OCP(别名) OCP.localdomain(主机名)
[root@OCP Desktop]# vi /etc/sysconfig/network
NETWORKING=yes
HOSTNAME=OCP.localdomain
■Checking the Hardware Requirements
检查硬件需求
|
RAM |
Swap Space |
|
Between 1 GB and 2 GB |
1.5 times the size of the RAM |
|
Between 2 GB and 16 GB |
Equal to the size of the RAM |
|
More than 16 GB |
16 GB |
[root@OCP Desktop]# grep MemTotal /proc/meminfo
MemTotal: 1541880 kB
[root@OCP Desktop]# uname -m
x86_64
[root@OCP Desktop]# grep SwapTotal /proc/meminfo
SwapTotal: 5119996 kB
[root@OCP Desktop]# free
total used free shared buffers cached
Mem: 1541880 485160 1056720 0 29140 180520
-/+ buffers/cache: 275500 1266380
Swap: 5119996 0 5119996
[root@OCP Desktop]# df -k /dev/shm/
Filesystem 1K-blocks Used Available Use% Mounted on
tmpfs 770940 76 770864 1% /dev/shm
[root@OCP Desktop]# df -h /tmp
Filesystem Size Used Avail Use% Mounted on
/dev/mapper/vg_ocp-LogVol01 57G 4.1G 50G 8% /
[root@OCP Desktop]# df -h
Filesystem Size Used Avail Use% Mounted on
/dev/mapper/vg_ocp-LogVol01 57G 4.1G 50G 8% /
tmpfs 753M 76K 753M 1% /dev/shm
/dev/sda1 477M 55M 397M 13% /boot
■Checking the Software Requirements
检查软件需求
[root@OCP Desktop]# cat /proc/version
Linux version 3.8.13-16.2.1.el6uek.x86_64 (mockbuild@ca-build44.us.oracle.com) (gcc version 4.4.7 20120313 (Red Hat 4.4.7-3) (GCC) ) #1 SMP Thu Nov 7 17:01:44 PST 2013
[root@OCP Desktop]# lsb_release -id
Distributor ID: OracleServer
Description: Oracle Linux Server release 6.5
[root@OCP Desktop]# uname -r
3.8.13-16.2.1.el6uek.x86_64
以下为oracle linux 6 64位必须安装的软件包
|
Oracle Linux 6 and Red Hat Enterprise Linux 6 |
The following packages (or later versions) must be installed: binutils-2.20.51.0.2-5.11.el6 (x86_64) compat-libcap1-1.10-1 (x86_64) compat-libstdc++-33-3.2.3-69.el6 (x86_64) compat-libstdc++-33-3.2.3-69.el6.i686 gcc-4.4.4-13.el6 (x86_64) gcc-c++-4.4.4-13.el6 (x86_64) glibc-2.12-1.7.el6 (i686) glibc-2.12-1.7.el6 (x86_64) glibc-devel-2.12-1.7.el6 (x86_64) glibc-devel-2.12-1.7.el6.i686 ksh libgcc-4.4.4-13.el6 (i686) libgcc-4.4.4-13.el6 (x86_64) libstdc++-4.4.4-13.el6 (x86_64) libstdc++-4.4.4-13.el6.i686 libstdc++-devel-4.4.4-13.el6 (x86_64) libstdc++-devel-4.4.4-13.el6.i686 libaio-0.3.107-10.el6 (x86_64) libaio-0.3.107-10.el6.i686 libaio-devel-0.3.107-10.el6 (x86_64) libaio-devel-0.3.107-10.el6.i686 make-3.81-19.el6 sysstat-9.0.4-11.el6 (x86_64) |
[root@OCP Desktop]# rpm -qa binutils* compat-lib* gcc* glibc* ksh* libgcc* libstdc* libaio* make* sysstat*
compat-libstdc++-296-2.96-144.el6.i686
compat-libtermcap-2.0.8-49.el6.x86_64
gcc-4.4.7-4.el6.x86_64
gcc-c++-4.4.7-4.el6.x86_64
glibc-headers-2.12-1.132.el6.x86_64
compat-libstdc++-33-3.2.3-69.el6.x86_64
compat-libgfortran-41-4.1.2-39.el6.x86_64
glibc-2.12-1.132.el6.i686
sysstat-9.0.4-22.el6.x86_64
libgcc-4.4.7-4.el6.x86_64
glibc-2.12-1.132.el6.x86_64
libstdc++-4.4.7-4.el6.x86_64
binutils-2.20.51.0.2-5.36.el6.x86_64
make-3.81-20.el6.x86_64
libstdc++-devel-4.4.7-4.el6.x86_64
glibc-devel-2.12-1.132.el6.x86_64
libaio-0.3.107-10.el6.x86_64
compat-libf2c-34-3.4.6-19.el6.x86_64
libgcc-4.4.7-4.el6.i686
gcc-gfortran-4.4.7-4.el6.x86_64
binutils-devel-2.20.51.0.2-5.36.el6.x86_64
compat-libcap1-1.10-1.x86_64
glibc-common-2.12-1.132.el6.x86_64
从显示结果来看,需要的包都已经安装好了。
如果没有安装我们可以搭建yum,利用yum快速安装。
[root@OCP Desktop]# vi /etc/yum.repos.d/server.repo
[server]
name=OCP
baseurl=file:///media/mycdrom/Server
enabled=1
gpgcheck=0
[root@OCP Desktop]# df -h
Filesystem Size Used Avail Use% Mounted on
/dev/mapper/vg_ocp-LogVol01 57G 4.1G 50G 8% /
tmpfs 753M 224K 753M 1% /dev/shm
/dev/sda1 477M 55M 397M 13% /boot
/dev/sr0 3.7G 3.7G 0 100% /media/OL6.5 x86_64 Disc 1 20131125
[root@OCP Desktop]# umount /dev/sr0
[root@OCP Desktop]# mount /dev/sr0 /media/mycdrom
mount: block device /dev/sr0 is write-protected, mounting read-only
[root@OCP yum.repos.d]# mv public-yum-ol6.repo public-yum-ol6.repo.bak修改yum默认打开的文件,不然它找不到server.repo
[root@OCP Desktop]#yum install -y binutils* compat-lib* gcc* glibc* ksh* libgcc* libstdc* libaio* make* sysstat*
最后执行上面的安装命令
■Creating Required Operating System Groups and Users
创建操作系统用户组和用户
[root@OCP Desktop]# grep oinstall /etc/group
[root@OCP Desktop]# more /etc/oraInst.loc
/etc/oraInst.loc: No such file or directory
[root@OCP Desktop]# /usr/sbin/groupadd oinstall
[root@OCP Desktop]# /usr/sbin/groupadd -g 502 dba
[root@OCP Desktop]# /usr/sbin/groupadd -g 503 oper
[root@OCP Desktop]# id oracle
id: oracle: No such user
[root@OCP Desktop]# /usr/sbin/useradd -u 502 -g oinstall -G dba,oper oracle
[root@OCP Desktop]# passwd oracle
Changing password for user oracle.
New password:
BAD PASSWORD: it is based on a dictionary word
BAD PASSWORD: is too simple
Retype new password:
passwd: all authentication tokens updated successfully.
■Configuring Kernel Parameters
配置内核参数
检查软硬限制
Check the soft and hard limits for the file descriptor setting
[root@OCP Desktop]# ulimit -Sn
1024
[root@OCP Desktop]# ulimit -Hn
4096
Check the soft and hard limits for the number of processes available to a user
[root@OCP Desktop]# ulimit -Su
11861
[root@OCP Desktop]# ulimit -Hu
11861
Check the soft limit for the stack setting
[root@OCP Desktop]# ulimit -Ss
8192
[root@OCP Desktop]# ulimit -Hs
Unlimited
设置oracle的软限制和硬限制
root@OCP Desktop]# vi /etc/security/limits.conf
加入下面内容
oracle soft nproc 2047
oracle hard nproc 16384
oracle soft nofile 1024
oracle hard nofile 65536
oracle soft stack 10240
设置内核参数
[root@OCP Desktop]# cat /etc/sysctl.conf|grep -v ^#|grep ^[^#]
net.ipv4.ip_forward = 0
net.ipv4.conf.default.rp_filter = 1
net.ipv4.conf.default.accept_source_route = 0
kernel.sysrq = 0
kernel.core_uses_pid = 1
net.ipv4.tcp_syncookies = 1
net.bridge.bridge-nf-call-ip6tables = 0
net.bridge.bridge-nf-call-iptables = 0
net.bridge.bridge-nf-call-arptables = 0
kernel.msgmnb = 65536
kernel.msgmax = 65536
kernel.shmmax = 68719476736
kernel.shmall = 4294967296
[root@OCP Desktop]# vi /etc/sysctl.conf
加入如下内容
fs.aio-max-nr = 1048576
fs.file-max = 6815744
kernel.shmall = 2097152
kernel.shmmax = 4294967295
kernel.shmmni = 4096
kernel.sem = 250 32000 100 128
net.ipv4.ip_local_port_range = 9000 65500
net.core.rmem_default = 262144
net.core.rmem_max = 4194304
net.core.wmem_default = 262144
net.core.wmem_max = 1048576
执行/sbin/sysctl –p使参数生效
■Creating Required Directories
创建所需目录
[root@OCP Desktop]# mkdir -p /u01/app/oracle
[root@OCP Desktop]# chown -R oracle:oinstall /u01/app
[root@OCP Desktop]# chmod -R 775 /u01/app/oracle
■Configuring the oracle User’s Environment
配置oracle用户环境
切换到oracle用户su – oracle
[root@OCP Desktop]# su - oracle
[oracle@OCP ~]$ vi /home/oracle/.bash_profile
加入下面内容
export ORACLE_SID=orcl
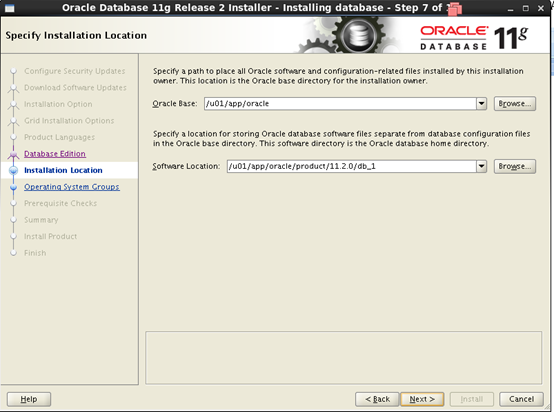
export ORACLE_BASE=/u01/app/oracle //ORACLE
export ORACLE_HOME=$ORACLE_BASE/product/11.2.0/db_1
export PATH=$PATH:$ORACLE_HOME/bin
export ORACLE_TERM=xterm
export LD_LIBRARY_PATH=$LD_LIBRARY_PATH:$ORACLE_HOME/lib
export CLASSPATH=$ORACLE_HOME/JRE:ORACLE_HOME/jlib:$ORACLE_HOME/rdbms/jlib
■Mounting the Product Disc
装载安装盘
到官网下载oracle软件包http://www.oracle.com/technetwork/indexes/downloads/index.html
本例用的是zip包。
p13390677_112040_Linux-x86-64_1of7.zip
p13390677_112040_Linux-x86-64_2of7.zip
把两个包粘贴到同一个文件夹下(本例在/u01/app/oracle),用unzip命令解压。
如unzip p13390677_112040_Linux-x86-64_1of7.zip
解压后cd database
执行安装
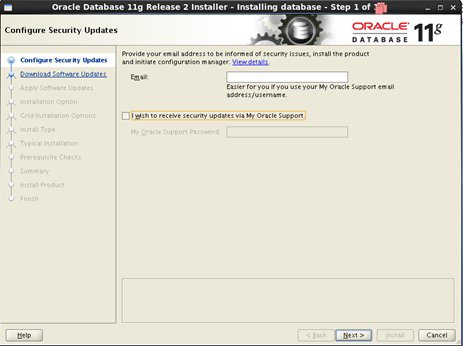
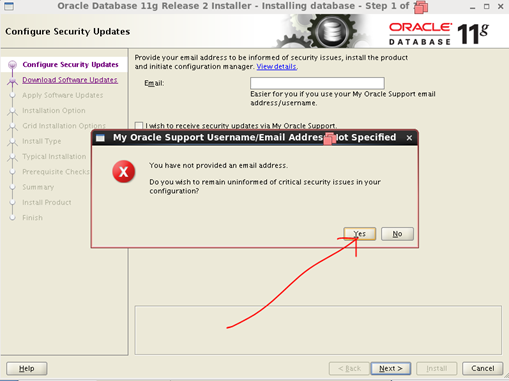
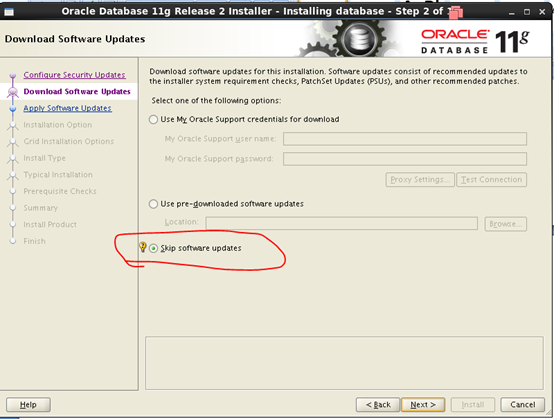
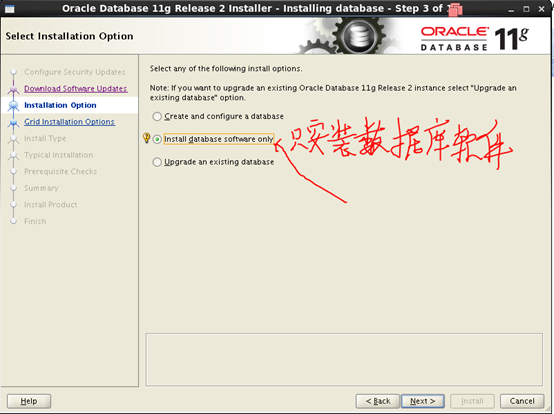
■Installing Oracle Database
安装oracle数据库
[oracle@OCP oracle]$ ll database
total 60
drwxr-xr-x. 4 oracle oinstall 4096 Aug 27 2013 install
-rw-r--r--. 1 oracle oinstall 30016 Aug 27 2013 readme.html
drwxr-xr-x. 2 oracle oinstall 4096 Aug 27 2013 response
drwxr-xr-x. 2 oracle oinstall 4096 Aug 27 2013 rpm
-rwxr-xr-x. 1 oracle oinstall 3267 Aug 27 2013 runInstaller
drwxr-xr-x. 2 oracle oinstall 4096 Aug 27 2013 sshsetup
drwxr-xr-x. 14 oracle oinstall 4096 Aug 27 2013 stage
-rw-r--r--. 1 oracle oinstall 500 Aug 27 2013 welcome.html
[oracle@OCP oracle]$ cd database
[oracle@OCP database]$ ls
install response runInstaller stage
readme.html rpm sshsetup welcome.html
[oracle@OCP database]$ xhost +
access control disabled, clients can connect from any host
[oracle@OCP database]$ ./runInstaller
Starting Oracle Universal Installer...
Checking Temp space: must be greater than 120 MB. Actual 43474 MB Passed
Checking swap space: must be greater than 150 MB. Actual 4999 MB Passed
Checking monitor: must be configured to display at least 256 colors. Actual 16777216 Passed
Preparing to launch Oracle Universal Installer from /tmp/OraInstall2015-07-24_04-41-31PM. Please wait ...


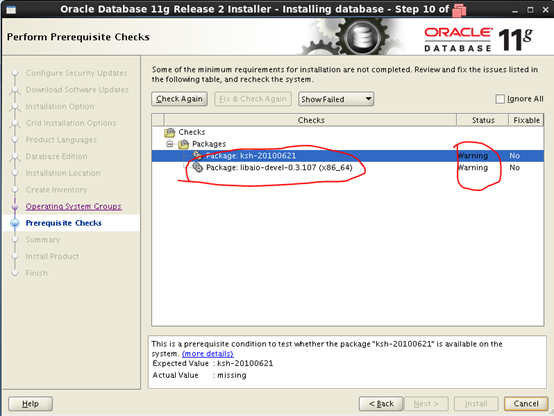
有两个包提示警告,我们到root用户下用rpm -qa 查看
发现这两个包没有装,我们用yum对这两个包进行安装。
[root@OCP Desktop]# yum install -y ksh* libaio-devel
Loaded plugins: refresh-packagekit, security
server | 3.7 kB 00:00 ...
server/primary_db | 3.0 MB 00:00 ...
Setting up Install Process
Resolving Dependencies
--> Running transaction check
---> Package ksh.x86_64 0:20120801-10.el6 will be installed
---> Package libaio-devel.x86_64 0:0.3.107-10.el6 will be installed
--> Finished Dependency Resolution
Dependencies Resolved
================================================================================
Package Arch Version Repository Size
================================================================================
Installing:
ksh x86_64 20120801-10.el6 server 755 k
libaio-devel x86_64 0.3.107-10.el6 server 13 k
Transaction Summary
================================================================================
Install 2 Package(s)
Total download size: 768 k
Installed size: 1.7 M
Downloading Packages:
--------------------------------------------------------------------------------
Total 4.0 MB/s | 768 kB 00:00
Running rpm_check_debug
Running Transaction Test
Transaction Test Succeeded
Running Transaction
Installing : libaio-devel-0.3.107-10.el6.x86_64 1/2
Installing : ksh-20120801-10.el6.x86_64 2/2
Verifying : ksh-20120801-10.el6.x86_64 1/2
Verifying : libaio-devel-0.3.107-10.el6.x86_64 2/2
Installed:
ksh.x86_64 0:20120801-10.el6 libaio-devel.x86_64 0:0.3.107-10.el6
Complete!
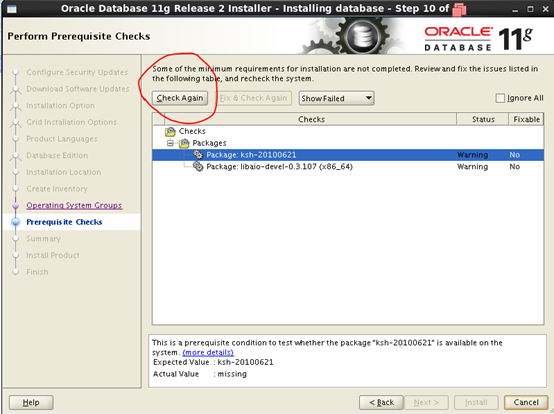
再次查看.显示装好。单击Check Again再次检查
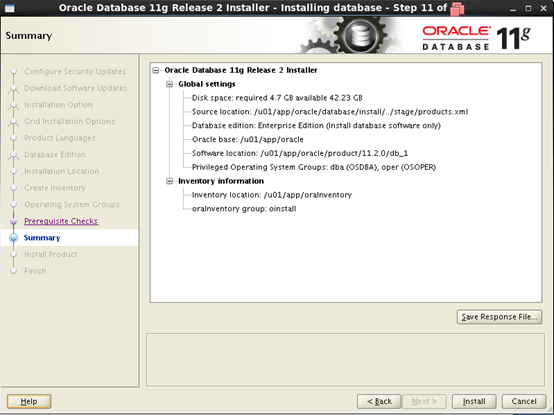

在root用户下执行这两个脚本。执行完后按OK继续
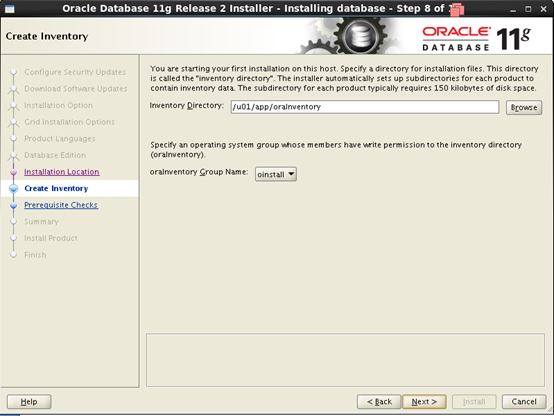
[root@OCP Desktop]# /u01/app/oraInventory/orainstRoot.sh
Changing permissions of /u01/app/oraInventory.
Adding read,write permissions for group.
Removing read,write,execute permissions for world.
Changing groupname of /u01/app/oraInventory to oinstall.
The execution of the script is complete.
[root@OCP Desktop]# /u01/app/oracle/product/11.2.0/db_1/root.sh
Performing root user operation for Oracle 11g
The following environment variables are set as:
ORACLE_OWNER= oracle
ORACLE_HOME= /u01/app/oracle/product/11.2.0/db_1
Enter the full pathname of the local bin directory: [/usr/local/bin]:
Copying dbhome to /usr/local/bin ...
Copying oraenv to /usr/local/bin ...
Copying coraenv to /usr/local/bin ...
Creating /etc/oratab file...
Entries will be added to the /etc/oratab file as needed by
Database Configuration Assistant when a database is created
Finished running generic part of root script.
Now product-specific root actions will be performed.
Finished product-specific root actions.

到此数据库软件就安装好了
linux系统安装Oracle11g详细步骤的更多相关文章
- 使用autotools工具用configure、make、make install编译安装linux工程的详细步骤
使用autotools工具用configure.make.make install编译安装linux工程的详细步骤 转载tmxkwzy 最后发布于2016-11-24 10:20:15 阅读数 324 ...
- linux配置防火墙详细步骤(iptables命令使用方法)
通过本教程操作,请确认您能使用linux本机.如果您使用的是ssh远程,而又不能直接操作本机,那么建议您慎重,慎重,再慎重! 通过iptables我们可以为我们的Linux服务器配置有动态的防火墙,能 ...
- Linux安装JDK详细步骤
Linux安装JDK步骤 1.先从网上下载jdk(jdk-7u1-linux-i586.rpm),下载地址:http://www.oracle.com/technetwork/java/javase/ ...
- linux安装mysql详细步骤
最近买了个腾讯云服务器,搭建环境. 该笔记用于系统上未装过mysql的干净系统第一次安装mysql.自己指定安装目录,指定数据文件目录. linux系统版本: CentOS 7.3 64位 安装源文件 ...
- 【记录】Linux安装JDK详细步骤
Linux安装JDK步骤1. 先从网上下载jdk(jdk-1_5_0_02-linux-i586.rpm) ,推荐SUN的官方网站www.sun.com,下载后放在/home目录中,当然其它地方也行. ...
- Windows中安装Linux子系统的详细步骤
早就听说Windows中可以安装Linux子系统,体验了一下,感觉还是不错的,下面直接开始安装和配置步骤吧! 开启Windows中的配置 首先开启开发者模式 打开"所有设置"进入& ...
- Linux安装JDK8详细步骤
1.下载jdk8 查看Linux位数,到oracle官网下载对应的jdk ① sudo uname --m 确认32位还是64位 ② https://www.oracle.com/technetwo ...
- 【转】Linux系统安装Redis详细过程
本文来源 https://blog.csdn.net/qq_20989105/article/details/76390367 ,转载前请先联系原作者并声明出处. 一.安装gcc 1.Redis在li ...
- Linux安装mariadb详细步骤
1.安装mariadb yum和源码编译安装的区别? 1.路径区别-yum安装的软件是他自定义的,源码安装的软件./configure --preifx=软件安装的绝对路径 2.yum仓库的软件,版本 ...
随机推荐
- Windown Server 2008配置tomcat9虚拟路径
一.用途 用于保存项目运产生的文件 二.步骤 1.修改conf\下的web.xml <!-- 找到listings将false改为true --> <init-para ...
- c++ 判断点和圆位置关系(类的声明和类的实现分开)
Point.h: #pragma onceclass Point{private: double p_x, p_y;public: void setXY(double x,double y); dou ...
- C++中的自定义内存管理
1,问题: 1,new 关键字创建出来的对象位于什么地方? 1,位于堆空间: 2,有没有可能位于其它地方? 1,有: 2,通过一些方式可以使动态创建的对象位于静态存储区: 3,这个存储区在程序结束后释 ...
- hibernate-HQL连接查询 转载sincoolvip
和SQL查询一样,HQL也支持各种各样的连接查询,如内连接.外连接 连接类型 HQL语法内连接 inner join 或者join迫切内连接 inner join fetch 或join fetch左 ...
- GitHub编辑README.md
一.标题 等级表示法(六级): #一级标题 ##二级标题 ###三级标题 ####四级标题 #####五级标题 ######六级标题 一级标题/大标题(文本下面加上等于号): 大标题 === 二级标题 ...
- win10删除文件夹时需要管理员授权或拒绝访问(无权访问权限修改)
win10 用户:我自己就是电脑主人,凭啥我没有自己电脑文件夹的权限? 微软:对不起,您是电脑硬件的主人,但是电脑系统的主人是我!你只不过是个用户而已. win10 用户:我cao你...[哔-] 对 ...
- java中的进制转换
java中的进制转换及转换函数 转自:https://blog.csdn.net/V0218/article/details/74945203 Java的进制转换 进制转换原理 十进制 转 二进制: ...
- mac StarUML3.0.2破解
mac StarUML3.0.2破解 StarUML是一款开放源码的UML开发工具,是由韩国公司主导开发出来的产品,可以直接到StarUML网站下载.可以用来创建UML类图. 破解办法是通过asar工 ...
- Centos7安装升级Ruby和集群搭建参考
安装升级Ruby参考:https://blog.csdn.net/qq_26440803/article/details/82717244 集群搭建参考:https://www.cnblogs.com ...
- mybatis 动态SQL查询总结
背景 ××项目需要提供系统部分函数第三方调用接口,基于安全性和避免暴露数据库表信息的基础上进行函数接口的设计,根据第三方调用身份的权限提供某张表的自定义集合.本项目基于mybatis的持久层框架,支持 ...