Oracle JET 单页面应用程序Router 使用(上)
单页面应用程序:使用一个进加载一次的网页,如果页面由于用户的交互而改变,则仅绘制更改的页面部分。
要创建单页面应用程序需要使用 oj.Router 的虚拟导航来支持,ojModule 用来响应页面的重新绘制。 ojModule 仅用于分离的 view 和 viewMode ,使之与页面通过 Knockout绑定。另外,ojModule 可选,当不使用分离视图与模型时,可直接在元素上响应变化。
1.简单模型:

当选择 Chapter1 或其他时,将显示新内容,并且URL更改以反映用户在页面上当前的位置。

2.路由器适配器
路由器带有两个URL适配器。每个适配器定义如何将URL格式化表示。
urlPathAdapter:在路径段中格式化 URL 。每个段都是的当前状态 id ,由 ‘ / ’ 分隔,如: localhost:8000/chap1
urlParamAdapter:使用查询参数格式化 URL 。每个参数都是路由器名称及其当前状态 id ,如:localhost:8000/?root=chap1
路由器的默认适配器是 urlPathAdapter 。需要更改可以使用 方法:
oj.Router.defaults['urlAdapter'] = new oj.Router.urlParamAdapter
当路由单页应用程序时,页面不会从头开始加载,但页面内容会动态更改。为了成为浏览器历史的一部分并提供书签内容,Oracle JET 路由器模拟使用 HTML5 历史记录推送状态功能导航的行为。路由器还控制 URL 看起来像传统页面 URL。 这些 URL 没有资源,必须设置 HTML 服务器。这是通过一个重写引擎的简单规则完成的。
一般来说,当应用程序中用户需求只包含几个视图并且关联状态不是很复杂,则使用查询参数。而路径段显示 URL 则显得 URL 更简洁,特别是使用嵌套路径(添加子路由)。
ojModule 与 oj.Router 结合使用,可以配置 ojModule 对象,其中模块名称是路由器的状态。当路由器更改状态时,ojModule 将自动加载并呈现当前 RouterState 对象的值得指定模块内容。
3.简单使用例子:
(1)appController.js:
define(['ojs/ojcore', 'knockout', 'ojs/ojknockout', 'ojs/ojrouter', 'ojs/ojbutton', 'ojs/ojtoolbar'],

  function(oj, ko) {

    function ControllerViewModel() {

      var self = this;

      self.router = oj.Router.rootInstance;

      self.router.configure({

        'pref': { label: 'Preface', isDefault: true},

        'chap1': { label: 'Chapter 1'},

        'chap2': { label: 'Chapter 2'},

        'chap3' : {label: 'Chapter 3'}

      });

      oj.Router.defaults['urlAdapter'] = new oj.Router.urlParamAdapter;

    }

    return new ControllerViewModel();

  }

);
a)添加 ojrouter 模块。
'ojs/ojrouter'
b)创建路由实例,oj.Router.rootInstance 表示唯一根路由,该路由的名称是 “root” 。
self.router = oj.Router.rootInstance;
c)配置路由器状态,属性: label:链接字符串,没有定义标题属性时,用于页面的标题。
value:与该状态相关联的对象。
isDefault:设置起始页面
      self.router.configure({

            'pref': { label: 'Preface', isDefault: true},

            'chap1': { label: 'Chapter 1'},

            'chap2': { label: 'Chapter 2'},

            'chap3' : {label: 'Chapter 3'}

          });
d)URL适配器,可选。
oj.Router.defaults['urlAdapter'] = new oj.Router.urlParamAdapter;
(2)main.js
require(['ojs/ojcore', 'knockout', 'appController', 'ojs/ojknockout', 'ojs/ojrouter', 'ojs/ojmodule'],

  function (oj, ko, app) {

    $(function() {

        oj.Router.sync().then(

          function() {

            ko.applyBindings(app, document.getElementById('routingContainer'));

          },

          function(error) {

            oj.Logger.error('Error in root start: ' + error.message);

          }

        );

    });

  }

);
a)添加 ojrouter 模块和 ojmodule(需要使用 ojmodule 时添加)
'ojs/ojrouter', 'ojs/ojmodule'
b)将路由器与当前 URL 同步。必须在路由器配置后才能调用,以将 URL 与路由器状态同步。
oj.Router.sync().then()
c)将 appController 挂载到 HTML 上
ko.applyBindings(app, document.getElementById('routingContainer'))
(3)index.html
  <div id="routing-container">

      <div id='buttons-container' data-bind="ojComponent: {component:'ojToolbar'}">

        <div data-bind="ojComponent: { component: 'ojButtonset',

                                        checked: router.stateId,

                                        focusManagement: 'none'}">

          <!-- ko foreach: router.states -->

            <label data-bind="attr: {for : id}"></label>

            <input type="radio" name="chapter" data-bind="value: id,

                                                          attr: { id: id},

                                                          ojComponent: { component: 'ojButton',

                                                                          label: label}"/>

          <!-- /ko -->

        </div>

      </div>

      <div data-bind="ojModule: router.moduleConfig"></div>

    </div>
a)选择时触发状态转换
定义 checked 属性给予 router.stateId 观察值。它使用双向绑定。当点击一个按钮时,id 被写入到 stateId 中,使路由器状态转换。
b)观察状态并更新相关部分
data-bind="ojModule: router.moduleConfig"
使用需要创建相应的 views 和 viewModels

c) router.states 可以获取到路由配置转化的数组以供遍历展示内容
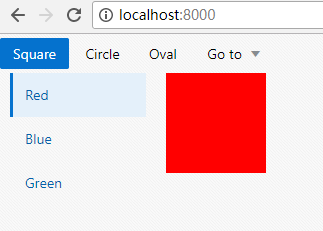
(4)实际效果如前简单模型相同。
4.使用子路由
(1)appController.js
define(['ojs/ojcore', 'knockout', 'ojs/ojknockout', 'ojs/ojrouter', 'ojs/ojbutton', 'ojs/ojtoolbar', 'ojs/ojnavigationlist'],

  function(oj, ko) {

    function ControllerViewModel() {

      var self = this;

      // 创建根路由

      self.shapeRouter = oj.Router.rootInstance;

      self.shapeRouter.configure({

        'square': { label: 'Square', isDefault: true },

        'circle': { label: 'Circle' },

        'oval': { label: 'Oval'}

      });

      // 创建子路由配置

      self.colorRouter = self.shapeRouter.createChildRouter('color').configure({

        'red': { label: 'Red', isDefault: true },

        'blue': { label: 'Blue' },

        'green': {label: 'Green'}

      });

      self.menuItemSelect = function(event, ui) {

        self.shapeRouter.go(ui.item.children('a').text());

      }

    }

    return new ControllerViewModel();

  }

);
a)创建根路由
b)创建子路由并配置
使用 createChildRouter('name') 创建子路由并添加 configure 配置。
(function(event, ui) 这里的 event, ui 是 select 带有的属性。另外 optionhange 等也有这两属性)
(2)main.js 与上例相同
(3)index.html
<div id="routing-container">

    <!-- 导航栏部分 -->

      <div id="toolbar" data-bind="ojComponent: { component: 'ojToolbar'}">

     <!-- 父路由导航栏部分 -->

        <div data-bind="ojComponent: { component: 'ojButtonset',

                                       checked: shapeRouter.stateId,

                                       focusManagement: 'none' }">

          <!-- ko foreach: shapeRouter.states -->

            <label data-bind="attr: {for: id}"></label>

            <input type="radio" name="shape" data-bind="value: id, attr: { id: id},

                                                        ojComponent: {component: 'ojButton',

                                                                      label: label}"></input>

          <!-- /ko -->

        </div>

     <!-- 直接跳转指定位置 -->

        <button id="menuButton" data-bind="ojComponent: { component: 'ojButton', label: 'Go to',

                                                          menu: '#gotoMenu'}">

        </button>

     <!-- 列表显示跳转位置 -->

        <ul id="gotoMenu" style="display: none" data-bind="ojComponent: { component: 'ojMenu',

                                                                           select: menuItemSelect }">

          <!-- ko foreach: shapeRouter.states -->

            <li>

              <a data-bind="text: label"></a>

              <ul data-bind="foreach: $root.colorRouter.states">

                <li>

                  <a data-bind="text: '/' + $parent.id + '/' + id"></a>

                </li>

              </ul>

            </li>

          <!-- /ko -->

        </ul>

      </div>

      <hr/>

    <!-- 展示部分 -->

      <div id="pageContent" class="oj-flex oj-flex-items-pad">

     <!-- 子路由导航栏 -->

        <div class="oj-xl-2 oj-lg-2 oj-md-2 oj-sm-12 oj-flex-item">

          <div id="colors" data-bind="ojComponent: { component: 'ojNavigationList',

                                                     selection: colorRouter.stateId,

                                                     drillMode: 'none'}">

            <ul data-bind="foreach: colorRouter.states">

              <li data-bind="attr: {id: id}">

                <a data-bind="text: label"></a>

              </li>

            </ul>

          </div>

        </div>

     <!-- 图形显示 -->

        <div class="oj-xl-10 oj-md-10 oj-sm-12 oj-flex-item">

          <div data-bind="css: shapeRouter.stateId(), style: { background: colorRouter.stateId() }"></div>

        </div>

      </div>

    </div>
a)stateId 可以让 knockout 观察,而 steteId() 则可以读取当前的 Id 的值。
(4)CSS
.square { width: 100px; height: 100px; }

.circle { width: 100px; height: 100px;

          -moz-border-radius: 50px;

          -webkit-border-radius: 50px;

          border-radius: 50px; }

.oval   { width: 200px; height: 100px;

          -moz-border-radius: 100px / 50px;

          -webkit-border-radius: 100px / 50px;

          border-radius: 100px / 50px; }
(5)效果显示:


Oracle JET 单页面应用程序Router 使用(上)的更多相关文章
- Ember.js实现单页面应用程序
1.1.1 摘要 单页应用程序 (SPA) 是加载单个HTML 页面并在用户与应用程序交互时动态更新该页面的Web应用程序. SPA使用AJAX和HTML5创建流畅且响应迅速的Web应用程序,不会经常 ...
- SPA 单页面应用程序。
看到这个问题,先说下自己的理解到的程度,再去参考做修正,争取这一次弄懂搞清楚 自己的理解: 单页面应用程序,解决浏览器获取数据刷新页面的尴尬,通过ajax请求获取数据达到异步更新视图的按钮,原理的实现 ...
- Kendo UI 单页面应用(二) Router 类
Kendo UI 单页面应用(二) Router 类 Route 类负责跟踪应用的当前状态和支持在应用的不同状态之间切换.Route 通过 Url 的片段功能(#url)和流量器的浏览历史功能融合在一 ...
- 通过Blazor使用C#开发SPA单页面应用程序(1)
2019年9月23——25日 .NET Core 3.0即将在.NET Conf上发布! .NET Core的发布及成熟重燃了.net程序员的热情和希望,一些.net大咖也在积极的为推动.NET Co ...
- 通过Blazor使用C#开发SPA单页面应用程序(3)
今天我们来看看Blazor开发的一些基本知识. 一.Blazor组件结构 Blazor中组件的基本结构可以分为3个部分,如下所示: //Counter.razor //Directives secti ...
- 单页面应用程序(SPA)
一.概念 ①在一个页面上实现网站的大部分功能,就是单页面应用程序,是一种常见的网页开发模式. ②整个网站就只有一个Html文件,每次在切换页面时,不需要请求服务器,只要通过本地的js来切换即可.这样可 ...
- 单页面应用程序(SPA)的优缺点
我们通常所说的单页面应用程序通常通过前端框架(angular.react.vue)进行开发,单页面应用程序将所有的活动局限于一个Web页面中,仅在该Web页面初始化时加载相应的HTML.JavaScr ...
- Vue系列(1):单页面应用程序
前言:关于页面上的知识点,如有侵权,请看 这里 . 关键词:SPA.单个 HTML 文件.全靠 JS 操作.Virtual DOM.hash/history api 路由跳转.ajax 响应.按需加载 ...
- Kendo UI开发教程(24): 单页面应用(二) Router 类
Route类负责跟踪应用的当前状态和支持在应用的不同状态之间切换.Route通过Url的片段功能(#url)和流量器的浏览历史功能融合在一起.从而可以支持把应用的某个状态作为书签添加到浏览器中.Rou ...
随机推荐
- p标签在div中水平垂直居中且文本左对齐
<!DOCTYPE html> <html> <head> <meta charset="UTF-8"> <title> ...
- RabbitMQ入门教程(五):扇形交换机发布/订阅(Publish/Subscribe)
原文:RabbitMQ入门教程(五):扇形交换机发布/订阅(Publish/Subscribe) 版权声明:本文为博主原创文章,遵循CC 4.0 BY-SA版权协议,转载请附上原文出处链接和本声明. ...
- 已知两个int变量a、b,定义4个方法分别对变量a、b进行加减乘除运算,并测试结果。
package com.fs.test; public class Test { public void aMethod(int a, int b) { int add = a + b;//*表示加法 ...
- python变量、对象和引用你真的明白了吗
python变量.对象和引用你真的明白了吗 变量.对象和引用 Python不像C++,Java等语言一样,他们可以不用事先声明变量类型而直接对变量进行赋值.对Python语言来讲,对象的类型和内存都是 ...
- Delphi 赋值语句和程序的顺序结构
- 这才是最完美SSD:性能满血发挥 万里挑一
固态硬盘同质化日益严重,不同品牌的固态盘想要一决高下就只有靠品牌口碑与做工硬实力了. 最近影驰对他们的ONE系列固态硬盘产品进行了一波更新,推出了多种容量的ONE PCIe M.2 SSD,今天我们就 ...
- yum 安装mysql-server 5.6
# rpm ivh http://dev.mysql.com/get/mysql-community-release-el6-5.noarch.rpm # yum install -y mysql-s ...
- Java Script入门
学习来源:https://www.runoob.com/js/js-tutorial.html JavaScript 教程 JavaScript 是 Web 的编程语言. 所有现代的 HTML 页面都 ...
- 关于 php for zookeeper
原文:Distributed application in PHP with Apache Zookeeper 地址:http://systemsarchitect.net/distributed-a ...
- Jmeter启动jmeter-server.bat 报java.io.FileNotFoundException:rmi_keystore.jks 解决方法
解决方法:1.找到apache-jmeter-5.0\bin\jmeter.properties 2.修改server.rmi.ssl.disable=true (记得去除server.rmi.ssl ...
