MSER最稳定极值区域源码分析
最稳定极值区域介绍
如把灰度图看成高低起伏的地形图,其中灰度值看成海平面高度的话,MSER的作用就是在灰度图中找到符合条件的坑洼。条件为坑的最小高度,坑的大小,坑的倾斜程度,坑中如果已有小坑时大坑与小坑的变化率。
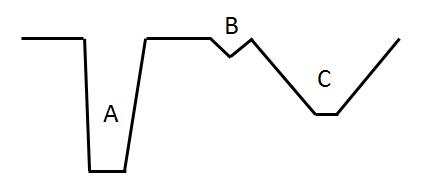
上图展示了几种不同的坑洼,根据最小高度,大小,倾斜程度这些条件的不同,选择的坑也就不同。
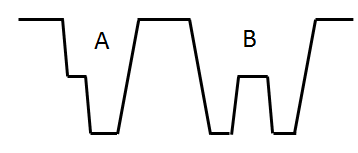
上图展示了最后一个条件,大坑套小坑的情况。根据条件的不同,选择也不同。
以上便是对坑的举例,MSER主要流程就三部分组成:
1.预处理数据
2.遍历灰度图
3.判断一个区域(坑洼)是否满足条件
简单来说,就如将水注入这个地形中。水遇到低处就往低处流,如果没有低处了,水位就会一点点增长,直至淹没整个地形。在之前预处理下数据,在水位提高时判断下是否满足条件。
预处理数据
先说下流程中的主要部件,如下:
1.img,由原8位单通道灰度图转化的更容易遍历和记录数据的32位单通道图。预处理内容为:
32位值记录从这点是否探索过,探索过的方向,灰度值;图大小也扩大了,最外添加了一个像素的完整一圈,值为-1可看作墙,宽度也改变为2的整数次方,用于加快运算。
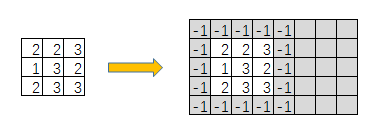
如果由掩码图,如下:

2.heap,记录坑洼边界的堆栈,每个灰度值都有自己的堆栈。预处理内容为:
计算所有灰度值的个数,这样提前就可以分配堆栈大小。例如知道了灰度2的像素由4个,就可以将灰度2的堆栈大小分配为5(多一个位标志位空)。
3.comp,记录水坑数据的堆栈,有水位值(灰度值),面积(像素个数和像素位置)等。预处理内容为:
仅仅是分配内存,分配257个(0-255外多一个用作结束)
4.history,记录水位抬高的历史,就是一个小坑抬高水位后一点点变成大坑的历史。预处理内容为:
仅仅是分配内存,大小为像素点个数(就是宽*高)。可以想成所有点都不同都可以形成历史的最大个数。
遍历灰度图
在重复下整个简单的过程:就如将水注入这个地形中。水遇到低处就往低处流,如果没有低处了,水位就会一点点增长,直至淹没整个地形。先说下主要部件:
1.img,由原8位单通道灰度图转化的更容易遍历和记录数据的32位单通道图。遍历时:
当前像素位置中有3位记录方向(除了东南西北还有一个用来代表结束),逐个改变方向遍历。还有最高1位记录是否发现过了。根据方向遍历相邻像素,如果4个方向都探索过了,就从heap边界中找到一个最小灰度的边界,出栈来用作当前像素。最终将所有像素的4个方向都走完,也是所有像素都被发现了,遍历就结束。
2.heap,记录坑洼边界的堆栈,每个灰度值都有自己的堆栈。遍历时:
当水遇到低处时入栈当前位置为低处的边界,当水遇到相等高度或高处时入栈那个边界;当抬高水位时出栈被抬高到的边界。
3.comp,记录水坑数据的堆栈,有水位值(灰度值),面积(像素个数和像素位置)等。遍历时:
当水位下降时新入栈,水位提高时出栈并可能与之前的合并。
4.history,记录水位抬高的历史,就是一个小坑抬高水位后一点点变成大坑的历史。遍历时:
history主要是记录用来判断最大稳定极值区域的数据,没有遍历的作用。主要记录时刻有两种:提高水位到边界heap中的最小高度,提高水位到comp中上一项的高度。要记录灰度值,像素数,快捷指针,孩子指针,稳定时的像素数。
下面举例子,走下遍历的流程(并不是依次就是一步,一些步骤合并了)(红色为有变动位置,时间匆忙没有仔细校准每个位置):
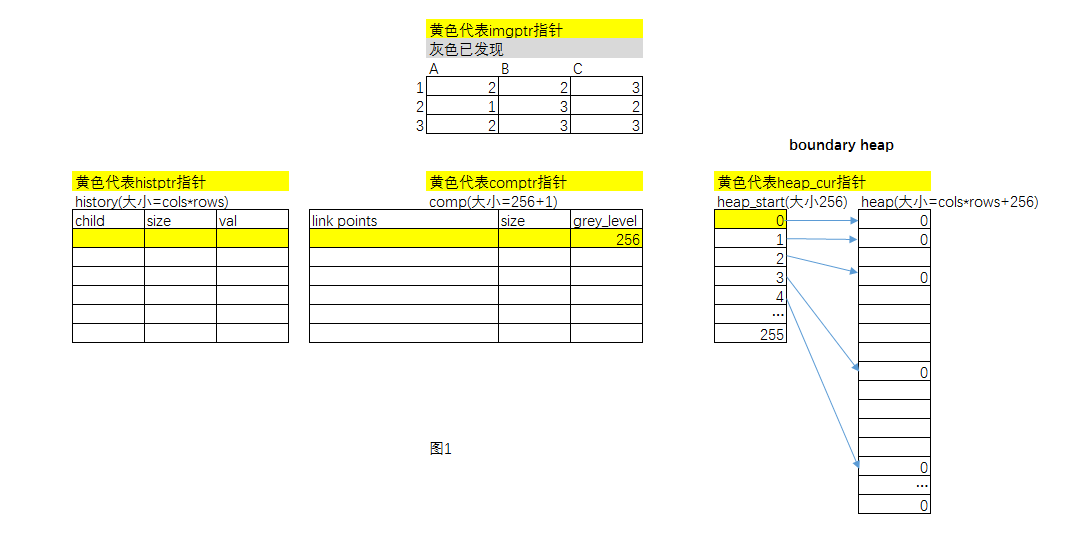
中上,要遍历的灰度图。为了方便观看,上文提到周围一圈的-1被去掉了。
左下,history是抬高水位的历史。
中下,comp是水位数据。预先入栈一个256的灰度作为顶,用来抬高水位时判断边界值小还是上一个水位数据的灰度值小。
右下,heap是边界堆栈,heap_start是每个灰度指向heap堆栈的指针。特殊说明下,heap是一个个堆栈连接在一起的一个数组,由于上面说的预处理过了,已经知道每个灰度的像素个数,所以提前指定了heap_start中每个灰度指向heap中的位置,指向0代表所在堆栈没有数据。例如灰度2有4个像素,所以灰度3的指针从灰度2指针后5个后开始,4个是像素数,1个是代表空的0。
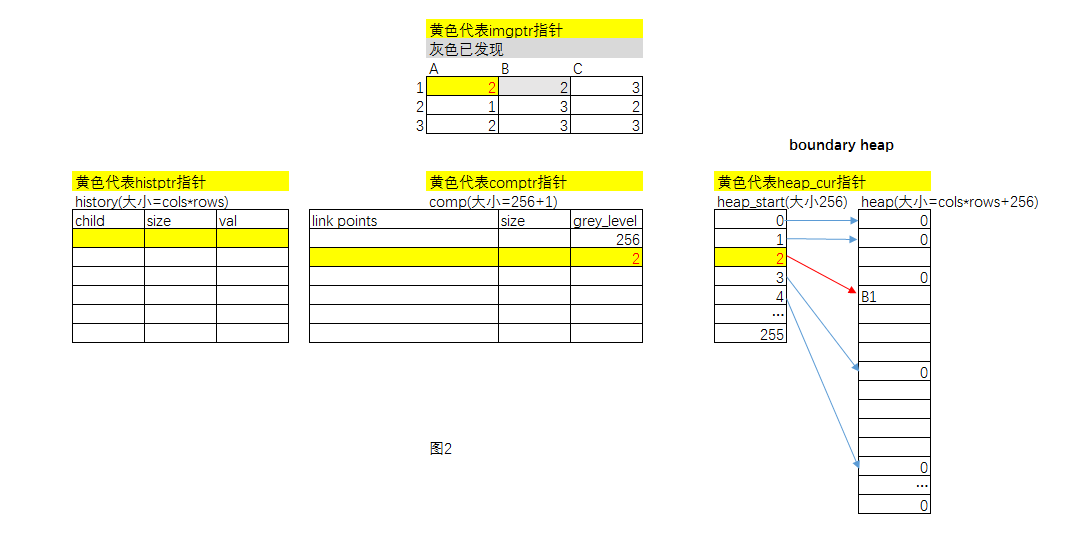
从A1位置开始,comp中入栈个灰度2的数据项,并将heap_cur当前指针设置为2灰度的指针。
探索A1右边B1,标识为已发现。B1的值2没有小于当前水位值2,作为边界入栈。
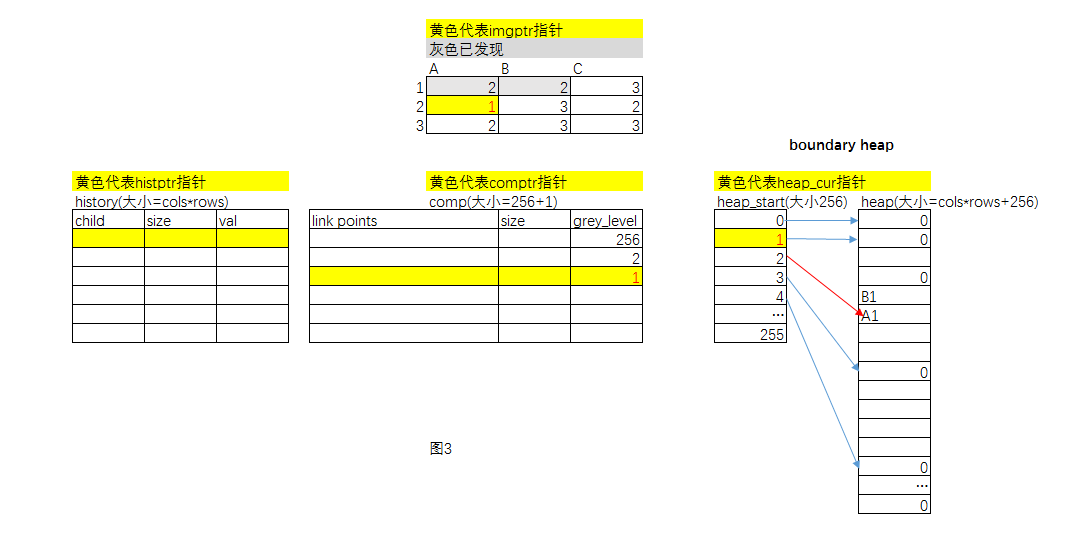
探索A1下面的A2。值1小于当前水位2,将2入栈边界栈,入栈水位数据1,调整边界指针heap_cur为指向1的指针,当前像素为A2。
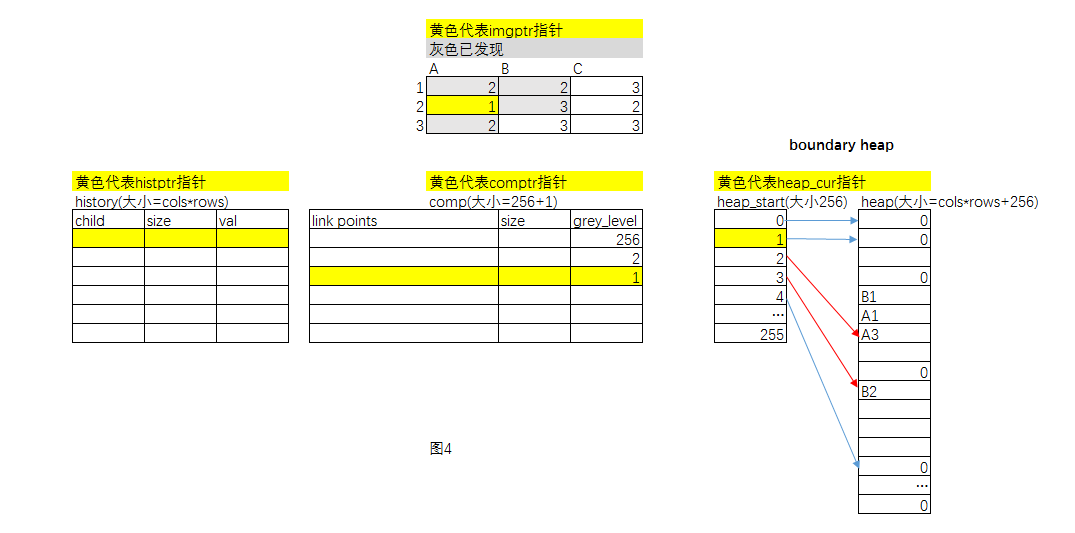
探索A2右边B3与下边A3,都没有比当前水位1小,分别入栈所属灰度的边界栈。

A2所有方向都探索完,将A2加入当前水位数据comp中。
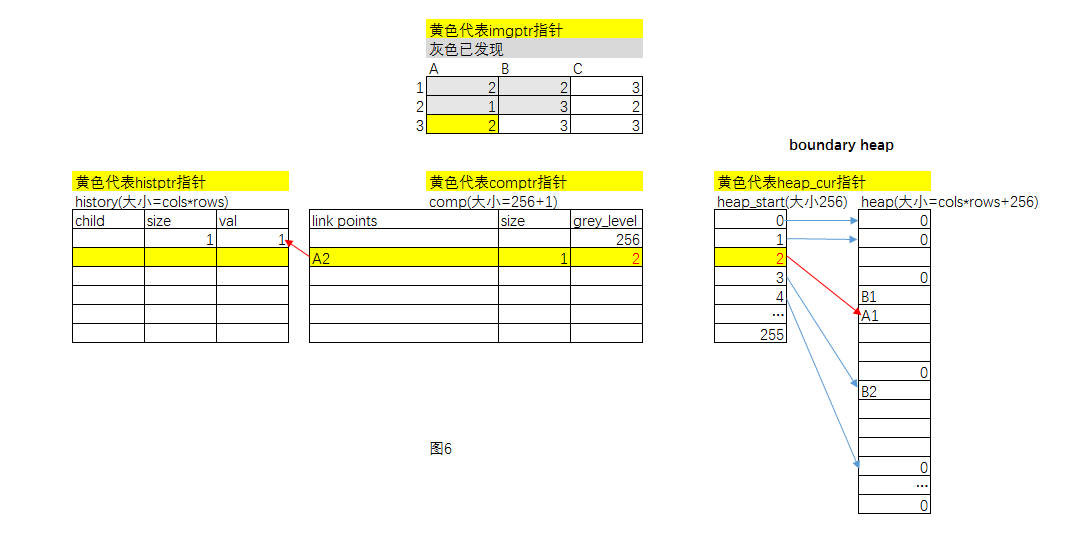
在边界栈中找到最小灰度的一个值出栈(图5里边界里有灰度2的和灰度3的,从当前灰度1开始一点点加大所以找到了灰度2),出栈了A3。A3的灰度2,所以抬高水位。记录历史histroy,修改当前水位数据灰度为2,边界指针heap_cur指向2灰度的堆栈。
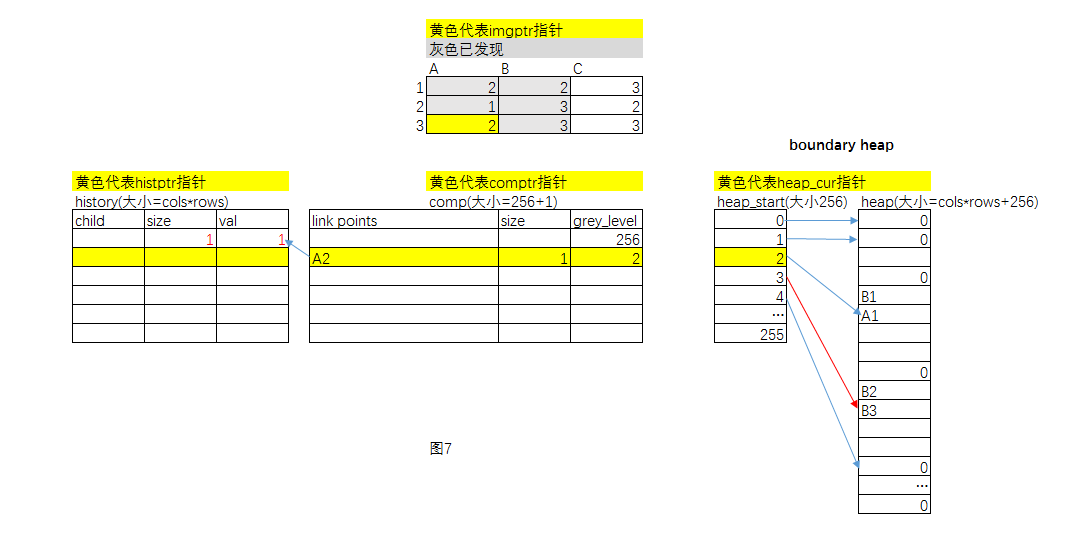
探索A3周边,发现B3,灰度3比当前大作为边界入栈。

A3所有方向也都探索完,将A3加入当前水位数据comp中。
边界中找到A1。由于A1灰度还是2,没有提升水位。将A1作为当前像素。
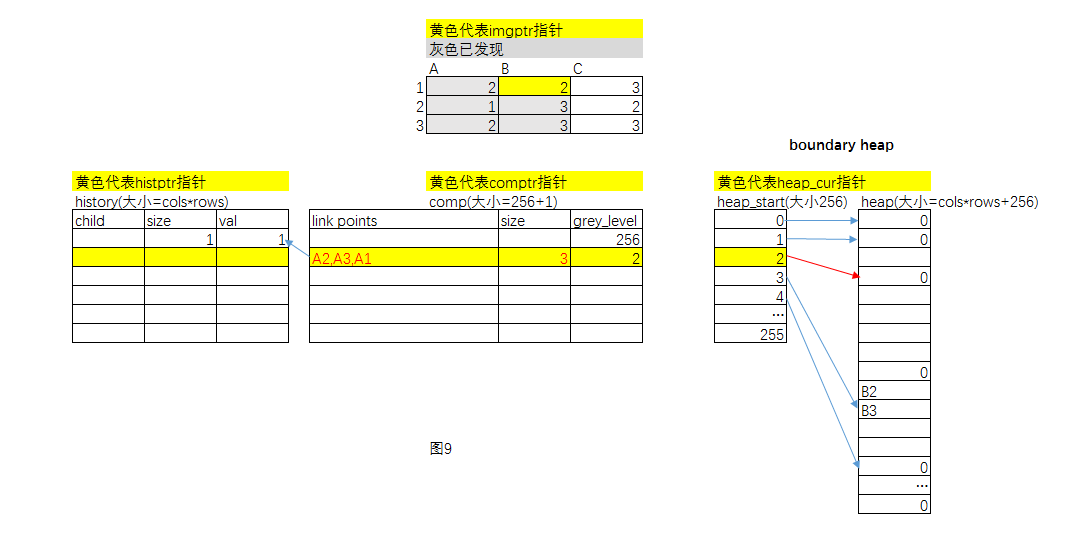
刚刚的A1周围也早就探索完了,将A1加入当前水位数据comp中。
又在边界中找到了B1,并出栈作为当前像素。
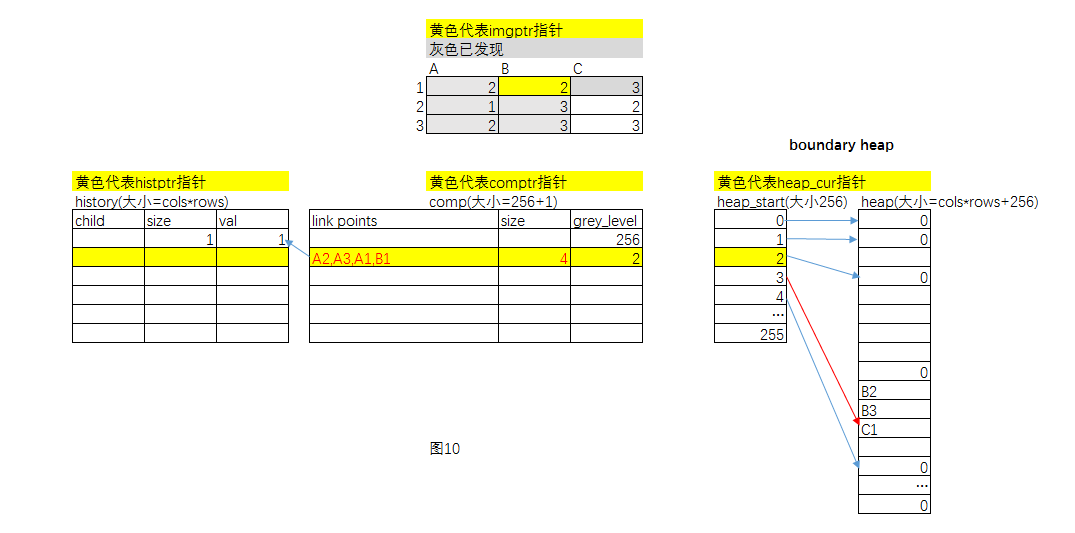
B1右边探索到了C1,加入灰度3的边界栈。
这时,B1周围已经探索完毕,将B1加入当前水位数据comp中。

B1被加入在边界栈中从灰度2开始查找,找到灰度3中C1作为当前像素。然后记录历史history,提高当前水位数据comp的灰度值,设置heap_cur指针到灰度3的边界栈。
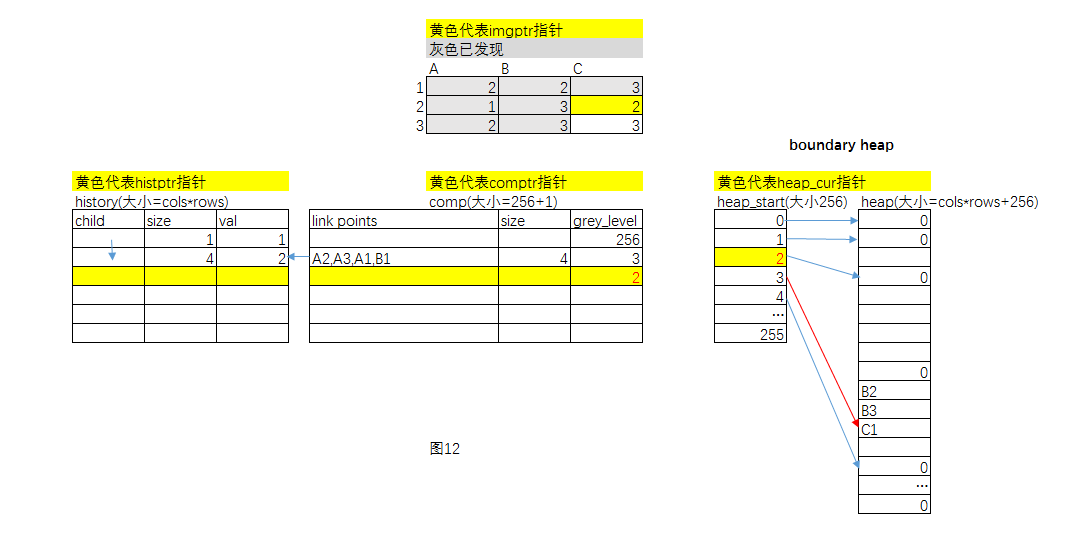
从当前像素C1向下找到C2,C2灰度比当前低。将当前像素C1入栈边界栈,新建灰度2的水位数据comp,边界指针heap_cur指向灰度2,设置C2为当前指针。
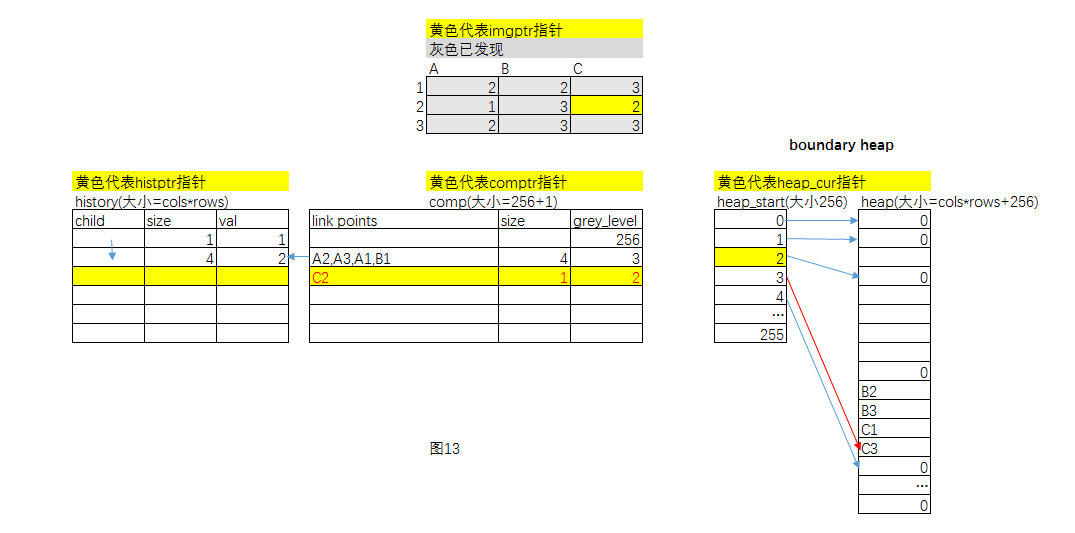
探索C2下面最后一个像素C3,将C3加入边界栈。
将C2加入水位数据comp中。
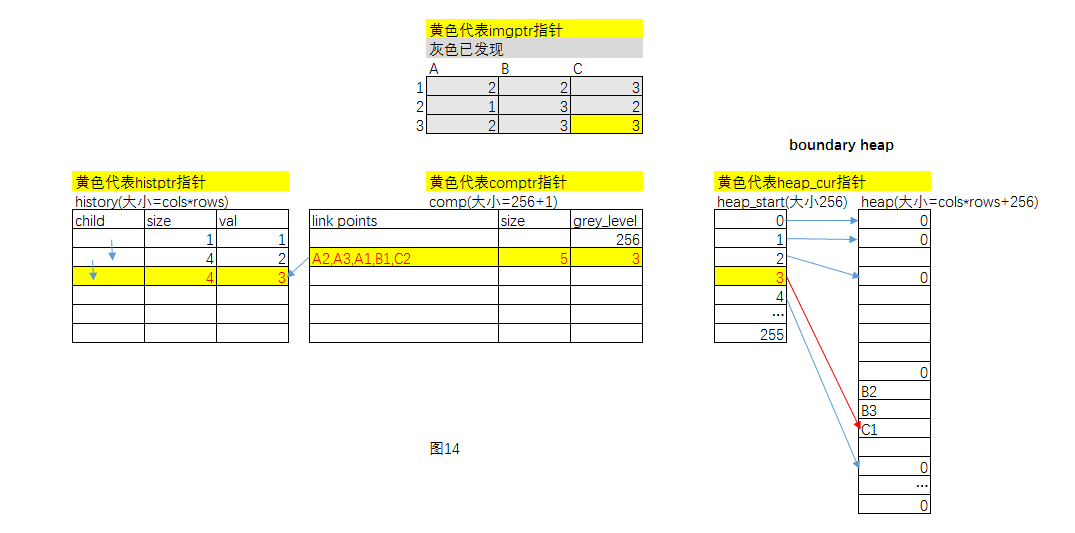
需要抬高水位了,从灰度3的边界栈中出栈C3,发现灰度和上一个水位数据comp的灰度一样,需要合并这两个comp数据。添加历史history,合并两个comp数,改变边界栈heap_cur到灰度3,设置C3为当前像素。
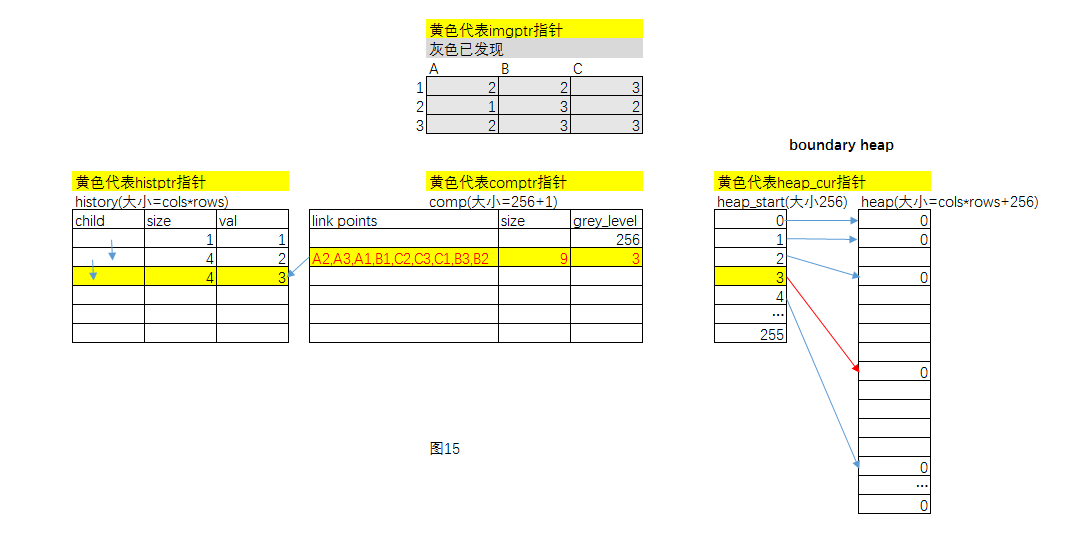
最后的C3,C1,B3,B2周围都没有可以探索的像素了,依次出栈加入水位数据。
至此所有9个像素都探索完毕了。
判断一个区域(坑洼)是否满足条件
先看下参数:
int delta; // 两个区域间的灰度差
int minArea; // 区域最小像素数
int maxArea; // 区域最大像素数
double maxVariation; // 两个区域的偏差
double minDiversity; // 当前区域与稳定区域的变化率
一个水坑的变化如下图A,随着水位的提高,面积由Ra变为Rb在到Rc,Ra为Rb的父区域;判断极值区域的方法如图B,在delta水位差间两个区域面积是否满足一定条件;还有一个判断条件如图C,如果已经有一个候选区域Rstable了,Rcandidate是否可以作为一个极值区域,也就是大坑套小坑的情况。

maxVariation是上图B的情况,值为下面的公式A;minDiversity是上图C的情况,值为下面公式B:

下面是在条件判断时两个有用的部件(其他没有任何作用):
3.comp,记录水坑数据的堆栈,有水位值(灰度值),面积(像素个数和像素位置)等。条件判断时:
有个history指向当前区域的历史的指针,用来查找当前区域之前的变化历史;var用来记录上次计算的variation;div用来记录上次计算的diversity。(var与div用来确保坑越来越稳定,如果与上次的值比较发散了则不满足条件)
4.history,记录水位抬高的历史,就是一个小坑抬高水位后一点点变成大坑的历史。条件判断时:
每一个历史项都有指向孩子历史的指针child,与指向相差delta灰度历史的快捷指针shortcut,还有上次稳定时的像素数stable,最后就是那个历史时刻的灰度值val与像素数size。(快捷指针是用来加速计算的,在历史里一个一个向前找也能找到,但总没有直接在上次找到的位置前后找更快吧:))
源码
基本结构:
typedef struct LinkedPoint

    {

        struct LinkedPoint* prev;

        struct LinkedPoint* next;

        Point pt;

    }

    LinkedPoint;

    // the history of region grown

    typedef struct MSERGrowHistory

    {

        // 快捷路径,是指向以前历史的指针。因为不是一个一个连接的,所以不是parent。算法中是记录灰度差为delta的历史的指针。

        // 例如:当前是灰度是10,delta=3,这个指针就指向灰度为7时候的历史

        struct MSERGrowHistory* shortcut;

        // 指向更新历史的指针,就是从这个历史繁衍的新历史,所以叫孩子

        struct MSERGrowHistory* child;

        // 大于零代表稳定,值是稳定是的像素数。这个值在不停的继承

        int stable; // when it ever stabled before, record the size

        // 灰度值

        int val;

        // 像素数

        int size;

    }

    MSERGrowHistory;

    typedef struct MSERConnectedComp

    {

        // 像素点链的头

        LinkedPoint* head;

        // 像素点链的尾

        LinkedPoint* tail;

        // 区域上次的增长历史,可以通过找个历史找到之前的记录

        MSERGrowHistory* history;

        // 灰度值

        unsigned long grey_level;

        // 像素数

        int size;

        int dvar; // the derivative of last var

        float var; // the current variation (most time is the variation of one-step back)

    }

    MSERConnectedComp;

struct MSERParams

    {

        MSERParams(int _delta, int _minArea, int _maxArea, double _maxVariation,

            double _minDiversity, int _maxEvolution, double _areaThreshold,

            double _minMargin, int _edgeBlurSize)

            : delta(_delta), minArea(_minArea), maxArea(_maxArea), maxVariation(_maxVariation),

            minDiversity(_minDiversity), maxEvolution(_maxEvolution), areaThreshold(_areaThreshold),

            minMargin(_minMargin), edgeBlurSize(_edgeBlurSize)

        {}

        // MSER使用

        int delta;                        // 两个区域间的灰度差

        int minArea;                    // 区域最小像素数

        int maxArea;                    // 区域最大像素数

        double maxVariation;        // 两个区域的偏差

        double minDiversity;        // 当前区域与稳定区域的变化率

        // MSCR使用

        int maxEvolution;

        double areaThreshold;

        double minMargin;

        int edgeBlurSize;

    };
预处理:
// to preprocess src image to following format

    // 32-bit image

    // > 0 is available, < 0 is visited

    // 17~19 bits is the direction

    // 8~11 bits is the bucket it falls to (for BitScanForward)

    // 0~8 bits is the color

    /** @brief 将所给原单通道灰度图和掩码图 预处理为一张方便遍历与记录数据的32位单通道图像;并且根据像素灰度值分配边缘栈。

    * 32位格式如下:

    * > 0 可用,< 0 已经被访问

    * 17~19位用于记录下一个要探索的方向,5个值

    * 8~11位 用于优化的二值搜索

    * 0~8位用于记录灰度值

    *@param heap_cur 边缘栈

    *@param src 原单通道灰度图

    *@param mask 掩码图

    */

    static int* preprocessMSER_8UC1(CvMat* img,

        int*** heap_cur,

        CvMat* src,

        CvMat* mask)

    {

        // 数据有效内容是在img中,由一圈-1包围着,靠左的区域。也就是被一圈-1的墙包围着。

        // 原始数据跳转到下一行的偏移量。

        int srccpt = src->step - src->cols;

        // 跳转到下一行的偏移量,最后减一是因为,例如:xoooxxx,o是有效数据,x是扩充出来的。偏移量应该是3,就是ooo最

        // 右边的xxx个数。为了计算,就需要减去ooo最左面的一个x。

        int cpt_1 = img->cols - src->cols - ;

        int* imgptr = img->data.i;

        int* startptr;

        // 用于记录每个灰度有多少像素

        int level_size[];

        for (int i = ; i < ; i++)

            level_size[i] = ;

        // 设置第一行为-1

        for (int i = ; i < src->cols + ; i++)

        {

            *imgptr = -;

            imgptr++;

        }

        // 偏移到第一个有效数据所在行的开头

        imgptr += cpt_1 - ;

        uchar* srcptr = src->data.ptr;

        if (mask)

        {

            // 有掩码

            startptr = ;            // 数据处理的开始位置,为最左上的位置。

            uchar* maskptr = mask->data.ptr;

            for (int i = ; i < src->rows; i++)

            {

                // 最左面设置为-1

                *imgptr = -;

                imgptr++;

                for (int j = ; j < src->cols; j++)

                {

                    if (*maskptr)

                    {

                        if (!startptr)

                            startptr = imgptr;

                        // 灰度值取反!!!!! !!!!! !!!!! !!!!!

                        *srcptr = 0xff - *srcptr;

                        // 所在灰度值个数自增

                        level_size[*srcptr]++;

                        // 写入0~8位,8~13位用作BitScanForward

                        *imgptr = ((*srcptr >> ) << ) | (*srcptr);

                    }

                    else {

                        // 标为-1,就是当作一个已经被发现的位置,和外围-1墙的原理一样

                        *imgptr = -;

                    }

                    imgptr++;

                    srcptr++;

                    maskptr++;

                }

                // 最右面设置为-1

                *imgptr = -;

                // 都跳到下一行开始

                imgptr += cpt_1;

                srcptr += srccpt;

                maskptr += srccpt;

            }

        }

        else {

            // 就是没有掩码的情况

            startptr = imgptr + img->cols + ;

            for (int i = ; i < src->rows; i++)

            {

                *imgptr = -;

                imgptr++;

                for (int j = ; j < src->cols; j++)

                {

                    *srcptr = 0xff - *srcptr;

                    level_size[*srcptr]++;

                    *imgptr = ((*srcptr >> ) << ) | (*srcptr);

                    imgptr++;

                    srcptr++;

                }

                *imgptr = -;

                imgptr += cpt_1;

                srcptr += srccpt;

            }

        }

        // 设置最后一行为-1

        for (int i = ; i < src->cols + ; i++)

        {

            *imgptr = -;

            imgptr++;

        }

        // 确定每个灰度在边界堆中的指针位置。0代表没有值。

        heap_cur[][] = ;

        for (int i = ; i < ; i++)

        {

            heap_cur[i] = heap_cur[i - ] + level_size[i - ] + ;

            heap_cur[i][] = ;

        }

        return startptr;

    }
主流程及遍历方法:
static void extractMSER_8UC1_Pass(int* ioptr,

        int* imgptr,

        int*** heap_cur,                            // 边界栈的堆,里面是每一个灰度的栈

        LinkedPoint* ptsptr,

        MSERGrowHistory* histptr,

        MSERConnectedComp* comptr,

        int step,

        int stepmask,

        int stepgap,

        MSERParams params,

        int color,

        CvSeq* contours,

        CvMemStorage* storage)

    {

        // ER栈第一项为结束的标识项,值为大于255的256

        comptr->grey_level = ;

        // 将当前位置值入栈,并初始化

        comptr++;

        comptr->grey_level = (*imgptr) & 0xff;

        initMSERComp(comptr);

        // 设置为已经发现

        *imgptr |= 0x80000000;

        // 加上灰度偏移就将指针定位到了相应灰度的边界栈上

        heap_cur += (*imgptr) & 0xff;

        // 四个方向的偏移量,上下的偏移是隔行的步长

        int dir[] = { , step, -, -step };

#ifdef __INTRIN_ENABLED__

        unsigned long heapbit[] = { , , , , , , ,  };

        unsigned long* bit_cur = heapbit + (((*imgptr) & 0x700) >> );

#endif

        // 循环

        for (;;)

        {

            // take tour of all the 4 directions

            // 提取当前像素的方向值,判断是否还有方向没有走过

            while (((*imgptr) & 0x70000) < 0x40000)

            {

                // get the neighbor

                // 通过方向对应的偏移获得相邻像素指针

                int* imgptr_nbr = imgptr + dir[((*imgptr) & 0x70000) >> ];

                // 判断是否访问过

                if (*imgptr_nbr >= ) // if the neighbor is not visited yet

                {

                    // 没有访问过,标记为访问过

                    *imgptr_nbr |= 0x80000000; // mark it as visited

                    if (((*imgptr_nbr) & 0xff) < ((*imgptr) & 0xff))

                    {

                        // when the value of neighbor smaller than current

                        // push current to boundary heap and make the neighbor to be the current one

                        // create an empty comp

                        // 如果相邻像素的灰度小于当前像素,将当前像素加入边界栈堆,并把相邻像素设置为当前像素,并新建ER栈项

                        // 将当前加入边界栈堆

                        (*heap_cur)++;

                        **heap_cur = imgptr;

                        // 转换方向

                        *imgptr += 0x10000;

                        // 将边界栈堆的指针调整为相邻的像素灰度所对应的位置

                        heap_cur += ((*imgptr_nbr) & 0xff) - ((*imgptr) & 0xff);

#ifdef __INTRIN_ENABLED__

                        _bitset(bit_cur, (*imgptr) & 0x1f);

                        bit_cur += (((*imgptr_nbr) & 0x700) - ((*imgptr) & 0x700)) >> ;

#endif

                        // 将相邻像素设置为当前像素

                        imgptr = imgptr_nbr;

                        // 新建ER栈项,并设置灰度为当前像素灰度

                        comptr++;

                        initMSERComp(comptr);

                        comptr->grey_level = (*imgptr) & 0xff;

                        continue;

                    }

                    else {

                        // otherwise, push the neighbor to boundary heap

                        // 否则,将相邻像素添加到对应的边界帧堆中

                        heap_cur[((*imgptr_nbr) & 0xff) - ((*imgptr) & 0xff)]++;

                        *heap_cur[((*imgptr_nbr) & 0xff) - ((*imgptr) & 0xff)] = imgptr_nbr;

#ifdef __INTRIN_ENABLED__

                        _bitset(bit_cur + ((((*imgptr_nbr) & 0x700) - ((*imgptr) & 0x700)) >> ), (*imgptr_nbr) & 0x1f);

#endif

                    }

                }

                // 将当前像素的方向转换到下一个方向

                *imgptr += 0x10000;

            }

            int imsk = (int)(imgptr - ioptr);

            // 记录x&y,

            ptsptr->pt = cvPoint(imsk&stepmask, imsk >> stepgap);

            // get the current location

            accumulateMSERComp(comptr, ptsptr);

            ptsptr++;

            // get the next pixel from boundary heap

            // 从边界栈堆中获取一个像素用作当前像素

            if (**heap_cur)

            {

                // 当前灰度的边界栈堆有值可以用,将当前边界栈堆值设置为当前像素,因为当前边界栈堆的灰度就是当前像素的灰度,所以可以直接拿出来用

                imgptr = **heap_cur;

                // 出栈

                (*heap_cur)--;

#ifdef __INTRIN_ENABLED__

                if (!**heap_cur)

                    _bitreset(bit_cur, (*imgptr) & 0x1f);

#endif

            }

            else {

                // 当前灰度边界栈堆中没有值可以用

#ifdef __INTRIN_ENABLED__

                bool found_pixel = ;

                unsigned long pixel_val;

                for (int i = ((*imgptr) & 0x700) >> ; i < ; i++)

                {

                    if (_BitScanForward(&pixel_val, *bit_cur))

                    {

                        found_pixel = ;

                        pixel_val += i << ;

                        heap_cur += pixel_val - ((*imgptr) & 0xff);

                        break;

                    }

                    bit_cur++;

                }

                if (found_pixel)

#else

                // 从当前灰度后逐步提高灰度值,在边界堆中找到一个边界像素

                heap_cur++;

                unsigned long pixel_val = ;

                for (unsigned long i = ((*imgptr) & 0xff) + ; i < ; i++)

                {

                    if (**heap_cur)

                    {

                        // 不为零,指针指向了一个像素,这个灰度值还有边界

                        pixel_val = i;

                        break;

                    }

                    // 提高灰度值

                    heap_cur++;

                }

                // 判断边界中是否还有像素

                if (pixel_val)

#endif

                {

                    // 将边界中的像素作为当前像素,并从边界中去除

                    imgptr = **heap_cur;

                    (*heap_cur)--;

#ifdef __INTRIN_ENABLED__

                    if (!**heap_cur)

                        _bitreset(bit_cur, pixel_val & 0x1f);

#endif

                    if (pixel_val < comptr[-].grey_level)

                    {

                        // 刚从边界获得灰度如果小于上一个MSER组件灰度值,需要提高当前水位到边界的灰度值

                        // check the stablity and push a new history, increase the grey level

                        if (MSERStableCheck(comptr, params))

                        {

                            CvContour* contour = MSERToContour(comptr, storage);

                            contour->color = color;

                            cvSeqPush(contours, &contour);

                        }

                        // 由于水位要有变化了,添加一个历史

                        MSERNewHistory(comptr, histptr);

                        // 提高水位到边界的水位

                        comptr[].grey_level = pixel_val;

                        // 指向下一个未使用历史空间

                        histptr++;

                    }

                    else {

                        // 刚从边界获得灰度如果不小于上一个MSER组件灰度值,其实就是和上一个灰度值一样。

                        // 例如:当前水位2,上一个水位3,从边界出栈的水位为3.

                        // keep merging top two comp in stack until the grey level >= pixel_val

                        for (;;)

                        {

                            // 合并MSER组件,里面也随带完成了一个历史

                            comptr--;

                            MSERMergeComp(comptr + , comptr, comptr, histptr);

                            histptr++;

                            if (pixel_val <= comptr[].grey_level)

                                break;

                            // 到这里,等于comptr[0].grey_level < pixel_val,也是当前像素的灰度与MSER组件的不一致,要提高MSER组件灰度

                            if (pixel_val < comptr[-].grey_level)

                            {

                                // 其实就是comptr[0].grey_level < pixel_val < comptr[-1].grey_level

                                // 当前灰度大于当前MSER灰度小于上一个MSER组件灰度。同上面的代码情况一样。

                                // check the stablity here otherwise it wouldn't be an ER

                                if (MSERStableCheck(comptr, params))

                                {

                                    CvContour* contour = MSERToContour(comptr, storage);

                                    contour->color = color;

                                    cvSeqPush(contours, &contour);

                                }

                                MSERNewHistory(comptr, histptr);

                                comptr[].grey_level = pixel_val;

                                histptr++;

                                break;

                            }

                        }

                    }

                }

                else

                    break;

            }

        }

    }

    /** @brief 通过8UC1类型的图像提取MSER

    *@param mask 掩码

    *@param contours 轮廓结果

    *@param storage 轮廓内存空间

    *@param params 参数

    */

    static void extractMSER_8UC1(CvMat* src,

        CvMat* mask,

        CvSeq* contours,

        CvMemStorage* storage,

        MSERParams params)

    {

        // 为了加速计算,将每行数据大小扩展为大于原大小的第一个2的整指数。

        // 这样在后面计算y时,只要右移stepgap就算除以2^stepgap了

        int step = ;

        int stepgap = ;

        while (step < src->step + )

        {

            step <<= ;

            stepgap++;

        }

        int stepmask = step - ;

        // to speedup the process, make the width to be 2^N

        CvMat* img = cvCreateMat(src->rows + , step, CV_32SC1);

        int* ioptr = img->data.i + step + ;        // 数据在扩展后的最开始位置

        int* imgptr;                                        // 用于指向mser遍历的当前像素(所有数据)

        // pre-allocate boundary heap

        // 预分配边界堆和每个灰度指向堆的指针数组

        // 堆大小就是像素数+所有灰度值(一个标志数据,用来表明这个灰度没有数据了)

        int** heap = (int**)cvAlloc((src->rows*src->cols + ) * sizeof(heap[]));

        int** heap_start[];

        heap_start[] = heap;

        // pre-allocate linked point and grow history

        // 预分配连接像素点,用于将区域中的像素连接起来,大小就为所有像素个数

        LinkedPoint* pts = (LinkedPoint*)cvAlloc(src->rows*src->cols * sizeof(pts[]));

        // 预分配增长历史,用于记录区域在太高水位后的父子关系,最大个数为所有像素个数。

        MSERGrowHistory* history = (MSERGrowHistory*)cvAlloc(src->rows*src->cols * sizeof(history[]));

        // 预分配区域,用于记录每个区域的数据,大小为所有灰度值+1个超大灰度值代表顶

        MSERConnectedComp comp[];

        // darker to brighter (MSER-)

        // 提取mser亮区域(preprocessMSER_8UC1中将灰度值取反)

        imgptr = preprocessMSER_8UC1(img, heap_start, src, mask);

        extractMSER_8UC1_Pass(ioptr, imgptr, heap_start, pts, history, comp, step, stepmask, stepgap, params, -, contours, storage);

        // brighter to darker (MSER+)

        // 提取mser暗区域

        imgptr = preprocessMSER_8UC1(img, heap_start, src, mask);

        extractMSER_8UC1_Pass(ioptr, imgptr, heap_start, pts, history, comp, step, stepmask, stepgap, params, , contours, storage);

        // clean up

        cvFree(&history);

        cvFree(&heap);

        cvFree(&pts);

        cvReleaseMat(&img);

    }
条件判断和生成结果:
// clear the connected component in stack

    static void

        initMSERComp(MSERConnectedComp* comp)

    {

        comp->size = ;

        comp->var = ;

        comp->dvar = ;

        comp->history = NULL;

    }

    // add history of size to a connected component

    static void

        /** @brief 通过当前ER项构建一个对应的历史,也就是说找个ER项要准备改变了

        */

        MSERNewHistory(MSERConnectedComp* comp, MSERGrowHistory* history)

    {

        // 初始时将下一条历史设置为自己

        history->child = history;

        if (NULL == comp->history)

        {

            // 从来没有历史过,将快捷路径也设置为自己,稳定的像素数为0

            history->shortcut = history;

            history->stable = ;

        }

        else {

            // 有历史,将当前历史设置为上一个历史的下个历史

            comp->history->child = history;

            // 快捷路径与稳定值继承至上一个历史

            history->shortcut = comp->history->shortcut;

            history->stable = comp->history->stable;

        }

        // 记录这时的ER项的灰度值与像素数

        history->val = comp->grey_level;

        history->size = comp->size;

        // 设置ER项的历史为找个最新的历史

        comp->history = history;

    }

    // merging two connected component

    static void

        MSERMergeComp(MSERConnectedComp* comp1,

            MSERConnectedComp* comp2,

            MSERConnectedComp* comp,

            MSERGrowHistory* history)

    {

        LinkedPoint* head;

        LinkedPoint* tail;

        comp->grey_level = comp2->grey_level;

        history->child = history;

        // select the winner by size

        if (comp1->size >= comp2->size)

        {

            if (NULL == comp1->history)

            {

                history->shortcut = history;

                history->stable = ;

            }

            else {

                comp1->history->child = history;

                history->shortcut = comp1->history->shortcut;

                history->stable = comp1->history->stable;

            }

            // 如果组件2有stable,并且大于1的,则stable使用2的值

            if (NULL != comp2->history && comp2->history->stable > history->stable)

                history->stable = comp2->history->stable;

            // 使用数量多的

            history->val = comp1->grey_level;

            history->size = comp1->size;

            // put comp1 to history

            comp->var = comp1->var;

            comp->dvar = comp1->dvar;

            // 如果组件1和2都有像素点,将两个链按照1->2连接在一起

            if (comp1->size >  && comp2->size > )

            {

                comp1->tail->next = comp2->head;

                comp2->head->prev = comp1->tail;

            }

            // 确定头尾

            head = (comp1->size > ) ? comp1->head : comp2->head;

            tail = (comp2->size > ) ? comp2->tail : comp1->tail;

            // always made the newly added in the last of the pixel list (comp1 ... comp2)

        }

        else {

            // 与上面的正好相反

            if (NULL == comp2->history)

            {

                history->shortcut = history;

                history->stable = ;

            }

            else {

                comp2->history->child = history;

                history->shortcut = comp2->history->shortcut;

                history->stable = comp2->history->stable;

            }

            if (NULL != comp1->history && comp1->history->stable > history->stable)

                history->stable = comp1->history->stable;

            history->val = comp2->grey_level;

            history->size = comp2->size;

            // put comp2 to history

            comp->var = comp2->var;

            comp->dvar = comp2->dvar;

            if (comp1->size >  && comp2->size > )

            {

                comp2->tail->next = comp1->head;

                comp1->head->prev = comp2->tail;

            }

            head = (comp2->size > ) ? comp2->head : comp1->head;

            tail = (comp1->size > ) ? comp1->tail : comp2->tail;

            // always made the newly added in the last of the pixel list (comp2 ... comp1)

        }

        comp->head = head;

        comp->tail = tail;

        comp->history = history;

        // 新ER的像素数量是两个ER项的和

        comp->size = comp1->size + comp2->size;

    }

    /** @brief 通过delta计算给定ER项的偏差

    */

    static float MSERVariationCalc(MSERConnectedComp* comp, int delta)

    {

        MSERGrowHistory* history = comp->history;

        int val = comp->grey_level;

        if (NULL != history)

        {

            // 从快捷路径开始往回找历史,找到灰度差大于delta的历史

            MSERGrowHistory* shortcut = history->shortcut;

            while (shortcut != shortcut->shortcut && shortcut->val + delta > val)

                shortcut = shortcut->shortcut;

            // 由于快捷路径是直接跳过一些历史的,要找到最准确的历史还要从以前历史往当前找

            MSERGrowHistory* child = shortcut->child;

            while (child != child->child && child->val + delta <= val)

            {

                shortcut = child;

                child = child->child;

            }

            // get the position of history where the shortcut->val <= delta+val and shortcut->child->val >= delta+val

            // 更新快捷路径

            history->shortcut = shortcut;

            // 返回(R-R(-delta)) / (R-delta)

            return (float)(comp->size - shortcut->size) / (float)shortcut->size;

            // here is a small modification of MSER where cal ||R_{i}-R_{i-delta}||/||R_{i-delta}||

            // in standard MSER, cal ||R_{i+delta}-R_{i-delta}||/||R_{i}||

            // my calculation is simpler and much easier to implement

        }

        // 没有历史,结果为1。也就是没有-delta对应的值。

        // 如果按照(R-R(-delta)) / R(-delta) = 1公式推导:

        // R = 2R(-delta)

        // 就面积来说,怎么两倍这种关系都比较奇怪,因为是xy两个维度的,每个维度提高sqrt(2)倍

        return .;

    }

    /** @brief 检查是否为最稳定极值区域

    */

    static bool MSERStableCheck(MSERConnectedComp* comp, MSERParams params)

    {

        // 检查就是要确定水位的底是否是稳定的

        // tricky part: it actually check the stablity of one-step back

        // 稳定区域都是由比较而来的,不能没有上一个历史。

        if (comp->history == NULL || comp->history->size <= params.minArea || comp->history->size >= params.maxArea)

            return ;

        // diversity : (R(-1) - R(stable)) / R(-1)

        // 使用水位的底与稳定时大小做比较

        float div = (float)(comp->history->size - comp->history->stable) / (float)comp->history->size;

        // variation

        float var = MSERVariationCalc(comp, params.delta);

        // 现在的variation要大于以前的variation,就是以前的更稳定

        // 灰度值差是否大于1

        int dvar = (comp->var < var || (unsigned long)(comp->history->val + ) < comp->grey_level);

        int stable = (dvar && !comp->dvar && comp->var < params.maxVariation && div > params.minDiversity);

        comp->var = var;

        comp->dvar = dvar;

        if (stable)

            // 如果稳定的话,稳定值就是像素数

            comp->history->stable = comp->history->size;

        return stable != ;

    }

    // add a pixel to the pixel list

    /** @brief 添加像素到给定的MSER项中

    */

    static void accumulateMSERComp(MSERConnectedComp* comp, LinkedPoint* point)

    {

        if (comp->size > )

        {

            // 之前有像素,连接到原来像素的链上

            point->prev = comp->tail;

            comp->tail->next = point;

            point->next = NULL;

        }

        else {

            // 第一个像素

            point->prev = NULL;

            point->next = NULL;

            comp->head = point;

        }

        // 新加入的点作为尾巴

        comp->tail = point;

        // 像素数自增

        comp->size++;

    }

    // convert the point set to CvSeq

    static CvContour* MSERToContour(MSERConnectedComp* comp, CvMemStorage* storage)

    {

        CvSeq* _contour = cvCreateSeq(CV_SEQ_KIND_GENERIC | CV_32SC2, sizeof(CvContour), sizeof(CvPoint), storage);

        CvContour* contour = (CvContour*)_contour;

        // 上次历史就是水位的底,将水位的底都添加到轮廓中

        cvSeqPushMulti(_contour, , comp->history->size);

        LinkedPoint* lpt = comp->head;

        for (int i = ; i < comp->history->size; i++)

        {

            CvPoint* pt = CV_GET_SEQ_ELEM(CvPoint, _contour, i);

            pt->x = lpt->pt.x;

            pt->y = lpt->pt.y;

            lpt = lpt->next;

        }

        cvBoundingRect(contour);

        return contour;

    }
p.s. 以上代码有点长了:(
应用
下面对一些图片做实验,测试下mser的检出能力。
    // 加载图像

    Mat srcColor = imread("");

    //创建MSER类

    MSER ms(                    // delta

        ,                         // min area

        ,                     // max area

        , 0.05f                    // max variation

        , 0.4f                        // min diversity

        );                            // edge blur size

    // 转换为灰度图

    Mat srcGray;

    cvtColor(srcColor, srcGray, CV_BGR2GRAY);

    //用于组块区域的像素点集

    vector<vector<Point>> regions;

    ms(srcGray, regions, Mat());

    for (int i = ; i < regions.size(); i++)

    {

        //用连线绘制

        ////polylines(srcGray, regions[i], true, Scalar(0, 0, 255));

        //用椭圆形绘制

        ellipse(srcColor, fitEllipse(regions[i]), Scalar(, , ), );

    }


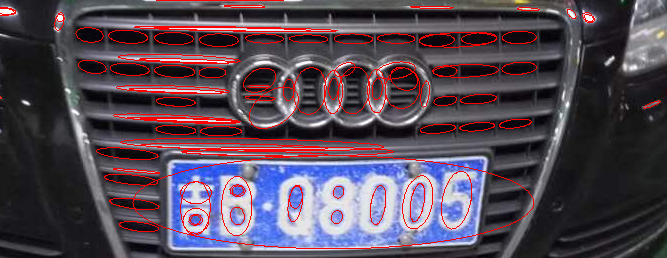

可以看出mser对旋转和不同大小的字符都有一定的检出能力,但如果想对不同灰度变化也有能力,应该修改源码来适应了。
下次介绍mscr,用于在彩色图种查找稳定区域。
转载请注明出处,谢谢~
MSER最稳定极值区域源码分析的更多相关文章
- mser 最大稳定极值区域(文字区域定位)算法 附完整C代码
mser 的全称:Maximally Stable Extremal Regions 第一次听说这个算法时,是来自当时部门的一个同事, 提及到他的项目用它来做文字区域的定位,对这个算法做了一些优化. ...
- OpenCV学习笔记(27)KAZE 算法原理与源码分析(一)非线性扩散滤波
http://blog.csdn.net/chenyusiyuan/article/details/8710462 OpenCV学习笔记(27)KAZE 算法原理与源码分析(一)非线性扩散滤波 201 ...
- 【OpenCV】SIFT原理与源码分析:方向赋值
<SIFT原理与源码分析>系列文章索引:http://www.cnblogs.com/tianyalu/p/5467813.html 由前一篇<关键点搜索与定位>,我们已经找到 ...
- 【OpenCV】SIFT原理与源码分析:关键点搜索与定位
<SIFT原理与源码分析>系列文章索引:http://www.cnblogs.com/tianyalu/p/5467813.html 由前一步<DoG尺度空间构造>,我们得到了 ...
- 并发-HashMap和HashTable源码分析
HashMap和HashTable源码分析 参考: https://blog.csdn.net/luanlouis/article/details/41576373 http://www.cnblog ...
- Guava cacha 机制及源码分析
1.ehcahce 什么时候用比较好:2.问题:当有个消息的key不在guava里面的话,如果大量的消息过来,会同时请求数据库吗?还是只有一个请求数据库,其他的等待第一个把数据从DB加载到Guava中 ...
- spark源码分析以及优化
第一章.spark源码分析之RDD四种依赖关系 一.RDD四种依赖关系 RDD四种依赖关系,分别是 ShuffleDependency.PrunDependency.RangeDependency和O ...
- 鸿蒙内核源码分析(内存规则篇) | 内存管理到底在管什么 | 百篇博客分析OpenHarmony源码 | v16.02
百篇博客系列篇.本篇为: v16.xx 鸿蒙内核源码分析(内存规则篇) | 内存管理到底在管什么 | 51.c.h .o 内存管理相关篇为: v11.xx 鸿蒙内核源码分析(内存分配篇) | 内存有哪 ...
- 鸿蒙内核源码分析(内存主奴篇) | 皇上和奴才如何相处 | 百篇博客分析OpenHarmony源码 | v10.04
百篇博客系列篇.本篇为: v10.xx 鸿蒙内核源码分析(内存主奴篇) | 皇上和奴才如何相处 | 51.c.h .o 前因后果相关篇为: v08.xx 鸿蒙内核源码分析(总目录) | 百万汉字注解 ...
随机推荐
- requirejs 第一个实例
介绍:requirejs 是实现了模块化加载和按需加载的js库,防止了全局变量的污染. 1.安装 require : 在require 中文网下载 http://www.requirejs.cn/,然 ...
- ps 教程
http://www.ps-xxw.cn/ps_cs5_shipinjiaochen.html https://68ps.com/zt/CS6/ https://68ps.com/zt/CC/ htt ...
- 【BZOJ2384】[Ceoi2011]Match KMP
[BZOJ2384][Ceoi2011]Match Description 作为新一轮广告大战的一部分,格丁尼亚的一家大公司准备在城市的某处设置公司的标志(logo).公司经理决定用一些整栋的建筑来构 ...
- SQL实战
一.表关系 二.操作表 1.自行创建测试数据 表结构和数据 SET NAMES utf8;SET FOREIGN_KEY_CHECKS = 0; -- ------------------------ ...
- SPDY
转载SPDY 是什么 SPDY 是 Google 开发的基于传输控制协议 (TCP) 的应用层协议 ,开发组正在推动 SPDY 成为正式标准(现为互联网草案).SPDY 协议旨在通过压缩.多路复用和优 ...
- hive批量执行sql命令及使用小技巧
root@hadoop-senior hive-0.13.1]$ bin/hive -helpusage: hive -d, --define <key=value> Variable s ...
- su: warning: cannot change directory to : Permission denied ;-bash: bash_profile: Permission denied
一.查看主目录权限对不对 1:问题描述 [root@ser6-52 ~]# su - mongodb su: warning: cannot change directory to /home/mon ...
- centos7 yum安装MongoDB
centos7 yum安装MongoDB 原文博客地址http://xgs888.top/post/view?id=64 centos7 yum安装mongodb: 1:创建仓库 vi /etc/ ...
- (转)js原生自定义事件的触发dispatchEvent
1. 对于标准浏览器,其提供了可供元素触发的方法:element.dispatchEvent(). 不过,在使用该方法之前,我们还需要做其他两件事,及创建和初始化.因此,总结说来就是: 1 2 3 d ...
- Python学习笔记1_初识Python
一.Python的发展 1.CNRI时期:CNRI是自助Python发展初期的重要单位,Python1.5版之前的成果大部分都在此时期内完成 2.BeOpen时期:Guido van Rossum与B ...
