【八】MongoDB管理之分片集群实践
MongoDB中集群有三种:主从复制、副本集、分片集群。目前副本集已经替代主从复制架构,成为官方建议采用的架构,而分片集群相较于前两种,更加复杂。
下面是生产环境中常用的分片集群架构:
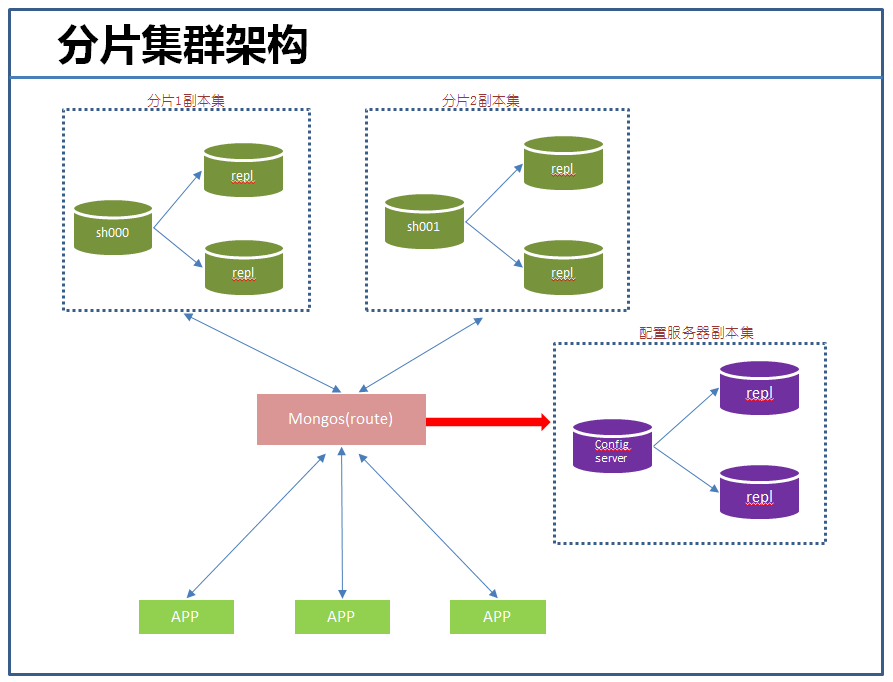
我们知道,分片集群由三个组件构成:
【分片】:官方建议采用副本集,提供数据冗余和高可用,主要存储业务数据。
【配置服务器】:官方建议采用副本集,存储集群的元数据。很重要,能够影响集群的使用。
【mongos instances】:是应用程序的接口,通过它,应用程序与整个集群是透明的,故一般每个应用服务器对应一个实例,可以跟应用部署到一台服务器上。它主要读取或缓存配置服务器中元数据,提供查询路由到每个分片的功能。
一、分片集群部署
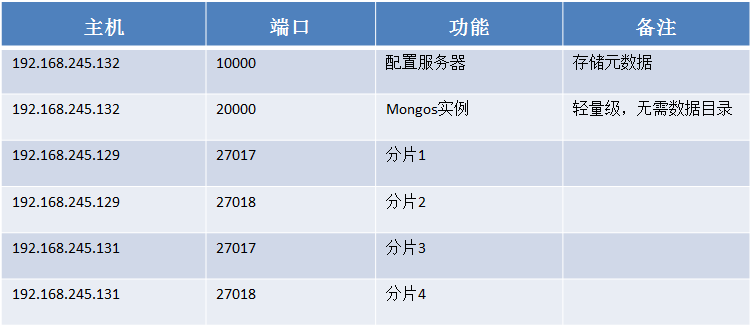
下面我们就根据上面的架构搭建个用于开发测试的环境。当然作为测试环境,为了简单方便,这里就不用副本集了。具体测试环境描述如下:
搭建本环境前提是:所有服务器上mongodb已经安装完成。
1、启动配置服务器(192.168.245.132:10000)
mongod --configsvr --port --dbpath /data/config/db --logpath /data/config/log/mongodb.log --fork
2、启动mongos实例(192.168.245.132:20000)
mongos --configdb 192.168.245.132: --port --logpath /data/config/log/mongodb.log --fork
3、启动各个分片
mongod --dbpath=/data//db --fork --logpath=/data//log/mongodb.log --port

mongod --dbpath=/data//db --fork --logpath=/data//log/mongodb.log --port
4、添加分片到集群中
[root@node3 log]# mongo --host 192.168.245.132 --port 20000     #连接到mongos实例

mongos> sh.addShard("192.168.245.129:27017")                    #添加单个主机,如果要添加副本集:sh.addShard( "<repl_name>/<ip>:<port>" )

{ "shardAdded" : "shard0000", "ok" :  }

mongos> sh.addShard("192.168.245.129:27018")

{ "shardAdded" : "shard0001", "ok" :  }

mongos> sh.addShard("192.168.245.131:27018")

{ "shardAdded" : "shard0002", "ok" :  }

mongos> sh.addShard("192.168.245.131:27017")

{ "shardAdded" : "shard0003", "ok" :  }

mongos>
5、开启数据库分片功能
mongos> sh.enableSharding("test")     #让test库可以分片

{ "ok" :  }
在为collection分片前,必须让该集合所属的数据库具有分片的功能,一旦你开启了某个数据库的分片,MongoDB会分配一个主片。
6、为集合分片
mongos> sh.shardCollection("test.user",{"_id":})    #以_id字段为shard key进行分片

{ "collectionsharded" : "test.user", "ok" :  }
#查看分片后的情况
mongos> use config
switched to db config
mongos> db.databases.find()
{ "_id" : "test", "primary" : "shard0000", "partitioned" : true }
mongos> db.chunks.find()
{ "_id" : "test.user-_id_MinKey", "ns" : "test.user", "min" : { "_id" : { "$minKey" : 1 } }, "max" : { "_id" : { "$maxKey" : 1 } }, "shard" : "shard0000", "lastmod" : Timestamp(1, 0), "lastmodEpoch" : ObjectId("5677cc4015fdf4f1ffbb15bd") }
mongos>
到这里,整个测试的分片集群就搭建完成了,下面进行测试。
二、分片集群测试
1、对新插入的数据是否正常分片测试
mongos> for(i=;i<;i++){ db.user.insert({"_id":i,"Name":"darren","Age":,"Date":new Date()}); }

WriteResult({ "nInserted" :  })

mongos> use config

switched to db config

mongos> db.chunks.find()      #

{ "_id" : "test.user-_id_MinKey", "lastmod" : Timestamp(, ), "lastmodEpoch" : ObjectId("5677cc4015fdf4f1ffbb15bd"), "ns" : "test.user", "min" : { "_id" : { "$minKey" : 1 } }, "max" : { "_id" : 1 }, "shard" : "shard0001" }

{ "_id" : "test.user-_id_1.0", "lastmod" : Timestamp(, ), "lastmodEpoch" : ObjectId("5677cc4015fdf4f1ffbb15bd"), "ns" : "test.user", "min" : { "_id" : 1 }, "max" : { "_id" :  }, "shard" : "shard0002" }

{ "_id" : "test.user-_id_17.0", "lastmod" : Timestamp(, ), "lastmodEpoch" : ObjectId("5677cc4015fdf4f1ffbb15bd"), "ns" : "test.user", "min" : { "_id" : 17 }, "max" : { "_id" : { "$maxKey" :  } }, "shard" : "shard0000" }
到此为止,貌似有点不正常啊,我明明有4个分片的,为什么这里仅仅有三个呢,而且数据的范围也不对啊,数据明显分配得不均匀,这是为什么呢?
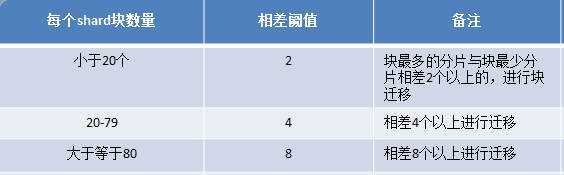
通过查阅文档发现,默认chunk的大小是64M,config.settings.find()可以看到这个值,而我们刚才插入的数据量不大,估计也不会产生几个chunks,而且chunk迁移需要满足一定的条件:
所以,为了能够测试看的很清楚,我们调整下chunk的大小为1M:
mongos> db.settings.save( { _id:"chunksize", value:  } )

WriteResult({ "nMatched" : , "nUpserted" : , "nModified" :  })

mongos> db.settings.find()

{ "_id" : "chunksize", "value" :  }
这时再次进行测试:
mongos> use admin

switched to db admin

mongos> db.runCommand({"shardcollection":"test.students3","key":{"Uid":}})

{ "collectionsharded" : "test.students3", "ok" :  }

mongos> use test

switched to db test

mongos> for(i=;i<;i++){ db.students3.insert({"Uid":i,"Name":"darren","Age":,"Date":new Date()}); }

WriteResult({ "nInserted" :  })

mongos> use config

switched to db config

mongos> db.chunks.find()

{ "_id" : "test.students3-Uid_MinKey", "lastmod" : Timestamp(6, 1), "lastmodEpoch" : ObjectId("5678e209e02c4f2c17a4bfeb"), "ns" : "test.students3", "min" : { "Uid" : { "$minKey" : 1 } }, "max" : { "Uid" : 1 }, "shard" : "shard0001" }
{ "_id" : "test.students3-Uid_1.0", "lastmod" : Timestamp(7, 1), "lastmodEpoch" : ObjectId("5678e209e02c4f2c17a4bfeb"), "ns" : "test.students3", "min" : { "Uid" : 1 }, "max" : { "Uid" : 13 }, "shard" : "shard0002" }
{ "_id" : "test.students3-Uid_13.0", "lastmod" : Timestamp(8, 1), "lastmodEpoch" : ObjectId("5678e209e02c4f2c17a4bfeb"), "ns" : "test.students3", "min" : { "Uid" : 13 }, "max" : { "Uid" : 6649 }, "shard" : "shard0000" }
{ "_id" : "test.students3-Uid_6649.0", "lastmod" : Timestamp(3, 3), "lastmodEpoch" : ObjectId("5678e209e02c4f2c17a4bfeb"), "ns" : "test.students3", "min" : { "Uid" : 6649 }, "max" : { "Uid" : 14804 }, "shard" : "shard0000" }
{ "_id" : "test.students3-Uid_14804.0", "lastmod" : Timestamp(9, 1), "lastmodEpoch" : ObjectId("5678e209e02c4f2c17a4bfeb"), "ns" : "test.students3", "min" : { "Uid" : 14804 }, "max" : { "Uid" : 21440 }, "shard" : "shard0003" }
{ "_id" : "test.students3-Uid_21440.0", "lastmod" : Timestamp(4, 3), "lastmodEpoch" : ObjectId("5678e209e02c4f2c17a4bfeb"), "ns" : "test.students3", "min" : { "Uid" : 21440 }, "max" : { "Uid" : 29158 }, "shard" : "shard0003" }
以上测试正常了,几个分片上都有数据了,比如shard0001分片有1个文档,shard0002有1到13个文档,shard0000有:13-14804个文档等等。mongodb分片并不能做到数据非常的均匀。也可以通过sh.status()直观的查看分片情况:
--- Sharding Status ---

  sharding version: {

    "_id" : ,

    "minCompatibleVersion" : ,

    "currentVersion" : ,

    "clusterId" : ObjectId("5677bf1e37ac37662f7982ed")

}

  shards:

    {  "_id" : "shard0000",  "host" : "192.168.245.129:27017" }

    {  "_id" : "shard0001",  "host" : "192.168.245.129:27018" }

    {  "_id" : "shard0002",  "host" : "192.168.245.131:27018" }

    {  "_id" : "shard0003",  "host" : "192.168.245.131:27017" }

  active mongoses:

    "3.2.0" :

  balancer:

    Currently enabled:  yes

    Currently running:  no

    Failed balancer rounds in last  attempts:

    Migration Results for the last  hours:

        No recent migrations

  databases:

    {  "_id" : "test",  "primary" : "shard0000",  "partitioned" : true }

        test.students3

            shard key: { "Uid" :  }

            unique: false

            balancing: true

            chunks:

                shard0000

                shard0001

                shard0002

                shard0003

            { "Uid" : { "$minKey" :  } } -->> { "Uid" :  } on : shard0001 Timestamp(, )

            { "Uid" :  } -->> { "Uid" :  } on : shard0002 Timestamp(, )

            { "Uid" :  } -->> { "Uid" :  } on : shard0000 Timestamp(, )

            { "Uid" :  } -->> { "Uid" :  } on : shard0000 Timestamp(, )

            { "Uid" :  } -->> { "Uid" :  } on : shard0003 Timestamp(, )

            { "Uid" :  } -->> { "Uid" :  } on : shard0003 Timestamp(, )

            { "Uid" :  } -->> { "Uid" :  } on : shard0001 Timestamp(, )

            { "Uid" :  } -->> { "Uid" :  } on : shard0001 Timestamp(, )

            { "Uid" :  } -->> { "Uid" :  } on : shard0002 Timestamp(, )

            { "Uid" :  } -->> { "Uid" :  } on : shard0002 Timestamp(, )

            { "Uid" :  } -->> { "Uid" :  } on : shard0000 Timestamp(, )

            { "Uid" :  } -->> { "Uid" :  } on : shard0000 Timestamp(, )

            { "Uid" :  } -->> { "Uid" :  } on : shard0003 Timestamp(, )

            { "Uid" :  } -->> { "Uid" :  } on : shard0003 Timestamp(, )

            { "Uid" :  } -->> { "Uid" : { "$maxKey" :  } } on : shard0001 Timestamp(, )
2、对已存在数据分片测试(最常用)
一般而言,数据是由少到多,架构发展也是一样,由简单到复杂。之前是直接搭建个分片集群,考虑到维护成本等原因,现实中这样的做法一般不常用。当一个服务器上的数据库增长到瓶颈时,需要对其进行分片,这个是我们常遇到的情况。
假设现在存在一个数据很大的children数据库,在192.168.245.129:27019上面,需要将这些数据进行分片,下面经过以下几个步骤:
1)连接到mongos实例,将192.168.245.129:27019添加到分片集群中。
mongos> sh.addShard("192.168.245.129:27019")

{ "shardAdded" : "shard0004", "ok" :  }
注意集群分片中不能与新添加的分片中有相同的数据库,否则报错。假如新加入的分片中有test库且有文档数据,集群分片中也存在一个test库,那么这时添加分片时就会报错了,这时可以删除test库。
mongos> sh.addShard("192.168.245.129:27019")

{

    "ok" : ,

    "errmsg" : "can't add shard '192.168.245.129:27019' because a local database 'test' exists in another shard0000",

    "code" :

}
2)在需要的数据库上开启分片功能
mongos> sh.enableSharding("children")

{ "ok" :  }
3)对children数据库下的集合进行分片。注意:对已存在的数据进行分片,一定要保证shard key字段是索引,否则报下面的错误。
mongos> sh.shardCollection("children.children",{"Uid":})

{

    "proposedKey" : {

        "Uid" :

    },

    "curIndexes" : [

        {

            "v" : ,

            "key" : {

                "_id" :

            },

            "name" : "_id_",

            "ns" : "children.children"

        }

    ],

    "ok" : ,

    "errmsg" : "please create an index that starts with the shard key before sharding."

}
在Uid上创建个索引,然后再进行分片:
#要到那个192.168.245.:27019上创建

> db.children.createIndex({"Uid":})

{

    "createdCollectionAutomatically" : false,

    "numIndexesBefore" : ,

    "numIndexesAfter" : ,

    "ok" :

}

#重新分片

mongos> sh.shardCollection("children.children",{"Uid":})

{ "collectionsharded" : "children.children", "ok" :  }
这个时候查看具体分片情况:
mongos> db.shards.find()
{ "_id" : "shard0000", "host" : "192.168.245.129:27017" }
{ "_id" : "shard0001", "host" : "192.168.245.129:27018" }
{ "_id" : "shard0002", "host" : "192.168.245.131:27018" }
{ "_id" : "shard0003", "host" : "192.168.245.131:27017" }
{ "_id" : "shard0004", "host" : "192.168.245.129:27019" }   #新加入的分片
mongos> db.databases.find()
{ "_id" : "test", "primary" : "shard0000", "partitioned" : true }
{ "_id" : "OSSP10", "primary" : "shard0001", "partitioned" : true }
{ "_id" : "children", "primary" : "shard0004", "partitioned" : true }  #这个分片的大本营是0004

mongos> use config

switched to db config

mongos> db.chunks.find()

{ "_id" : "children.children-Uid_MinKey", "lastmod" : Timestamp(, ), "lastmodEpoch" : ObjectId("56790924e02c4f2c17a4c7c1"), "ns" : "children.children", "min" : { "Uid" : { "$minKey" :  } }, "max" : { "Uid" :  }, "shard" : "shard0000" }

{ "_id" : "children.children-Uid_6316.0", "lastmod" : Timestamp(, ), "lastmodEpoch" : ObjectId("56790924e02c4f2c17a4c7c1"), "ns" : "children.children", "min" : { "Uid" :  }, "max" : { "Uid" :  }, "shard" : "shard0001" }

{ "_id" : "children.children-Uid_12633.0", "lastmod" : Timestamp(, ), "lastmodEpoch" : ObjectId("56790924e02c4f2c17a4c7c1"), "ns" : "children.children", "min" : { "Uid" :  }, "max" : { "Uid" :  }, "shard" : "shard0002" }

{ "_id" : "children.children-Uid_18950.0", "lastmod" : Timestamp(, ), "lastmodEpoch" : ObjectId("56790924e02c4f2c17a4c7c1"), "ns" : "children.children", "min" : { "Uid" :  }, "max" : { "Uid" :  }, "shard" : "shard0003" }

{ "_id" : "children.children-Uid_25267.0", "lastmod" : Timestamp(, ), "lastmodEpoch" : ObjectId("56790924e02c4f2c17a4c7c1"), "ns" : "children.children", "min" : { "Uid" :  }, "max" : { "Uid" :  }, "shard" : "shard0000" }

{ "_id" : "children.children-Uid_31584.0", "lastmod" : Timestamp(, ), "lastmodEpoch" : ObjectId("56790924e02c4f2c17a4c7c1"), "ns" : "children.children", "min" : { "Uid" :  }, "max" : { "Uid" :  }, "shard" : "shard0001" }

{ "_id" : "children.children-Uid_37901.0", "lastmod" : Timestamp(, ), "lastmodEpoch" : ObjectId("56790924e02c4f2c17a4c7c1"), "ns" : "children.children", "min" : { "Uid" :  }, "max" : { "Uid" :  }, "shard" : "shard0004" }

{ "_id" : "children.children-Uid_44218.0", "ns" : "children.children", "min" : { "Uid" :  }, "max" : { "Uid" : { "$maxKey" :  } }, "shard" : "shard0004", "lastmod" : Timestamp(, ), "lastmodEpoch" : ObjectId("56790924e02c4f2c17a4c7c1") }
3、哈希分片测试
以上都是基于range的分片,这种方式优点是:对于一些基于范围的查询速度很快;缺点是在各分片上数据分配不均匀。而哈希分片恰恰相反,它牺牲了范围查询的性能,能够让数据相对均匀的分配到各个分片上。下面我们进行测试:
mongos> sh.enableSharding("HashTest")

{ "ok" :  }

mongos>  sh.shardCollection("HashTest.HashTest",{"Uid":"hashed"})   #与上面的范围分片就这个红色的区别

{ "collectionsharded" : "HashTest.HashTest", "ok" :  }

mongos> use HashTest

switched to db HashTest

mongos> for(i=;i<;i++){ db.HashTest.insert({"Uid":i,"Name":"darren","Age":,"Date":new Date()}); }   #插入10万条文档数据

WriteResult({ "nInserted" :  })

mongos> use config

switched to db config

mongos> db.chunks.find()  #不像范围分片那样,有具体的行数,hash貌似还看不出,都是hash值,那么就具体到每个分片上数数数据记录条数吧。
{ "_id" : "HashTest.HashTest-Uid_MinKey", "lastmod" : Timestamp(5, 2), "lastmodEpoch" : ObjectId("56790d30e02c4f2c17a4c89e"), "ns" : "HashTest.HashTest", "min" : { "Uid" : { "$minKey" : 1 } }, "max" : { "Uid" : NumberLong("-7378697629483820640") }, "shard" : "shard0000" }
{ "_id" : "HashTest.HashTest-Uid_-5534023222112865480", "lastmod" : Timestamp(5, 4), "lastmodEpoch" : ObjectId("56790d30e02c4f2c17a4c89e"), "ns" : "HashTest.HashTest", "min" : { "Uid" : NumberLong("-5534023222112865480") }, "max" : { "Uid" : NumberLong("-3689348814741910320") }, "shard" : "shard0001" }
{ "_id" : "HashTest.HashTest-Uid_-1844674407370955160", "lastmod" : Timestamp(5, 6), "lastmodEpoch" : ObjectId("56790d30e02c4f2c17a4c89e"), "ns" : "HashTest.HashTest", "min" : { "Uid" : NumberLong("-1844674407370955160") }, "max" : { "Uid" : NumberLong(0) }, "shard" : "shard0002" }
{ "_id" : "HashTest.HashTest-Uid_1844674407370955160", "lastmod" : Timestamp(5, 8), "lastmodEpoch" : ObjectId("56790d30e02c4f2c17a4c89e"), "ns" : "HashTest.HashTest", "min" : { "Uid" : NumberLong("1844674407370955160") }, "max" : { "Uid" : NumberLong("3689348814741910320") }, "shard" : "shard0003" }
{ "_id" : "HashTest.HashTest-Uid_5534023222112865480", "lastmod" : Timestamp(5, 10), "lastmodEpoch" : ObjectId("56790d30e02c4f2c17a4c89e"), "ns" : "HashTest.HashTest", "min" : { "Uid" : NumberLong("5534023222112865480") }, "max" : { "Uid" : NumberLong("7378697629483820640") }, "shard" : "shard0004" }
{ "_id" : "HashTest.HashTest-Uid_-7378697629483820640", "lastmod" : Timestamp(5, 3), "lastmodEpoch" : ObjectId("56790d30e02c4f2c17a4c89e"), "ns" : "HashTest.HashTest", "min" : { "Uid" : NumberLong("-7378697629483820640") }, "max" : { "Uid" : NumberLong("-5534023222112865480") }, "shard" : "shard0000" }
{ "_id" : "HashTest.HashTest-Uid_-3689348814741910320", "lastmod" : Timestamp(5, 5), "lastmodEpoch" : ObjectId("56790d30e02c4f2c17a4c89e"), "ns" : "HashTest.HashTest", "min" : { "Uid" : NumberLong("-3689348814741910320") }, "max" : { "Uid" : NumberLong("-1844674407370955160") }, "shard" : "shard0001" }
{ "_id" : "HashTest.HashTest-Uid_0", "lastmod" : Timestamp(5, 7), "lastmodEpoch" : ObjectId("56790d30e02c4f2c17a4c89e"), "ns" : "HashTest.HashTest", "min" : { "Uid" : NumberLong(0) }, "max" : { "Uid" : NumberLong("1844674407370955160") }, "shard" : "shard0002" }
{ "_id" : "HashTest.HashTest-Uid_3689348814741910320", "lastmod" : Timestamp(5, 9), "lastmodEpoch" : ObjectId("56790d30e02c4f2c17a4c89e"), "ns" : "HashTest.HashTest", "min" : { "Uid" : NumberLong("3689348814741910320") }, "max" : { "Uid" : NumberLong("5534023222112865480") }, "shard" : "shard0003" }
{ "_id" : "HashTest.HashTest-Uid_7378697629483820640", "lastmod" : Timestamp(5, 11), "lastmodEpoch" : ObjectId("56790d30e02c4f2c17a4c89e"), "ns" : "HashTest.HashTest", "min" : { "Uid" : NumberLong("7378697629483820640") }, "max" : { "Uid" : { "$maxKey" : 1 } }, "shard" : "shard0004" }
最后查了下:shard0000:19833 shard0001:20132 shard0002:20310 shard0003:19916 shard0004:19809 应该算是均匀分布了!!!
三、分片集群常用的管理命令
1、添加分片
sh.addShard( "<ip>:<27017>" )
2、删除分片
#需要运行两次,如果删除的是大本营,必须先要把数据库移到别的分片上或者删除该数据库
db.runCommand({"removeshard":"192.168.245.131:27017"})
3、修改chunk的大小
db.settings.save( { _id:"chunksize", value:  } )

db.settings.find()
4、刷新config服务器路由
use admin

db.runCommand("flushRouterConfig");
5、对数据库/集合进行分片
sh.enableSharding("HashTest") 或者  db.runCommand({"enablesharding":"test"})
sh.shardCollection("HashTest.HashTest",{"Uid":1}) 或者 db.runCommand({"shardcollection":"test.students2","key":{"Uid":1}})
sh.shardCollection("HashTest.HashTest",{"Uid":"hashed"})   #hash分片
6、查看分片集群的状态
sh.status()
7、查看config库信息
mongos> use config

switched to db config

mongos> show collections

actionlog

changelog

chunks

collections

databases

lockpings

locks

mongos

settings

shards

tags

testss

version

#查看分片信息

mongos> db.shards.find()

{ "_id" : "shard0000", "host" : "192.168.245.129:27017" }

{ "_id" : "shard0001", "host" : "192.168.245.129:27018" }

{ "_id" : "shard0002", "host" : "192.168.245.131:27018" }

{ "_id" : "shard0003", "host" : "192.168.245.131:27017" }

{ "_id" : "shard0004", "host" : "192.168.245.129:27019" }

#查看分片数据库信息
mongos> db.databases.find()

{ "_id" : "test", "primary" : "shard0000", "partitioned" : true }

{ "_id" : "OSSP10", "primary" : "shard0001", "partitioned" : true }

{ "_id" : "children", "primary" : "shard0004", "partitioned" : true }

{ "_id" : "HashTest", "primary" : "shard0002", "partitioned" : true }

#查看块信息
mongos> db.chunks.find()

{ "_id" : "test.user-_id_MinKey", "lastmod" : Timestamp(, ), "lastmodEpoch" : ObjectId("5677cc4015fdf4f1ffbb15bd"), "ns" : "test.user", "min" : { "_id" : { "$minKey" :  } }, "max" : { "_id" :  }, "shard" : "shard0001" }

{ "_id" : "test.user-_id_1.0", "lastmod" : Timestamp(, ), "lastmodEpoch" : ObjectId("5677cc4015fdf4f1ffbb15bd"), "ns" : "test.user", "min" : { "_id" :  }, "max" : { "_id" :  }, "shard" : "shard0002" }

{ "_id" : "test.user-_id_17.0", "lastmod" : Timestamp(, ), "lastmodEpoch" : ObjectId("5677cc4015fdf4f1ffbb15bd"), "ns" : "test.user", "min" : { "_id" :  }, "max" : { "_id" : { "$maxKey" :  } }, "shard" : "shard0000" }
【八】MongoDB管理之分片集群实践的更多相关文章
- 【七】MongoDB管理之分片集群介绍
分片是横跨多台主机存储数据记录的过程,它是MongoDB针对日益增长的数据需求而采用的解决方案.随着数据的快速增长,单台服务器已经无法满足读写高吞吐量的需求.分片通过水平扩展的方式解决了这个问题.通过 ...
- mongoDB研究笔记:分片集群部署
前面几篇文章的分析复制集解决了数据库的备份与自动故障转移,但是围绕数据库的业务中当前还有两个方面的问题变得越来越重要.一是海量数据如何存储?二是如何高效的读写海量数据?尽管复制集也可以实现读写分析,如 ...
- mongoDB研究笔记:分片集群的工作机制
上面的(http://www.cnblogs.com/guoyuanwei/p/3565088.html)介绍了部署了一个默认的分片集群,对mongoDB的分片集群有了大概的认识,到目前为止我们还没有 ...
- 关于MongoDB副本集和分片集群有关用户和权限的说明分析
1.MongoDB副本集 可以先创建超管用户,然后再关闭服务,创建密钥文件,修改配置文件,启动服务,使用超管用户登录验证,然后创建普通用户 2.MongoDB分片集群 先关闭服务,创建密钥文件,修改配 ...
- MongoDB 3.4 分片集群副本集 认证
连接到router所在的MongoDB Shell 我本机端口设置在50000上 mongo --port 接下来的流程和普通数据库添加用户权限一样 db.createUser({user:&quo ...
- MongoDB DBA 实践6-----MongoDB的分片集群部署
一.分片 MongoDB使用分片技术来支持大数据集和高吞吐量操作. 1.分片目的 对于单台数据库服务器,庞大的数据量及高吞吐量的应用程序对它而言无疑是个巨大的挑战.频繁的CRUD操作能够耗尽服务器的C ...
- MongoDB Sharding(二) -- 搭建分片集群
在上一篇文章中,我们基本了解了分片的概念,本文将着手实践,进行分片集群的搭建 首先我们再来了解一下分片集群的架构,分片集群由三部分构成: mongos:查询路由,在客户端程序和分片之间提供接口.本次实 ...
- 网易云MongoDB分片集群(Sharding)服务已上线
此文已由作者温正湖授权网易云社区发布. 欢迎访问网易云社区,了解更多网易技术产品运营经验. MongoDB sharding cluster(分片集群)是MongoDB提供的数据在线水平扩展方案,包括 ...
- 【MongoDB】在windows平台下搭建mongodb的分片集群(二)
在上一片博客中我们讲了Mongodb数据库中分片集群的主要原理. 在本篇博客中我们主要讲描写叙述分片集群的搭建过程.配置分片集群主要有两个步骤.第一启动全部须要的mongod和mongos进程. 第二 ...
随机推荐
- 开发中可能会用到的几个小tip----QT, pycharm, android, 等
QT: 如果是在windows下开发的话,添加外部库,外部包含头文件路径的时候,要注意用相对路径,或者在项目上右键添加外部库的路径或者头文件路径,否则,会卡在这里开始怀疑人生... 如果是在linux ...
- hbase的数据模型
hbase类似bigTable是一个分布式的数据库,它是一个稀疏的,长期存储的,多维的,排序的映射表,这张表的索引是行关键字,列关键字,时间戳.hbase中的数据都是字符串,没有类型. ...
- 基于JT/T 1078协议设计和开发部标视频服务器
交通部与2016年10月份推出了JT/T 1078-2016标准,全称是<道路运输车辆卫星定位系统视频通信协议>.该标准将改变以往两客一危车辆的视频监控设备通信协议都是设备厂商私有协议的局 ...
- 在Windows 10中开启开发者模式
及以上)的电脑上使用Visual Studio来开发Windows 10或者Windows 8.1的应用,你可能会遇到下面的问题,要求你开启开发者模式. 于是你跑到设置里面,把开发者模式打开: 结果你 ...
- 线性判别函数-Fisher 线性判别
这是我在上模式识别课程时的内容,也有参考这里. 线性判别函数的基本概念 判别函数为线性的情况的一般表达式 式中x是d 维特征向量,又称样本向量, 称为权向量, 分别表示为 是个常数,称为阈值权. 设样 ...
- 【Mac系统】之fiddler下载和安装
使用教程参考:http://www.cnblogs.com/TankXiao/archive/2012/02/06/2337728.html#request 一.首先,在Mac下安装fiddler时, ...
- 生成JNI的DLL时提示找不到jni.h的解决的方法Cannot open include file: 'jni.h': No such file or directory
解决的方法: 就是到jdk的安装文件夹下include下把下面对应的文件,拷贝到vc文件夹下的include文件夹下 \jdk\include\jni.h \jdk\include\win32\jaw ...
- [c++]对象指针,引用的操作
1.time类保存在"htime.h"中.要求: ⑴ 数据成员包括时(hour).分(minute).秒(second),为私有成员: ⑵ 能给数据成员提供值的成员函数(默认值为0 ...
- JQuery+Json 省市区三级联动
一.画面以及JS <!DOCTYPE html> <head> <meta http-equiv="Content-Type" content=&qu ...
- unity 切换场景
using System.Collections; using System.Collections.Generic; using UnityEngine; using UnityEngine.UI; ...