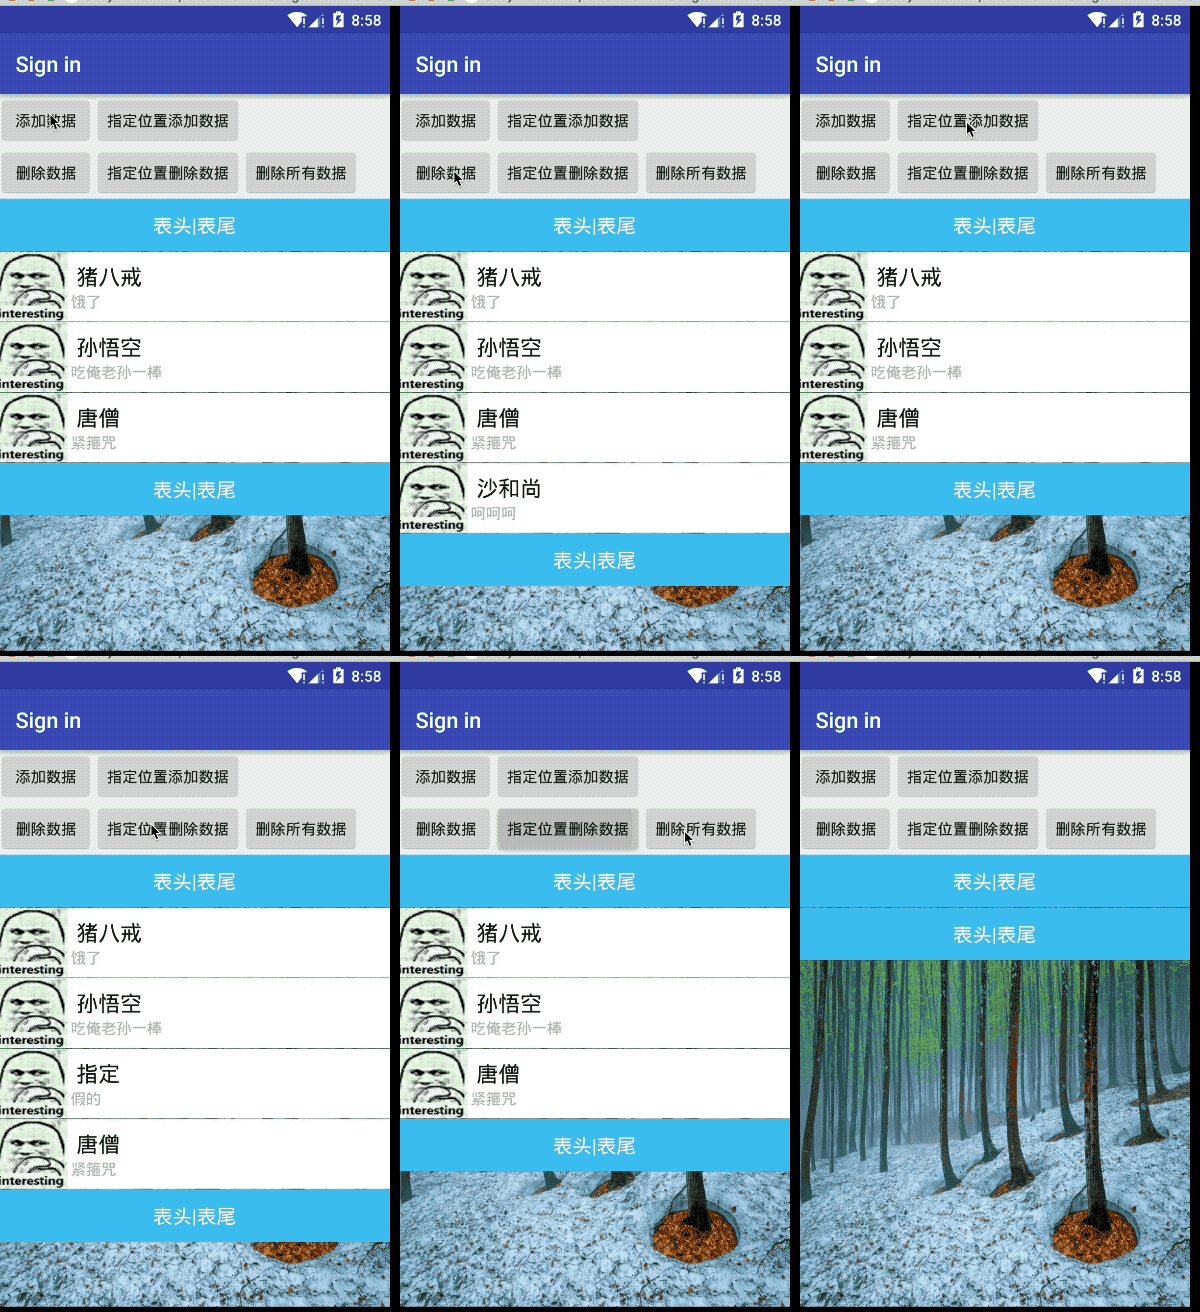
Android基础控件ListView基础操作
1、简介
基于Android基础控件ListView和自定义BaseAdapter适配器情况下,对ListView的数据删除和添加操作:
    public boolean add(E e) {//添加数据

        throw new RuntimeException("Stub!");

    }

    public void add(int index, E element) {//通过索引添加数据

        throw new RuntimeException("Stub!");

    }

    public boolean remove(Object o) {//移除数据

        throw new RuntimeException("Stub!");

    }

    public E remove(int index) {//通过索引移除数据

        throw new RuntimeException("Stub!");

    }

    public void clear() {//清除所有数据

        throw new RuntimeException("Stub!");

    }

    public void notifyDataSetChanged() {//刷新ListView

        throw new RuntimeException("Stub!");

    }
2、简单使用

1)添加按钮布局xml文件:
    <LinearLayout

        android:layout_width="match_parent"

        android:layout_height="wrap_content"

        android:orientation="horizontal">

        <Button

            android:layout_width="wrap_content"

            android:layout_height="wrap_content"

            android:text="添加数据"

            android:id="@+id/addbtn"/>

        <Button

            android:layout_width="wrap_content"

            android:layout_height="wrap_content"

            android:text="指定位置添加数据"

            android:id="@+id/addbtn1"/>

    </LinearLayout>

    <LinearLayout

        android:layout_width="match_parent"

        android:layout_height="wrap_content"

        android:orientation="horizontal">

        <Button

            android:layout_width="wrap_content"

            android:layout_height="wrap_content"

            android:text="删除数据"

            android:id="@+id/Remove"/>

        <Button

            android:layout_width="wrap_content"

            android:layout_height="wrap_content"

            android:text="指定位置删除数据"

            android:id="@+id/Remove1"/>

        <Button

            android:layout_width="wrap_content"

            android:layout_height="wrap_content"

            android:text="删除所有数据"

            android:id="@+id/clearAll"/>

    </LinearLayout>
2)在自定义的Adapter.java文件中添加、移除代码:
    public void add(Custom custom){

        if (aData == null){

            aData = new LinkedList<>();

        }

        aData.add(custom);

        notifyDataSetChanged();

    }

    public void add(int position,Custom custom){

        if (aData == null){

            aData = new LinkedList<>();

        }

        aData.add(position,custom);

        notifyDataSetChanged();

    }

    public void remove(Custom custom){

        if (aData !=null){

            aData.remove(custom);

        }

        notifyDataSetChanged();

    }

    public void remove(int postition){

        if (aData !=null){

            aData.remove(postition);

        }

        notifyDataSetChanged();

    }

    public void clear() {

        if(aData != null) {

            aData.clear();

        }

        notifyDataSetChanged();

    }
3)Java文件的代码:
public class LoginActivity extends AppCompatActivity implements AdapterView.OnItemClickListener,OnClickListener{

    private String[] names = new String[]{"猪八戒","孙悟空","唐僧"};

    private String[] says = new String[]{"饿了","吃俺老孙一棒","紧箍咒"};

    private  int[] images = new int[]{R.drawable.icon,R.drawable.icon,R.drawable.icon};

    private Button btnAdd,addBtn1,removeBtn,removeBtn1,clearBtn;

    private CustomAdapter customAdapter = null;

    private Custom custom_1 = null;

    @Override

    protected void onCreate(Bundle savedInstanceState) {

        super.onCreate(savedInstanceState);

        setContentView(R.layout.activity_login);

        btnAdd = (Button)findViewById(R.id.addbtn);

        btnAdd.setOnClickListener(this);

        addBtn1 = (Button)findViewById(R.id.addbtn1);

        addBtn1.setOnClickListener(this);

        removeBtn = (Button)findViewById(R.id.Remove);

        removeBtn.setOnClickListener(this);

        removeBtn1 = (Button)findViewById(R.id.Remove1);

        removeBtn1.setOnClickListener(this);

        clearBtn = (Button)findViewById(R.id.clearAll);

        clearBtn.setOnClickListener(this);

        ListView list_test = (ListView) findViewById(R.id.listview);

        final LayoutInflater inflater = LayoutInflater.from(this);

        View headView = inflater.inflate(R.layout.list_header, null, false);

        View footView = inflater.inflate(R.layout.list_header, null, false);

        List<Custom> aData = new LinkedList<Custom>();

        for (int i=0;i<names.length;i++){

            aData.add(new Custom(names[i],says[i],images[i]));

        }

        //添加表头和表尾需要写在setAdapter方法调用之前!!!

        list_test.addHeaderView(headView);

        list_test.addFooterView(footView);

        customAdapter = new CustomAdapter((LinkedList<Custom>)aData,LoginActivity.this);

        list_test.setAdapter(customAdapter);

        list_test.setOnItemClickListener(this);

    }

    @Override

    public void onClick(View view){

        switch (view.getId()){

            case R.id.addbtn:

                custom_1 = new Custom("沙和尚","呵呵呵",R.drawable.icon);

                customAdapter.add(custom_1);

                break;

            case R.id.addbtn1:

                customAdapter.add(2,new Custom("指定","假的",R.drawable.icon));

                break;

            case R.id.Remove:

                customAdapter.remove(custom_1);

                break;

            case R.id.Remove1:

                //判断是否越界 省略

                customAdapter.remove(2);

                break;

            case R.id.clearAll:

                customAdapter.clear();

                break;

        }

    }

}
Android基础控件ListView基础操作的更多相关文章
- Android列表控件ListView详解
ListView绝对可以称得上是Android中最常用的控件之一,几乎所有应用程序都会用到它. 由于手机屏幕空间都比较有限,能够一次性在屏幕上显示的内容并不多,当我们的程序中有大量的数据需要展示的时候 ...
- Android:控件ListView列表项与适配器结合使用
Listview是用来展示一些重复性的数据用的,比如一些列表集合数据展示到手机,需要适配器作为载体获取数据,最后将数据填充到布局. ListView里面的每个子项Item可以使一个字符串,也可以是一个 ...
- Android基础控件ListView和自定义BaseAdapter适配器
1.简介 ListView用于列表显示,相当于OC中的TableView,和适配器一块使用,相关属性: footerDividersEnabled:是否在footerView(表尾)前绘制一个分隔条, ...
- Android重要控件———ListView
<RelativeLayout xmlns:android="http://schemas.android.com/apk/res/android" xmlns:tools= ...
- Android学习——控件ListView的使用
一.ListView的简单用法 首先新建一个ListViewTest项目,并让Android Studio自动创建好活动.然后修改activity_main.xml中的代码,如下: <?xml ...
- android 基础控件(EditView、SeekBar等)的属性及使用方法
android提供了大量的UI控件,本文将介绍TextView.ImageView.Button.EditView.ProgressBar.SeekBar.ScrollView.WebView ...
- 矩阵, 矩阵 , Android基础控件之ImageView
天下文章大家抄,以下所有内容,有来自copy,有来自查询,亦有自己的总结(目的是总结出自己的东西),所以说原创,不合适,说是转载也不恰当,所以我称之为笔记,可惜没有此分类选项,姑且不要脸一点,选择为原 ...
- React Native环境搭建以及几个基础控件的使用
之前写了几篇博客,但是没有从最基础的开始写,现在想了想感觉不太合适,所以现在把基础的一些东西给补上,也算是我从零开始学习RN的经验吧! 一.环境搭建 首先声明一下,本人现在用的编辑器是SublimeT ...
- Android基本控件之listView(三)<用ListView实现分页加载>
我们之前讨论了ListView的基本使用方法和ListView的优化 今天我们再来讨论一个关于ListView的一个新的东西~就是分页加载.那么什么是分页加载呢?简单点说,就是"下拉刷新&q ...
随机推荐
- 大道浮屠诀---cwRsync同步工具的使用
目的: 在日常生活中,我们有时候会遇到这样类似的问题 ---需要把一台服务器上的某个重要的文件进行备份(拷贝另外的服务器上) ---需要同步系统上的配置文件到其他系统 利用此cwRsync软件可以解决 ...
- mycat-zookeepr--mycatweb
##############################mycat镜像############################## 5-1 创mycat镜像 wget http://dl.myca ...
- neo4j采坑记
1.安装后启动不起来,解决方案: https://stackoverflow.com/questions/38607283/failed-to-start-neo4j-service 2.一直启动不 ...
- python接口自动化(接口基础)
一.什么是接口? 前端负责展示和收集数据 后端负责处理数据,返回对应的结果 接口是前端与后端之间的桥梁,传递数据的通道 二.
- 一个好的mvc5+ef6的学习地址
链接地址: MVC5 + EF6 入门完整教程 感谢这位博主的无私奉献 文章目录列表:http://www.cnblogs.com/miro/p/3777960.html#3673688
- C# 创建DataTable并添加行和列
DataTable dt=new DataTable dt.Columns.Add("numview", typeof(Int32)); dt.Columns.Add(" ...
- 【数论】[SDOI2010]古代猪文
大概就是求这个: $$G^\sum_{k|N} C_{n}^{k}$$ 显然只要把后面的$\sum_{k|N}C_{n}^{k}$求出来就好了 几个要用的定理: 欧拉定理的推论:(a和n互质) $$a ...
- c# 给文件/文件夹 管理用户权限
public class PermissionManager { /// <summary> /// 为文件添加users,everyone用户组的完全控制权限 /// </summ ...
- [JZOJ6344] 【NOIP2019模拟2019.9.7】Huge Counting
题目 题目大意自己看题去-- 正解 比赛时在刚第二题,所以根本没有时间思考-- 模型可以转化为从\((x_1,x_2,..,x_n)\)出发到\((1,1)\)的方案数模\(2\). 方案数就用有重复 ...
- mysql数据库优化思路
1.设置合适的主键和索引. (1).设置主键和索引的字段尽量不要选取经常修改的字段,同时索引的个数一般不宜超过6个: (2).sql语句中like “%str%” 不支持索引, "str% ...
