tensorflow在文本处理中的使用——词袋
代码来源于:tensorflow机器学习实战指南(曾益强 译,2017年9月)——第七章:自然语言处理
代码地址:https://github.com/nfmcclure/tensorflow-cookbook
解决问题:使用“词袋”嵌入来进行垃圾短信的预测(使用逻辑回归算法)
缺点:不考虑相关单词顺序特征,长文本的处理困难
步骤如下:
step1:导入需要的包
step2:准备数据集
step3:选择参数(每个文本保留多少单词数,最低词频是多少)
step4:构建词袋
step5:分割数据集
step6:构建图
step7:训练
step8:测试
step1:导入需要的包
import tensorflow as tf

import matplotlib.pyplot as plt

import os

import numpy as np

import csv

import string

import requests

import io

from zipfile import ZipFile

from tensorflow.contrib import learn

from tensorflow.python.framework import ops

ops.reset_default_graph()

# Start a graph session

sess = tf.Session()
step2:准备数据集
# Check if data was downloaded, otherwise download it and save for future use

save_file_name = os.path.join('temp','temp_spam_data.csv')

if os.path.isfile(save_file_name):

    text_data = []

    with open(save_file_name, 'r') as temp_output_file:

        reader = csv.reader(temp_output_file)

        for row in reader:

            text_data.append(row)

else:

    zip_url = 'http://archive.ics.uci.edu/ml/machine-learning-databases/00228/smsspamcollection.zip'

    r = requests.get(zip_url)

    z = ZipFile(io.BytesIO(r.content))

    file = z.read('SMSSpamCollection')

    # Format Data

    text_data = file.decode()

    text_data = text_data.encode('ascii',errors='ignore')

    text_data = text_data.decode().split('\n')

    text_data = [x.split('\t') for x in text_data if len(x)>=1]

    # And write to csv

    with open(save_file_name, 'w') as temp_output_file:

        writer = csv.writer(temp_output_file)

        writer.writerows(text_data)

texts = [x[1] for x in text_data]

target = [x[0] for x in text_data]

# Relabel 'spam' as 1, 'ham' as 0

target = [1 if x=='spam' else 0 for x in target]

# Normalize text,为减少无意义的词汇,对文本进行规则化处理

# Lower case

texts = [x.lower() for x in texts]

# Remove punctuation

texts = [''.join(c for c in x if c not in string.punctuation) for x in texts]

# Remove numbers

texts = [''.join(c for c in x if c not in '') for x in texts]

# Trim extra whitespace

texts = [' '.join(x.split()) for x in texts]
step3:选择参数
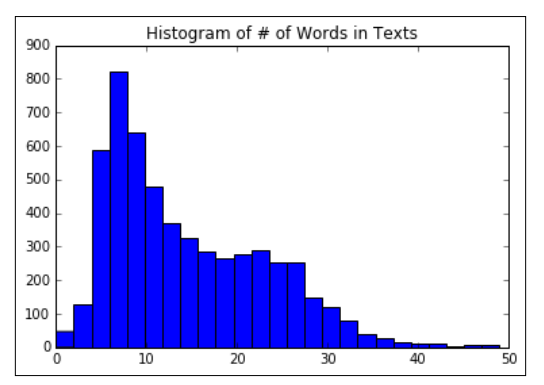
# Plot histogram of text lengths文本数据中的单词数的直方图

text_lengths = [len(x.split()) for x in texts]

text_lengths = [x for x in text_lengths if x < 50]

plt.hist(text_lengths, bins=25)

plt.title('Histogram of # of Words in Texts')
step4:构建词袋
# Choose max text word length at 25,也可以设为30或者40

sentence_size = 25

min_word_freq = 3

# Setup vocabulary processor

vocab_processor = learn.preprocessing.VocabularyProcessor(sentence_size, min_frequency=min_word_freq)

# Have to fit transform to get length of unique words.

vocab_processor.fit_transform(texts)

embedding_size = len(vocab_processor.vocabulary_)
step5:分割数据集
# Split up data set into train/test

train_indices = np.random.choice(len(texts), round(len(texts)*0.8), replace=False)

test_indices = np.array(list(set(range(len(texts))) - set(train_indices)))

texts_train = [x for ix, x in enumerate(texts) if ix in train_indices]

texts_test = [x for ix, x in enumerate(texts) if ix in test_indices]

target_train = [x for ix, x in enumerate(target) if ix in train_indices]

target_test = [x for ix, x in enumerate(target) if ix in test_indices]
step6:构建图
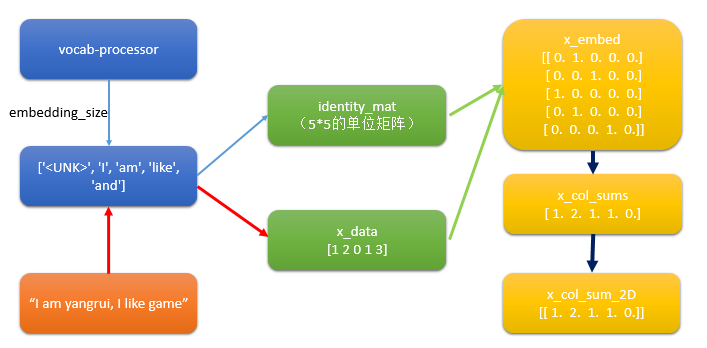
step6.1:构建出文本的向量
# Setup Index Matrix for one-hot-encoding,使用该矩阵为每个单词查找稀疏向量

identity_mat = tf.diag(tf.ones(shape=[embedding_size]))

# Create variables for logistic regression

A = tf.Variable(tf.random_normal(shape=[embedding_size,1]))

b = tf.Variable(tf.random_normal(shape=[1,1]))

# Initialize placeholders

x_data = tf.placeholder(shape=[sentence_size], dtype=tf.int32)

y_target = tf.placeholder(shape=[1, 1], dtype=tf.float32)

# Text-Vocab Embedding,使用tf的嵌入查找函数来映射句子中的单词为单位矩阵的one-hot向量,再进行求和

# tf.nn.embedding_lookup(y,x)x为索引,找出y中对应索引的值

x_embed = tf.nn.embedding_lookup(identity_mat, x_data)

x_col_sums = tf.reduce_sum(x_embed, 0)

# Declare model operations

x_col_sums_2D = tf.expand_dims(x_col_sums, 0)
疑问:如何利用词袋将文本变成向量?
step6.2 构建图
model_output = tf.add(tf.matmul(x_col_sums_2D, A), b)

# Declare loss function (Cross Entropy loss)

loss = tf.reduce_mean(tf.nn.sigmoid_cross_entropy_with_logits(model_output, y_target))

# Prediction operation

prediction = tf.sigmoid(model_output)

# Declare optimizer

my_opt = tf.train.GradientDescentOptimizer(0.001)

train_step = my_opt.minimize(loss)
step7:训练
# Intitialize Variables

init = tf.initialize_all_variables()

sess.run(init)

# Start Logistic Regression

print('Starting Training Over {} Sentences.'.format(len(texts_train)))

loss_vec = []

train_acc_all = []

train_acc_avg = []

for ix, t in enumerate(vocab_processor.fit_transform(texts_train)):

    y_data = [[target_train[ix]]]

    sess.run(train_step, feed_dict={x_data: t, y_target: y_data})

    temp_loss = sess.run(loss, feed_dict={x_data: t, y_target: y_data})

    loss_vec.append(temp_loss)

    if (ix+1)%10==0:

        print('Training Observation #' + str(ix+1) + ': Loss = ' + str(temp_loss))

    # Keep trailing average of past 50 observations accuracy

    # Get prediction of single observation

    [[temp_pred]] = sess.run(prediction, feed_dict={x_data:t, y_target:y_data})

    # Get True/False if prediction is accurate

    train_acc_temp = target_train[ix]==np.round(temp_pred)

    train_acc_all.append(train_acc_temp)

    if len(train_acc_all) >= 50:

        train_acc_avg.append(np.mean(train_acc_all[-50:]))
step8:测试
# Get test set accuracy

print('Getting Test Set Accuracy For {} Sentences.'.format(len(texts_test)))

test_acc_all = []

for ix, t in enumerate(vocab_processor.fit_transform(texts_test)):

    y_data = [[target_test[ix]]]

    if (ix+1)%50==0:

        print('Test Observation #' + str(ix+1))

    # Keep trailing average of past 50 observations accuracy

    # Get prediction of single observation

    [[temp_pred]] = sess.run(prediction, feed_dict={x_data:t, y_target:y_data})

    # Get True/False if prediction is accurate

    test_acc_temp = target_test[ix]==np.round(temp_pred)

    test_acc_all.append(test_acc_temp)

print('\nOverall Test Accuracy: {}'.format(np.mean(test_acc_all)))

# Plot training accuracy over time

plt.plot(range(len(train_acc_avg)), train_acc_avg, 'k-', label='Train Accuracy')

plt.title('Avg Training Acc Over Past 50 Generations')

plt.xlabel('Generation')

plt.ylabel('Training Accuracy')

plt.show()
tensorflow在文本处理中的使用——词袋的更多相关文章
- tensorflow在文本处理中的使用——TF-IDF算法
代码来源于:tensorflow机器学习实战指南(曾益强 译,2017年9月)——第七章:自然语言处理 代码地址:https://github.com/nfmcclure/tensorflow-coo ...
- tensorflow在文本处理中的使用——CBOW词嵌入模型
代码来源于:tensorflow机器学习实战指南(曾益强 译,2017年9月)——第七章:自然语言处理 代码地址:https://github.com/nfmcclure/tensorflow-coo ...
- tensorflow在文本处理中的使用——Doc2Vec情感分析
代码来源于:tensorflow机器学习实战指南(曾益强 译,2017年9月)——第七章:自然语言处理 代码地址:https://github.com/nfmcclure/tensorflow-coo ...
- tensorflow在文本处理中的使用——skip-gram模型
代码来源于:tensorflow机器学习实战指南(曾益强 译,2017年9月)——第七章:自然语言处理 代码地址:https://github.com/nfmcclure/tensorflow-coo ...
- tensorflow在文本处理中的使用——Word2Vec预测
代码来源于:tensorflow机器学习实战指南(曾益强 译,2017年9月)——第七章:自然语言处理 代码地址:https://github.com/nfmcclure/tensorflow-coo ...
- tensorflow在文本处理中的使用——skip-gram & CBOW原理总结
摘自:http://www.cnblogs.com/pinard/p/7160330.html 先看下列三篇,再理解此篇会更容易些(个人意见) skip-gram,CBOW,Word2Vec 词向量基 ...
- tensorflow在文本处理中的使用——辅助函数
代码来源于:tensorflow机器学习实战指南(曾益强 译,2017年9月)——第七章:自然语言处理 代码地址:https://github.com/nfmcclure/tensorflow-coo ...
- (数据科学学习手札71)在Python中制作个性化词云图
本文对应脚本及数据已上传至我的Github仓库https://github.com/CNFeffery/DataScienceStudyNotes 一.简介 词云图是文本挖掘中用来表征词频的数据可视化 ...
- TensorFlow实现文本情感分析详解
http://c.biancheng.net/view/1938.html 前面我们介绍了如何将卷积网络应用于图像.本节将把相似的想法应用于文本. 文本和图像有什么共同之处?乍一看很少.但是,如果将句 ...
随机推荐
- SQL知识总结(1)
什么是数据库: sql组成: DDL:数据定义语句,有CREATE/DROP等: DML:数据操作语句,有DELETE/UPDATE/INSERT/INSERT等; DQL:数据查询语句,有SELEC ...
- 异步操作async await
async函数的特点: 语义化强 里面的await只能在async函数中使用 await后面的语句可以是promise对象.数字.字符串等 async函数返回的是一个Promsie对象 await语句 ...
- day39-Spring 03-JDK的动态代理
package cn.itcast.spring3; import java.lang.reflect.InvocationHandler; import java.lang.reflect.Meth ...
- PLAY2.6-SCALA(二) Actions, Controllers ,Results,routes
一.Action(play.api.mvc.Action) 大多数的应用的请求都是由action进行处理,并生成一个结果给客户端,Action有多种创建方式: 1. Action {Ok(" ...
- 字符串Hash算法比较
基本概念所谓完美哈希函数,就是指没有冲突的哈希函数,即对任意的 key1 != key2 有h(key1) != h(key2).设定义域为X,值域为Y, n=|X|,m=|Y|,那么肯定有m> ...
- 在IDEA中实战Git 合并&提交&切换&创建分支
工作中多人使用版本控制软件协作开发,常见的应用场景归纳如下: 假设小组中有两个人,组长小张,组员小袁 场景一:小张创建项目并提交到远程Git仓库 场景二:小袁从远程Git仓库上获取项目源码 场景三:小 ...
- Docker Swarm:经济高效的容器调度
本文探讨了几种容器调度策略,并以内存约束为例,讨论了如何利用Docker Swarm,通过资源约束实现容器的合理调度.其中,对容器资源的约束,包括硬约束和软约束,硬约束是指内存资源的实际限制条件,而软 ...
- UVa 495【大数加法】
UVa 495 求第n位斐波那契数列,n<=5000. 还是大数问题,这次是大数加法.仿照UVa 623的解法来做.623位数可以一位一位的增,但是这个需要预先给够位数,要是按六位存一个数组元素 ...
- C++第一次作业(循环语句的使用)
一.知识点 循环结构 二.教学目的 掌握while和do...while循环语句在C++中的写法 三.教学内容 1.while语句 (1)执行顺序:先判断表达式(循环控制条件)的值,若表达式的值为tr ...
- 最优化WPF 3D性能(基于“Tier-2”硬件)
原文:最优化WPF 3D性能(基于"Tier-2"硬件) 原文地址:Maximizing WPF 3D Performance on Tier-2 Hardware 开发人员在应用 ...