IOS开发基础知识--碎片41
1:UIWebView加载本地的HTML
NSString *path = [[NSBundle mainBundle] bundlePath];

NSURL *baseURL = [NSURL fileURLWithPath:path];

NSString * htmlPath = [[NSBundle mainBundle] pathForResource:@"index1"

                                                      ofType:@"html"];

NSString * htmlCont = [NSString stringWithContentsOfFile:htmlPath

                                                encoding:NSUTF8StringEncoding

                                                   error:nil];

[self.webView loadHTMLString:htmlCont baseURL:baseURL];
注意:如何创建工程内的Css,js,html文件,创建iOS -other-Empty 如果Css 则以.css结尾,Js则以.js结尾,Html则是以.html结尾
2:JSPatch的运用
a:OC转JSPatch的地址:http://bang590.github.io/JSPatchConvertor/
b:JSPatch脚本介绍地址:https://github.com/bang590/JSPatch/wiki
c:比较不错的文章地址:ww.cnblogs.com/dsxniubility/p/5080875.html
d:JSPatch自动补地址:https://github.com/bang590/JSPatchX
注意版本控制(可以根据APP的版本号架服务端的请求地址)跟JS安全性(MD5加密然后再APP解密);

管理中心的一些考虑:
 |
 |
下面分享一个帮助类:
#import "JSPatchHelper.h"

//文件名称

NSString * const jsPatchJsFileName=@"main.js";

@implementation JSPatchHelper

+ (instancetype)sharedInstance

{

    static JSPatchHelper* instance = nil;

    static dispatch_once_t onceToken;

    dispatch_once(&onceToken, ^{

        instance = [JSPatchHelper new];

    });

    return instance;

}

+(void)HSDevaluateScript

{

    //从本地获取下载的JS文件

    NSURL *p = FilePath;

    //判断文件是否存在

    NSString *curFilePath=[p.path stringByAppendingString:[NSString stringWithFormat:@"/%@",jsPatchJsFileName]];

    if (![[NSFileManager defaultManager] fileExistsAtPath:curFilePath]) {

        return;

    }

    //获取内容

    NSString *js = [NSString stringWithContentsOfFile:curFilePath encoding:NSUTF8StringEncoding error:nil];

    //如果有内容

    if (js.length > )

    {

        //-------

        //服务端要对JS内容进行加密,在此处解密js内容;增加安全性

        //----

        //运行

        [JPEngine startEngine];

        [JPEngine evaluateScript:js];

    }

}

+(void)loadJSPatch

{

    //优化间隔一段时间 再去请求一次 否则太频繁(这边定义为一个小时才去请求一次)

    NSDate *myNowDate=[NSDate date];

    if (!BBUserDefault.MBJsPatchTime) {

        BBUserDefault.MBJsPatchTime=myNowDate;

        return;

    }

    if ([myNowDate timeIntervalSinceDate:BBUserDefault.MBJsPatchTime]<) {

        return;

    }

    //使用AFNetWork下载在服务器的js文件

    NSURLSessionConfiguration *configuration = [NSURLSessionConfiguration defaultSessionConfiguration];

    AFURLSessionManager *manager = [[AFURLSessionManager alloc] initWithSessionConfiguration:configuration];

    NSURL *URL = [NSURL URLWithString:kJSPatchServerPath];

    NSURLRequest *request = [NSURLRequest requestWithURL:URL];

    NSURLSessionDownloadTask *downloadTask = [manager downloadTaskWithRequest:request progress:nil destination:^NSURL *(NSURL *targetPath, NSURLResponse *response)

                                              {

                                                  NSHTTPURLResponse *httpResponse = (NSHTTPURLResponse*)response;

                                                  if (httpResponse.statusCode==) {

                                                      NSURL *documentsDirectoryURL = FilePath;

                                                      //保存到本地 Library/Caches目录下

                                                      return [documentsDirectoryURL URLByAppendingPathComponent:jsPatchJsFileName];

                                                  }

                                                  else

                                                  {

                                                      return nil;

                                                  }

                                              }

                                                            completionHandler:^(NSURLResponse *response, NSURL *filePath, NSError *error)

                                              {

                                                  NSLog(@"下载失败 to: %@", filePath);

                                              }];

    [downloadTask resume];

}

@end
详细的源代码可以到:https://github.com/wujunyang/MobileProject查看
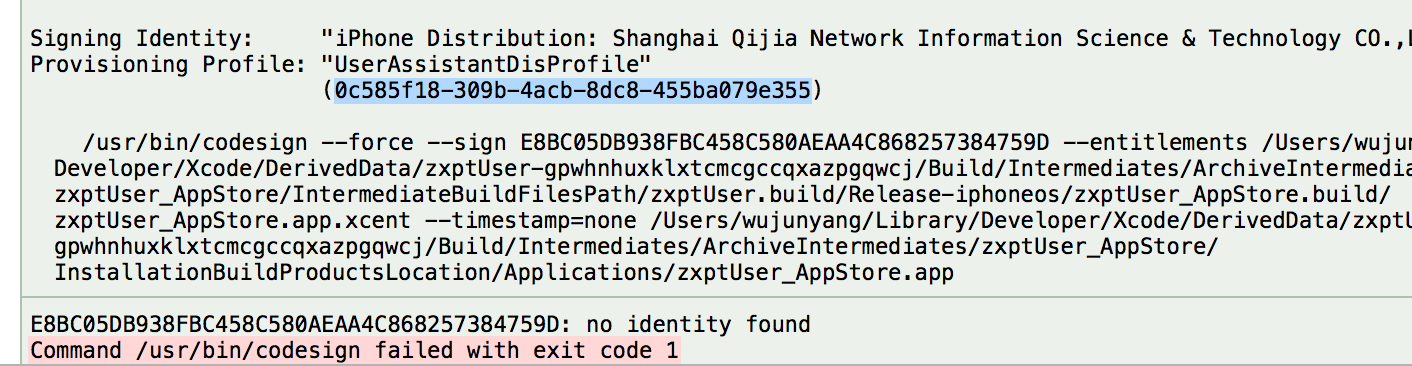
3:证书快要过期问题
第一步:如果开发者证书过期了的话,首先,打开密钥中心,生成一个CSR(证书请求)。然后,到Apple Center把证书revoke,然后新建一个,新建的将会默认是刚刚revoke的证书的所有设置的。把下载回来的证书导出一份p12格式的保存起来(因为如果其他人需要的时候,只能跟你拿了,在Apple Center下载的用不了的。)然后去provision profile edit 一下,从新下载,替换掉原来的。你就可以继续开发了(对外面已经安装的用户不会有影响)。
第二步:安装新的p12证书,并下载修改后的描述文件,如果本地已经安装以后的provisioning profile要先进行删除,可以进入~/Library/MobileDevice/Provisioning Profiles ,找到相应的文件进行删除,因为在文件里面它是以一串字符为命名,可以把旧证书先删除然后在Xcode里面打包,它会有提示这个provisioning profile的名字,删除就可以;然后在进行安装最新的provisioning profile,并选择相应证书就可以了;

4:给项目新建文件都默认增加前缀

5:iOS远程推送知识点
我们的设备联网时(无论是蜂窝联网还是Wi-Fi联网)都会与苹果的APNs服务器建立一个长连接(persistent IP connection),当Provider(我们自个的后台服务器,用于推送)推送一条通知的时候,这条通知并不是直接推送给了我们的设备,而是先推送到苹果的APNs服务器上面,而苹果的APNs服务器再通过与设备建立的长连接进而把通知推送到我们的设备上(参考图1-1,图1-2)。而当设备处于非联网状态的时候,APNs服务器会保留Provider所推送的最后一条通知,当设备转换为连网状态时,APNs则把其保留的最后一条通知推送给我们的设备;如果设备长时间处于非联网状态下,那么APNs服务器为其保存的最后一条通知也会丢失。Remote Notification必须要求设备连网状态下才能收到,并且太频繁的接收远程推送通知对设备的电池寿命是有一定的影响的。
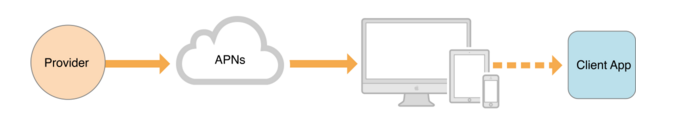
deviceToken的生成:当一个App注册接收远程通知时,系统会发送请求到APNs服务器,APNs服务器收到此请求会根据请求所带的key值生成一个独一无二的value值也就是所谓的deviceToken,而后APNs服务器会把此deviceToken包装成一个NSData对象发送到对应请求的App上。然后App把此deviceToken发送给我们自己的服务器,就是所谓的Provider。Provider收到deviceToken以后进行储存等相关处理,以后Provider给我们的设备推送通知的时候,必须包含此deviceToken

远程推送内容
每一条通知的消息都会组成一个JSON字典对象,其格式如下所示,示例中的key值为苹果官方所用key。自定义字段的时候要避开这些key值。
{

     "aps" : {

         "alert"              :              {   // string or dictionary

            "title"          :   "string"

            "body"           :   "string",

            "title-loc-key"  :   "string or null"

            "title-loc-args" :   "array of strings or null"

            "action-loc-key" :   "string or null"

            "loc-key"        :   "string"

            "loc-args"       :   "array of strings"

            "launch-image"   :   "string"

         },

          "badge"             :    number,

          "sound"             :    "string"

          "content-available" :    number;

          "category"          :    "string"

     },

}

aps:推送消息必须有的key

alert:推送消息包含此key值,系统就会根据用户的设置展示标准的推送信息

badge:在app图标上显示消息数量,缺少此key值,消息数量就不会改变,消除标记时把此key对应的value设置为0

sound:设置推送声音的key值,系统默认提示声音对应的value值为default

content-available:此key值设置为1,系统接收到推送消息时就会调用不同的回调方法,iOS7之后配置后台模式

category:UIMutableUserNotificationCategory's identifier 可操作通知类型的key值

title:简短描述此调推送消息的目的,适用系统iOS8.2之后版本

body:推送的内容

title-loc-key:功能类似title,附加功能是国际化,适用系统iOS8.2之后版本

title-loc-args:配合title-loc-key字段使用,适用系统iOS8.2之后版本

action-loc-key:可操作通知类型key值,不详细叙述

loc-key:参考title-loc-key

loc-args:参考title-loc-args

launch-image:点击推送消息或者移动事件滑块时,显示的图片。如果缺少此key值,会加载app默认的启动图片。
当然以上key值并不是每条推送消息都必带的key值,应当根据需求来选择所需要的key值,除了以上系统所提供的key值外,你还可以自定义自己的key值,来作为消息推送的负载,自定义key值与aps此key值并列。如下格式:
{

    "aps" : {

        "alert" : "Provider push messag.",

        "badge" : ,

        "sound" : "toAlice.aiff"

    },

    "Id"   : ,               //  自定义key值

    "type" : "customType"        //  自定义key值

}
指定用户的推送
对于要求用户登录的App,推送是可以指定用户的,同一条推送有些用户可以收到,但是有些用户又不能收到。说起来这个就要提到另外的一个token了,一般称之为userToken,userToken一般都是根据自己公司自定义的规则去生成的。userToken是以用户的账号加对应的密码生成的。这样结合上面提到的deviceToken,就可以做到根据不同的用户推送不同的消息。deviceToken找到对应某台设备和该设备上的应用,而userToken对应找到该用户。客户端在上报deviceToken的时候,要把userToken对应一起上报给服务端也就是Provider。
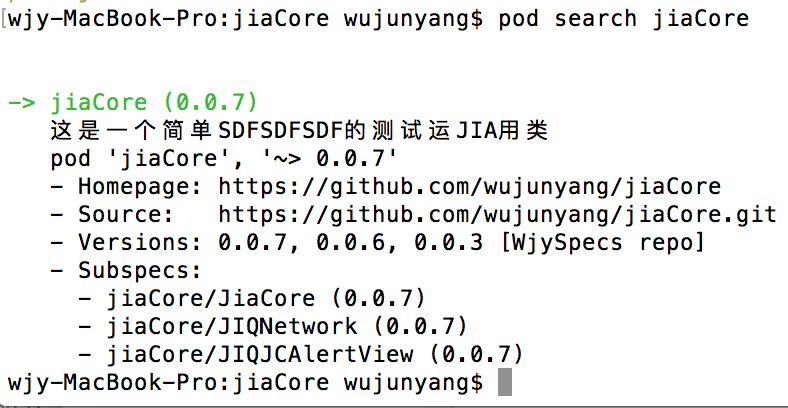
6:创建私有pod
关于这方面的知识可以查看下面几个文章,有时间再写一篇文章
http://www.jianshu.com/p/ddc2490bff9f[如何创建私有 CocoaPods 仓库]
http://www.jianshu.com/p/7a82e977281c[制作 CocoaPods 依赖库]
http://blog.devzeng.com/blog/ios-cocoapods-private-repo.html [在iOS项目中使用CocoaPods私有库]
http://www.pluto-y.com/cocoapods-getting-stared/ [Cocoapods系列教程1,2,3]
http://www.cocoachina.com/ios/20150228/11206.html[使用Cocoapods创建私有podspec]
http://www.jianshu.com/p/1139a603f413[创建私有pod]
http://eric-gao.iteye.com/blog/2128283 [提交framework到cocoapods官方去]
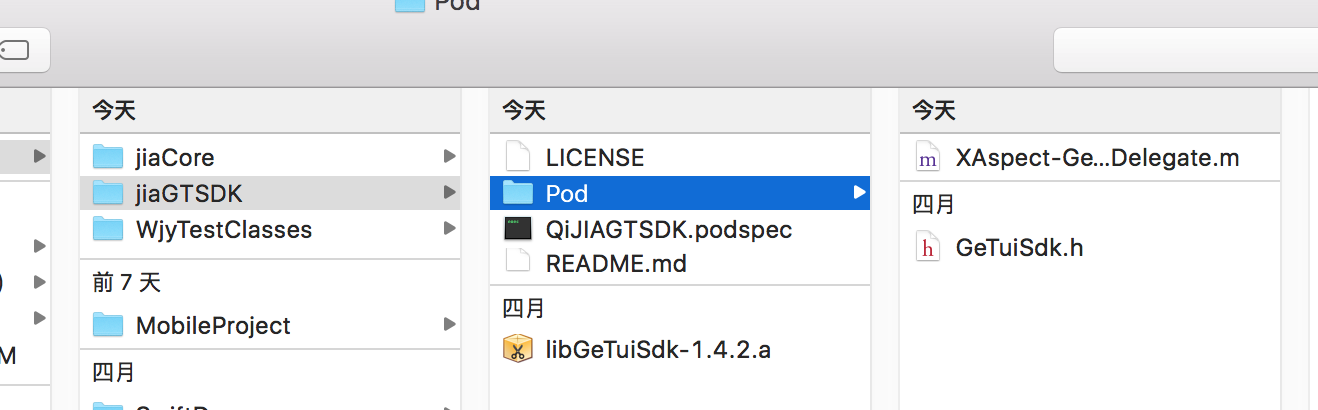
下面来几张成功创建的图片:
 |
 |
|
 |
 |
 |
配置文件:
#

#  Be sure to run `pod spec lint WjyTestClasses.podspec' to ensure this is a

#  valid spec and to remove all comments including this before submitting the spec.

#

#  To learn more about Podspec attributes see http://docs.cocoapods.org/specification.html

#  To see working Podspecs in the CocoaPods repo see https://github.com/CocoaPods/Specs/

#

Pod::Spec.new do |s|

  # ―――  Spec Metadata  ―――――――――――――――――――――――――――――――――――――――――――――――――――――――――― #

  #

  #  These will help people to find your library, and whilst it

  #  can feel like a chore to fill in it's definitely to your advantage. The

  #  summary should be tweet-length, and the description more in depth.

  #

  s.name         = "WjyTestClasses"

  s.version      = "0.0.2"

  s.summary      = "这是一个简单的测试运用类"

  # This description is used to generate tags and improve search results.

  #   * Think: What does it do? Why did you write it? What is the focus?

  #   * Try to keep it short, snappy and to the point.

  #   * Write the description between the DESC delimiters below.

  #   * Finally, don't worry about the indent, CocoaPods strips it!

#s.description  = DESC

  s.homepage     = "https://github.com/wujunyang/WjyTestClasses"

  # s.screenshots  = "www.example.com/screenshots_1.gif", "www.example.com/screenshots_2.gif"

  # ―――  Spec License  ――――――――――――――――――――――――――――――――――――――――――――――――――――――――――― #

  #

  #  Licensing your code is important. See http://choosealicense.com for more info.

  #  CocoaPods will detect a license file if there is a named LICENSE*

  #  Popular ones are 'MIT', 'BSD' and 'Apache License, Version 2.0'.

  #

 s.license      = { :type => "MIT", :file => "/Doc/GitHub/WjyTestClasses/FILE_LICENSE" }

  # ――― Author Metadata  ――――――――――――――――――――――――――――――――――――――――――――――――――――――――― #

  #

  #  Specify the authors of the library, with email addresses. Email addresses

  #  of the authors are extracted from the SCM log. E.g. $ git log. CocoaPods also

  #  accepts just a name if you'd rather not provide an email address.

  #

  #  Specify a social_media_url where others can refer to, for example a twitter

  #  profile URL.

  #

  s.author             = { "wujunyang" => "wujunyang@126.com" }

  # Or just: s.author    = "wujunyang"

  # s.authors            = { "wujunyang" => "wujunyang@126.com" }

  # s.social_media_url   = "http://twitter.com/wujunyang"

  # ――― Platform Specifics ――――――――――――――――――――――――――――――――――――――――――――――――――――――― #

  #

  #  If this Pod runs only on iOS or OS X, then specify the platform and

  #  the deployment target. You can optionally include the target after the platform.

  #

  # s.platform     = :ios

   s.platform     = :ios, "7.0"

  #  When using multiple platforms

  # s.ios.deployment_target = "5.0"

  # s.osx.deployment_target = "10.7"

  # s.watchos.deployment_target = "2.0"

  # s.tvos.deployment_target = "9.0"

  # ――― Source Location ―――――――――――――――――――――――――――――――――――――――――――――――――――――――――― #

  #

  #  Specify the location from where the source should be retrieved.

  #  Supports git, hg, bzr, svn and HTTP.

  #

  s.source       = { :git => "https://github.com/wujunyang/WjyTestClasses.git", :tag => "v0.0.2" }

  # ――― Source Code ―――――――――――――――――――――――――――――――――――――――――――――――――――――――――――――― #

  #

  #  CocoaPods is smart about how it includes source code. For source files

  #  giving a folder will include any swift, h, m, mm, c & cpp files.

  #  For header files it will include any header in the folder.

  #  Not including the public_header_files will make all headers public.

  #

  s.source_files  = "Pod/Classes/**/*.{h,m}"

#s.exclude_files = "Classes/Exclude"

  # s.public_header_files = "Classes/**/*.h"

  # ――― Resources ―――――――――――――――――――――――――――――――――――――――――――――――――――――――――――――――― #

  #

  #  A list of resources included with the Pod. These are copied into the

  #  target bundle with a build phase script. Anything else will be cleaned.

  #  You can preserve files from being cleaned, please don't preserve

  #  non-essential files like tests, examples and documentation.

  #

  # s.resource  = "icon.png"

  # s.resources = "Resources/*.png"

  # s.preserve_paths = "FilesToSave", "MoreFilesToSave"

  # ――― Project Linking ―――――――――――――――――――――――――――――――――――――――――――――――――――――――――― #

  #

  #  Link your library with frameworks, or libraries. Libraries do not include

  #  the lib prefix of their name.

  #

  # s.framework  = "SomeFramework"

  # s.frameworks = "SomeFramework", "AnotherFramework"

  # s.library   = "iconv"

  # s.libraries = "iconv", "xml2"

  # ――― Project Settings ――――――――――――――――――――――――――――――――――――――――――――――――――――――――― #

  #

  #  If your library depends on compiler flags you can set them in the xcconfig hash

  #  where they will only apply to your library. If you depend on other Podspecs

  #  you can include multiple dependencies to ensure it works.

  # s.requires_arc = true

  # s.xcconfig = { "HEADER_SEARCH_PATHS" => "$(SDKROOT)/usr/include/libxml2" }

  # s.dependency "JSONKit", "~> 1.4"

end
注意: a. s.version应和tag的版本一致.先push该文件之后,再push --tags
b. 将源代码放置在固定的文件夹下,同时修改s.source
c. 一定要有开源协议
d.在私有库中引用私有库(配置文件 首先要写上s.dependency)
即在Podspec文件中依赖(dependency)私有库 这种情况就比较麻烦一点,因为毕竟Podspec文件中并没有指明私有仓库地址的地方。那么肯定就不在Podspec文件里面指明私有仓库的地方。而是在验证和上传私有库的时候进行指明。即在下面这两条命令中进行指明:pod lib lint 项目名.podspec --sources=https://github.com/CocoaPods/Specs.git,192.168.0.100:Plutoy/Specs.git以及pod repo push --source=https://github.com/CocoaPods/Specs.git,192.168.0.100:Plutoy/Specs.git,要不然你在检验项目以及提交项目过程中就会出现Error的情况。
但是这两种情况还是有点不同的,第一种情况是可以采用开发者模式,而第二种情况不能采用开发者模式,只能通过打tag之后才能进行使用,所以在使用第二种情况下最好是测试好之后打完tag再进行引用。

要推到私有仓库时,先打上对应的TAG,然后也要加上sources指令:

e:模块化配置:
Pod::Spec.new do |s|

s.name         = "jiaCore"

s.version      = "0.0.7"

s.summary      = "这是一个简单SDFSDFSDF的测试运JIA用类"

s.homepage     = "https://github.com/wujunyang/jiaCore"

s.license      = { :type => "MIT", :file => "/Doc/GitHub/jiaCore/FILE_LICENSE" }

s.author             = { "wujunyang" => "wujunyang@126.com" }

s.platform     = :ios, "7.0"

s.source       = { :git => "https://github.com/wujunyang/jiaCore.git", :tag => "0.0.7" }

s.requires_arc = true

s.subspec 'JiaCore' do |jiaCore|

jiaCore.source_files = 'Pod/JiaCore/**/*.{h,m}'

end

s.subspec 'JIQNetwork' do |networkEngine|

networkEngine.source_files = 'Pod/YTKNetwork/**/*'

networkEngine.dependency 'AFNetworking', '~> 2.6.3'

networkEngine.dependency 'AFDownloadRequestOperation'

end

s.subspec 'JIQJCAlertView' do |jiqAlertView|

jiqAlertView.source_files = 'Pod/JCAlertView/**/*'

jiqAlertView.resource ='Pod/JCAlertView/JCAlertView.bundle'

end

s.frameworks = 'UIKit'

# s.xcconfig = { "HEADER_SEARCH_PATHS" => "$(SDKROOT)/usr/include/libxml2" }

# s.dependency "JSONKit", "~> 1.4"

end
结构如下:

这样就可以全引用,也可以模块引用

其它实例:
platform :ios, '7.0'

pod 'PodTestLibrary/NetWorkEngine', '1.0.0'  #使用某一个部分

pod 'PodTestLibrary/UIKitAddition', '1.0.0'

pod 'PodTestLibrary', '1.0.0'   #使用整个库
f:依赖自身模块的写法:
Pod::Spec.new do |s|

s.name         = "jiaCore"

s.version      = "0.0.10"

s.summary      = "这是一个简单SDFSDFSDF的测试运JIA用类"

s.homepage     = "https://github.com/wujunyang/jiaCore"

s.license      = { :type => "MIT", :file => "/Doc/GitHub/jiaCore/FILE_LICENSE" }

s.author             = { "wujunyang" => "wujunyang@126.com" }

s.platform     = :ios, "7.0"

s.source       = { :git => "https://github.com/wujunyang/jiaCore.git", :tag => "0.0.10" }

s.requires_arc = true

s.subspec 'JiaCore' do |jiaCore|

jiaCore.source_files = 'Pod/JiaCore/**/*.{h,m}'

end

s.subspec 'JiaUmeng' do |jiaumeng|

jiaumeng.source_files = 'Pod/UmengCore/**/*.{h,m}'

jiaumeng.dependency 'jiaCore/JiaCore'

end

s.frameworks = 'UIKit'

# s.xcconfig = { "HEADER_SEARCH_PATHS" => "$(SDKROOT)/usr/include/libxml2" }

# s.dependency "JSONKit", "~> 1.4"

end
特别注意:jiaumeng.dependency 'jiaCore/JiaCore'
提交podspec文件到Spec仓库
1.检查podspec文件是否正确
pod spec lint Foundation-pd.podspec --verbose --sources='git@gitlab.com:zengjing/Specs.git,https://github.com/CocoaPods/Specs' --use-libraries
2.提交podspec文件到Spec库
pod repo push zengjing-spec Foundation-pd.podspec --verbose --sources='git@gitlab.com:zengjing/Specs.git,https://github.com/CocoaPods/Specs' --use-libraries --allow-warnings
实例:

说明:
(1)--verbose:表示显示全部的日志信息,建议加上这个,方便判断错误信息。
(2)--sources:如果我们在podspec里面依赖到一些私有的库之后,直接进行校验是会报错的提示找不到,这里加上我们的Spec仓库的地址告诉CocoaPods找不到的时候去哪里找。
(3)--allow-warnings:表示允许警告.
(4)--use-libraries:表示使用静态库或者是framework,这里主要是解决当我们依赖一些framework库后校验提示找不到库的时候用到。
g:[iOS] xcodebuild: Returned an unsuccessful exit code错误解决方式:

pod repo push <repo-name> <podspec-file-name>.podspec --allow-warnings --use-libraries 加上指令:--use-libraries

8:如果依赖别人的SDK报错解决
可以把SDK相关的内容,在公司私有再架一个,然后依赖公司的私库;
#

#  Be sure to run `pod spec lint getui-sdk-ios-cocoapods.podspec' to ensure this is a

#  valid spec and to remove all comments including this before submitting the spec.

#

#  To learn more about Podspec attributes see http://docs.cocoapods.org/specification.html

#  To see working Podspecs in the CocoaPods repo see https://github.com/CocoaPods/Specs/

#

Pod::Spec.new do |s|

  # ―――  Spec Metadata  ―――――――――――――――――――――――――――――――――――――――――――――――――――――――――― #

  #

  #  These will help people to find your library, and whilst it

  #  can feel like a chore to fill in it's definitely to your advantage. The

  #  summary should be tweet-length, and the description more in depth.

  #

  s.name         = "QiJIAGTSDK"

  s.version      = "1.4.3"

  s.summary      = "个推iOS SDK Cocoa Pods集成库"

  s.description  = <<-DESC

                   A longer description of getui-sdk-ios-cocoapods in Markdown format.

                   个推iOS SDK

                   DESC

  s.homepage     = "https://github.com/GetuiLaboratory/getui-sdk-ios-cocoapods"

  # s.screenshots  = "www.example.com/screenshots_1.gif", "www.example.com/screenshots_2.gif"

  # ―――  Spec License  ――――――――――――――――――――――――――――――――――――――――――――――――――――――――――― #

  #

  #  Licensing your code is important. See http://choosealicense.com for more info.

  #  CocoaPods will detect a license file if there is a named LICENSE*

  #  Popular ones are 'MIT', 'BSD' and 'Apache License, Version 2.0'.

  #

 # s.license      = "MIT (example)"

  s.license      = { :type => "MIT", :file => "LICENSE" }

  # ――― Author Metadata  ――――――――――――――――――――――――――――――――――――――――――――――――――――――――― #

  #

  #  Specify the authors of the library, with email addresses. Email addresses

  #  of the authors are extracted from the SCM log. E.g. $ git log. CocoaPods also

  #  accepts just a name if you'd rather not provide an email address.

  #

  #  Specify a social_media_url where others can refer to, for example a twitter

  #  profile URL.

  #

  s.author             = { "个推" => "support@getui.com" }

  # Or just: s.author    = "个推实验室"

  # s.authors            = { "个推实验室" => "support@getui.com" }

  # s.social_media_url   = "http://twitter.com/个推实验室"

  # ――― Platform Specifics ――――――――――――――――――――――――――――――――――――――――――――――――――――――― #

  #

  #  If this Pod runs only on iOS or OS X, then specify the platform and

  #  the deployment target. You can optionally include the target after the platform.

  #

  # s.platform     = :ios

  s.platform     = :ios, "7.0"

  #  When using multiple platforms

  s.ios.deployment_target = "7.0"

  # s.osx.deployment_target = "10.7"

  # s.watchos.deployment_target = "2.0"

  # ――― Source Location ―――――――――――――――――――――――――――――――――――――――――――――――――――――――――― #

  #

  #  Specify the location from where the source should be retrieved.

  #  Supports git, hg, bzr, svn and HTTP.

  #

  s.source       = { :git => "https://github.com/wujunyang/jiaGTSDK.git", :tag => "1.4.3" }

  # ――― Source Code ―――――――――――――――――――――――――――――――――――――――――――――――――――――――――――――― #

  #

  #  CocoaPods is smart about how it includes source code. For source files

  #  giving a folder will include any swift, h, m, mm, c & cpp files.

  #  For header files it will include any header in the folder.

  #  Not including the public_header_files will make all headers public.

  #

s.source_files  = "Pod/**/*.{h,m}"

  #s.exclude_files = "Classes/Exclude"

  # s.public_header_files = "Classes/**/*.h"

  # ――― Resources ―――――――――――――――――――――――――――――――――――――――――――――――――――――――――――――――― #

  #

  #  A list of resources included with the Pod. These are copied into the

  #  target bundle with a build phase script. Anything else will be cleaned.

  #  You can preserve files from being cleaned, please don't preserve

  #  non-essential files like tests, examples and documentation.

  #

  # s.resource  = "icon.png"

  # s.resources = "Resources/*.png"

  s.preserve_paths = "libGeTuiSdk-1.4.2.a"

  s.ios.vendored_library = "libGeTuiSdk-1.4.2.a"

  # ――― Project Linking ―――――――――――――――――――――――――――――――――――――――――――――――――――――――――― #

  #

  #  Link your library with frameworks, or libraries. Libraries do not include

  #  the lib prefix of their name.

  #

  #s.framework  = "UIKit"

  # s.frameworks = "SomeFramework", "AnotherFramework"

  s.frameworks = 'SystemConfiguration', 'CFNetwork','CoreTelephony','CoreLocation','AVFoundation','CoreBluetooth','Security','JavaScriptCore'

  s.ios.frameworks = 'SystemConfiguration', 'CFNetwork','CoreTelephony','CoreLocation','AVFoundation','CoreBluetooth','Security','JavaScriptCore'

  # s.library   = "sqlite3"

  s.ios.libraries = 'z','sqlite3.0'

  # ――― Project Settings ――――――――――――――――――――――――――――――――――――――――――――――――――――――――― #

  #

  #  If your library depends on compiler flags you can set them in the xcconfig hash

  #  where they will only apply to your library. If you depend on other Podspecs

  #  you can include multiple dependencies to ensure it works.

  s.requires_arc = true

  # s.xcconfig = { "HEADER_SEARCH_PATHS" => "$(SDKROOT)/usr/include/libxml2" }

  s.dependency "jiaCore"

end
把个推相关文件下载,并修改podspec让它指向我们当前的GIT,然后工程里面引入QiJAGSDK就可以了,也会把个推的文件引入;

9:如果提交时报下面这一句:
[!] The validator for Swift projects uses Swift 3.0 by default, if you are using a different version of swift you can use a `.swift-version` file to set the version for your Pod. For example to use Swift 2.3, run:
`echo "2.3" > .swift-version`.
解决问题:
在命令终端输入:
echo 3.0 > .swift-version
10:报如下错误:
ERROR | name: The name of the spec should match the name of the file.
是因为.podspec文件的名字跟脚本内还有提交的指令没有对应上,特别要小心大小写
11:问题file not found with <angled> include; use "quotes" instead
[JiaCordova/JiaCordovaManager] xcodebuild: /gitHub/JiaCordova/JiaCordova/JiaCordovaManager/JiaCordovaViewController.h:9:9: error: 'CDV.h' file not found with <angled> include; use "quotes" instead
这个是引入头文件时要注意;
引入#import <CDV.h>时报错的,因为是第三方库所以要把其前缀也带上;如下面
#import <Cordova/CDV.h>
IOS开发基础知识--碎片41的更多相关文章
- IOS开发基础知识碎片-导航
1:IOS开发基础知识--碎片1 a:NSString与NSInteger的互换 b:Objective-c中集合里面不能存放基础类型,比如int string float等,只能把它们转化成对象才可 ...
- IOS开发基础知识--碎片33
1:AFNetworking状态栏网络请求效果 直接在AppDelegate里面didFinishLaunchingWithOptions进行设置 [[AFNetworkActivityIndicat ...
- IOS开发基础知识--碎片42
1:报thread 1:exc_bad_access(code=1,address=0x70********) 闪退 这种错误通常是内存管理的问题,一般是访问了已经释放的对象导致的,可以开启僵尸对象( ...
- IOS开发基础知识--碎片50
1:Masonry 2个或2个以上的控件等间隔排序 /** * 多个控件固定间隔的等间隔排列,变化的是控件的长度或者宽度值 * * @param axisType 轴线方向 * @param fi ...
- IOS开发基础知识--碎片3
十二:判断设备 //设备名称 return [UIDevice currentDevice].name; //设备型号,只可得到是何设备,无法得到是第几代设备 return [UIDevice cur ...
- IOS开发基础知识--碎片11
1:AFNetwork判断网络状态 #import “AFNetworkActivityIndicatorManager.h" - (BOOL)application:(UIApplicat ...
- IOS开发基础知识--碎片14
1:ZIP文件压缩跟解压,使用ZipArchive 创建/添加一个zip包 ZipArchive* zipFile = [[ZipArchive alloc] init]; //次数得zipfilen ...
- IOS开发基础知识--碎片16
1:Objective-C语法之动态类型(isKindOfClass, isMemberOfClass,id) 对象在运行时获取其类型的能力称为内省.内省可以有多种方法实现. 判断对象类型 -(BOO ...
- IOS开发基础知识--碎片19
1:键盘事件顺序 UIKeyboardWillShowNotification // 键盘显示之前 UIKeyboardDidShowNotification // 键盘显示完成后 UIKeyboar ...
随机推荐
- C# 将PowerPoint文件转换成PDF文件
PowerPoint的优势在于对演示文档的操作上,而用PPT查看资料,反而会很麻烦.这时候,把PPT转换成PDF格式保存,再浏览,不失为一个好办法.在日常编程中和开发软件时,我们也有这样的需要.本文旨 ...
- Spire.Pdf 的各种操作总结
Spire.Pdf 的各种操作总结 简介 试验新产品总是给我带来许多挑战,当然这也是一个引进创新技术的好方法.在这里我要跟大家分享的是使用Spire.Pdf的过程,它是来自E-iceblue公司的轻 ...
- C#对SQL Server数据库的备份与还原
备份数据库: string connectionString = "server=服务器名称;database=数据库名;uid=登入名;pwd=登入密码"; // ...
- .net提交HTML元素到后台,遇到Request报错 解决方案
对于.NET MVC 项目来说,在Controller中对应的Action方法上打上标签: [ValidateInput(false)] 在MSDN上:HttpRequest 类使用输入验证标志来跟踪 ...
- js赋值运算的理解
简介 js引擎由于为了效率,很多时候的非直接量赋值都不是copy一份在赋值给新的变量,而是一个引用 ps:直接量:直接值数字字符串等 为什么使用len = doms.length; 里的len效率要比 ...
- Winform混合式开发框架访问Web API接口的处理
在我的混合式开发框架里面,集成了WebAPI的访问,这种访问方式不仅可以实现简便的数据交换,而且可以在多种平台上进行接入,如Winform程序.Web网站.移动端APP等多种接入方式,Web API的 ...
- C#图片加水印实例与代码
本文要提供的类可以为图片加文字水印,以及判断是否是图片文件.经过测试可运行,例子请下载:http://hovertree.com/h/bjaf/5qc5eh6y.htm 例子效果图: 以下是Hover ...
- C#中IList与List
C#中IList<T>与List<T>的区别感想 写代码时对: IList IList11 =new List (); List List11 =new List (); 有所 ...
- combox
通过combox控件本身的item添加了选项后,该控件在启动后SelectedIndex默认值是-1,所以最好是在窗体加载的时候初始化城SelectedIndex=0 另外如果是窗体加载时item从数 ...
- TensorFlow知识总结
学习资料: 英文官方网站 Tensorflow 将要写的博客目录: 1.使用Spring AOP对异常进行统一处理 2.动态代理模式理解 aop中的动态代理模式 3.工厂模式三种的理解.logger ...