Windows 8.1 应用再出发 (WinJS) - 几种新增控件(2)
上篇我们介绍了Windows 8.1 和 WinJS 中新增控件中的 AppBarCommand、BackButton、Hub、ItemContainer,本篇我们接着来介绍 NavBar、Repeater 和 WebView。
1. NavBar
NavBar 是专门用于导航命令的应用栏控件,它是AppBar 的子类。可以完成简单的链接,也可以完成多层链接。
类似XAML 中的 TopAppBar,NavBar 会在用户通过边缘滑动或按下 Win + Z 或鼠标右键点击的时候,出现在页面顶部。
NavBar 包括三个组件:
1) NavBar
2) NavBarContainer, 它包含了导航项,支持分页和滚动等。在一个NavBar 中可以包含多个NavBarContainer 对象。
3) NavBarCommand, 就是我们刚才说的导航项,用户单击它可以导航到目标。
想要实现导航,可以设置NavBarCommand 的 location 属性,用户单击时,可以导航到指定的位置。
另外可以定义NavBar 的 oninvoked 事件,并编写事件处理程序来执行导航操作。下面看看代码实现:
    <div id="NavBar" data-win-control="WinJS.UI.NavBar">

        <div id="GlobalNav" data-win-control="WinJS.UI.NavBarContainer">

            <div data-win-control="WinJS.UI.NavBarCommand" data-win-options="{

                label: 'Home',

                icon: WinJS.UI.AppBarIcon.home,

                location: '/html/home.html',

                splitButton: false

                }">

            </div>

            <div data-win-control="WinJS.UI.NavBarCommand" data-win-options="{

                label: 'Your apps',

                icon: WinJS.UI.AppBarIcon.favorite,

                location: '/html/yourapps.html',

                splitButton: false

                }">

            </div>

        </div>

    </div>
我们定义了NavBar,添加了两个command:Home 和 Your apps。通过location属性来定义导航目标,来看看效果图:

下面来看看自定义oninvoked 事件的部分代码:
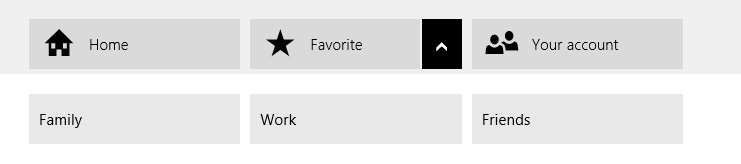
    <div id="useSplit" data-win-control="WinJS.UI.NavBar">

        <div class="globalNav" data-win-control="WinJS.UI.NavBarContainer">

            <div data-win-control="WinJS.UI.NavBarCommand" data-win-options="{ label: 'Home', icon: 'home' }"></div>

            <div data-win-control="WinJS.UI.NavBarCommand" data-win-options="{ label: 'Favorite', icon: 'favorite', splitButton: 'true' }"></div>

            <div data-win-control="WinJS.UI.NavBarCommand" data-win-options="{ label: 'Your account', icon: 'people' }"></div>

        </div>

    </div>

    <div id="contactFlyout" data-win-control="WinJS.UI.Flyout" data-win-options="{ placement: 'bottom' }">

        <div id="contactNavBarContainer" data-win-control="WinJS.UI.NavBarContainer">

            <div data-win-control="WinJS.UI.NavBarCommand" data-win-options="{ label: 'Family' }"></div>

            <div data-win-control="WinJS.UI.NavBarCommand" data-win-options="{ label: 'Work' }"></div>

            <div data-win-control="WinJS.UI.NavBarCommand" data-win-options="{ label: 'Friends' }"></div>

        </div>

    </div>
(function () {

    "use strict";

    var navcontainer;

    var page = WinJS.UI.Pages.define("/html/main.html", {

        ready: function (element, options) {

            document.body.querySelector('#useSplit').addEventListener('invoked', this.navbarInvoked.bind(this));

            document.body.querySelector('#contactNavBarContainer').addEventListener('invoked', this.navbarInvoked.bind(this));

            var navBarContainerEl = document.body.querySelector('#useSplit .globalNav');

            if (navBarContainerEl) {

                this.setupNavBarContainer();

            } else {

                var navBarEl = document.getElementById('useSplit');

                navBarEl.addEventListener('childrenprocessed', this.setupNavBarContainer.bind(this));

            }

        },

        navbarInvoked: function (ev) {

            var navbarCommand = ev.detail.navbarCommand;

            WinJS.log && WinJS.log(navbarCommand.label + " NavBarCommand invoked", "sample", "status");

            document.querySelector('select').focus();

        },

        setupNavBarContainer: function () {

            var navBarContainerEl = document.body.querySelector('#useSplit .globalNav');

            navBarContainerEl.addEventListener("splittoggle", function (e) {

                var flyout = document.getElementById("contactFlyout").winControl;

                var navbarCommand = e.detail.navbarCommand;

                if (e.detail.opened) {

                    flyout.show(navbarCommand.element);

                    var subNavBarContainer = flyout.element.querySelector('.win-navbarcontainer');

                    if (subNavBarContainer) {

                        subNavBarContainer.winControl.forceLayout();

                        subNavBarContainer.currentIndex = 0;

                    }

                    flyout.addEventListener('beforehide', go);

                } else {

                    flyout.removeEventListener('beforehide', go);

                    flyout.hide();

                }

                function go() {

                    flyout.removeEventListener('beforehide', go);

                    navbarCommand.splitOpened = false;

                }

            });

        }

    });

})();
我们为NavBar 定义了三个command, Home、Favorites 和 Your account。其中Favorites 命令点击时,弹出contactFlyout,点击flyout 中的命令时,完成导航。
2. Repeater
Repeater 可以使用模板从一组数据中生成HTML标记,使用它可以生成自定义列表和表格。Repeater 可以从List 中生成数据,来看看代码示例:
    <div id="exampleFlyout" data-win-control="WinJS.UI.Flyout" aria-label="{Example flyout}">

        <div>This is an example AppBarCommand of type 'flyout'.</div>

    </div>

    <div id="listTemplate" data-win-control="WinJS.Binding.Template">

        <li data-win-bind="textContent: title"></li>

    </div>

    <div data-win-control="WinJS.UI.Repeater"

         data-win-options="{data: RepeaterExample.basicList, template: select('#listTemplate')}"

         style="margin: 150px">

    </div>
    var basicList2 = new WinJS.Binding.List(

       [

           { title: "Item 1" },

           { title: "Item 2" },

           { title: "Item 3" },

           { title: "Item 4" }

       ]);

    WinJS.Namespace.define("RepeaterExample",

        {

            basicList: basicList2

        });
我们在html 代码中定义了Repeater 和它对应的模板,并在js中定义了数据。来看看效果图: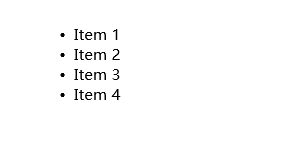
3. WebView
WebView 是用于显示Web内容的控件。在WebView 出现之前,想要显示网页内容,需要使用iframe 元素。WebView 有这么几方面的优势:
- 支持 HTML5 ,WebView 中的页面可访问大部分HTML5 功能
- 改进的导航支持,WebView有单独的历史记录堆栈,提供了包括前后导航以及重新加载当前页等方法
- 支持在iframe 中无法使用的站点
WebView 支持使用 src 属性,navigate 方法 或 navigateToString 方法导航到指定URI,我们分别来看看代码实现:
1)通过src 属性导航
    <x-ms-webview id="webview" src="http://msdn.microsoft.com/">

    </x-ms-webview>
我们看,WebView 对应 x-ms-webview 元素。来看看效果图: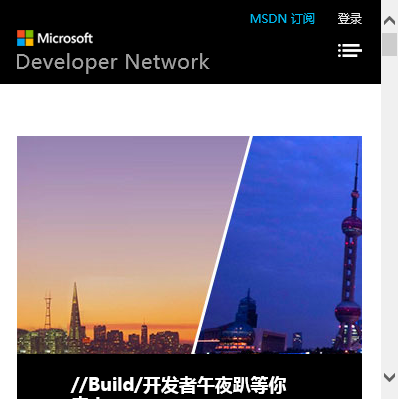
2)使用 navigate 方法 来加载存储在应用的状态文件夹中的Html 内容,这需要ms-appdata:// 协议的配合
    Windows.Storage.ApplicationData.current.localFolder.createFolderAsync("NavigateToState", Windows.Storage.CreationCollisionOption.openIfExists).then(function (stateFolder) {

        Windows.ApplicationModel.Package.current.installedLocation.getFileAsync("webViewContent.html").then(function (htmlFile) {

            return htmlFile.copyAsync(stateFolder, "webViewContent.html", Windows.Storage.CreationCollisionOption.failIfExists);

        });

    }).done(function () {

        document.getElementById("webview").navigate("ms-appdata:///local/NavigateToState/webViewContent.html");

    }, function (error) {

        WinJS.log && WinJS.log("Couldn't create HTML file in local app state folder", "sample", "error");

    });

3)使用 navigateToString 方法来加载Html 字符串
    var htmlString = "<!DOCTYPE html>" +

            "<html>" +

            "<head><title>HTML page</title></head>" +

            "<body>" +

                "<h1>Hi!</h1>" +

                "<p>使用navigateToString 加载的网页</p>" +

            "</body>" +

            "</html>";

    document.getElementById("webview").navigateToString(htmlString);

另外WebView 还支持通过 navigateWithHttpRequestMessage 方法向指定 URI 方法POST请求和HTTP标头的方式来显示网页,这里我们不做显示。
好了,到这里,我们就把Windows 8.1 和 WinJS 新增的控件介绍完了,希望对大家有所帮助,谢谢。
Windows 8.1 应用再出发 (WinJS) - 几种新增控件(2)的更多相关文章
- Windows 8.1 应用再出发 (WinJS) - 几种新增控件(1)
Windows 8.1 和 WinJS 引入了以下新控件和功能,分别是:AppBarCommand.BackButton.Hub.ItemContainer.NavBar.Repeater.WebVi ...
- Windows 8.1 应用再出发 (WinJS) - 创建一个简单项目
前面几篇我们介绍了如何利用 C# + XAML 完成Windows Store App 功能的实现,接下来的几篇我们来看看如何利用 Html + WinJS 来完成这些功能. 本篇我们使用WinJS ...
- Windows 8.1 应用再出发 - 几种新增控件(1)
Windows 8.1 新增的一些控件,分别是:AppBar.CommandBar.DatePicker.TimePicker.Flyout.MenuFlyout.SettingsFlyout.Hub ...
- Windows 8.1 应用再出发 - 几种新增控件(2)
本篇我们接着来介绍Windows 8.1 的新增控件,分别是:Flyout.MenuFlyout.SettingsFlyout.Hub 和 Hyperlink. 1. Flyout Flyout被称为 ...
- Windows 8.1 应用再出发 - 几种布局控件
本篇为大家介绍Windows 商店应用中几种布局控件的用法.分别是Canvas.Grid.StackPanel 和 VariableSizedWrapGrid. 1. Canvas Canvas使用绝 ...
- 与众不同 windows phone (49) - 8.1 新增控件: 概述, ContentDialog, MapControl
[源码下载] 与众不同 windows phone (49) - 8.1 新增控件: 概述, ContentDialog, MapControl 作者:webabcd 介绍与众不同 windows p ...
- Windows Phone中的几种集合控件
前言 Windows Phone开发过程中不可避免的就是和集合数据打交道,如果之前做过WP App的开发的话,相信你已经看过了各种集合控件的使用.扩展和自定义.这些个内容在这篇博客里都没有,那么我们今 ...
- Delphi一共封装(超类化)了8种Windows基础控件和17种复杂控件
超类化源码: procedure TWinControl.CreateSubClass(var Params: TCreateParams; ControlClassName: PChar); con ...
- Windows 8.1中WinRT的变化(一)——新增控件
这次WinRT的变化还是不小的,就拿新增控件来说,就有如下几种: AppBar 控件 我以前写过一篇文章接受过如何在WinRT程序中快速创建Metro风格图标,现在MS已经把他们标准化了,就不用我们自 ...
随机推荐
- MyBatis学习总结(六)——调用存储过程
一.提出需求 查询得到男性或女性的数量, 如果传入的是0就女性否则是男性 二.准备数据库表和存储过程 create table p_user( id int primary key auto_incr ...
- js编译器的一些简单原理
有没有发现在写代码的时候,往往会遇到一些莫名其妙的错误,然后时间紧急不得不去网上查阅一些代码.虽然要实现的功能解决了,但是看被拷贝的代码好多真心看不懂,以后遇到诸如此类的问题,如果查阅不到这些代码的话 ...
- 一个最小化的SpringBoot项目
项目结构 项目基于Maven管理,注意使用了父pom <parent> <groupId>org.springframework.boot</groupId> &l ...
- C# RSA 算法
RSA公钥加密算法是1977年由Ron Rivest.Adi Shamirh和LenAdleman在(美国麻省理工学院)开发的.RSA取名来自开发他们三者的名字.RSA是目前最有影响力的公钥加密算法, ...
- MongoEngine简易教程(转)
原文:http://www.xefan.com/archives/84063.html Mongoengine教程(1)——概述 Mongoengine教程(2)——文档模式 Mongoengine教 ...
- 30、shiro框架入门2,关于Realm
1.Jdbc的Realm链接,并且获取权限 首先创建shiro-jdbc.ini的配置文件,主要配置链接数据库的信息 配置文件中的内容如下所示 1.变量名=全限定类名会自动创建一个类实例 2.变量名. ...
- Excel的文件打开特别慢,xls文件特别大解决一例
Excel的文件打开特别慢,xls文件特别大解决一例 打开Excel的xls文件打开特别慢,而且操作也非常慢,动辄需要10几20分钟,很不正常.一个简单的Excel的xls文件有10几兆,甚至几百兆的 ...
- linux C学习笔记04--内存映射
内存映射代码,打开一个文件与映射到内存中,对内存和文件的修改都会反映到文件中来,反之亦然,先贴代码,以后再完善: /****************************************** ...
- Ubuntu12.04-x64编译Hadoop2.2.0和安装Hadoop2.2.0集群
本文Blog地址:http://www.cnblogs.com/fesh/p/3766656.html 本文对Hadoop-2.2.0源码进行重新编译(64位操作系统下不重新编译会有版本问题) ...
- python学习笔记1-元类__metaclass__
type 其实就是元类,type 是python 背后创建所有对象的元类 python 中的类的创建规则: 假设创建Foo 这个类 class Foo(Bar): def __init__(): ...