CSS简单入门
— Java攻城狮学习路线 —
一. 什么是CSS
CSS指层叠样式表(Cascading Style Sheets),定义如何显示HTML元素
二. CSS语法
/* 选择器 { 声明; 声明;}*/

    h1 { color:blue;font-size:12px;}

      /* 属性:值*/
样式
1.选择器
选择器优先级:内联>外联; id>类>元素>伪类
- id选择器
id选择器为标有特定id的HTML元素设置样式
#para1 {

    text-align:center;

    color:red;

}
- class选择器
选中同一class元素
.center {

    text-align:center;

}
- 元素选择器
选中同一类元素
p {

    text-align:center;

}
- 伪类和伪元素
<!-- 伪类语法 -->

selector:pseudo-class { property:value; }

selector.class:pseudo-class { property:value; }

<!--anchor 伪类 -->

a:link {color:#FF0000;} /* 未访问的链接 */

a:visited {color:#00FF00;} /* 已访问的链接 */

a:hover {color:#FF00FF;} /* 鼠标划过链接 */

a:active {color:#0000FF;} /* 已选中的链接 */

<!-- 孩子选择 -->

p:first-child {color:blue;} /*p下第一个孩子*/

p:nth-child(2) {} /*p下第2个孩子(下标从1开始)*/

<!-- 伪元素语法 -->

selector:pseudo-element {property:value;}

selector.class:pseudo-element {property:value;}

<!--:first-line-->

p:first-line { color:#ff0000;} /* 对p的第一行文本进行格式化*/

<!--:first-letter-->

p:first-letter {color:#ff0000;} /*文本首字母设置样式*/

<!--:before-->

h1:before {content:url(smiley.gif);} /*元素前插入新内容*/

<!--:after-->

h1:after{content:url(smiley.gif);} /*元素后插入新内容*/
-属性选择器
/*通过属性设定样式*/

*把包含title属性的元素设置样式*/

[title] {

    color:blue;

}

/* 改变title='run'元素样式*/

[title=runoob]{

    border:5px solid green;

}
- 组合选择器
- 后代选取器
/*匹配所有后代相同元素(利用空格分隔)*/

div p {

    background-color:yellow;

}
- 子元素选择器
/*只能匹配子元素中相同元素(利用>连接)*/

div>p {

    background-color:yellow;

}
- 相邻兄弟选择器
<!--选择紧邻兄弟元素(利用+连接)-->

div+p {

  background-color:yellow;

}
- 普通兄弟选择器
/*选取所有指定元素后相邻兄弟元素(利用~连接)*/

div~p

{

  background-color:yellow;

}
2.背景
背景用于定义HTML元素的背景
- 背景颜色: background-color
body {background-color:#b0c4de;}
- 背景图像:background-image
body {background-image:url('paper.gif');}
- 背景水平或垂直平铺:background-repeat:repeat-x
body{

    background-image:url('gradient2.png');

    background-repeat:repeat-x;

}
- 背景不平铺:background-repeat:no-repeat
body{

    background-image:url('img_tree.png');

    background-repeat:no-repeat;

}
- 背景简写:依次为背景颜色、图片、不平铺...
body {background:#ffffff url('img_tree.png') no-repeat right top;}
3.文本
设置文字样式
- 文本颜色:color
/*设置文字的颜色*/

body {color:red;}

h1 {color:#00ff00;}

h2 {color:rgb(255,0,0);}
- 文本对齐方式:
/*设置文本水平对齐方式*/

h1 {text-align:center;}

p.date {text-align:right;}

p.main {text-align:justify;}
- 文本修饰:
/*设置或删除文本的装饰*/

a {text-decoration:none;}

h1 {text-decoration:overline;}

h2 {text-decoration:line-through;}

h3 {text-decoration:underline;}
- 文本转换:
/*指定文本中的大写和小写字母*/

p.uppercase {text-transform:uppercase;}

p.lowercase {text-transform:lowercase;}

p.capitalize {text-transform:capitalize;}
- 文本缩进:
/*指定文本的第一行的缩进*/

p {text-indent:50px;}
4.字体
定义字体加粗、大小、文字样式
- 字体系利:font-family
p{font-family:"Times New Roman", Times, serif;}
- 字体样式:font-style
p.normal {font-style:normal;}

p.italic {font-style:italic;}

p.oblique {font-style:oblique;}
- 字体大小:font-size
/*像素设置*/

h1 {font-size:40px;}

h2 {font-size:30px;}

p {font-size:14px;}

/*em设置(1em=16px)*/

h1 {font-size:2.5em;} /* 40px/16=2.5em */

h2 {font-size:1.875em;} /* 30px/16=1.875em */

p {font-size:0.875em;} /* 14px/16=0.875em */

/*em和百分比设置*/

body {font-size:100%;}

h1 {font-size:2.5em;}

h2 {font-size:1.875em;}

p {font-size:0.875em;}
5.链接
- 链接样式
a:link {color:#000000;}      /* 未访问链接*/

a:visited {color:#00FF00;}  /* 已访问链接 */

a:hover {color:#FF00FF;}  /* 鼠标移动到链接上 */

a:active {color:#0000FF;}  /* 鼠标点击时 */

/*a:hover 必须跟在 a:link 和 a:visited后面

a:active 必须跟在 a:hover后面*/
- 文本修饰
/*删除下划线*/

a:link {text-decoration:none;}

a:visited {text-decoration:none;}

a:hover {text-decoration:underline;}

a:active {text-decoration:underline;}
- 背景颜色
a:link {background-color:#B2FF99;}

a:visited {background-color:#FFFF85;}

a:hover {background-color:#FF704D;}

a:active {background-color:#FF704D;}
6.列表
- 不同列表项标记:list-style-type
ul.a {list-style-type: circle;}

ul.b {list-style-type: square;}

ol.c {list-style-type: upper-roman;}

ol.d {list-style-type: lower-alpha;}
- 作为列表项标记的图像:list-style-image
ul {

    list-style-image: url('sqpurple.gif');

}
- 简写属性
ul {

    list-style: square url("sqpurple.gif");

}
7.表格
- 表格边框:border
table, th, td {

border: 1px solid black;

}
- 折叠边框:border-collapse
table {

border-collapse:collapse;

}
- 表格宽度和高度:width和height
table {

width:100%;

}

th {

height:50px;

}
- 表格文字对齐:text-align
td {

text-align:right;

}
- 表格填充:padding
td {

padding:15px;

}
- 表格颜色:
table, td, th {

border:1px solid green;

}

th {

background-color:green;

color:white;

}
布局
1.盒子模型
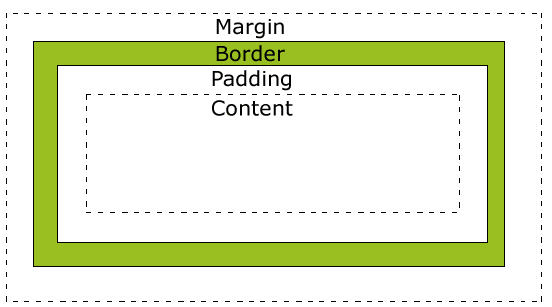
- Margin(外边距) - 清除边框外的区域,外边距是透明的。
- Border(边框) - 围绕在内边距和内容外的边框。
- Padding(内边距) - 清除内容周围的区域,内边距是透明的。
- Content(内容) - 盒子的内容,显示文本和图像。
2.margin
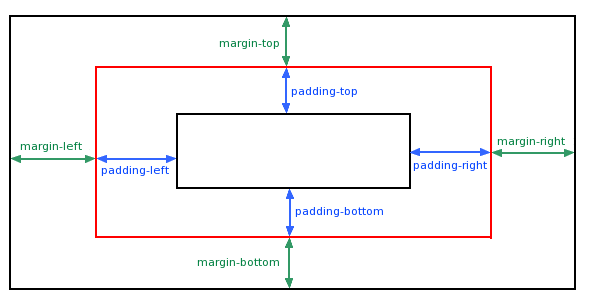
- 单边外边距
margin-top:100px;

margin-bottom:100px;

margin-right:50px;

margin-left:50px;
- 简写
margin:25px 50px 75px 100px;

/* tips:居中显示 */

magin:0 auto;
3.padding
- 单边内边距
padding-top:25px;

padding-bottom:25px;

padding-right:50px;

padding-left:50px;
- 简写
padding:25px 50px 75px 100px;
4.border
- 边框样式:border-style
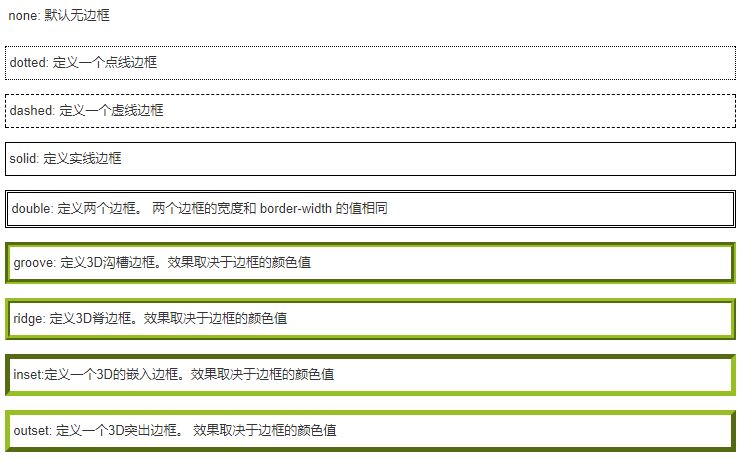
- 边框宽度:border-width
p.one {

    border-style:solid;

    border-width:5px;

}

p.two {

    border-style:solid;

    border-width:medium;

}
- 边框颜色:border-color
p.one {

    border-style:solid;

    border-color:red;

}

p.two {

    border-style:solid;

    border-color:#98bf21;

}
- 边框单独设置
p {

    border-top-style:dotted;

    border-right-style:solid;

    border-bottom-style:dotted;

    border-left-style:solid;

}

p {

    border-style:dotted solid double dashed;

                /*上     右     底     左*/

}
- 边框简写
border:5px solid red;
5.尺寸
设置元素的高度和宽度
- 设置元素高度:height
- 设置元素宽度:width
- 设置行高:line-height
- 设置元素最大高度:max-height
- 设置元素最大宽度:max-width
- 设置元素最小高度:min-height
- 设置元素最小宽度:min-width
6.显示
- display、visibility
<!--隐藏元素-->

h1.hidden {visibility:hidden;} /*仍占用空间*/

h1.hidden {display:none;} /*不占用空间*/

<!--改变元素显示-->

li {display:inline;}

span {display:block;}
7.定位
- static
/*静态定位的元素不会受到 top, bottom, left, right影响*/

position:static;
- fixed
/*元素的位置相对于浏览器窗口是固定位置*/

p.pos_fixed {

    position:fixed;

    top:30px;

    right:5px;

}
- relative
/*相对定位元素的定位是相对其正常位置*/

/*相对定位元素经常被用来作为绝对定位元素的容器块*/

h2.pos_left{

    position:relative;

    left:-20px;

}

h2.pos_right{

    position:relative;

    left:20px;

}
- absolute
/*绝对定位的元素的位置相对于最近的已定位父元素,

如果元素没有已定位的父元素,那么它的位置相对于<html>*/

h2{

    position:absolute;

    left:100px;

    top:150px;

}

/*absolute 定位使元素的位置与文档流无关,因此不占据空间。

absolute 定位的元素和其他元素重叠。*/
- sticky
/*吸附效果,类似relative和fixed结合*/

position:sticky;
- z-index
/*z-index属性指定了一个元素的堆叠顺序*/

z-index:-1;
8.浮动
可以实现图片排列及文字环绕
- 相邻浮动
div1 {

    float:left;

    width:110px;

    height:90px;

}

div2 {

    float:left;

    width:110px;

    height:90px;

}
- 清除浮动
div {

    clear:both;

}
9.对齐
- 元素居中(margin:auto)
div {

    margin: auto;

    width: 50%;

    border: 3px solid green;

}
- 文本居中(text-align:center)
text-align: center;
- 图片居中(margin: auto)
img {

    display: block;

    margin: auto;

    width: 40%;

}
- 左右对齐-定位方式(position: absolute)
.right {

    position: absolute;

    right: 0px;

    width: 300px;

    border: 3px solid #73AD21;

    padding: 10px;

}
- 左右对齐-float方式
.right {

    float: right;

    width: 300px;

    border: 3px solid #73AD21;

    padding: 10px;

}
- 垂直居中-使用padding
.center {

    padding: 70px 0;

    border: 3px solid green;

}
- 垂直居中-使用line-height
.center {

    line-height: 200px;

    height: 200px;

    border: 3px solid green;

    text-align: center;

}

/* 如果文本有多行,添加以下代码: */

.center p {

    line-height: 1.5;

    display: inline-block;

    vertical-align: middle;

}
- 垂直居中-使用position和transform
.center {

    height: 200px;

    position: relative;

    border: 3px solid green;

}

.center p {

    margin: 0;

    position: absolute;

    top: 50%;

    left: 50%;

    transform: translate(-50%, -50%);

}
10.透明度
设置颜色透明度
opacity:0.5;

rgba(); /*a代表透明度*/
CSS简单入门的更多相关文章
- 一个CSS简单入门网站
讲的知识简单明了,很实用: http://zh.learnlayout.com/
- JavaScript操作HTML&CSS简单入门
- Java攻城狮学习路线 - 一. JavaScript基础 输出 使用 window.alert() 弹出警告框. 使用 document.write() 方法将内容写到 HTML 文档中. 使用 ...
- Vue的简单入门
Vue的简单入门 一.什么是Vue? vue.js也一个渐进式JavaScript框架,可以独立完成前后端分离式web项目 渐进式:vue可以从小到控制页面中的一个变量后到页面中一块内容再到整个页面, ...
- Bootstrap简单入门
Bootstrap简单入门 BootStrap基本模板 <!DOCTYPE html> <html> <head> <meta charset="U ...
- Python爬虫的简单入门(一)
Python爬虫的简单入门(一) 简介 这一系列教学是基于Python的爬虫教学在此之前请确保你的电脑已经成功安装了Python(本教程使用的是Python3).爬虫想要学的精通是有点难度的,尤其是遇 ...
- 一篇文章带你了解网页框架——Vue简单入门
一篇文章带你了解网页框架--Vue简单入门 这篇文章将会介绍我们前端入门级别的框架--Vue的简单使用 如果你以后想从事后端程序员,又想要稍微了解前端框架知识,那么这篇文章或许可以给你带来帮助 温馨提 ...
- 一篇文章带你了解轻量级Web服务器——Nginx简单入门
一篇文章带你了解轻量级Web服务器--Nginx简单入门 Nginx是一款轻量级的Web服务器/反向代理服务器及电子邮件代理服务器 在本篇中我们会简单介绍Nginx的特点,安装,相关指令使用以及配置信 ...
- 用IntelliJ IDEA创建Gradle项目简单入门
Gradle和Maven一样,是Java用得最多的构建工具之一,在Maven之前,解决jar包引用的问题真是令人抓狂,有了Maven后日子就好过起来了,而现在又有了Gradle,Maven有的功能它都 ...
- [原创]MYSQL的简单入门
MYSQL简单入门: 查询库名称:show databases; information_schema mysql test 2:创建库 create database 库名 DEFAULT CHAR ...
随机推荐
- jq 替换DOM layeui 不刷新
<!DOCTYPE html> <html> <head> <meta charset="utf-8"> <title> ...
- MATLAB图形界面设计(上)
参考https://www.cnblogs.com/BlueMountain-HaggenDazs/p/4307777.html 一.图形句柄 1.定义 MATLAB在创建每一个图形对象时,都会给该对 ...
- swift-导航栏添加自定义返回按钮
//1.添加返回按钮 func addBackBtn(){ let leftBtn:UIBarButtonItem=UIBarButtonItem(title: "返回", sty ...
- [poj1325] Machine Schedule (二分图最小点覆盖)
传送门 Description As we all know, machine scheduling is a very classical problem in computer science a ...
- django数据库设置为MySQL
django默认使用sqlite,然后想使用MySQL数据库 在项目的setting文件中找到 DATABASES = { 'default': { 'ENGINE': 'django.db.back ...
- C# 通过反射为一个对象赋值
/// <summary> /// 反射赋值 /// </summary> public class ObjectReflection { publ ...
- 权值线段树&线段树合并
权值线段树 所谓权值线段树,就是一种维护值而非下标的线段树,我个人倾向于称呼它为值域线段树. 举个栗子:对于一个给定的数组,普通线段树可以维护某个子数组中数的和,而权值线段树可以维护某个区间内数组元素 ...
- 第二次组队赛 二分&三分全场
网址:CSUST 7月30日(二分和三分) 这次的比赛是二分&三分专题,说实话以前都没有接触过二分,就在比赛前听渊神略讲了下.......不过做着做着就对二分熟悉了,果然做题是学习的好方法啊~ ...
- Java - 将vCard中十六进制编码转换成Unicode
做课程设计的时候在处理vCard格式的时候遇到过出现十六进制编码的情况,例如 QUOTED-PRINTABLE:=XX=XX=XX=XX=XX`````` 其中XX代表十六进制数,当然,也有可能在末尾 ...
- 心急的C小加 贪心算法
心急的C小加 时间限制:1000 ms | 内存限制:65535 KB 难度:4 描述 C小加有一些木棒,它们的长度和质量都已经知道,需要一个机器处理这些木棒,机器开启的时候需要耗费一个单位的 ...