基于GTID的Mysql-Mha高可用方案探索
声明: 本篇文章内容整理来源于互联网以及本人自己的梳理总结,目的是从零到一的搭建起来mysql mha高可用架构。
一、软件概述
MHA(Master High Availability)目前在MySQL高可用方面是一个相对成熟的解决方案,它由日本DeNA公司youshimaton(现就职于Facebook公司)开发,是一套优秀的作为MySQL高可用性环境下故障切换和主从提升的高可用软件。在MySQL故障切换过程中,MHA能做到在0~30秒之内自动完成数据库的故障切换操作,并且在进行故障切换的过程中,MHA能在最大程度上保证数据的一致性,以达到真正意义上的高可用。
该软件由两部分组成:MHA Manager(管理节点)和MHA Node(数据节点)。MHA Manager可以单独部署在一台独立的机器上管理多个master-slave集群,也可以部署在一台slave节点上。MHA Node运行在每台MySQL服务器上,MHA Manager会定时探测集群中的master节点,当master出现故障时,它可以自动将最新数据的slave提升为新的master,然后将所有其他的slave重新指向新的master。整个故障转移过程对应用程序完全透明。
在MHA自动故障切换过程中,MHA试图从宕机的主服务器上保存二进制日志,最大程度的保证数据的不丢失,但这并不总是可行的。例如,如果主服务器硬件故障或无法通过ssh访问,MHA没法保存二进制日志,只进行故障转移而丢失了最新的数据。使用MySQL 5.5的半同步复制,可以大大降低数据丢失的风险。MHA可以与半同步复制结合起来。如果只有一个slave已经收到了最新的二进制日志,MHA可以将最新的二进制日志应用于其他所有的slave服务器上,因此可以保证所有节点的数据一致性。
目前MHA主要支持一主多从的架构,要搭建MHA,要求一个复制集群中必须最少有三台数据库服务器,一主二从,即一台充当master,一台充当备用master,另外一台充当从库,因此至少需要三台服务器。
官网:https://github.com/yoshinorim/mha4mysql-manager/wiki/FAQ
二、环境说明
2.1 系统环境
|
系统版本 |
CentOS release 6.5 (Final) |
|
内核版本 |
2.6.32-431.el6.x86_64 |
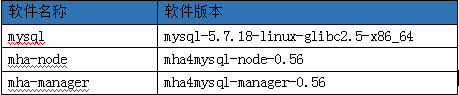
2.2 软件版本
Mysql选取最新的5.7版本,下载二进制包的方式部署
2.3 角色说明

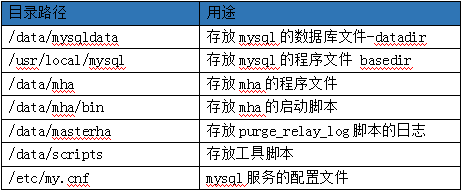
2.4 目录约定
三、Mysql安装部署
官方下载地址: https://dev.mysql.com/downloads/mysql/
3.1 准备安装包
下载二进制安装包放置三台mysql服务器的/usr/local目录下面,软件包名称为:mysql-5.7.18-linux-glibc2.5-x86_64.tar.gz
3.2 卸载系统lib包
# rpm -qa|grep mysql

mysql-libs-5.1.71-1.el6.x86_64

# rpm -e mysql-libs-5.1.71-1.el6.x86_64 -nodeps
3.3 创建mysql用户
# groupadd mysql

# useradd -r -g mysql mysql

# 参数表示mysql用户是系统用户,不可用于登录系统。
3.4 安装程序
解压TAR包,更改所属的组和用户,并且创建软连接的方式
# pwd

/usr/local

# ls mysql-5.7.18-linux-glibc2.5-x86_64.tar.gz

mysql-5.7.18-linux-glibc2.5-x86_64.tar.gz

# tar -zxvf mysql-5.7.18-linux-glibc2.5-x86_64.tar.gz

# ln -s mysql-5.7.18-linux-glibc2.5-x86_64 mysql

# ll mysql

lrwxrwxrwx 1 root root 34 May 25 12:54 mysql -> mysql-5.7.18-linux-glibc2.5-x86_64

# chown -R mysql:mysql mysql-5.7.18-linux-glibc2.5-x86_64
3.5 初始化数据库 (!!!做完3.7再做此步骤吧)
# mkdir -pv /data/mysqldata  # 创建放置mysql的数据目录

mkdir: created directory `/data/mysqldata'

# chown -R mysql:mysql /data/mysqldata/

# pwd

/usr/local/mysql

# ./bin/mysqld --user=mysql --basedir=/usr/local/mysql/ --datadir=/data/mysqldata/ --initialize

# mysql 5.7使用mysqld进行数据库的初始化

2017-05-25T05:37:55.408516Z 0 [Warning] TIMESTAMP with implicit DEFAULT value is deprecated. Please use --explicit_defaults_for_timestamp server option (see documentation for more details).

2017-05-25T05:37:55.674238Z 0 [Warning] InnoDB: New log files created, LSN=45790

2017-05-25T05:37:55.721899Z 0 [Warning] InnoDB: Creating foreign key constraint system tables.

2017-05-25T05:37:55.780139Z 0 [Warning] No existing UUID has been found, so we assume that this is the first time that this server has been started. Generating a new UUID: 4dbe04ea-410c-11e7-82cb-000e1ebbacb0.

2017-05-25T05:37:55.780754Z 0 [Warning] Gtid table is not ready to be used. Table 'mysql.gtid_executed' cannot be opened.

2017-05-25T05:37:55.781792Z 1 [Note] A temporary password is generated for root@localhost: rtSOJ:hyx54y  #会初始化一个root密码
3.6 修改启动脚本
# pwd

/usr/local/mysql

# cp -a ./support-files/mysql.server  /etc/init.d/mysqld

# vim /etc/init.d/mysqld

     basedir='/usr/local/mysql'

     datadir='/data/mysqldata'
3.7 创建配置文件
# /etc/my.cnf

[mysqld]

basedir = /usr/local/mysql

datadir = /data/mysqldata

port = 3306

server_id = 86   # !!!每台服务器的id不一样,必须更改

socket = /tmp/mysql.sock

pid-file = /data/mysqldata/mysql.pid

sql_mode=NO_ENGINE_SUBSTITUTION,STRICT_TRANS_TABLES

gtid_mode=on

enforce_gtid_consistency=on

log-bin=mysqlbin

log-slave-updates=1

binlog_format=row

log_error = /data/mysqldata/mysql-error.log

innodb_buffer_pool_size = 6G   #根据自己的内存大小进行更改,内存的70%~80%

innodb_log_buffer_size = 64M

innodb_max_dirty_pages_pct = 50

default-storage-engine = InnoDB

sync_binlog = 1

innodb_flush_log_at_trx_commit = 2

innodb_file_per_table = 1

innodb_data_file_path = ibdata1:1G:autoextend
3.8 启动数据库
# /etc/init.d/mysqld start

Starting MySQL.Logging to '/data/mysqldata/mysql-error.log'.

..... SUCCESS!
3.9 初始化密码
mysql5.7会生成一个初始化密码 ,位置在: /root/.mysql_secret ,在error日志中也有
# cat /root/.mysql_secret

# Password set for user 'root@localhost' at 2017-05-25 12:59:48

OU1qrvuT1t)?

# /usr/local/mysql/bin/mysql -uroot -p

Enter password:

Welcome to the MySQL monitor.  Commands end with ; or \g.

Your MySQL connection id is 3

Server version: 5.7.18

Copyright (c) 2000, 2017, Oracle and/or its affiliates. All rights reserved.

Oracle is a registered trademark of Oracle Corporation and/or its

affiliates. Other names may be trademarks of their respective

owners.

Type 'help;' or '\h' for help. Type '\c' to clear the current input statement.

mysql> SET PASSWORD = PASSWORD('dbpass123');

Query OK, 0 rows affected, 1 warning (0.00 sec)

mysql> flush privileges;

Query OK, 0 rows affected (0.00 sec)
3.10 设置开机启动
chkconfig --level 35 mysqld on
四、主从复制搭建
Mysql复制在5.6.5之后有两种配置方式,一种是基于binlog文件中的POS值来进行配置,另外一种则是通过GTID的方式来进行复制。
4.1 GTID工作原理
1、全局事务标识:global transaction identifiers。

2、GTID是一个事务一一对应,并且全局唯一ID。

3、一个GTID在一个服务器上只执行一次,避免重复执行导致数据混乱或者主从不一致。

4、GTID用来代替传统复制方法,不再使用MASTER_LOG_FILE+MASTER_LOG_POS开启复制。而是使用MASTER_AUTO_POSTION=1的方式开始复制。

5、MySQL-5.6.5开始支持的,MySQL-5.6.10后开始完善。

6、在传统的slave端,binlog是不用开启的,但是在GTID中slave端的binlog是必须开启的,目的是记录执行过的GTID(强制)。

过程描述:

1、当一个事务在主库端执行并提交时,产生GTID,一同记录到binlog日志中。

2、binlog传输到slave,并存储到slave的relaylog后,读取这个GTID的这个值设置gtid_next变量,即告诉Slave,下一个要执行的GTID值。

3、sql线程从relay log中获取GTID,然后对比slave端的binlog是否有该GTID。

4、如果有记录,说明该GTID的事务已经执行,slave会忽略。

5、如果没有记录,slave就会执行该GTID事务,并记录该GTID到自身的binlog,在读取执行事务前会先检查其他session持有该GTID,确保不被重复执行。

6、在解析过程中会判断是否有主键,如果没有就用二级索引,如果没有就用全部扫描。
4.2 配置文件必须参数
[mysqld]

server_id = 86  #服务器id,每个mysql实例必须不一样,建议取ip最后段的值

gtid_mode=on             #开启gtid模式

enforce_gtid_consistency=on  #强制gtid一致性,开启后对于特定create table不被支持

log-bin=mysqlbin     # 开启binlog

log-slave-updates=1

binlog_format=row   # 强烈建议,其他格式可能造成数据不一致
4.3 创建复制帐号
在主库上创建复制帐号,授权从库使用帐号来进行复制
GRANT REPLICATION SLAVE ON *.* TO repluser@192.168.129.87 IDENTIFIED BY  'replpass';

GRANT REPLICATION SLAVE ON *.* TO repluser@192.168.129.88 IDENTIFIED BY  'replpass';

flush privileges;
4.4 从库开启复制
# 在两个从库上执行:

CHANGE MASTER TO MASTER_HOST='192.168.129.86',   #  主库ip

MASTER_USER='repluser',                    #  复制帐号

MASTER_PASSWORD='replpass',              #  帐号密码

MASTER_AUTO_POSITION=1;

Start slave;
GTID复制官方地址:https://dev.mysql.com/doc/refman/5.6/en/replication-gtids-howto.html
4.5 查看复制状态
在从库主机上使用 show slave status查看复制状态,当Slave_IO_Running和Slave_SQL_Running都是Yes的时候说明主从复制状态是正常的,此时可以在主库上操作数据,然后在从库上验证数据是否会同步过来。
至此,mysql基于GTID的主从复制搭建完毕,下面就剩下mha软件的搭建了。
五、mha搭建
mha node角色需要部署在每台主机上面,mha manager只需要部署在mha控制节点89上。
5.1 配置host文件
使用主机别名的方式更容易使配置简单,在每台机器的/etc/hosts文件中添加以下对应关系
# add /etc/hosts

192.168.129.86  node86 master

192.168.129.87  node87 salve87

192.168.129.88  node88 salve88
5.2 mha node节点部署
Mha是由perl语言开发,所以需要使用perl的依赖,推荐使用yum进行安装,此软件需要安装在每台服务器上.
5.2.1 安装依赖
yum install -y perl-DBD-MySQL.x86_64 \

                     perl-DBI.x86_64 perl-ExtUtils-CBuilder \

                     perl-ExtUtils-MakeMaker perl-CPAN.x86_64 \

                     perl-Mail-Sender perl-Log-Dispatch
5.2.2 安装mha node
tar xf mha4mysql-node-0.56.tar.gz

cd mha4mysql-node-0.56

perl Makefile.PL

make

make install
5.2.3 node主要工具
Node工具包(这些工具通常由MHA Manager的脚本触发,无需人为操作)主要包括以下几个工具:
save_binary_logs                保存和复制master的二进制日志

apply_diff_relay_logs            识别差异的中继日志事件并将其差异的事件应用于其他的slave

filter_mysqlbinlog               去除不必要的ROLLBACK事件(MHA已不再使用这个工具)

purge_relay_logs                清除中继日志(不会阻塞SQL线程)
5.3 mha manager 节点部署(需要访问公网)
Mha manager控制节点单独一台服务器,部署在192.168.129.89服务器上。
由于已经安装mha node,所以相关依赖的perl模块已经安装,可以直接安装mha manager软件.
5.3.1 安装mha manager
tar -zxvf mha4mysql-manager-0.56.tar.gz

cd mha4mysql-manager-0.56

perl Makefile.PL

make

make install
5.3.2 manager主要工具
masterha_check_ssh              检查MHA的SSH配置状况

masterha_check_repl             检查MySQL复制状况

masterha_manger                启动MHA

masterha_check_status            检测当前MHA运行状态

masterha_master_monitor          检测master是否宕机

masterha_master_switch           控制故障转移(自动或者手动)

masterha_conf_host               添加或删除配置的server信息
5.4 配置ssh密钥登陆
需要配置SSH登陆无密码验证功能,因为mha切换的时候需要到主机上执行命令,各主机之间应当都是免密登陆。
需要注意的是不能禁止password登陆,否则会出现错误.
Mha manager主机需要登陆到三台node节点主机,在192.168.129.89上执行:
# ssh-keygen    #一路回车

# cd ~/.ssh

# ssh-copy-id -i ./id_rsa.pub root@192.168.129.86

# ssh-copy-id -i ./id_rsa.pub root@192.168.129.87

# ssh-copy-id -i ./id_rsa.pub root@192.168.129.88
在192.168.129.86/87/88上生成密钥对,然后互相打通ssh密钥登陆
86上执行命令:

# ssh-copy-id -i ./id_rsa.pub root@192.168.129.88

# ssh-copy-id -i ./id_rsa.pub root@192.168.129.87

87上执行命令:

# ssh-copy-id -i ./id_rsa.pub root@192.168.129.86

# ssh-copy-id -i ./id_rsa.pub root@192.168.129.88

88上执行命令:

# ssh-copy-id -i ./id_rsa.pub root@192.168.129.86

# ssh-copy-id -i ./id_rsa.pub root@192.168.129.87
5.5 设置从库只读
两台slave服务器设置read_only(从库对外提供读服务,只所以没有写进配置文件,是因为随时slave会提升为master)
# 设置只读的指令,需要在两个从库87/88上执行

# mysql -uroot -p -e 'set global read_only=1'
5.6 创建监控帐号
# 在主库上执行

grant all privileges on *.* to 'mhamon'@'192.168.129.89' identified  by 'mhamonpass';

flush  privileges;
5.7 设置relaylog清理
MHA在发生切换的过程中,从库的恢复过程中依赖于relay log的相关信息,所以这里要将relay log的自动清除设置为OFF,
采用手动清除relay log的方式。在默认情况下,从服务器上的中继日志会在SQL线程执行完毕后被自动删除。
# 设置关闭relay_log自动清理的指令,需要在两个从库87/88上执行

# mysql -uroot -p -e 'set global relay_log_purge=0'
在MHA环境中,这些中继日志在恢复其他从服务器时可能会被用到,因此需要禁用中继日志的自动删除功能。定期清除中继日志需要考虑到复制延时的问题。在ext3的文件系统下,删除大的文件需要一定的时间,会导致严重的复制延时。为了避免复制延时,需要暂时为中继日志创建硬链接,因为在linux系统中通过硬链接删除大文件速度会很快。(在mysql数据库中,删除大表时,通常也采用建立硬链接的方式)
MHA节点中包含了pure_relay_logs命令工具,它可以为中继日志创建硬链接,执行SET GLOBAL relay_log_purge=1,等待几秒钟以便SQL线程切换到新的中继日志,再执行SET GLOBAL relay_log_purge=0.这是此工具的原理.
可参照: http://blog.csdn.net/leshami/article/details/45688503
Pure_relay_log脚本介绍
--user mysql                      用户名

--password mysql                  密码

--port                            端口号

--workdir                         指定创建relay log的硬链接的位置,默认是/var/tmp,由于系统不同分区创建硬链接文件会失败,故需要执行硬链接具体位置,成功执行脚本后,硬链接的中继日志文件被删除

--disable_relay_log_purge         默认情况下,如果relay_log_purge=1,脚本会什么都不清理,自动退出,通过设定这个参数,当relay_log_purge=1的情况下会将relay_log_purge设置为0。清理relay log之后,最后将参数设置为OFF。
两台从服务器上设置relay脚本定期清除.
# crontab -l

0 4 * * * /bin/bash /data/scripts/purge_relay_log.sh

[root@nma04-305-bigdata-035129087.ctc.local][~]

# cat /data/scripts/purge_relay_log.sh   # 清理脚本

#!/bin/bash

. /etc/profile

. ~/.bash_profile

. ~/.bashrc

user=root

passwd=dbpass123

port=3306

log_dir='/data/masterha/log'

work_dir='/data/masterha'

purge='/usr/local/bin/purge_relay_logs'

if [ ! -d $log_dir ]

then

   mkdir $log_dir -p

fi

$purge --user=$user --password=$passwd --disable_relay_log_purge --port=$port --workdir=$work_dir >> $log_dir/purge_relay_logs.log 2>&1
5.8 配置mha manager
5.8.1 Mha软件目录结构
# tree /data/mha/  # 存放mha的相关配置与脚本

/data/mha/

├── app1         # 日志目录

│   ├── app1.log  # 日志文件

│   └── app1.master_status.health #检查文件

├── app1.cnf   # mha配置文件

├── bin

│   └── mhaCli.sh  # mha启动脚本,自己编写

├── master_ip_failover # mha检测失败后执行的自动切换脚本

└── sendEmail    # mha切换后的发送告警邮件的脚本
5.8.2 mha配置文件
/data/mha/app1.cnf
[server default]

manager_log=/data/mha/app1/app1.log   # 设置manager的日志

manager_workdir=/data/mha/app1/      # 设置manager的工作目录

master_binlog_dir=/data/mysqldata      # 设置master 保存binlog的位置,以便MHA可以找到master的日志,我这里的也就是mysql的数据目录

master_ip_failover_script=/data/mha/master_ip_failover # 设置自动failover时候的切换脚本

master_ip_online_change_script=/data/mha/master_ip_failover #设置手动failover时候的切换脚本

report_script=/data/mha/sendEmail    # 设置发生切换后发送的报警的脚本

remote_workdir=/tmp              # 设置远端mysql在发生切换时binlog的保存位置

ping_interval=10                  #设置监控主库,发送ping包的时间间隔,默认是3秒,尝试三次没有回应的时候自动进行railover

user=mhamon                    # 设置监控用户

password=mhamonpass         #  设置监控用户的密码

repl_password=replpass        # 设置复制账号的密码

repl_user=repluser                # 设置复制账号

ssh_port=22                     # 设置ssh的端口号

ssh_user=root                    # 设置ssh的登陆用户

secondary_check_script=/usr/local/bin/masterha_secondary_check -s slave87 -s slave88

[server1]

hostname=192.168.129.86

port=3306

[server2]

hostname=192.168.129.87

port=3306

# 下面这两个参数我没有使用,但是需要了解

# candidate_master=1 设置为候选master,如果设置该参数以后,发生主从切换以后将会将此从库提升为主库,即使这个主库不是集群中事件最新的slave

# check_repl_delay=0  默认情况下如果一个slave落后master 100M的relay logs的话,MHA将不会选择该slave作为一个新的master,
#                     因为对于这个slave的恢复需要花费很长时间,通过设置check_repl_delay=0,MHA触发切换在选择一个新的master的时候将
                      会忽略复制延时,这个参数对于设置了candidate_master=1的主机非常有用,因为这个候选主在切换的过程中一定是新的master

[server3]

hostname=192.168.129.88

port=3306
5.8.3 mha 启动脚本
# cat bin/mhaCli.sh

#!/bin/bash

. /etc/profile

. ~/.bash_profile

. ~/.bashrc

run_num=$(ps -ef|grep masterha_manager |grep -v grep|wc -l)

pid_file='/data/mha/app1/app1.master_status.health'

start() {

   if [[ $run_num < 1 ]];then

   args="--conf=/data/mha/app1.cnf --remove_dead_master_conf --ignore_last_failover"

   nohup masterha_manager $args < /dev/null > /data/mha/app1/app1.log 2>&1 &

   else

     echo 'mha is already running...'

   fi

}

stop() {

  if [[ $run_num < 1 ]];then

     echo 'mha not running ...'

     exit 64

  else

     ps -ef|grep masterha_manager |grep -v grep|awk '{print $2}'|xargs kill -9

     rm -f $pid_file

     echo 'mha stop...'

  fi

}

status() {

 masterha_check_status --conf=/data/mha/app1.cnf

}

case "$1" in

  start)

  start

  ;;

  stop)

  stop

  ;;

  status)

  status

  ;;

  *)

  echo 'mhaCli {stop|start|status}'

  ;;

esac
5.8.4 mha自动切换脚本
脚本直接使用下面的这个,注意修改标红部分
# cat master_ip_failover
#!/usr/bin/env perl use strict;
use warnings FATAL => 'all'; use Getopt::Long; my (
$command, $ssh_user, $orig_master_host, $orig_master_ip,
$orig_master_port, $new_master_host, $new_master_ip, $new_master_port
); my $vip = '192.168.129.91/26'; # 设置VIP的地方
my $key = '91'; # 此处代表 绑定在 bond0:91上
my $ssh_start_vip = "/sbin/ifconfig bond0:$key $vip"; # 开启VIP
my $ssh_stop_vip = "/sbin/ifconfig bond0:$key down"; # 关闭VIP GetOptions(
'command=s' => \$command,
'ssh_user=s' => \$ssh_user,
'orig_master_host=s' => \$orig_master_host,
'orig_master_ip=s' => \$orig_master_ip,
'orig_master_port=i' => \$orig_master_port,
'new_master_host=s' => \$new_master_host,
'new_master_ip=s' => \$new_master_ip,
'new_master_port=i' => \$new_master_port,
); exit &main(); sub main { print "\n\nIN SCRIPT TEST====$ssh_stop_vip==$ssh_start_vip===\n\n"; if ( $command eq "stop" || $command eq "stopssh" ) { my $exit_code = 1;
eval {
print "Disabling the VIP on old master: $orig_master_host \n";
&stop_vip();
$exit_code = 0;
};
if ($@) {
warn "Got Error: $@\n";
exit $exit_code;
}
exit $exit_code;
}
elsif ( $command eq "start" ) { my $exit_code = 10;
eval {
print "Enabling the VIP - $vip on the new master - $new_master_host \n";
&start_vip();
$exit_code = 0;
};
if ($@) {
warn $@;
exit $exit_code;
}
exit $exit_code;
}
elsif ( $command eq "status" ) {
print "Checking the Status of the script.. OK \n";
exit 0;
}
else {
&usage();
exit 1;
}
} sub start_vip() {
`ssh $ssh_user\@$new_master_host \" $ssh_start_vip \"`;
}
sub stop_vip() {
return 0 unless ($ssh_user);
`ssh $ssh_user\@$orig_master_host \" $ssh_stop_vip \"`;
} sub usage {
"Usage: master_ip_failover --command=start|stop|stopssh|status --orig_master_host=host --orig_master_ip=ip --orig_master_port=port --new_master_host=host --new_master_ip=ip --new_master_port=port\n";
}
5.8.5 告警脚本
# cat sendEmail

#!/usr/bin/perl

#  Copyright (C) 2011 DeNA Co.,Ltd.

#

#  This program is free software; you can redistribute it and/or modify

#  it under the terms of the GNU General Public License as published by

#  the Free Software Foundation; either version 2 of the License, or

#  (at your option) any later version.

#

#  This program is distributed in the hope that it will be useful,

#  but WITHOUT ANY WARRANTY; without even the implied warranty of

#  MERCHANTABILITY or FITNESS FOR A PARTICULAR PURPOSE.  See the

#  GNU General Public License for more details.

#

#  You should have received a copy of the GNU General Public License

#   along with this program; if not, write to the Free Software

#  Foundation, Inc.,

#  51 Franklin Street, Fifth Floor, Boston, MA  02110-1301  USA

## Note: This is a sample script and is not complete. Modify the script based on your environment.

use strict;

use warnings FATAL => 'all';

use Mail::Sender;

use Getopt::Long;

#new_master_host and new_slave_hosts are set only when recovering master succeeded

my ( $dead_master_host, $new_master_host, $new_slave_hosts, $subject, $body );

my $smtp='smtp.163.com';

my $mail_from='xxx@163.com';

my $mail_user='xxx@163.com';

my $mail_pass='xxxxxx';

my $mail_to=['xxx@xxx.cn','xxxxx@xxx.cn'];

GetOptions(

  'orig_master_host=s' => \$dead_master_host,

  'new_master_host=s'  => \$new_master_host,

  'new_slave_hosts=s'  => \$new_slave_hosts,

  'subject=s'          => \$subject,

  'body=s'             => \$body,

);

mailToContacts($smtp,$mail_from,$mail_user,$mail_pass,$mail_to,$subject,$body);

sub mailToContacts {

    my ( $smtp, $mail_from, $user, $passwd, $mail_to, $subject, $msg ) = @_;

    open my $DEBUG, "> /tmp/monitormail.log"

        or die "Can't open the debug      file:$!\n";

    my $sender = new Mail::Sender {

        ctype       => 'text/plain; charset=utf-8',

        encoding    => 'utf-8',

        smtp        => $smtp,

        from        => $mail_from,

        auth        => 'LOGIN',

        TLS_allowed => '0',

        authid      => $user,

        authpwd     => $passwd,

        to          => $mail_to,

        subject     => $subject,

        debug       => $DEBUG

    };

    $sender->MailMsg(

        {   msg   => $msg,

            debug => $DEBUG

        }

    ) or print $Mail::Sender::Error;

    return 1;

}

# Do whatever you want here

exit 0;
5.9 Mha 集群测试&启动
测试ssh免密通信是否正常:masterha_check_ssh --conf=/data/mha/app1.cnf
出现的是六个ok,没有fail的报错,则是通过。
测试mysql复制是否正常:masterha_check_repl --conf=/data/mha/app1.cnf
Wed May 31 16:14:56 2017 - [warning] Global configuration file /etc/masterha_default.cnf not found. Skipping.

Wed May 31 16:14:56 2017 - [info] Reading application default configuration from /data/mha/app1.cnf..

Wed May 31 16:14:56 2017 - [info] Reading server configuration from /data/mha/app1.cnf..

Wed May 31 16:14:56 2017 - [info] MHA::MasterMonitor version 0.56.

Wed May 31 16:14:57 2017 - [info] GTID failover mode = 1

Wed May 31 16:14:57 2017 - [info] Dead Servers:

Wed May 31 16:14:57 2017 - [info] Alive Servers:

Wed May 31 16:14:57 2017 - [info]   192.168.129.86(192.168.129.86:3306)

Wed May 31 16:14:57 2017 - [info]   192.168.129.87(192.168.129.87:3306)

Wed May 31 16:14:57 2017 - [info]   192.168.129.88(192.168.129.88:3306)

Wed May 31 16:14:57 2017 - [info] Alive Slaves:

Wed May 31 16:14:57 2017 - [info]   192.168.129.87(192.168.129.87:3306)  Version=5.7.18-log (oldest major version between slaves) log-bin:enabled

Wed May 31 16:14:57 2017 - [info]     GTID ON

Wed May 31 16:14:57 2017 - [info]     Replicating from 192.168.129.86(192.168.129.86:3306)

Wed May 31 16:14:57 2017 - [info]   192.168.129.88(192.168.129.88:3306)  Version=5.7.18-log (oldest major version between slaves) log-bin:enabled

Wed May 31 16:14:57 2017 - [info]     GTID ON

Wed May 31 16:14:57 2017 - [info]     Replicating from 192.168.129.86(192.168.129.86:3306)

Wed May 31 16:14:57 2017 - [info] Current Alive Master: 192.168.129.86(192.168.129.86:3306)

Wed May 31 16:14:57 2017 - [info] Checking slave configurations..

Wed May 31 16:14:57 2017 - [info]  read_only=1 is not set on slave 192.168.129.87(192.168.129.87:3306).

Wed May 31 16:14:57 2017 - [info]  read_only=1 is not set on slave 192.168.129.88(192.168.129.88:3306).

Wed May 31 16:14:57 2017 - [info] Checking replication filtering settings..

Wed May 31 16:14:57 2017 - [info]  binlog_do_db= , binlog_ignore_db=

Wed May 31 16:14:57 2017 - [info]  Replication filtering check ok.

Wed May 31 16:14:57 2017 - [info] GTID (with auto-pos) is supported. Skipping all SSH and Node package checking.

Wed May 31 16:14:57 2017 - [info] Checking SSH publickey authentication settings on the current master..

Wed May 31 16:14:57 2017 - [info] HealthCheck: SSH to 192.168.129.86 is reachable.

Wed May 31 16:14:57 2017 - [info]

192.168.129.86(192.168.129.86:3306) (current master)

 +--192.168.129.87(192.168.129.87:3306)

 +--192.168.129.88(192.168.129.88:3306)

Wed May 31 16:14:57 2017 - [info] Checking replication health on 192.168.129.87..

Wed May 31 16:14:57 2017 - [info]  ok.

Wed May 31 16:14:57 2017 - [info] Checking replication health on 192.168.129.88..

Wed May 31 16:14:57 2017 - [info]  ok.

Wed May 31 16:14:57 2017 - [info] Checking master_ip_failover_script status:

Wed May 31 16:14:57 2017 - [info]   /data/mha/master_ip_failover --command=status --ssh_user=root --orig_master_host=192.168.129.86 --orig_master_ip=192.168.129.86 --orig_master_port=3306

IN SCRIPT TEST====/sbin/ifconfig bond0:91 down==/sbin/ifconfig bond0:91 192.168.129.91/26===

Checking the Status of the script.. OK

Wed May 31 16:14:57 2017 - [info]  OK.

Wed May 31 16:14:57 2017 - [warning] shutdown_script is not defined.

Wed May 31 16:14:57 2017 - [info] Got exit code 0 (Not master dead).

MySQL Replication Health is OK.
启动mha manager节点:
/data/mha/bin/mhaCli.sh start
检查mha manager的状态:
masterha_check_status --conf=/data/mha/app1.cnf

或者: /data/mha/bin/mhaCli.sh status
5.10 配置VIP
因为使用脚本的方式,所以第一次VIP需要手动配置,在主服务器86上执行:
# /sbin/ifconfig bond0:91 192.168.129.91/26

# ifconfig

bond0     Link encap:Ethernet  HWaddr 00:0E:1E:BD:03:E0

          inet addr:192.168.129.86  Bcast:192.168.129.127  Mask:255.255.255.192

          UP BROADCAST RUNNING MASTER MULTICAST  MTU:1500  Metric:1

          RX packets:1335051 errors:0 dropped:0 overruns:0 frame:0

          TX packets:708712 errors:0 dropped:0 overruns:0 carrier:0

          collisions:0 txqueuelen:0

          RX bytes:1524679739 (1.4 GiB)  TX bytes:708278247 (675.4 MiB)

bond0:91  Link encap:Ethernet  HWaddr 00:0E:1E:BD:03:E0

          inet addr:192.168.129.91  Bcast:192.168.129.127  Mask:255.255.255.192

          UP BROADCAST RUNNING MASTER MULTICAST  MTU:1500  Metric:1
六、Mha集群测试
测试方法可以将主上面的mysql停掉之后,观察mha的日志,可以看到详细的切换过程.
停掉86的mysql, VIP 91会漂移到新的master,并且新的master也会被提升为主.
在87上执行 ifconfig 查看验证.
七、节点重新上线
当原来的主服务器A问题修复好之后,此时需要重新上线主机,则可以通过以下方式:
- 在服务器A上搭建好mysql服务,建议和之前配置参数一致;服务器之间免密。
- 在现在的master或者slave使用mysqldump将数据备份,加--master-data=2 -A参数
- 将备份数来的数据在服务器A上进行恢复,完成后执行flush privileges刷新权限。
- 成后配置GTID的change master操作(见4.4),start slave即可
- 将主机的信息添加到mha的配置文件中,以便mha manager检测到新的节点主机
- 使用mha的测试命令进行测试,见(5.9),成功则启动mha程序即可
八、总结
目前高可用方案可以一定程度上实现数据库的高可用,比如MMM,heartbeat+drbd,Cluster等,还有percona的Galera Cluster等。
这些高可用软件各有优劣。在进行高可用方案选择时,主要是看业务还有对数据一致性方面的要求。最后出于对数据库的高
可用和数据一致性的要求,推荐使用MHA架构。
参考文档:
https://yq.aliyun.com/articles/58004?spm=5176.100239.blogcont57855.9.jUuCt0
http://www.cnblogs.com/gomysql/p/3675429.html
http://blog.csdn.net/wb96a1007/article/details/51559741
https://github.com/yoshinorim/mha4mysql-manager/wiki/ReleaseNotes#changes-in-manager-057
基于GTID的Mysql-Mha高可用方案探索的更多相关文章
- Oracle和MySQL的高可用方案对比【转】
关于Oracle和MySQL的高可用方案,其实一直想要总结了,就会分为几个系列来简单说说.通过这样的对比,会对两种数据库架构设计上的细节差异有一个基本的认识.Oracle有一套很成熟的解决方案.用我在 ...
- (转)基于keepalived搭建MySQL的高可用集群
基于keepalived搭建MySQL的高可用集群 原文:http://www.cnblogs.com/ivictor/p/5522383.html MySQL的高可用方案一般有如下几种: keep ...
- 基于keepalived搭建MySQL的高可用集群
MySQL的高可用方案一般有如下几种: keepalived+双主,MHA,MMM,Heartbeat+DRBD,PXC,Galera Cluster 比较常用的是keepalived+双主,MHA和 ...
- 搭建MySQL MHA高可用
本文内容参考:http://www.ttlsa.com/mysql/step-one-by-one-deploy-mysql-mha-cluster/ MySQL MHA 高可用集群 环境: Linu ...
- MySQL MHA 高可用集群部署及故障切换
MySQL MHA 高可用集群部署及故障切换 1.概念 2.搭建MySQL + MHA 1.概念: a)MHA概念 : MHA(MasterHigh Availability)是一套优秀的MySQL高 ...
- 分布式数据存储 - MySQL主从复制高可用方案
前面几篇文章说道MySQL数据库的高可用方案主从复制.主从复制的延迟产生原因.延迟检测及延迟解决方案(并未从根本上解决),这种主从复制方案保证数据的冗余的同时可以做读写分离来分担系统压力但是并非是高可 ...
- MYSQL数据库高可用方案探究
MySQL作为最关键的应用数据存储中心,如何保证MySQL服务的可靠性和持续性,是我们不得不细致考虑的一个问题.当master宕机的时候,我们如何保证数据尽可能的不丢失,如何保证快速的获知master ...
- MySQL数据库高可用方案
一.什么是高可用性: 高可用性=可靠性,它的本质就是通过技术和工具提高可靠性,尽可能长时间保持数据可用和系统运行,实现高可用性的原则,首先要消除单点故障,其次通过冗余机制实现快速恢复,还有就是实现容错 ...
- Mysql MHA高可用集群架构
** 记得之前发过一篇文章,名字叫<浅析MySQL高可用架构>,之后一直有很多小伙伴在公众号后台或其它渠道问我,何时有相关的深入配置管理文章出来,因此,民工哥,也将对前面的各类架构逐一进行 ...
随机推荐
- Hash Table Performance in R: Part I(转)
What Is It? A hash table, or associative array, is a well known key-value data structure. In R there ...
- Eclipse设置文字大小
1,选择窗口,preference 2,general
- css块级元素居中
<!DOCTYPE html> <html> <head> <title>index</title> </head> <b ...
- Ubuntu安装genymotion模拟器步骤
1.安装VitrualBox genymotion模拟器需要有VirtualBox环境,打开终端(ctrl + alt + T),执行以下命令: sudo apt-get install virtua ...
- [转]tomcat部署
转载博客原文地址: http://www.cnblogs.com/xing901022/p/4463896.html 阅读目录 介绍 静态部署——在tomcat启动时部署 动态部署——在tomcat ...
- sublime 新手代码提示
有提示的 你按 table 试试这就是按过的结果 是不是很方便这是按后的效果 是不是很方便 下面是各种简写效果html <html></html> ...
- 修复python的ModuleNotFoundError
我在项目里面用到了python,但其他的同事并没有安装python环境,为了不强制每个人都安装python,我下载了python-3.6.1-embed-amd64,并将用一个.bat去调用它. 大概 ...
- 提高java编程质量 - (四)i++ 和 ++i 探究原理
先看一个例子: package com.test; public class AutoIncrement { public static void main(String[] args) { int ...
- asp.net core 教程(七)-异常处理、静态文件
Asp.Net Core-异常处理 Asp.Net Core-异常处理 在这一章,我们将讨论异常和错误处理.当 ASP.NET Core应用程序中发生错误时,您可以以各种不同的方式来处理.让我们来看看 ...
- mysql关闭/启用外键约束
1.有时为了导入数据方便,需要临时关闭外键约束mysql>SET FOREIGN_KEY_CHECKS=0; 2.打开外键约束mysql>SET FOREIGN_KEY_CHECKS=1; ...