初学spring boot踩过的坑
一、搭建spring boot环境
maven工程
pom文件内容
|
<project xmlns="http://maven.apache.org/POM/4.0.0" xmlns:xsi="http://www.w3.org/2001/XMLSchema-instance" xsi:schemaLocation="http://maven.apache.org/POM/4.0.0 http://maven.apache.org/xsd/maven-4.0.0.xsd"> <parent> |
项目目录结构
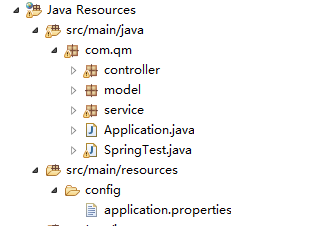
其中springTest类是spring boot内部tomcat启动时要运行的类
其中内容如下
| package com.qm;
import org.springframework.boot.SpringApplication; import com.qm.controller.UserController; @SpringBootApplication |
Application类的作用是外部服务器启动spring boot所要做的一些事。内容如下
|
package com.qm; import org.springframework.boot.SpringApplication; @SpringBootApplication |
application.properties文件内容如下
|
server.port=8080 //热部署,需要提供的路径 |
踩过的坑
坑一,
一开始以为文件目录,可以随便放,经过坑一的教训,才知道代码文件存放有一定的顺序
如上项目结构图,其中springtest类和application类一定要放在最外面的包里,如com.qm 当启动spring boot时,它会去加载com.qm包及其子包下的所有类,
当你不按顺序时,且代码中有@Autowired注解注入bean时,会报以下错误
Description:
Field userService in com.qm.controller.UserController required a bean of type 'com.qm.service.UserService' that could not be found.
Action:
Consider defining a bean of type 'com.qm.service.UserService' in your configuration.
,即bean找不到。,这是应该注意代码顺序。
坑二
补齐坑一后,在service层的接口继承jpa,然后在controller层使用注入的service方法会报以下错误
Error creating bean with name 'dataController': Unsatisfied dependency expressed through field 'personRepository'; nested exception is org.springframework.beans.factory.BeanCreationException: Error creating bean with name 'personRepository': Invocation of init method failed; nested exception is org.springframework.data.mapping.PropertyReferenceException: No property auto found for type Person!
这是因为hibernate版本的问题,
只要加上
<dependency>
<groupId>org.antlr</groupId>
<artifactId>antlr4-runtime</artifactId>
<version>4.1</version>
这个依赖即可
添加之后,若maven仓库中有该jar包,最好删掉,编译时重新下载
若spring boot正常启动,而地址栏访问不到controller,则此时应该注意,spring boot启动时,未扫描到controller类,
在spring boot入口类上再添加一个注解
@ComponentScan("要扫描的包名")
以上就是我在学spring boot时遇到过得一些坑。
初学spring boot踩过的坑的更多相关文章
- 部署spring boot + Vue遇到的坑(权限、刷新404、跨域、内存)
部署spring boot + Vue遇到的坑(权限.刷新404.跨域.内存) 项目背景是采用前后端分离,前端使用vue,后端使用springboot. 工具 工欲善其事必先利其器,我们先找一个操作L ...
- Spring Boot踩坑之路一
Takes an opinionated view of building production-ready Spring applications. Spring Boot favors conve ...
- Spring Boot 踩坑之路之 Configuration Annotation Proessor not found in classpath
1. 出现spring boot Configuration Annotation Proessor not found in classpath的提示是在用了@ConfigurationProper ...
- spring boot踩坑记
Resolved exception caused by handler execution: org.springframework.http.converter.HttpMessageNotWri ...
- 初学 Spring boot 报错 Whitelabel Error Page 404
按照教程,写了个最简单的 HelloWorld,尼玛报错 -->Whitelabel Error Page 404. 网上99%都是项目结构不对,说什么 Application放在父级 pack ...
- 记录初学Spring boot中使用GraphQL编写API的几种方式
Spring boot+graphql 一.使用graphql-java-tools方式 <dependency> <groupId>com.graphql-java-kick ...
- spring boot 枚举使用的坑3
上一篇说到spring boot 使用jackson在枚举enum序列化和反序列化的问题, 再来说说在JPA中实体entity使用枚举的问题. 还是这个枚举: @Getter @AllArgsCons ...
- spring boot 枚举使用的坑
java 枚举的功能挺多,但是坑更多,使用的时候要注意.如下面这个枚举. @Getter @AllArgsConstructor public enum EnumExpenseType impleme ...
- Spring Boot 学习填的坑一
1.关于springBoot自动扫描规则: SpringBoot项目的Bean装配默认规则是根据Application类所在的包位置从上往下扫描! "Application"类是指 ...
随机推荐
- Linux环境g++编译GDAL动态库
一.编译步骤 解压下载的GDAL源程序,并在命令行中切换到解压目录. tar -xzvf gdal-2.1.3.tar.gz cd gdal-2.1.3 GDAL可通过configure来实现一些自定 ...
- Handler线程间通信
package com.hixin.appexplorer; import java.util.List; import android.app.Activity; import android.ap ...
- java 空指针异常造成的原因有哪些
实际上 空指针异常 也就是你用了一个没有实际值的对象 1. 某一对象没有被实例化,就拿来使用,如调用此对象的方法,会抛空指针异常. 2. 获取从别的对象传过来的对象为空 3. 数据库查询方面的空指 ...
- SVN分支/合并原理及最佳实践
转自:http://blog.csdn.net/e3002/article/details/21469437 使用svn几年了,一直对分支和合并敬而远之,一来是因为分支的管理不该我操心,二来即使涉及到 ...
- SG函数和SG定理【详解】
在介绍SG函数和SG定理之前我们先介绍介绍必胜点与必败点吧. 必胜点和必败点的概念: P点:必败点,换而言之,就是谁处于此位置,则在双方操作正确的情况下必败. N点:必胜点 ...
- 03 编译安装apache的简易配置
1.监听端口,默认为80,在主配置文件 /etc/httpd24/httpd.conf中可以更改 2.持久连接 Include /etc/httpd24/extra/httpd-default.con ...
- stickUp.js:98 Uncaught ReferenceError: vartop is not defined at HTMLDocument.<anonymous> (stickUp.js:98)
附加var vartop = 0;在var topMargin = 0;这之后,这里是我附加的代码:$(document).ready(function(){ var contentButton = ...
- web前端面试集锦(自己搜集的,如有错误请不吝赐教)
css 1 浏览器兼容性 CSS hack(针对IE6-,IE7,IE8,IE9以及其他浏览器) ‘ * ’ : 所有的IE浏览器都能识别 说明:在标准模式中 “-″减号是IE6专有的hack “\9 ...
- 点评阿里JAVA手册之异常日志(异常处理 日志规约 )
下载原版阿里JAVA开发手册 [阿里巴巴Java开发手册v1.2.0] 本文主要是对照阿里开发手册,注释自己在工作中运用情况. 本文内容:异常处理 日志规约 本文难度系数为一星(★) 本文为第三篇 ...
- 刨根究底字符编码之十二——UTF-8究竟是怎么编码的
UTF-8究竟是怎么编码的 1. UTF-8编码是Unicode字符集的一种编码方式(CEF),其特点是使用变长字节数(即变长码元序列.变宽码元序列)来编码.一般是1到4个字节,当然,也可以更长. 为 ...