python+selenium自动化软件测试(第4章):场景判断与封装
4.1 显示等待WebDriverWait
前言:
在脚本中加入太多的sleep后会影响脚本的执行速度,虽然implicitly_wait()这种隐式等待在一定程度上节省了很多时间。
但是一旦页面上某些js无法加载出来(其实界面元素已经出来了),左上角那个图标一直转圈,这时候会一直等待的。
一、参数解释
1.这里主要有三个参数:
class WebDriverWait(object):driver, timeout, poll_frequency
2.driver:返回浏览器的一个实例,这个不用多说
3.timeout:超时的总时长
4.poll_frequency:循环去查询的间隙时间,默认0.5秒
以下是源码的解释文档(案例一个是元素出现,一个是元素消失)
   def __init__(self, driver, timeout, poll_frequency=POLL_FREQUENCY, ignored_exceptions=None):
        """Constructor, takes a WebDriver instance and timeout in seconds.
           :Args:
            - driver - Instance of WebDriver (Ie, Firefox, Chrome or Remote)
            - timeout - Number of seconds before timing out
            - poll_frequency - sleep interval between calls
              By default, it is 0.5 second.
            - ignored_exceptions - iterable structure of exception classes ignored during calls.
              By default, it contains NoSuchElementException only.
           Example:
            from selenium.webdriver.support.ui import WebDriverWait \n
            element = WebDriverWait(driver, 10).until(lambda x: x.find_element_by_id("someId")) \n
            is_disappeared = WebDriverWait(driver, 30, 1, (ElementNotVisibleException)).\ \n
                        until_not(lambda x: x.find_element_by_id("someId").is_displayed())
        """
二、元素出现:until()
1.until里面有个lambda函数,这个语法看python文档吧
2.以百度输入框为例:

三、元素消失:until_not()
1.判断元素是否消失,是返回Ture,否返回False
备注:此方法未调好,暂时放这
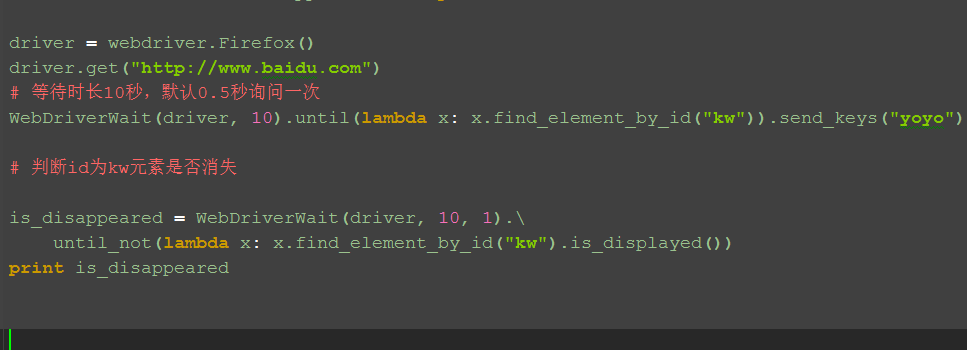
四、参考代码:
# coding:utf-8
from selenium import webdriver
from selenium.webdriver.support.wait import WebDriverWait
driver = webdriver.Firefox()
driver.get("http://www.baidu.com")
# 等待时长10秒,默认0.5秒询问一次
WebDriverWait(driver, 10).until(lambda x: x.find_element_by_id("kw")).send_keys("yoyo")
# 判断id为kw元素是否消失
is_disappeared = WebDriverWait(driver, 10, 1).\
    until_not(lambda x: x.find_element_by_id("kw").is_displayed())
print is_disappeared
五、WebDriverWait源码
1.WebDriverWait主要提供了两个方法,一个是until(),另外一个是until_not()
以下是源码的注释,有兴趣的小伙伴可以看下:
# Licensed to the Software Freedom Conservancy (SFC) under one
# or more contributor license agreements.  See the NOTICE file
# distributed with this work for additional information
# regarding copyright ownership.  The SFC licenses this file
# to you under the Apache License, Version 2.0 (the
# "License"); you may not use this file except in compliance
# with the License.  You may obtain a copy of the License at
#
#   http://www.apache.org/licenses/LICENSE-2.0
#
# Unless required by applicable law or agreed to in writing,
# software distributed under the License is distributed on an
# "AS IS" BASIS, WITHOUT WARRANTIES OR CONDITIONS OF ANY
# KIND, either express or implied.  See the License for the
# specific language governing permissions and limitations
# under the License.
import time
from selenium.common.exceptions import NoSuchElementException
from selenium.common.exceptions import TimeoutException
POLL_FREQUENCY = 0.5  # How long to sleep inbetween calls to the method
IGNORED_EXCEPTIONS = (NoSuchElementException,)  # exceptions ignored during calls to the method
class WebDriverWait(object):
    def __init__(self, driver, timeout, poll_frequency=POLL_FREQUENCY, ignored_exceptions=None):
        """Constructor, takes a WebDriver instance and timeout in seconds.
           :Args:
            - driver - Instance of WebDriver (Ie, Firefox, Chrome or Remote)
            - timeout - Number of seconds before timing out
            - poll_frequency - sleep interval between calls
              By default, it is 0.5 second.
            - ignored_exceptions - iterable structure of exception classes ignored during calls.
              By default, it contains NoSuchElementException only.
           Example:
            from selenium.webdriver.support.ui import WebDriverWait \n
            element = WebDriverWait(driver, 10).until(lambda x: x.find_element_by_id("someId")) \n
            is_disappeared = WebDriverWait(driver, 30, 1, (ElementNotVisibleException)).\ \n
                        until_not(lambda x: x.find_element_by_id("someId").is_displayed())
        """
        self._driver = driver
        self._timeout = timeout
        self._poll = poll_frequency
        # avoid the divide by zero
        if self._poll == 0:
            self._poll = POLL_FREQUENCY
        exceptions = list(IGNORED_EXCEPTIONS)
        if ignored_exceptions is not None:
            try:
                exceptions.extend(iter(ignored_exceptions))
            except TypeError:  # ignored_exceptions is not iterable
                exceptions.append(ignored_exceptions)
        self._ignored_exceptions = tuple(exceptions)
    def __repr__(self):
        return '<{0.__module__}.{0.__name__} (session="{1}")>'.format(
            type(self), self._driver.session_id)
    def until(self, method, message=''):
        """Calls the method provided with the driver as an argument until the \
        return value is not False."""
        screen = None
        stacktrace = None
        end_time = time.time() + self._timeout
        while True:
            try:
                value = method(self._driver)
                if value:
                    return value
            except self._ignored_exceptions as exc:
                screen = getattr(exc, 'screen', None)
                stacktrace = getattr(exc, 'stacktrace', None)
            time.sleep(self._poll)
            if time.time() > end_time:
                break
        raise TimeoutException(message, screen, stacktrace)
    def until_not(self, method, message=''):
        """Calls the method provided with the driver as an argument until the \
        return value is False."""
        end_time = time.time() + self._timeout
        while True:
            try:
                value = method(self._driver)
                if not value:
                    return value
            except self._ignored_exceptions:
                return True
            time.sleep(self._poll)
            if time.time() > end_time:
                break
        raise TimeoutException(message)
4.2 定位方法参数化find_element()
前言
元素基本的定位有八种方法,这个能看到这一篇的小伙伴都知道了,那么有没有一种方法,可以把八种定位合为一种呢?也就是把定位的方式参数化,如id,name.css等设置为一个参数,这样只需维护定位方式的参数就行了。
一、find_element()
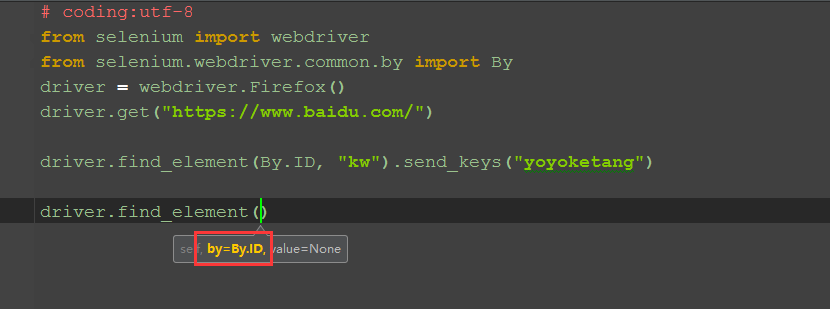
1.selenium元素定位里面其实是有这个方法的,只是大部分时候都是结合By方法使用,如下图:
二、查看find_element方法源码
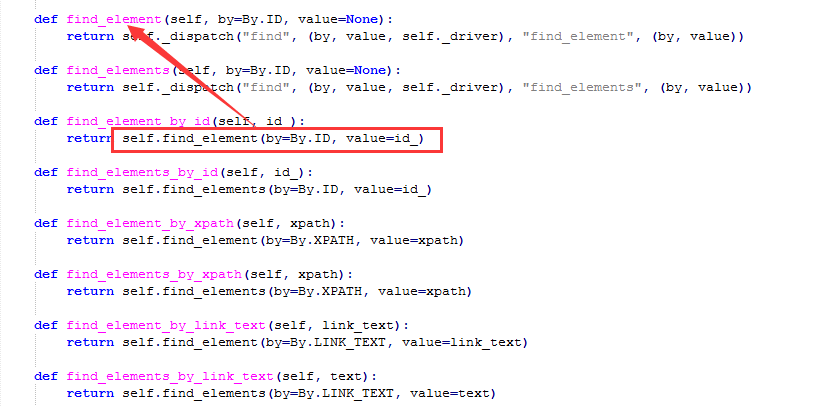
1.find_element跟find_element_by_xxx到底有什么区别呢?好奇害死猫啊,找到这个路径:Lib\site-packages\selenium\webdriver\remote\utils.py
2.打开文件夹后发现,其实定find_element_by_xxx的方法都是返回的find_element方法,也就是说那八个定位方法其实就是八个小分支。
三、By定位方法
1.找到这个路径:Lib\site-packages\selenium\webdriver\common\by.py
2.打开by这个模块,其实里面很简单啊,就是几个字符串参数。
3.那么问题就简单了,其实压根可以不用绕这么大弯路去导入这个模块啊,说实话,我一点都不喜欢去导入这个By,总觉得太繁琐。
"""
The By implementation.
"""
class By(object):
    """
    Set of supported locator strategies.
    """

    ID = "id"
    XPATH = "xpath"
    LINK_TEXT = "link text"
    PARTIAL_LINK_TEXT = "partial link text"
    NAME = "name"
    TAG_NAME = "tag name"
    CLASS_NAME = "class name"
    CSS_SELECTOR = "css selector"
四、定位参数化
1.小编一直追求简单粗暴的方式,接下来就用最简单的方法去定位
2.总结下几种定位方法(字符串中间是空格需注意)
by_id= "id"
by_xpath = "xpath"
by_link_text = "link text"
by_partial_text = "partial link text"
by_name = "name"
by_tag_name = "tag name"
by_class_name = "class name"
by_css_selector = "css selector"
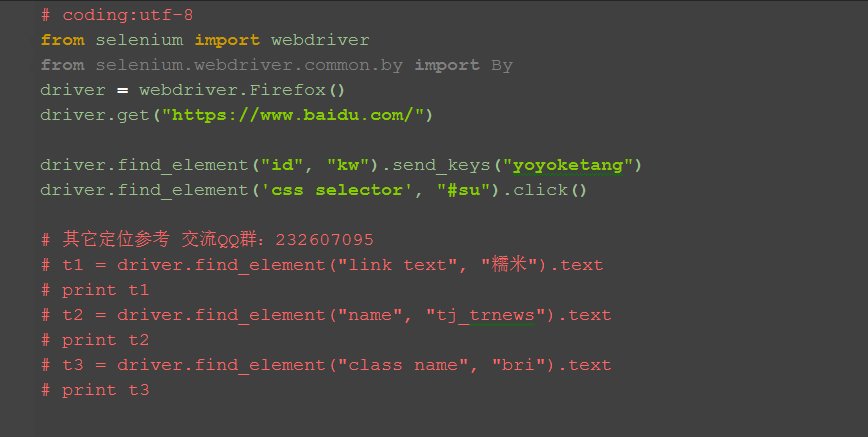
五、参考代码
# coding:utf-8
from selenium import webdriver
from selenium.webdriver.common.by import By
driver = webdriver.Firefox()
driver.get("https://www.baidu.com/")
driver.find_element("id", "kw").send_keys("yoyoketang")
driver.find_element('css selector', "#su").click()
# 其它定位参考 交流QQ群:232607095
# t1 = driver.find_element("link text", "糯米").text
# print t1
# t2 = driver.find_element("name", "tj_trnews").text
# print t2
# t3 = driver.find_element("class name", "bri").text
# print t3
4.3 参数化登录方法
前言
登录这个场景在写用例的时候经常会有,我们可以把登录封装成一个方法,然后把账号和密码参数化,这样以后用的登录的时候,只需调用这个方法就行了
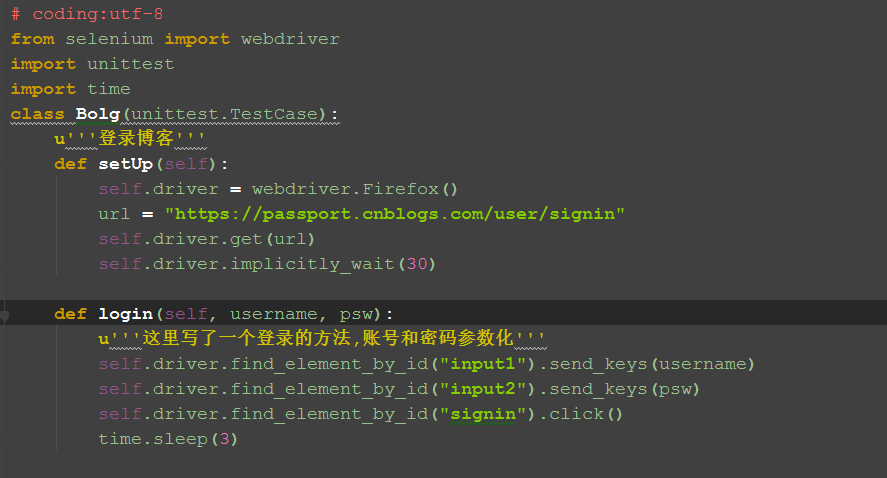
一、登录方法
1.把输入账号、输入密码、点击登录按钮三个步骤写成一个方法
2.然后把输入的账号和密码参数化
二、用例
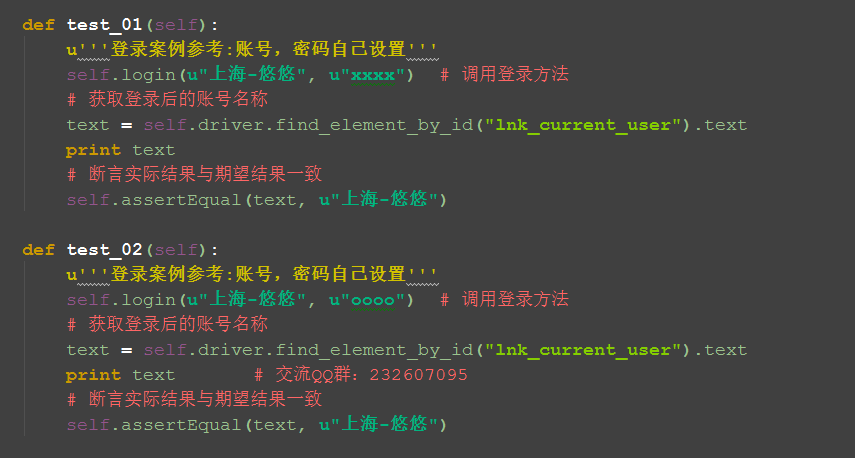
1.下面的用例可以调用前面写的登录方法,这样不用每次都去走登录流程
2.判断是否登录成功,我这里是取的登录成功后的账户名
三、判断方法封装
1.如果用上面的方法去判断的话,有个缺陷,当登录不成功的时候,页面是不会跳转的,所以查找元素会报异常:
NoSuchElementException: Message: Unable to locate element: {"method":"id","selector":"lnk_current_user"}
2.这个时候就简单封装下判断方法:获取到账户名返回Ture;没有获取到返回False
(这里封装思路仅供参考,勿照搬,后面参考二次封装的方法)

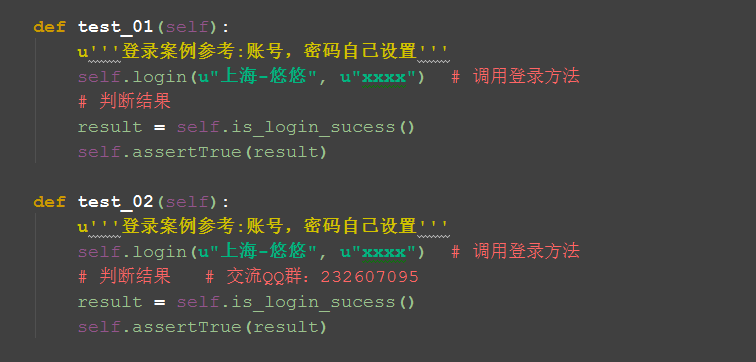
四、优化后案例
1.优化后的登录案例如下,这样看起来更清楚了
五、参考代码
# coding:utf-8
from selenium import webdriver
import unittest
import time
class Bolg(unittest.TestCase):
    u'''登录博客'''
    def setUp(self):
        self.driver = webdriver.Firefox()
        url = "https://passport.cnblogs.com/user/signin"
        self.driver.get(url)
        self.driver.implicitly_wait(30)
    def login(self, username, psw):
        u'''这里写了一个登录的方法,账号和密码参数化'''
        self.driver.find_element_by_id("input1").send_keys(username)
        self.driver.find_element_by_id("input2").send_keys(psw)
        self.driver.find_element_by_id("signin").click()
        time.sleep(3)
    def is_login_sucess(self):
        u'''判断是否获取到登录账户名称'''
        try:
            text = self.driver.find_element_by_id("lnk_current_user").text
            print text
            return True
        except:
            return False
    def test_01(self):
        u'''登录案例参考:账号,密码自己设置'''
        self.login(u"上海-悠悠", u"xxxx")  # 调用登录方法
        # 判断结果
        result = self.is_login_sucess()
        self.assertTrue(result)
    def test_02(self):
        u'''登录案例参考:账号,密码自己设置'''
        self.login(u"上海-悠悠", u"xxxx")  # 调用登录方法
        # 判断结果   # 交流QQ群:232607095
        result = self.is_login_sucess()
        self.assertTrue(result)
    # def test_01(self):
    #     u'''登录案例参考:账号,密码自己设置'''
    #     self.login(u"上海-悠悠", u"xxxx")  # 调用登录方法
    #     # 获取登录后的账号名称
    #     text = self.driver.find_element_by_id("lnk_current_user").text
    #     print text
    #     # 断言实际结果与期望结果一致
    #     self.assertEqual(text, u"上海-悠悠")
    #
    # def test_02(self):
    #     u'''登录案例参考:账号,密码自己设置'''
    #     self.login(u"上海-悠悠", u"oooo")  # 调用登录方法
    #     # 获取登录后的账号名称
    #     text = self.driver.find_element_by_id("lnk_current_user").text
    #     print text            # 断言实际结果与期望结果一致
    #     self.assertEqual(text, u"上海-悠悠")

    def tearDown(self):
        self.driver.quit()
if __name__ == "__main__":
    unittest.main()
4.4 封装读取excel方法
前言
当登录的账号有多个的时候,我们一般用excel存放测试数据,本节课介绍,python读取excel方法,并保存为字典格式。
一、环境准备
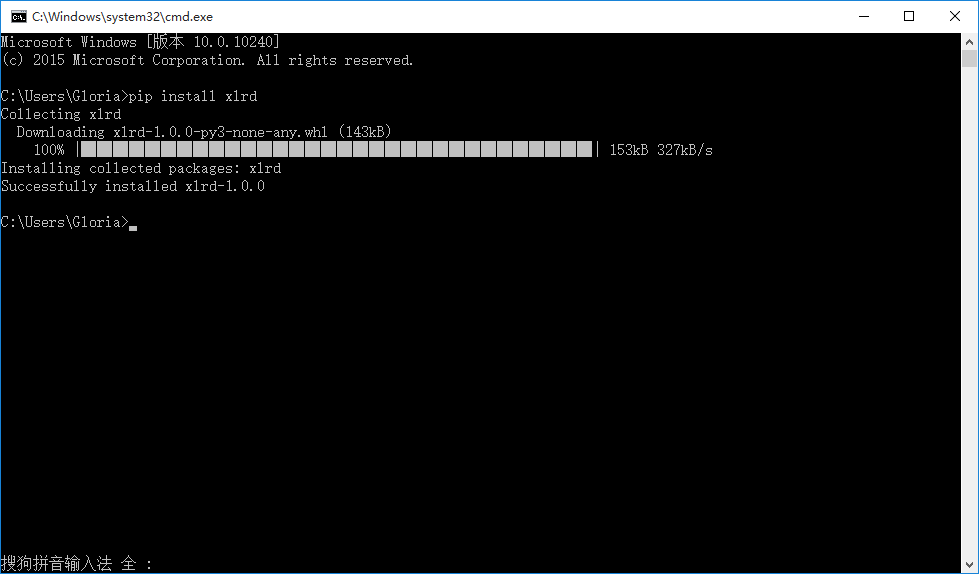
1.先安装xlrd模块,打开cmd,输入pip install xlrd在线安装
>>pip install xlrd
二、基本操作
1.exlce基本操作方法如下
# 打开exlce表格,参数是文件路径
data = xlrd.open_workbook('test.xlsx')
# table = data.sheets()[0]           #  通过索引顺序获取
# table = data.sheet_by_index(0)     #  通过索引顺序获取
table = data.sheet_by_name(u'Sheet1')  # 通过名称获取
nrows = table.nrows  # 获取总行数
ncols = table.ncols  # 获取总列数
# 获取一行或一列的值,参数是第几行
print table.row_values(0)  # 获取第一行值
print table.col_values(0)  # 获取第一列值
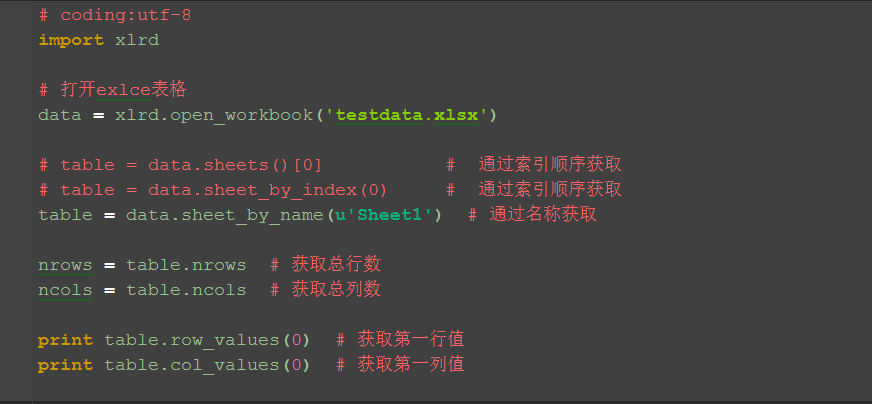
三、excel存放数据
1.在excel中存放数据,第一行为标题,也就是对应字典里面的key值,如:username,password
2.如果excel数据中有纯数字的一定要右键》设置单元格格式》文本格式,要不然读取的数据是浮点数
(先设置单元格格式后编辑,编辑成功左上角有个小三角图标)
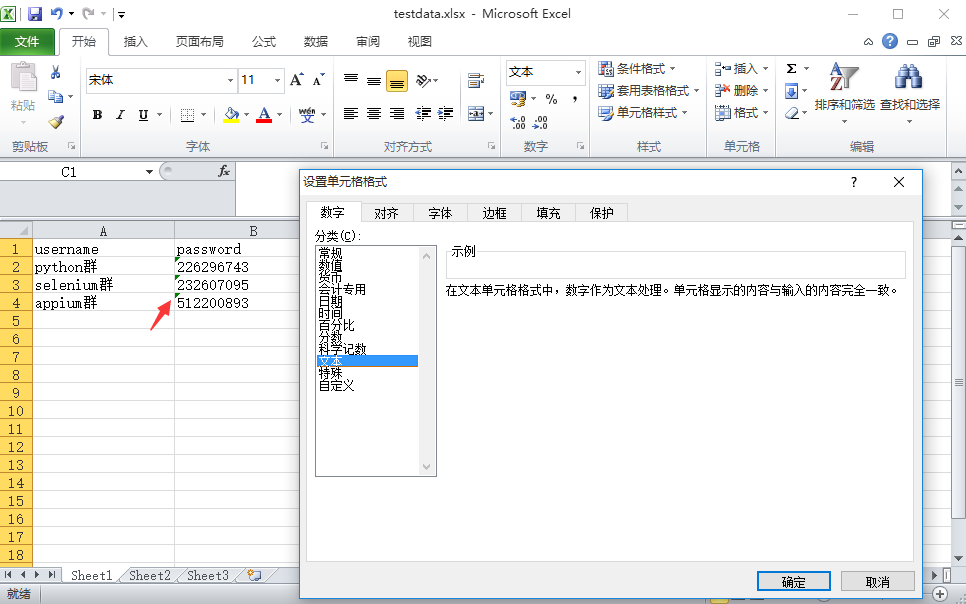
四、封装读取方法
1.最终读取的数据是多个字典的list类型数据,第一行数据就是字典里的key值,从第二行开始一一对应value值
2.封装好后的代码如下:
# coding:utf-8
import xlrd
class ExcelUtil():
    def __init__(self, excelPath, sheetName):
        self.data = xlrd.open_workbook(excelPath)
        self.table = self.data.sheet_by_name(sheetName)
        # 获取第一行作为key值
        self.keys = self.table.row_values(0)
        # 获取总行数
        self.rowNum = self.table.nrows
        # 获取总列数
        self.colNum = self.table.ncols
    def dict_data(self):
        if self.rowNum <= 1:
            print("总行数小于1")
        else:
            r = []
            j=1
            for i in range(self.rowNum-1):
                s = {}
                # 从第二行取对应values值
                values = self.table.row_values(j)
                for x in range(self.colNum):
                    s[self.keys[x]] = values[x]
                r.append(s)
                j+=1
            return r
if __name__ == "__main__":
   # 注意:此代码if以上的勿乱改,调用此方法只需修改两个参数,一个是excelPath存放xlsx的路径,另外一个是sheetName的值
    filePath = "D:\\test\\web-project\\5ke\\testdata.xlsx"
    sheetName = "Sheet1"
    data = ExcelUtil(filePath, sheetName)
    print data.dict_data()
运行结果:
[{u'username': u'python\u7fa4', u'password': u'226296743'},{u'username': u'selenium\u7fa4', u'password': u'232607095'},{u'username': u'appium\u7fa4', u'password': u'512200893'}]
4.5 数据驱动ddt
前言
在设计用例的时候,有些用例只是参数数据的输入不一样,比如登录这个功能,操作过程但是一样的。如果用例重复去写操作过程会增加代码量,对应这种多组数据的测试用例,可以用数据驱动设计模式,一组数据对应一个测试用例,用例自动加载生成。
一、环境准备
1.安装ddt模块,打开cmd输入pip install ddt在线安装
>>pip install ddt
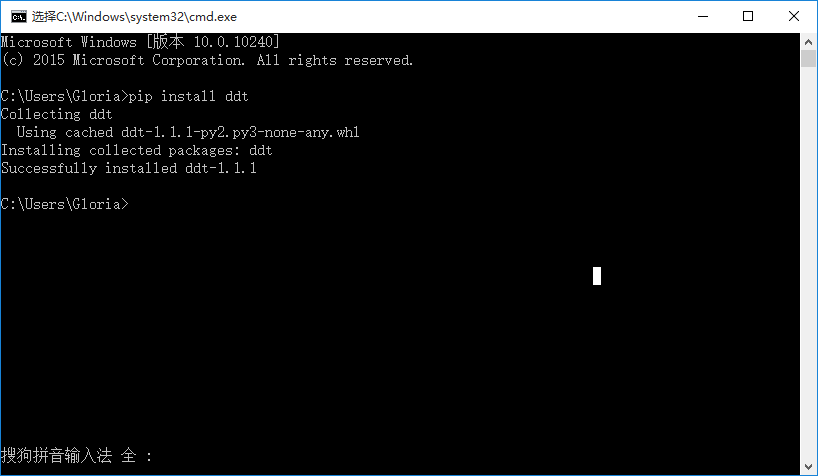
二、数据驱动原理
1.测试数据为多个字典的list类型
2.测试类前加修饰@ddt.ddt
3.case前加修饰@ddt.data()
4.运行后用例会自动加载成三个单独的用例
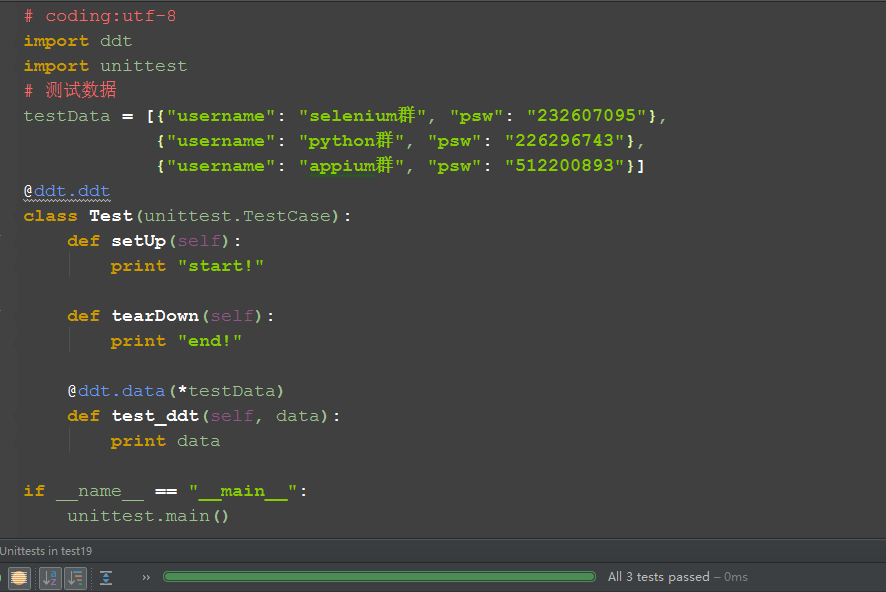
5.测试结果:
Testing started at 21:51 ...
start!
{'username': 'selenium\xe7\xbe\xa4', 'psw': '232607095'}
end!
start!
{'username': 'python\xe7\xbe\xa4', 'psw': '226296743'}
end!
start!
{'username': 'appium\xe7\xbe\xa4', 'psw': '512200893'}
end!
三、selenium案例
1.从上一篇4.4封装的excel方法里面读取数据,作为测试数据。
2.在之前写的4.3参数化登录那篇基础上做点修改,测试参数读取excel里的数据。
3.代码参考如下:
# 测试数据
testData = data.dict_data()
print testData
@ddt.ddt
class Bolg(unittest.TestCase):
    u'''登录博客'''
    def setUp(self):
        self.driver = webdriver.Firefox()
        url = "https://passport.cnblogs.com/user/signin"
        self.driver.get(url)
        self.driver.implicitly_wait(30)
    def login(self, username, psw):
        u'''这里写了一个登录的方法,账号和密码参数化'''
        self.driver.find_element_by_id("input1").send_keys(username)
        self.driver.find_element_by_id("input2").send_keys(psw)
        self.driver.find_element_by_id("signin").click()
        time.sleep(3)
    def is_login_sucess(self):
        u'''判断是否获取到登录账户名称'''
        try:
            text = self.driver.find_element_by_id("lnk_current_user").text
            print text
            return True
        except:
            return False
    @ddt.data(*testData)
    def test_login(self, data):
        u'''登录案例参考'''
        print ("当前测试数据%s"%data)
        # 调用登录方法
        self.login(data["username"], data["password"])
        # 判断结果
        result = self.is_login_sucess()
        self.assertTrue(result)
    def tearDown(self):
        self.driver.quit()
if __name__ == "__main__":
    unittest.main()
4.6 判断元素16种方法expected_conditions
前言
经常有小伙伴问,如何判断一个元素是否存在,如何判断alert弹窗出来了,如何判断动态的元素等等一系列的判断,在selenium的expected_conditions模块收集了一系列的场景判断方法,这些方法是逢面试必考的!!!
expected_conditions一般也简称EC,本篇先介绍下有哪些功能,后续更新中会单个去介绍。
一、功能介绍和翻译
| title_is | 判断当前页面的title是否完全等于(==)预期字符串,返回布尔值。 |
| title_contains | 判断当前页面的title是否包含预期字符串,返回布尔值。 |
| presence_of_element_located | 判断某个元素是否被加到了dom树里,并不代表该元素一定可见。 |
| visibility_of_element_located | 判断某个元素是否可见. 可见代表元素非隐藏,并且元素的宽和高都不等于0。 |
| visibility_of | 跟上面的方法做一样的事情,只是上面的方法要传入locator,这个方法直接传定位到的element就好了。 |
| presence_of_all_elements_located | 判断是否至少有1个元素存在于dom树中。举个例子,如果页面上有n个元素的class都是'column-md-3',那么只要有1个元素存在,这个方法就返回True。 |
| text_to_be_present_in_element | 判断某个元素中的text是否 包含 了预期的字符串。 |
| text_to_be_present_in_element_value | 判断某个元素中的value属性是否 包含 了预期的字符串 |
| frame_to_be_available_and_switch_to_it | 判断该frame是否可以switch进去,如果可以的话,返回True并且switch进去,否则返回False。 |
| invisibility_of_element_located | 判断某个元素中是否不存在于dom树或不可见。 |
| element_to_be_clickable | 判断某个元素中是否可见并且是enable的,这样的话才叫clickable。 |
| staleness_of | 等某个元素从dom树中移除,注意,这个方法也是返回True或False。 |
| element_to_be_selected | 判断某个元素是否被选中了,一般用在下拉列表。 |
| element_selection_state_to_be | 判断某个元素的选中状态是否符合预期。 |
| element_located_selection_state_to_be | 跟上面的方法作用一样,只是上面的方法传入定位到的element,而这个方法传入locator。 |
| alert_is_present | 判断页面上是否存在alert。 |
二、查看源码和注释
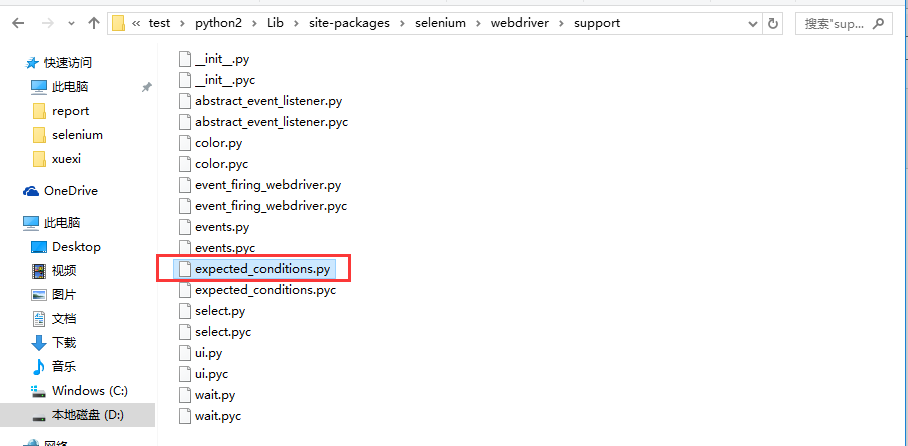
1.打开python里这个目录l可以找到:Lib\site-packages\selenium\webdriver\support\expected_conditions.py
from selenium.common.exceptions import NoSuchElementException
from selenium.common.exceptions import NoSuchFrameException
from selenium.common.exceptions import StaleElementReferenceException
from selenium.common.exceptions import WebDriverException
from selenium.common.exceptions import NoAlertPresentException
"""
 * Canned "Expected Conditions" which are generally useful within webdriver
 * tests.
"""
class title_is(object):
    """An expectation for checking the title of a page.
    title is the expected title, which must be an exact match
    returns True if the title matches, false otherwise."""
    def __init__(self, title):
        self.title = title
    def __call__(self, driver):
        return self.title == driver.title
class title_contains(object):
    """ An expectation for checking that the title contains a case-sensitive
    substring. title is the fragment of title expected
    returns True when the title matches, False otherwise
    """
    def __init__(self, title):
        self.title = title
    def __call__(self, driver):
        return self.title in driver.title
class presence_of_element_located(object):
    """ An expectation for checking that an element is present on the DOM
    of a page. This does not necessarily mean that the element is visible.
    locator - used to find the element
    returns the WebElement once it is located
    """
    def __init__(self, locator):
        self.locator = locator
    def __call__(self, driver):
        return _find_element(driver, self.locator)
class visibility_of_element_located(object):
    """ An expectation for checking that an element is present on the D
OM of a
    page and visible. Visibility means that the element is not only displayed
    but also has a height and width that is greater than 0.
    locator - used to find the element
    returns the WebElement once it is located and visible
    """
    def __init__(self, locator):
        self.locator = locator
    def __call__(self, driver):
        try:
            return _element_if_visible(_find_element(driver, self.locator))
        except StaleElementReferenceException:
            return False
class visibility_of(object):
    """ An expectation for checking that an element, known to be present on the
    DOM of a page, is visible. Visibility means that the element is not only
    displayed but also has a height and width that is greater than 0.
    element is the WebElement
    returns the (same) WebElement once it is visible
    """
    def __init__(self, element):
        self.element = element
    def __call__(self, ignored):
        return _element_if_visible(self.element)
def _element_if_visible(element, visibility=True):
    return element if element.is_displayed() == visibility else False
class presence_of_all_elements_located(object):
    """ An expectation for checking that there is at least one element present
    on a web page.
    locator is used to find the element
    returns the list of WebElements once they are located
    """
    def __init__(self, locator):
        self.locator = locator
    def __call__(self, driver):
        return _find_elements(driver, self.locator)
class visibility_of_any_elements_located(object):
    """ An expectation for checking that there is at least one element visible
    on a web page.
    locator is used to find the element
    returns the list of WebElements once they are located
    """
    def __init__(self, locator):
        self.locator = locator
    def __call__(self, driver):
        return [element for element in _find_elements(driver, self.locator) if _element_if_visible(element)]
class text_to_be_present_in_element(object):
    """ An expectation for checking if the given text is present in the
    specified element.
    locator, text
    """
    def __init__(self, locator, text_):
        self.locator = locator
        self.text = text_
    def __call__(self, driver):
        try:
            element_text = _find_element(driver, self.locator).text
            return self.text in element_text
        except StaleElementReferenceException:
            return False
class text_to_be_present_in_element_value(object):
    """
    An expectation for checking if the given text is present in the element's
    locator, text
    """
    def __init__(self, locator, text_):
        self.locator = locator
        self.text = text_
    def __call__(self, driver):
        try:
            element_text = _find_element(driver,
                                         self.locator).get_attribute("value")
            if element_text:
                return self.text in element_text
            else:
                return False
        except StaleElementReferenceException:
                return False
class frame_to_be_available_and_switch_to_it(object):
    """ An expectation for checking whether the given frame is available to
    switch to.  If the frame is available it switches the given driver to the
    specified frame.
    """
    def __init__(self, locator):
        self.frame_locator = locator
    def __call__(self, driver):
        try:
            if isinstance(self.frame_locator, tuple):
                driver.switch_to.frame(_find_element(driver,
                                                     self.frame_locator))
            else:
                driver.switch_to.frame(self.frame_locator)
            return True
        except NoSuchFrameException:
            return False
class invisibility_of_element_located(object):
    """ An Expectation for checking that an element is either invisible or not
    present on the DOM.
    locator used to find the element
    """
    def __init__(self, locator):
        self.locator = locator
    def __call__(self, driver):
        try:
            return _element_if_visible(_find_element(driver, self.locator), False)
        except (NoSuchElementException, StaleElementReferenceException):
            # In the case of NoSuchElement, returns true because the element is
            # not present in DOM. The try block checks if the element is present
            # but is invisible.
            # In the case of StaleElementReference, returns true because stale
            # element reference implies that element is no longer visible.
            return True
class element_to_be_clickable(object):
    """ An Expectation for checking an element is visible and enabled such that
    you can click it."""
    def __init__(self, locator):
        self.locator = locator
    def __call__(self, driver):
        element = visibility_of_element_located(self.locator)(driver)
        if element and element.is_enabled():
            return element
        else:
            return False
class staleness_of(object):
    """ Wait until an element is no longer attached to the DOM.
    element is the element to wait for.
    returns False if the element is still attached to the DOM, true otherwise.
    """
    def __init__(self, element):
        self.element = element
    def __call__(self, ignored):
        try:
            # Calling any method forces a staleness check
            self.element.is_enabled()
            return False
        except StaleElementReferenceException:
            return True
class element_to_be_selected(object):
    """ An expectation for checking the selection is selected.
    element is WebElement object
    """
    def __init__(self, element):
        self.element = element
    def __call__(self, ignored):
        return self.element.is_selected()
class element_located_to_be_selected(object):
    """An expectation for the element to be located is selected.
    locator is a tuple of (by, path)"""
    def __init__(self, locator):
        self.locator = locator
    def __call__(self, driver):
        return _find_element(driver, self.locator).is_selected()
class element_selection_state_to_be(object):
    """ An expectation for checking if the given element is selected.
    element is WebElement object
    is_selected is a Boolean."
    """
    def __init__(self, element, is_selected):
        self.element = element
        self.is_selected = is_selected
    def __call__(self, ignored):
        return self.element.is_selected() == self.is_selected
class element_located_selection_state_to_be(object):
    """ An expectation to locate an element and check if the selection state
    specified is in that state.
    locator is a tuple of (by, path)
    is_selected is a boolean
    """
    def __init__(self, locator, is_selected):
        self.locator = locator
        self.is_selected = is_selected
    def __call__(self, driver):
        try:
            element = _find_element(driver, self.locator)
            return element.is_selected() == self.is_selected
        except StaleElementReferenceException:
            return False
class alert_is_present(object):
    """ Expect an alert to be present."""
    def __init__(self):
        pass
    def __call__(self, driver):
        try:
            alert = driver.switch_to.alert
            alert.text
            return alert
        except NoAlertPresentException:
            return False
def _find_element(driver, by):
    """Looks up an element. Logs and re-raises ``WebDriverException``
    if thrown."""
    try:
        return driver.find_element(*by)
    except NoSuchElementException as e:
        raise e
    except WebDriverException as e:
        raise e
def _find_elements(driver, by):
    try:
        return driver.find_elements(*by)
    except WebDriverException as e:
        raise e
本篇的判断方法和场景很多,先贴出来,后面慢慢更新,详细讲解每个的功能的场景和用法。
这些方法是写好自动化脚本,提升性能的必经之路,想做好自动化,就得熟练掌握。
4.7 判断title方法title_is
前言
获取页面title的方法可以直接用driver.title获取到,然后也可以把获取到的结果用做断言。
本篇介绍另外一种方法去判断页面title是否与期望结果一种,用到上一篇提到的expected_conditions模块里的title_is和title_contains两种方法。
一、源码分析
1.首先看下源码,如下:
class title_is(object):
    """An expectation for checking the title of a page.
    title is the expected title, which must be an exact match

    returns True if the title matches, false otherwise."""
    '''翻译:检查页面的title与期望值是都完全一致,如果完全一致,返回Ture,否则返回Flase'''
    def __init__(self, title):
        self.title = title
    def __call__(self, driver):
        return self.title == driver.title
2.注释翻译:检查页面的title与期望值是都完全一致,如果完全一致,返回True,否则返回Flase。
3.title_is()这个是一个class类型,里面有两个方法。
4.__init__是初始化内容,参数是title,必填项。
5.__call__是把实例变成一个对象,参数是driver,返回的是self.title == driver.title,布尔值。
二、判断title:title_is()
1.首先导入expected_conditions模块。
2.由于这个模块名称比较长,所以为了后续的调用方便,重新命名为EC了(有点像数据库里面多表查询时候重命名)。
3.打开博客首页后判断title,返回结果是True或False。
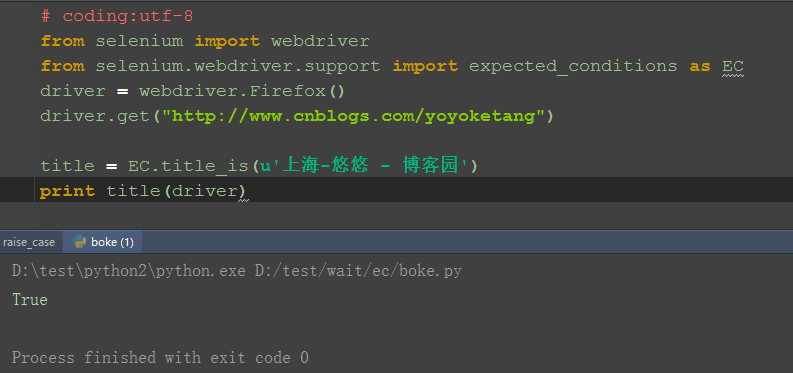
三、判断title包含:title_contains
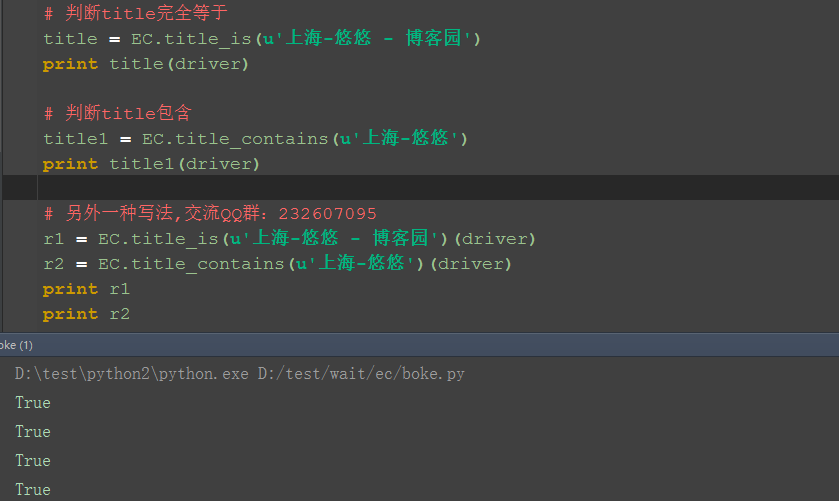
1.这个类跟上面那个类差不多,只是这个是部分匹配(类似于xpath里面的contains语法)。
2.判断title包含'上海-悠悠'字符串。
四、参考代码
# coding:utf-8
from selenium import webdriver
from selenium.webdriver.support import expected_conditions as EC
driver = webdriver.Firefox()
driver.get("http://www.cnblogs.com/yoyoketang")
# 判断title完全等于
title = EC.title_is(u'上海-悠悠 - 博客园')
print title(driver)
# 判断title包含
title1 = EC.title_contains(u'上海-悠悠')
print title1(driver)
# 另外一种写法,交流QQ群:232607095
r1 = EC.title_is(u'上海-悠悠 - 博客园')(driver)
r2 = EC.title_contains(u'上海-悠悠')(driver)
print r1
print r2
4.8 判断文本text_to_be_present_in_element
前言
在做结果判断的时候,经常想判断某个元素中是否存在指定的文本,如登录后判断页面中是账号是否是该用户的用户名。
在前面的登录案例中,写了一个简单的方法,但不是公用的,在EC模块有个方法是可以专门用来判断元素中存在指定文本的:text_to_be_present_in_element。
另外一个差不多复方法判断元素的value值:text_to_be_present_in_element_value。
一、源码分析
class text_to_be_present_in_element(object):
    """ An expectation for checking if the given text is present in the
    specified element.
    locator, text
    """
    '''翻译:判断元素中是否存在指定的文本,参数:locator, text'''
    def __init__(self, locator, text_):
        self.locator = locator
        self.text = text_
    def __call__(self, driver):
        try:
            element_text = _find_element(driver, self.locator).text
            return self.text in element_text
        except StaleElementReferenceException:
            return False
1.翻译:判断元素中是否存在指定的文本,两个参数:locator, text
2.__call__里返回的是布尔值:Ture和False
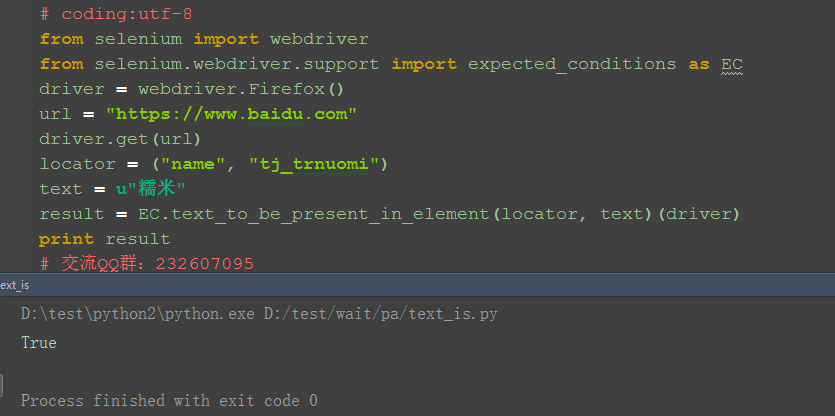
二、判断文本
1.判断百度首页上,“糯米”按钮这个元素中存在文本:糯米
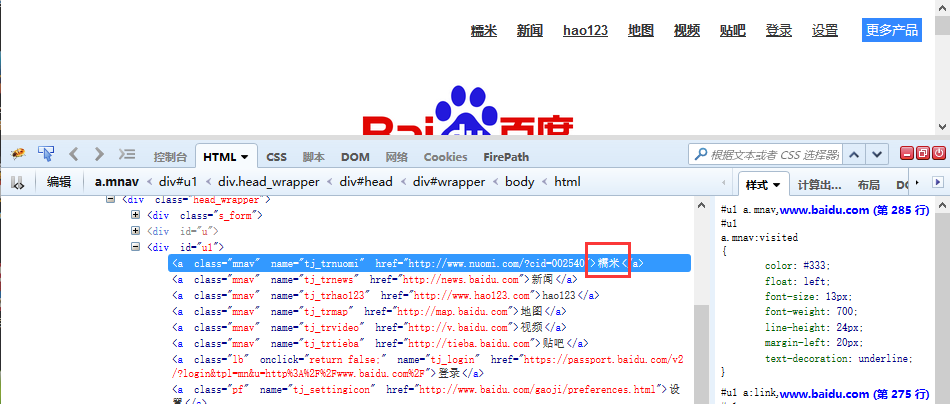
2.locator参数是定位的方法
3.text参数是期望的值
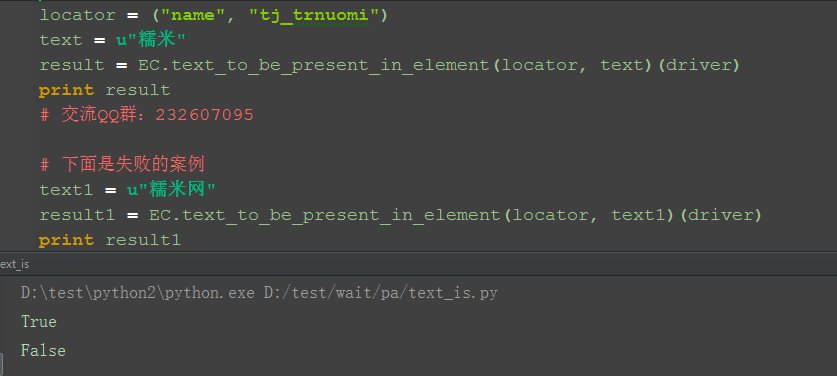
三、失败案例
1.如果判断失败,就返回False
四、判断value的方法
class text_to_be_present_in_element_value(object):
    """
    An expectation for checking if the given text is present in the element's
    locator, text

    """
    def __init__(self, locator, text_):
        self.locator = locator
        self.text = text_
    def __call__(self, driver):
        try:
            element_text = _find_element(driver,
                                         self.locator).get_attribute("value")
            if element_text:
                return self.text in element_text
            else:
                return False

        except StaleElementReferenceException:
                return False
1.这个方法跟上面的差不多,只是这个是判断的value的值
2.这里举个简单案例,判断百度搜索按钮的value值
五、参考代码
# coding:utf-8
from selenium import webdriver
from selenium.webdriver.support import expected_conditions as EC
driver = webdriver.Firefox()
url = "https://www.baidu.com"
driver.get(url)
locator = ("name", "tj_trnuomi")
text = u"糯米"
result = EC.text_to_be_present_in_element(locator, text)(driver)
print result
# 交流QQ群:232607095
# 下面是失败的案例
text1 = u"糯米网"
result1 = EC.text_to_be_present_in_element(locator, text1)(driver)
print result1
locator2 = ("id", "su")
text2 = u"百度一下"
result2 = EC.text_to_be_present_in_element_value(locator2, text2)(drive
r)
print result2
4.9 判断弹出框alert_is_present
系统弹窗这个是很常见的场景,有时候它不弹出来去操作的话,会抛异常。那么又不知道它啥时候会出来,那么就需要去判断弹窗是否弹出了。
本篇接着讲expected_conditions这个模块
一、判断alert源码分析
class alert_is_present(object):
    """ Expect an alert to be present."""
    """判断当前页面的alert弹窗"""
    def __init__(self):
        pass
    def __call__(self, driver):
        try:
            alert = driver.switch_to.alert
            alert.text
            return alert
        except NoAlertPresentException:
            return False
1.这个类比较简单,初始化里面无内容
2.__call__里面就是判断如果正常获取到弹出窗的text内容就返回alert这个对象(注意这里不是返回Ture),没有获取到就返回False
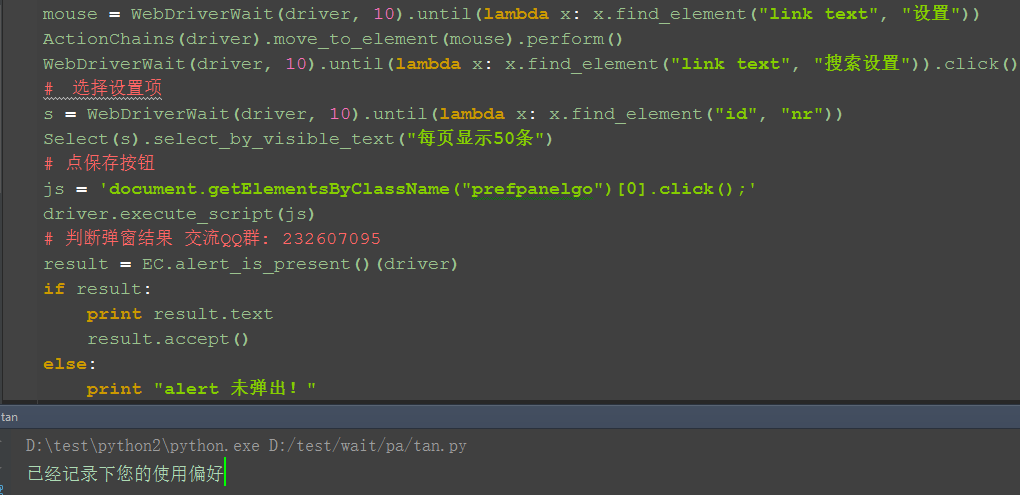
二、实例操作
1.前面的操作步骤优化了下,为了提高脚本的稳定性,确保元素出现后操作,这里结合WebDriverWait里的方法
2.实现步骤如下,这里判断的结果返回有两种:没找到就返回False;找到就返回alert对象
3.先判断alert是否弹出,如果弹出就点确定按钮accept()
三、参考代码
# coding:utf-8
from selenium import webdriver
from selenium.webdriver.common.action_chains import ActionChains
from selenium.webdriver.support.select import Select
from selenium.webdriver.support.wait import WebDriverWait
from selenium.webdriver.support import expected_conditions as EC
driver = webdriver.Firefox()
url = "https://www.baidu.com"
driver.get(url)
mouse = WebDriverWait(driver, 10).until(lambda x: x.find_element("link text", "设置"))
ActionChains(driver).move_to_element(mouse).perform()
WebDriverWait(driver, 10).until(lambda x: x.find_element("link text", "搜索设置")).click()
# 选择设置项
s = WebDriverWait(driver, 10).until(lambda x: x.find_element("id", "nr"))
Select(s).select_by_visible_text("每页显示50条")
# 点保存按钮
js = 'document.getElementsByClassName("prefpanelgo")[0].click();'
driver.execute_script(js)
# 判断弹窗结果 交流QQ群: 232607095
result = EC.alert_is_present()(driver)
if result:
    print result.text
    result.accept()
else:
    print "alert 未弹出!"
4.10 二次封装(click/sendkeys)
前言
我们学了显示等待后,就不需要sleep了,然后查找元素方法用参数化去定位,这样定位方法更灵活了,但是这样写起来代码会很长了,于是问题来了,总不能每次定位一个元素都要写一大堆代码吧?这时候就要学会封装啦!
一、显示等待
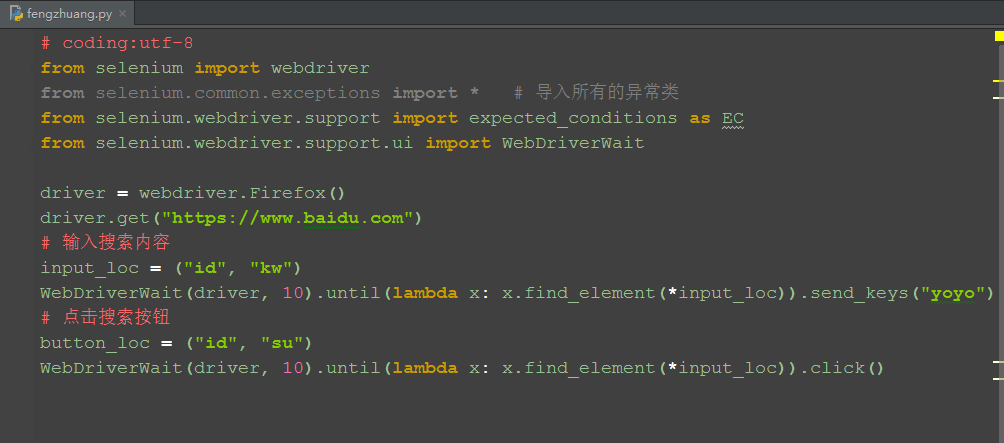
1.如果你的定位元素代码,还是这样:driver.find_element_by_id("kw").send_keys("yoyo"),那说明你还停留在小学水平,如何让代码提升逼格呢?
2.前面讲过显示等待相对于sleep来说更省时间,定位元素更靠谱,不会出现一会正常运行,一会又报错的情况,所以我们的定位需与WebDriverWait结合
3.以百度的搜索为例
二、封装定位方法
1.从上面代码看太长了,每次定位写一大串,这样不方便阅读,写代码的效率也低,于是我们可以把定位方法进行封装
2.定位方法封装后,我们每次调用自己写的方法就方便多了
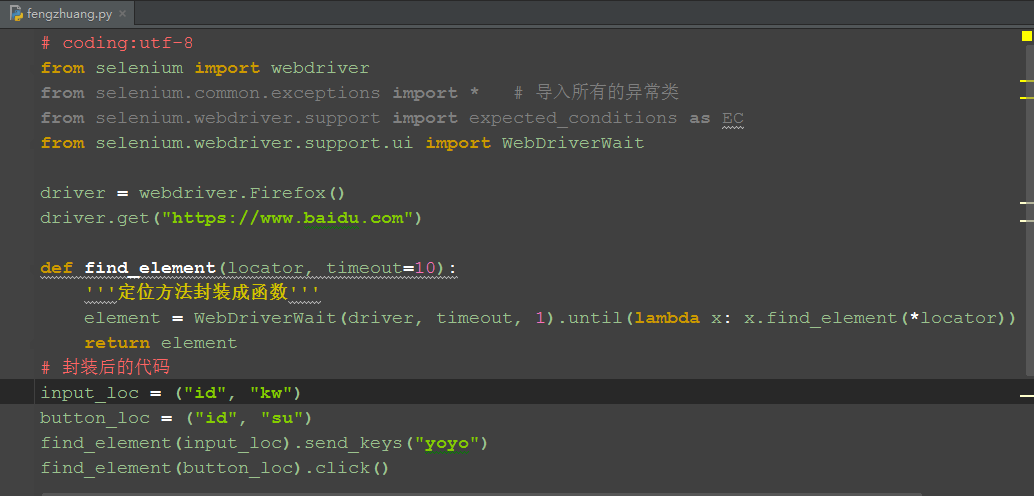
三、封装成类
1.我们可以把send_keys()和click()方法也一起封装,写到一个类里
2.定位那里很多小伙伴弄不清楚lambda这个函数,其实不一定要用这个,我们可以用EC模块的presence_of_element_located()这个方法,参数直接传locator就可以了
3.以下是presence_of_element_located这个方法的源码:
class presence_of_element_located(object):

    """ An expectation for checking that an element is present on the DOM
    of a page. This does not necessarily mean that the element is visible.
    locator - used to find the element
    returns the WebElement once it is located
    """
    def __init__(self, locator):
        self.locator = locator
    def __call__(self, driver):
        return _find_element(driver, self.locator)
四、参考代码
1.把get、find_element、click、send_keys封装成类
# coding:utf-8
from selenium import webdriver
from selenium.common.exceptions import *   # 导入所有的异常类
from selenium.webdriver.support import expected_conditions as EC
from selenium.webdriver.support.ui import WebDriverWait
class Yoyo(object):
    """基于原生的selenium框架做了二次封装."""
    def __init__(self):
        """启动浏览器参数化,默认启动firefox."""
        self.driver = webdriver.Firefox()
    def get(self, url):
        '''使用get打开url'''
        self.driver.get(url)
    def find_element(self, locator, timeout=10):
        '''定位元素方法封装'''
        element = WebDriverWait(self.driver, timeout, 1).until(EC.presence_of_element_located(locator))
        return element
    def click(self, locator):
        '''点击操作'''
        element = self.find_element(locator)
        element.click()
    def send_keys(self, locator, text):
        '''发送文本,清空后输入'''
        element = self.find_element(locator)
        element.clear()
        element.send_keys(text)
if __name__ == "__main__":
    d = Yoyo()  # 启动firefox
    d.get("https://www.baidu.com")
    input_loc = ("id", "kw")
    d.send_keys(input_loc, "yoyo")   # 输入搜索内容
    button_loc = ("id", "su")
    d.click(button_loc)           # 点击搜索按钮
4.11 二次封装(完整版)
先上代码吧!后面有空再细化整理
# coding:utf-8
from selenium import webdriver
from selenium.webdriver.common.action_chains import ActionChains
from selenium.webdriver.support.select import Select
from selenium.common.exceptions import *   # 导入所有的异常类
from selenium.webdriver.support import expected_conditions as EC
from selenium.webdriver.support.ui import WebDriverWait
'''
下面这三行代码是为了避免python2中文乱码问题,python3忽略
import sys
reload(sys)
sys.setdefaultencoding('utf-8')
'''
def browser(browser='firefox'):
   """
   打开浏览器函数,"firefox"、"chrome"、"ie"、"phantomjs"
   """
   try:
       if browser == "firefox":
           driver = webdriver.Firefox()
           return driver
       elif browser == "chrome":
           driver = webdriver.Chrome()
           return driver
       elif browser == "ie":
           driver = webdriver.Ie()
           return driver
       elif browser == "phantomjs":
           driver = webdriver.PhantomJS()
           return driver
       else:
           print("Not found this browser,You can enter 'firefox', 'chrome', 'ie' or 'phantomjs'")
   except Exception as msg:
       print "%s" % msg
class Yoyo(object):
   """
   基于原生的selenium框架做了二次封装.
   """
   def __init__(self, driver):
       """
       启动浏览器参数化,默认启动firefox.
       """
       self.driver = driver
   def open(self, url, t='', timeout=10):
       '''
       使用get打开url后,最大化窗口,判断title符合预期
       Usage:
       driver = Yoyo()
       driver.open(url,t='')
       '''
       self.driver.get(url)
       self.driver.maximize_window()
       try:
           WebDriverWait(self.driver, timeout, 1).until(EC.title_contains(t))
       except TimeoutException:
           print("open %s title error" % url)
       except Exception as msg:
           print("Error:%s" % msg)
   def find_element(self, locator, timeout=10):
       '''
       定位元素,参数locator是元祖类型
       Usage:
       locator = ("id","xxx")
       driver.find_element(locator)
       '''
       element = WebDriverWait(self.driver, timeout, 1).until(EC.presence_of_element_located(locator))
       return element
   def find_elements(self, locator, timeout=10):
       '''定位一组元素'''
       elements = WebDriverWait(self.driver, timeout, 1).until(EC.presence_of_all_elements_located(locator))
       return elements
   def click(self, locator):
       '''
       点击操作
       Usage:
       locator = ("id","xxx")
       driver.click(locator)
       '''
       element = self.find_element(locator)
       element.click()
   def send_keys(self, locator, text):
       '''
       发送文本,清空后输入
       Usage:
       locator = ("id","xxx")
       driver.send_keys(locator, text)
       '''
       element = self.find_element(locator)
       element.clear()
       element.send_keys(text)
   def is_text_in_element(self, locator, text, timeout=10):
       '''
       判断文本在元素里,没定位到元素返回False,定位到返回判断结果布尔值
       result = driver.text_in_element(locator, text)
       '''
       try:
           result = WebDriverWait(self.driver, timeout, 1).until(EC.text_to_be_present_in_element(locator, text))
       except TimeoutException:
           print "元素没定位到:"+str(locator)
           return False
       else:
           return result
   def is_text_in_value(self, locator, value, timeout=10):
       '''
       判断元素的value值,没定位到元素返回false,定位到返回判断结果布尔值
       result = driver.text_in_element(locator, text)
       '''
       try:
           result = WebDriverWait(self.driver, timeout, 1).until(EC.text_to_be_present_in_element_value(locator, value))
       except TimeoutException:
           print "元素没定位到:"+str(locator)
           return False
       else:
           return result
   def is_title(self, title, timeout=10):
       '''判断title完全等于'''
       result = WebDriverWait(self.driver, timeout, 1).until(EC.title_is(title))
       return result
   def is_title_contains(self, title, timeout=10):
       '''判断title包含'''
       result = WebDriverWait(self.driver, timeout, 1).until(EC.title_contains(title))
       return result
   def is_selected(self, locator, timeout=10):
       '''判断元素被选中,返回布尔值,'''
       result = WebDriverWait(self.driver, timeout, 1).until(EC.element_located_to_be_selected(locator))
       return result
   def is_selected_be(self, locator, selected=True, timeout=10):
       '''判断元素的状态,selected是期望的参数true/False
       返回布尔值'''
       result = WebDriverWait(self.driver, timeout, 1).until(EC.element_located_selection_state_to_be(locator, selected))
       return result
   def is_alert_present(self, timeout=10):
       '''判断页面是否有alert,有返回alert(注意这里是返回alert,不是True)
       没有返回False'''
       result = WebDriverWait(self.driver, timeout, 1).until(EC.alert_is_present())
       return result
   def is_visibility(self, locator, timeout=10):
       '''元素可见返回本身,不可见返回Fasle'''
       result = WebDriverWait(self.driver, timeout, 1).until(EC.visibility_of_element_located(locator))
       return result
   def is_invisibility(self, locator, timeout=10):
       '''元素可见返回本身,不可见返回True,没找到元素也返回True'''
       result = WebDriverWait(self.driver, timeout, 1).until(EC.invisibility_of_element_located(locator))
       return result
   def is_clickable(self, locator, timeout=10):
       '''元素可以点击is_enabled返回本身,不可点击返回Fasle'''
       result = WebDriverWait(self.driver, timeout, 1).until(EC.element_to_be_clickable(locator))
       return result
   def is_located(self, locator, timeout=10):
       '''判断元素有没被定位到(并不意味着可见),定位到返回element,没定位到返回False'''
       result = WebDriverWait(self.driver, timeout, 1).until(EC.presence_of_element_located(locator))
       return result
   def move_to_element(self, locator):
       '''
       鼠标悬停操作
       Usage:
       locator = ("id","xxx")
       driver.move_to_element(locator)
       '''
       element = self.find_element(locator)
       ActionChains(self.driver).move_to_element(element).perform()
   def back(self):
       """
       Back to old window.
       Usage:
       driver.back()
       """
       self.driver.back()
   def forward(self):
       """
       Forward to old window.
       Usage:
       driver.forward()
       """
       self.driver.forward()
   def close(self):
       """
       Close the windows.
       Usage:
       driver.close()
       """
       self.driver.close()
   def quit(self):
       """
       Quit the driver and close all the windows.
       Usage:
       driver.quit()
       """
       self.driver.quit()
   def get_title(self):
       '''获取title'''
       return self.driver.title
   def get_text(self, locator):
       '''获取文本'''
       element = self.find_element(locator)
       return element.text
   def get_attribute(self, locator, name):
       '''获取属性'''
       element = self.find_element(locator)
       return element.get_attribute(name)
   def js_execute(self, js):
       '''执行js'''
       return self.driver.execute_script(js)
   def js_focus_element(self, locator):
       '''聚焦元素'''
       target = self.find_element(locator)
       self.driver.execute_script("arguments[0].scrollIntoView();", target)
   def js_scroll_top(self):
       '''滚动到顶部'''
       js = "window.scrollTo(0,0)"
       self.driver.execute_script(js)
   def js_scroll_end(self):
       '''滚动到底部'''
       js = "window.scrollTo(0,document.body.scrollHeight)"
       self.driver.execute_script(js)
   def select_by_index(self, locator, index):
       '''通过索引,index是索引第几个,从0开始'''
       element = self.find_element(locator)
       Select(element).select_by_index(index)
   def select_by_value(self, locator, value):
       '''通过value属性'''
       element = self.find_element(locator)
       Select(element).select_by_value(value)
   def select_by_text(self, locator, text):
       '''通过文本值定位'''
       element = self.find_element(locator)
       Select(element).select_by_value(text)
if __name__ == '__main__':
   # if下面的代码都是测试调试的代码,自测内容
  driver = browser()
   driver_n = Yoyo(driver)  # 返回类的实例:打开浏览器
   driver_n.open("http://www.cnblogs.com/yoyoketang/")  # 打开url,顺便判断打开的页面对不对
   input_loc = ("id", "kw")
   print driver_n.get_title()
   # el = driver_n.find_element(input_loc)
   # driver_n.send_keys(input_loc, "yoyo")
   # button_loc = ("id", "su")
   # driver_n.click(button_loc)
   # print driver_n.text_in_element(("name", "tj_trmap"), "地图")
   # set_loc = ("link text", "设置")
   # driver_n.move_to_element(set_loc)
4.12 PageObject设计模式
一、PageObect
PagetObect设计模式就是把web的每一个页面写成一个page类(继承前面封装的)。
定位元素方法和操作元素方法分离开,元素定位全部放一起,每一个操作元素动作写成一个方法。
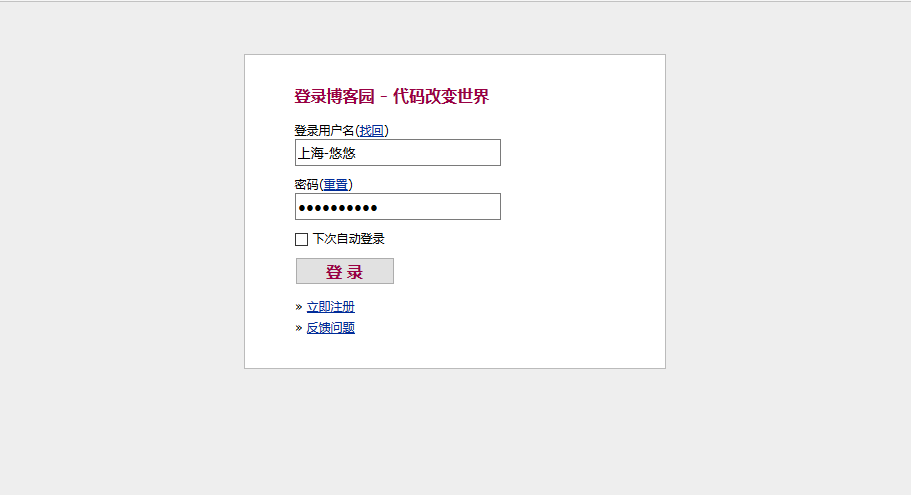
二、定位方法对应参照表
ID = "id"
XPATH = "xpath"
LINK_TEXT = "link text"
PARTIAL_LINK_TEXT = "partial link text"
NAME = "name"
TAG_NAME = "tag name"
CLASS_NAME = "class name"
CSS_SELECTOR = "css selector"
三、参考代码如下
1.新建以下脚本。
二、定位方法对应参照表
ID = "id"
XPATH = "xpath"
LINK_TEXT = "link text"
PARTIAL_LINK_TEXT = "partial link text"
NAME = "name"
TAG_NAME = "tag name"
CLASS_NAME = "class name"
CSS_SELECTOR = "css selector"
三、参考代码如下
1.新建以下脚本
# coding:utf-8
from xxx.yoyo_selenium import Yoyo  # 导入4.11二次封装的类
login_url = "https://passport.cnblogs.com/user/signin"
class LoginPage(Yoyo):
    # 定位器,定位页面元素
    username_loc = ("id", 'input1')  # 输入账号
    password_loc = ("id", 'input2')
    submit_loc = ("id", 'signin')
    remember_loc = ('id', 'remember_me')
    retrieve_loc = ('link text', '找回')
    reset_loc = ('link text', '重置')
    register_loc = ('link text', '立即注册')
    feedback_loc = ('link text', '反馈问题')
    def input_username(self, username):
        '''输入账号框'''
        self.send_keys(self.username_loc, username)
    def input_password(self, password):
        '''输入密码框'''
        self.send_keys(self.password_loc, password)
    def click_submit(self):
        '''登录按钮'''
        self.click(self.submit_loc)
    def click_remember_live(self):
        '''下次记住登录'''
        self.click(self.remember_loc)
    def click_retrieve(self):
        '''找回密码'''
        self.click(self.retrieve_loc)
    def click_reset(self):
        '''重置密码'''
        self.click(self.reset_loc)
    def click_register(self):
        '''注册新账号'''
        self.click(self.register_loc)
    def click_feedback(self):
        '''反馈问题'''
        self.click(self.feedback_loc)
    def login(self, username, password):
        '''登录方法'''
        self.input_username(username)
        self.input_password(password)
        self.click_submit()
四、用例参考
1.导入上面的page类
# coding:utf-8
import unittest
from xxx.yoyo_selenium import browser
from xxx.xxx import LoginPage, login_url
class Login_test(unittest.TestCase):
    u'''登录页面的case'''
    def setUp(self):
        self.driver = browser()
        self.login= LoginPage(self.driver)  #login参数是LoginPage的实例
        self.login.open(login_url)
    def login_case(self, username, psw, expect=True):
        '''登录用例的方法,'''
        # 第1步:输入账号
        self.login.input_username(username)
        # 第2步: 输入密码
        self.login.input_password(psw)
        # 第3步:点登录按钮
        self.login.click_submit()
        # 第4步:测试结果,判断是否登录成功
        result = self.login.is_text_in_element(("id","lnk_current_user"),"上海-悠悠")
        # 第5步:期望结果
        expect_result = expect
        self.assertEqual(result, expect_result)
    def test_login01(self):
        u'''输入正确账号密码'''
        self.login_case("xx", "xx", True)
    def test_login02(self):
        u'''输入错误账号密码'''
        self.login_case("xx", "xx", False)
    def tearDown(self):
        self.driver.quit()
if __name__ == "__main__":
    unittest.main()
(备注:不要copy后直接运行,注意思考!!!直接copy运行报错不解决)
4.13 装饰器之异常后截图
前言
对于用例失败截图,很多小伙伴都希望用例执行失败的时候能自动截图,想法是很好的,实现起来并不是那么容易,这里小编分享下最近研究装饰器,打算用装饰器来实现自动截图
一、函数作为形参
1.函数的参数也可以是另外一个函数,也就是说传的参数不仅可以是常见的字符串、数字等,也可以是一个函数
2.定义aaa为一个加法函数,bbb为减法函数
3.calculate这个函数传三个参数,第一个参数是一个函数,另外两个参数是函数的两个参数
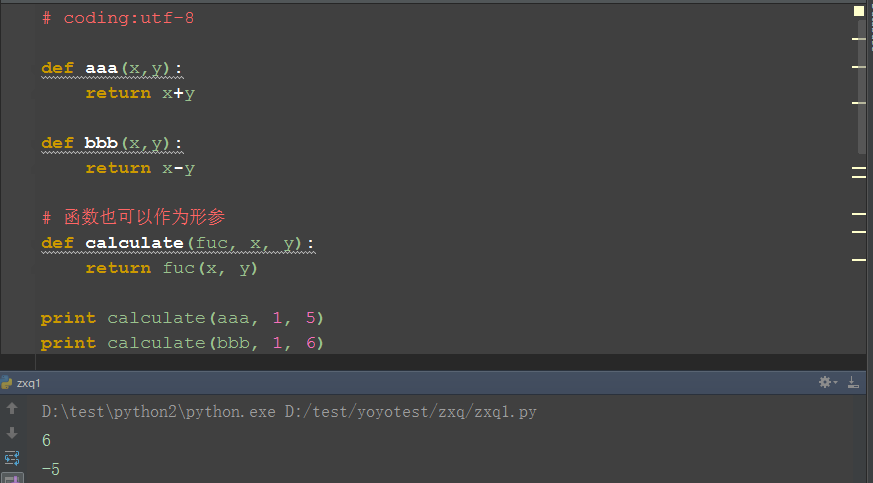
二、万能装饰器
1.由于不知道我们被调用的函数到底有几个参数,这时候就可以写一个万能的装饰器,传可变参数
2.这个装饰器实现一个简单功能:运行一个函数,运行不抛异常,就打印pass;运行函数抛异常就打印fail
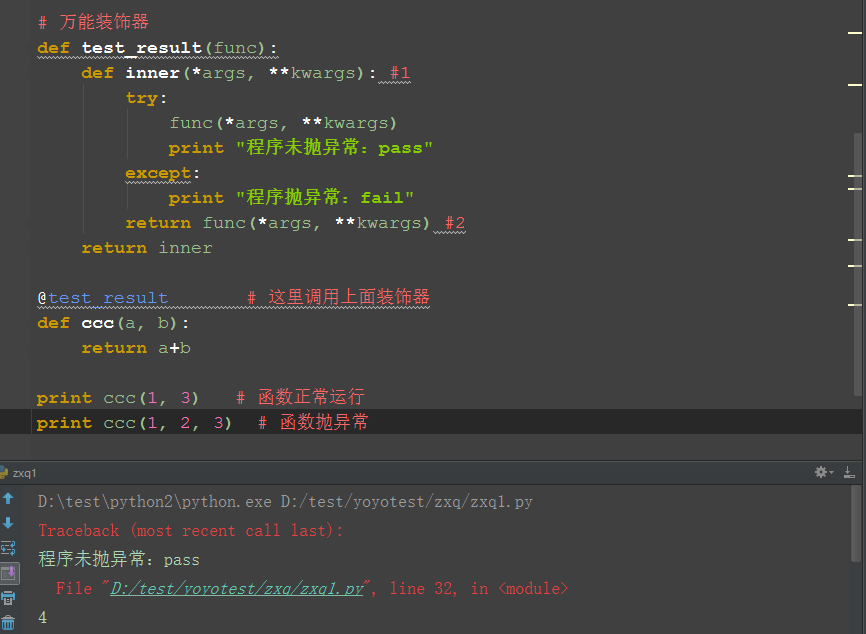
三、实现百度搜索功能
# coding:utf-8
from selenium import webdriver
driver = webdriver.Firefox()
# 截图功能
def get_screen():
    '''截图'''
    import time
    nowTime = time.strftime("%Y_%m_%d_%H_%M_%S")
    driver.get_screenshot_as_file('%s.jpg' % nowTime)
# 自动截图装饰器
def screen(func):
    '''截图装饰器'''
    def inner(*args, **kwargs):
        try:
            f = func(*args, **kwargs)
            return f
        except:
            get_screen()  # 失败后截图
           raise
    return inner
@screen
def search(driver):
    driver.get("https://www.baidu.com")
    driver.find_element_by_id("kw11").send_keys("python")  # 此行运行失败的
    driver.find_element_by_id("su").click()
search(driver)  # 执行search
这里介绍的是简单的装饰器函数,下一篇会介绍复杂一点的带参数的装饰器。
4.14 装饰器之用例失败后截图
前言:
装饰器其实就是一个以函数作为参数并返回一个替换函数的可执行函数。
上面讲到用装饰器解决异常后自动截图,不过并没有与unittest结合,这篇把截图的装饰器改良了下,可以实现用例执行失败自动截图。
一、不带变量的装饰器
1.参考资料:http://www.artima.com/weblogs/viewpost.jsp?thread=240845,这里这篇讲的很好,可以看下原文。
2.这个是不带变量的装饰器__init__里是初始化参数,__call__里面是原函数参数。
Decorators without Arguments
If we create a decorator without arguments, the function to be decorated
is passed to the constructor, and the __call__() method is called
whenever the decorated function is invoked:
class decoratorWithoutArguments(object):
    def __init__(self, f):
        """
        If there are no decorator arguments, the function
        to be decorated is passed to the constructor.
        """
        print "Inside __init__()"
        self.f = f
    def __call__(self, *args):
        """
        The __call__ method is not called until the
        decorated function is called.
        """
        print "Inside __call__()"
        self.f(*args)
        print "After self.f(*args)"
@decoratorWithoutArguments
def sayHello(a1, a2, a3, a4):
    print 'sayHello arguments:', a1, a2, a3, a4
二、带变量的装饰器。
1.这个是带变量的参数,参数写到__init__里。
Decorators with Arguments

Now let's modify the above example to see what happens when we add arguments to the decorator:
class decoratorWithArguments(object):
    def __init__(self, arg1, arg2, arg3):
        """
        If there are decorator arguments, the function
        to be decorated is not passed to the constructor!
        """
        print "Inside __init__()"
        self.arg1 = arg1
        self.arg2 = arg2
        self.arg3 = arg3
    def __call__(self, f):

   """
        If there are decorator arguments, __call__() is only called
        once, as part of the decoration process! You can only give
        it a single argument, which is the function object.
        """
        print "Inside __call__()"
        def wrapped_f(*args):
            print "Inside wrapped_f()"
            print "Decorator arguments:", self.arg1, self.arg2, self.arg3
            f(*args)
            print "After f(*args)"
        return wrapped_f

@decoratorWithArguments("hello", "world", 42)
def sayHello(a1, a2, a3, a4):
    print 'sayHello arguments:', a1, a2, a3, a4
三、截图装饰器
有了上面的参考文档,依着葫芦画瓢就行,最大的麻烦就是driver参数处理,这里放到__init__里就可以了。
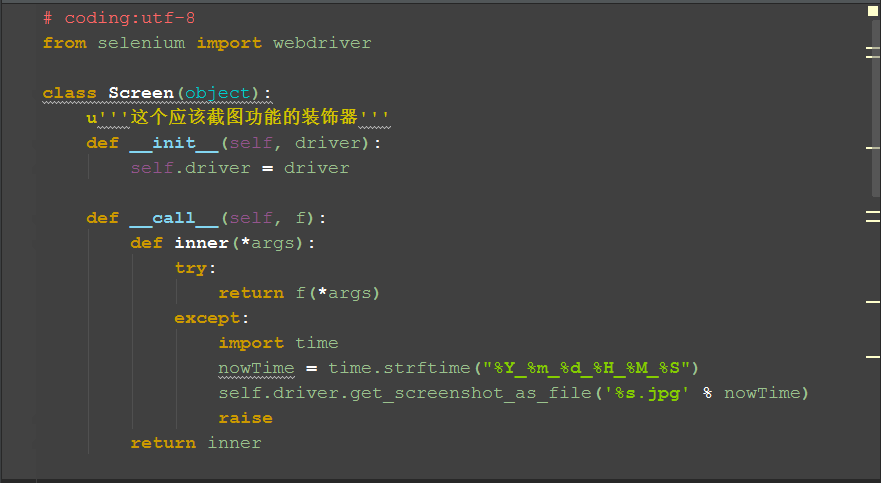
四、参考案例
# coding:utf-8
from selenium import webdriver
class Screen(object):
    u'''这个应该截图功能的装饰器'''
    def __init__(self, driver):
        self.driver = driver
    def __call__(self, f):
        def inner(*args):
            try:
                return f(*args)
            except:
                import time
                nowTime = time.strftime("%Y_%m_%d_%H_%M_%S")
                self.driver.get_screenshot_as_file('%s.jpg' % nowTime)
                raise
        return inner
# 以下是装饰器与unittest结合的案例
import unittest
class Test(unittest.TestCase):
    driver = webdriver.Firefox()  # 全局参数driver
    def setUp(self):
        self.driver.get("https://www.baidu.com")
    @Screen(driver)
    def test01(self):
        u'''这个是失败的案例'''
        self.driver.find_element_by_id("11kw").send_keys("python")
        self.driver.find_element_by_id("su").click()
    @Screen(driver)
    def test_02(self):
        u'''这个是通过的案例'''
        self.driver.find_element_by_id("kw").send_keys("yoyo")
        self.driver.find_element_by_id("su").click()
    def tearDown(self):
        self.driver.quit()
if __name__ == "__main__":
    unittest.main()
4.15 练习题1:多个浏览器之间的切换
前言
有时候一些业务的功能涉及到多个系统,需要在web系统1打开造一些数据,然后用到某些参数是动态生成的,需要调用web系统2里面的参数。
举个简单例子:在做某些业务的时候,需要手机短信验证码,我不可能去搞个手机连着电脑吧,那样太傻,我们的目的是获取短信验证码,短信验证码都有短信平台去查询。
当然能直接操作数据库最简单了,直接通过sql去查就行。
一、启动两个driver
1.如果我想启动2个火狐,一个火狐打开百度,另外一个火狐打开博客园,我们只需用2个实例driver去控制就行
(注意:不要两个都叫driver,要不然后面的会覆盖前面的,导致无法继续操作前面那个浏览器窗口了)
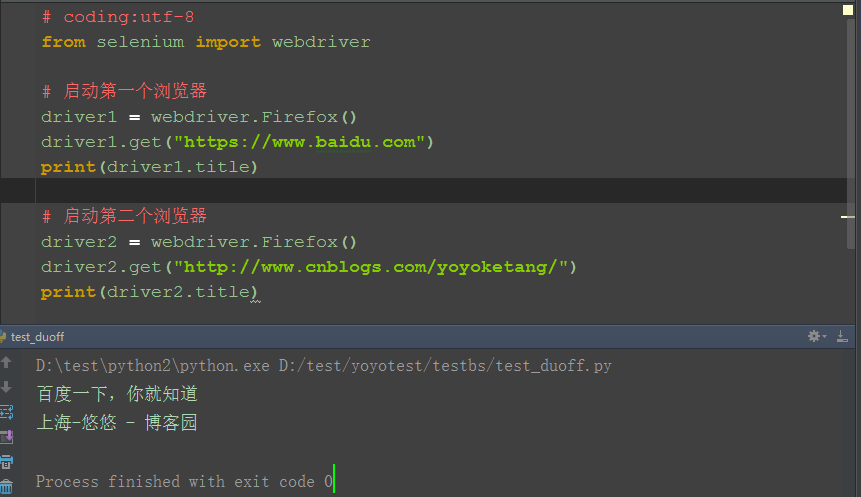
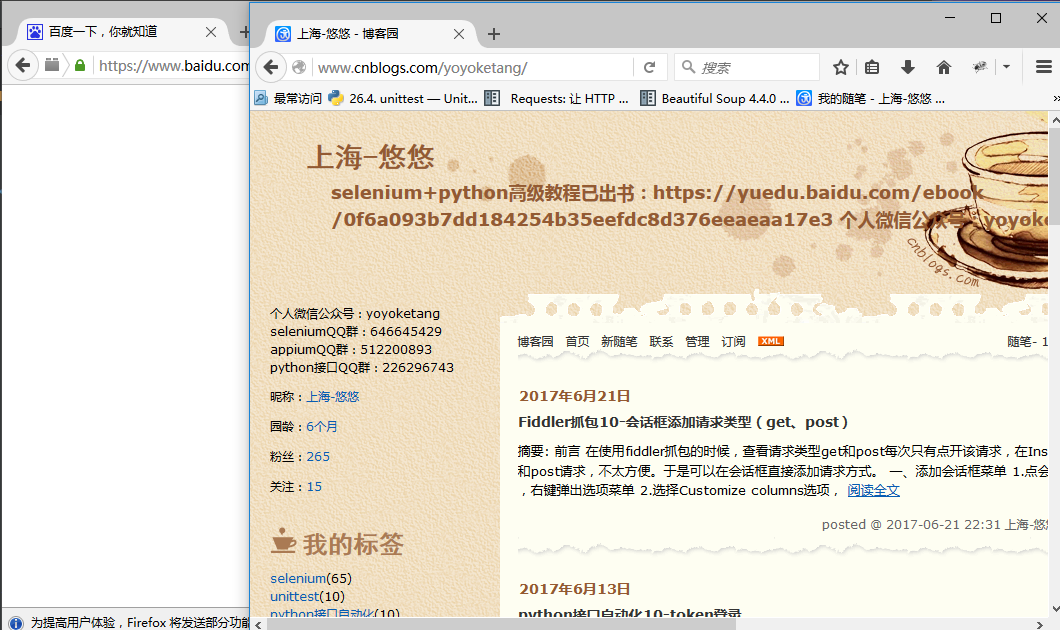
2.运行后结果,桌面启动2个窗口,一个打开了百度,一个打开了上海-悠悠 博客园
二、关掉窗口
1.driver1是控制第一个浏览器窗口的实例参数,driver2是控制第二个窗口的实例参数,如果想关掉第一个,driver1.quit()就行了
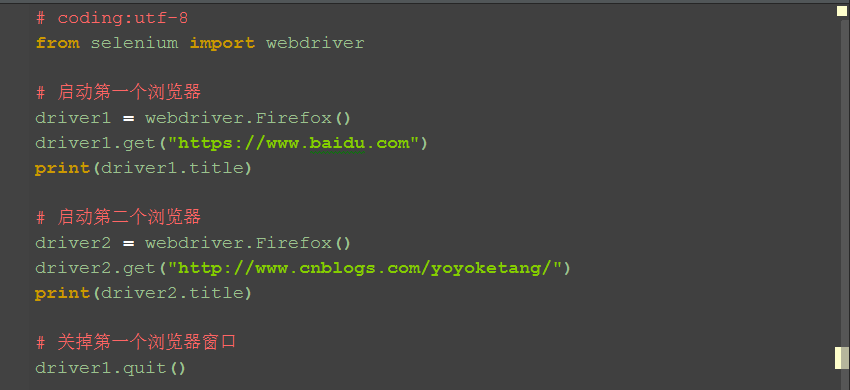
2.quit掉第一个浏览器窗口后,前面那个浏览器窗口就无法操作了,这里可以接着操作第二个浏览器窗口。
# coding:utf-8
from selenium import webdriver
import time
# 启动第一个浏览器
driver1 = webdriver.Firefox()
driver1.get("https://www.baidu.com")
print(driver1.title)
# 启动第二个浏览器
driver2 = webdriver.Firefox()
driver2.get("http://www.cnblogs.com/yoyoketang/")
print(driver2.title)
# 关掉第一个浏览器窗口
driver1.quit()
# 点首页"博客园"按钮
driver2.find_element_by_id("blog_nav_sitehome").click()
time.sleep(2)
print(driver2.title)
三、封装启动浏览器方法
1.如果涉及到不同的浏览器(如Firefox、chrome)之间的切换,我们可以专门写一个函数去启动不同浏览器
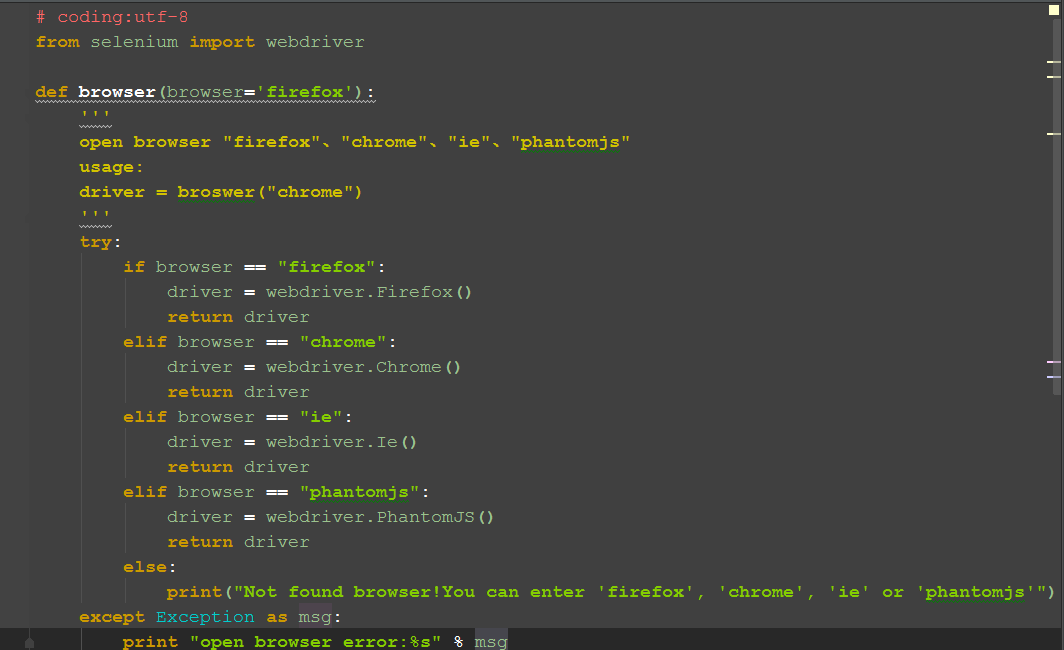
四、参考代码
# coding:utf-8
from selenium import webdriver
def browser(browser='firefox'):
    '''
    open browser "firefox"、"chrome"、"ie"、"phantomjs"
    usage:
    driver = broswer("chrome")
    '''
    try:
        if browser == "firefox":
            driver = webdriver.Firefox()
            return driver
        elif browser == "chrome":
            driver = webdriver.Chrome()
            return driver
        elif browser == "ie":
            driver = webdriver.Ie()
            return driver
        elif browser == "phantomjs":
            driver = webdriver.PhantomJS()
            return driver
        else:
            print("Not found browser!You can enter 'firefox', 'chrome', 'ie' or 'phantomjs'")
    except Exception as msg:
        print "open browser error:%s" % msg
if __name__ == "__main__":
    # 默认启动firefox
    driver_firefox = browser()
    driver_firefox.get("https://www.baidu.com")
    print("open browser:%s" % driver_firefox.name)
    print(driver_firefox.title)
    # 启动第phantomjs
    driver_pj = browser("phantomjs")
    driver_pj.get("http://www.cnblogs.com/yoyoketang/")
    print("open browser:%s" % driver_pj.name)
    print(driver_pj.title)

python+selenium自动化软件测试(第4章):场景判断与封装的更多相关文章
- python+selenium自动化软件测试(第13章):selenium面试题
前言最近看到群里有小伙伴贴出一组面试题,最近又是跳槽黄金季节,小编忍不住抽出一点时间总结了下 一.selenium中如何判断元素是否存在?expected_conditions模块提供了16种判断方法 ...
- python+selenium自动化软件测试(第10章):测试驱动TDD
测试驱动开发模式,要求开发在写业务代码的时候,先写出测试代码,同时单元测试例子决定了如何来写产品的代码,并且不断的成功的执行编写的所有的单元测试例子,不断的完善单元测试例子进而完善产品代码, 这样随着 ...
- python+selenium自动化软件测试(第11章):持续集成jenkins和GitHub的使用
11.1 jenkins持续集成环境 相关安装包下载链接:http://pan.baidu.com/s/1qYhmlg4 密码:dcw2赠送jenkins集成selenium环境视频链接http:// ...
- python+selenium自动化软件测试(第9章) :Logging模块
9.1 Logging模块 什么是日志记录?记录是跟踪运行时发生的事件的一种手段.该软件的开发人员将记录调用添加到其代码中,以指示某些事件已发生.事件由描述性消息描述,该消息可以可选地包含可变数据(即 ...
- python+selenium自动化软件测试(第8章) :多线程
前戏:线程的基础 运行多个线程同时运行几个不同的程序类似,但具有以下优点:进程内共享多线程与主线程相同的数据空间,如果他们是独立的进程,可以共享信息或互相沟通更容易.线程有时称为轻量级进程,他们并不需 ...
- python+selenium自动化软件测试(第16章):基础实战(3)
#coding:utf-8 from time import sleep from selenium import webdriver class cloudedge_register(object) ...
- python+selenium自动化软件测试(第15章):基础实战(2)
#coding:utf-8 #for windows/py2.7 from time import sleep from selenium import webdriver browser = web ...
- python+selenium自动化软件测试(第14章):基础实战(1)
#coding=utf- from selenium import webdriven from selenium.webdriver.common.by import By from seleniu ...
- python+selenium自动化软件测试(第12章):Python读写XML文档
XML 即可扩展标记语言,它可以用来标记数据.定义数据类型,是一种允许用户对自己的标记语言进 行定义的源语言.xml 有如下特征: 首先,它是有标签对组成:<aa></aa> ...
- python+selenium自动化软件测试(第7章):Page Object模式
什么是Page ObjectModel模式Page Objects是selenium的一种测试设计模式,主要将每个页面看作是一个class.class的内容主要包括属性和方法,属性不难理解,就是这个页 ...
随机推荐
- QuartusII 13.0 PLL IP Core调用及仿真
有一个多月没用用Quartus II了,都快忘了IP 是怎么用调用的了,还好有之前做的笔记,现在整理出来,终于体会到做笔记的好处. 一. QuartusII的pll的调用 打开软件界面 Tool—— ...
- 以图像分割为例浅谈支持向量机(SVM)
1. 什么是支持向量机? 在机器学习中,分类问题是一种非常常见也非常重要的问题.常见的分类方法有决策树.聚类方法.贝叶斯分类等等.举一个常见的分类的例子.如下图1所示,在平面直角坐标系中,有一些点 ...
- 学会用requirejs,5分钟足矣
学会用requirejs,5分钟足矣 据说公司的项目较多的用到requirejs管理依赖,所以大熊同学挤出了5分钟休息时间学习了一下,现在分享一下.如果你想了解requirejs的实现原理,请绕道!如 ...
- Java内存区域与对象创建过程
一.java内存区域 Java虚拟机在执行Java程序的过程中会把它所管理的内存划分为若干个不同的数据区域.这些区域都有各自的用途,以及创建和销毁的时间,有的区域随着虚拟机进程的启动而存在,有的区域则 ...
- 前端数据存储方案集合(cookie localStorage等)以及详解 (一)
客户端.前端 存储 一. 起 因 首先解释下为什么想来写这个关于前端存储的问题,因为最近在做小程序相关的内容.但是,在开发过程中,我们难免会遇到 token 存储. 代码缓存. 图片存储等等. 以及可 ...
- Javascript之布尔
一.概念 将非布尔值转成布尔值(true)或(false). 二.创建布尔对象 var bool = new Boolean(); console.log(bool);//Boolean { fals ...
- ++i,i++和i += 1的区别
++i,i++和i += 1的区别 单条语句:i++;.++i;和 i += 1;等价. int i = 0; ++i; // 或者i++;或者i += 1; cout << i < ...
- spring mvc4使用及json 日期转换解决方案
spring mvc使用注解方式配制,以及对rest风格的支持,真是完美致极.下面将这两天研究到的问题做个总结,供参考.1.request对象的获取方式1:在controller方法上加入reques ...
- 在webpack中使用Code Splitting--代码分割来实现vue中的懒加载
当Vue应用程序越来越大,使用Webpack的代码分割来懒加载组件,路由或者Vuex模块, 只有在需要时候才加载代码. 我们可以在Vue应用程序中在三个不同层级应用懒加载和代码分割: 组件,也称为异步 ...
- 贡献你的代码,将jar包发布到Maven中央仓库以及常见错误的解决办法
前几天将自己的日志工具发布到了Maven中央仓库中.这个工具本省没有多少技术含量,因为是修改别人的源代码实现的,但是将jar发布到Maven仓库却收获颇丰,因为网上有些教程过时了,在此分享下自己发布j ...
