学习openldap02
III (二十二)OpenLDAP
目录服务:
目录是一类为了浏览和搜索数据而设计的特殊的数据库,目录服务是按照树状形式存储信息,目录包含基于属性的描述性信息,并且支持高级的过滤功能,如microsoft的active directory活动目录就是目录数据库的一种;
a directory is like a phone book,and is not like a directory(folder) on your computer
一般目录不支持大多数事务型数据库所支持的高吞吐量和复杂的更新操作,目录进行更新操作是要么全部要么都不的原子操作;
目录服务适合的应用在于提供大量的查询和搜索操作,而不是大量的写入操作(读多写少);
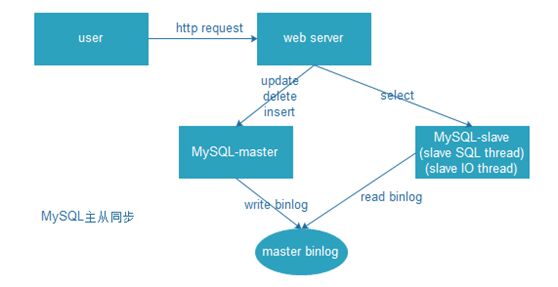
为保证目录数据的可用性和可靠性,在确保使用目录服务提供快速查询和搜索操作的同时,目录服务还提供了主从server同步目录数据信息的能力,同传统的MySQL的主从同步功能一样,甚至比MySQL的同步功能更多,ldap可以有一主多从,最大限度的确保基于目录业务的服务持续可用性与提供并发查询能力,active directory就有主域和备份域的说法,ldap可以说是active directory活动目录在Linux上的开源实现;
广义的目录服务概念,可以用多种不同的方式来提供目录服务,不同的目录所允许存储的信息是不同的,在信息如何被引用、查询、更新及防止未经授权的访问等问题上,不同的目录服务的处理方式也有诸多不同;
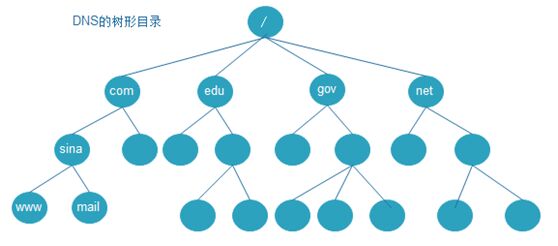
举例,一些目录服务是本地的,只提供受限的服务(如单机上的finger服务);一些目录服务是大范围的global,面向internet提供广阔的多的服务,通常是分布的(数据是分布在多台机器上的),这些机器一起来提供目录服务,典型的大范围服务定义一个统一的namespace名称空间来给出一个相同的数据视图data view,而不管具体数据所在位置,如DNS是一个典型的大范围分布式目录服务的例子
ldap(lightweight directory access protocol),ldap是在X.500标准基础上产生的一个简化版本;
目录服务通常有两个国际标准,X.500和LDAP;
X.500是ITU-T和ISO定义的目录标准,它实际上不是一个协议,而是由一个协议族组成,包括从X.501到X.525等一系列非常完整的目录服务协议;
LDAP基于tcp/ip的目录访问协议,是internet上目录服务的通用访问协议,LDAP运行在tcp/ip或其它的面向连接的传输服务之上,LDAP完整的技术规范由RFC2251(LDAPv3)和其它几个在RFC3377中定义的文档组成;
从技术上说,LDAP是一个到X.500目录服务的目录访问协议,X.500是一个OSI(open system interconnection)目录服务,最初,LDAP客户端通过网关访问X.500目录服务,网关在客户端和X.500server之间,而X.500 DAP(directory access protocol)位于这个网关和X.500服务器之间;

DAP是一个重量级的协议,在整个OSI协议栈上进行操作,而且占用大量计算机资源,而LDAP设计在tcp/ip层上操作,以小得多的代价实现了大多数DAP的功能,虽然LDAP仍可通过网关访问X.500 server,但现在通常都是在X.500 server上直接实现LDAP;
单独的LDAP守护进程slapd(openldap),可被看作是轻量级的X.500目录服务器,也就是说它没有实现X.500完全的DAP协议,作为一个轻量级的目录服务器,slapd实现的仅是X.500模型的一个子集;
X.500为网络用户提供分布式目录服务,它定义一个机构如何在一个企业的全局范围内共享名字和与它们相关的对象,X.500规范总体命名方式,全球统一的名字空间,一个完整的X.500系统称为一个目录,这个目录是一个数据库,或为目录信息数据库;
X.500是层次性的,所有对象被组织成树形结构,模仿一个机构的组织形式;
X.500目录服务还能够实现身份认证、访问控制、它被公认为是实现一个目录服务的最好途径,但是它的实现需要很大投资,效率不高,在实际中存在不少障碍,DAP对相关层协议环境要求过多,在许多小系统上无法使用,也不适应tcp/ip协议体系,因此IETF设计并定义LDAP作为使用X.500目录的更好的途径;
X.500具备的特征:
分散维护(运行X.500的每个站点只负责本地目录部分,可立即进行更新和维护操作);
搜索性能(X.500具有强大的搜索功能,支持用户建立的任意复杂查询);
单一全局命名空间(类似DNS,X.500为用户提供单一同性命名空间single homegeneous namespace,与DNS相比,X.500的命名空间更灵活且易于扩展);
结构化信息结构(X.500目录中定义了信息结构,允许本地扩展);
基于标准的目录服务(由于X.500可被用于建立一个基于标准的目录,在某种意义上,请求应用目录信息(Email、资源自动分配器、特定目录工具)的应用程序就能访问重要且有价值的信息);
LDAP与X.500的相同点(LDAP是X.500标准中的目录访问协议DAP的一个子集,可用于建立X.500目录,这两个目录服务技术标准有许多共同之处):
在平台上,都实现了一个通用的平台结构,提供了一个OS和application需要的信息服务类型,可被许多平台和应用程序接收和实现;
在信息模型上,都使用了项、对象类、属性等概念和模式来描述信息;
在命名空间方面,都使用了目录信息树结构和层次命名模型;
在功能模型上,都使用了相似的操作命令来管理目录信息;
在认证框架方面,都可实现用户名称和密码,或基于安全加密方式的认证机制;
在灵活性上,它们的目录规模都可大可小,大到全球目录树,小到只有一台目录server;
在分布性方面,目录信息都可分布在多个目录服务器中,这些server可以由各组织管理,既保证了目录信息总体结构的一致性,又满足了分级管理的需要;
LDAP与X.500的差别:
LDAP基于internet tcp/ip,直接运行在更简单和更通用的tcp/ip或其它可靠的传输协议层上,避免了在OSI会话层和表示层处理包操作的开销,使连接的建立和包的处理更简单、更快,对于互联网和企业网应用更理想;
X.500基于OSI,建立在应用层上的DAP,需要在OSI会话层和表示层上进行许多的建立连接和包处理的任务,需要特殊的网络软件实现对网络的访问;
LDAP协议更为简单,它继承了X.500最好的特性,同时去掉了X.500的复杂性,LDAP通过使用查找操作实现列表操作了读操作,另一方面省去了X.500中深奥的和很少使用的服务控制和安全特性,只保留常用的特性;
LDAP通过引用机制实现分布式访问,通过clientAPI实现分布式操作平衡了负载(对于应用透明);
X.500 DSA通过server之间的链操作实现分布式的访问,这样查询的压力集中于服务端;
LDAP的实现具有低费用、易配置和易管理的特点,经性能测试,LDAP比X.500具有更少的响应时间,LDAP提供了满足应用程序对目录服务所需求的特性;
LDAP中常用名词缩写及含义:
dc(domain component,域名的部分,其格式是将完整的域名分成几部分,如example.com,dc=example,dc=com);
uid(user id,用户ID);
ou(organization unit,组织单位,类似于LinuxFS的子目录,它是一个容器对象,组织单位可包含其它各种对象,包括其它组织单元,如"tech");
cn(common name,公共名称,如"ThomasJohansson");
sn(surname,姓,如"Johnsson");
dn(distinguished name,唯一辨别名,类似LinuxFS的绝对路径,每个对象都有一个唯一的名称,如"uid=tom,ou=market,dc=example,dc=com",在一个目录树中,dn总是唯一的,它是一个识别属性,通常用于检索,相当于关系DB表中的primary key);
rdn(relative dn,相对辨别名,类似于LinuxFS的相对路径,它是与目录树结构无关的部分,如"uid=tom"或"cn=Thomas Johasson");
c(country,国家,如"CN","US");
o(organization,组织名,如"Example,Inc.");
dn的两种设置:
基于cn,最常见的cn是从/etc/group转来的条目,例如:cn=test,ou-auth,dc=example,dc=org;
基于uid,最常见的uid是从/etc/passwd转来的条目,例如:uid=test,ou=auth,dc=example,dc=org;
LDAP目录服务的特点:
LDAP是一个跨平台的、标准的协议,近年来得到业界广泛认可;
LDAP的结构用树形结构来表示,而不是用表格,因此不用SQL语句维护;
LDAP提供了静态数据的快速查询方式,但在写数据方面并不擅长;
LDAP服务可使用基于push或pull的复制信息技术,用简单的或基于安全证书的安全认证,复制部分或全部数据,既保证了数据的安全性又提高了数据的访问效率;
LDAP是一个安全的协议,LDAPv3支持SASL(simpleauthentication and security layer)、SSL(secure socket layer)和TLS(transport layer security),使用认证来确保事务的安全,另LDAP提供了不同层次的访问控制,以限制不同用户的访问权限;
LDAP支持异类数据存储,存储的数据可以是文本资料、二进制图片等;
LDAP是C/S模型,server用于存储树,client提供操作目录信息树的工具,通过这些工具可将数据库的内容以文本格式LDIF(LDAP data interchange format)呈现在我们面前;
LDAP是一种开放internet标准,LDAP协议是跨平台的internet协议,它是基于X.500标准的,与X.500不同,LDAP支持tcp/ip即可以分布式部署;
LDIF,LDAP datainterchange format,LDAP数据交换格式,用于LDAP数据导入、导出的格式,它是LDAP数据库信息的一种文本格式,一种ASCII文件格式,用来交换数据并使得在LDAP server间交换数据成为可能,LDIF文件最常用的功能是向目录导入或修改信息,这些信息的格式需按照LDAP中架构schema格式组织,若不符合其要求的格式就会出现错误;
LDIF文件的特点:
通过空行来分割或定义一个条目;
以#开始的行为注释;
所有属性的赋值方法为:属性:属性值,如dn:dc=……,dc=……;
属性可以被重复赋值;
每行的结尾不允许有空格;
注:LDAP的每条记录中必须包含一个objectClass属性,且需赋值至少一个值,objectClass属性有等级之分,属性相当于变量,它可以被自定义赋值,值不能相同
LDAP的目录结构:
LDAP目录服务是通过目录数据库来存储网络信息来提供目录服务的,为方便用户迅速查找和定位信息,目录数据库是以目录信息树DIT(directory information tree)为存储方式的树形存储结构,DIT及其相关概念构成了LDAP协议的信息模型;
在LDAP中,目录是按照树形结构组织,DIT是一个主要进行读操作的数据库;
DIT由entry条目组成,entry相当于关系DB中的表中的记录record;
entry是具有dn的attribute-value(属性-值对)的集合;
在Linux FS中,最顶层是root根,LDAP也用root作根,称为BaseDN(LDAP目录的最顶部根);
由于X.500历史原因,LDAP目录用ou从逻辑上把数据分开,ou也是一种entry(容器条目),ou下即是真正的用户条目;
什么样的信息可存储在目录当中:
LDAP的信息模型基于entry,一个条目就是一些具有全局唯一的标识名称,dn的属性集合,dn用于无二义性的指代一个唯一的条目,条目的每一个属性都有一个type,一个或多个value,type往往是特定字符串的简写,如用cn指代common name,或用mail指代电子邮件地址,value的语法依赖于type,比如,type为cn的属性可能包含值Babs Jensen,type为mail的属性可能包含值babs@example.org,type为jpeg photo的属性可能包含二进制格式的JPEG图像;
LDAP允许通过使用objectClass的特殊属性或控制哪些属性是条目所必须的,哪些属性是条目可选的,objectClass属性的值是由条目所必须遵从的方案schema来定义的;
#ldapsearch -LLL -w oldboy -x -Hldap://10.0.0.8 -D "cn=admin,dc=etiantian,dc=org" -b"dc=etiantian,dc=org" "uid=*" #(通过此命令可取出数据库中存储的内容)
LDAP目录逻辑结构原理(信息在目录中是如何组织的):
在ldap中条目是按树状层次结构组织的,传统上,这个结构往往是地理界限或组织界限的反映,代表国家的条目位于整个目录树的顶层,之下的条目则代表各个州及国家性的组织,再下面的条目代表着组织单位、个人、打印机、文件等,下图是按传统命名方式组织的ldap目录信息树;
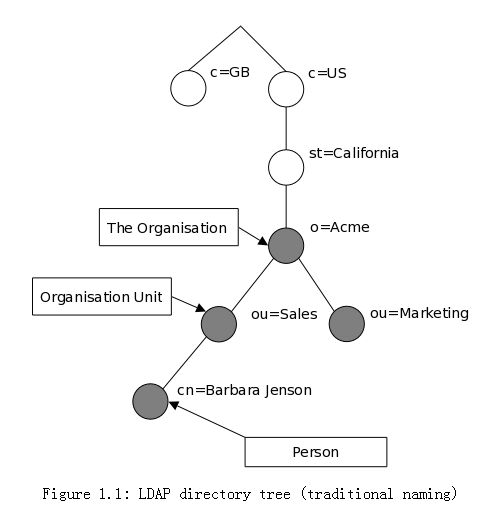
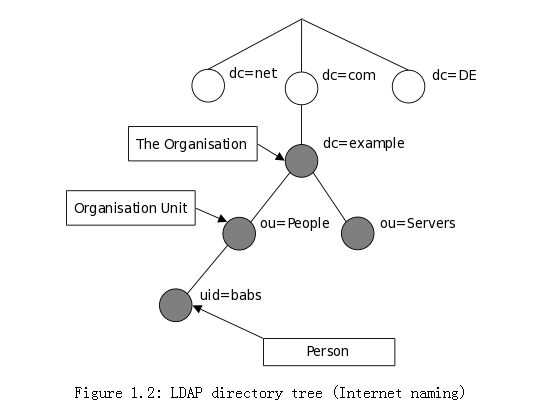
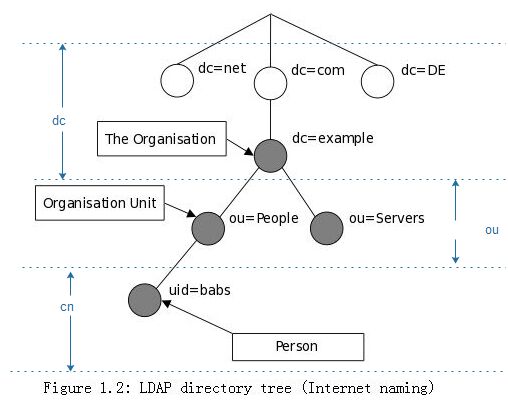
目录树也可按照internet域名结构组织,因为它允许按DNS对目录服务进行定位,这种命名方式正变得越来越受欢迎,如下图:
信息是如何被引用的?
一个条目是通过它的标识名来引用的,而标识名是由相对标识名rdn和它的父条目名连在一直构成的,比如上图:在internet命名例子中,Barbara Jensen条目有相对标识名uid=babs和[绝对]标识名uid=babs,ou=People,dc=example,dc=com
注:一般用绝对标识名,完整dn格式在RFC2253中描述
信息是如何被访问的?
LDAP定义了一组查询和更新目录的操作,支持的操作包括从目录中添加和删除条目,更改已有的条目及名字,大多数情况,LDAP是用于搜索目录中的信息的,通过指定搜索过滤器,LDAP可在目录的相关部分搜索相符的条目,满足过滤条件的每一个条目都能收到请求信息;
比如,要搜索位于st=California,c=US子树之下且名称中有Acme字符串且有一个传真号的组织的条目,LDAP可轻松完成;要搜索位于dc=example,dc=com目录子树下的叫Barbara Jensen的人的条目并获取找到的每个条目的email地址,LDAP也可轻松完成;
怎样保护信息不受未经授权的访问?
一些目录服务不但提供保护、允许信息对任何人可见,LDAP提供了一套机制来对客户进行身份确认,或让客户证明他拥有连接到服务器的身份,这对服务器进行全方位的访问控制铺平了道路,从而确保了服务器上所包含信息的安全,LDAP也支持privacy和integrity的安全服务
LDAP是怎样工作的?
LDAP目录服务是基于C/S模式的,一个或者多个LDAPserver包含着组成整个DIT的数据,client连接到server并且发出一个请求request,然后server要么以answer回答予以回应,要么给出一个指针referral,客户可以通过此指针获取到所需的数据(通常该指针是指向另一个LDAP server),无论client连到哪个LDAP server,它看到的都是同一个目录视图view,这是LDAP这类全局目录服务的一个重要特征
LDAP的4个重要配置模式:
基本的目录查询服务(重点),slapd只为本地域提供目录服务,不会以任何方式与别的目录服务器交互;

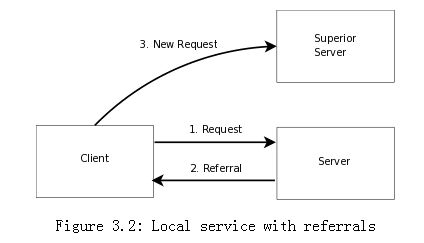
目录查询代理服务(指针referral),带有referral的本地目录服务,类似DNS的转发器(dnsmasq开源软件),本地运行ldap server,并将配置成为当客户的请求走出本地域的处理能力时能返回一个指针,该指针指向一个具备处理客户请求能力的更高级的服务器地址,你可以自己运行这一服务,也可以使用别人已经提供的;
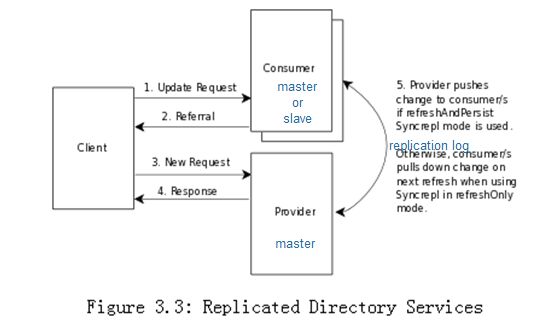
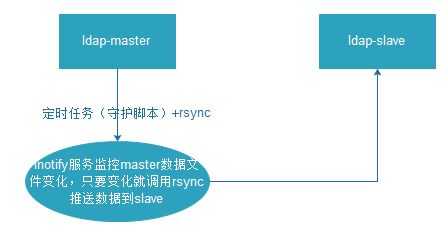
异机复制数据(即主从同步),同步复制的目录服务,slapd守护程序用来将主slapd上的改变传播到一个或多个从属的slapd上,简单易用的同步复制目录方案(inotify+ldap客户端命令方案;定时任务+ldap客户端命令方案);
分布式目录服务:
In this configuration, the local service is partitioned intosmaller services, each of which may be replicated, and glued together with superior and subordinatereferrals.
本地的服务被分割成为多个更小的服务,每一个都可能被复制,且通过指针referral将上级superior和下级subordinate粘合起来,在实际工作中,使用主从同步集群较多,跨机房就是通过open***同步;
ldap+haproxy|nginx|heartbeat(集群高可用,验证时不跨机房);
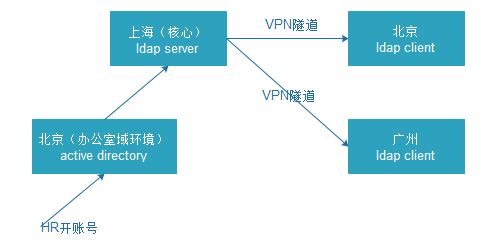
LDAP服务的应用领域(ldap目录服务适合那些需要从不同的地点读取信息,但是对于不需要经常更新的业务信息最为有用):
信息安全类(数字证书管理、授权管理、单点登录);
科学计算类(DCE(distributed computing environment分布式计算环境),UDDI(universaldescription discovery and integration统一描述、发现和集成协议));
网络资源管理类(mail系统、DNS系统、网络用户管理、电话号码簿);
电子政务资源管理类(内网组织信息服务、电子政务目录体系、人口基础库、法人基础库);
注:常用ldap作为公司所有员工账号的基础信息库,如:邮件账号、电脑登录账号、办公平台账号、共享服务账号、SVN账号、***账号、server账号、无线网登录账号等公共账号登录信息库,可理解为企业的active directory,另ldap可与microsoft的active directory打通
www.openldap.org
2.3是rhel5系列的默认版本;2.4是rhel6系列的默认版本;
ldap服务对系统要求不高,如DELLR410配置足够,生产场景应至少两台server做ldap不至于宕机,ldap若在公网上使用两台server均应有两个网卡(分别用于WAN数据转发和LAN数据转发),若通过***做LAN的ldap仅一个网卡即可
准备环境:
[root@localhost ~]# cat /etc/redhat-release
Red Hat Enterprise Linux Server release 6.5(Santiago)
[root@localhost ~]# uname -r
2.6.32-431.el6.x86_64
[root@localhost ~]# uname -m
x86_64
注:rhel6通过vmware clone后,先用setup命令配置好IP、DNS,并在配置文件ifcfg-eth0中将HWMAC和UUID项删除,再#> /etc/udev/rules.d/70-persistent-net.rules将此文件清空,最后重启系统
[root@localhost ~]# mv /etc/yum.repos.d/rhel-source.repo /etc/yum.repos.d/rhel-source.repo.backup
[root@localhost ~]# cd /etc/yum.repos.d/
[root@localhost yum.repos.d]# rz(上传http://mirrors.163.com/.help/CentOS6-Base-163.repo此地址下载的CentOS6-Base-163.repo文件)
[root@localhost yum.repos.d]# sed -i 's/$releasever/6/g' CentOS6-Base-163.repo
[root@localhost yum.repos.d]# yum clean all
Loaded plugins: product-id,refresh-packagekit, security, subscription-manager
This system is not registered to Red HatSubscription Management. You can use subscription-manager to register.
Cleaning repos: base extras updates
Cleaning up Everything
[root@localhost yum.repos.d]# yum makecache
Loaded plugins: product-id,refresh-packagekit, security, subscription-manager
This system is not registered to Red HatSubscription Management. You can use subscription-manager to register.
base | 3.7 kB 00:00
base/group_gz | 226 kB 00:00
base/filelists_db ……
[root@localhost yum.repos.d]# sed -i 's/keepcache=0/keepcache=1/g' /etc/yum.conf
[root@localhost yum.repos.d]# grep keepcache /etc/yum.conf
keepcache=1
[root@localhost yum.repos.d]# cd
[root@localhost ~]# getenforce
Permissive
[root@localhost ~]#service iptables stop
iptables: Setting chains to policy ACCEPT:filter [ OK ]
iptables: Flushing firewall rules: [ OK ]
iptables: Unloading modules: [ OK ]
[root@localhost ~]# ntpdate time.windows.com
19 Jul 00:38:12 ntpdate[27946]: adjust timeserver 40.69.40.157 offset -0.016416 sec
[root@localhost ~]# date
Tue Jul 19 00:38:15 PDT 2016
[root@localhost ~]# crontab -e
……
[root@localhost ~]# crontab -l
#time sync
*/5 * * * * /usr/sbin/ntpdatetime.windows.com &> /dev/null
[root@localhost ~]# echo "10.96.20.113 etiantian.org" >> /etc/hosts
[root@localhost ~]# tail -1 !$ #(生产环境下hosts文件的分发工作由分发工具完成)
tail -1 /etc/hosts
10.96.20.113 etiantian.org
[root@localhost ~]# ping etiantian.org
PING etiantian.org (10.96.20.113) 56(84)bytes of data.
64 bytes from etiantian.org (10.96.20.113):icmp_seq=1 ttl=64 time=0.051 ms
64 bytes from etiantian.org (10.96.20.113):icmp_seq=2 ttl=64 time=0.021 ms
……
在master-side安装openldap:
[root@localhost ~]# rpm -qa openldap
openldap-2.4.23-32.el6_4.1.x86_64
[root@localhost ~]# rpm -qa | grep openldap
openldap-2.4.23-32.el6_4.1.x86_64
openldap-devel-2.4.23-32.el6_4.1.x86_64
compat-openldap-2.3.43-2.el6.x86_64
[root@localhost ~]#yum -y install openldap openldap-*
……
Total download size: 4.1 M
Downloading Packages:
(1/6):openldap-2.4.40-12.el6.x86_64.rpm | 284 kB 00:00
(2/6):openldap-clients-2.4.40-12.el6.x86_64.rpm |165 kB 00:00
(3/6):openldap-devel-2.4.40-12.el6.x86_64.rpm | 1.1 MB 00:00
(4/6):openldap-servers-2.4.40-12.el6.x86_64.rpm |2.0 MB 00:00
(5/6):openldap-servers-sql-2.4.40-12.el6.x86_64.rpm | 140 kB 00:00
(6/6):unixODBC-2.2.14-14.el6.x86_64.rpm |378 kB 00:00
……
[root@localhost ~]# yum -y install nscdnss-pam-ldapd nss-* pcre pcre-* #(安装nss-*时有报错,将nss-*与其它软件包分开安装,原因nss-softokn-freebl*冲突,先升级再安装)
……
Protected multilib versions:nss-softokn-freebl-3.14.3-23.3.el6_8.x86_64 !=nss-softokn-freebl-3.14.3-9.el6.i686
Youcould try using --skip-broken to work around the problem
Youcould try running: rpm -Va --nofiles --nodigest
[root@localhost ~]# yum -y install nscd nss-pam-ldapd pcre pcre-*
……
Total download size: 25 M
Downloading Packages:
(1/12): glibc-2.12-1.192.el6.i686.rpm | 4.4 MB 00:00
(2/12):glibc-2.12-1.192.el6.x86_64.rpm |3.8 MB 00:03
(3/12):glibc-common-2.12-1.192.el6.x86_64.rpm | 14 MB 00:12
(4/12):glibc-devel-2.12-1.192.el6.x86_64.rpm |988 kB 00:00
(5/12):glibc-headers-2.12-1.192.el6.x86_64.rpm | 617 kB 00:00
(6/12): nscd-2.12-1.192.el6.x86_64.rpm | 230 kB 00:00
(7/12):nss-pam-ldapd-0.7.5-32.el6.x86_64.rpm | 153 kB 00:00
(8/12): pam_ldap-185-11.el6.x86_64.rpm | 88 kB 00:00
(9/12): pcre-7.8-7.el6.x86_64.rpm | 196 kB 00:00
(10/12): pcre-devel-7.8-7.el6.x86_64.rpm | 320 kB 00:00
(11/12):pcre-static-7.8-7.el6.x86_64.rpm | 83 kB 00:00
(12/12): tzdata-2016f-1.el6.noarch.rpm | 452 kB 00:00
……
[root@localhost ~]# yum -y update nss-softokn-freebl
……
Total download size: 1.1 M
Downloading Packages:
(1/9): nspr-4.11.0-1.el6.x86_64.rpm | 114 kB 00:00
(2/9):nspr-devel-4.11.0-1.el6.x86_64.rpm | 112 kB 00:00
(3/9):nss-softokn-3.14.3-23.3.el6_8.x86_64.rpm | 262 kB 00:00
(4/9):nss-softokn-devel-3.14.3-23.3.el6_8.x86_64.rpm | 14 kB 00:00
(5/9):nss-softokn-freebl-3.14.3-23.3.el6_8.i686.rpm | 157 kB 00:00
(6/9):nss-softokn-freebl-3.14.3-23.3.el6_8.x86_64.rpm | 168 kB 00:00
(7/9):nss-softokn-freebl-devel-3.14.3-23.3.el6_8.x86_64.rpm | 140 kB 00:00
(8/9):nss-util-3.21.0-2.el6.x86_64.rpm | 67 kB 00:00
(9/9):nss-util-devel-3.21.0-2.el6.x86_64.rpm | 69 kB 00:00
……
[root@localhost ~]#yum -y install nss-*
……
Total download size: 1.6 M
Downloading Packages:
(1/5): nss-3.21.0-8.el6.x86_64.rpm | 859 kB 00:00
(2/5):nss-devel-3.21.0-8.el6.x86_64.rpm | 205 kB 00:00
(3/5):nss-pkcs11-devel-3.21.0-8.el6.x86_64.rpm | 104 kB 00:00
(4/5):nss-sysinit-3.21.0-8.el6.x86_64.rpm | 47 kB 00:00
(5/5):nss-tools-3.21.0-8.el6.x86_64.rpm | 437 kB 00:00
……
[root@localhost ~]# rpm -qa | grep openldap
openldap-servers-2.4.40-12.el6.x86_64
openldap-2.4.40-12.el6.x86_64
openldap-clients-2.4.40-12.el6.x86_64
compat-openldap-2.3.43-2.el6.x86_64
openldap-servers-sql-2.4.40-12.el6.x86_64
openldap-devel-2.4.40-12.el6.x86_64
在master-side配置openldap:
[root@localhost ~]# cd /etc/openldap/
[root@localhost openldap]# ll
total 20
drwxr-xr-x. 2 root root 4096 Jul 19 00:48certs
-rw-r-----. 1 root ldap 121 May 10 16:32 check_password.conf
-rw-r--r--. 1 root root 282 Mar 31 06:49 ldap.conf
drwxr-xr-x. 2 root root 4096 Jul 19 00:48schema
drwx------. 3 ldap ldap 4096 Jul 19 00:48slapd.d
注:2.3版本的配置文件在/etc/openldap/slapd.conf,2.4的配置文件/etc/openldap/slapd.d/slapd.conf,2.4也兼容2.3处的配置文件,在/etc/openldap/slapd.conf处编辑好后再用命令#slaptest-f /etc/openldap/slapd.conf -F /etc/openldap/slapd.d重新生成2.4的配置文件)
[root@localhost openldap]# cp /usr/share/openldap-servers/slapd.conf.obsolete /etc/openldap/slapd.conf
[root@localhost openldap]# cp slapd.conf slapd.conf.ori
[root@etiantian openldap]# slap<TAB>
slapacl slapadd slapauth slapcat slapd slapdn slapindex slappasswd slapschema slaptest
注:
[root@localhost openldap]# slappasswd --help
slappasswd: invalid option -- '-'
Usage: slappasswd [options]
-c format crypt(3) salt format
-g generate random password
-h hash password scheme
-n omit trailing newline
-o <opt>[=val] specify an option with a(n optional) value
module-path=<pathspec>
module-load=<filename>
-s secret new password
-u generate RFC2307 values (default)
-v increase verbosity
-T file read file for new password
[root@localhost openldap]# slappasswd -s oldboy #(用-s指定生成密码,也可直接用#slappasswd交互式生成密码,oldboy即为openldap默认管理员Manager的密码,此处管理员已更改为admin)
{SSHA}hTALz9Z4+KSokCeQrLtVQbXBnQlzJ31c
[root@localhost openldap]# slappasswd -s oldboy | sed -e "s#{SSHA}#rootpw\t {SSHA}#g" >>/etc/openldap/slapd.conf #(生成密码并加入到配置文件中)
[root@localhost openldap]# tail -1 !$
tail -1 /etc/openldap/slapd.conf
rootpw {SSHA}oN4m6ZMllYE/RGsP5AOe4WBsB85tRatJ
[root@localhost openldap]# vim slapd.conf #(从98行开始更改如下,将98行到108行的权限控制注释掉,自定义配置权限如下;指定数据库格式为bdb,directory指定数据库存储路径;suffix指定搜索的后缀;checkpoint设置把内存中的数据写回数据文件的操作,每达到2048KB或10min执行一次;rootdn中的cn设置管理员用户名;loglevel设置日志级别,296=256+32+8(256(日志连接|操作|结果);32(搜索过滤器处理);8(连接管理));cachesize设置ldap可缓存的记录数;注意此配置文件中参数在文件中的先后次序不能随意改变,空格和以#开头的注释行被忽略,若某一行以空格开头则被认为是续上一行内容,即使前一行是注释信息)
------------------file modify start--------------
#database config
#access to *
#bydn.exact="gidNumber=0+uidNumber=0,cn=peercred,cn=external,cn=auth"manage
#by * none
# enable server status monitoring(cn=monitor)
#database monitor
#access to *
#bydn.exact="gidNumber=0+uidNumber=0,cn=peercred,cn=external,cn=auth"read
#by dn.exact="cn=Manager,dc=my-domain,dc=com" read
#by * none
access to *
by self write
by anonymous auth
by * read
database bdb
#suffix "dc=my-domain,dc=com"
suffix "dc=etiantian,dc=org"
#checkpoint 1024 15
checkpoint 2048 10
#rootdn "cn=Manager,dc=my-domain,dc=com"
rootdn "cn=admin,dc=etiantian,dc=org"
……
directory /var/lib/ldap
……
rootpw {SSHA}oN4m6ZMllYE/RGsP5AOe4WBsB85tRatJ
loglevel 296
cachesize 1000
-----------------file modify end------------------
[root@etiantian openldap]# diff slapd.conf.ori slapd.conf
……
[root@etiantian openldap]# egrep -v "#|^$" slapd.conf
-------------------file start---------------
include /etc/openldap/schema/corba.schema
include /etc/openldap/schema/core.schema
include /etc/openldap/schema/cosine.schema
include /etc/openldap/schema/duaconf.schema
include /etc/openldap/schema/dyngroup.schema
include /etc/openldap/schema/inetorgperson.schema
include /etc/openldap/schema/java.schema
include /etc/openldap/schema/misc.schema
include /etc/openldap/schema/nis.schema
include /etc/openldap/schema/openldap.schema
include /etc/openldap/schema/ppolicy.schema
include /etc/openldap/schema/collective.schema
allow bind_v2
pidfile /var/run/openldap/slapd.pid
argsfile /var/run/openldap/slapd.args
TLSCACertificate Path /etc/openldap/certs
TLSCertificate File "\"OpenLDAPServer\""
TLSCertificate KeyFile/etc/openldap/certs/password
access to *
by self write
by anonymous auth
by * read
database bdb
suffix "dc=etiantian,dc=org"
checkpoint 204810
rootdn "cn=admin,dc=etiantian,dc=org"
directory /var/lib/ldap
index objectClass eq,pres
index ou,cn,mail,surname,givenname eq,pres,sub
index uidNumber,gidNumber,loginShell eq,pres
index uid,memberUid eq,pres,sub
index nisMapName,nisMapEntry eq,pres,sub
rootpw {SSHA}oN4m6ZMllYE/RGsP5AOe4WBsB85tRatJ
loglevel 296
cachesize 1000
-------------------file end------------------
注:也可用脚本快速配置
sed -i 's#^suffix#suffix "dc=etiantian,dc=org"#g' slapd.conf
sed -i 's#^rootdn#rootdn "cn=admin,dc=etiantian,dc=org"#g' slapd.conf
cat >> /etc/slapd.conf << EOF
loglevel 296
cachesize 1000
checkpoint 2048 10
EOF
注:权限控制的另一个案例(可生产环境用):
access to *
by self write
by dn.exact="uid=auth,ou-sysusers,dc=intra,dc=qq,dc=com" Peername.regex=127\.0\.0\.1write
by dn.subtree="ou=sysusers,dc=intra,dc=qq,dc=com" read
by anonymous auth
配置rsyslog记录ldap服务日志:
[root@etiantian openldap]# cp /etc/rsyslog.conf /etc/rsyslog.conf.ori.`date +%F%T`
[root@etiantian openldap]# ll /etc/rsyslog.conf*
-rw-r--r--. 1 root root 3167 Mar 31 06:46/etc/rsyslog.conf
-rw-r--r--. 1 root root 3167 Jul 24 19:38/etc/rsyslog.conf.ori.2016-07-2419:38:03
[root@etiantian openldap]# vim /etc/rsyslog.conf
[root@etiantian openldap]# echo "#record ldap.log by jowin 2016-07-24" >> /etc/rsyslog.conf
[root@etiantian openldap]# echo "local4.* /var/log/ldap.log" >> /etc/rsyslog.conf
[root@etiantian openldap]# tail -2/etc/rsyslog.conf
#record ldap.log by jowin 2016-07-24
local4.* /var/log/ldap.log
[root@etiantian openldap]# service rsyslog restart
Shutting down system logger: [ OK ]
Starting system logger: [ OK ]
配置ldap数据库路径:
[root@etiantian openldap]# cp /usr/share/openldap-servers/DB_CONFIG.example /var/lib/ldap/DB_CONFIG
[root@etiantian openldap]# chown ldap.ldap /var/lib/ldap/DB_CONFIG
[root@etiantian openldap]# chmod 700 /var/lib/ldap/
[root@etiantian openldap]# ll !$
ll /var/lib/ldap/
total 4
-rw-r--r--. 1 ldap ldap 845 Jul 24 19:55DB_CONFIG
[root@etiantian openldap]# slaptest -u #(检测配置是否成功)
config file testing succeeded
[root@etiantian openldap]# pwd
/etc/openldap
[root@etiantian openldap]# ll slapd.d/
total 8
drwx------. 3 ldap ldap 4096 Jul 19 00:48cn=config
-rw-------. 1 ldap ldap 1281 Jul 19 00:48cn=config.ldif
[root@etiantian openldap]# rm -rf /etc/openldap/slapd.d/* #(将此目录下默认的配置文件删除,使用/etc/openldap/slapd.conf重新生成2.4版本的配置文件,若不重新生成在ldapsearch时会报错ldap_bind: Invalid credentials (49))
[root@etiantian openldap]# slaptest -f /etc/openldap/slapd.conf -F /etc/openldap/slapd.d #(若此步骤生成时出错,#chown -Rldap.ldap /var/lib/ldap,#chown -R ldap.ldap /etc/openldap/slapd.d/,在/var/lib/ldap/下运行#db_recover并删除alock,启动slapd再次生成)
579584fe bdb_monitor_db_open: monitoringdisabled; configure monitor database to enable
config file testing succeeded
[root@etiantian openldap]# chown -R ldap.ldap /etc/openldap/slapd.d/
[root@etiantian openldap]# service slapd start #(rhel6的OpenLDAP版本为2.4.40,rhel5.8中的openldap版本启动使用#service ldap start)
Starting slapd: [ OK ]
[root@etiantian openldap]# slapd -V
@(#) $OpenLDAP: slapd 2.4.40 (May 10 201623:30:49) $
mockbuild@worker1.bsys.centos.org:/builddir/build/BUILD/openldap-2.4.40/openldap-2.4.40/build-servers/servers/slapd
[root@etiantian openldap]# lsof -i :389 #(默认port389,ldaps加密后的port636)
COMMAND PID USER FD TYPE DEVICE SIZE/OFF NODE NAME
slapd 36097 ldap 7u IPv4 684359 0t0 TCP *:ldap (LISTEN)
slapd 36097 ldap 8u IPv6 684360 0t0 TCP *:ldap (LISTEN)
[root@etiantian openldap]# ps aux | grepldap
ldap 36097 0.0 7.3 498712 16780 ? Ssl 19:59 0:00 /usr/sbin/slapd-h ldap:/// ldapi:/// -u ldap
root 36125 0.0 0.3 103264 832 pts/0 S+ 20:03 0:00 grep ldap
[root@etiantian openldap]# chkconfig slapdon
[root@etiantian openldap]# chkconfig --listslapd
slapd 0:off 1:off 2:on 3:on 4:on 5:on 6:off
[root@etiantian openldap]# tail/var/log/ldap.log
……
[root@etiantian openldap]# rpm -q openldap-clients
openldap-clients-2.4.40-12.el6.x86_64
[root@etiantian openldap]# ldap<TAB>
ldapadd ldapcompare ldapdelete ldapexop ldapmodify ldapmodrdn ldappasswd ldapsearch ldapurl ldapwhoami
[root@etiantian openldap]# ldapsearch -LLL -W -x -H ldap://etiantian.org -D "cn=admin,dc=etiantian,dc=org" -b "dc=etiantian,dc=org" "(uid=*)" #(No such object表示数据库没有内容,正常)
Enter LDAP Password:
No such object (32)
在ldap-master中添加数据:
方1、编辑配置文件*.ldif并导入数据,此方法理解较复杂,但操作简单,不适合初学者;
方2、根据系统用户及ldap自带的脚本初始化数据;
方3、通过ldap客户端工具来初始化数据(此处是web程序);
举例(方2):
[root@etiantian openldap]# yum -y install migrationtools
[root@etiantian openldap]# rpm -qlmigrationtools
……
/usr/share/migrationtools/migrate_common.ph
……
[root@etiantian openldap]# groupadd -g 5000 test
[root@etiantian openldap]# useradd -u 5000 -g 5000 test
[root@etiantian openldap]# echo test | passwd --stdin test
Changing password for user test.
passwd: all authentication tokens updatedsuccessfully.
[root@etiantian openldap]# grep test /etc/passwd > passwd.in
[root@etiantian openldap]# grep test /etc/group > group.in
[root@etiantian openldap]# cp/usr/share/migrationtools/migrate_common.ph/usr/share/migrationtools/migrate_common.ph.bakup
[root@etiantian openldap]# vim /usr/share/migrationtools/migrate_common.ph #(在71行处更改如下两行信息)
#$DEFAULT_MAIL_DOMAIN ="padl.com";
$DEFAULT_MAIL_DOMAIN ="etiantian.org";
#$DEFAULT_BASE ="dc=padl,dc=com";
$DEFAULT_BASE ="dc=etiantian,dc=org";
[root@etiantian openldap]# echo $LC_ALL
[root@etiantian openldap]# export LC_ALL=C
[root@etiantian openldap]# cd/usr/share/migrationtools/
[root@etiantian migrationtools]# ./migrate_base.pl > base.ldif
[root@etiantian migrationtools]# ./migrate_passwd.pl /etc/openldap/passwd.in passwd.ldif
[root@etiantian migrationtools]# ./migrate_group.pl /etc/openldap/group.in group.ldif
[root@etiantian migrationtools]# ldapadd --help
usage: ldapadd [options]
Thelist of desired operations are read from stdin or from the file
specifiedby "-f file".
-f file read operations from `file'
-D binddn bind DN
-H URI LDAP Uniform Resource Identifier(s)
-w passwd bind password (for simple authentication)
-x Simple authentication
[root@etiantian migrationtools]# ldapadd -w oldboy -x -H ldap://127.0.0.1 -D "cn=admin,dc=etiantian,dc=org" -f base.ldif #(-w不交互直接指定密码,类似mysql的-p)
adding new entry "dc=etiantian,dc=org"
adding new entry"ou=Hosts,dc=etiantian,dc=org"
adding new entry"ou=Rpc,dc=etiantian,dc=org"
adding new entry"ou=Services,dc=etiantian,dc=org"
adding new entry"nisMapName=netgroup.byuser,dc=etiantian,dc=org"
adding new entry "ou=Mounts,dc=etiantian,dc=org"
adding new entry"ou=Networks,dc=etiantian,dc=org"
adding new entry"ou=People,dc=etiantian,dc=org"
adding new entry"ou=Group,dc=etiantian,dc=org"
adding new entry"ou=Netgroup,dc=etiantian,dc=org"
adding new entry "ou=Protocols,dc=etiantian,dc=org"
adding new entry"ou=Aliases,dc=etiantian,dc=org"
adding new entry"nisMapName=netgroup.byhost,dc=etiantian,dc=org"
[root@etiantian migrationtools]# ldapadd -w oldboy -x -H ldap://127.0.0.1 -D "cn=admin,dc=etiantian,dc=org" -f passwd.ldif
adding new entry"uid=test,ou=People,dc=etiantian,dc=org"
[root@etiantian migrationtools]# ldapadd -w oldboy -x -H ldap://127.0.0.1 -D "cn=admin,dc=etiantian,dc=org" -f group.ldif
adding new entry"cn=test,ou=Group,dc=etiantian,dc=org"
[root@etiantian migrationtools]# ldapsearch -LLL -w oldboy -x -H ldap://etiantian.org -D "cn=admin,dc=etiantian,dc=org" -b "dc=etiantian,dc=org" #(查询导入的结果)
……
[root@etiantian migrationtools]# ldapsearch -LLL -w oldboy -x -H ldap://etiantian.org -D "cn=admin,dc=etiantian,dc=org" -b "dc=etiantian,dc=org" > ldap-backup.ldif #(将查询结果导出即是备份,最好将base和用户分开存放)
[root@etiantian openldap]# ldapdelete -x -D "cn=admin,dc=etiantian,dc=org" -w oldboy "uid=test,ou=People,dc=etiantian,dc=org" #(使用ldapdelete可删除ldapsearch查询出的任一条目)
注:
[root@etiantian ~]# ldapsearch --help
ldapsearch: invalid option -- '-'
ldapsearch: unrecognized option --
usage: ldapsearch [options] [filter[attributes...]]
where:
filter RFC 4515 compliant LDAPsearch filter
attributes whitespace-separatedlist of attribute descriptions
which may include:
1.1 no attributes
* all user attributes
+ all operational attributes
Search options:
-LLL print responses in LDIFformat without comments
-h host LDAP server
-H URI LDAP Uniform ResourceIdentifier(s)
-x Simple authentication
-w passwd bind password (for simpleauthentication)
-D binddn bind DN
-b basedn base dn for search
为ldap-master配置web管理接口:
http://www.ldap-account-manager.org/
ldap客户端管理接口很多,有b/s架构的,有c/s架构的,现以b/s架构的ldap-accout-manager-3.7.tar.gz说明;
[root@etiantian openldap]# yum -y install httpd php php-ldap php-gd
[root@etiantian openldap]# rpm -q httpd php php-ldap php-gd
httpd-2.2.15-54.el6.centos.x86_64
php-5.3.3-47.el6.x86_64
php-ldap-5.3.3-47.el6.x86_64
php-gd-5.3.3-47.el6.x86_64
[root@etiantian openldap]# cd /var/www/html
[root@etiantian html]# rz -E
rz waiting to receive.
[root@etiantian html]# tar xf ldap-account-manager-3.7.tar.gz
[root@etiantian html]# mv ldap-account-manager-3.7 ldap
[root@etiantian html]# cd ldap/config
[root@etiantian config]# cp config.cfg.sample config.cfg
[root@etiantian config]# cp lam.conf_sample lam.conf
[root@etiantian config]# vim lam.conf
:%s/cn=Manager/cn=admin/g
:%s/dc=my-domain/dc=etiantian/g
:%s/dc=com/dc=org/g
[root@etiantian config]# chown -R apache.apache /var/www/html/ldap
[root@etiantian config]# service httpdrestart
Stopping httpd: [ OK ]
Starting httpd: [ OK ]
在win的浏览器上http://10.96.20.113/ldap
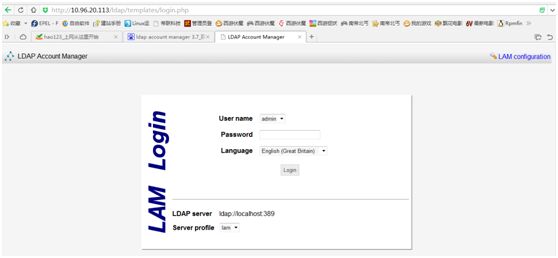
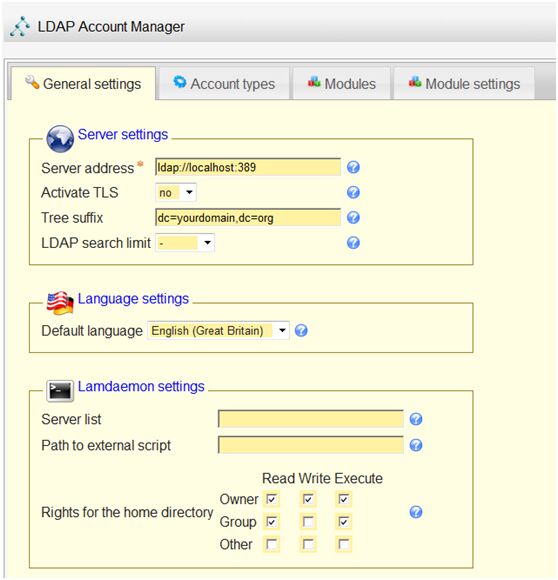
点击右上角LAM configuration-->Edit server profiles或Edit generalsetting(此处密码不是ldap管理员的密码,而是client软件的密码默认为lam)


点帮助后显示如下

输入密码lam进入后,可设置如下信息,此处改语言为中文,改进入此处密码为123456-->save
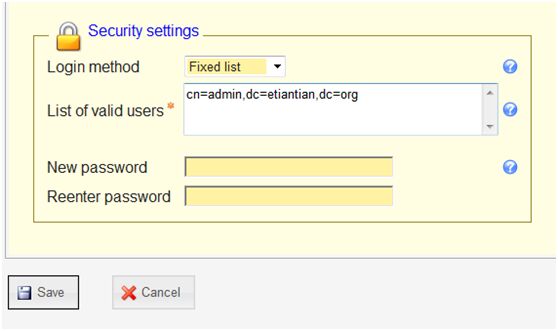
回到主页,进入管理员admin,密码oldboy(前面用slappasswd 命令生成的密码)-->登录-->建立(初始化ldap数据库的域)
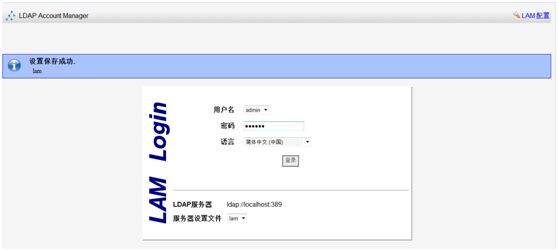

经过使用,发现360浏览器不能很好的支持此网页程序(不能很友好的显示,点新用户无反应等),换google浏览器很好
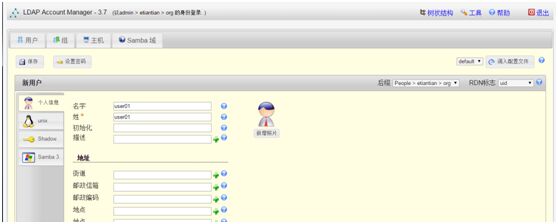
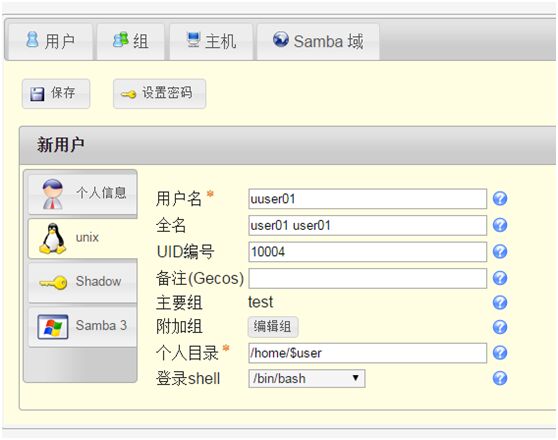
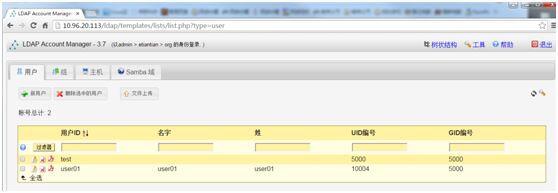
点用户-->新用户-->在个人信息处,名字和姓都填user01-->点unix,输入如下信息-->点设置密码-->确定-->保存
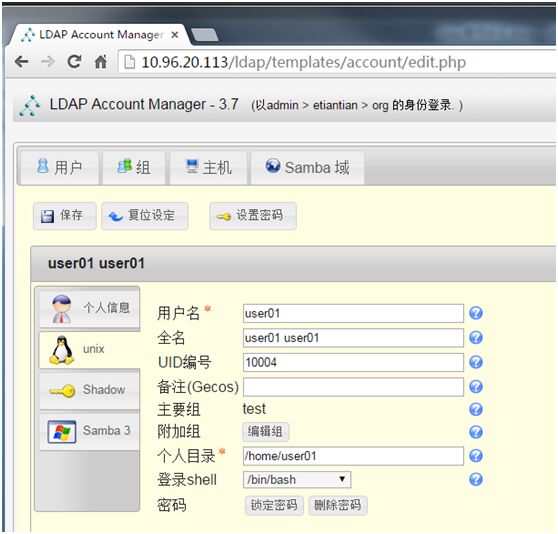
在server-side查询,最后有刚添加的用户:
[root@etiantian config]# ldapsearch -LLL -w oldboy -x -H ldap://etiantian.org -D "cn=admin,dc=etiantian,dc=org" -b "dc=etiantian,dc=org""(uid=*)"
dn: uid=test,ou=People,dc=etiantian,dc=org
uid: test
cn: test
objectClass: account
objectClass: posixAccount
objectClass: top
objectClass: shadowAccount
userPassword::e2NyeXB0fSQxJHB5ZVpmdUJXJHEuWFc2d3Q5T2FsNmQ2QkVGeW51OS4=
shadowLastChange: 17007
shadowMin: 0
shadowMax: 99999
shadowWarning: 7
loginShell: /bin/bash
uidNumber: 5000
gidNumber: 5000
homeDirectory: /home/test
dn:uid=user01,ou=People,dc=etiantian,dc=org
objectClass: posixAccount
objectClass: inetOrgPerson
objectClass: organizationalPerson
objectClass: person
loginShell: /bin/bash
cn: user01 user01
uidNumber: 10004
gidNumber: 5000
sn: user01
givenName: user01
userPassword::e1NTSEF9c0tMVGpDVGdPT0ROMzY2VHA1V0FTQ3dRV1B4a3ZrQkQ=
uid: user01
homeDirectory: /home/user01
案例:
配置SVN+SASL通过ldap进行身份验证:
SASL(simpleauthentication and security layer,是一种用来扩充C/S模式验证能力的机制,sasl是一个胶合库glue,通过这个库把应用层与形式多样的认证系统整合在一起,类似PAM,PAM是认证方式(决定什么人可访问什么服务),而SASL是认证过程,侧重于信任建立的过程,这个过程可以调用PAM来建立信任关系,具体认证交给SASL库,SASL会根据相应的认证机制来完成验证功能,默认rhel环境会安装cyrus-sasl包);
[root@etiantian ~]# rpm -qa sasl
[root@etiantian ~]# rpm -qa | grep sasl
cyrus-sasl-devel-2.1.23-13.el6_3.1.x86_64
cyrus-sasl-plain-2.1.23-13.el6_3.1.x86_64
cyrus-sasl-md5-2.1.23-13.el6_3.1.x86_64
cyrus-sasl-lib-2.1.23-13.el6_3.1.x86_64
cyrus-sasl-2.1.23-13.el6_3.1.x86_64
[root@etiantian ~]# yum -y install *sasl*
……
[root@etiantian ~]#saslauthd -v #(当前可用的密码验证方法)
saslauthd 2.1.23
authentication mechanisms: getpwent kerberos5 pam rimap shadow ldap
[root@etiantian ~]# grep MECH /etc/sysconfig/saslauthd #(当前验证方式为pam)
MECH=pam
# Options sent to the saslauthd. If theMECH is other than "pam" uncomment the next line.
[root@etiantian ~]# sed -i 's#MECH=pam#MECH=shadow#g' /etc/sysconfig/saslauthd #(先更改为本地认证方式,并测试是否成功,再切换至ldap)
[root@etiantian ~]# grep MECH !$
grep MECH /etc/sysconfig/saslauthd
MECH=shadow
# Options sent to the saslauthd. If theMECH is other than "pam" uncomment the next line.
[root@etiantian ~]# service saslauthd restart
Stopping saslauthd: [FAILED]
Starting saslauthd: [ OK ]
[root@etiantian ~]# ps aux | grep saslauthd
root 38257 0.0 0.4 66384 960 ? Ss 03:39 0:00 /usr/sbin/saslauthd-m /var/run/saslauthd -a shadow
root 38259 0.0 0.3 66384 692 ? S 03:39 0:00 /usr/sbin/saslauthd-m /var/run/saslauthd -a shadow
root 38260 0.0 0.3 66384 692 ? S 03:39 0:00 /usr/sbin/saslauthd-m /var/run/saslauthd -a shadow
root 38261 0.0 0.3 66384 692 ? S 03:39 0:00 /usr/sbin/saslauthd-m /var/run/saslauthd -a shadow
root 38262 0.0 0.3 66384 692 ? S 03:39 0:00 /usr/sbin/saslauthd-m /var/run/saslauthd -a shadow
root 38264 0.0 0.2 6392 668 pts/0 S+ 03:39 0:00 grep saslauthd
[root@etiantian ~]# testsaslauthd -utest -ptest #(检验本地认证)
0: OK "Success."
[root@etiantian ~]# testsaslauthd -uuser01 -puser01 #(user01为ldap用户,认证失败)
0: NO "authentication failed"
[root@etiantian ~]# grep user01 /etc/passwd
[root@etiantian ~]# grep test /etc/passwd
test:x:5000:5000::/home/test:/bin/bash
[root@etiantian ~]#sed -i 's#MECH=shadow#MECH=ldap#g' /etc/sysconfig/saslauthd
[root@etiantian ~]#grep 'MECH=' /etc/sysconfig/saslauthd
MECH=ldap
[root@etiantian ~]# man saslauthd #(搜索ldap,有如下帮助信息)
Authenticate against an ldap server. The ldap configuration parameters are readfrom /etc/saslauthd.conf. The location of this file can be changed withthe -O parameter. See the LDAP_SASLAUTHD file included with the distributionfor the list of available parameters.
[root@etiantian ~]# vim /etc/saslauthd.conf #(创建并编辑此文件)
ldap_servers:ldap://etiantian.org/
ldap_bind_dn:cn=admin,dc=etiantian,dc=org
ldap_bind_pw: oldboy
ldap_search_base:ou=People,dc=etiantian,dc=org
ldap_filter: uid=%U
ldap_password_attr:userPassword
[root@etiantian ~]# service saslauthd restart
Stopping saslauthd: [ OK ]
Starting saslauthd: [ OK ]
[root@etiantian ~]# testsaslauthd -uuser01 -puser01
0: OK "Success."
[root@etiantian ~]# testsaslauthd -utest -ptest
0: OK "Success."
安装配置启动SVN(详见《二十一SVN》)
[root@etiantian ~]# svnserve -d -r/application/svndata/
[root@etiantian ~]# lsof -i :3690
COMMAND PID USER FD TYPE DEVICE SIZE/OFF NODE NAME
svnserve 39169 root 3u IPv4 786445 0t0 TCP *:svn (LISTEN)
[root@etiantian ~]# vim /etc/sasl2/svn.conf #(编辑并创建此目录下svn.conf文件)
pwcheck_method: saslauthd
mech_list: PLAIN LOGIN
[root@etiantian ~]# cd/application/svndata/sadoc/conf/
[root@etiantian conf]# vim svnserve.conf #(配置指定项目下的svnserve.conf该文件,使之使用sasl认证,注意打开的参数要顶格)
[sasl]
use-sasl = true
[root@etiantian conf]# vim /application/svnpasswd/authz #(要在svn的authz文件中授权,添加如下信息,使之可访问svn中指定的项目,passwd文件中不再需要添加用户了因为走的是sasl认证)
[groups]
ldap_user = test,user01
[sadoc:/]
@ldap_user = rw
[/]
@ldap_user = r
[root@etiantian conf]# pkill svnserve
[root@etiantian conf]# lsof -i :3690
[root@etiantian conf]# svnserve -d -r /application/svndata
[root@etiantian conf]# lsof -i :3690
COMMAND PID USER FD TYPE DEVICE SIZE/OFF NODE NAME
svnserve 39209 root 3u IPv4 789136 0t0 TCP *:svn (LISTEN)
[root@etiantian conf]# ll /tmp
total 24
drwx------. 2 chai chai 4096 Mar 30 22:52pulse-MUK7gfWor9cA
drwxrwxrwt. 2 root root 4096 Mar 31 06:51VMwareDnD
drwxr-xr-x. 3 root root 4096 Jul 13 20:43www
-rw-------. 1 root root 977 Jul 24 23:47yum_save_tx-2016-07-24-23-47dRJqm_.yumtx
-rw-------. 1 root root 4431 Jul 24 23:51yum_save_tx-2016-07-24-23-51LOK3bk.yumtx
[root@etiantian conf]# svn checkout svn://10.96.20.113/sadoc /tmp --username test --password test
-----------------------------------------------------------------------
ATTENTION! Your password for authentication realm:
<svn://10.96.20.113:3690> fa820bcd-c61a-46d9-beed-a63b9ef0bbc6
can only be stored to diskunencrypted! You are advised toconfigure
your system so that Subversion can storepasswords encrypted, if
possible. See the documentation for details.
You can avoid future appearances of thiswarning by setting the value
of the 'store-plaintext-passwords' optionto either 'yes' or 'no' in
'/root/.subversion/servers'.
-----------------------------------------------------------------------
Store password unencrypted (yes/no)? yes
A /tmp/2.txt
A /tmp/b.txt
A /tmp/test2.txt
A /tmp/3.txt
A /tmp/c.txt
A /tmp/d.txt
A /tmp/rsync.txt
A /tmp/test.txt
A /tmp/1.txt
A /tmp/a.txt
Checked out revision 21.
[root@etiantian conf]# ll /tmp
total 24
-rw-r--r--. 1 root root 0 Jul 25 19:07 1.txt
-rw-r--r--. 1 root root 0 Jul 25 19:07 2.txt
-rw-r--r--. 1 root root 0 Jul 25 19:07 3.txt
-rw-r--r--. 1 root root 0 Jul 25 19:07 a.txt
-rw-r--r--. 1 root root 0 Jul 25 19:07 b.txt
-rw-r--r--. 1 root root 0 Jul 25 19:07 c.txt
-rw-r--r--. 1 root root 0 Jul 25 19:07 d.txt
drwx------. 2 chai chai 4096 Mar 30 22:52pulse-MUK7gfWor9cA
-rw-r--r--. 1 root root 0 Jul 25 19:07 rsync.txt
-rw-r--r--. 1 root root 0 Jul 25 19:07 test2.txt
-rw-r--r--. 1 root root 0 Jul 25 19:07 test.txt
drwxrwxrwt. 2 root root 4096 Mar 31 06:51VMwareDnD
drwxr-xr-x. 3 root root 4096 Jul 13 20:43www
-rw-------. 1 root root 977 Jul 24 23:47yum_save_tx-2016-07-24-23-47dRJqm_.yumtx
-rw-------. 1 root root 4431 Jul 24 23:51yum_save_tx-2016-07-24-23-51LOK3bk.yumtx
实现open***、samba、vsftpd、redmine、Mantis、httpd、git等应用软件通过ldap权限认证;
实现acitve directory与ldap同步
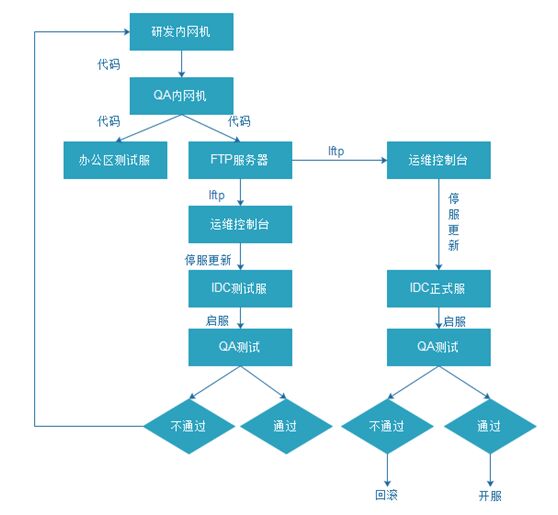
补充svn,某公司网页游戏更新流程:
学习openldap02的更多相关文章
- 从直播编程到直播教育:LiveEdu.tv开启多元化的在线学习直播时代
2015年9月,一个叫Livecoding.tv的网站在互联网上引起了编程界的注意.缘于Pingwest品玩的一位编辑在上网时无意中发现了这个网站,并写了一篇文章<一个比直播睡觉更奇怪的网站:直 ...
- Angular2学习笔记(1)
Angular2学习笔记(1) 1. 写在前面 之前基于Electron写过一个Markdown编辑器.就其功能而言,主要功能已经实现,一些小的不影响使用的功能由于时间关系还没有完成:但就代码而言,之 ...
- ABP入门系列(1)——学习Abp框架之实操演练
作为.Net工地搬砖长工一名,一直致力于挖坑(Bug)填坑(Debug),但技术却不见长进.也曾热情于新技术的学习,憧憬过成为技术大拿.从前端到后端,从bootstrap到javascript,从py ...
- 消息队列——RabbitMQ学习笔记
消息队列--RabbitMQ学习笔记 1. 写在前面 昨天简单学习了一个消息队列项目--RabbitMQ,今天趁热打铁,将学到的东西记录下来. 学习的资料主要是官网给出的6个基本的消息发送/接收模型, ...
- js学习笔记:webpack基础入门(一)
之前听说过webpack,今天想正式的接触一下,先跟着webpack的官方用户指南走: 在这里有: 如何安装webpack 如何使用webpack 如何使用loader 如何使用webpack的开发者 ...
- Unity3d学习 制作地形
这周学习了如何在unity中制作地形,就是在一个Terrain的对象上盖几座小山,在山底种几棵树,那就讲一下如何完成上述内容. 1.在新键得项目的游戏的Hierarchy目录中新键一个Terrain对 ...
- 《Django By Example》第四章 中文 翻译 (个人学习,渣翻)
书籍出处:https://www.packtpub.com/web-development/django-example 原作者:Antonio Melé (译者注:祝大家新年快乐,这次带来<D ...
- 菜鸟Python学习笔记第一天:关于一些函数库的使用
2017年1月3日 星期二 大一学习一门新的计算机语言真的很难,有时候连函数拼写出错查错都能查半天,没办法,谁让我英语太渣. 关于计算机语言的学习我想还是从C语言学习开始为好,Python有很多语言的 ...
- 多线程爬坑之路-学习多线程需要来了解哪些东西?(concurrent并发包的数据结构和线程池,Locks锁,Atomic原子类)
前言:刚学习了一段机器学习,最近需要重构一个java项目,又赶过来看java.大多是线程代码,没办法,那时候总觉得多线程是个很难的部分很少用到,所以一直没下决定去啃,那些年留下的坑,总是得自己跳进去填 ...
随机推荐
- Excel入门简单,想要进阶实属不易?推荐这个数据分析工具
大数据时代,数据分析在我们的日常生活和工作中应用越来越广泛,不管是公司的行政.人事.销售.运营还是专业的数据分析师,都经常需要通过数据来发现业务问题,因此数据分析正逐渐成为职场通用能力. 说到数据分析 ...
- PCL库在Linux环境下的编译安装
PCL库在Linux环境下的编译安装 PCL库的源码库:https://github.com/PointCloudLibrary/pcl 下载完了之后解压下来 编译库的几个步骤 mkdir build ...
- [炼丹术]DeepLabv3+训练模型学习总结
DeepLabv3+训练模型学习总结 一.DeepLabs3+介绍 DeepLabv3是一种语义分割架构,它在DeepLabv2的基础上进行了一些修改.为了处理在多个尺度上分割对象的问题,设计了在级联 ...
- lvs-安装以及脚本
1.dr 采用修改mac 地址方式,使用二层网络mac路由.所以rs调度的vip 和 后端的realip必须是同一网段. 注意事项:真是服务器上本地lo网卡需要配置为和rs调度的vip 一样. 这样真 ...
- ElasticSearch内部基于_version乐观锁控制机制
1.悲观锁与乐观锁机制 为控制并发问题,我们通常采用锁机制.分为悲观锁和乐观锁两种机制. 悲观锁:很悲观,所有情况都上锁.此时只有一个线程可以操作数据.具体例子为数据库中的行级锁.表级锁.读锁.写锁等 ...
- springboot----二、Hello,SpringBoot!
二.Hello,SpringBoot! 2.1.环境搭建 java version 1.8 maven springboot 最新版 开发工具:idea 2.2.创建基础项目说明 Spring官方提供 ...
- Flutter的强制自我审查
在<如何做好 Code Review>中我论述过代码审查对于保证代码品质的重要性,最近开始采用Git Hooks的方式为Flutter项目增加提交前的强制自我审查.这样做的好处在于将机械化 ...
- oop简易封装增删改查
//注意要先引入含有封装类的文件文件:如下: <?phpclass Db{ public $host='127.0.0.1'; public $user='root'; public $pass ...
- centos7安装mysql(完整)
安装包下载并上传到Linux系统中 官网5.7版本:https://cdn.mysql.com//Downloads/MySQL-5.7/mysql-5.7.29-1.el7.x86_64.rpm-b ...
- 使用WebService的优点
1.支持跨平台,跨语言,远程调用 WSDL:web service definition language 直译 webservice定义语言 对应一种类型的文件.wsdl2.定义了web servi ...
