drf-三大认证源码分析、基于APIView编写分页、异常处理
1.权限源码分析
1.APIView源码497行:self.initial(request, *args, **kwargs)中进行了三大认证。

2.在initial的源码中,以下三行代码是进行三大认证的代码:

        self.perform_authentication(request)

        self.check_permissions(request)

        self.check_throttles(request)

        # 按照顺序从上往下执行,先执行认证,再执行权限认证,最后执行频率认证。三大认证走不完视图类也不会走。

self.check_permissions(request)进行了权限认证,依然是在APIView中找到了check_permissions方法:

   def check_permissions(self, request):

        for permission in self.get_permissions():

				...

发现有一个get_permissions()方法。

3.依然是在APIView中,找到了get_permissions()方法:

    def get_permissions(self):

        return [permission() for permission in self.permission_classes]

self是视图类的对象,视图类BookView中我们添加权限认证时已经正好添加了permission_classes。并且permission_classes可以有多个值,返回值permission()就是一个个权限类的对象。

4.回到check_permissions:

    def check_permissions(self, request):

		# 此时的self.get_permissions()就是一个个权限类对象,用permission进行for循环

        for permission in self.get_permissions():

      # 用permission点方法has_permission(),这也是我们重写has_permission()方法需要返回布尔值的原因。

            if not permission.has_permission(request, self):

      # 如果has_permission返回了None,权限类对象点方法permission_denied()时权限认证就会停止。所以只要有一个权限类认证不通过,那么就无法通过。

                self.permission_denied(

                    request,

       # permission_denied方法有属性messgae和code,message就是在前端提示的detail错误信息,code是提示码

                    message=getattr(permission, 'message', None),

                    code=getattr(permission, 'code', None)

                )

"""

总结:

	-APIView---dispatch----》initial---》倒数第二行---》self.check_permissions(request)

    	里面取出配置在视图类上的权限类,实例化得到对象,一个个执行对象的has_permission方法,如果返回False,就直接结束,不再继续往下执行,权限就认证通过

    -如果视图类上不配做权限类:permission_classes = [CommonPermission],会使用配置文件的api_settings.DEFAULT_PERMISSION_CLASSES

    优先使用项目配置文件,其次使用drf内置配置文件

"""
2.认证源码分析
1.和之前一样,APIView中497行会执行三大认证,进入到initial源码中:

        self.perform_authentication(request)

        self.check_permissions(request)

        self.check_throttles(request)

进入到perform_authentication()方法。

2.perform_authentication()代码如下:

    def perform_authentication(self, request):

        request.user

此时用ruquest点数据user,此时需要进入到类Request中查找user的来源。

"""

1.user代码如下,可以看出user是被伪装成数据的方法:

    @property

    def user(self):

        if not hasattr(self, '_user'):

            with wrap_attributeerrors():

                self._authenticate()

        # self是Request的对象,现在要从Request中找_authenticate()方法

        return self._user

2._authenticate()方法代码如下:

    def _authenticate(self):

        """

        Attempt to authenticate the request using each authentication instance

        in turn.

        """

        for authenticator in self.authenticators:

            try:

                user_auth_tuple = authenticator.authenticate(self)

            except exceptions.APIException:

                self._not_authenticated()

                raise

            if user_auth_tuple is not None:

                self._authenticator = authenticator

                self.user, self.auth = user_auth_tuple

                return

        self._not_authenticated()

3.上述for循环self.authenticators,点进self.authenticators,

class Request:

    def __init__(self, request, parsers=None, authenticators=None,

                 negotiator=None, parser_context=None):

        self.authenticators = authenticators or ()

说明authenticators属性是在类Request产生对象时生成,

"""

3.在APIView中391行中,包含了新的request:

   def initialize_request(self, request, *args, **kwargs):

        parser_context = self.get_parser_context(request)

        return Request(

            request,

            parsers=self.get_parsers(),

            authenticators=self.get_authenticators(),

            # authenticators这时候传进去了

            negotiator=self.get_content_negotiator(),

            parser_context=parser_context

        )

4.self.get_authenticators()是生成authenticators这时候传进去了属性,点进去方法get_authenticators():

    def get_authenticators(self):

        return [auth() for auth in self.authentication_classes]

发现get_authenticators()方法的返回值是视图类中一个个认证类。

5.再回到类Request中的方法_authenticate():

    def _authenticate(self):

        for authenticator in self.authenticators:

            try:

        # self是Request对象,所以此时调用了我们自己定义的认证类中的方法:authenticate(self),并且这里的self是自定义类方法中的参数request:

       # 自定义类方法:def authenticate(self, request):

                user_auth_tuple = authenticator.authenticate(self)

            except exceptions.APIException:

                self._not_authenticated()

                raise

		# 如果拿到的元组不为空,说明在自定义认证类中认证成功,token表中有该字符串,此时直接结束for循环。所以认证类只要有一个类认证成功直接结束。而权限类需要所有的类全部校验完成才算成功。

            if user_auth_tuple is not None:

                self._authenticator = authenticator

                self.user, self.auth = user_auth_tuple

       # 解压赋值:self.user是用户对象(token字符串对应的用户), self.auth是token字符串。此时的self是Request对象,所以拿到的是用户对象。

                return

		# 返回None则继续下一个视图类,所以多个认证类时只需要最后一个认证类返回两个结果就可以,其他的返回None。

        self._not_authenticated()

"""

总结:

	1 配置在视图类上的认证类,会在执行视图类方法之前执行,在权限认证之前执行

    2 自己写的认证类,可以返回两个值或None

    3 后续可以从request.user 取出当前登录用户(前提是你要在认证类中返回)

"""
3.自定义频率类
1.思路:

	1.取出访问者ip

	2.判断当前ip在不在访问字典内,如果不在则添加进去,并且直接返回True,表示第一次访问,在字典里。继续往下走,数据类型按照如下格式:{ip地址:[时间1,时间2,时间3,时间4]}

	3.循环判断当前ip的列表,并且保证列表不为空,并且当前时间减去列表的最后一个时间大于60s,把这种数据pop掉,这样列表中只有60s以内的访问

	4.判断,当列表小于3,说明一分钟以内访问不足三次,把当前时间插入到列表第一个位置,返回True,顺利通过

	5.当大于等于3,说明一分钟内访问超过三次,返回False验证失败

2.代码:

from rest_framework.throttling import BaseThrottle

import time

#

class SuperThrottle(BaseThrottle):

    VISIT_RECODE = {}

    def __init__(self):

        self.history = None

    def allow_request(self, request, view):

        ip = request.META.get('REMOTE_ADDR')

        ctime = time.time()

        if not ip in self.VISIT_RECODE:

            self.VISIT_RECODE[ip] = [ctime,]

        self.history = self.VISIT_RECODE.get(ip,[])

        while self.history and ctime - self.history[-1] > 60:

            self.history.pop()

        if len(self.history) < 4:

            self.history.insert(0,ctime)

            return True

        else:

            return False

	def wait(self):  # 时间提示

        import time

        ctime = time.time()

        return 60 - (ctime - self.history[-1])
4.频率源码分析
1.自定义频率类代码:

from rest_framework.throttling import SimpleRateThrottle

class Mythrottle(SimpleRateThrottle):

    scope = 'zkz'

    def get_cache_key(self, request, view):

        return request.META.get('REMOTE_ADDR')

2.我们首先去Mythrottle的父类当中寻找方法,在类SimpleRateThrottle可以找到该方法:

    def allow_request(self, request, view):

        if self.rate is None:  # rate是一个属性,要去__init__方法中找

            return True

3.同样是在在类SimpleRateThrottle可以找到该方法:

    def __init__(self):

        if not getattr(self, 'rate', None):

            self.rate = self.get_rate()  # get_rate()也是类中的一个方法

        self.num_requests, self.duration = self.parse_rate(self.rate)

4.在类SimpleRateThrottle找get_rate()方法:

    def get_rate(self):

  		# 我们在盘频率类中定义了scope = 'zkz',所以不会报错

        if not getattr(self, 'scope', None):

            msg = ("You must set either `.scope` or `.rate` for '%s' throttle" %

                   self.__class__.__name__)

            raise ImproperlyConfigured(msg)

        try:

      # self是频率类的对象,THROTTLE_RATES同样是类SimpleRateThrottle中的方法

   		# THROTTLE_RATES = api_settings.DEFAULT_THROTTLE_RATES,self.scope = 'zkz',所以self.THROTTLE_RATES[self.scope]相当于settings.py中的REST_FRAMEWORK中的DEFAULT_THROTTLE_RATES['zkz'],self.THROTTLE_RATES[self.scope]得结果是'10/m'。

            return self.THROTTLE_RATES[self.scope]

        except KeyError:

            msg = "No default throttle rate set for '%s' scope" % self.scope

            raise ImproperlyConfigured(msg)

5.回到类SimpleRateThrottle的__init__方法,self.rate = '10/m'。

self.num_requests, self.duration = self.parse_rate(self.rate)。现在寻找parse_rate(self.rate)方法:

    def parse_rate(self, rate):

        # rate有值,不会返回(None, None)

        if rate is None:

            return (None, None)

        # num=10,period=m

        num, period = rate.split('/')

        # 将num转化成整形

        num_requests = int(num)

        # period[0]就是m,所以只要首字母在duration当中,就可以

        duration = {'s': 1, 'm': 60, 'h': 3600, 'd': 86400}[period[0]]

        # return (10,60)

        return (num_requests, duration)

6.再回到类SimpleRateThrottle中的__init__方法:

    def __init__(self):

        if not getattr(self, 'rate', None):

            # 此时self.rate有值,是'10/m'

            self.rate = self.get_rate()

        # 此时self.num_requests是10,self.duration是60

        self.num_requests, self.duration = self.parse_rate(self.rate)

7.再回到allow_request:

   def allow_request(self, request, view):

        if self.rate is None:

            return True

        self.key = self.get_cache_key(request, view)

        if self.key is None:

            return True

		# self.cache.get(self.key, [])是从缓存当中取,取不到就拿一个空列表

        self.history = self.cache.get(self.key, [])

        # 获取当前时间,time=time.time,什么时候加括号什么时候调用

        self.now = self.timer()

		# 列表中的最后一个数字小于当前时间-60s(其他场景是每分钟或者每小时)

        while self.history and self.history[-1] <= self.now - self.duration:

            # 超出每个时间单位的时间,剔除,循环,直到列表中剩下最后一个数据为止

            self.history.pop()

         # self.num_requests是数字限制,就是10,如果在单位时间访问次数大于限制次数,报错。如果小于,则返回True

        if len(self.history) >= self.num_requests:

            return self.throttle_failure()

        return self.throttle_success()

"""

   def throttle_failure(self):

        return False

   def throttle_success(self):

   		# 在列表的最前面插入当前时间

        self.history.insert(0, self.now)

        self.cache.set(self.key, self.history, self.duration)

        return True

"""
5.基于APIView编写分页
views.py:

from .commonLimitOffsetPagination import CommonLimitOffsetPagination

class BookView(ViewSetMixin,APIView):

    def list(self,request):

        books = Book.objects.all()

        paginator = CommonLimitOffsetPagination()

        page = paginator.paginate_queryset(books,request,self)

        if page is not None:

            serializer = BookSerializer(instance=page,many=True)

            return Response({

                'total':paginator.count,

                'next':paginator.get_next_link(),

                'previous':paginator.get_previous_link(),

                'results':serializer.data

            })

commonLimitOffsetPagination.py:

from rest_framework.pagination import LimitOffsetPagination

class CommonLimitOffsetPagination(LimitOffsetPagination):

    default_limit = 3

    limit_query_param = 'limit'

    offset_query_param = 'offset'

    max_limit = 5
6.异常处理
1.在drf中通过如下方式导入drf异常:

from rest_framework.exceptions import APIException

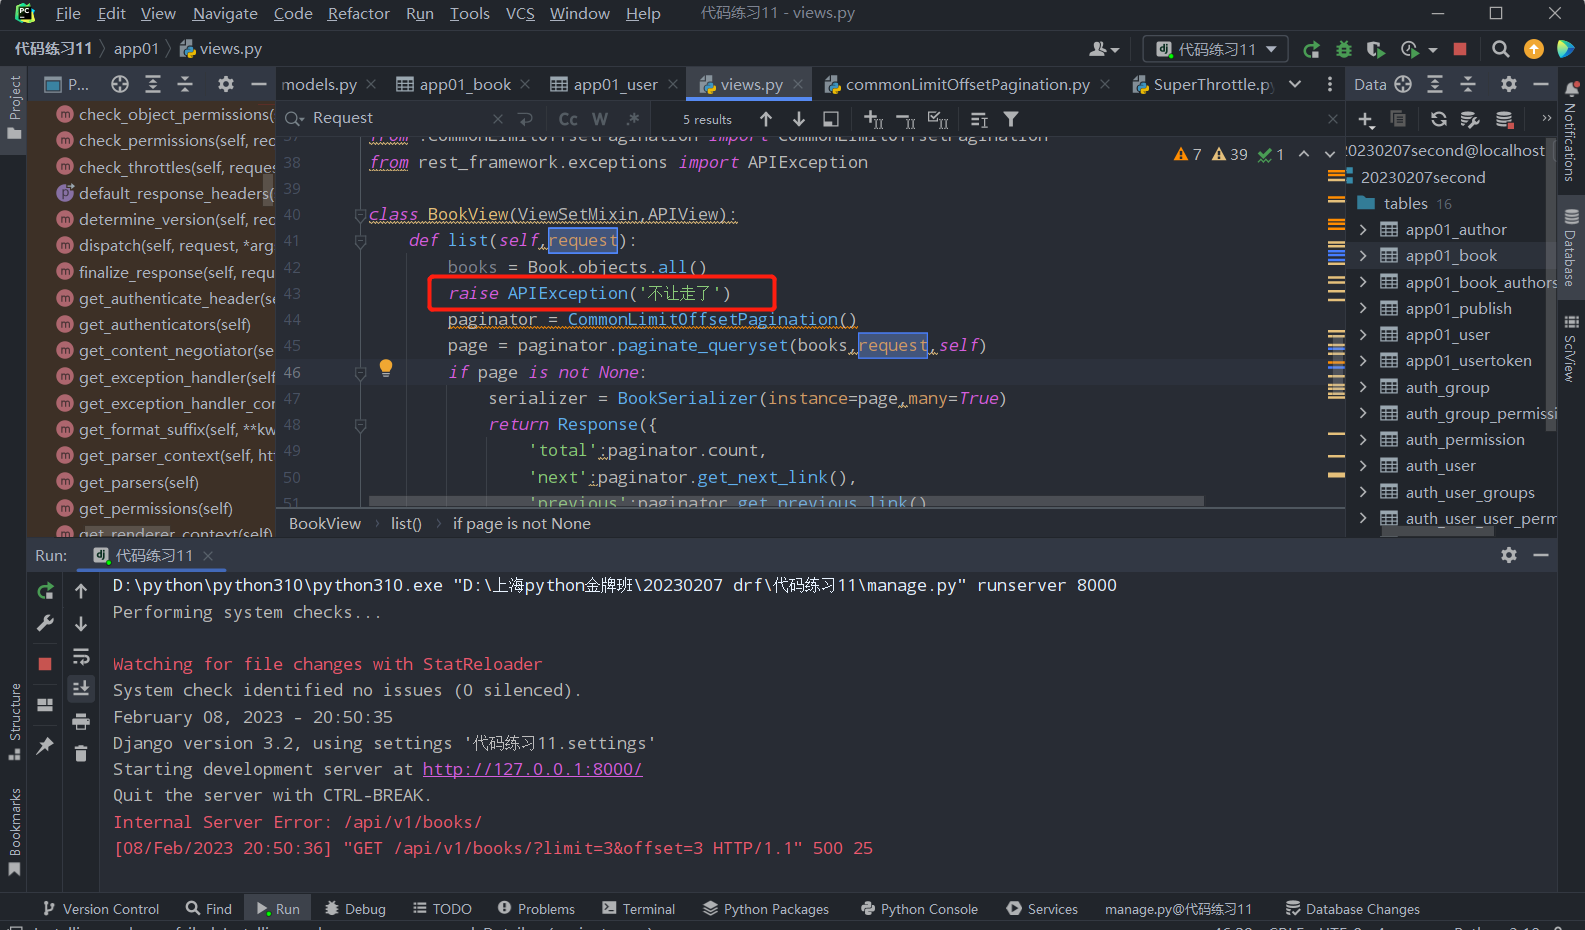
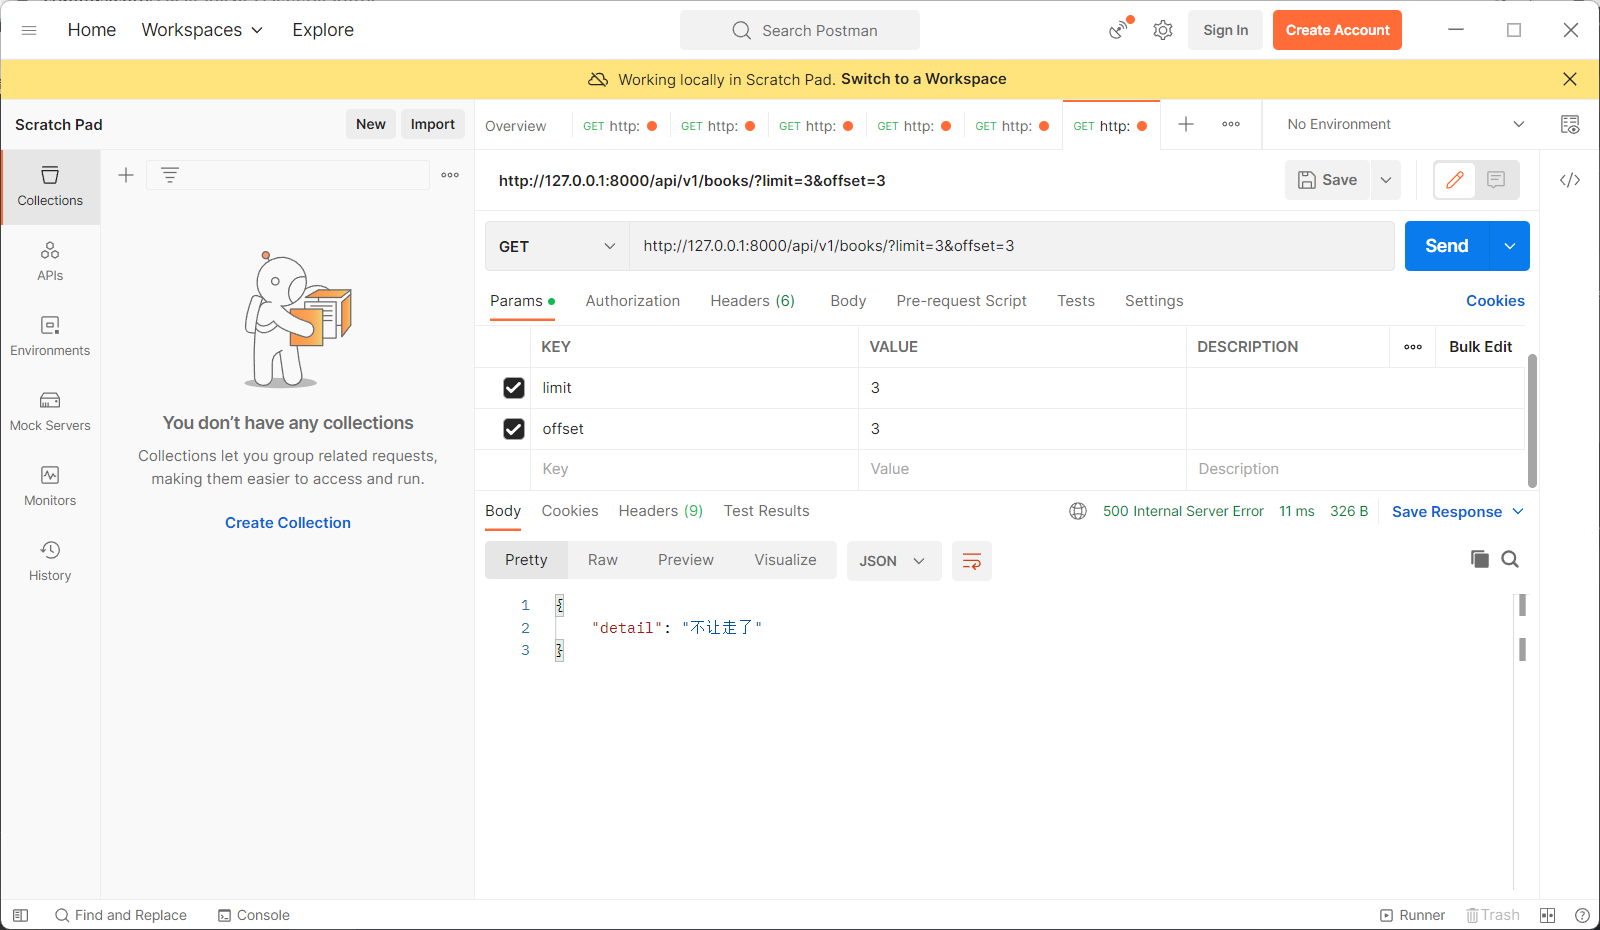
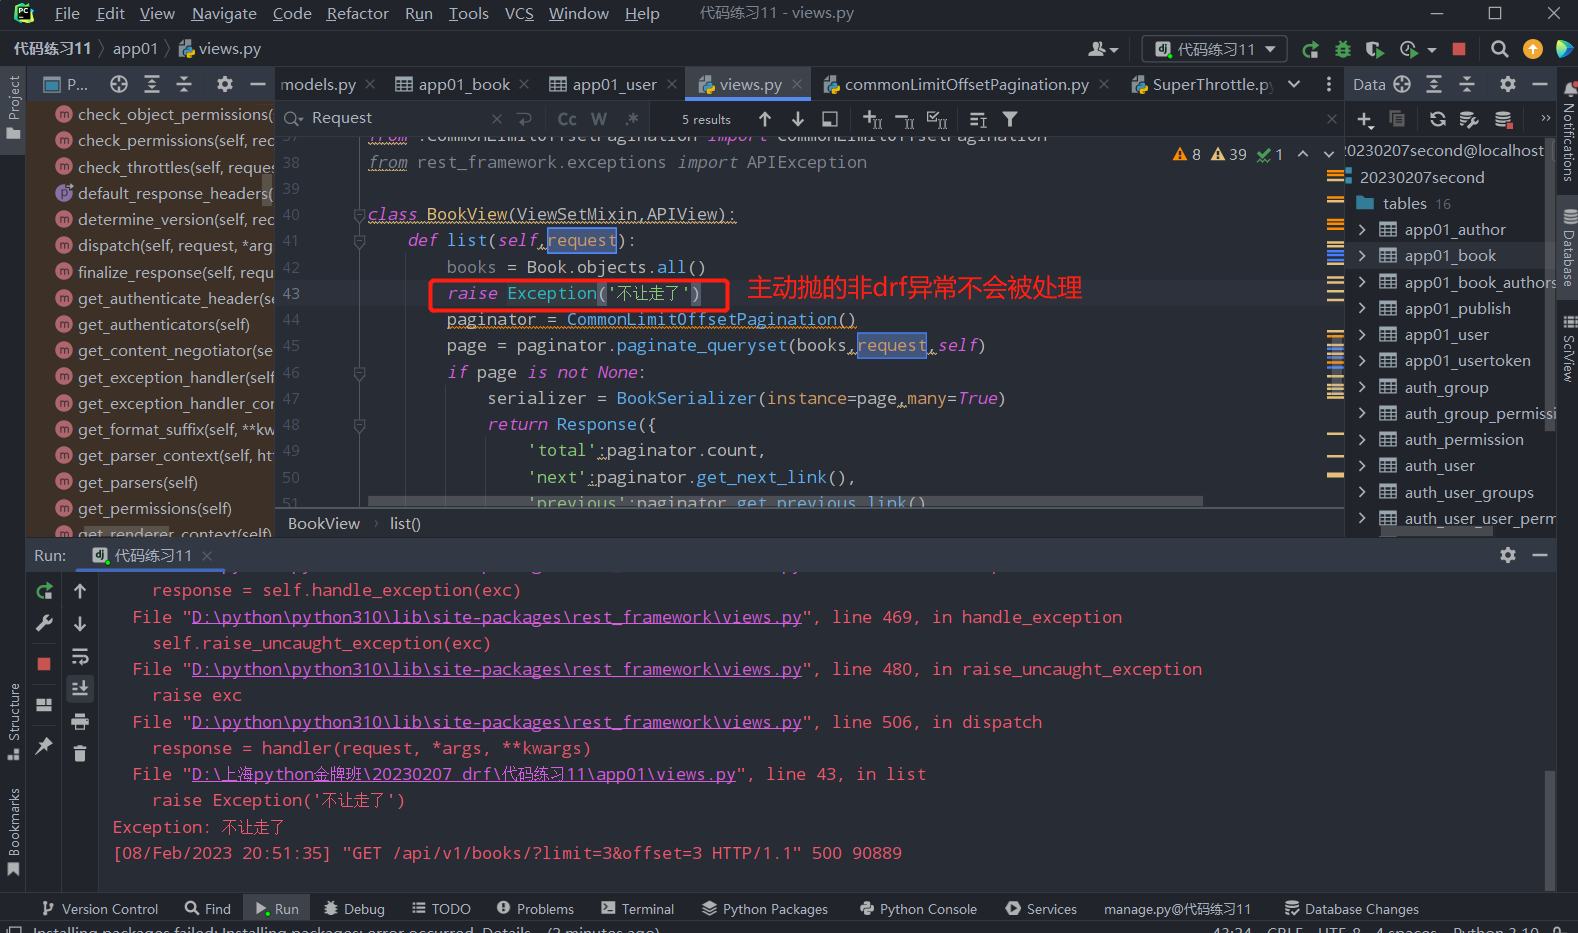
如果我们主动在代码中抛出drf异常,那么前端会处理成json格式,非drf错误不管是主动抛出还是非主动抛出的错误,都无法自动捕获并处理:


2.我们的目标是,不管什么错误(主动还是非主动)都处理成:{"code":999,"msg":"系统错误,请联系管理员"}

3.代码:

# 新建一个py文件

exception_handler.py:

from rest_framework.views import exception_handler

from rest_framework.response import Response

def common_exception_handler(exc, context):

    # 调用函数exception_handler()

    res = exception_handler(exc, context)

    # 如果有值说明是drf错误

    if res:

        res = Response({'code':101,'msg':res.data.get('detail')})

    else:

     # 没有值说明是非drf错误,针对这种错误统一处理,msg也可以直接写死:'系统错误,请联系系统管理员'

        res = Response({'code':102,'msg':str(exc)})

    return res

setting.py:

REST_FRAMEWORK = {

 'EXCEPTION_HANDLER':'app01.exception_handler.common_exception_handler',

}
drf-三大认证源码分析、基于APIView编写分页、异常处理的更多相关文章
- Django drf:序列化增删改查、局部与全局钩子源码流程、认证源码分析、执行流程
一.序列化类的增.删.改.查 用drf的序列化组件 -定义一个类继承class BookSerializer(serializers.Serializer): -写字段,如果不指定source ...
- Django(64)频率认证源码分析与自定义频率认证
前言 有时候我们发送手机验证码,会发现1分钟只能发送1次,这是做了频率限制,限制的时间次数,都由开发者自己决定 频率认证源码分析 def check_throttles(self, request): ...
- AtomicInteger源码分析——基于CAS的乐观锁实现
AtomicInteger源码分析——基于CAS的乐观锁实现 1. 悲观锁与乐观锁 我们都知道,cpu是时分复用的,也就是把cpu的时间片,分配给不同的thread/process轮流执行,时间片与时 ...
- 并发-AtomicInteger源码分析—基于CAS的乐观锁实现
AtomicInteger源码分析—基于CAS的乐观锁实现 参考: http://www.importnew.com/22078.html https://www.cnblogs.com/mantu/ ...
- HashMap 源码分析 基于jdk1.8分析
HashMap 源码分析 基于jdk1.8分析 1:数据结构: transient Node<K,V>[] table; //这里维护了一个 Node的数组结构: 下面看看Node的数 ...
- Spring IoC 源码分析 (基于注解) 之 包扫描
在上篇文章Spring IoC 源码分析 (基于注解) 一我们分析到,我们通过AnnotationConfigApplicationContext类传入一个包路径启动Spring之后,会首先初始化包扫 ...
- Django(50)drf异常模块源码分析
异常模块源码入口 APIView类中dispatch方法中的:response = self.handle_exception(exc) 源码分析 我们点击handle_exception跳转,查看该 ...
- Django-restframework 之认证源码分析
Django-restframework 源码分析之认证 前言 最近学习了 django 的一个 restframework 框架,对于里面的执行流程产生了兴趣,经过昨天一晚上初步搞清楚了执行流程(部 ...
- Django(48)drf请求模块源码分析
前言 APIView中的dispatch是整个请求生命过程的核心方法,包含了请求模块,权限验证,异常模块和响应模块,我们先来介绍请求模块 请求模块:request对象 源码入口 APIView类中di ...
- Django(49)drf解析模块源码分析
前言 上一篇分析了请求模块的源码,如下: def initialize_request(self, request, *args, **kwargs): """ Retu ...
随机推荐
- Python调用golang
有些时候因为效率问题部分代码会 使用Python调用go的编译生成动态链接库go 代码示例//add.gopackage main import "C" //export Addf ...
- 【云原生 · Kubernetes】apiserver高可用
个人名片: 因为云计算成为了监控工程师 个人博客:念舒_C.ying CSDN主页️:念舒_C.ying 7.1 高可用选型 ipvs+keepalived nginx+keepalived hap ...
- 基于python的数学建模---scipy库
instance1: 求解下列线性规划问题 s.t. 代码: from scipy import optimizeimport numpy as npc = np.array([2,3,-5])A ...
- bugku 计算器
打开就一个输入框和验证,尝试后发现输入框限制了位数,这还不简单,F12直接修改表单长度试试 成功得到flag
- thinkphp6文件上传自定义命名规则
think官方自带的命名规则有三种 规则 描述 date 根据日期和微秒数生成 md5 对文件使用md5_file散列生成 sha1 对文件使用sha1_file散列生成 其中md5和sha1规则会自 ...
- Apache手动安装教程及报错解决梳理
操作参考教程:https://www.cnblogs.com/haw2106/p/9839655.html 下载地址(例):wget https://dlcdn.apache.org/httpd/ht ...
- kubernetes CKA题库(附答案)
第一题 RBAC授权问题权重: 4% 设置配置环境:[student@node-1] $ kubectl config use-context k8s Context为部署管道创建一个新的Cluste ...
- Spring面试点汇总
Spring面试点汇总 我们会在这里介绍我所涉及到的Spring相关的面试点内容,本篇内容持续更新 我们会介绍下述Spring的相关面试点: Spring refresh Spring bean Sp ...
- vue中单独封装elementui中的Dialog弹框组件
一.在components文件中新建 弹框组件 <template> <div> <el-dialog title="提示" :visible.syn ...
- 网络监测工具之Zabbix的搭建与测试方法(二)-- SNMP、OID和MIB概述
概念 SNMP是专门设计用于在 IP 网络管理网络节点的一种标准协议,它是一种应用层协议.SNMP使网络管理员能够管理网络效能,发现并解决网络问题以及规划网络增长.通过SNMP接收随机消息(及事件报告 ...
