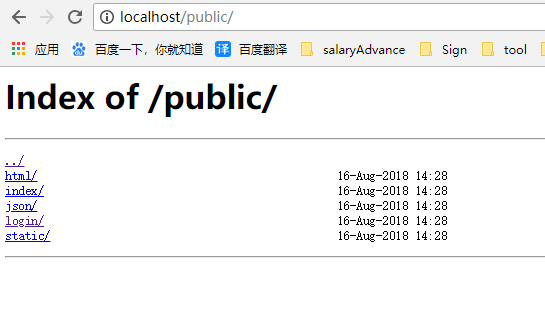
nginx配置文服
修改nginx.conf
添加如下内容
autoindex on; # 显示目录
autoindex_exact_size on; # 显示文件大小
autoindex_localtime on; # 显示文件时间
- # power by www.phpStudy.net
- #user nobody;
- worker_processes 1;
- error_log logs/error.log;
- #error_log logs/error.log notice;
- #error_log logs/error.log info;
- #pid logs/nginx.pid;
- events {
- worker_connections 1024;
- }
- http {
- include mime.types;
- default_type application/octet-stream;
- log_format main '$remote_addr - $remote_user [$time_local] "$request" '
- '$status $body_bytes_sent "$http_referer" '
- '"$http_user_agent" "$http_x_forwarded_for"';
- access_log logs/access.log main;
- sendfile on;
- #tcp_nopush on;
- #keepalive_timeout 0;
- keepalive_timeout 65;
- #tcp_nodelay on;
- fastcgi_connect_timeout 300;
- fastcgi_send_timeout 300;
- fastcgi_read_timeout 300;
- fastcgi_buffer_size 128k;
- fastcgi_buffers 4 128k;
- fastcgi_busy_buffers_size 256k;
- fastcgi_temp_file_write_size 256k;
- #gzip on;
- gzip on;
- gzip_min_length 1k;
- gzip_buffers 4 32k;
- gzip_http_version 1.1;
- gzip_comp_level 2;
- gzip_types text/plain application/x-javascript text/css application/xml;
- gzip_vary on;
- gzip_disable "MSIE [1-6].";
- server_names_hash_bucket_size 128;
- client_max_body_size 100m;
- client_header_buffer_size 256k;
- large_client_header_buffers 4 256k;
- underscores_in_headers on;
- autoindex on; # 显示目录
- autoindex_exact_size on; # 显示文件大小
- autoindex_localtime on; # 显示文件时间
- root "F:/work/workspace/smart/spring-smart-html/";
- index index.html index.htm;
- server {
- listen 80;
- server_name 192.168.64.1 192.168.0.104 127.0.0.1;
- #charset koi8-r;
- #access_log logs/host.access.log main;
- location /smart/ {
- proxy_pass http://localhost:8081/spring-smart-web/smart/;
- proxy_set_header Host $host;
- proxy_set_header X-Real-IP $remote_addr;
- proxy_set_header X-Forwarded-For $proxy_add_x_forwarded_for;
- proxy_connect_timeout 300;
- proxy_send_timeout 300;
- proxy_read_timeout 300;
- }
- location ~ .*\.(html|htm|gif|jpg|jpeg|bmp|png|ico|txt|js|css|less|map|eot|svg|ttf|woff|woff2|cab|scss|otf|exe|pdf|doc|xlsx)$ {
- root "F:/work/workspace/smart/spring-smart-html/";
- index index.html index.htm;
- expires 1d;
- }
- }
- include vhost/*.conf;
- }
访问

nginx配置文服的更多相关文章
- 史上最全的Nginx配置文档
Nginx是一个异步框架的Web服务器,也可以用作反向代理,负载平衡器 和 HTTP缓存.该软件由Igor Sysoev 创建,并于2004年首次公开发布.同名公司成立于2011年,以提供支持.Ngi ...
- Nginx配置文档具体解释
Nginx的配置文档具体解释.在这儿做个总结,以便以后使用的时间查看. 下面大部分自己整理.部分来自參考 #设置用户 #user nobody; #启动进程数(一般和server的CPU同样) #能 ...
- Rhel6-cacti+nagios+ganglia(nginx)配置文档
(lnmp平台) 系统环境: rhel6 x86_64 iptables and selinux disabled 主机: 192.168.122.185 server85.example.com 1 ...
- Nginx配置文档
转https://www.cnblogs.com/hunttown/p/5759959.html
- nginx配置 的话注意几点 1.错误时注意看log 2.天威证书的话,有文档按照其文档一步步配置即可;3每句话的结尾注意千万别丢掉分号
nginx配置 的话注意几点 1.错误时注意看log 2.天威证书的话,有文档按照其文档一步步配置即可:3每句话的结尾注意千万别丢掉分号:4.配置https时 其转发可以转发到http上 pass_ ...
- 死磕nginx系列--配置文档解读
nginx配置文件主要分为四个部分: main(全局设置) http ( ) upstream(负载均衡服务器设置) server(主机设置) location(URL匹配特点位置的设置) serve ...
- nginx 安全配置文档
1.配置文档中有多处明确写出了nginx的配置文件路径,该路径是测试环境中的路径,线上系统的nginx配置文件与文档中所写的路径可能不一样,在进行相关配置时,应以线上配置文件的实际路径为准. 线上系统 ...
- (转)nginx 安全配置文档
原文:https://www.cnblogs.com/heaven-xi/p/9961357.html#top 1.配置文档中有多处明确写出了nginx的配置文件路径,该路径是测试环境中的路径,线上系 ...
- Nginx 1.10.1 编译、配置文档(支持http_v2,TLSv1.2,openssl v1.0.2)
1.安装常用工具及基础包: [root@localhost /]# yum -y install wget git vim make gcc gcc-c++ openssl-devel [root@l ...
随机推荐
- 可访问范围 与 visual 或 abstract “修饰符”
protected:在当前类内定义,则在当前类“内部”可以调用,则在 派生子类"内部" 也可以调用 private,除去,在 派生子类"内部" 也可以调用,其它 ...
- android-------- 常用且应该学习的框架
今天来分享一下一些常用的库,在Github 上 star数也是很高的,开发中也是很常用的: 简单的分享一下,一起学习. http://www.xiufm.com/blog-1-944.html 框架名 ...
- android------Eclipse Memory Analyzer (MAT)
简单介绍 MAT(Memory Analyzer Tool),一个基于Eclipse的内存分析工具,是一个快速.功能丰富的JAVA heap分析工具,它可以帮助我们查找内存泄漏和减少内存消耗. 使用内 ...
- linux网络配置命令(二)——ip
ip命令 查看/设置路由.设备.路由策略和渠道信息 格式 ip [ OPTIONS ] OBJECT { COMMAND | help } OBJECT := { link | addr | addr ...
- python中list、tuple、dict、set的使用
1.list列表 list是一种可变的,有序的列表,可以随时添加和删除其中的元素. 其格式如下:list-name=[element1,element2,....] >>> nums ...
- date命令说明
基本使用格式: date [-d "time-to-display"] +"format-to-display" -d指定要显示的时间,如果不指定默认为当前时间 ...
- [转]每天一个linux命令(44):top命令
top命令是Linux下常用的性能分析工具,能够实时显示系统中各个进程的资源占用状况,类似于Windows的任务管理器.下面详细介绍它的使用方法.top是一个动态显示过程,即可以通过用户按键来不断刷新 ...
- 码云git使用一(上传本地项目到码云git服务器上)
主要讲下如果将项目部署到码云git服务器上,然后使用studio导入git项目,修改本地代码后,并同步到码云git上面. 首先:我们在码云上注册账号并登陆.官网(https://git.oschina ...
- etymon word air aero aeri aer ag agreement walk joint trick skill chief forget out~1
1● air 2● aero 3● aeri 4● aer 空气 充气 1● ag 做,代理做 =====>agency 1● agr 2● agri 3 ...
- 使用AndroidStudio运行eclipse开发的app项目
由于AS和eclipse开发的APP项目格式不同,所以直接用AS运行eclipse项目是行不通的. 下面给大家讲解一下如何在AS上成功运行eclipse项目 首先有这么个eclipse项目文件夹 然后 ...
