第壹課-Install:Mirth Connect在Win10下的安装步骤
1.安装JDK,推荐安装JDK8 64位,版本jdk-8u201-windows-x64.exe.
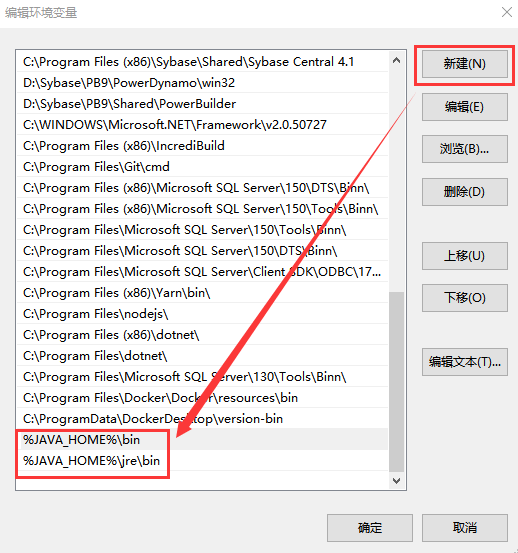
安装JDK后,同时必须配置win10的系统环境变量【示例如下】:
JAVA_HOME : F:\Java\jdk8
JAVA_TOOL_OPTIONS : -Dfile.encoding=UTF-8 -Duser.language=en -Duser.country=US
CLASSPATH : .;%JAVA_HOME%\lib;%JAVA_HOME%\lib\dt.jar;%JAVA_HOME%\lib\tools.jar;
Path环境变量需要添加一个变量值:
点'新建'后直接把%JAVA_HOME%\bin和%JAVA_HOME%\jre\bin输入进去。
- 变量值:%JAVA_HOME%\bin
- 变量值:%JAVA_HOME%\jre\bin
注意:输入的时候不要有分号
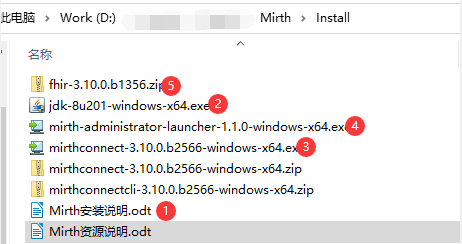
2.安装Mirth,推荐安装3.10.1 64 位,版本mirthconnect-3.10.1.b280-windows-x64.exe,安装说明如下:
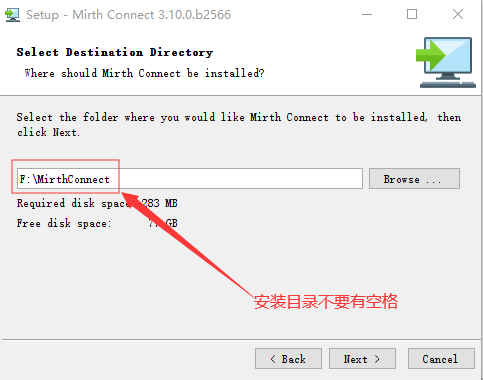
(图1,安装目录不要带有空格)
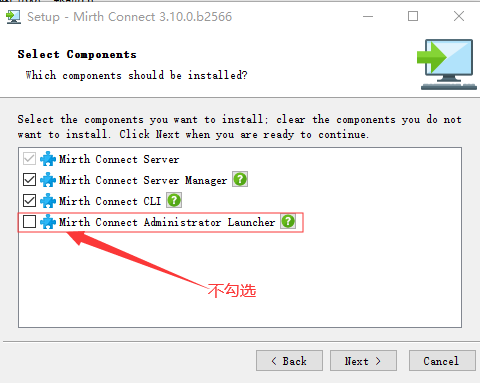
(图2,不勾选安装Administrator Launcher)

(图3,启动URL地址 https://localhost:8443 )
3.安装客户端启动工具,推荐安装1.1.0 64 位,版本mirth-administrator-launcher-1.1.0-windows-x64.exe,安装说明如下:
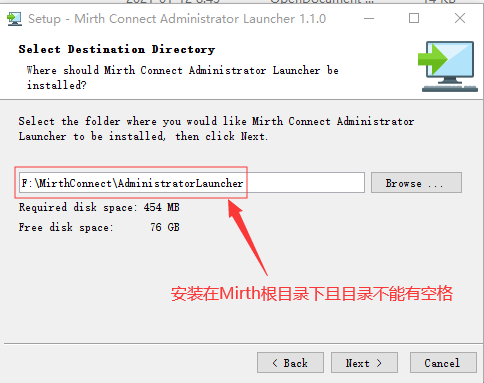
(图4,安装在第2步的根目录下且目录不能有空格)
4.停止Mirth服务,设置‘系统环境变量’,配置说明如下:

(图5,右键‘我的电脑’,设置系统环境变量,解决Mirth客户端界面中文GBK乱码问题)
在安装目录中有个 F:\MirthConnect\custom-lib文件夹,这里是扩展Mirth功能,此目录放置的是用户自定义JAR包功能扩展库;因此需要把此路径加到‘系统的环境变量’CLASSPATH的配置中:
CLASSPATH : .;%JAVA_HOME%\lib;%JAVA_HOME%\lib\dt.jar;%JAVA_HOME%\lib\tools.jar;F:\MirthConnect\custom-lib;
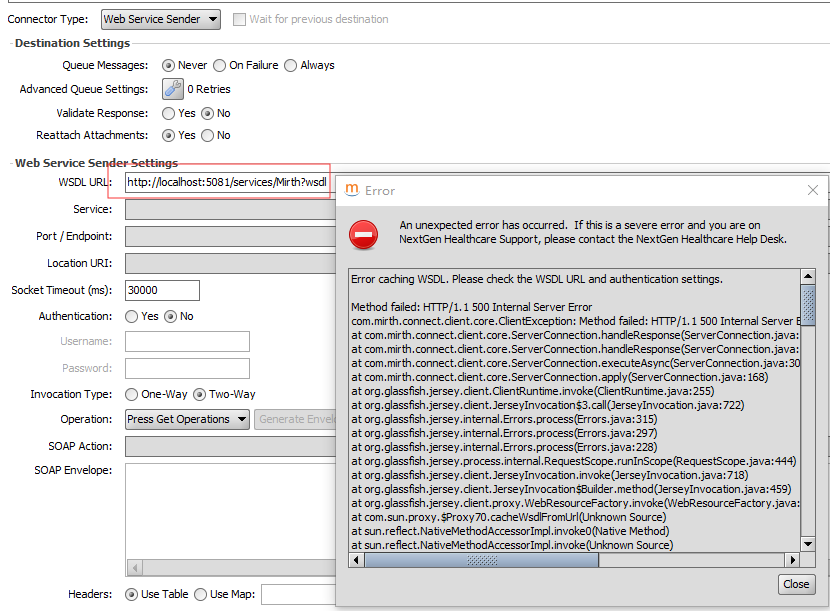
JDK8安装特别说明:首先java8安装目录不能使用默认目录,必须是手动选择安装到非空格非中文的目录;
然后配置JAVA_HOME系统变量,如上图所示。
经过大量测试,如果java8安装在默认的有空格目录,web service channel信道会报错,用不了,报错截图如下:
特别提示:改变环境变量,mirth 驾驶舱的管理界面正常显示不再有乱码;
但信道描述和日志的中文显示会乱码;但接收和发送中文不受影响。
故这样改系统环境变量后再使用 mirth 时,建立信道写信道相关描述或日志请用英文。
5.安装FHIR信道扩展,推荐版本fhir-3.10.1.b286.zip;
安装步骤,解压fhir-3.10.1.b286.zip后,拷贝解压后的fhir整个目录到mirth服务插件目录F:\MirthConnect\extensions中,如图所示:

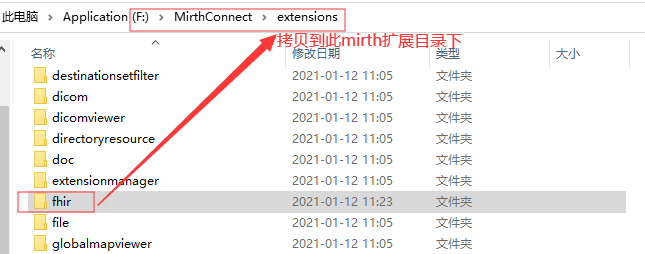
(图6,解压FHIR扩展并拷贝到mirth服务的扩展extensions根目录)
6.启动Mirth服务;然后以管理员模式启动F:\MirthConnect\AdministratorLauncher目录中的mirth administrator launcher程序launcher.exe,如图所示:
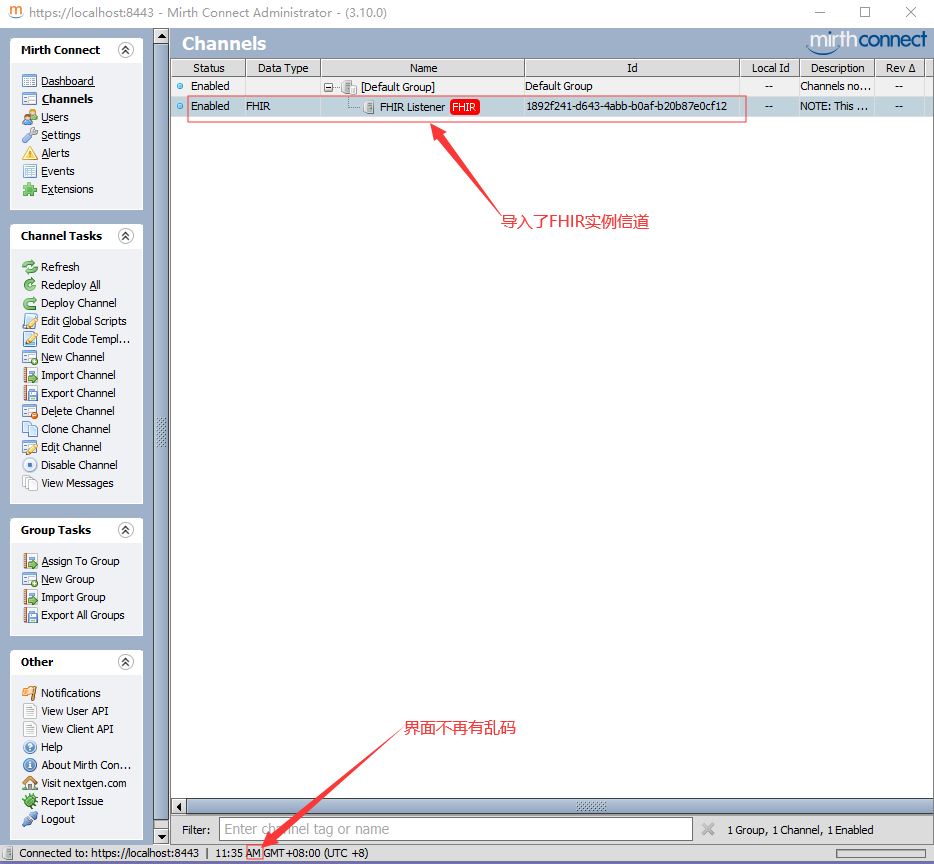
(图7,管理客户端截图)
特别说明:
导入FHIR部署实例:
https://github.com/Fdawgs/ydh-fhir-listeners

(图8,扩展视图中可见FHIR扩展已经导入且启用)
(图9,Mirth完整安装包)
MIRTH CONNECT README
Contents
==================================================
1. General Information
2. Installation and Upgrade
3. Starting Mirth Connect
4. Running Mirth Connect in Java 9 or greater
5. More Information
1. General Information
==================================================
Mirth
Connect is an open source health care integration engine. By
supporting numerous standards (like HL7, EDI/X12, XML, NCPDP, DICOM,
and Delimited Text) and protocols (like TCP/LLP, HTTP, JDBC, and
File/FTP/SFTP), Mirth Connect allows for the filtering,
transformation, and routing of messages between disparate systems to
allow them to share data.
2.
Installation and Upgrade
==================================================
Mirth
Connect installers are available for individual operating systems
(EXE for Windows, RPM and SH for Linux, and DMG for Mac OS X).
Pre-packaged distributions are also available for individual
operating systems (ZIP for Windows, TAR.GZ for Linux, and TAR.GZ for
Mac OS X). The installer allows you to automatically upgrade previous
Mirth Connect installations (starting with version 1.5).
Mirth
Connect installers also come with the option to install and start a
service which will run the background. You also have the option of
installing and running the Mirth Connect Server Manager, which allows
you to start and stop the service on some operating systems, change
Mirth Connect properties and backend database settings, and view the
server logs.
An
optional Mirth Connect Command Line Interface can be installed,
allowing you to connect to a running Mirth Connect Server using a
command line. This tool is useful for performing or scripting server
tasks without opening the Mirth Connect Administrator.
After
the installation, the Mirth Connect directory layout will look as
follows:
/appdata/mirthdb:
The embedded database (Do NOT delete if you specify Derby as your
database). This will be created when the Mirth Connect Server is
started. The path for appdata is defined by the dir.appdata property
in mirth.properties.
/cli-lib:
Libraries for the Mirth Connect Command Line Interface (if installed)
/client-lib:
Libraries for the Mirth Connect Administrator
/conf:
Configuration files
/custom-lib:
Place your custom user libraries here. These libraries will be loaded
on the Mirth Connect Server classpath when it is started, making them
accessible to channel scripts.
/docs:
This document and a copy of the Mirth Connect license
/docs/javadocs:
Generated javadocs for the installed version of Mirth Connect. These
documents are also available when the server is running at
http://[server address]:8080/javadocs/ (i.e.
http://localhost:8080/javadocs/).
/extensions:
Libraries and meta data for Plug-ins and Connectors
/logs:
Default location for logs generated by Mirth Connect and its
sub-components
/manager-lib:
Libraries for the Mirth Connect Server Manager (if installed)
/public_html:
Directory exposed by the embedded web server
/server-lib:
Mirth Connect server libraries
/webapps:
Directory exposed by the embedded web server to host webapps
3.
Starting Mirth Connect
==================================================
Once
Mirth Connect has been installed, there are several ways to connect
to launch the Mirth Connect Administrator. On a Windows installation,
there is a Mirth Connect Administrator item in the Start Menu which
launches the application directly.
If
the option is not available, you can connect to the Mirth Connect
Administrator launch page which by default should be available at
http://[server address]:8080 (i.e. http://localhost:8080). Clicking
the Launch Mirth Connect Administrator button will connect you to the
server which will be listening on https://[server address]:8443 (i.e.
https://localhost:8443). If running a new installation, the default
username and password for the login screen is admin and admin. This
should be changed immediately for security purposes.
If
you are launching the administrator for the first time, you will
notice that the libraries for the Mirth Connect Administrator will be
loaded. This feature allows you run the Administrator from any remote
Mirth Connect server without having to download and install a
separate client.
You
may also notice a security warning when starting the administrator
(dialog box depends on browser being used). This is normal and you
should click Run to continue launching the administrator.
4.
Running Mirth Connect in Java 9 or greater
==================================================
In
order to run Mirth Connect in Java 9 or greater, copy the options
from /docs/mcservice-java9+.vmoptions and append them to either
mcserver.vmoptions or mcservice.vmoptions, depending on your
deployment. Then restart Mirth Connect.
To
run the Mirth Connect Command Line Interface, create a new file named
mccommand.vmoptions in the Mirth Connect root directory. Copy all of
the options from /docs/mcservice-java9+.vmoptions into
mccommand.vmoptions and save before launching the Command Line
Interface.
5.
More Information
==================================================
You
can find the latest Mirth Connect release information, documentation,
and more at:
https://www.nextgen.com/products-and-services/integration-engine
Join
the Mirth Connect Community at:
http://www.mirthcorp.com/community/registration
第壹課-Install:Mirth Connect在Win10下的安装步骤的更多相关文章
- 全网最新方法:Win10下如何安装和搭建appium自动化测试环境
为了方便大家,下面是本人安装和搭建appium所需要的软件,自取. 链接:https://pan.baidu.com/s/1wl5Xnos4BmnSZsBRd6B5YA#list/path=%2F ...
- Anaconda3(5-2)程序编辑器 win10下PyCharm安装及配置Pytorch流程
由于破解和付费问题,不推荐.优先用自带的spyder Win10 下PyCharm安装流程:(1)官网:https://www.jetbrains.com/pycharm/download/#sect ...
- win10下硬盘安装CentOS7
安装环境: 1.系统:Windows 10 2.硬盘:SSD(已装好Win 10) + HHD(用来装CentOS 7) 准备工作: 1.DiskGenius(分区工具):用来给硬盘做分区: 2.系统 ...
- 萌新深度学习与Pytorch入门记录(一):Win10下环境安装
深度学习从入门到入土,安装软件及配置环境踩了不少坑,过程中参考了多处博主给的解决方法,遂整合一下自己的采坑记录. (若遇到不一样的错误,请参考其他博主答案解决) 笔者电脑系统为win10系统,在此环境 ...
- ml-agent:Win10下环境安装
这是我看到的最全面最详细的ml-agent讲解.(只用于学习与知识分享,如有侵权,联系删除.谢谢!) 来自CodeGize的个人博客 .源链接:https://www.cnblogs.com/Code ...
- win10 下Oracle安装
在win10 64bit下安装oracle 11的时候,有些问题不注意,安装的时候才遇到就gg了.下面将介绍win10下安装oracle 11的步骤以及安装过程中遇到的一些问题及解决方案. 安装过程中 ...
- MongoDB在Win10下的安装
原文地址:http://blog.csdn.net/polo_longsan/article/details/52430539 1.下载MongoDB在windows下的安装文件 首先去官网https ...
- win10 下ie11安装flash debuger (install flashplayer debuger on win10 64bit)
1不能安装的现象 由于win10 ie11 内置flash 微软不让用户自己手动更新ie11的flash以及安装flash debugger ,这怕是让还在用 flex 开发的大胸弟们很头疼 ...
- Win10下 VS2017 安装失败 未能安装包“Microsoft.VisualStudio.AspNet45.Feature,version=15.0.26208.0”
事情的起因是这样的,前段时间,VS2017发布当天,想在自己的Win10上安装VS2017,然而,由于自己的系统很久没有更新(PS:自己关闭了Windows更新). 安装提示:未能安装包“Micros ...
- 【20181025】win10下Python安装osmnx包
系统:win10 64位 Python:3.7 在网上查了很多资料,主要有两种方法安装osmnx包,一种是通过anaconda安装,这种方法会自动帮你装好osmnx的依赖包:另一种是用pip安装,需要 ...
随机推荐
- Prompt进阶2:LangGPT(构建高性能Prompt策略和技巧)--最佳实践指南
Prompt进阶2:LangGPT(构建高性能Prompt策略和技巧)--最佳实践指南 0.前言 左图右图 prompt 基本是一样的,差别只在提示工程这个词是否用中英文表达.我们看到,一词之差,回答 ...
- windows下删除文件时提示“操作无法完成 因为文件已在。。。”解决方案
解决方案:利用"资源监视器",如上图: 具体步骤: win+r,输入perfmon打开资源监视器 或者 右键--Windows 7任务栏--启动任务管理器--性能--资源监视器-- ...
- Java-求根号n
平方,开根号在java中是很简单的,Math.sqrt(double n)或者 Math.pow(double a, double b),求a的b次方.但是我们可以自己想想,这些方法到底是怎么实现的. ...
- GPT-SoVITS教程,接入酒馆AI,SillyTavern-1.11.5,让AI女友声若幽兰
本次分享一下如何将GPT-SoVITS接入SillyTavern-1.11.5项目,让让AI女友声若幽兰,首先明确一下,SillyTavern-1.11.5只是一个前端项目,它没有任何大模型文本生成能 ...
- KingbaseES V8R6集群运维案例-- 备库数据库服务意外down分析
案例说明: KingbaseES V8R6一主二备架构的集群,两个备库节点sys_log日志分别不同时间点收到'fast shutdown request'的日志信息,导致备库数据库服务down,需要 ...
- KingbaseES Json 系列七:Json记录操作函数二
KingbaseES Json 系列七--Json记录操作函数二(JSONB_POPULATE_RECORD,JSONB_POPULATE_RECORDSET,JSON_POPULATE_RECORD ...
- 鸿蒙HarmonyOS实战-ArkUI组件(List)
一.List 1.概述 列表是一种非常有用且功能强大的容器,它常用于呈现同类型或多类型数据集合,例如图片.文本.音乐.通讯录.购物清单等.列表对于显示大量内容而不耗费过多空间和内存是非常有帮助的,因为 ...
- linux 查看磁盘空间命令
一. df -h 显示当前磁盘挂载(包含剩余空间)情况 二. cd 到大容量的路径下使用命令 [root@hadoop102 /]# du -sh *|sort -n 三. 循环这个过程
- Python---flask框架实现清除cookies功能
路由部分: 1 #用户退出清理cookie 2 @app.route('/clean_cookies',methods=['GET', 'POST']) 3 def clean_cookies(): ...
- 16 JavaScript逗号运算符
16 JavaScript逗号运算符 Python 逗号运算符一般用于组合多个表达式,其返回值是最后一个表达式的值,例如: function s(){ console.log(1), console. ...