RabbitMQ保姆级教程最佳实践
一、消息队列介绍
1、消息队列概念

1、MQ全称为Message Queue,消息队列(MQ)是⼀种应⽤程序对应⽤程序的通信⽅法。应⽤程序通过读写出⼊队列的消息(针对应⽤程序的数据)来通信,⽽⽆需专⽤连接来链接它们。2、消息传递指的是程序之间通过在消息中发送数据进⾏通信,⽽不是通过直接调⽤彼此来通信,直接调⽤通常是⽤于诸如远程过程调⽤的技术。
2、常⽤的消息队列产品
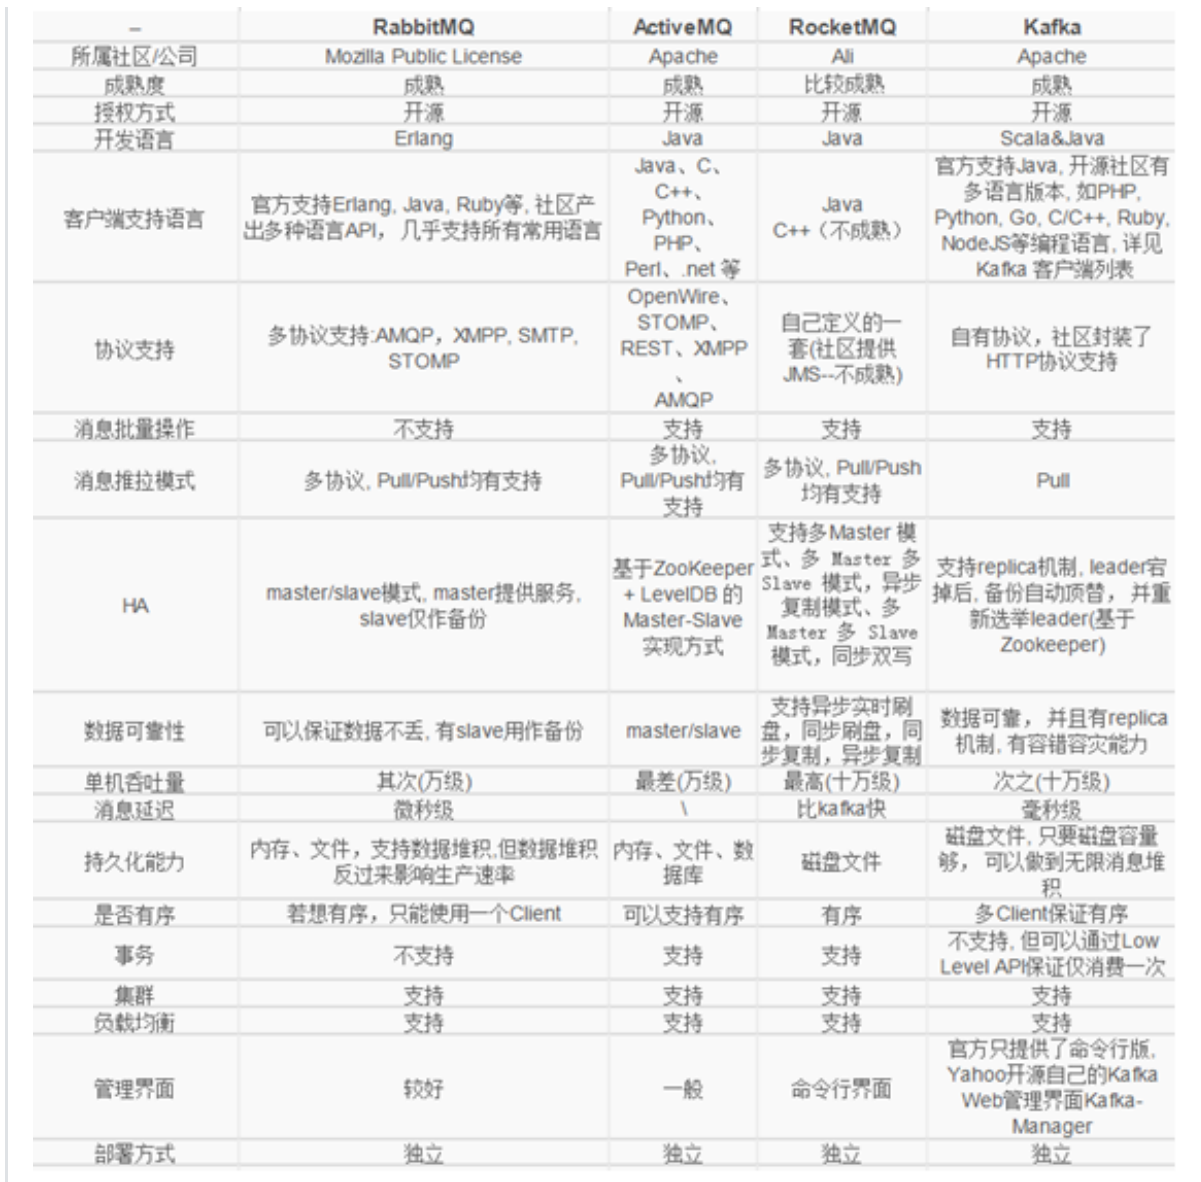
1、RabbitMQ 稳定可靠,数据⼀致,⽀持多协议,有消息确认,基于erlang语⾔2、Kafka ⾼吞吐,⾼性能,快速持久化,⽆消息确认,⽆消息遗漏,可能会有有重复消息,依赖于zookeeper,成本⾼.3、ActiveMQ 不够灵活轻巧,对队列较多情况⽀持不好.4、RocketMQ 性能好,⾼吞吐,⾼可⽤性,⽀持⼤规模分布式,协议⽀持单⼀
⼆、RabbitMQ
1、RabbitMQ介绍
1、RabbitMQ是⼀个在AMQP基础上完成的,可复⽤的企业消息系统。他遵循MozillaPublic License开源协议。2、AMQP,即Advanced Message Queuing Protocol, ⼀个提供统⼀消息服务的应⽤层标准⾼级消息队列协议,是应⽤层协议的⼀个开放标准,为⾯向消息的中间件设计。基于此协议的客户端与消息中间件可传递消息,并不受客户端/中间件不同产品,不同的开发语⾔等条件的限制。Erlang中的实现有 RabbitMQ等。3、主要特性:
- 保证可靠性 :使⽤⼀些机制来保证可靠性,如持久化、传输确认、发布确认
- 灵活的路由功能
- 可伸缩性:⽀持消息集群,多台RabbitMQ服务器可以组成⼀个集群
- ⾼可⽤性 :RabbitMQ集群中的某个节点出现问题时队列仍然可⽤
- ⽀持多种协议
- ⽀持多语⾔客户端
- 提供良好的管理界⾯
- 提供跟踪机制:如果消息出现异常,可以通过跟踪机制分析异常原因
- 提供插件机制:可通过插件进⾏多⽅⾯扩展
2、RabbitMQ安装和配置
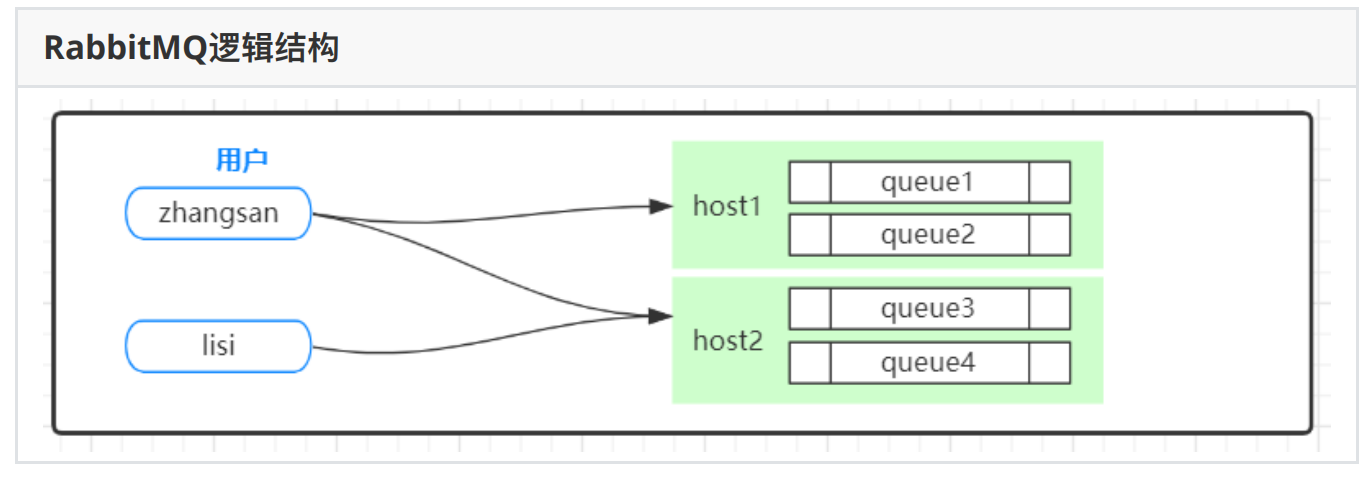
3、RabbitMQ逻辑结构
三、RabbitMQ⽤户管理
RabbitMQ默认提供了⼀个guests账号,但是此账号不能⽤作远程登录,也就是不能在管理系统的登录;我们可以创建⼀个新的账号并授予响应的管理权限来实现远程登录
1、逻辑结构
⽤户虚拟主机队列
2、⽤户管理
2.1、命令⾏⽤户管理
1、在linux中使⽤命令⾏创建⽤户
## 进⼊到rabbit_mq的sbin⽬录

cd /usr/local/rabbitmq_server-3.7.0/sbin

## 新增⽤户

./rabbitmqctl add_user ytao admin123
2、设置⽤户级别
## ⽤户级别:

## 1.administrator 可以登录控制台、查看所有信息、可以对RabbitMQ进⾏管理

## 2.monitoring 监控者 登录控制台、查看所有信息

## 3.policymaker 策略制定者 登录控制台、指定策略

## 4.managment 普通管理员 登录控制台

./rabbitmqctl set_user_tags ytao administrator
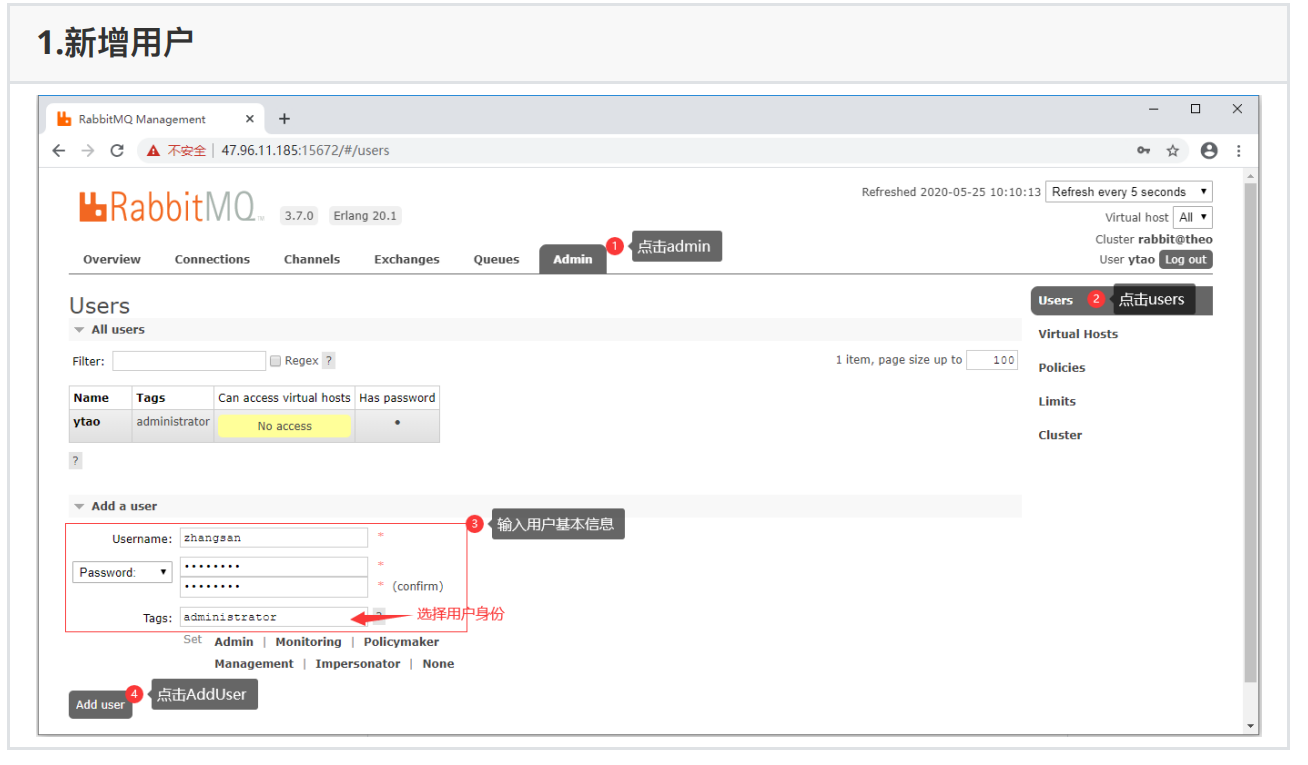
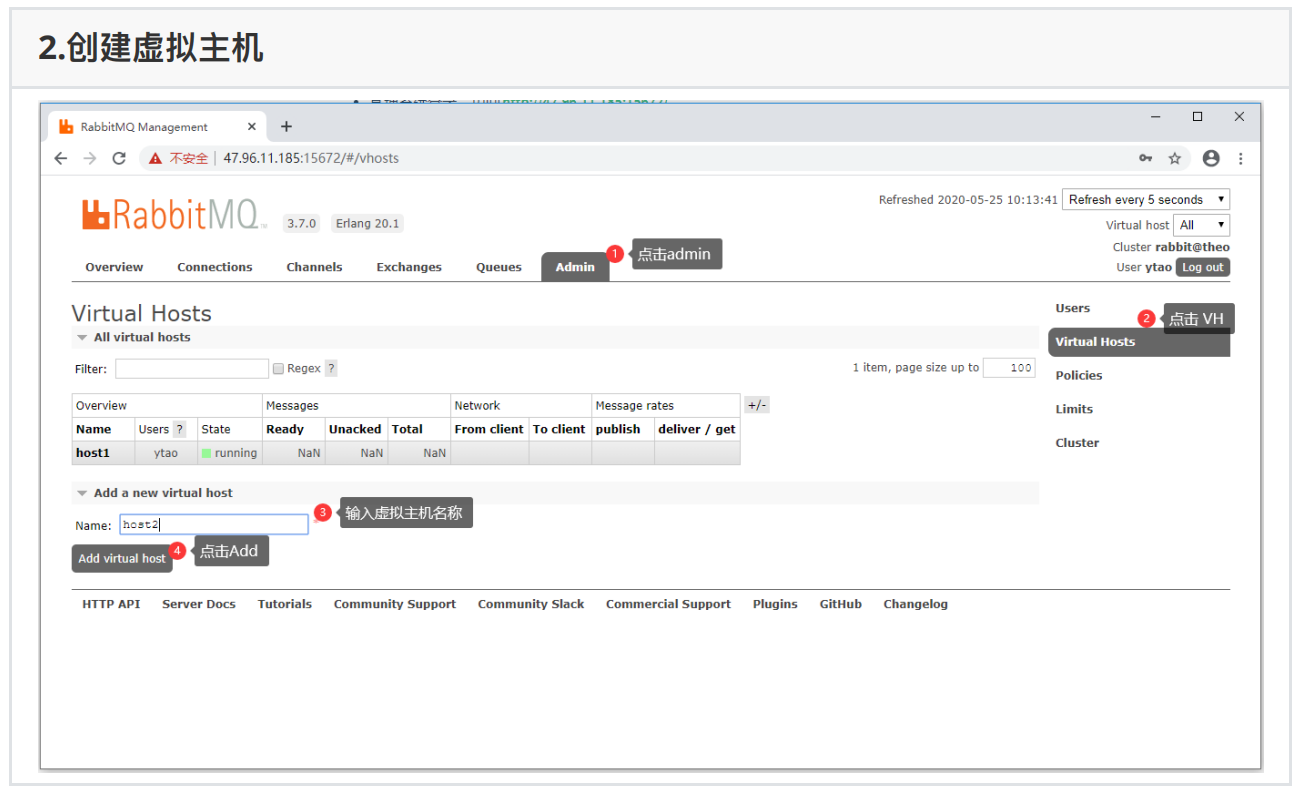
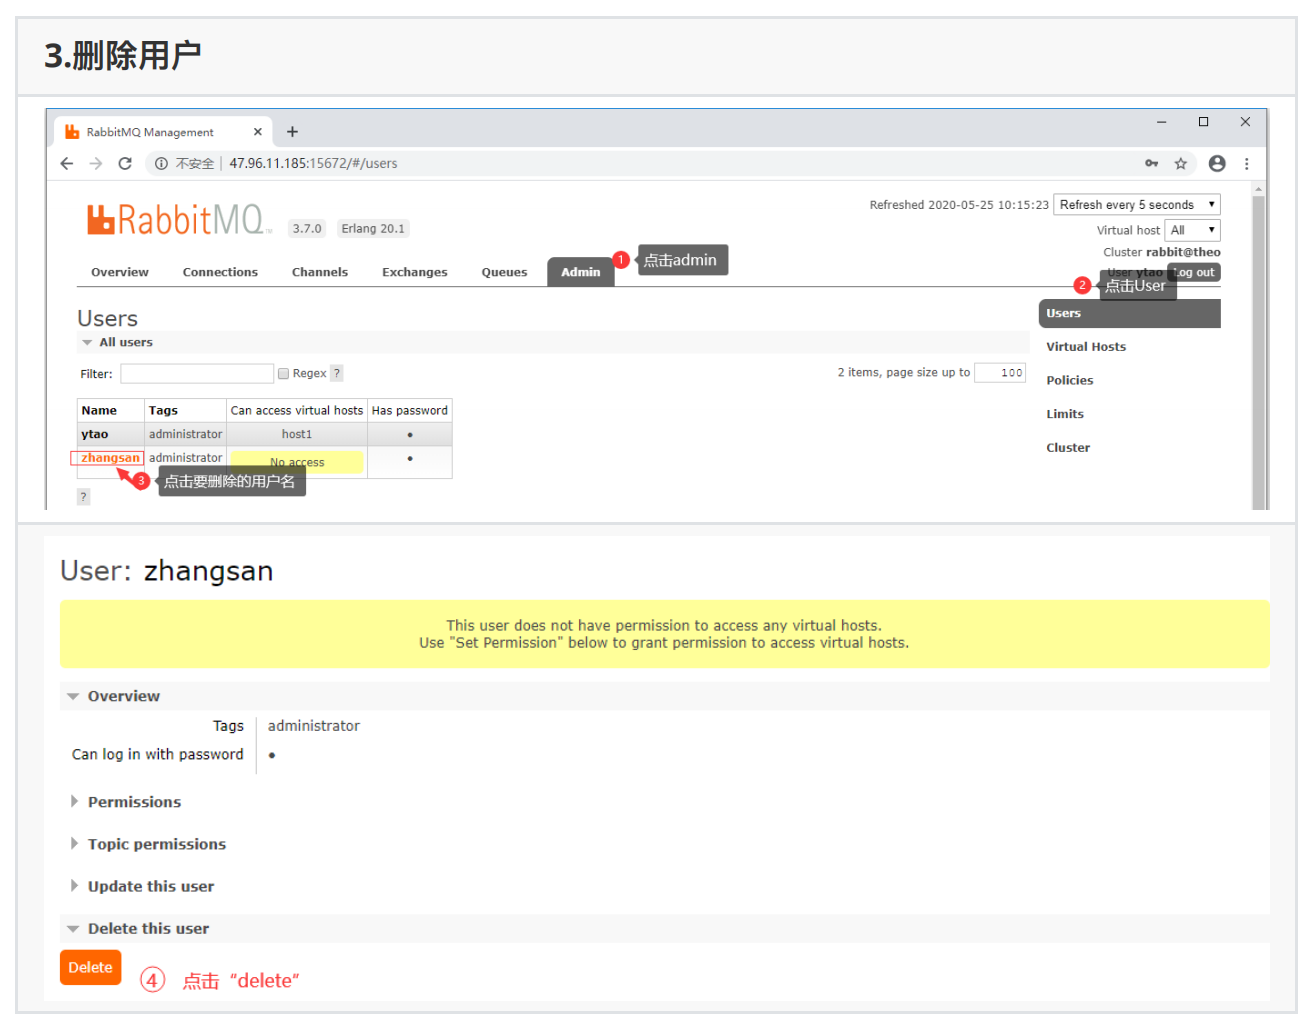
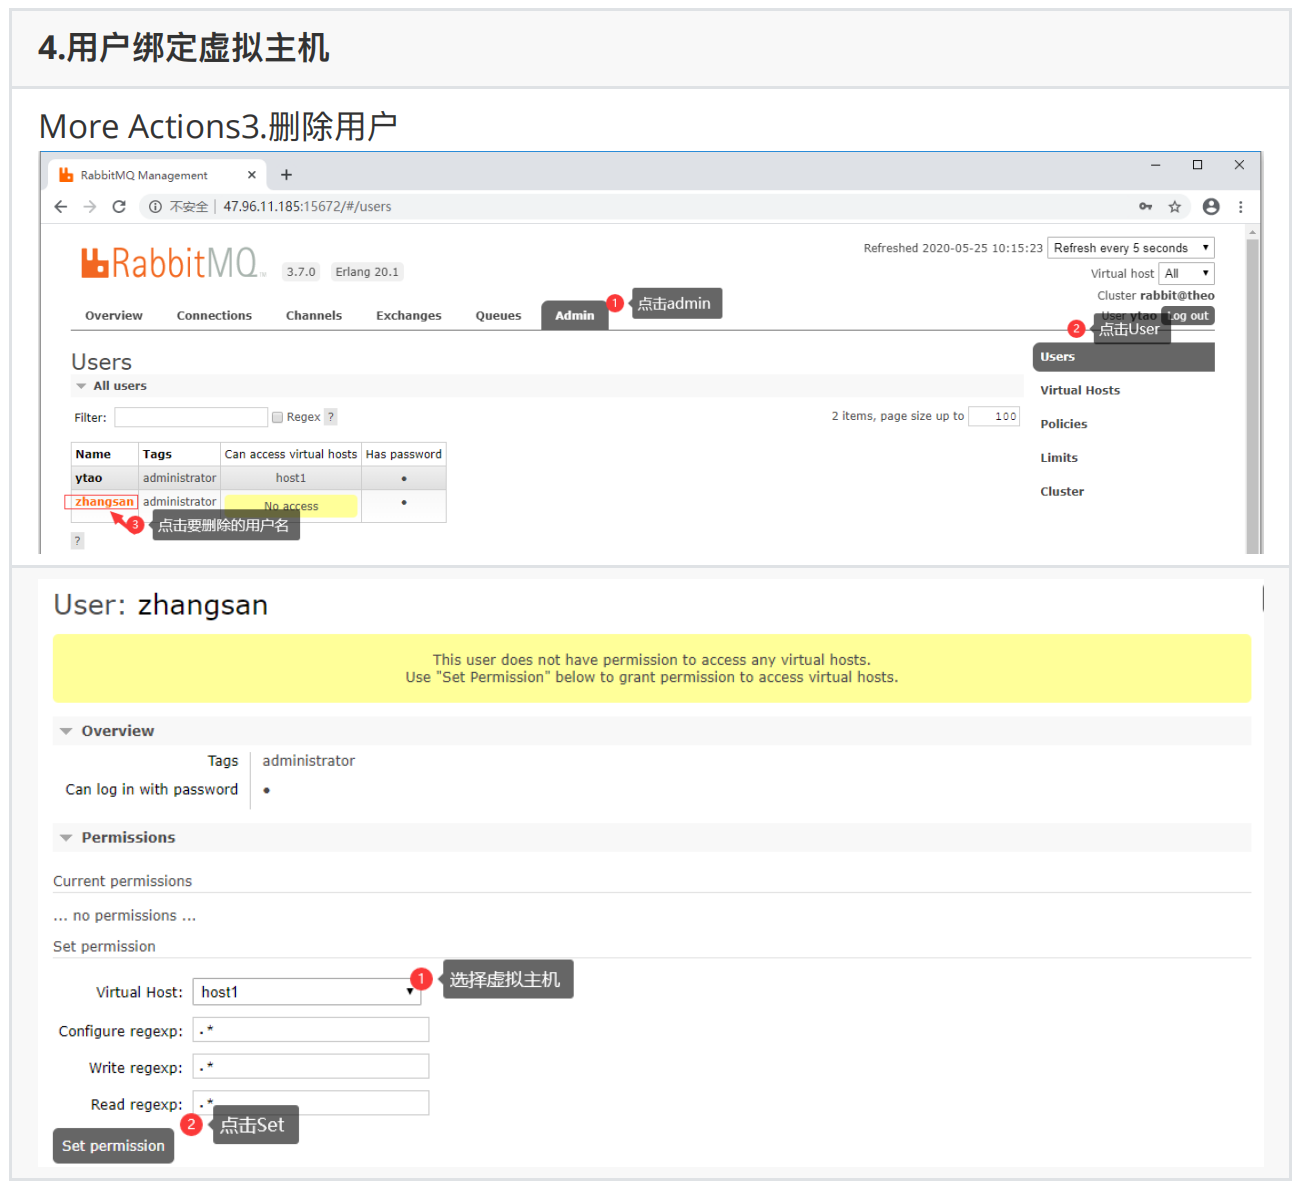
2.2、管理系统进⾏⽤户管理
管理系统登录:访问http://localhost:15672/
四、RabbitMQ⼯作⽅式
RabbitMQ提供了多种消息的通信⽅式—⼯作模式 https://www.rabbitmq.com/getstarted.html消息通信是由两个⻆⾊完成:消息⽣产者(producer)和 消息消费者(Consumer)
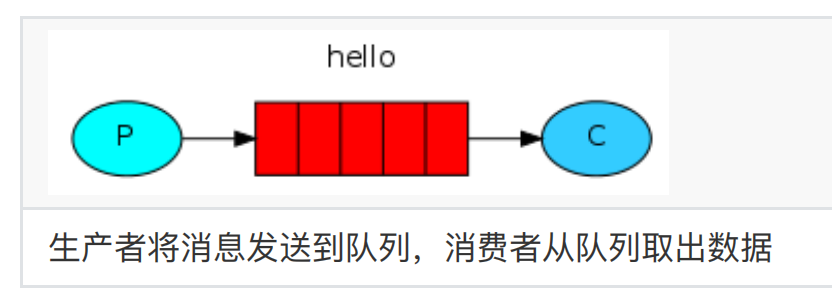
1、简单模式
⼀个队列只有⼀个消费者
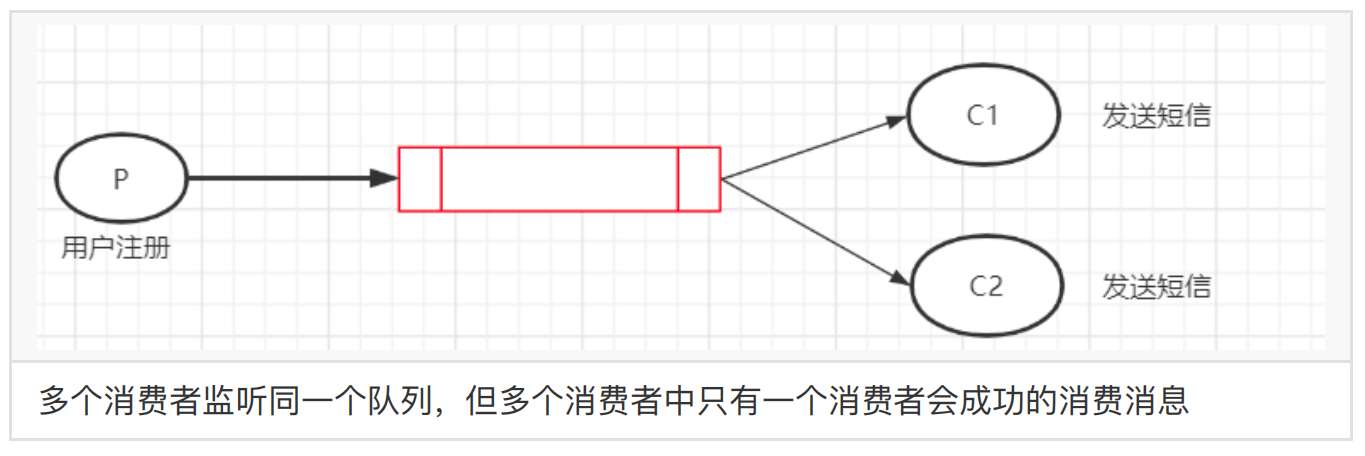
2、⼯作模式
多个消费者监听同⼀个队列
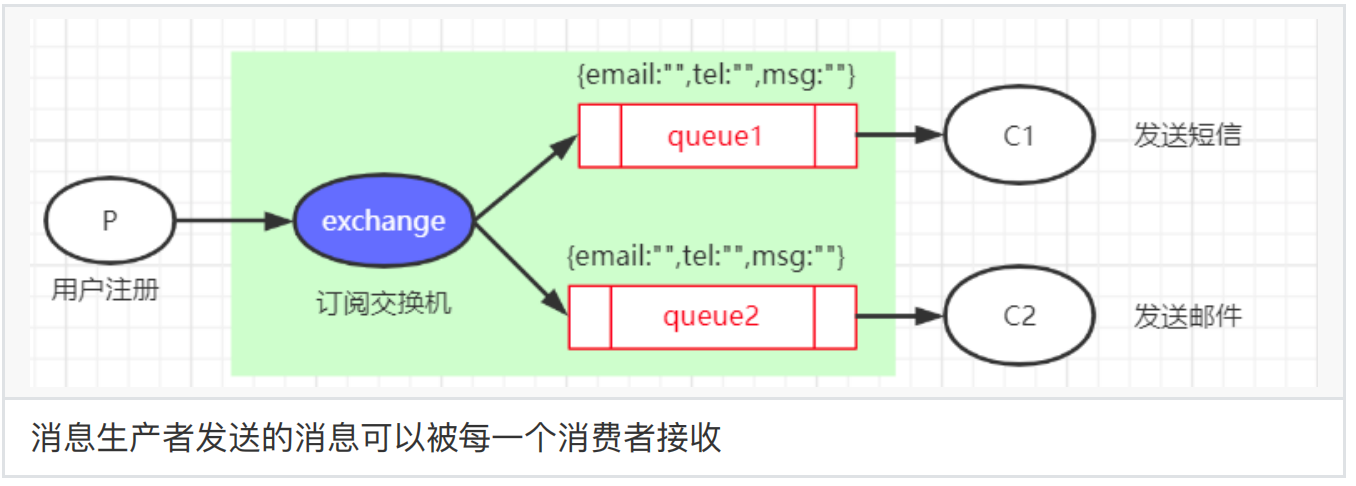
3、订阅模式
⼀个交换机绑定多个消息队列,每个消息队列有⼀个消费者监听
4、路由模式
⼀个交换机绑定多个消息队列,每个消息队列都由⾃⼰唯⼀的key,每个消息队列有⼀个消费者监听

五、RabbitMQ交换机和队列管理
1、创建队列
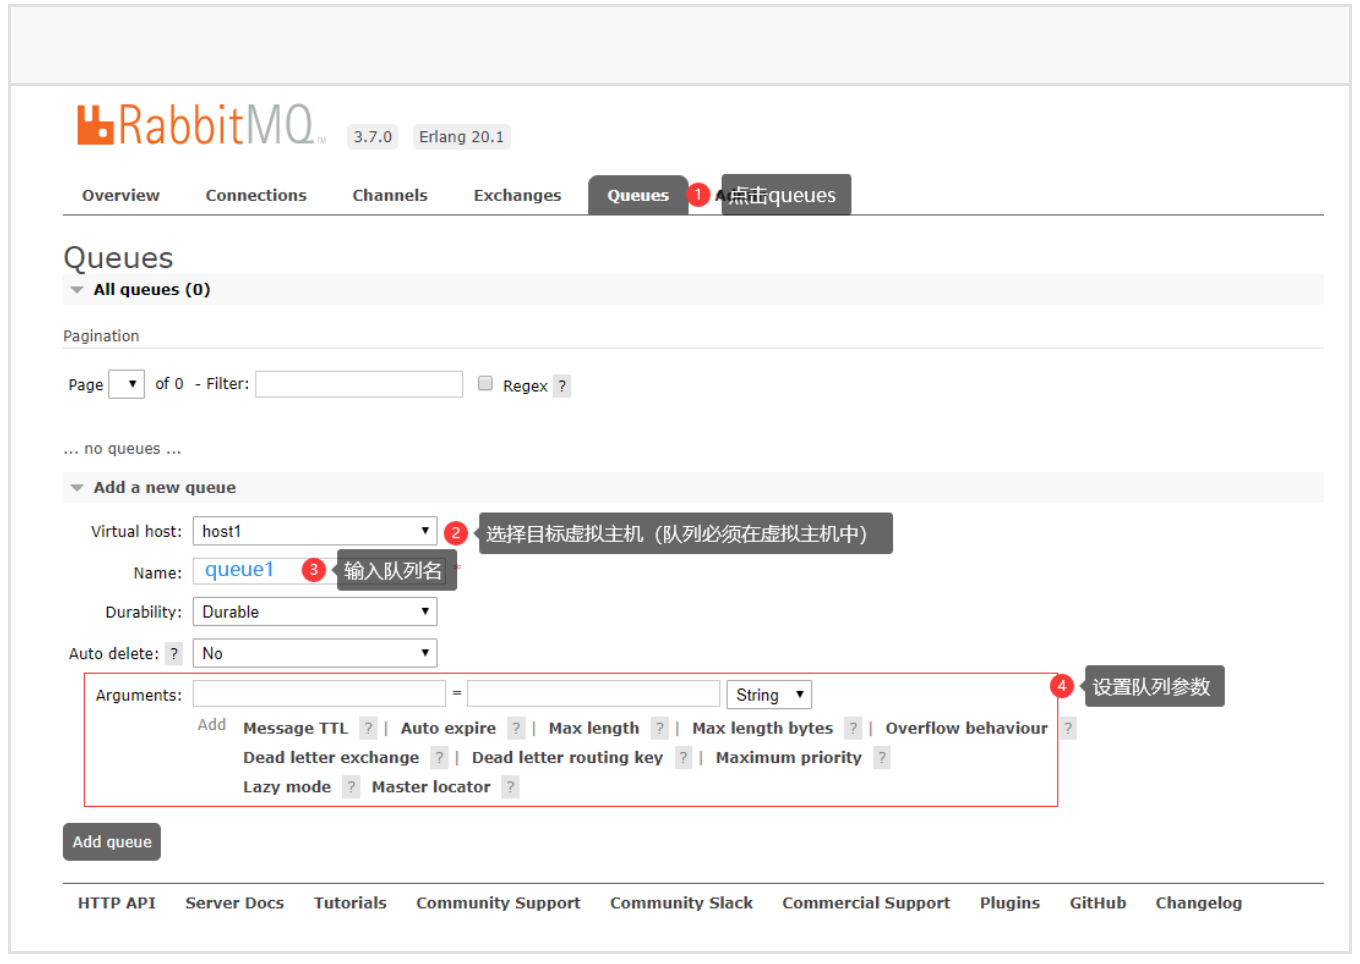
2、创建交换机
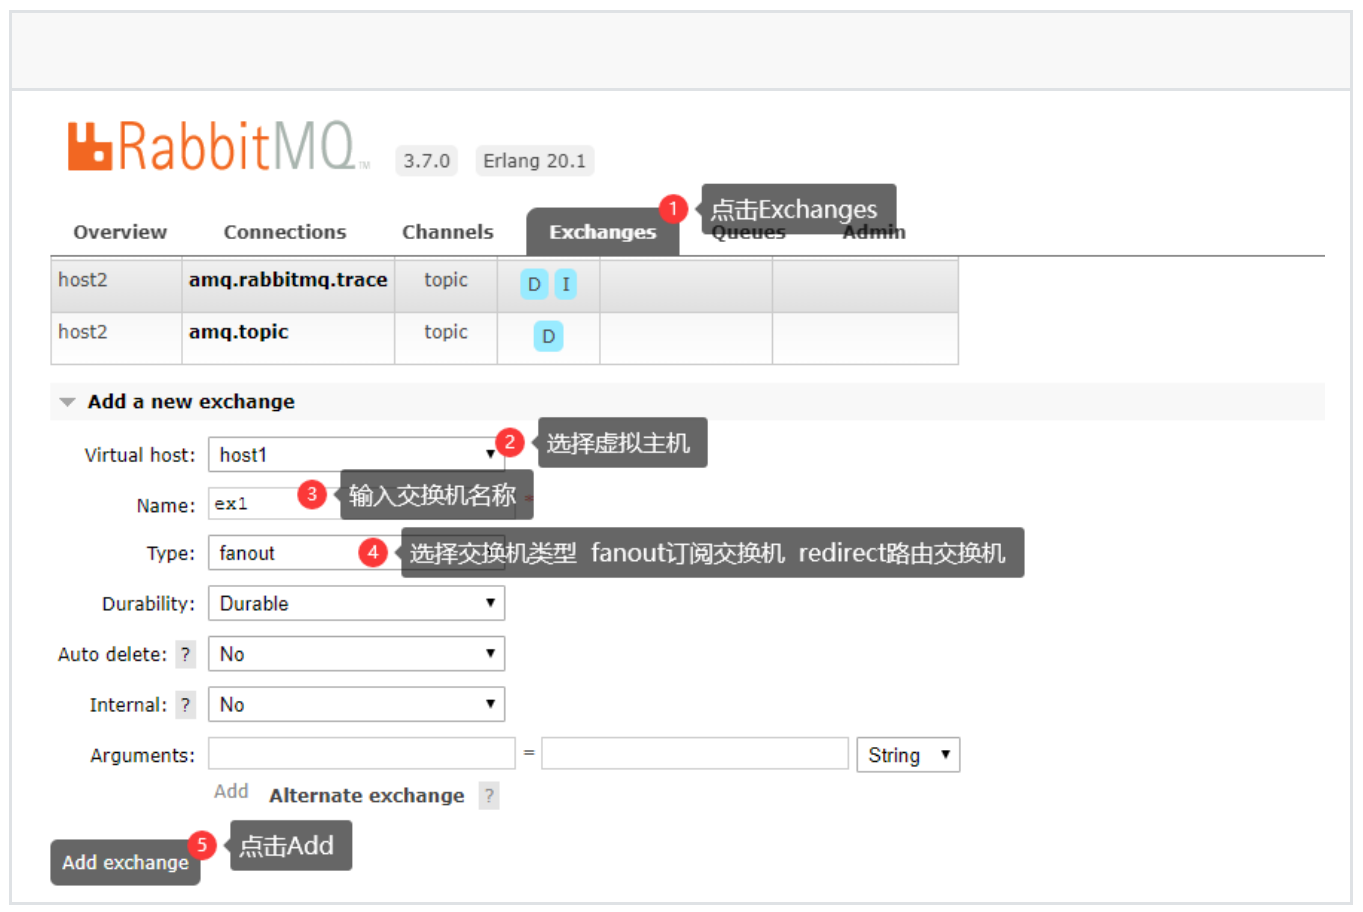
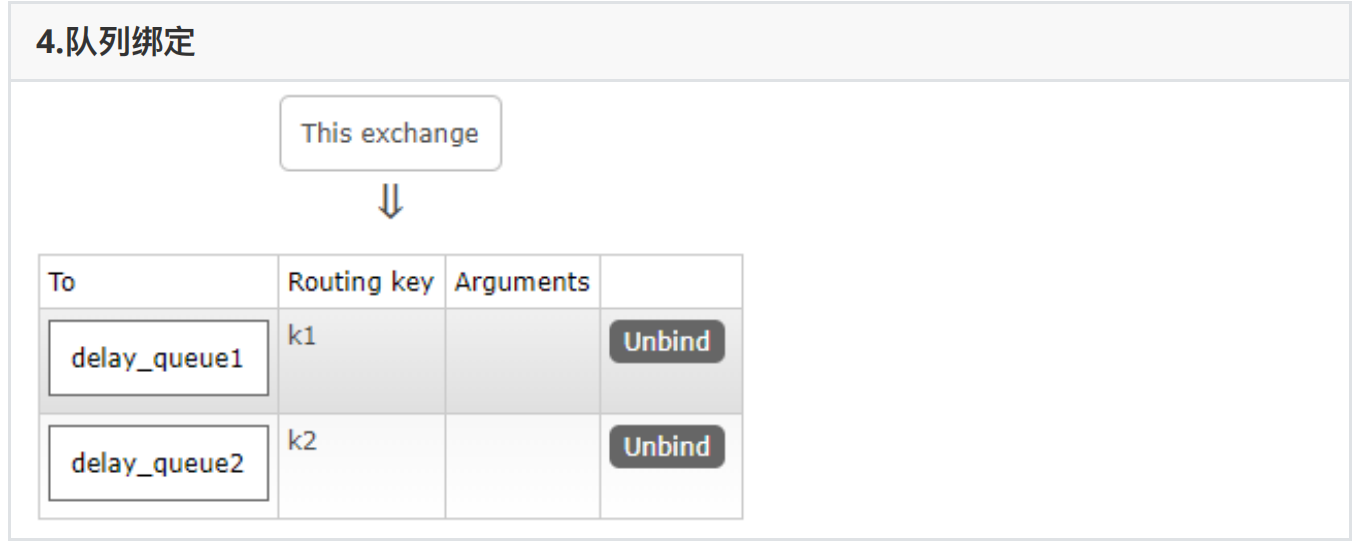
3、交换机绑定队列
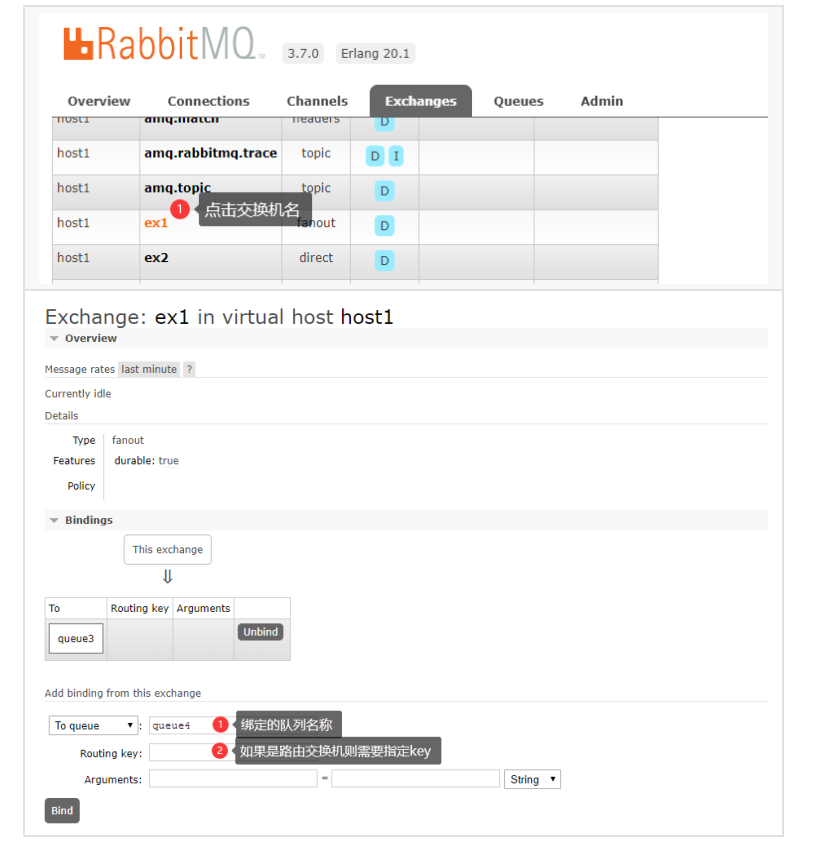
六、在普通的Maven应⽤中使⽤MQ
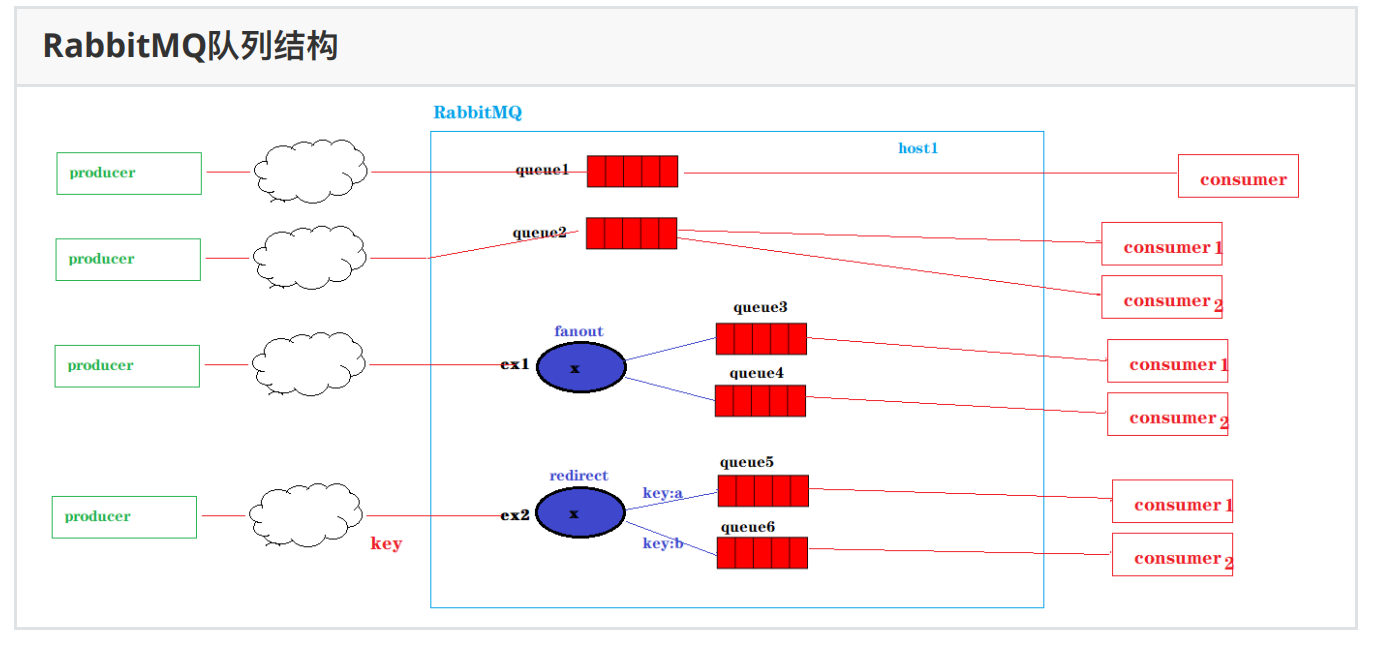
1、简单模式
1.1、消息⽣产者
1、创建Maven项⽬
2、添加RabbitMQ连接所需要的依赖
<!-- https://mvnrepository.com/artifact/com.rabbitmq/amqp-client -->

<dependency>

 <groupId>com.rabbitmq</groupId>

 <artifactId>amqp-client</artifactId>

 <version>4.10.0</version>

</dependency>

<!-- https://mvnrepository.com/artifact/org.slf4j/slf4j-log4j12 -->

<dependency>

 <groupId>org.slf4j</groupId>

 <artifactId>slf4j-log4j12</artifactId>

 <version>1.7.25</version>

 <scope>test</scope>

</dependency>

<!-- https://mvnrepository.com/artifact/org.apache.commons/commonslang3 -->

<dependency>

 <groupId>org.apache.commons</groupId>

 <artifactId>commons-lang3</artifactId>

 <version>3.9</version>

</dependency>
3、在resources⽬录下创建log4j.properties
log4j.rootLogger=DEBUG,A1 log4j.logger.com.taotao = DEBUG

log4j.logger.org.mybatis = DEBUG

log4j.appender.A1=org.apache.log4j.ConsoleAppender

log4j.appender.A1.layout=org.apache.log4j.PatternLayout

log4j.appender.A1.layout.ConversionPattern=%-d{yyyy-MM-dd HH:mm:ss,SSS} [%t] [%c]-[%p] %m%n
4、创建MQ连接工具类
import com.rabbitmq.client.Connection;

import com.rabbitmq.client.ConnectionFactory;

import java.io.IOException;

import java.util.concurrent.TimeoutException;

public class ConnectionUtil {

    public static Connection getConnection() throws IOException,

    TimeoutException {

        //1.创建连接⼯⼚

        ConnectionFactory factory = new ConnectionFactory();

        //2.在⼯⼚对象中设置MQ的连接信息

        (ip,port,virtualhost,username,password)

         factory.setHost("47.96.11.185");

        factory.setPort(5672);

        factory.setVirtualHost("host1");

        factory.setUsername("ytao");

        factory.setPassword("admin123");

        //3.通过⼯⼚对象获取与MQ的链接

        Connection connection = factory.newConnection();

        return connection;

    }

}
5、消息⽣产者发送消息
import com.qfedu.mq.utils.ConnectionUtil;

import com.rabbitmq.client.Channel;

import com.rabbitmq.client.Connection;

public class SendMsg {

    public static void main(String[] args) throws Exception{

        String msg = "Hello HuangDaoJun!";

        Connection connection = ConnectionUtil.getConnection();

        Channel channel = connection.createChannel();

        //定义队列(使⽤Java代码在MQ中新建⼀个队列)

        //参数1:定义的队列名称

        //参数2:队列中的数据是否持久化(如果选择了持久化)

        //参数3: 是否排外(当前队列是否为当前连接私有)

        //参数4:⾃动删除(当此队列的连接数为0时,此队列会销毁(⽆论队列中是否还有数据))

        //参数5:设置当前队列的参数

        //channel.queueDeclare("queue7",false,false,false,null);

        //参数1:交换机名称,如果直接发送信息到队列,则交换机名称为""

        //参数2:⽬标队列名称

        //参数3:设置当前这条消息的属性(设置过期时间 10)

        //参数4:消息的内容

        channel.basicPublish("","queue1",null,msg.getBytes());

        System.out.println("发送:" + msg);

        channel.close();

        connection.close();

    }

}
1.2、消息消费者
1、创建Maven项⽬2、添加依赖3、log4j.properties4、ConnetionUtil.java5、消费者消费消息import com.qfedu.mq.utils.ConnectionUtil;
import com.rabbitmq.client.*;
import java.io.IOException;
import java.util.concurrent.TimeoutException;
public class ReceiveMsg {
public static void main(String[] args) throws IOException, TimeoutException {
Connection connection = ConnectionUtil.getConnection();
Channel channel = connection.createChannel();
Consumer consumer = new DefaultConsumer(channel){
@Override
public void handleDelivery(String consumerTag, Envelope envelope, AMQP.BasicProperties properties, byte[] body) throws IOException {
//body就是从队列中获取的数据
String msg = new String(body);
System.out.println("接收:"+msg);
}
};
channel.basicConsume("queue1",true,consumer);
}
}
2、⼯作模式
⼀个发送者多个消费者
2.1、发送者
public class SendMsg {

    public static void main(String[] args) throws Exception{

        System.out.println("请输⼊消息:");

        Scanner scanner = new Scanner(System.in);

        String msg = null;

        while(!"quit".equals(msg = scanner.nextLine())){

            Connection connection = ConnectionUtil.getConnection();

            Channel channel = connection.createChannel();

            channel.basicPublish("","queue2",null,msg.getBytes());

            System.out.println("发送:" + msg);

            channel.close();

            connection.close();

        }

    }

}
2.2、消费者1
public class ReceiveMsg {

    public static void main(String[] args) throws Exception {

        Connection connection = ConnectionUtil.getConnection();

        Channel channel = connection.createChannel();

        Consumer consumer = new DefaultConsumer(channel){

            @Override

            public void handleDelivery(String consumerTag, Envelope envelope, AMQP.BasicProperties properties, byte[] body) throws IOException {

                //body就是从队列中获取的数据

                String msg = new String(body);

                System.out.println("Consumer1接收:"+msg);

                if("wait".equals(msg)){

                    try {

                        Thread.sleep(10000);

                    }

                    catch (InterruptedException e) {

                        e.printStackTrace();

                    }

                }

            }

        };

        channel.basicConsume("queue2",true,consumer);

    }

}
2.3、消费者2
public class ReceiveMsg {

    public static void main(String[] args) throws IOException,

    TimeoutException {

        Connection connection = ConnectionUtil.getConnection();

        Channel channel = connection.createChannel();

        Consumer consumer = new DefaultConsumer(channel){

            @Override

            public void handleDelivery(String consumerTag, Envelope envelope, AMQP.BasicProperties properties, byte[] body) throws IOException {

                //body就是从队列中获取的数据

                String msg = new String(body);

                System.out.println("Consumer2接收:"+msg);

            }

        };

        channel.basicConsume("queue2",true,consumer);

    }

}
3、订阅模式
1、发送者 发送消息到交换机
public class SendMsg {

    public static void main(String[] args) throws Exception{

        System.out.println("请输⼊消息:");

        Scanner scanner = new Scanner(System.in);

        String msg = null;

        while(!"quit".equals(msg = scanner.nextLine())){

            Connection connection = ConnectionUtil.getConnection();

            Channel channel = connection.createChannel();

            channel.basicPublish("ex1","",null,msg.getBytes());

            System.out.println("发送:" + msg);

            channel.close();

            connection.close();

        }

    }

}
2、消费者1
public class ReceiveMsg1 {

    public static void main(String[] args) throws Exception {

        Connection connection = ConnectionUtil.getConnection();

        Channel channel = connection.createChannel();

        Consumer consumer = new DefaultConsumer(channel){

            @Override

            public void handleDelivery(String consumerTag, Envelope envelope, AMQP.BasicProperties properties, byte[] body) throws IOException {

                //body就是从队列中获取的数据

                String msg = new String(body);

                System.out.println("Consumer1接收:"+msg);

                if("wait".equals(msg)){

                    try {

                        Thread.sleep(10000);

                    }

                    catch (InterruptedException e) {

                        e.printStackTrace();

                    }

                }

            }

        };

        channel.basicConsume("queue3",true,consumer);

    }

}
3、消费者2
public class ReceiveMsg2 {

    public static void main(String[] args) throws IOException,

    TimeoutException {

        Connection connection = ConnectionUtil.getConnection();

        Channel channel = connection.createChannel();

        Consumer consumer = new DefaultConsumer(channel){

            @Override

            public void handleDelivery(String consumerTag, Envelope envelope, AMQP.BasicProperties properties, byte[] body) throws IOException {

                //body就是从队列中获取的数据

                String msg = new String(body);

                System.out.println("Consumer2接收:"+msg);

            }

        }

        ;

        channel.basicConsume("queue4",true,consumer);

    }

}
4、路由模式
1、发送者 发送消息到交换机
public class SendMsg {

    public static void main(String[] args) throws Exception{

        System.out.println("请输⼊消息:");

        Scanner scanner = new Scanner(System.in);

        String msg = null;

        while(!"quit".equals(msg = scanner.nextLine())){

            Connection connection = ConnectionUtil.getConnection();

            Channel channel = connection.createChannel();

            if(msg.startsWith("a")){

                channel.basicPublish("ex2","a",null,msg.getBytes());

            } else if(msg.startsWith("b")){

                channel.basicPublish("ex2","b",null,msg.getBytes());

            }

            System.out.println("发送:" + msg);

            channel.close();

            connection.close();

        }

    }

}
2、消费者1
public class ReceiveMsg1 {

    public static void main(String[] args) throws Exception {

        Connection connection = ConnectionUtil.getConnection();

        Channel channel = connection.createChannel();

        Consumer consumer = new DefaultConsumer(channel){

            @Override

            public void handleDelivery(String consumerTag, Envelope envelope, AMQP.BasicProperties properties, byte[] body) throws IOException {

                //body就是从队列中获取的数据

                String msg = new String(body);

                System.out.println("Consumer1接收:"+msg);

                if("wait".equals(msg)){

                    try {

                        Thread.sleep(10000);

                    }

                    catch (InterruptedException e) {

                        e.printStackTrace();

                    }

                }

            }

        };

        channel.basicConsume("queue5",true,consumer);

    }

}
3、消费者2
public class ReceiveMsg2 {

    public static void main(String[] args) throws IOException, TimeoutException {

        Connection connection = ConnectionUtil.getConnection();

        Channel channel = connection.createChannel();

        Consumer consumer = new DefaultConsumer(channel){

            @Override

            public void handleDelivery(String consumerTag, Envelope envelope, AMQP.BasicProperties properties, byte[] body) throws IOException {

                //body就是从队列中获取的数据

                String msg = new String(body);

                System.out.println("Consumer2接收:"+msg);

            }

        };

        channel.basicConsume("queue6",true,consumer);

    }

}
七、在SpringBoot应⽤中使⽤MQ
SpringBoot应⽤可以完成⾃动配置及依赖注⼊——可以通过Spring直接提供与MQ的连接对象
1、消息⽣产者
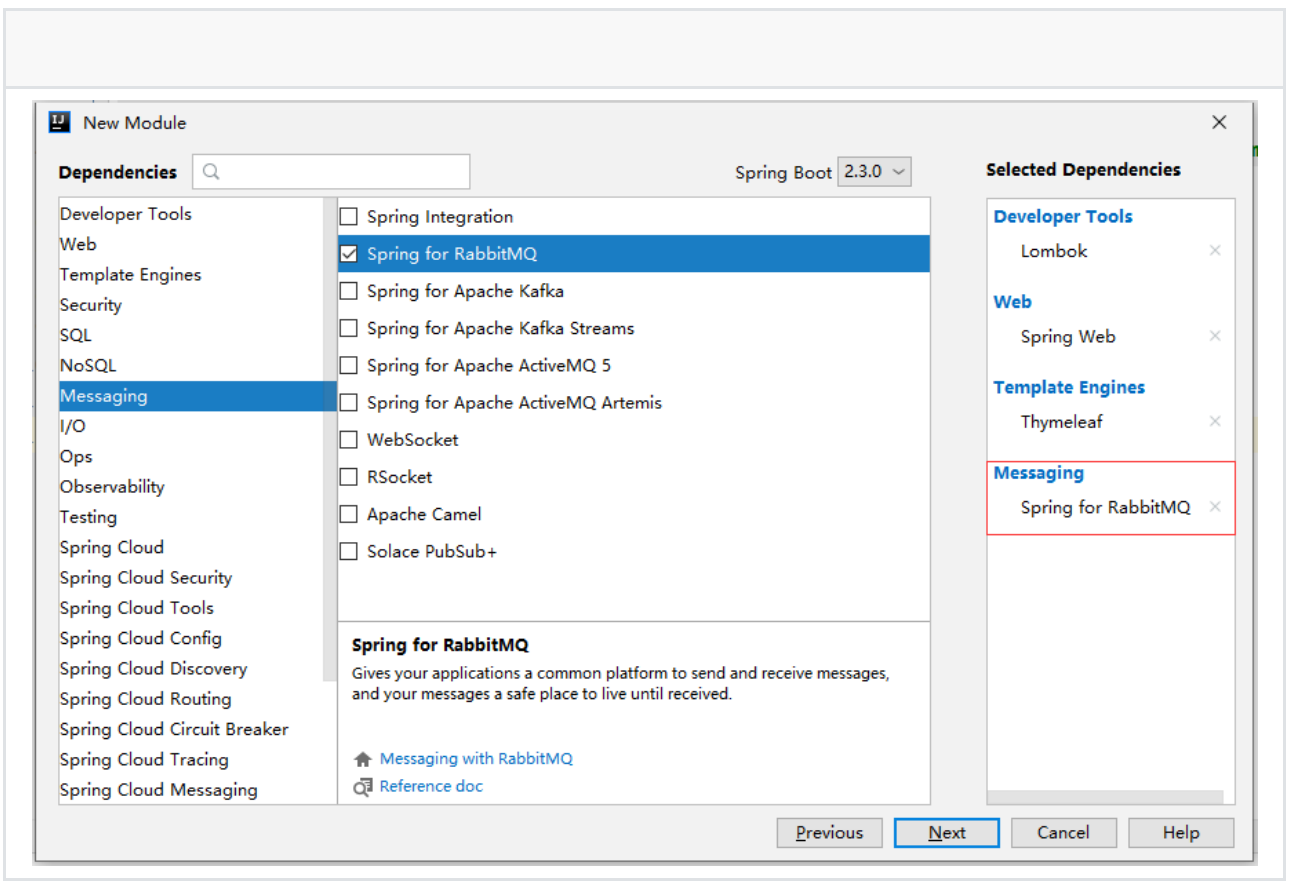
1、创建SpringBoot应⽤,添加依赖
2、配置application.yml
server:

  port: 9001

spring:

  application:

    name: producer

  rabbitmq:

    host: 47.96.11.185

    port: 5672

    virtual-host: host1

    username: ytao

    password: admin123
3、发送消息
@Service

public class TestService {

    @Resource

    private AmqpTemplate amqpTemplate;

    public void sendMsg(String msg){

        //1. 发送消息到队列

        amqpTemplate.convertAndSend("queue1",msg);

        //2. 发送消息到交换机(订阅交换机)

        amqpTemplate.convertAndSend("ex1","",msg);

        //3. 发送消息到交换机(路由交换机)

        amqpTemplate.convertAndSend("ex2","a",msg);

    }

}
2、消息消费者
1、创建项⽬添加依赖2、配置yml3、接收消息@Service
//@RabbitListener(queues = {"queue1","queue2"})
@RabbitListener(queues = "queue1")
public class ReceiveMsgService {
@RabbitHandler
public void receiveMsg(String msg){
System.out.println("接收MSG:"+msg);
}
}
⼋、使⽤RabbitMQ传递对象
RabbitMQ是消息队列,发送和接收的都是字符串/字节数组类型的消息
1、使⽤序列化对象
要求:传递的对象实现序列化接⼝传递的对象的包名、类名、属性名必须⼀致
1、消息提供者
@Service

public class MQService {

    @Resource

    private AmqpTemplate amqpTemplate;

    public void sendGoodsToMq(Goods goods){

        //消息队列可以发送 字符串、字节数组、序列化对象

        amqpTemplate.convertAndSend("","queue1",goods);

    }

}
2、消息消费者
@Component

@RabbitListener(queues = "queue1")

public class ReceiveService {

    @RabbitHandler

    public void receiveMsg(Goods goods){

        System.out.println("Goods---"+goods);

    }

}
2、使⽤序列化字节数组
要求:传递的对象实现序列化接⼝传递的对象的包名、类名、属性名必须⼀致
1、消息提供者
@Service

public class MQService {

    @Resource

    private AmqpTemplate amqpTemplate;

    public void sendGoodsToMq(Goods goods){

        //消息队列可以发送 字符串、字节数组、序列化对象

        byte[] bytes = SerializationUtils.serialize(goods);

        amqpTemplate.convertAndSend("","queue1",bytes);

    }

}
2、消息消费者
@Component

@RabbitListener(queues = "queue1")

public class ReceiveService {

    @RabbitHandler

    public void receiveMsg(byte[] bs){

        Goods goods = (Goods) SerializationUtils.deserialize(bs);

        System.out.println("byte[]---"+goods);

    }

}
3、使⽤JSON字符串传递
要求:对象的属性名⼀直
1、消息提供者
@Service

public class MQService {

    @Resource

    private AmqpTemplate amqpTemplate;

    public void sendGoodsToMq(Goods goods) throws JsonProcessingException {

        //消息队列可以发送 字符串、字节数组、序列化对象

        ObjectMapper objectMapper = new ObjectMapper();

        String msg = objectMapper.writeValueAsString(goods);

        amqpTemplate.convertAndSend("","queue1",msg);

    }

}
2、消息消费者
@Component

@RabbitListener(queues = "queue1")

public class ReceiveService {

    @RabbitHandler

    public void receiveMsg(String msg) throws JsonProcessingException {

        ObjectMapper objectMapper = new ObjectMapper();

        Goods goods = objectMapper.readValue(msg,Goods.class);

        System.out.println("String---"+msg);

    }

}
九、基于Java的交换机与队列创建
我们使⽤消息队列,消息队列和交换机可以通过管理系统完成创建,也可以在应⽤程序中通过Java代码来完成创建
1、普通Maven项⽬交换机及队列创建
1、使⽤Java代码新建队列
//1.定义队列 (使⽤Java代码在MQ中新建⼀个队列)

//参数1:定义的队列名称

//参数2:队列中的数据是否持久化(如果选择了持久化)

//参数3: 是否排外(当前队列是否为当前连接私有)

//参数4:⾃动删除(当此队列的连接数为0时,此队列会销毁(⽆论队列中是否还有数据))

//参数5:设置当前队列的参数

channel.queueDeclare("queue7",false,false,false,null);
2、新建交换机
//定义⼀个“订阅交换机”

channel.exchangeDeclare("ex3", BuiltinExchangeType.FANOUT);

//定义⼀个“路由交换机”

channel.exchangeDeclare("ex4", BuiltinExchangeType.DIRECT);
3、绑定队列到交换机
//绑定队列

//参数1:队列名称

//参数2:⽬标交换机

//参数3:如果绑定订阅交换机参数为"",如果绑定路由交换机则表示设置队列的key

channel.queueBind("queue7","ex4","k1");

channel.queueBind("queue8","ex4","k2");
2、SpringBoot应⽤中通过配置完成队列的创建
@Configuration

public class RabbitMQConfiguration {

    //声明队列

    @Bean

    public Queue queue9(){

        Queue queue9 = new Queue("queue9");

        //设置队列属性

        return queue9;

    }

    @Bean

    public Queue queue10(){

        Queue queue10 = new Queue("queue10");

        //设置队列属性

        return queue10;

    }

    //声明订阅模式交换机

    @Bean

    public FanoutExchange ex5(){

        return new FanoutExchange("ex5");

    }

    //声明路由模式交换机

    @Bean

    public DirectExchange ex6(){

        return new DirectExchange("ex6");

    }

    //绑定队列

    @Bean

    public Binding bindingQueue9(Queue queue9, DirectExchange ex6){

        return BindingBuilder.bind(queue9).to(ex6).with("k1");

    }

    @Bean

    public Binding bindingQueue10(Queue queue10, DirectExchange ex6){

        return BindingBuilder.bind(queue10).to(ex6).with("k2");

    }

}
⼗、消息的可靠性
消息的可靠性:从 ⽣产者发送消息 —— 消息队列存储消息 —— 消费者消费消息 的整个过程中消息的安全性及可控性。
- ⽣产者
- 消息队列
- 消费者
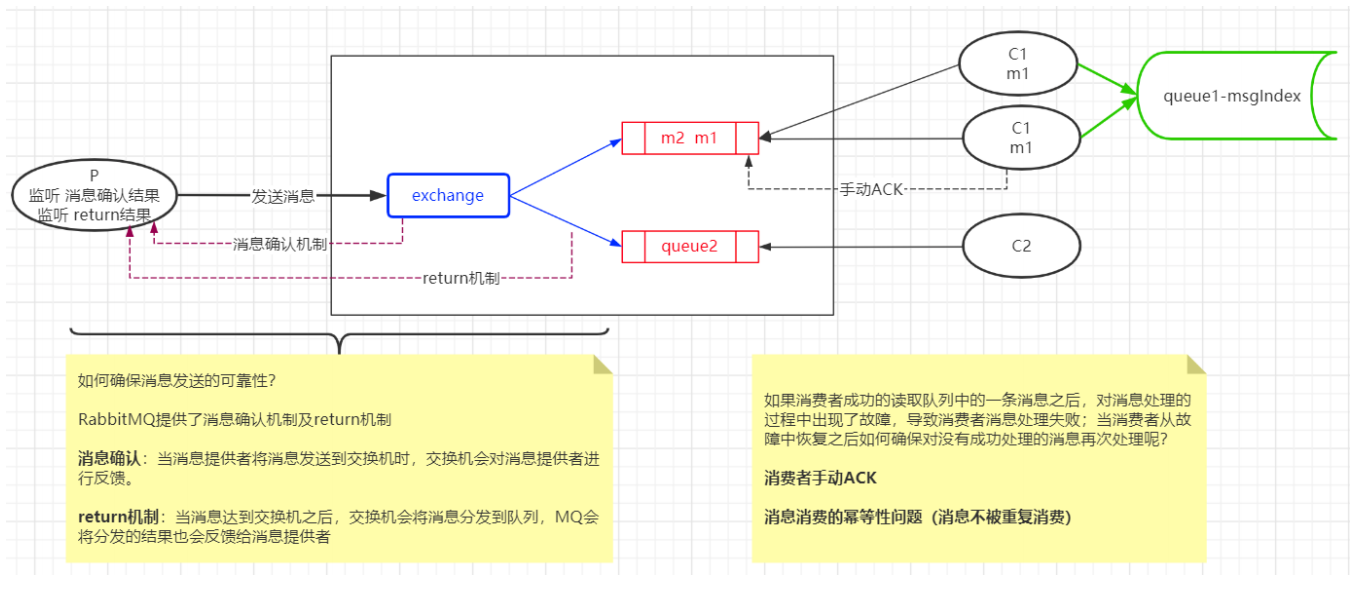
1、RabbitMQ事务
RabbitMQ事务指的是基于客户端实现的事务管理,当在消息发送过程中添加了事务,处理效率降低⼏⼗倍甚⾄上百倍
Connection connection = RabbitMQUtil.getConnection(); //connection 表示与 host1的连接

Channel channel = connection.createChannel();

channel.txSelect();//开启事务

try{

    channel.basicPublish("ex4", "k1", null, msg.getBytes());

    channel.txCommit();//提交事务

}

catch (Exception e){

    channel.txRollback();//事务回滚

}

finally{

    channel.close();

    connection.close();

}
2、RabbitMQ消息确认和return机制
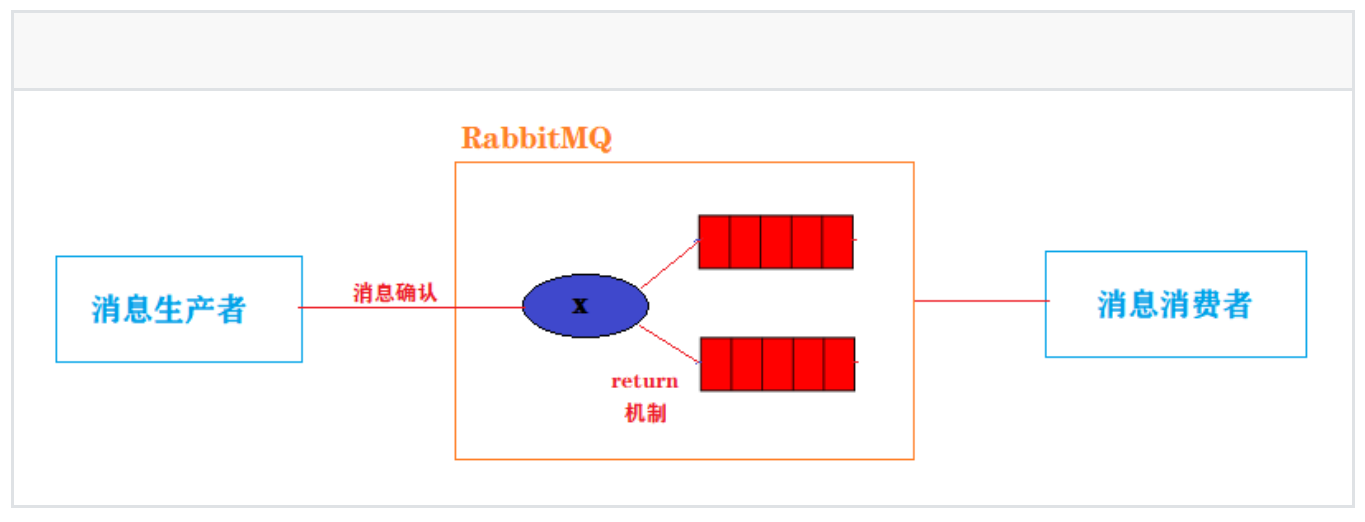
1、消息确认机制:确认消息提供者是否成功发送消息到交换机2、return机制:确认消息是否成功的从交换机分发到队列
2.1、普通Maven项⽬的消息确认
1、普通confirm⽅式
//1.发送消息之前开启消息确认

channel.confirmSelect();

channel.basicPublish("ex1", "a", null, msg.getBytes());

//2.接收消息确认

Boolean b = channel.waitForConfirms();

System.out.println("发送:" +(b?"成功":"失败"));
2、批量confirm⽅式
//1.发送消息之前开启消息确认

channel.confirmSelect();

//2.批量发送消息

for (int i=0 ; i<10 ; i++){

    channel.basicPublish("ex1", "a", null, msg.getBytes());

}

//3.接收批量消息确认:发送的所有消息中,如果有⼀条是失败的,则所有消息发送直接失败,抛出IO异常

Boolean b = channel.waitForConfirms();
3、异步confirm⽅式
//发送消息之前开启消息确认

channel.confirmSelect();

//批量发送消息

for (int i=0 ; i<10 ; i++){

    channel.basicPublish("ex1", "a", null, msg.getBytes());

}

//假如发送消息需要10s,waitForConfirms会进⼊阻塞状态

//boolean b = channel.waitForConfirms();

//使⽤监听器异步confirm

channel.addConfirmListener(new ConfirmListener() {

    //参数1: long l 返回消息的表示

    //参数2: boolean b 是否为批量confirm

    public void handleAck(long l, Boolean b) throws IOException {

        System.out.println("~~~~~消息成功发送到交换机");

    }

    public void handleNack(long l, Boolean b) throws IOException {

        System.out.println("~~~~~消息发送到交换机失败");

    }

}

);
2.2、普通Maven项⽬的return机制
1、添加return监听器2、发送消息是指定第三个参数为true3、由于监听器监听是异步处理,所以在消息发送之后不能关闭channelString msg = "Hello HuangDaoJun!";
Connection connection = ConnectionUtil.getConnection();
//相当于JDBC操作的数据库连接
Channel channel = connection.createChannel();
//相当于JDBC操作的statement
//return机制:监控交换机是否将消息分发到队列
channel.addReturnListener(new ReturnListener() {
public void handleReturn(int i, String s, String s1, String s2,AMQP.BasicProperties basicProperties,byte[] bytes) throws IOException {
//如果交换机分发消息到队列失败,则会执⾏此⽅法(⽤来处理交换机分发消息到队列失败的情况)
System.out.println("*****"+i);//标识
System.out.println("*****"+s);//
System.out.println("*****"+s1);//交换机名
System.out.println("*****"+s2);//交换机对应的队列的key
System.out.println("*****"+new String(bytes));//发送的消息
}
}
);
//发送消息
//channel.basicPublish("ex2", "c", null, msg.getBytes());
channel.basicPublish("ex2", "c", true, null, msg.getBytes());
2.3、在SpringBoot应⽤实现消息确认与return监听
1、配置application.yml,开启消息确认和return监听
spring:

 rabbitmq:

    publisher-confirm-type: simple ## 开启消息确认模式

    publisher-returns: true ##使⽤return监听机制
2、创建confirm和return监听
2.1、消息确认
@Component

public class MyConfirmListener implements

RabbitTemplate.ConfirmCallback {

    @Autowired

    private AmqpTemplate amqpTemplate;

    @Autowired

    private RabbitTemplate rabbitTemplate;

    @PostConstruct

    public void init(){

        rabbitTemplate.setConfirmCallback(this);

    }

    @Override

    public void confirm(CorrelationData correlationData, Boolean b, String s) {

        //参数b 表示消息确认结果

        //参数s 表示发送的消息

        if(b){

            System.out.println("消息发送到交换机成功!");

        } else{

            System.out.println("消息发送到交换机失败!");

            amqpTemplate.convertAndSend("ex4","",s);

        }

    }

}
2.2、return机制
@Component

public class MyReturnListener implements RabbitTemplate.ReturnsCallback

{

    @Autowired

    private AmqpTemplate amqpTemplate;

    @Autowired

    private RabbitTemplate rabbitTemplate;

    @PostConstruct

    public void init(){

        rabbitTemplate.setReturnsCallback(this);

    }

    @Override

    public void returnedMessage(ReturnedMessage returnedMessage) {

        System.out.println("消息从交换机分发到队列失败");

        String exchange = returnedMessage.getExchange();

        String routingKey = returnedMessage.getRoutingKey();

        String msg = returnedMessage.getMessage().toString();

        amqpTemplate.convertAndSend(exchange,routingKey,msg);

    }

}
3、RabbitMQ消费者⼿动应答
@Component

@RabbitListener(queues="queue01")

public class Consumer1 {

    @RabbitHandler

    public void process(String msg,Channel channel, Message message) throws IOException {

        try {

            System.out.println("get msg1 success msg = "+msg);

            /**

         * 确认⼀条消息:<br>

         * channel.basicAck(deliveryTag, false); <br>

         * deliveryTag:该消息的index <br>

         * multiple:是否批量.true:将⼀次性ack所有⼩于deliveryTag的消息 <br>

       */

            channel.basicAck(message.getMessageProperties().getDeliveryTag(), false);

        } catch (Exception e) {

            //消费者处理出了问题,需要告诉队列信息消费失败

            /**

         * 拒绝确认消息:<br>

         * channel.basicNack(long deliveryTag, boolean multiple, boolean requeue) ; <br>

         * deliveryTag:该消息的index<br>

         * multiple:是否批量.true:将⼀次性拒绝所有⼩于deliveryTag的消息。<br>

         * requeue:被拒绝的是否重新⼊队列 <br>

       */

            channel.basicNack(message.getMessageProperties().getDeliveryTag(), false, true);

            System.err.println("get msg1 failed msg = "+msg);

        }

    }

}
4、消息消费的幂等性问题
消息消费的幂等性——多次消费的执⾏结果时相同的 (避免重复消费)解决⽅案:处理成功的消息setnx到redis
⼗⼀、延迟机制
1、延迟队列
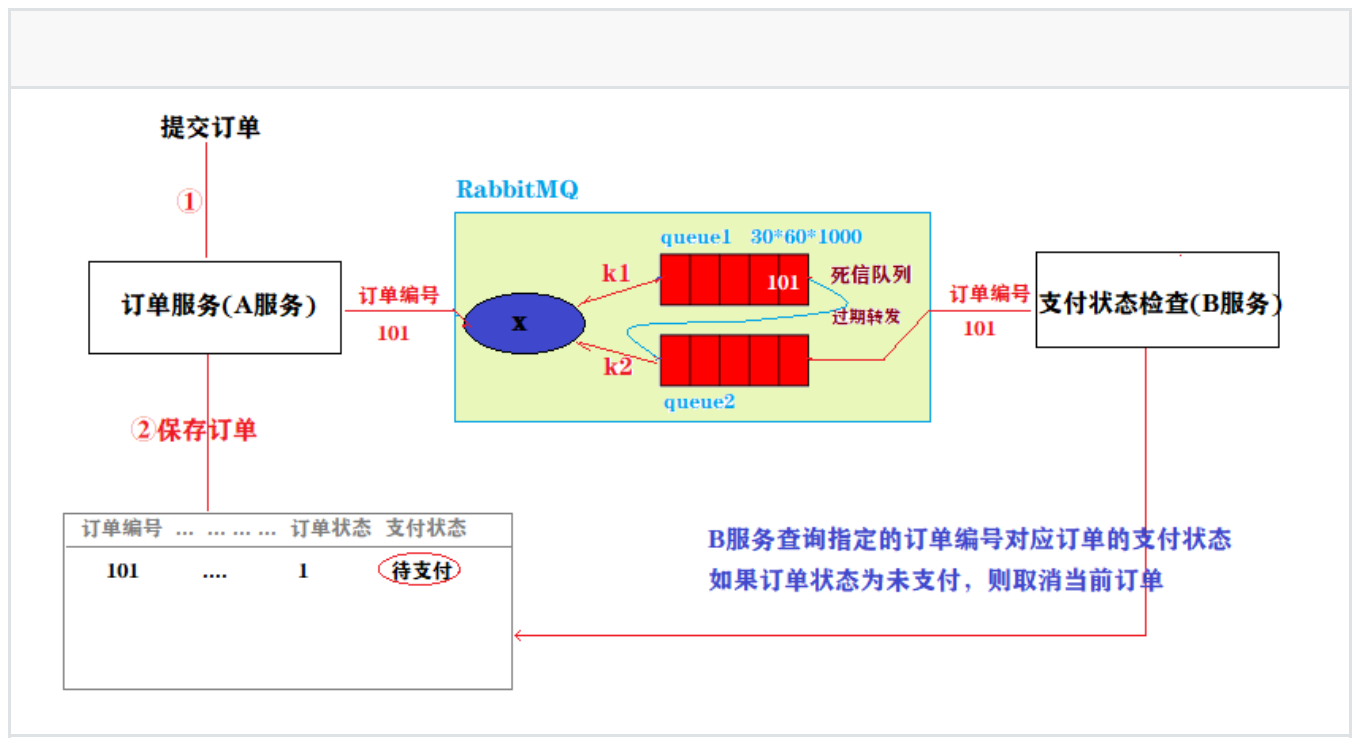
1、延迟队列——消息进⼊到队列之后,延迟指定的时间才能被消费者消费2、AMQP协议和RabbitMQ队列本身是不⽀持延迟队列功能的,但是可以通过TTL(Time To Live)特性模拟延迟队列的功能3、TTL就是消息的存活时间。RabbitMQ可以分别对队列和消息设置存活时间

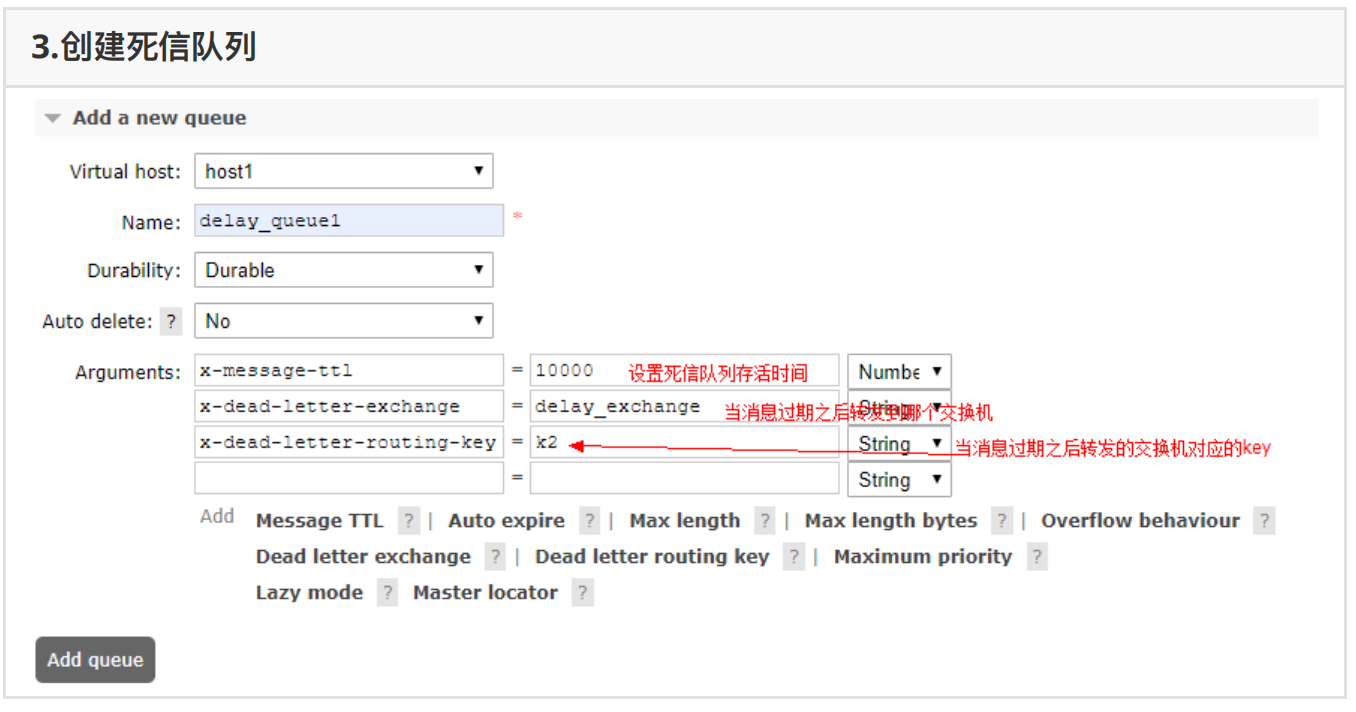
1、在创建队列的时候可以设置队列的存活时间,当消息进⼊到队列并且在存活时间内没有消费者消费,则此消息就会从当前队列被移除;2、创建消息队列没有设置TTL,但是消息设置了TTL,那么当消息的存活时间结束,也会被移除;3、当TTL结束之后,我们可以指定将当前队列的消息转存到其他指定的队列
2、使⽤延迟队列实现订单⽀付监控
1、实现流程图
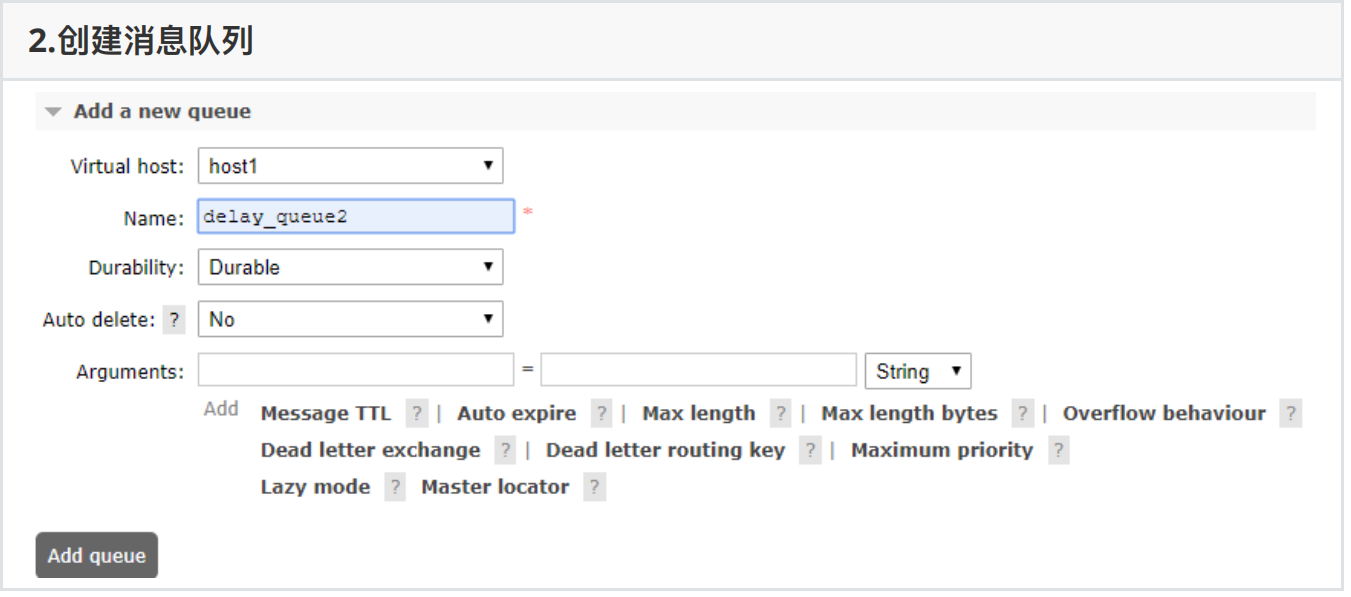
2、创建交换机和队列
⼗⼆、消息队列作⽤/使⽤场景总结
1、解耦
场景说明:⽤户下单之后,订单系统要通知库存系统


2、异步
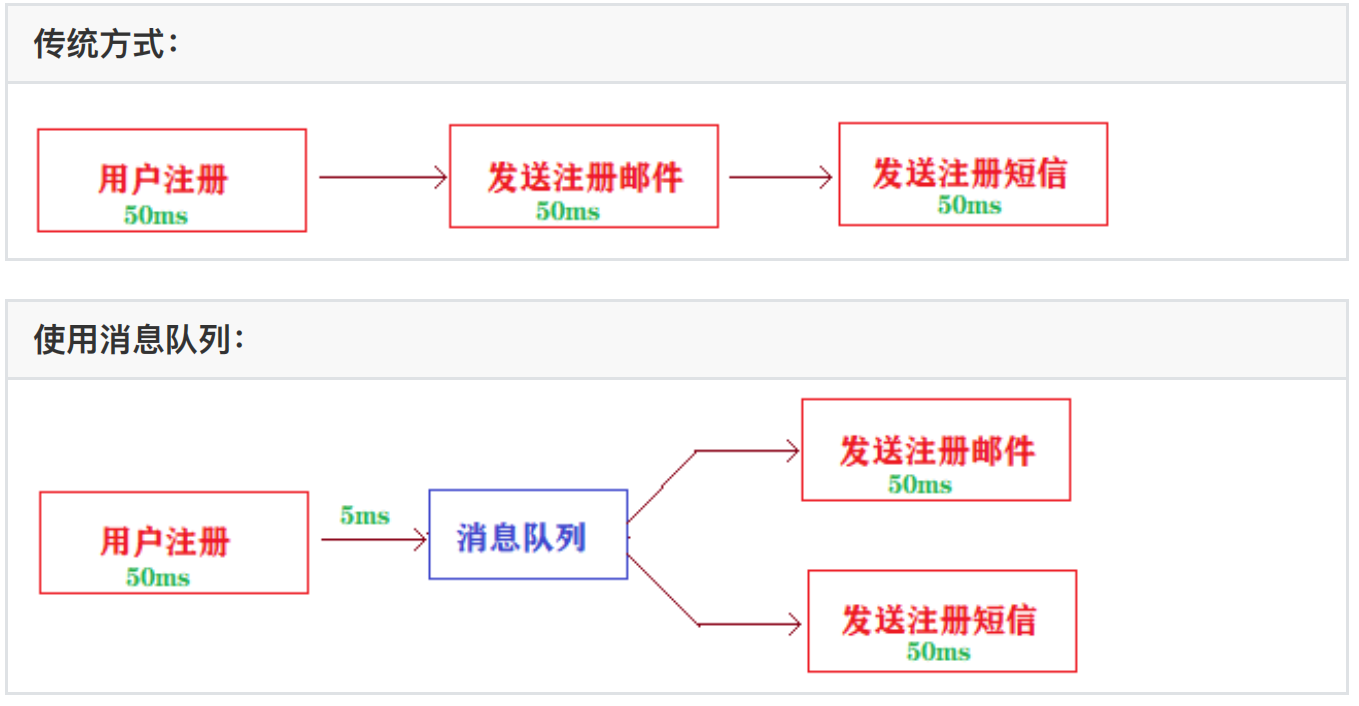
场景说明:⽤户注册成功之后,需要发送注册邮件及注册短信提醒
3、消息通信
场景说明:应⽤系统之间的通信,例如聊天室

4、流量削峰
场景说明:秒杀业务

5、⽇志处理
场景说明:系统中⼤量的⽇志处理

RabbitMQ保姆级教程最佳实践的更多相关文章
- 保姆级教程——Ubuntu16.04 Server下深度学习环境搭建:安装CUDA8.0,cuDNN6.0,Bazel0.5.4,源码编译安装TensorFlow1.4.0(GPU版)
写在前面 本文叙述了在Ubuntu16.04 Server下安装CUDA8.0,cuDNN6.0以及源码编译安装TensorFlow1.4.0(GPU版)的亲身经历,包括遇到的问题及解决办法,也有一些 ...
- 自建本地服务器,自建Web服务器——保姆级教程!
搭建本地服务器,Web服务器--保姆级教程! 本文首发于https://blog.chens.life/How-to-build-your-own-server.html. 先上图!大致思路就是如此. ...
- Eclipse for C/C++ 开发环境部署保姆级教程
Eclipse for C/C++ 开发环境部署保姆级教程 工欲善其事,必先利其器. 对开发人员来说,顺手的开发工具必定事半功倍.自学编程的小白不知道该选择那个开发工具,Eclipse作为一个功能强大 ...
- 强大博客搭建全过程(1)-hexo博客搭建保姆级教程
1. 前言 本人本来使用国内的开源项目solo搭建了博客,但感觉1核CPU2G内存的服务器,还是稍微有点重,包括服务器内还搭建了数据库.如果自己开发然后搭建,耗费时间又比较多,于是乎开始寻找轻量型的博 ...
- RocketMQ保姆级教程
大家好,我是三友~~ 上周花了一点时间从头到尾.从无到有地搭建了一套RocketMQ的环境,觉得还挺easy的,所以就写篇文章分享给大家. 整篇文章可以大致分为三个部分,第一部分属于一些核心概念和工作 ...
- 保姆级教程!使用k3d实现K3s高可用!
你是否曾经想尝试使用K3s的高可用模式?但是苦于没有3个"备用节点",或者没有设置相同数量的虚拟机所需的时间?那么k3d这个方案也许你十分需要噢! 如果你对k3d尚不了解,它的名字 ...
- 用 Python 写个贪吃蛇,保姆级教程!
本文基于 Windows 环境开发,适合 Python 新手 本文作者:HelloGitHub-Anthony HelloGitHub 推出的<讲解开源项目>系列,本期介绍 Python ...
- 保姆级教程!手把手教你使用Longhorn管理云原生分布式SQL数据库!
作者简介 Jimmy Guerrero,在开发者关系团队和开源社区拥有20多年的经验.他目前领导YugabyteDB的社区和市场团队. 本文来自Rancher Labs Longhorn是Kubern ...
- 保姆级教程,如何发现 GitHub 上的优质项目?
先看再点赞,给自己一点思考的时间,微信搜索[沉默王二]关注这个靠才华苟且的程序员.本文 GitHub github.com/itwanger 已收录,里面还有一线大厂整理的面试题,以及我的系列文章. ...
- ElasticSearch入门篇(保姆级教程)
本章将介绍:ElasticSearch的作用,搭建elasticsearch的环境(Windows/Linux),ElasticSearch集群的搭建,可视化客户端插件elasticsearch-he ...
随机推荐
- Java如何生成随机数?要不要了解一下!
前言 我们在学习 Java 基础时就知道可以生成随机数,可以为我们枯燥的学习增加那么一丢丢的乐趣.本文就来介绍 Java 随机数. 一.Random类介绍 在 Java 中使用 Random 工具类来 ...
- App性能测试之SoloPi
SoloPi简介 SoloPi是蚂蚁金服开发的一款无线化.非侵入.免Root的Android专项测试工具.直接操控安卓系统的手机或智能设备,即可完成自动化的功能.性能.兼容性.以及稳定性测试等工作,降 ...
- 解决github无法打开问题
在国内访问国外服务器(如github)会有卡顿.无法加载等问题,提供两种解决方案: 1.查看github的IP地址并修改Hosts windows键+R,打开cmd(或windows键+X,打开Win ...
- C++面试八股文:static_cast了解一下?
某日二师兄参加XXX科技公司的C++工程师开发岗位第20面: 面试官:C++中支持哪些类型转换? 二师兄:C++支持C风格的类型转换,并在C++11引入新的关键字规范了类型转换. 二师兄:C++11引 ...
- 如何通过数据warehouse更好地支持企业数字化转型战略
目录 1. 引言 2. 技术原理及概念 3. 实现步骤与流程 4. 应用示例与代码实现讲解 5. 优化与改进 <如何通过数据 warehouse 更好地支持企业数字化转型战略> 随着企业数 ...
- 曲线艺术编程 coding curves 第十二章 超级椭圆与超级方程(Superellipses and Superformulas)
第十三章 超级椭圆与超级方程(Superellipses and Superformulas) 原作:Keith Peters https://www.bit-101.com/blog/2022/11 ...
- Nginx+php关联
nginx配置php选项,解除对IIS.Apache的php环境依赖 php.ini配置 取消extension_dir注释 取消cgi.fix_pathinfo注释 nginx.conf配置 取消 ...
- 关于Java已死,看看国外开发者怎么说的
博主在浏览 medium 社区时,发现了一篇点赞量 1.5k 的文章,名称叫<Java is Dead - 5 Misconceptions of developers that still t ...
- 【Nginx】Nginx访问静态资源
Nginx访问静态资源 即通过IP:端口/文件名 访问文件实现. 修改Nginx配置 location / { # root html; # index index.html index.htm; a ...
- Golang 中文转拼音
翻遍整个 GitHub , Golang 中文转拼音类库, 怎么就这么难找呢? 于是我造了一个轮子: 中文转拼音类库. 目前来说应该是最好用的了. GitHub 传送门: https://github ...

