httprunner3.x全网最详细教程
一、所需环境
- wiindows10以上
- python3.6以上
- httprunner3.1.6(最新版本)
- pycharm社区版
二、安装httprunner
1、卸载旧版本
卸载之前版本的命令为:pip3 uninstall httprunner
2、安装新版本
默认安装方式:
pip3 install httprunner
以这种方式是默认安装最新版本的,并且是从国外服务器下载,但是偶尔会出现报错或者超时的情况,因此一般采用国内镜像安装,这里采用国内豆瓣源镜像安装。
一般安装命令:
pip3 install httprunner==3.1.6 -i https://pypi.douban.com/simple
此种方式是指定安装版本和安装源
安装完成后如下显示,表示安装成功
点击查看代码
C:\Users\fsy>pip3 install httprunner==3.1.6 -i https://pypi.douban.com/simple

Looking in indexes: https://pypi.douban.com/simple

Collecting httprunner==3.1.6

  Downloading https://pypi.doubanio.com/packages/e4/2f/25011310f2f13f55de18845435f62b0ae16fbb69500885c268705ef42ee2/httprunner-3.1.6-py3-none-any.whl (60 kB)

     |████████████████████████████████| 60 kB 549 kB/s

Collecting requests<3.0.0,>=2.22.0

  Downloading https://pypi.doubanio.com/packages/2d/61/08076519c80041bc0ffa1a8af0cbd3bf3e2b62af10435d269a9d0f40564d/requests-2.27.1-py2.py3-none-any.whl (63 kB)

     |████████████████████████████████| 63 kB 584 kB/s

Collecting jmespath<0.10.0,>=0.9.5

  Downloading https://pypi.doubanio.com/packages/a3/43/1e939e1fcd87b827fe192d0c9fc25b48c5b3368902bfb913de7754b0dc03/jmespath-0.9.5-py2.py3-none-any.whl (24 kB)

Collecting pytest<6.0.0,>=5.4.2

  Downloading https://pypi.doubanio.com/packages/9f/f3/0a83558da436a081344aa6c8b85ea5b5f05071214106036ce341b7769b0b/pytest-5.4.3-py3-none-any.whl (248 kB)

     |████████████████████████████████| 248 kB 819 kB/s

Collecting sentry-sdk<0.15.0,>=0.14.4

  Downloading https://pypi.doubanio.com/packages/1b/95/9a20eebcedab2c1c63fad59fe19a0469edfc2a25b8576497e8084629c2ff/sentry_sdk-0.14.4-py2.py3-none-any.whl (104 kB)

     |████████████████████████████████| 104 kB 1.3 MB/s

Collecting black<20.0,>=19.10b0

  Downloading https://pypi.doubanio.com/packages/fd/bb/ad34bbc93d1bea3de086d7c59e528d4a503ac8fe318bd1fa48605584c3d2/black-19.10b0-py36-none-any.whl (97 kB)

     |████████████████████████████████| 97 kB 951 kB/s

Collecting pytest-html<3.0.0,>=2.1.1

  Downloading https://pypi.doubanio.com/packages/00/a7/34f195c514d39b4453619b3eb284989e5adb09a2a68ac09ce3779f9b9478/pytest_html-2.1.1-py2.py3-none-any.whl (16 kB)

Collecting pyyaml<6.0.0,>=5.1.2

  Downloading https://pypi.doubanio.com/packages/97/d3/24097209f6af04fcdbb40500480a0feaa62164e60bca4c9532f0e9354e47/PyYAML-5.4.1-cp38-cp38-win_amd64.whl (213 kB)

     |████████████████████████████████| 213 kB 3.3 MB/s

Collecting loguru<0.5.0,>=0.4.1

  Downloading https://pypi.doubanio.com/packages/b2/f4/2c8b94025c6e30bdb331c7ee628dc152771845aedff35f0365c2a4dacd42/loguru-0.4.1-py3-none-any.whl (54 kB)

     |████████████████████████████████| 54 kB 331 kB/s

Collecting jinja2<3.0.0,>=2.10.3

  Downloading https://pypi.doubanio.com/packages/7e/c2/1eece8c95ddbc9b1aeb64f5783a9e07a286de42191b7204d67b7496ddf35/Jinja2-2.11.3-py2.py3-none-any.whl (125 kB)

     |████████████████████████████████| 125 kB 819 kB/s

Collecting pydantic<2.0,>=1.4

  Downloading https://pypi.doubanio.com/packages/5f/ca/ec4b2597b7ace79a05300a2e7eff8713b55745312b2acc89f74bf73f8dfc/pydantic-1.9.0-cp38-cp38-win_amd64.whl (2.1 MB)

     |████████████████████████████████| 2.1 MB 1.3 MB/s

Collecting Brotli<2.0.0,>=1.0.9

  Downloading https://pypi.doubanio.com/packages/63/29/1b104b5915e61d9f7443889657d93937b7e0b33b331609b82693547934a0/Brotli-1.0.9-cp38-cp38-win_amd64.whl (365 kB)

     |████████████████████████████████| 365 kB 6.8 MB/s

Collecting attrs>=18.1.0

  Downloading https://pypi.doubanio.com/packages/be/be/7abce643bfdf8ca01c48afa2ddf8308c2308b0c3b239a44e57d020afa0ef/attrs-21.4.0-py2.py3-none-any.whl (60 kB)

     |████████████████████████████████| 60 kB 952 kB/s

Collecting typed-ast>=1.4.0

  Downloading https://pypi.doubanio.com/packages/93/6a/1b01a1864854fd6ed63e0e0649a9c1e4ef1425e417c43e7b09c0e4e7fdac/typed_ast-1.5.1-cp38-cp38-win_amd64.whl (164 kB)

     |████████████████████████████████| 164 kB 819 kB/s

Collecting click>=6.5

  Downloading https://pypi.doubanio.com/packages/48/58/c8aa6a8e62cc75f39fee1092c45d6b6ba684122697d7ce7d53f64f98a129/click-8.0.3-py3-none-any.whl (97 kB)

     |████████████████████████████████| 97 kB 3.2 MB/s

Collecting appdirs

  Downloading https://pypi.doubanio.com/packages/3b/00/2344469e2084fb287c2e0b57b72910309874c3245463acd6cf5e3db69324/appdirs-1.4.4-py2.py3-none-any.whl (9.6 kB)

Collecting regex

  Downloading https://pypi.doubanio.com/packages/e2/b1/b1d30513d3638e1e48cdfa5857a0e9c92ec7d19c0641836d0b49c4d00cac/regex-2021.11.10-cp38-cp38-win_amd64.whl (273 kB)

     |████████████████████████████████| 273 kB 731 kB/s

Collecting toml>=0.9.4

  Downloading https://pypi.doubanio.com/packages/44/6f/7120676b6d73228c96e17f1f794d8ab046fc910d781c8d151120c3f1569e/toml-0.10.2-py2.py3-none-any.whl (16 kB)

Collecting pathspec<1,>=0.6

  Downloading https://pypi.doubanio.com/packages/42/ba/a9d64c7bcbc7e3e8e5f93a52721b377e994c22d16196e2b0f1236774353a/pathspec-0.9.0-py2.py3-none-any.whl (31 kB)

Collecting colorama

  Downloading https://pypi.doubanio.com/packages/44/98/5b86278fbbf250d239ae0ecb724f8572af1c91f4a11edf4d36a206189440/colorama-0.4.4-py2.py3-none-any.whl (16 kB)

Collecting MarkupSafe>=0.23

  Downloading https://pypi.doubanio.com/packages/30/9e/4b7116f464a0151b86ce42b5185941eb74c207b38fe033f71f5e5d150356/MarkupSafe-2.0.1-cp38-cp38-win_amd64.whl (14 kB)

Collecting win32-setctime>=1.0.0

  Downloading https://pypi.doubanio.com/packages/37/6a/a498698d31626f32eae2c3bd1f1c303c6b3d54589b2993e9e05a4cd513dd/win32_setctime-1.0.4-py3-none-any.whl (3.5 kB)

Collecting typing-extensions>=3.7.4.3

  Downloading https://pypi.doubanio.com/packages/05/e4/baf0031e39cf545f0c9edd5b1a2ea12609b7fcba2d58e118b11753d68cf0/typing_extensions-4.0.1-py3-none-any.whl (22 kB)

Collecting wcwidth

  Downloading https://pypi.doubanio.com/packages/59/7c/e39aca596badaf1b78e8f547c807b04dae603a433d3e7a7e04d67f2ef3e5/wcwidth-0.2.5-py2.py3-none-any.whl (30 kB)

Collecting pluggy<1.0,>=0.12

  Downloading https://pypi.doubanio.com/packages/a0/28/85c7aa31b80d150b772fbe4a229487bc6644da9ccb7e427dd8cc60cb8a62/pluggy-0.13.1-py2.py3-none-any.whl (18 kB)

Collecting atomicwrites>=1.0

  Downloading https://pypi.doubanio.com/packages/2c/a0/da5f49008ec6e9a658dbf5d7310a4debd397bce0b4db03cf8a410066bb87/atomicwrites-1.4.0-py2.py3-none-any.whl (6.8 kB)

Collecting packaging

  Downloading https://pypi.doubanio.com/packages/05/8e/8de486cbd03baba4deef4142bd643a3e7bbe954a784dc1bb17142572d127/packaging-21.3-py3-none-any.whl (40 kB)

     |████████████████████████████████| 40 kB 2.7 MB/s

Collecting more-itertools>=4.0.0

  Downloading https://pypi.doubanio.com/packages/e5/c3/48e2c81038f57e8caab9a6e6fb6c2fc23536c59b092abefc447e6b5d1903/more_itertools-8.12.0-py3-none-any.whl (54 kB)

     |████████████████████████████████| 54 kB 1.9 MB/s

Collecting py>=1.5.0

  Downloading https://pypi.doubanio.com/packages/f6/f0/10642828a8dfb741e5f3fbaac830550a518a775c7fff6f04a007259b0548/py-1.11.0-py2.py3-none-any.whl (98 kB)

     |████████████████████████████████| 98 kB 2.6 MB/s

Collecting pytest-metadata

  Using cached https://pypi.doubanio.com/packages/e5/12/bfb677aad996cc994efb9c61289a4994d60079587e85155738859fd3b68e/pytest_metadata-1.11.0-py2.py3-none-any.whl (10 kB)

Collecting idna<4,>=2.5

  Downloading https://pypi.doubanio.com/packages/04/a2/d918dcd22354d8958fe113e1a3630137e0fc8b44859ade3063982eacd2a4/idna-3.3-py3-none-any.whl (61 kB)

     |████████████████████████████████| 61 kB 2.0 MB/s

Collecting urllib3<1.27,>=1.21.1

  Downloading https://pypi.doubanio.com/packages/4e/b8/f5a25b22e803f0578e668daa33ba3701bb37858ec80e08a150bd7d2cf1b1/urllib3-1.26.8-py2.py3-none-any.whl (138 kB)

     |████████████████████████████████| 138 kB 6.8 MB/s

Collecting charset-normalizer~=2.0.0

  Downloading https://pypi.doubanio.com/packages/84/3e/1037abe6498e65d645ce7a22d3402605d49a3b2c7f20c3abb027760da4f0/charset_normalizer-2.0.10-py3-none-any.whl (39 kB)

Collecting certifi>=2017.4.17

  Downloading https://pypi.doubanio.com/packages/37/45/946c02767aabb873146011e665728b680884cd8fe70dde973c640e45b775/certifi-2021.10.8-py2.py3-none-any.whl (149 kB)

     |████████████████████████████████| 149 kB 3.2 MB/s

Collecting pyparsing!=3.0.5,>=2.0.2

  Downloading https://pypi.doubanio.com/packages/a0/34/895006117f6fce0b4de045c87e154ee4a20c68ec0a4c9a36d900888fb6bc/pyparsing-3.0.6-py3-none-any.whl (97 kB)

     |████████████████████████████████| 97 kB 1.7 MB/s

Installing collected packages: pyparsing, wcwidth, py, pluggy, packaging, more-itertools, colorama, attrs, atomicwrites, pytest, win32-setctime, urllib3, typing-extensions, typed-ast, toml, regex, pytest-metadata, pathspec, MarkupSafe, idna, click, charset-normalizer, certifi, appdirs, sentry-sdk, requests, pyyaml, pytest-html, pydantic, loguru, jmespath, jinja2, Brotli, black, httprunner

Successfully installed Brotli-1.0.9 MarkupSafe-2.0.1 appdirs-1.4.4 atomicwrites-1.4.0 attrs-21.4.0 black-19.10b0 certifi-2021.10.8 charset-normalizer-2.0.10 click-8.0.3 colorama-0.4.4 httprunner-3.1.6 idna-3.3 jinja2-2.11.3 jmespath-0.9.5 loguru-0.4.1 more-itertools-8.12.0 packaging-21.3 pathspec-0.9.0 pluggy-0.13.1 py-1.11.0 pydantic-1.9.0 pyparsing-3.0.6 pytest-5.4.3 pytest-html-2.1.1 pytest-metadata-1.11.0 pyyaml-5.4.1 regex-2021.11.10 requests-2.27.1 sentry-sdk-0.14.4 toml-0.10.2 typed-ast-1.5.1 typing-extensions-4.0.1 urllib3-1.26.8 wcwidth-0.2.5 win32-setctime-1.0.4
3、查看版本号
用hrun命令查看安装的httprunner版本号,或者用命令httprunner,效果是一样的
C:\Users\fsy>hrun -V

3.1.6

C:\Users\fsy>httprunner -V

3.1.6
至此,httprunner已经安装成功,安装成功后,httprunner会自动生成几个重要的命令,通过-h查看命令
C:\Users\fsy>httprunner -h

usage: httprunner [-h] [-V] {run,startproject,har2case,make} ...

One-stop solution for HTTP(S) testing.

positional arguments:

  {run,startproject,har2case,make}

                        sub-command help

    run                 Make HttpRunner testcases and run with pytest.

    startproject        Create a new project with template structure.

    har2case            Convert HAR(HTTP Archive) to YAML/JSON testcases for HttpRunner.

    make                Convert YAML/JSON testcases to pytest cases.

optional arguments:

  -h, --help            show this help message and exit

  -V, --version         show version
可以看到生成了4个命令,分别是
run:运行测试用例的命令startproject:创建测试模板项目的命令har2case:将fiddler或者charles导出的文件转化成py文件的命令make:将yaml文件的测试用例或者json文件的测试用例转化成pytest测试用例
三、创建项目
1、用命令startproject创建一个模板项目,进入到对应的目录下面,执行命令
D:\httprunnerStudy>httprunner startproject httprunner_demo

2022-01-09 13:25:30.189 | INFO     | httprunner.scaffold:create_scaffold:43 - Create new project: httprunner_demo

Project Root Dir: D:\httprunnerStudy\httprunner_demo

created folder: httprunner_demo

created folder: httprunner_demo\har

created folder: httprunner_demo\testcases

created folder: httprunner_demo\reports

created file: httprunner_demo\testcases\demo_testcase_request.yml

created file: httprunner_demo\testcases\demo_testcase_ref.yml

created file: httprunner_demo\debugtalk.py

created file: httprunner_demo\.env

created file: httprunner_demo\.gitignore

$ tree httprunner_demo -a

2022-01-09 13:25:30.205 | WARNING  | httprunner.scaffold:show_tree:29 - tree command not exists, ignore.

Sentry is attempting to send 0 pending error messages

Waiting up to 2 seconds

Press Ctrl-Break to quit
从日志信息可以看到已经成功创建了一个项目,通过pycahrm打开创建的项目,看到项目结构如下
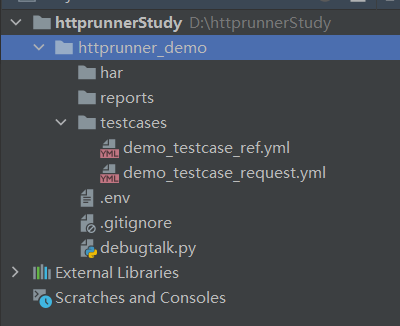
其中包含两个yml文件,这两个yml文件是官方给的示例,实际使用的时候可以删除掉,执行其中一个yml测试用例
 D:\httprunnerStudy> hrun D:\httprunnerStudy\httprunner_demo\testcases\demo_testcase_ref.yml

2022-01-09 13:31:48.546 | INFO     | httprunner.make:__make:512 - make path: D:\httprunnerStudy\httprunner_demo\testcases\demo_testcase_ref.yml

2022-01-09 13:31:48.556 | INFO     | httprunner.compat:ensure_testcase_v3:219 - ensure compatibility with testcase format v2

2022-01-09 13:31:48.561 | INFO     | httprunner.loader:load_dot_env_file:127 - Loading environment variables from D:\httprunnerStudy\httprunner_demo\.env

2022-01-09 13:31:48.566 | DEBUG    | httprunner.utils:set_os_environ:33 - Set OS environment variable: USERNAME

2022-01-09 13:31:48.566 | DEBUG    | httprunner.utils:set_os_environ:33 - Set OS environment variable: PASSWORD

2022-01-09 13:31:48.566 | INFO     | httprunner.make:make_testcase:349 - start to make testcase: D:\httprunnerStudy\httprunner_demo\testcases\demo_testcase_ref.yml

2022-01-09 13:31:48.586 | INFO     | httprunner.compat:ensure_testcase_v3:219 - ensure compatibility with testcase format v2

2022-01-09 13:31:48.586 | INFO     | httprunner.make:make_testcase:349 - start to make testcase: D:\httprunnerStudy\httprunner_demo\testcases\demo_testcase_request.yml

2022-01-09 13:31:48.586 | INFO     | httprunner.make:make_testcase:442 - generated testcase: D:\httprunnerStudy\httprunner_demo\testcases\demo_testcase_request_test.py

2022-01-09 13:31:48.596 | INFO     | httprunner.make:make_testcase:442 - generated testcase: D:\httprunnerStudy\httprunner_demo\testcases\demo_testcas2022-01-09 13:31:48.596 | INFO     | httprunner.make:format_pytest_with_black:170 - format pytest cases with black ...

reformatted D:\httprunnerStudy\httprunner_demo\testcases\demo_testcase_ref_test.py

reformatted D:\httprunnerStudy\httprunner_demo\testcases\demo_testcase_request_test.py

All done!

2 files reformatted.

2022-01-09 13:31:50.116 | INFO     | httprunner.cli:main_run:56 - start to run tests with pytest. HttpRunner version: 3.1.6

================================================================ test session starts ================================================================

platform win32 -- Python 3.8.10, pytest-5.4.3, py-1.11.0, pluggy-0.13.1

rootdir: D:\httprunnerStudy

plugins: html-2.1.1, metadata-1.11.0

collected 1 item

httprunner_demo\testcases\demo_testcase_ref_test.py .                                                                                          [100%]

================================================================= 1 passed in 2.46s =================================================================
从日志最后可以看到该用例执行成功,如果想要2个用例一起执行,则执行命令hrun run testcases,如下看到已经执行成功
D:\httprunnerStudy\httprunner_demo> httprunner run testcases

2022-01-09 13:36:28.756 | INFO     | httprunner.make:__make:512 - make path: D:\httprunnerStudy\httprunner_demo\testcases

2022-01-09 13:36:28.772 | INFO     | httprunner.compat:ensure_testcase_v3:219 - ensure compatibility with testcase format v2

2022-01-09 13:36:28.772 | INFO     | httprunner.loader:load_dot_env_file:127 - Loading environment variables from D:\httprunnerStudy\httprunner_demo\.env

2022-01-09 13:36:28.772 | DEBUG    | httprunner.utils:set_os_environ:33 - Set OS environment variable: USERNAME

2022-01-09 13:36:28.772 | DEBUG    | httprunner.utils:set_os_environ:33 - Set OS environment variable: PASSWORD

2022-01-09 13:36:28.772 | INFO     | httprunner.make:make_testcase:349 - start to make testcase: D:\httprunnerStudy\httprunner_demo\testcases\demo_testcase_ref.yml

2022-01-09 13:36:28.788 | INFO     | httprunner.compat:ensure_testcase_v3:219 - ensure compatibility with testcase format v2

2022-01-09 13:36:28.788 | INFO     | httprunner.make:make_testcase:349 - start to make testcase: D:\httprunnerStudy\httprunner_demo\testcases\demo_testcase_request.yml

2022-01-09 13:36:28.788 | INFO     | httprunner.make:make_testcase:442 - generated testcase: D:\httprunnerStudy\httprunner_demo\testcases\demo_testcase_request_test.py

2022-01-09 13:36:28.803 | INFO     | httprunner.make:make_testcase:442 - generated testcase: D:\httprunnerStudy\httprunner_demo\testcases\demo_testcase_ref_test.py

2022-01-09 13:36:28.803 | INFO     | httprunner.compat:ensure_testcase_v3:219 - ensure compatibility with testcase format v2

2022-01-09 13:36:28.803 | INFO     | httprunner.make:make_testcase:349 - start to make testcase: D:\httprunnerStudy\httprunner_demo\testcases\demo_testcase_request.yml

2022-01-09 13:36:28.819 | INFO     | httprunner.make:format_pytest_with_black:170 - format pytest cases with black ...

reformatted D:\httprunnerStudy\httprunner_demo\testcases\demo_testcase_ref_test.py

reformatted D:\httprunnerStudy\httprunner_demo\testcases\demo_testcase_request_test.py

All done!

2 files reformatted.

2022-01-09 13:36:30.000 | INFO     | httprunner.cli:main_run:56 - start to run tests with pytest. HttpRunner version: 3.1.6

================================================================ test session starts ================================================================

platform win32 -- Python 3.8.10, pytest-5.4.3, py-1.11.0, pluggy-0.13.1

rootdir: D:\httprunnerStudy\httprunner_demo

plugins: html-2.1.1, metadata-1.11.0

collected 2 items

testcases\demo_testcase_request_test.py .                                                                                                      [ 50%]

testcases\demo_testcase_ref_test.py .                                                                                                          [100%]

================================================================= 2 passed in 4.00s =================================================================
这里我这里的项目根目录,和上面有所不同,如果目录和上面一样,需要在testcases目录前面加上httprunnerStudy,否则执行的时候找不到测试用例
四、测试用例
在httprunner项目结构中,测试用例直接写在testcases包下面,无论是单个请求,还是多个有依赖的请求,都写在这个包下面的yml文件中,一个yml文件代表一条测试用例
1、测试用例的属性
在yml文件中,也就是我们的测试用例,必须具有2个类属性,分别是config和teststeps,其中config包含以下属性
| 属性名称 | 是否必填 | 作用 |
|---|---|---|
| name | 必填 | 指定测试用例名称,测试用例名称将显示在执行日志和测试报告中 |
| base_url | 选填 | 如果base_url指定,则teststep中的url可以设置成相对路径 |
| verify | 选填 | https请求时是否检验证书,默认为true,如果设置成False,则表示忽略证书 |
| variables | 选填 | 指定测试用例的公共变量,每个测试步骤都可以引用该变量 |
| export | 选填 | 导出的测试用例会话变量,把变量暴露出来,设置成全局变量 |
teststeps中包含以下属性
| 属性名称 | 是否必填 | 作用 |
|---|---|---|
| name | 必填 | 指定测试步骤名称 |
| request | 必填 | 发送请求的参数,参数引用变量“$变量名” |
| variables | 选填 | 指定测试步骤变量,参数引用变量“$变量名” |
| extract | 选填 | 提取返回结果 |
| export | 选填 | 导出测试用例变量,设置成全局变量 |
| validate | 选填 | 校验返回结果 |
2、实际应用
以登录接口为例:登录地址:http://49.235.92.12:8201/api/v1/login,用户名:test,密码123456
- 在testcases包下面新建login.yml文件
- 在yml文件中填写以下信息
config:

  name: 登录用例

teststeps:

  - name: 登录

    request:

      url: http://49.235.92.12:8201/api/v1/login

      method: POST  # POST必须大写,这是约定

      json:

        username: test

        password: "123456"  # 123456如果不加引号,则表示的是int类型,但是实际需要的是str类型

    validate:

      - eq: [status_code,200]

      - eq: [body.msg,login success!]
- 在pycharm的terminal控制台中执行命令:
hrun testcases/login.yml,看到控制台信息:
 D:\httprunnerStudy\httprunner_demo> hrun testcases/login.yml

2022-01-09 16:16:58.932 | INFO     | httprunner.make:__make:512 - make path: D:\httprunnerStudy\httprunner_demo\testcases\login.yml

2022-01-09 16:16:58.937 | INFO     | httprunner.compat:ensure_testcase_v3:219 - ensure compatibility with testcase format v2

2022-01-09 16:16:58.939 | INFO     | httprunner.loader:load_dot_env_file:127 - Loading environment variables from D:\httprunnerStudy\httprunner_demo\.env

2022-01-09 16:16:58.941 | DEBUG    | httprunner.utils:set_os_environ:33 - Set OS environment variable: USERNAME

2022-01-09 16:16:58.942 | DEBUG    | httprunner.utils:set_os_environ:33 - Set OS environment variable: PASSWORD

2022-01-09 16:16:58.945 | INFO     | httprunner.make:make_testcase:349 - start to make testcase: D:\httprunnerStudy\httprunner_demo\testcases\login.yml

2022-01-09 16:16:58.948 | INFO     | httprunner.make:make_testcase:442 - generated testcase: D:\httprunnerStudy\httprunner_demo\testcases\login_test.p

================================================================= 1 passed in 0.52s =================================================================
上面日志表示该接口执行成功
3、request请求
request请求在python中最常用的就是post方式和get方式,在post请求中,如果请求头是Content-Type:application/json格式的话,post请求参数传json,如果请求头是application/x-www-from-urlencoded,post请求参数传data,详细参考request请求库
4、base_url
- 为什么会有base_uel?因为在我们测试中,会有多套测试环境,每套环境中除了服务器的地址不一样以外,其他都是一样的,服务器的地址就是我们的base_url,因此需要把服务器地址提取出来单独管理,这样以来,测试环境切换的时候,只需要修改base_url的值,接口中涉及引用到base_url的地方就全改过来了
- base_url写在yml文件中的哪里呢?实际上在yml文件中,base_url应该写在config属性下面,和name属于同一级,例如:
config:

  name: 获取商品

  base_url: http://49.235.92.12:8201

teststeps:

  - name: goods

    request:

      url: /api/v1/goods

      method: GET

      params:

        page: 1

        size: 2

    validate:

      - eq: [status_code,200]

      - eq: [body.code,0]
- 在config中写了base_url后,在teststeps中的url只需要写接口的路径地址接口,httprunner会将base_url和url拼接起来作为完整的地址发送出去
- 如果在base_url配置后,在测试步骤中的url写接口的绝对路径,是否会报错了?答案是否定的,因为httprunner在请求的时候,会遵从就近原则取url的地址,如果测试步骤中的地址是正确的地址,httprunner就会直接请求
5、变量的声明与应用
在yml文件中的两个属性中都有变量variables,其中在config中的变量对整个yml文件都有效,而teststeps中的变量只对当前step有效,可以理解为一个是全局变量,一个是局部变量,优先级是局部变量大于全局变量
6、validate校验
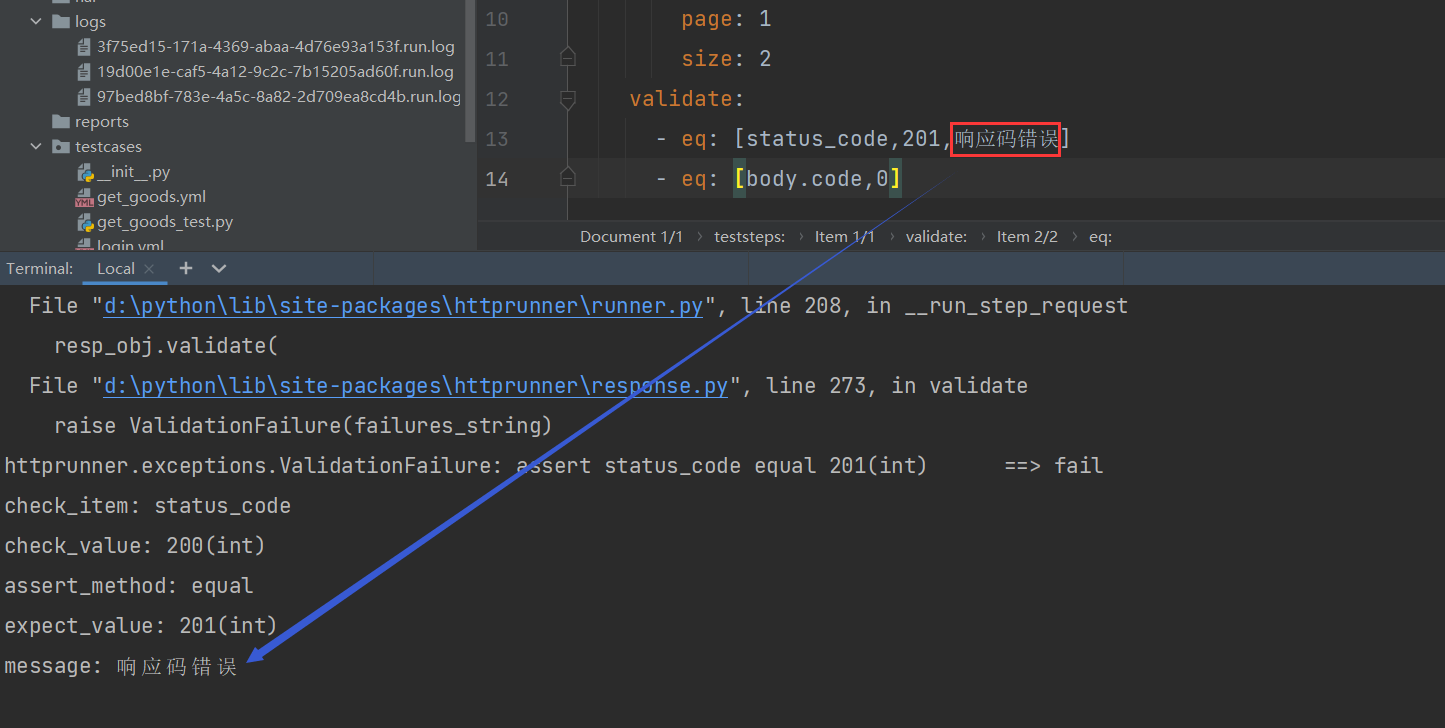
在httprunner的validate中,列表内部实际上能传3个参数, 第一个参数是jmespath表达式,也就是实际结果,第二个参数是期望结果,第三个参数是message,表示断言的错误原因,其中第一个参数和第二个参数是必传的,第三个参数可以不传
httprunner发送请求后,会返回四个对象,分别是:
- status_code:状态码
- headers:头部信息
- cookies:cookie信息
- body:返回的body内容
如果要校验返回头部的信息,则可以用headers.xxx等获取,如果要校验返回响应体的内容,则用body.xxx,如body.msg
7、参数关联
什么是参数关联?上一个接口返回的参数在下一个接口中需要用到,这就是参数关联,而且该参数是动态变化的。参数关联涉及两个点,一是提取变量,用extract,而是引用变量,引用变量和其他引用方式一样,$变量名。
点击查看代码
config:

  name: 登录用例

  base_url: http://49.235.92.12:8201

  variables:

    user: test

teststeps:

  - name: 登录

    request:

      url: /api/v1/login

      method: POST  # POST必须大写

      json:

        username: $user

        password: "123456"  # 123456如果不加引号,则表示的是int类型,但是实际需要的是str类型

    extract:

      token: body.token

    validate:

      - eq: [status_code,200]

      - eq: [body.msg,login success!]

  - name: 获取用户信息

    request:

      url: /api/v1/userinfo

      method: POST

      headers:

        Authorization: Token $token

      json:

        name: $user

        sex: M

        age: 18

        mail: 592485@qq.com

    validate:

    - eq: [status_code,200]

    - eq: [body.code,0]
上述代码关联是在一个yml文件中,而一个yml文件对应一个用例,如果需要在不同的yml文件中关联怎么处理呢?只需要将关联的值导出来即可,在config属性下面添加export,并设置导出后的变量
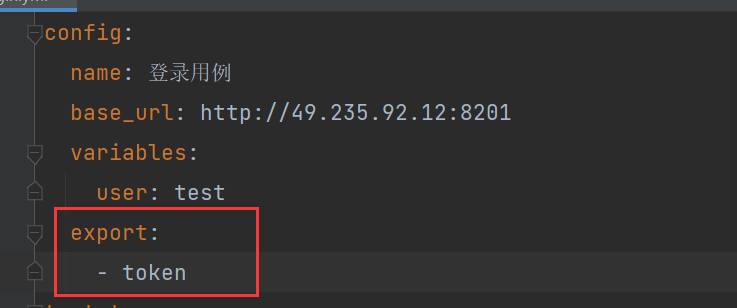
具体做法:有2个yml文件,一个是login.yml,另一个是userinfo.yml,很显然后一个文件需要依赖登录返回的token,需要在login.yml文件的config中写上上图信息,在userinfo.yml文件中的teststeps中有2个测试步骤,第一个测试步骤是登录,而登录在另一个文件中,所以需要在第一步中引用login.yml,一个yml文件引用另一个yml文件用到关键字testcase,然后第二步才是userinfo
login.yml代码:
点击查看代码
config:

  name: 登录用例

  base_url: http://49.235.92.12:8201

  variables:

    user: test

  export:

    - token

teststeps:

  - name: 登录

    request:

      url: /api/v1/login

      method: POST  # POST必须大写

      json:

        username: $user

        password: "123456"  # 123456如果不加引号,则表示的是int类型,但是实际需要的是str类型

    extract:

      token: body.token

    validate:

      - eq: [status_code,200]

      - eq: [body.msg,login success!]
userinfo.yml代码:
点击查看代码
config:

  name: 获取商品

  base_url: http://49.235.92.12:8201

teststeps:

  - name: 步骤1:登录

    testcase: testcases/login.yml

  - name: 获取用户信息

    request:

      url: /api/v1/userinfo

      method: POST

      headers:

        Authorization: Token $token

      json:

        name: test

        sex: M

        age: 18

        mail: 592485@qq.com

    validate:

    - eq: [status_code,200]

    - eq: [body.code,0]
8、环境变量
在项目的根目录中,有一个.env文件,该文件就是存放项目的环境变量,在该文件中变量的存放形式是k=v,一般存放的账号,密码,环境地址等等

那么如何环境变量呢?在yml文件中引用环境变量${ENV(变量名)}即可
9、参数化
在httprunner3版本中,实现参数化是在config中,参数化实现的方式有3中
方式一: (适用数据量比较少的情况)
在config属性下面添加关键字parameters实现参数化,然后指定user变量,具体变量写在[]中
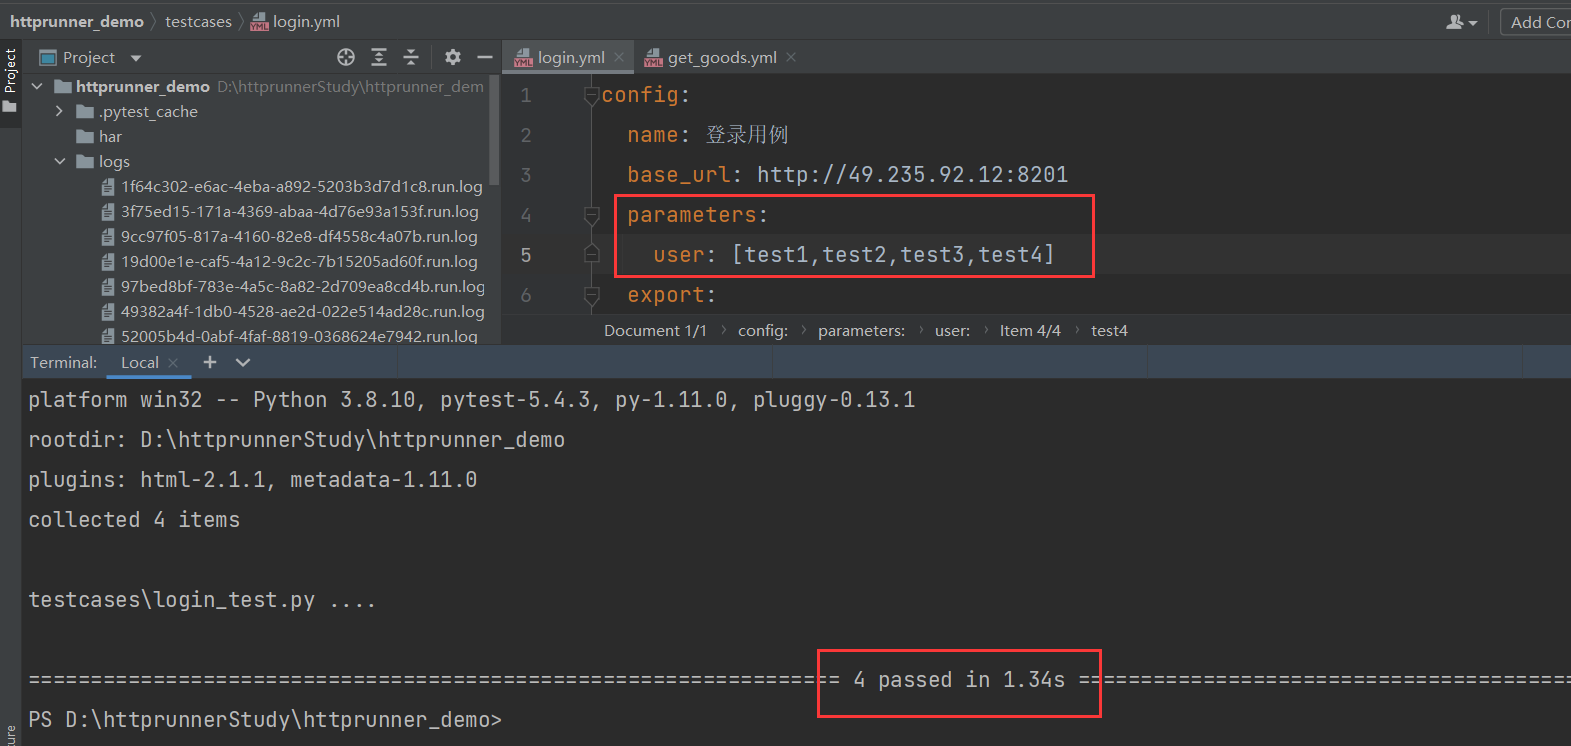
这是单个变量参数化的,如果多个参数参数化了,比如账号密码都要参数化,该怎么做呢?实际上多个参数化也是用parameters关键字。变量名用-链接起来,参数的所有组合方式展示在列表中即可,一行代表一种情况
parameters:

  user-password:

    - [test1,"123456"]

    - [test2,"123456"]

    - [test3,"123456"]

    - [test4,"123456"]
还可以用如下形式表示,笛卡尔积形式
parameters:

  user: [test1,test2,test3,test4]

  password: ["13578","246810","123456","456789"]
方式二:(适用数据量大的情况)
引用CSV文件进行参数化,在项目根目录下新建目录data,在data目录下新建一个csv文件,在csv文件里存放需要的参数化数据,csv文件的参数化数据用逗号分隔,csv第一行写参数名称
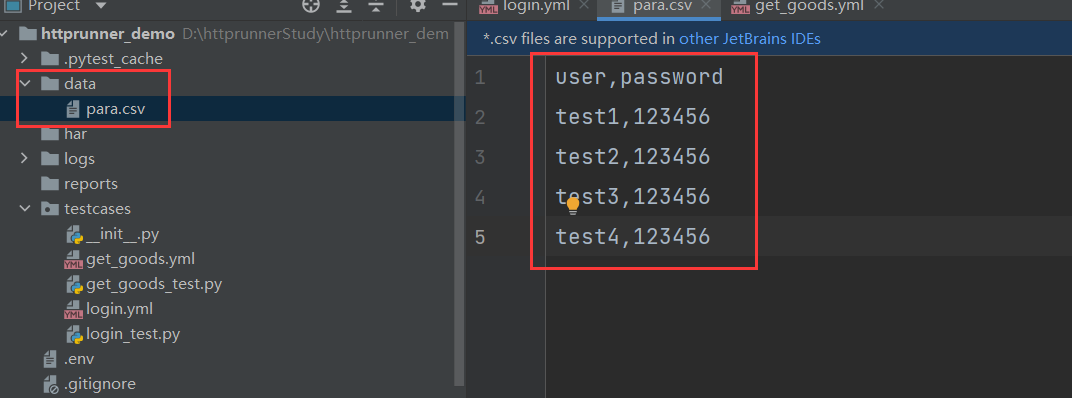
那么csv文件如何引用呢,只需要在paramaters关键字下面用P函数写上csv文件路径即可,路径一定是从项目的根目录查找
parameters:

  user-password:${P(data/para.csv)}
方式三:(适用比较灵活的参数)
该种方式是在项目根目录下的debugtalk.py文件中写python函数来实现的,单个参数的实现:
def get_user():

    return ["test1", "test2", "test3", "test4"]
如何引用呢?只需要在parameters关键字下面的user后面写上${get_user()}即可
多个参数的情况,python脚本为:
def get_user_pwd(m):

    account = []

    for i in range(1, m):

        account.append({"user": "test%s" % i, "pwd": 123456})

    return account
引用形式为:
parameters:

  user-password:${get_user_pwd(9)}
在debugtalk.py中参数化多于2个的时候返回值需要用字典的形式,变量名作为key,变量值作为value
10、hook机制
hook机制就是执行用例的前置步骤和后置步骤,在pytest中一般用setup和teardown来表示,在httprunner中,需要把前置函数和后置函数写在debugtalk.py中,然后在测试步骤teststeps中用关键字setup_hooks和teardown_hooks来引用
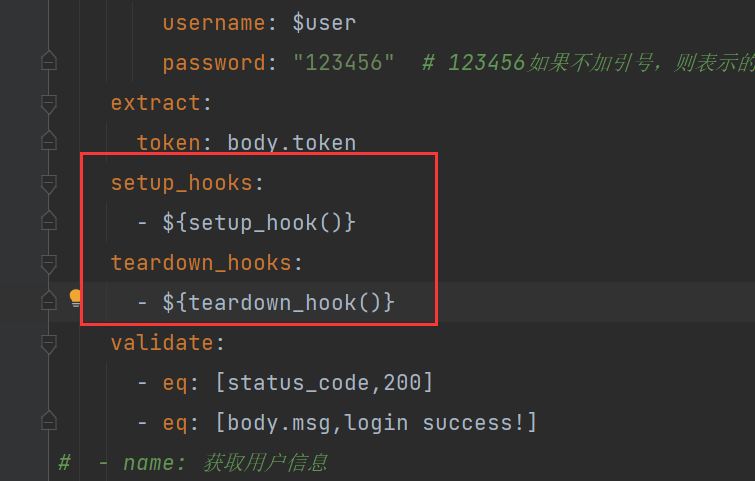
11、文件上传
文件上传在httprunner中使用的是关键字upload来实现,upload下面有几个参数根据实际情况来处理,这里只有2个,代码如下:
config:

  name: 文件上传

  base_url: http://49.235.92.12:8201

teststeps:

  - name: 上传文件

    request:

      url: /api/v1/upfile/

      method: POST

      upload:

        file: data/QQ20220109214618.png

        title: faith
但是我在运行的时候报错

根据提示执行命令:pip3 install requests_toolbelt filetype,之后再次运行该用例,执行成功
五、数据库链接
1、数据库链接
链接数据库需要驱动,首先得安装驱动,在cmd命令行中执行命令:pip3 install PyMySQL,默认安装最新的
C:\Users\fsy>pip3 install PyMySQL

Collecting PyMySQL

  Downloading PyMySQL-1.0.2-py3-none-any.whl (43 kB)

     |████████████████████████████████| 43 kB 28 kB/s

Installing collected packages: PyMySQL

Successfully installed PyMySQL-1.0.2
安装成功后,在项目根目录下新建目录utils,新建一个python文件,用于链接数据库操作
import pymysql

class MysqlHelper:

    # 初始化数据库信息

    def __init__(self, host, username, password, db, charset='utf8', port=3306):

        self.host = host

        self.username = username

        self.password = password

        self.db = db

        self.charset = charset

        self.port = port

    # 数据库连接

    def connect(self):

        self.conn = pymysql.connect(host=self.host, port=self.port, user=self.username, password=self.password,

                                    db=self.db, charset=self.charset, cursorclass=pymysql.cursors.DictCursor)

        self.cursor = self.conn.cursor()

    # 查询单条数据

    def get_one(self, sql, params=()):

        result = None

        try:

            self.connect()

            self.cursor.execute(sql, params)

            result = self.cursor.fetchone()

            self.close()

        except Exception as e:

            print(e)

        return result

    # 查询多条数据

    def get_all(self, sql, params=()):

        list_data = ()

        try:

            self.connect()

            self.cursor.execute(sql, params)

            list_data = self.cursor.fetchall()

            self.close()

        except Exception as e:

            print(e)

        return list_data

    def execute(self, sql, params=()):

        # SQL删除、提交、修改语句

        try:

            self.cursor.execute(sql, params)  # 执行SQL语句

            self.db.commit()  # 提交修改

        except Exception as e:

            # 发生错误时回滚

            print(e)

            self.db.rollback()

    # 关闭连接

    def close(self):

        self.cursor.close()

        self.conn.close()
2、数据库校验结果
在debugtalk.py文件中写入函数调用数据库查询,查询出来数据后,取出要校验的字段,然后返回出去,最后在校验字段的时候引用改函数来判断
六、jmespath
jmespath是用来提取json表达式的值,官网地址:https://jmespath.org/tutorial.html
分为以下几种情况
最简单的json格式,如`{"a": "foo", "b": "bar", "c": "baz"},这种方式取值直接输入key值即可

json嵌套形式的取值,如
{"a": {"b": {"c": {"d": "value"}}}},这种方式取值按照python字典取值的方式即可

列表取值,如
["a", "b", "c", "d", "e", "f"],按照python列表的取值方式即可

字典和列表相互嵌套的时候取值,就是将字典取值和列表取值结合起来
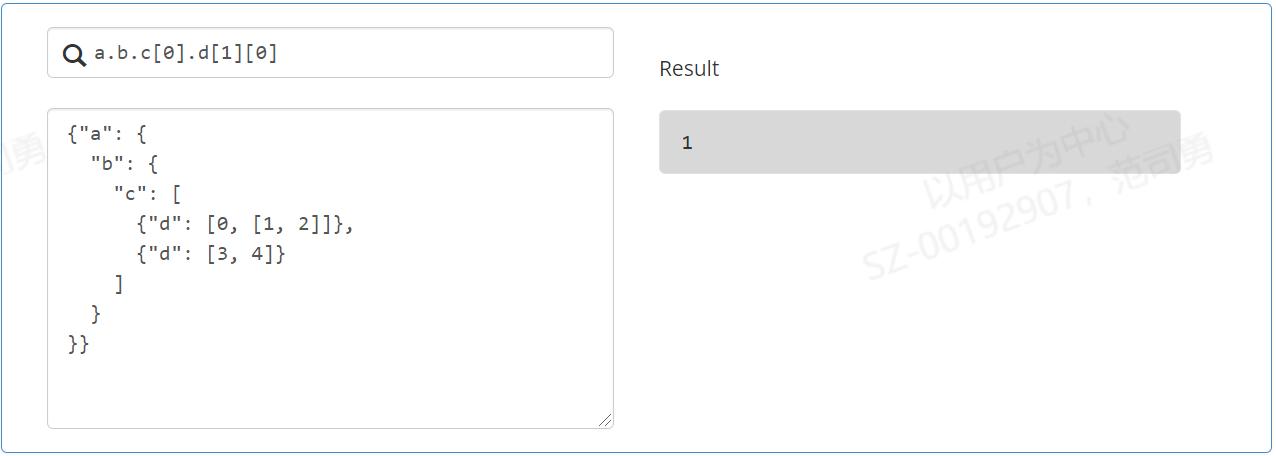
切片取值和python里面的切片取值一样的
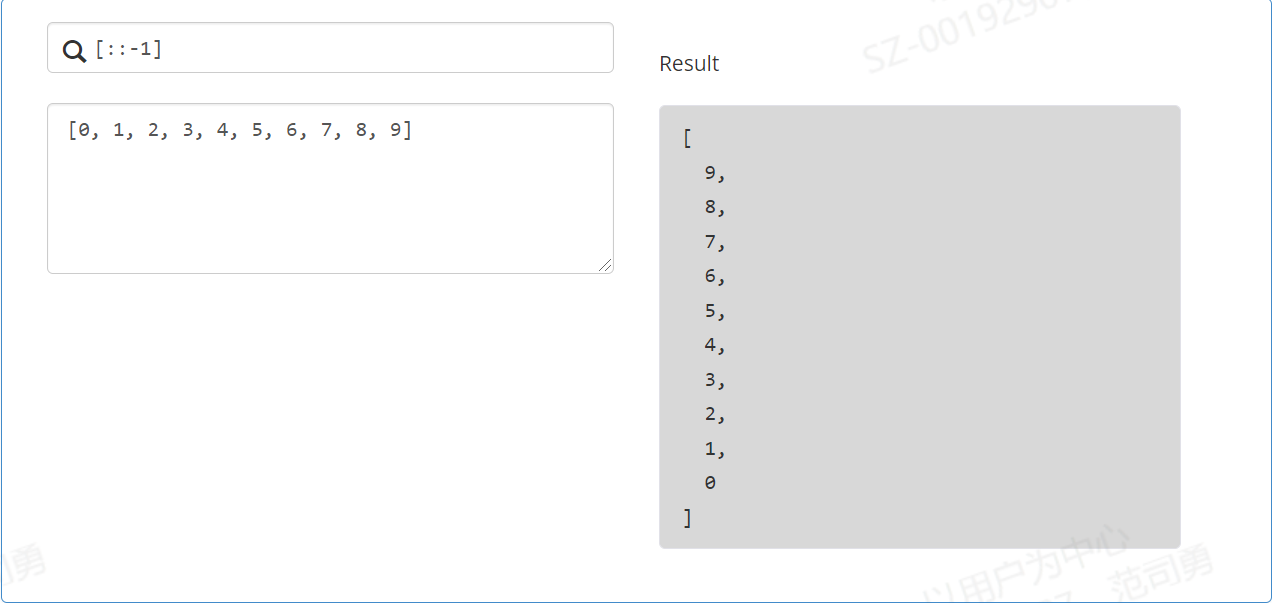
用
*取值
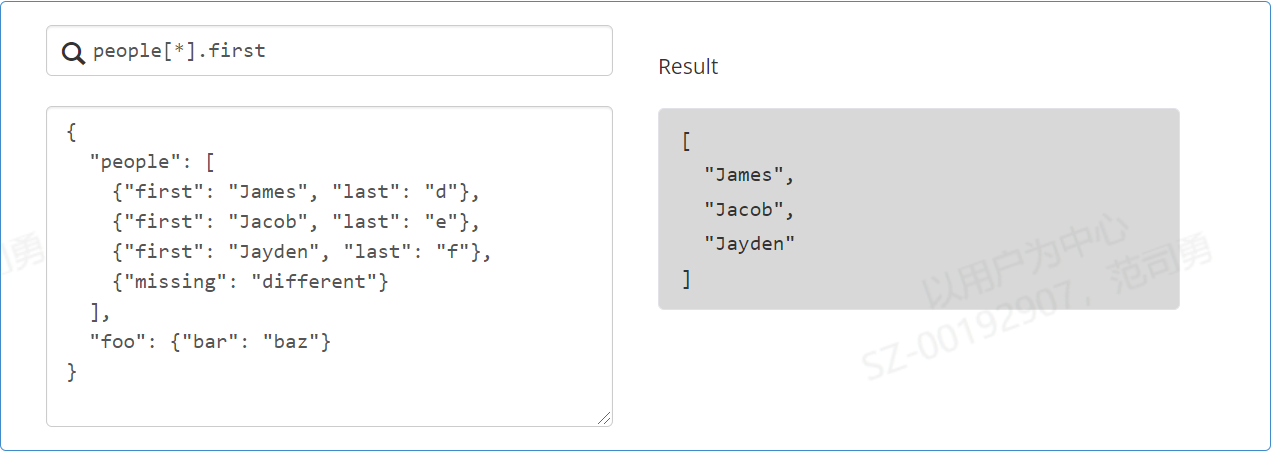
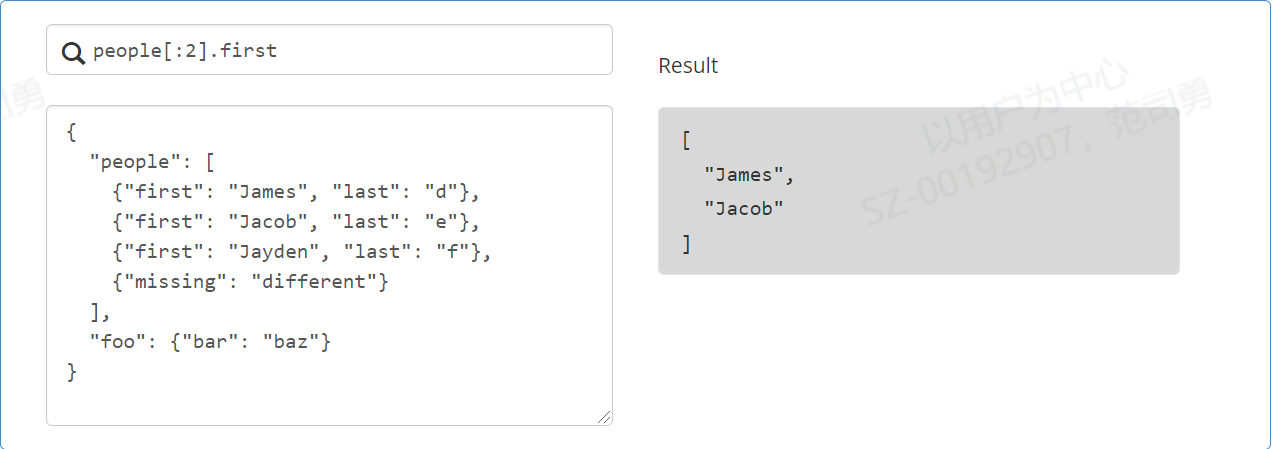
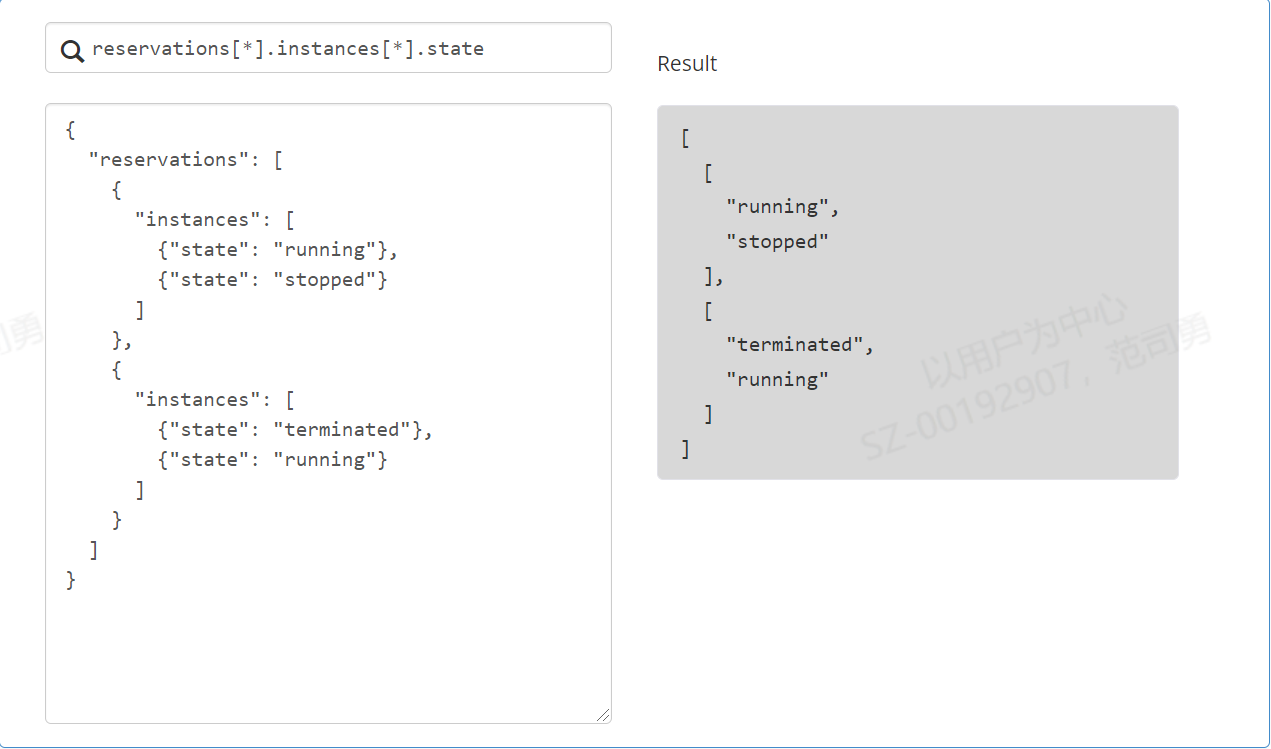
按条件取值

|管道符过滤取值
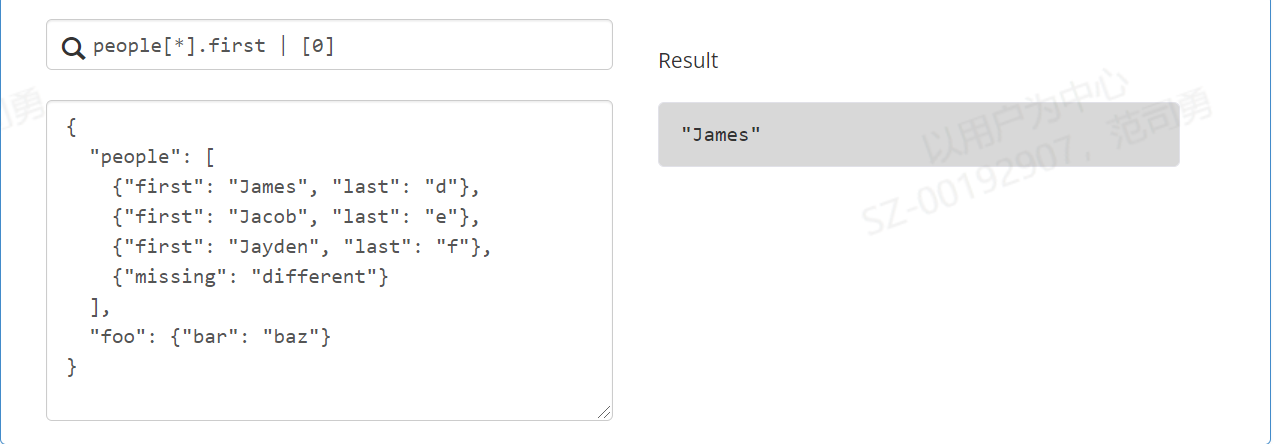
七、编写pytest用例
1、为什么要写pytest用例
因为httprunner底层用的就是pytest,所以httprunner支持pytest编写的用例,编写pytest用例需要满足以下条件:
- 文件名必须以test_.py文件或者_test.py文件
- 测试用例函数必须以test_开头
- 类是以Test开头的,不能带有__init__方法
- 所有的包必须有__init__.py文件
2、pytest用例的属性
一个pytest用例就是一个python类,这个类中有两个属性,分别是config和teststeps,只是把yml文件中的用例转换成立python语言而已,主要是teststeps中的一些方法
RunRequest测试步骤:RunRequest一般用在发送请求的时候,里面包含函数信息,请求方法,请求头,请求数据,断言信息等,具体如下
| 属性名称 | 是否必填 | 作用 |
|---|---|---|
| name | 必填 | 指定测试步骤名称 |
| method(url) | 必填 | 如果在config中设置了base_url,那method中只能设置相对路径 |
| with_params | 选填 | 对应params参数,一般用get方法的时候使用 |
| with_headers | 选填 | 对应headers参数 |
| with_cookies | 选填 | cookies参数 |
| with_data | 选填 | 对应于data参数 |
| with_json | 选填 | 对应json参数 |
| with_variables | 选填 | 测试步骤中的变量,每个步骤的变量独立,变量引用形式:$变量名,如果是函数引用则为:${函数名()} |
| with_jmespath | 选填 | 提取变量值,保存后给下个接口使用,和extract结合使用,先有extract,再有with_jmespath |
| validate | 选填 | 校验结果,和assert函数结合使用,先有validate,再有assert函数 |
RunTestCase:RunTestCase一般用作一个测试用例需要依赖另一个用例的时候,RunTestCase有以下参数
| 参数 | 作用 |
|---|---|
| name | 指定测试步骤名称,该名称将显示在执行日志和测试报告中 |
| with_variables | 定义变量 |
| call | 引用的测试用例类,需要提前导入这个类 |
| export | 从引用的测试用例导出的会话变量名称,导出的变量方便后续测试步骤引用 |
八、测试报告
1、pytest自带测试报告
由于httprunner底层用的是pytest测试框架,而pytest测试框架自带测试报告,因此httprunner也可以执行pytest的测试报告,执行命令:pytest testcases --html=./reports/result.html --self-contained-html
2、allure插件安装
allure测试报告是一个java开发的插件,需要java环境,首先按照allure-pytest插件
点击查看代码
C:\Users\siyong.fan>pip install allure-pytest -i https://pypi.douban.com/simple

Looking in indexes: https://pypi.douban.com/simple

Requirement already satisfied: allure-pytest in c:\users\siyong.fan\appdata\local\programs\python\python38\lib\site-packages (2.9.43)

Requirement already satisfied: six>=1.9.0 in c:\users\siyong.fan\appdata\local\programs\python\python38\lib\site-packages (from allure-pytest) (1.16.0)

Requirement already satisfied: allure-python-commons==2.9.43 in c:\users\siyong.fan\appdata\local\programs\python\python38\lib\site-packages (from allure-pytest) (2.9.43)

Requirement already satisfied: pytest>=4.5.0 in c:\users\siyong.fan\appdata\local\programs\python\python38\lib\site-packages (from allure-pytest) (5.4.3)

Requirement already satisfied: pluggy>=0.4.0 in c:\users\siyong.fan\appdata\local\programs\python\python38\lib\site-packages (from allure-python-commons==2.9.43->allure-pytest) (0.13.1)

Requirement already satisfied: attrs>=16.0.0 in c:\users\siyong.fan\appdata\local\programs\python\python38\lib\site-packages (from allure-python-commons==2.9.43->allure-pytest) (21.2.0)

Requirement already satisfied: colorama in c:\users\siyong.fan\appdata\local\programs\python\python38\lib\site-packages (from pytest>=4.5.0->allure-pytest) (0.4.4)

Requirement already satisfied: py>=1.5.0 in c:\users\siyong.fan\appdata\local\programs\python\python38\lib\site-packages (from pytest>=4.5.0->allure-pytest) (1.10.0)

Requirement already satisfied: more-itertools>=4.0.0 in c:\users\siyong.fan\appdata\local\programs\python\python38\lib\site-packages (from pytest>=4.5.0->allure-pytest) (8.12.0)

Requirement already satisfied: packaging in c:\users\siyong.fan\appdata\local\programs\python\python38\lib\site-packages (from pytest>=4.5.0->allure-pytest) (21.0)

Requirement already satisfied: atomicwrites>=1.0 in c:\users\siyong.fan\appdata\local\programs\python\python38\lib\site-packages (from pytest>=4.5.0->allure-pytest) (1.4.0)

Requirement already satisfied: wcwidth in c:\users\siyong.fan\appdata\local\programs\python\python38\lib\site-packages (from pytest>=4.5.0->allure-pytest) (0.2.5)

Requirement already satisfied: pyparsing>=2.0.2 in c:\users\siyong.fan\appdata\local\programs\python\python38\lib\site-packages (from packaging->pytest>=4.5.0->allure-pytest) (2.4.7)
这里已经安装成功
运行用例时,如果报错,是因为pytest-allure-adaptor与allure-pytest不能共存,下载掉即可:pip uninstall pytest-allure-adaptor,接着安装allure命令行工具:
下载allure-commandline安装包,github官网:https://github.com/allure-framework/allure2/releases/tag/2.17.2
解压下载的文件,进入到bin目录,一个是linux启动文件,一个是windows启动文件

将allure所在的bin目录添加到环境变量,注意只需要到bin目录即可,添加完成后,在新打开的cmd中输入
allure --version,可以看到显示版本表明allure安装成功
3、生成allure测试报告
- allure生成测试报告分成2个步骤,分别是运行用例和生成报告,运行用例有2中方式
hrun testcases --alluredir ./allure_reportpytest 测试用例文件 --alluredir ./reports/allure_report,测试用例文件可以写某个具体的文件,也可以不写,不写的话,allure会在当前目录下自动查找符合pytest用例风格的用例,执行命令后会在allure_report目录下生成json文件,json文件就是报告执行的结果
- 将json文件转换成html报告
在命令行执行:allure serve ./reports/allure_report生成html报告

八、持续集成
1、在linux服务器上安装python3.9版本,先安装相关依赖
yum -y install zlib-devel bzip2-devel openssl-devel ncurses-devel sqlite-devel readline-devel tk-devel gdbm-devel db4-devel libpcap-devel xz-devel mysql-devel
2、下载linux需要的python包,下载地址:https://www.python.org/ftp/python/3.9.0/Python-3.9.0.tgz
3、在linux中新建一个目录存放下载的python安装包,使用命令:mkdir python39,进入到python39目录,用wget命令下载3.9.0的python包
点击查看代码
[edenapp@eden-dev-test ~]$ cd python39/

[edenapp@eden-dev-test python39]$ wget https://www.python.org/ftp/python/3.9.0/Python-3.9.0.tgz

--2022-01-10 17:03:28--  https://www.python.org/ftp/python/3.9.0/Python-3.9.0.tgz

Resolving www.python.org (www.python.org)... 151.101.72.223, 2a04:4e42:11::223

Connecting to www.python.org (www.python.org)|151.101.72.223|:443... connected.

HTTP request sent, awaiting response... 200 OK

Length: 26724009 (25M) [application/octet-stream]

Saving to: ‘Python-3.9.0.tgz’

100%[=========================================================================================================================================================================>] 26,724,009  13.2MB/s   in 1.9s

2022-01-10 17:03:31 (13.2 MB/s) - ‘Python-3.9.0.tgz’ saved [26724009/26724009]
4、解压下载的python包
解压命令:tar -xvf Python-3.9.0.tgz
5、指定安装目录
执行命令:./configure --prefix=/usr/local/python39,如果执行命令报错:configure: error: no acceptable C compiler found in $PATH,则先执行sudo yum install gcc-c++,再执行上条命令就可以安装成功了
6、编译
在当前目录输入sudo make,执行完成后再执行sudo make install

7、添加软连接,查看安装的版本,软连接的目录一定要是之前指定的目录
[edenapp@eden-dev-test bin]$ sudo ln -s  /usr/local/python39/bin/python3.9 /usr/bin/python3

 [edenapp@eden-dev-test bin]$ python3

Python 3.9.0 (default, Jan 10 2022, 17:26:42)

[GCC 4.8.5 20150623 (Red Hat 4.8.5-44)] on linux

Type "help", "copyright", "credits" or "license" for more information.
8、给pip添加软连接,查看是否成功
[edenapp@eden-dev-test bin]$ sudo ln -s  /usr/local/python39/bin/pip3 /usr/bin/pip3

 [edenapp@eden-dev-test bin]$ pip3 -V

 pip 20.2.3 from /usr/local/python39/lib/python3.9/site-packages/pip (python 3.9)
9、安装httprunner
使用命令pip3 install httprunner安装,安装完成后,使用httprunner -V查看安装的版本,但是会出现如下信息,这是因为命令没有加环境变量或者软连接

为了解决问题,这里添加软连接,先查找httprunner命令,查找命令find / -name httprunner
[root@localhost Python-3.9.0]# find / -name httprunner

/usr/local/python39/bin/httprunner

/usr/local/python39/lib/python3.9/site-packages/httprunner

[root@localhost Python-3.9.0]#
找到bin目录下的httprunner,给他添加软连接
[root@localhost Python-3.9.0]# ln -s /usr/local/python39/bin/httprunner /usr/bin/httprunner

[root@localhost Python-3.9.0]# httprunner -V

3.1.6

[root@localhost Python-3.9.0]#
可以看到添加成功并可以正确使用,同样的方法给pytest添加软连接
10、执行测试用例
将在windows中写的测试代码打包,然后通过rz命令上传到linux服务器的指定目录下,然后在解压,解压后进入到项目的根目录下,查看需要安装的依赖库,把所需要的的依赖库全部安装完成,然后在根目录下输入pytest执行用例
11、集成到jenkins
jenkins安装直接使用docker安装,方便快捷,安装完成后创建一个自由风格的项目,指定项目的根目录

输入shell的命令pytest

最后一步就是jenkins生成allure测试报告,打开 jenkins 首页-系统管理-管理插件-可选插件
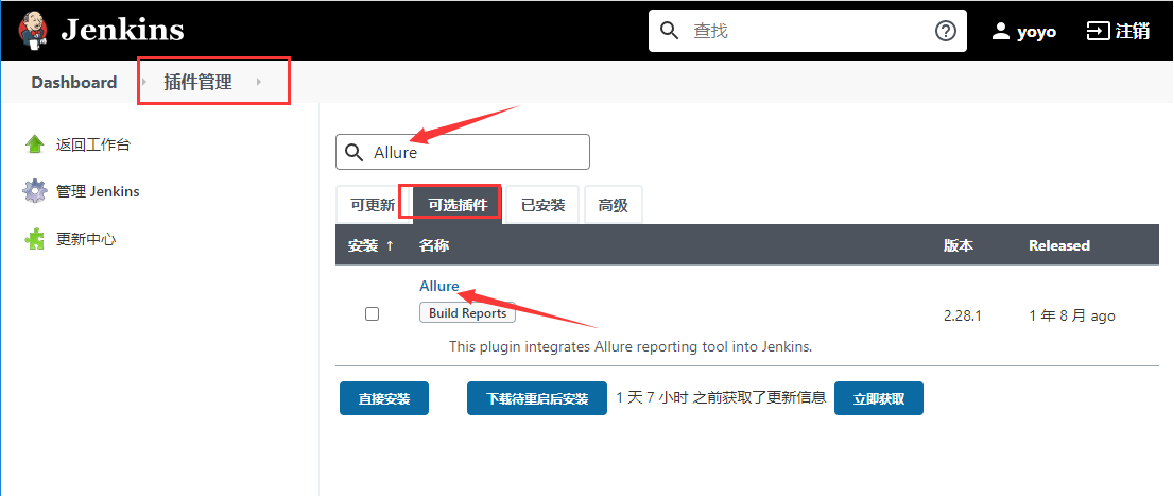
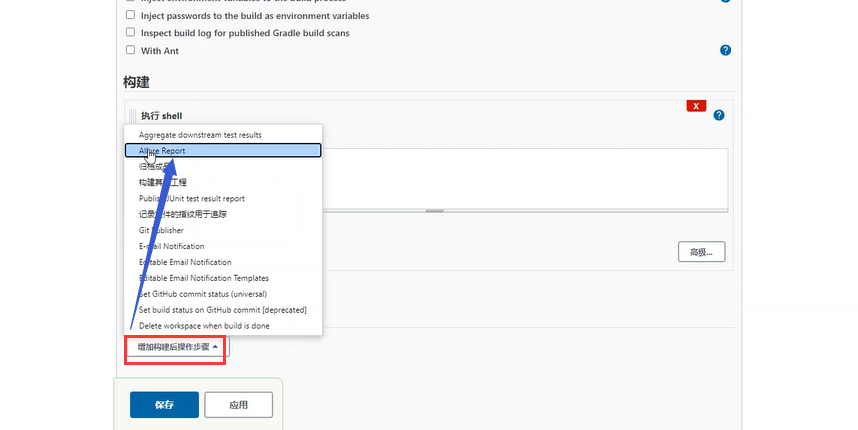
插件安装完成后,在配置里面找到allure的插件
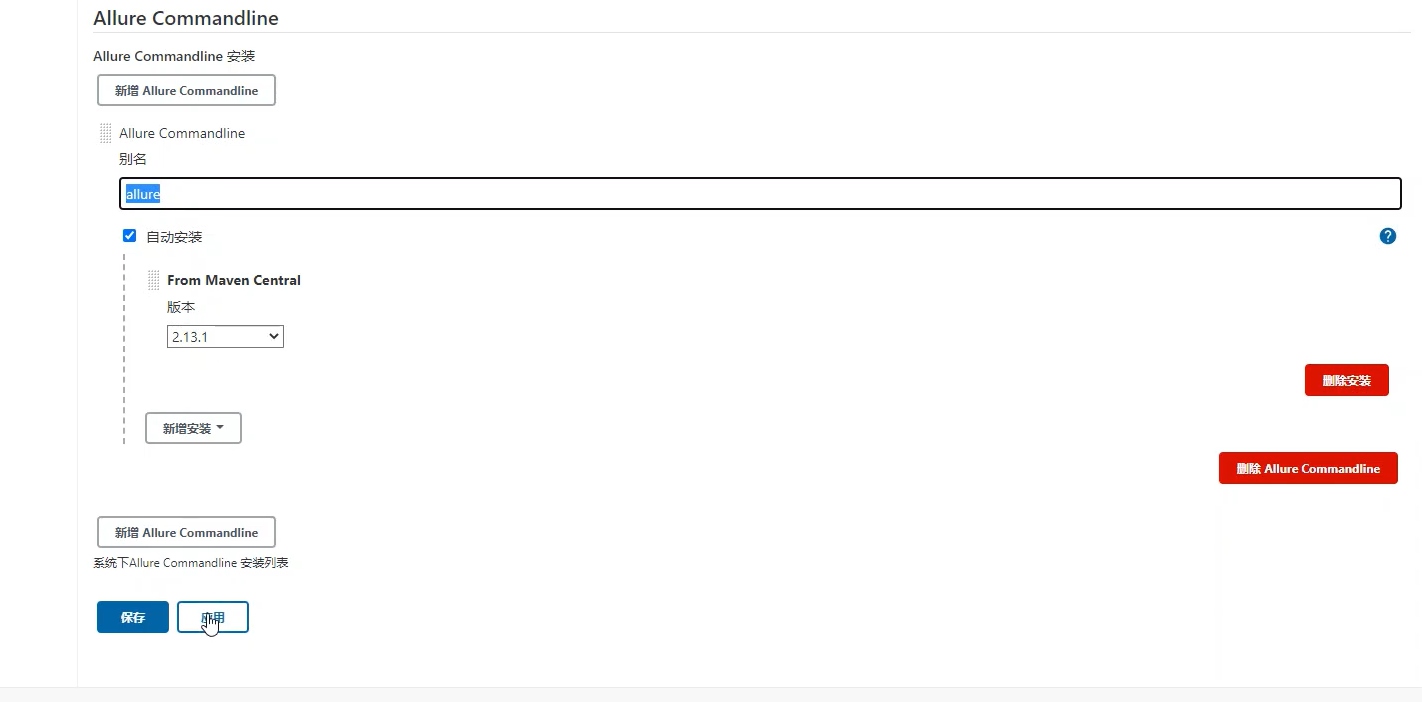
回到全局工具配置页面,找到Allure Commandline安装
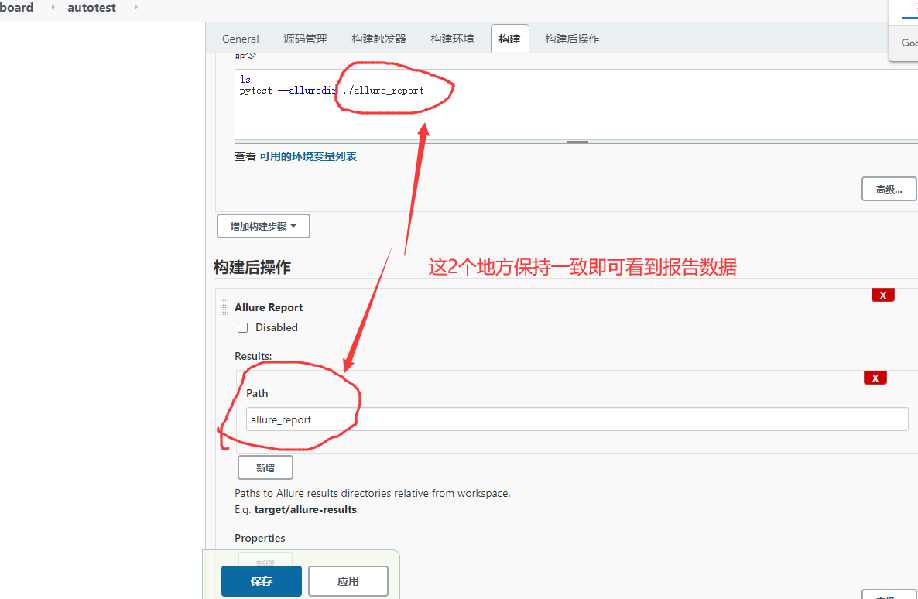
最后在构建页面按照如下信息输入
12、发送邮件
发送邮件需要插件,参考博客:https://www.cnblogs.com/yoyoketang/p/12174056.html
httprunner3.x全网最详细教程的更多相关文章
- H5网页应用打包安卓App (全网最详细教程)
img { box-shadow: 0 0.5rem 1rem rgba(0, 0, 0, 0.15) !important } .red { color: rgba(255, 0, 0, 1) } ...
- 在虚拟机中安装Linux系统CentOS7详细教程!!!超详细!!!!一看就会!!!手把手教学!!!
一.CentOS的下载 CentOS是免费版,推荐在官网上直接下载.https://www.centos.org/download/ DVD ISO:普通光盘完整安装版镜像,可离线安装到计算机硬盘上, ...
- SASS教程sass超详细教程
SASS安装及使用(sass教程.详细教程) 采用SASS开发CSS,可以提高开发效率. SASS建立在Ruby的基础之上,所以得先安装Ruby. Ruby的安装: 安装 rubyinstaller- ...
- Git使用详细教程(一)
很久不发博客,最近有兴趣想写点东西,但 Live Writer 不支持从Word复制图片,疯狂吐槽下 Git使用详细教程(一) Git使用详细教程(二) 该教程主要是Git与IntelliJ IDEA ...
- Win7 U盘安装Ubuntu16.04 双系统详细教程
Win7 U盘安装Ubuntu16.04 双系统详细教程 安装主要分为以下几步: 一. 下载Ubuntu 16.04镜像软件: 二. 制作U盘启动盘使用ultraISO: 三. 安装Ubuntu系统: ...
- Windows7 64位系统搭建Cocos2d-x-2.2.1最新版以及Android交叉编译环境(详细教程)
Windows7 64位系统搭建Cocos2d-x-2.2.1最新版以及Android交叉编译环境(详细教程) 声明:本教程在参考了以下博文,并经过自己的摸索后实际操作得出,本教程系本人原创,由于升级 ...
- Ubuntu 16.04安装QQ国际版图文详细教程
因工作需要,我安装了Ubuntu 16.04,但是工作上的很多事情需要QQ联系,然而在Ubuntu上的WebQQ很是不好用,于是在网上搜索了好多个Linux版本的QQ,然而不是功能不全 ...
- Ubuntu-安装-theano+caffe-超详细教程
一.说明 本文是继<Ubuntu-安装-cuda7.0-单显卡-超详细教程> 之后的续篇.theano和caffe是深度学习库,对运算能力需求很大,最好使用cuda进行加速.所以,请先阅读 ...
- Struts2详细教程
Struts2详细教程:http://www.yiibai.com/struts_2/
随机推荐
- array_filter()用法
第一种情况: 通过函数,过滤数组中的元素 array_filter($arr,'函数名称') 函数里可以写相应的过滤原则,下面举个栗子,过滤掉不是数字的元素 $arr=array('a','b','c ...
- HMAC在“挑战/响应”(Challenge/Response)身份认证的应用
HMAC的一个典型应用是用在"挑战/响应"(Challenge/Response)身份认证中. 认证流程 (1) 先由客户端向服务器发出一个验证请求. (2) 服务器接到此请求后生 ...
- CF157A Game Outcome 题解
Content 有一个 \(n\times n\) 的矩阵,每个元素都有一个权值.求所有满足其所在纵列所有元素权值和大于其所在横列所有元素权值和的元素个数. 数据范围:\(1\leqslant n\l ...
- java 常用类库:格式化NumberFormat;SimpleDataFormat类(转换Data()对象);DateTimeFormatter 转换LocalDateTime时间对象
NumberFormat类 该类是一个做数字格式化的类,它是一个抽象类,无法实例化.它提供了parse()和format()方法,其中format用于将数值,格式转化成字符串,parse()用于把字符 ...
- python2升级到python3 yum不可用解决方案
/usr/libexec/urlgrabber-ext-down /usr/bin/yum 这两个文件解释器 写 /usr/bin/python2
- vc++ 调用winapi调节屏幕亮度(增加win7代码demo)
1.关于 代码是通过测试的,测试环境: win7 + MFC 为什么要发在这里? 区别于上一篇随笔. MD排版更顺眼 demo 会放到 这里 更正了上一篇随笔中的代码错误 2.头文件 #include ...
- 【LeetCode】1022. Sum of Root To Leaf Binary Numbers 解题报告(Python)
作者: 负雪明烛 id: fuxuemingzhu 个人博客: http://fuxuemingzhu.cn/ 目录 题目描述 题目大意 解题方法 DFS 日期 题目地址:https://leetco ...
- 【LeetCode】36. Valid Sudoku 解题报告(Python)
[LeetCode]36. Valid Sudoku 解题报告(Python) 作者: 负雪明烛 id: fuxuemingzhu 个人博客: http://fuxuemingzhu.cn/ 题目地址 ...
- MySQL与Oracle 差异比较之二函数
函数 编号 类别 ORACLE MYSQL 注释 1 数字函数 round(1.23456,4) round(1.23456,4) 一样:ORACLE:select round(1.23456,4) ...
- The Expressive Power of Neural Networks: A View from the Width
目录 概 主要内容 定理1 定理2 定理3 定理4 定理1的证明 Lu Z, Pu H, Wang F, et al. The expressive power of neural networks: ...
