人脸检测(1)——HOG特征
一、概述
前面一个系列,我们对车牌识别的相关技术进行了研究,但是车牌识别相对来说还是比较简单的,后续本人会对人脸检测、人脸识别,人脸姿态估计和人眼识别做一定的学习和研究。其中人脸检测相对来说比较简单,譬如Dlib库中直接封装了现成的库函数 frontal_face_detector 供相关人员使用,但是Dlib的运行速率并不是很高,另外于仕琪老师的 libfaceDetection 库具有较高的识别率和相对较快的运行速度,具体可以从github 上获取 https://github.com/ShiqiYu/libfacedetection 。但是该库并没有提供源码分析,只有现成的lib库可以直接使用。
从学习和研究的角度来说,我们还是希望能够直接从源码中进行相关学习,因此此处我们通过Dlib库代码解读,来对人脸检测的相关技术做一定的分析。Dlib是一个机器学习的C++库,包含了许多机器学习常用的算法,并且文档和例子都非常详细。 Dlib官网地址: http://www.dlib.net 。下面我们通过一个简单的例子,来看下人脸检测是如何工作的,代码如下所示:
     try

     {

         frontal_face_detector detector = get_frontal_face_detector();

         image_window win;

         string filePath = "E:\\dlib-18.16\\dlib-18.16\\examples\\faces\\2008_002079.jpg";

         cout << "processing image " << filePath << endl;

         array2d<unsigned char> img;

         load_image(img, filePath);

         // Make the image bigger by a factor of two.  This is useful since

         // the face detector looks for faces that are about 80 by 80 pixels

         // or larger.  Therefore, if you want to find faces that are smaller

         // than that then you need to upsample the image as we do here by

         // calling pyramid_up().  So this will allow it to detect faces that

         // are at least 40 by 40 pixels in size.  We could call pyramid_up()

         // again to find even smaller faces, but note that every time we

         // upsample the image we make the detector run slower since it must

         // process a larger image.

         pyramid_up(img);

         // Now tell the face detector to give us a list of bounding boxes

         // around all the faces it can find in the image.

         std::vector<rectangle> dets = detector(img);

         cout << "Number of faces detected: " << dets.size() << endl;

         // Now we show the image on the screen and the face detections as

         // red overlay boxes.

         win.clear_overlay();

         win.set_image(img);

         win.add_overlay(dets, rgb_pixel(, , ));

         cout << "Hit enter to process the next image..." << endl;

         cin.get();

     }

     catch (exception& e)

     {

         cout << "\nexception thrown!" << endl;

         cout << e.what() << endl;

     }

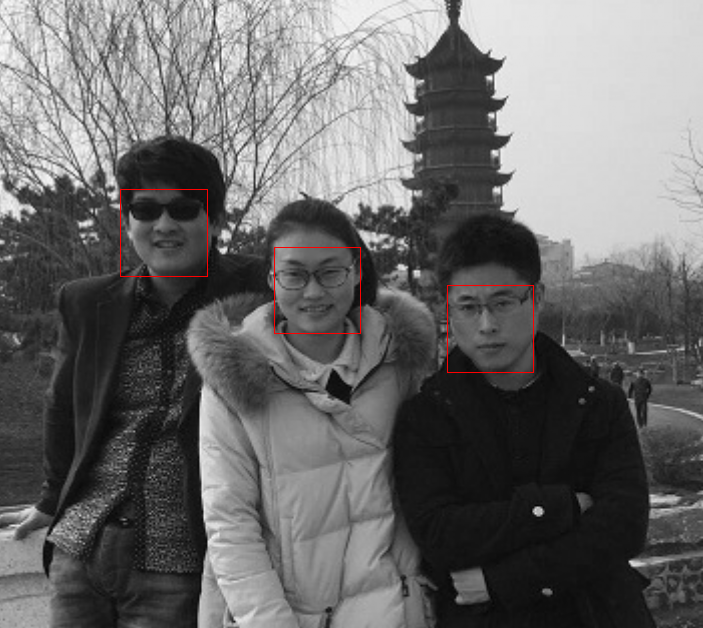
如上图所示,frontal_face_detector 将图像中所有的人脸都检测了出来,从代码中也可以看到,该方法的使用过程及其简单,当然人脸检测的内部逻辑是极其复杂的。
二、代码分析
下面我们一步步跟踪下代码,看看Dlib人脸检测内部究竟是如何工作的。
object_detector
typedef object_detector<scan_fhog_pyramid<pyramid_down<> > > frontal_face_detector;
类 frontal_face_detector 是Dlib库中定义的,位于 “frontal_face_detector.h” 中,可以看到类 frontal_face_detector 是类 object_detector的一种特殊情况;具体关于object_detector的内容后面再详细介绍。
定义Scanner,用于扫描图片并提取特征
类scan_fhog_pyramid 定义来自于”scan_fhog_pyramid.h ”
template <typename Pyramid_type, typename Feature_extractor_type =default_fhog_feature_extractor>

class scan_fhog_pyramid : noncopyable{...}
类模板中参数Pyramid_type表示图像金字塔的类型,本文使用的是pyramid_down<6>,表示图像金字塔进行下采样的比率为5/6,即对原图像不断缩小5/6,构成多级金字塔。当图像的大小小于扫描窗口大小的时候,停止下采样。
参数 Feature_extractor_type 表示特征提取器,默认情况下使用 "fhog.h"中的extract_fhog_feature() 提取特征,函数原型为:
    template <typename image_type, typename T, typename mm>

    void extract_fhog_features(

        const image_type& img,

        array2d<matrix<T,,>,mm>& hog,

        int cell_size = ,

        int filter_rows_padding = ,

        int filter_cols_padding =

    )

    {

        impl_fhog::impl_extract_fhog_features(img, hog, cell_size, filter_rows_padding, filter_cols_padding);

    }
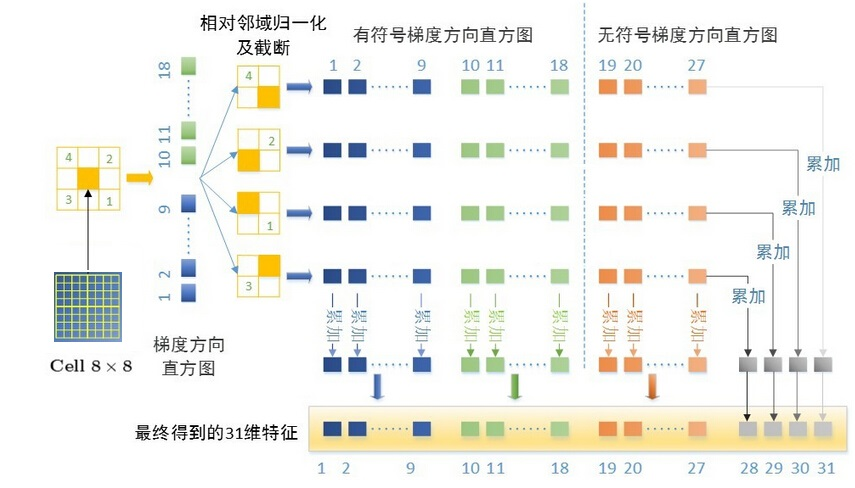
此函数提取的HOG特征来自于Felzenszwalb 版本的HOG [1] (简称fhog)它是对每个8*8像素大小的cell提取31维的 fhog算子,然后保存到上述hog array中供后续计算使用。
HOG的发明者是Navneet Dalal,在2005年其在CVPR上发表了《Histograms of Oriented Gradients forHuman Detection》这一篇论文,HOG一战成名。当然ND大神也就是我们经常使用的Inria数据集的缔造者。其博士的毕业论文《Finding People in Images and Videos》更是HOG研究者的一手资料。
HOG算法思想:
在计算机视觉以及数字图像处理中梯度方向直方图(HOG)是一种能对物体进行检测的基于形状边缘特征的描述算子,它的基本思想是利用梯度信息能很好的反映图像目标的边缘信息并通过局部梯度的大小将图像局部的外观和形状特征化。
HOG特征的提取可以用下面过程表示: 颜色空间的归一化是为了减少光照以及背景等因素的影响;划分检测窗口成大小相同的细胞单元(cell),并分别提取相应的梯度信息;组合相邻的细胞单元成大的相互有重叠的块(block),这样能有效的利用重叠的边缘信息,以统计整个块的直方图;并对每个块内的梯度直方图进行归一化,从而进一步减少背景颜色及噪声的影响;最后将整个窗口中所有块的HOG特征收集起来,并使用特征向量来表示其特征。
颜色空间归一化:
在现实的情况,图像目标会出现在不同的环境中,光照也会有所不一样,颜色空间归一化就是对整幅图像的颜色信息作归一化处理从而减少不同光照及背景的影响,也为了提高检测的鲁棒性,引入图像Gamma和颜色空间归一化来作为特征提取的预处理手段。ND大神等人也对不同的图像像素点的表达方式包括灰度空间等进行了评估,最终验证RGB还有LAB色彩空间能使检测结果大致相同且能起到积极的影响,且另一方面,ND大神等人在研究中分别在每个颜色通道上使用了两种不同的Gamma归一化方式,取平方根或者使用对数法,最终验证这一预处理对检测的结果几乎没有影响,而不能对图像进行高斯平滑处理,因平滑处理会降低图像目标边缘信息的辨识度,影响检测结果。
梯度计算:
边缘是由图像局部特征包括灰度、颜色和纹理的突变导致的。一幅图像中相邻的像素点之间变化比较少,区域变化比较平坦,则梯度幅值就会比较小,反之,则梯度幅值就会比较大。梯度在图像中对应的就是其一阶导数。模拟图像f(x,y)中任一像素点(x,y)的梯度是一个矢量:
其中,Gx是沿x方向上的梯度,Gy是沿y方向上的梯度,梯度的幅值及方向角可表示如下:
数字图像中像素点的梯度是用差分来计算的:

一维离散微分模板在将图像的梯度信息简单、快速且有效地计算出来,其公式如下:
式中,Gx,Gy,H(x,y)分别表示的是像素点(x,y)在水平方向上及垂直方向上的梯度以及像素的灰度值,其梯度的幅值及方向计算公式如下:

计算细胞单元的梯度直方图:
对于整个目标窗口,我们需要将其分成互不重叠大小相同的细胞单元(cell),然后分别计算出每个cell的梯度信息,包括梯度大小和梯度方向。ND大神等人实验指出,将像素的梯度方向在0-180°区间内平均划分为9个bins,超过9个时不仅检测性能没有明显的提高反而增加了检测运算量, 每个cell内的像素为其所在的梯度方向直方图进行加权投票,加权的权值可以是像素本身的梯度幅值,也可以是幅值的平方或平方根等,而若使用平方或平方根,实验的检测性能会有所降低,ND大神等人也验证,使用梯度幅值的实验效果更可靠。
对组合成块的梯度直方图作归一化:
从梯度计算公式中可以看出,梯度幅值绝对值的大小容易受到前景与背景对比度及局部光照的影响,要减少这种影响得到较准确的检测效果就必须对局部细胞单元进行归一化处理。归一化方法多种多样,但整体思想基本上是一致的:将几个细胞单元(cell)组合成更大的块(block),这时整幅图像就可看成是待检测窗口,将更大的块看成是滑动窗口,依次从左到右从上到下进行滑动,得到一些有重复细胞单元的块及一些相同细胞单元(cell)在不同块(block)中的梯度信息,再对这些块(block)信息分别作归一化处理,不同的细胞单元尺寸大小及不同块的尺寸大小会影响最终的检测效果。
介绍完HOG算子的基本概念,这边分析下31维的 fhog算子具体是从何而来呢?

其中,31D fhog=18D+9D+4D。
- 18D来自于对cell做18个bin的梯度方向直方图,即将360°划分为18个bin,然后令cell中的每个像素根据其梯度方向加权投影到直方图相应的bin中,这样就得到了18维有符号的fhog梯度。
- 9D来自于对cell做9个bin的梯度方向直方图,此时是将180°划分为9个bin,则得到无符号的9维fhog梯度。
- 最后的4D是来自于当前cell和其对角线临域的4个领域cell的归一化操作。具体地,取block=2*2 cell,则得到无符号fhog梯度4*9维,将其看成矩阵做按行按列累加可得到1D特征,4个领域则可得到4个block,共4维特征。
最终,每个cell的31维fhog特征就来自于上述三部分的串联。
具体代码如下所示:
template <
typename image_type,
typename out_type
>
void impl_extract_fhog_features(
const image_type& img_,
out_type& hog,
int cell_size,
int filter_rows_padding,
int filter_cols_padding
)
{
const_image_view<image_type> img(img_);
// make sure requires clause is not broken
DLIB_ASSERT( cell_size > &&
filter_rows_padding > &&
filter_cols_padding > ,
"\t void extract_fhog_features()"
<< "\n\t Invalid inputs were given to this function. "
<< "\n\t cell_size: " << cell_size
<< "\n\t filter_rows_padding: " << filter_rows_padding
<< "\n\t filter_cols_padding: " << filter_cols_padding
); /*
This function implements the HOG feature extraction method described in
the paper:
P. Felzenszwalb, R. Girshick, D. McAllester, D. Ramanan
Object Detection with Discriminatively Trained Part Based Models
IEEE Transactions on Pattern Analysis and Machine Intelligence, Vol. 32, No. 9, Sep. 2010 Moreover, this function is derived from the HOG feature extraction code
from the features.cc file in the voc-releaseX code (see
http://people.cs.uchicago.edu/~rbg/latent/) which is has the following
license (note that the code has been modified to work with grayscale and
color as well as planar and interlaced input and output formats): Copyright (C) 2011, 2012 Ross Girshick, Pedro Felzenszwalb
Copyright (C) 2008, 2009, 2010 Pedro Felzenszwalb, Ross Girshick
Copyright (C) 2007 Pedro Felzenszwalb, Deva Ramanan Permission is hereby granted, free of charge, to any person obtaining
a copy of this software and associated documentation files (the
"Software"), to deal in the Software without restriction, including
without limitation the rights to use, copy, modify, merge, publish,
distribute, sublicense, and/or sell copies of the Software, and to
permit persons to whom the Software is furnished to do so, subject to
the following conditions: The above copyright notice and this permission notice shall be
included in all copies or substantial portions of the Software. THE SOFTWARE IS PROVIDED "AS IS", WITHOUT WARRANTY OF ANY KIND,
EXPRESS OR IMPLIED, INCLUDING BUT NOT LIMITED TO THE WARRANTIES OF
MERCHANTABILITY, FITNESS FOR A PARTICULAR PURPOSE AND
NONINFRINGEMENT. IN NO EVENT SHALL THE AUTHORS OR COPYRIGHT HOLDERS BE
LIABLE FOR ANY CLAIM, DAMAGES OR OTHER LIABILITY, WHETHER IN AN ACTION
OF CONTRACT, TORT OR OTHERWISE, ARISING FROM, OUT OF OR IN CONNECTION
WITH THE SOFTWARE OR THE USE OR OTHER DEALINGS IN THE SOFTWARE.
*/ if (cell_size == )
{
impl_extract_fhog_features_cell_size_1(img_,hog,filter_rows_padding,filter_cols_padding);
return;
} // unit vectors used to compute gradient orientation
matrix<double,,> directions[];
directions[] = 1.0000, 0.0000;
directions[] = 0.9397, 0.3420;
directions[] = 0.7660, 0.6428;
directions[] = 0.500, 0.8660;
directions[] = 0.1736, 0.9848;
directions[] = -0.1736, 0.9848;
directions[] = -0.5000, 0.8660;
directions[] = -0.7660, 0.6428;
directions[] = -0.9397, 0.3420; // First we allocate memory for caching orientation histograms & their norms.
const int cells_nr = (int)((double)img.nr()/(double)cell_size + 0.5);
const int cells_nc = (int)((double)img.nc()/(double)cell_size + 0.5); if (cells_nr == || cells_nc == )
{
hog.clear();
return;
} // We give hist extra padding around the edges (1 cell all the way around the
// edge) so we can avoid needing to do boundary checks when indexing into it
// later on. So some statements assign to the boundary but those values are
// never used.
array2d<matrix<float,,> > hist(cells_nr+, cells_nc+);
for (long r = ; r < hist.nr(); ++r)
{
for (long c = ; c < hist.nc(); ++c)
{
hist[r][c] = ;
}
} array2d<float> norm(cells_nr, cells_nc);
assign_all_pixels(norm, ); // memory for HOG features
const int hog_nr = std::max(cells_nr-, );
const int hog_nc = std::max(cells_nc-, );
if (hog_nr == || hog_nc == )
{
hog.clear();
return;
}
const int padding_rows_offset = (filter_rows_padding-)/;
const int padding_cols_offset = (filter_cols_padding-)/;
init_hog(hog, hog_nr, hog_nc, filter_rows_padding, filter_cols_padding); const int visible_nr = std::min((long)cells_nr*cell_size,img.nr())-;
const int visible_nc = std::min((long)cells_nc*cell_size,img.nc())-; // First populate the gradient histograms
for (int y = ; y < visible_nr; y++)
{
const double yp = ((double)y+0.5)/(double)cell_size - 0.5;
const int iyp = (int)std::floor(yp);
const double vy0 = yp-iyp;
const double vy1 = 1.0-vy0;
int x;
for (x = ; x < visible_nc-; x+=)
{
simd4f xx(x,x+,x+,x+);
// v will be the length of the gradient vectors.
simd4f grad_x, grad_y, v;
get_gradient(y,x,img,grad_x,grad_y,v); // We will use bilinear interpolation to add into the histogram bins.
// So first we precompute the values needed to determine how much each
// pixel votes into each bin.
simd4f xp = (xx+0.5)/(float)cell_size + 0.5;
simd4i ixp = simd4i(xp);
simd4f vx0 = xp-ixp;
simd4f vx1 = 1.0f-vx0; v = sqrt(v); // Now snap the gradient to one of 18 orientations
simd4f best_dot = ;
simd4f best_o = ;
for (int o = ; o < ; o++)
{
simd4f dot = grad_x*directions[o]() + grad_y*directions[o]();
simd4f_bool cmp = dot>best_dot;
best_dot = select(cmp,dot,best_dot);
dot *= -;
best_o = select(cmp,o,best_o); cmp = dot>best_dot;
best_dot = select(cmp,dot,best_dot);
best_o = select(cmp,o+,best_o);
} // Add the gradient magnitude, v, to 4 histograms around pixel using
// bilinear interpolation.
vx1 *= v;
vx0 *= v;
// The amounts for each bin
simd4f v11 = vy1*vx1;
simd4f v01 = vy0*vx1;
simd4f v10 = vy1*vx0;
simd4f v00 = vy0*vx0; int32 _best_o[]; simd4i(best_o).store(_best_o);
int32 _ixp[]; ixp.store(_ixp);
float _v11[]; v11.store(_v11);
float _v01[]; v01.store(_v01);
float _v10[]; v10.store(_v10);
float _v00[]; v00.store(_v00); hist[iyp+] [_ixp[] ](_best_o[]) += _v11[];
hist[iyp++][_ixp[] ](_best_o[]) += _v01[];
hist[iyp+] [_ixp[]+](_best_o[]) += _v10[];
hist[iyp++][_ixp[]+](_best_o[]) += _v00[]; hist[iyp+] [_ixp[] ](_best_o[]) += _v11[];
hist[iyp++][_ixp[] ](_best_o[]) += _v01[];
hist[iyp+] [_ixp[]+](_best_o[]) += _v10[];
hist[iyp++][_ixp[]+](_best_o[]) += _v00[]; hist[iyp+] [_ixp[] ](_best_o[]) += _v11[];
hist[iyp++][_ixp[] ](_best_o[]) += _v01[];
hist[iyp+] [_ixp[]+](_best_o[]) += _v10[];
hist[iyp++][_ixp[]+](_best_o[]) += _v00[]; hist[iyp+] [_ixp[] ](_best_o[]) += _v11[];
hist[iyp++][_ixp[] ](_best_o[]) += _v01[];
hist[iyp+] [_ixp[]+](_best_o[]) += _v10[];
hist[iyp++][_ixp[]+](_best_o[]) += _v00[];
}
// Now process the right columns that don't fit into simd registers.
for (; x < visible_nc; x++)
{
matrix<double,,> grad;
double v;
get_gradient(y,x,img,grad,v); // snap to one of 18 orientations
double best_dot = ;
int best_o = ;
for (int o = ; o < ; o++)
{
const double dot = dlib::dot(directions[o], grad);
if (dot > best_dot)
{
best_dot = dot;
best_o = o;
}
else if (-dot > best_dot)
{
best_dot = -dot;
best_o = o+;
}
} v = std::sqrt(v);
// add to 4 histograms around pixel using bilinear interpolation
const double xp = ((double)x+0.5)/(double)cell_size - 0.5;
const int ixp = (int)std::floor(xp);
const double vx0 = xp-ixp;
const double vx1 = 1.0-vx0; hist[iyp+][ixp+](best_o) += vy1*vx1*v;
hist[iyp++][ixp+](best_o) += vy0*vx1*v;
hist[iyp+][ixp++](best_o) += vy1*vx0*v;
hist[iyp++][ixp++](best_o) += vy0*vx0*v;
}
} // compute energy in each block by summing over orientations
for (int r = ; r < cells_nr; ++r)
{
for (int c = ; c < cells_nc; ++c)
{
for (int o = ; o < ; o++)
{
norm[r][c] += (hist[r+][c+](o) + hist[r+][c+](o+)) * (hist[r+][c+](o) + hist[r+][c+](o+));
}
}
} const double eps = 0.0001;
// compute features
for (int y = ; y < hog_nr; y++)
{
const int yy = y+padding_rows_offset;
for (int x = ; x < hog_nc; x++)
{
const simd4f z1(norm[y+][x+],
norm[y][x+],
norm[y+][x],
norm[y][x]); const simd4f z2(norm[y+][x+],
norm[y][x+],
norm[y+][x+],
norm[y][x+]); const simd4f z3(norm[y+][x+],
norm[y+][x+],
norm[y+][x],
norm[y+][x]); const simd4f z4(norm[y+][x+],
norm[y+][x+],
norm[y+][x+],
norm[y+][x+]); const simd4f nn = 0.2*sqrt(z1+z2+z3+z4+eps);
const simd4f n = 0.1/nn; simd4f t = ; const int xx = x+padding_cols_offset; // contrast-sensitive features
for (int o = ; o < ; o+=)
{
simd4f temp0(hist[y++][x++](o));
simd4f temp1(hist[y++][x++](o+));
simd4f temp2(hist[y++][x++](o+));
simd4f h0 = min(temp0,nn)*n;
simd4f h1 = min(temp1,nn)*n;
simd4f h2 = min(temp2,nn)*n;
set_hog(hog,o,xx,yy, sum(h0));
set_hog(hog,o+,xx,yy, sum(h1));
set_hog(hog,o+,xx,yy, sum(h2));
t += h0+h1+h2;
} t *= *0.2357; // contrast-insensitive features
for (int o = ; o < ; o+=)
{
simd4f temp0 = hist[y++][x++](o) + hist[y++][x++](o+);
simd4f temp1 = hist[y++][x++](o+) + hist[y++][x++](o++);
simd4f temp2 = hist[y++][x++](o+) + hist[y++][x++](o++);
simd4f h0 = min(temp0,nn)*n;
simd4f h1 = min(temp1,nn)*n;
simd4f h2 = min(temp2,nn)*n;
set_hog(hog,o+,xx,yy, sum(h0));
set_hog(hog,o++,xx,yy, sum(h1));
set_hog(hog,o++,xx,yy, sum(h2));
} float temp[];
t.store(temp); // texture features
set_hog(hog,,xx,yy, temp[]);
set_hog(hog,,xx,yy, temp[]);
set_hog(hog,,xx,yy, temp[]);
set_hog(hog,,xx,yy, temp[]);
}
}
}
人脸检测(1)——HOG特征的更多相关文章
- opencv 实现人脸检测(harr特征)
我这里用的是已经训练好的haar级联分类器. 眼睛检测 haarcascade_eye_tree_eyeglasses.xml 人脸检测 haarcascade_frontalface_alt2.xm ...
- 【转载】opencv实现人脸检测
全文转载自CSDN的博客(不知道怎么将CSDN的博客转到博客园,应该没这功能吧,所以直接复制全文了),转载地址如下 http://blog.csdn.net/lsq2902101015/article ...
- Atitti opencv2.4 实现的人脸检测 attilax总结
Atitti opencv2.4 实现的人脸检测 attilax总结 1.1. 1.OpenCV人脸检测的方法1 1.2. /atiplat_img/src/com/attilax/facedetec ...
- paper 88:人脸检测和识别的Web服务API
本文汇总了全球范围内提供基于Web服务的人脸检测和识别的API,便于网络中快速部署和人脸相关的一些应用. 1:从How-old的火爆说起 最开始,网站的开发者只是给一个几百人的群发送email,请他们 ...
- [转]40多个关于人脸检测/识别的API、库和软件
[转]40多个关于人脸检测/识别的API.库和软件 http://news.cnblogs.com/n/185616/ 英文原文:List of 40+ Face Detection / Recogn ...
- 40多个关于人脸检测/识别的API、库和软件
英文原文:List of 40+ Face Detection / Recognition APIs, libraries, and software 译者:@吕抒真 译文:链接 自从谷歌眼镜被推出以 ...
- 转:40多个关于人脸检测/识别的API、库和软件
文章来自于:http://blog.jobbole.com/45936/ 自从谷歌眼镜被推出以来,围绕人脸识别,出现了很多争议.我们相信,不管是不是通过智能眼镜,人脸识别将在人与人交往甚至人与物交互中 ...
- 机器学习: Viola-Jones 人脸检测算法解析(二)
上一篇博客里,我们介绍了VJ人脸检测算法的特征,就是基于积分图像的矩形特征,这些矩形特征也被称为Haar like features, 通常来说,一张图像会生成一个远远高于图像维度的特征集,比如一个 ...
- 目标检测——HOG特征
1.HOG特征: 方向梯度直方图(Histogram of Oriented Gradient, HOG)特征是一种在计算机视觉和图像处理中用来进行物体检测的特征描述子.它通过计算和统计图像局部区域的 ...
随机推荐
- Spring Boot学习大全(入门)
Spring Boot学习(入门) 1.了解Spring boot Spring boot的官网(https://spring.io),我们需要的一些jar包,配置文件都可以在下载.添置书签后,我自己 ...
- Spark启动报错|java.io.FileNotFoundException: File does not exist: hdfs://hadoop101:9000/directory
at org.apache.spark.deploy.history.FsHistoryProvider.<init>(FsHistoryProvider.scala:) at org.a ...
- .NET Core 中的通用主机和后台服务
简介 我们在做项目的时候, 往往要处理一些后台的任务. 一般是两种, 一种是不停的运行,比如消息队列的消费者.另一种是定时任务. 在.NET Framework + Windows环境里, 我们一般会 ...
- Ubuntu安装后上网问题,
首先VMware网络配置详解一:三种网络模式简介 http://www.cnblogs.com/gylei/archive/2012/04/06/2435087.html 很详细. 此处讲述通过桥接来 ...
- DP问题
1.背包问题
- 阿里云 RDS for MySQL 物理备份文件恢复到自建数据库
想把阿里云的Mysql 生成的RAS 文件.tar文件 恢复到本地自建mysql, 遇到的坑.希望帮助大家 阿里云提供的地址 https://help.aliyun.com/knowledge_det ...
- mongodb 多表查询
今天有一个业务涉及到mongodb的多表查询,大体记录下语句结构 db.table_a.aggregate([ {$lookup:{from:"table_b",localFiel ...
- 数据结构——串(KMP)
空串:长度为0的串 空格串:由一个或多个空格组成的串 串常用的3种机内表示方法: 定长顺序存储表示: 用一组地址连续的存储单元存储串的字符序列,每一个串变量都有一个固定长度的存储区,可用定长数组来描述 ...
- 快速理解高性能HTTP服务端的负载均衡技术原理(转)
1.前言 在一个典型的高并发.大用户量的Web互联网系统的架构设计中,对HTTP集群的负载均衡设计是作为高性能系统优化环节中必不可少的方案.HTTP负载均衡的本质上是将Web用户流量进行均衡减压,因此 ...
- netcore 下加密遇到的问题
KeyedHashAlgorithm algorithm = KeyedHashAlgorithm.Create(algorithmName.ToString().ToUpper(CultureInf ...


