git之一: git基础
参考: SourceTree使用
1. git 概念介绍
- 工作区: 就是你在电脑里能看到的目录,比如我的learngit文件夹就是一个工作区,工作区下面有.git目录
- 版本库:工作区有一个隐藏目录.git,这个不算工作区,而是Git的版本库。 Git的版本库里存了很多东西,其中最重要的就是称为stage(或者叫index)的暂存区, 还有Git为我们自动创建的第一个分支master,以及指向master的一个指针叫HEAD。
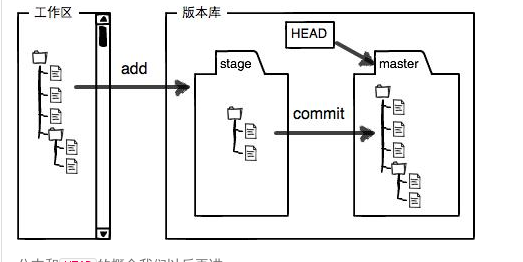
git 文件的4中状态:

git库所在的文件夹中的文件大致有4种状态

Untracked: 未跟踪, 此文件在文件夹中, 但并没有加入到git库, 不参与版本控制. 通过git add 状态变为Staged.

Unmodify: 文件已经入库, 未修改, 即版本库中的文件快照内容与文件夹中完全一致. 这种类型的文件有两种去处, 如果它被修改, 而变为Modified. 如果使用git rm移出版本库, 则成为Untracked文件

Modified: 文件已修改, 仅仅是修改, 并没有进行其他的操作. 这个文件也有两个去处, 通过git add可进入暂存staged状态, 使用git checkout 则丢弃修改过, 返回到unmodify状态, 这个git checkout即从库中取出文件, 覆盖当前修改

Staged: 暂存状态. 执行git commit则将修改同步到库中, 这时库中的文件和本地文件又变为一致, 文件为Unmodify状态. 执行git reset HEAD filename取消暂存, 文件状态为Modified
2. git常用命令
命令大概图解

创建配置版本库
. git init  #用于本地版本库的创建

"git init --bare #创建一个裸仓库(用于服务器版本库创建),裸仓库没有工作区,服务器上的Git仓库纯粹

是为了共享,所以不让用户直接登录到服务器上去改工作区,并且服务器上的Git仓库通常都以.git结尾。然后,

把owner改为git。

. git config --global user.email "you@example.com" #配置提交作者

   git config --global user.name "Your Name"
添加文件到版本库
. git add files  或者 git add .  #添加文件到暂存区(stage)

git add -A 将工作区中的所有改动以及新增文件添加到暂存区。

git add -i   #选择性添加到stage

. git commit -m "描述"
回退和查看
. git status  #查看加入到暂存区(stage)的文件和工作区文件的改动,可以回退,(git reset filename 回退,从暂存区撤销出来.)
  git  status -s

. git log 或者  git log dev # 查看分支的提交

   git log  --oneline  #查看更加简短的提交id,这个id也是可以使用的,比如在reset 或者revert命令中。

  git log  --oneline --decorate  #查看带有  tag的 简短的提交id

   git log  --stat  -2  #查看最新的2次提交
. git show 0a87317d6a8ccd3a5145c4d2668b63918a5de4e8 #查看某一个具体的提交

.git show-branch --more= #查看当前分支简洁单行摘要

5.  一个文件修改了很多行,如何让它回到最开始没有更改的状态
git chechkout -- filename
[root@chehce a1]# vim 2.txt
[root@chehce a1]# git status
# On branch master
# Your branch is ahead of 'origin/master' by 3 commits.
# (use "git push" to publish your local commits)
#
# Changes to be committed:
# (use "git reset HEAD <file>..." to unstage)
#
# new file: test
#
# Changes not staged for commit:
# (use "git add <file>..." to update what will be committed)
# (use "git checkout -- <file>..." to discard changes in working directory)
#
# modified: 2.txt
#
[root@chehce git]# git rev-list HEAD                #查看提交的所有cimmitid

e7bb519a7b89c85e52c5e2fea076d19e072abe34

a80132df92811ec377f1659014ccb0430f0e038e

9b526cb779001a371b252a180d9403da5d391ce8

990c9e00b023405c9f34ff3b4783b9147d8a6d26

a56abde92aeebe9bcd33bac309891de57ca07a2e

9eb33d3c55803cd9e989859e91af547eefb9a4b3

50df03d3229824e4f4a4a4a3972e23565eff1b27

8b0d08cf0f65d81fc5510c895f7a34d5adc7fd6f

[root@chehce git]# git log --oneline

e7bb519 add .txt

a80132d add .txt

9b526cb 修改ha.txt

990c9e0 mv haha.txt to ha.txt

a56abde Merge commit '9eb33d3c55803cd9e989859e91af547eefb9a4b3'

9eb33d3 haha

50df03d -

8b0d08c touch .txt
删除,重命名
将版本库中的文件删除或者重命名

git rm filename  --------> git commit -m "删除filename" #2步完成

如: 在客户端执行 git rm t1.sh , git commit -m "删除t1.sh" 后,

    再git push到服务器.另外一个客户端再git pull后,本地的t1.sh也被删除了。

git mv data newdata: 如

    git mv f1 f1.bak

    git commit -m "mv f1 to f1.bak" #通过2步完成

注意: 直接rm 删除或者 mv移动只是改变了个工作区,暂存区是没有改变的。要将暂存区删除得用上面的 git rm --cache 或者git reset
忽略文件
在work dir 或者它的子目录 新建 文件 .gitignore 文件,将要忽略的文件写入其中,那么在 git add 的时候就可以忽略掉这些文件。
可以使用匹配。例如 *.h 表示 所有.h 结尾的文件。
[root@chehce git]# ls

.txt  .txt  .txt  .txt  .txt  .txt  ha.txt

[root@chehce git]# touch {..}.h           #新建了几个文件

[root@chehce git]# ls

.h  .txt  .h  .txt  .h  .txt  .h  .txt  .h  .txt  .txt  ha.txt

[root@chehce git]# ls

.h  .txt  .h  .txt  .h  .txt  .h  .txt  .h  .txt  .txt  ha.txt

[root@chehce git]# vim .gitignore   #编辑忽略文件

[root@chehce git]# git status       #查看git 状态的时候,并没有提示那些文件需要 git add。 但是提示了 忽略文件自身.

# On branch master

# Untracked files:

#   (use "git add <file>..." to include in what will be committed)

#

#    .gitignore

nothing added to commit but untracked files present (use "git add" to track)
忽略掉自身
[root@chehce git]# cat .gitignore

*.h

.gitignore                        #文件中加入自己

[root@chehce git]# git status

# On branch master

nothing to commit, working directory clean
文件归档

git branch
git branch #查看本地分支
git branch -a #查看本地和远程的所有分支
git branch dev #创建分支
git checkout dev #切换分支
git branch -D dev 删除本地分支
git push origin :br 删除远程分支
#例子:在本地仓库创建分支,提交内容,然后push到远程仓库.另外一个客户端再pull远程仓库。
本地仓库的操作:

git branch dev

git checkout dev

touch test-dev.txt

git add test-dev.txt

git commint -m "add test-dev.txt"

#将本地dev分支push到远程仓库的dev分支(远程仓库不存在dev分支会创建)

git push origin dev:dev #origin 代表远程仓库,dev(本地分支):dev(远程分支)

#再另外一个git客户端pull的时候,是在master客户端执行的。只能pull到master客户端。

git pull #在客户端master分支上pull只能pull到远程仓库的master分支。

#将远程仓库分支到本地与本地dev分支合并。

git pull origin dev:dev
git pull
将远程存储库中的更改合并到当前分支中。在默认模式下,git pull是 git fetch后跟git merge FETCH_HEAD的缩写。
更准确地说,git pull使用给定的参数运行git fetch,并调用git merge将检索到的分支头合并到当前分支中。 使用–rebase,它运行git rebase而不是git merge。
示例
$ git pull <远程主机名> <远程分支名>:<本地分支名>

比如,要取回origin主机的next分支,与本地的master分支合并,需要写成下面这样 -

$ git pull origin next:master

如果远程分支(next)要与当前分支合并,则冒号后面的部分可以省略。上面命令可以简写为:

$ git pull origin next
git push
git push命令用于将本地分支的更新,推送到远程主机。它的格式与git pull命令相似。
$ git push <远程主机名> <本地分支名>:<远程分支名>

#将本地的master分支推送到origin主机的master分支。如果master不存在,则会被新建。

$ git push origin master

#如果省略本地分支名,则表示删除指定的远程分支,因为这等同于推送一个空的本地分支到远程分支。

$ git push origin :master

# 等同于

$ git push origin --delete master

#将当前分支推送到origin主机的对应分支。

$ git push origin

将本地的master分支推送到origin主机,同时指定origin为默认主机,

后面就可以不加任何参数使用git push了。

git push -u origin master
不带任何参数的git push,默认只推送当前分支,这叫做
simple方式。 此外,还有一种matching方式,会推送所有有对应的远程分支的本地分支。Git 2.0版本之前,默认采用matching方法,现在改为默认采用simple方式。 如果要修改这个设置,可以采用git config命令。还有一种情况,就是不管是否存在对应的远程分支,将本地的所有分支都推送到远程主机,这时需要使用–all选项。
$ git push --all origin 将所有本地分支都推送到origin主机。
如果远程主机的版本比本地版本更新,推送时Git会报错,要求先在本地做 git pull 合并差异,然后再推送到远程主机。 这时,如果你一定要推送,可以使用“`–force“ 选项。
$ git push --force origin
git merge
git merge命令用于将两个或两个以上的开发历史加入(合并)一起。
将分支dev合并到当前分支中,自动进行新的提交:

$ git merge dev
git fetch
git fetch命令用于从另一个存储库下载对象和引用。远程跟踪分支已更新(Git术语叫做commit), 需要将这些更新取回本地,这时就要用到git fetch命令。取回的更新现在看不到必须merge后才能查看到内容
要更新所有分支

$ git fetch <远程主机名> = git fetch

取回特定分支的更新,可以指定分支名

$ git fetch <远程主机名> <分支名>

取回远程主机的更新以后,可以在它的基础上,使用git checkout命令创建一个新的分支。

$ git checkout -b newBrach origin/master

也可以使用git merge命令或者git rebase命令,在本地分支上合并远程分支。在当前分支上,合并origin/master。

$ git merge origin/master

# 或者

$ git rebase origin/master
git 冲突
首先,用git diff查看冲突在哪里,然后手动修改。
也可用 git status查看, 可以告诉我们冲突的文件.
$ git status  查看冲突的文件

然后修改文件的冲突部分

再次提交。

$ git add readme.txt

$ git commit -m "conflict fixed"
3. git branch
创建分支
git branch  branch-name   [starting commint]


git branch t1 23fe826

#如果没有starting comminit,,就默认从当前分支的最近提交创建分支.
列出分支
git branch #列出本地分支

git branch -a #列出本地和远程分支

git branch --merged  #已经合并的分支.包括现在  所在的分支,master分支 和 新分支(未做任何开发提交)

git branch --no-merged  # 没有合并的分支。已经开发提交了的分支。但是还没合并过来的.
切换分支
git checkout branch-name
合并分支
git merge branch-name #合并分支到本分支
分支修改删除
[root@chehce a1]# git branch  -m dev dev1   #修改

[root@chehce a1]# git branch

  dev1

* master

  t1

[root@chehce a1]# git branch  -d dev1  #删除

Deleted branch dev1 (was fefba76).

[root@chehce a1]# git branch

* master

  t1
4. git的撤销和回滚
1. git commint 之前
未添加到暂存区的撤销(没有git add),比如修改了文件(新增加文件没法撤销,只能手动删除文件).
可以通过
git checkout -- filename 来撤销修改
# On branch master

# Changes not staged for commit:

#   (use "git add <file>..." to update what will be committed)

#   (use "git checkout -- <file>..." to discard changes in working directory)

#

#    modified:   .txt

#

no changes added to commit (use "git add" and/or "git commit -a")
如果想将多个文件一次性撤销可以用,(用于撤销文件中内容的修改,新建文件不起作用)
git checkout -- .
要撤销新建的文件可以用:
gti clean -fd
添加到暂存区域的(执行了 git add 命令的),状态如下
[root@chehce git]# git status

# On branch master

# Changes to be committed:

#   (use "git reset HEAD <file>..." to unstage)

#

#    modified:   .txt

#    modified:   .txt

#
利用git reset file来撤销 , 随后 用 git checkout -- filename 。 这两步来回到没更改的状态.
[root@chehce git]# git status

# On branch master

# Changes not staged for commit:

#   (use "git add <file>..." to update what will be committed)

#   (use "git checkout -- <file>..." to discard changes in working directory)

#

#    modified:   .txt

#    modified:   .txt

#

no changes added to commit (use "git add" and/or "git commit -a")

[root@chehce git]# git add  .

[root@chehce git]# git status

# On branch master

# Changes to be committed:

#   (use "git reset HEAD <file>..." to unstage)

#

#    modified:   .txt

#    modified:   .txt

#

[root@chehce git]# git reset .

Unstaged changes after reset:

M    .txt

M    .txt

[root@chehce git]# git status

# On branch master

# Changes not staged for commit:

#   (use "git add <file>..." to update what will be committed)

#   (use "git checkout -- <file>..." to discard changes in working directory)

#

#    modified:   .txt

#    modified:   .txt

#

no changes added to commit (use "git add" and/or "git commit -a")

[root@chehce git]# git checkout  -- .

[root@chehce git]# git status

# On branch master

nothing to commit, working directory clean
2. git commint 以后
如果当commit提交后想撤销的话,这就需要revert命令。git revert 命令是撤销某次操作,而在此次操作之前和之后的提交记录都会保留。
先修改了几个文件然后commit 再用git log查看提交记录。
commit 2842c8065322085c31fb7b8207b6296047c4ea3

Author: songguojun <songgj@kingnet.sh>

Date:   Sat Apr  ::  +

    add content
然后使用revert 后面跟上git提交的commitid
git revert 2842c8065322085c31fb7b8207b6296047c4ea3
然后在推送到远端更新远程仓库代码,修改的文件就撤销回来了。注意的是revert奇数次生效,偶数次又回到之前的修改状态。比如一个文件内容是a,那么修改为ab,revert后文件变成了a,如果在revert后文件又还原成ab了。在上次revert的基础上再来一次 reavert就回到了原来。
所以 git revert 是可逆的,该命令主要在对某些修改了的文件恢复到某个 状态,不管这个文件是在哪个时间修改的。然后又可以恢复回来.
3.回到之前某个版本reset
还有就是如果想回到之前某个版本,可以用reset命令,可以回退到某次提交,那次提交之后的提交都会回滚,不过这种覆盖是不可逆的,之前的提交记录都没有了。所以平时开发中尽量注意,避免使用reset。相当于这个版本的之后的添加的修改的文件全部都没有了。
用法:
git reset --hard commit_id
- --hard – 强制将缓存区和工作目录都同步到你指定的提交
git reset commit_id 查看日志的时候已经没有以前的提交记录,但是文件还没有被清理。 用 git clean -df 可以清理.就得到了回滚时候的状态.
这个时候,git服务器的版本肯定是领先本地reset后的版本,要想push的话,的用 -f 参数
git push -f origin master:master
同理。其它的客户端想要pull也要用 -f
git pull -f origin master:master
git reset 参数使用


4.挽救reset 的重置
git reflog show master ,通过logs查看分支指向的变迁。 默认非裸版本库提供分支日志功能。
[root@chehce git]# git reflog show master

8b0d08c master@{}: reset: moving to 8b0d08c

 master@{}: revert: Revert "Revert "touch .txt""

f3002c2 master@{}: revert: Revert "touch 1.txt"

7612e4d master@{}: commit:

a4aaa0c master@{}: commit: -

8b0d08c master@{}: reset: moving to 8b0d08cf0f65d81fc5510c895f7a34d5adc7fd6f

07d57c8 master@{}: pull: Fast-forward

8b0d08c master@{}: reset: moving to 8b0d08cf0f65d81fc5510c895f7a34d5adc7fd6f

78660cc master@{}: revert: Revert "Revert """

701a173 master@{}: revert: Revert ""

5f02a91 master@{}: commit:

07d57c8 master@{}: branch: Created from refs/remotes/origin/master
注意: 最新的改变放在了最前面
[root@chehce git]# git reflog  show master

8b0d08c master@{}: reset: moving to 8b0d08cf0f65d81fc5510c895f7a34d5adc7fd6f

50df03d master@{}: commit: -

8b0d08c master@{}: reset: moving to 8b0d08c

 master@{}: revert: Revert "Revert "touch .txt""

f3002c2 master@{}: revert: Revert "touch 1.txt"

7612e4d master@{}: commit:

a4aaa0c master@{}: commit: -

8b0d08c master@{}: reset: moving to 8b0d08cf0f65d81fc5510c895f7a34d5adc7fd6f

07d57c8 master@{}: pull: Fast-forward

8b0d08c master@{}: reset: moving to 8b0d08cf0f65d81fc5510c895f7a34d5adc7fd6f

78660cc master@{}: revert: Revert "Revert """

701a173 master@{}: revert: Revert ""

5f02a91 master@{}: commit:

07d57c8 master@{}: branch: Created from refs/remotes/origin/master

[root@chehce git]# git reset --hard  master@{1}   #重置master为1次变更之前的值。

HEAD is now at 50df03d -

[root@chehce git]# ls

.txt  .txt  .txt  .txt
修改 最新一次的提交说明
更改最新一次的 提交 说明。
git commit --amend -m "添加6.txt"
5. git cherry-pick (捡选,从其它分支捡选需要的 提交 到本HEAD(分支))
参考: https://www.jianshu.com/p/4ac5f52d9210
表示当前版本,也就是最新的提交3628164...882e1e0
(注意我的提交ID和你的肯定不一样),上一个版本就是HEAD^
,上上一个版本就是HEAD^^
,当然往上100个版本写100个^
比较容易数不过来,所以写成HEAD~100
[root@chehce git]# git checkout dev

Branch dev set up to track remote branch dev from origin.

Switched to a new branch 'dev'

[root@chehce git]# cat .git/HEAD   #当前版本是dev,也就是指向dev上最新的一个提交

ref: refs/heads/dev

[root@chehce git]# git checkout master

Switched to branch 'master'

[root@chehce git]# cat .git/HEAD   #切换到master上, 当前版本是 master。

ref: refs/heads/master
举例: 有 A B C D E F 6个提交,现在要去掉提交D
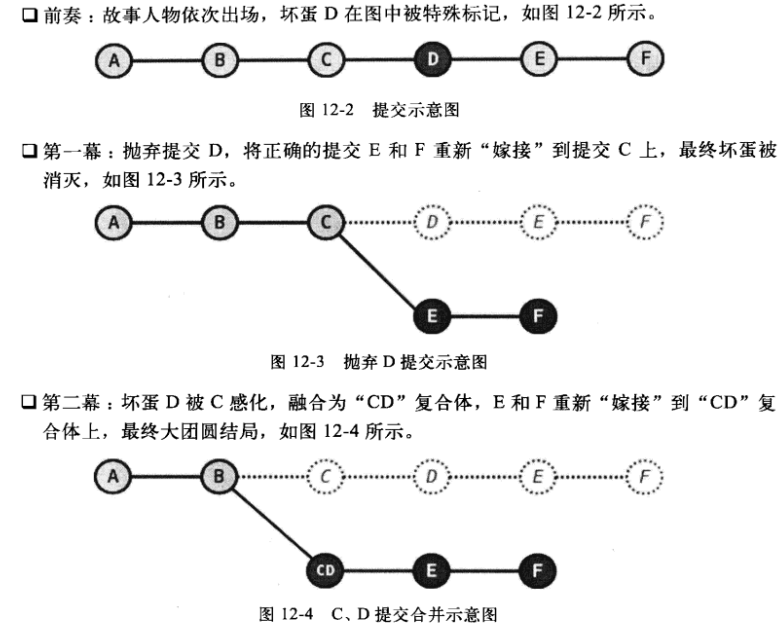
1. 上演第一幕: 干掉 D
[root@chehce git]# git log  --oneline  --decorate -6   #查看6次提交

3ba31ba (HEAD, tag: F, master) add F.txt

144cb97 (tag: E) add E.txt

 (tag: D) add D.txt

424dd1c (tag: C) add C.txt

c22e544 (tag: B) add B.txt

628e28c (tag: A) add A.txt

[root@chehce git]# git checkout C   #切换到tag C

Note: checking out 'C'.

You are in 'detached HEAD' state. You can look around, make experimental

changes and commit them, and you can discard any commits you make in this

state without impacting any branches by performing another checkout.

If you want to create a new branch to retain commits you create, you may

do so (now or later) by using -b with the checkout command again. Example:

  git checkout -b new_branch_name

HEAD is now at 424dd1c... add C.txt

[root@chehce git]# cat .git

.git/       .gitignore

[root@chehce git]# cat .git/HEAD   #查看现在的HEAD 是指向 C

424dd1c5c63353127836b86511868af18812125e

[root@chehce git]# git cherry-pick  E   #将tag  E 选捡到当前

[detached HEAD 5c8783e] add E.txt

  file changed,  insertion(+)

 create mode  E.txt

[root@chehce git]# git cherry-pick  F  #将 tag F 选捡到当前
 [detached HEAD 309f21e] add F.txt  file changed,  insertion(+) create mode  F.txt

[root@chehce git]# git checkout master   #切换到master
Warning: you are leaving  commits behind, not connected to
any of your branches:
  309f21e add F.txt
  5c8783e add E.txt
If you want to keep them by creating a new branch, this may be a good time
to do so with:
  git branch new_branch_name 309f21e
Switched to branch 'master'

[root@chehce git]# git reset --hard HEAD@{1}  #将HEAD@{1}相当于切换回master分支前的指向。也就是 重新选捡后的tag F 的commintid, 也可以把HEAD@{1}直接换成
重新选捡后的tag F 的commintid。可以看一下下面的演示。
HEAD is now at 309f21e add F.txt
[root@chehce git]# git log --oneline --decorate -5 #在次查看发现tag D 已经不在了。
309f21e (HEAD, master) add F.txt
5c8783e add E.txt
424dd1c (tag: C) add C.txt
c22e544 (tag: B) add B.txt
628e28c (tag: A) add A.txt
[root@chehce git]# git log  --oneline  --decorate

3ba31ba (HEAD, tag: F, master) add F.txt

144cb97 (tag: E) add E.txt

 (tag: D) add D.txt

424dd1c (tag: C) add C.txt

c22e544 (tag: B) add B.txt

628e28c (tag: A) add A.txt

cda8768 add .txt .txt

9b526cb (tag: version1.) 修改ha.txt

990c9e0 mv haha.txt to ha.txt

a56abde (tag: old_practice) Merge commit '9eb33d3c55803cd9e989859e91af547eefb9a4b3'

9eb33d3 haha

50df03d -

8b0d08c touch .txt

[root@chehce git]# git log  --oneline  --decorate -

3ba31ba (HEAD, tag: F, master) add F.txt

144cb97 (tag: E) add E.txt

 (tag: D) add D.txt

424dd1c (tag: C) add C.txt

c22e544 (tag: B) add B.txt

628e28c (tag: A) add A.txt

[root@chehce git]# git checkout C

Note: checking out 'C'.

You are in 'detached HEAD' state. You can look around, make experimental

changes and commit them, and you can discard any commits you make in this

state without impacting any branches by performing another checkout.

If you want to create a new branch to retain commits you create, you may

do so (now or later) by using -b with the checkout command again. Example:

  git checkout -b new_branch_name

HEAD is now at 424dd1c... add C.txt

[root@chehce git]# cat .git

.git/       .gitignore

[root@chehce git]# cat .git/HEAD

424dd1c5c63353127836b86511868af18812125e

[root@chehce git]# cat .git/refs/

heads/   remotes/ tags/

[root@chehce git]# cat .git/refs/heads/master

3ba31baf3649969d10d94b864b70828ce466fe81

[root@chehce git]#

[root@chehce git]# git cherry-pick E

[detached HEAD 433ac03] add E.txt

  file changed,  insertion(+)

 create mode  E.txt

[root@chehce git]# cat .git/refs/heads/master

3ba31baf3649969d10d94b864b70828ce466fe81

[root@chehce git]# cat .git/HEAD

433ac03c1843c90a677eeef63ffc18b5eff875aa

[root@chehce git]# git cherry-pick F

[detached HEAD 48a27b6] add F.txt

  file changed,  insertion(+)

 create mode  F.txt

[root@chehce git]# cat .git/refs/heads/master

3ba31baf3649969d10d94b864b70828ce466fe81

[root@chehce git]# cat .git/HEAD                         #现在  HEAD 的指针

48a27b694a5c1820588716b6c51fb7b611b3e4d4

[root@chehce git]# git checkout master

Warning: you are leaving  commits behind, not connected to

any of your branches:

  48a27b6 add F.txt

  433ac03 add E.txt

If you want to keep them by creating a new branch, this may be a good time

to do so with:

 git branch new_branch_name 48a27b6

Switched to branch 'master'

[root@chehce git]# cat .git/HEAD   #master的指针还是在master

ref: refs/heads/master

[root@chehce git]# git reset --hard 48a27b694a5c1820588716b6c51fb7b611b3e4d4     #将master的 指针指向上面 tag F 的HEAD

HEAD is now at 48a27b6 add F.txt

[root@chehce git]# git log --oneline --decorate

48a27b6 (HEAD, master) add F.txt

433ac03 add E.txt

424dd1c (tag: C) add C.txt

c22e544 (tag: B) add B.txt

628e28c (tag: A) add A.txt

cda8768 add .txt .txt

9b526cb (tag: version1.) 修改ha.txt

990c9e0 mv haha.txt to ha.txt

a56abde (tag: old_practice) Merge commit '9eb33d3c55803cd9e989859e91af547eefb9a4b3'

9eb33d3 haha

50df03d -

8b0d08c touch .txt
HEAD@{1}的演示
例子2:
https://blog.csdn.net/amanicspater/article/details/78624973
5. git检出
HEAD(头指针) 的重置即检出。
HEAD 指向了master分支.
[root@chehce git]# cat .git/HEAD

ref: refs/heads/master
[root@chehce git]# git checkout 8b0d08cf0f65d81fc5510c895f7a34d5adc7fd6f  #检出到commintID

Note: checking out '8b0d08cf0f65d81fc5510c895f7a34d5adc7fd6f'.

You are in 'detached HEAD' state. You can look around, make experimental

changes and commit them, and you can discard any commits you make in this

state without impacting any branches by performing another checkout.

If you want to create a new branch to retain commits you create, you may

do so (now or later) by using -b with the checkout command again. Example:

  git checkout -b new_branch_name

HEAD is now at 8b0d08c... touch .txt

[root@chehce git]# cat .git/HEAD   #HEAD 头指针指向不在是master,指向了一个具体的提交ID

8b0d08cf0f65d81fc5510c895f7a34d5adc7fd6f
# 新建文件并且提交
[root@chehce git]# vim haha.txt

[root@chehce git]# git add  .

[root@chehce git]# git commit -m "haha"

[detached HEAD 9eb33d3] haha

  file changed,  insertion(+)

 create mode  haha.txt

[root@chehce git]# ls

.txt  haha.txt

[root@chehce git]# cat .git/HEAD

9eb33d3c55803cd9e989859e91af547eefb9a4b3

[root@chehce git]# git log

commit 9eb33d3c55803cd9e989859e91af547eefb9a4b3

Author: che <che@example.com>

Date:   Thu Jun  ::  +

    haha

commit 8b0d08cf0f65d81fc5510c895f7a34d5adc7fd6f

Author: chepingan <@qq.com>

Date:   Thu Jun  ::  +

    touch .txt

[root@chehce git]# git log --graph --pretty=oneline  #新的提交是建立在之前的提交上。

* 9eb33d3c55803cd9e989859e91af547eefb9a4b3 haha

* 8b0d08cf0f65d81fc5510c895f7a34d5adc7fd6f touch .txt
切换回到 master分支,上面新建的文件不见了。日志里面也没有它的提交记录。如何让他可以到master分支呢? 合并,对将合并到master分支。
git merge 9eb33d3c55803cd9e989859e91af547eefb9a4b3
发现文件出现了。
[root@chehce git]# git log --graph --pretty=oneline

*   a56abde92aeebe9bcd33bac309891de57ca07a2e Merge commit '9eb33d3c55803cd9e989859e91af547eefb9a4b3' #合并

|\

| * 9eb33d3c55803cd9e989859e91af547eefb9a4b3 haha  # 创建文件提交

* | 50df03d3229824e4f4a4a4a3972e23565eff1b27 -4  #检出到 commitid

|/

* 8b0d08cf0f65d81fc5510c895f7a34d5adc7fd6f touch .txt
6. git tag操作
https://blog.csdn.net/wangjia55/article/details/8793577/
标签也叫做里程碑。
1. 标签列出和查看
git tag #查看当前分支下所有标签
[root@chehce git]# git tag

A

old_practice
git tag -l "*old*" #过滤标签
[root@chehce git]# git tag -l "*old*"

old_practice
git describe #显示可从提交中获得的最新标签。
[root@chehce git]# git describe

old_practice--g9b526cb     #这个表示的是在tag-修改次数-g现在的提交id.
git log --oneline --decorate #在提交id旁显示该提交的关联的引用(里程碑或者分支)。
[root@chehce git]# git log  --oneline  --decorate

9b526cb (HEAD, master) 修改ha.txt

990c9e0 mv haha.txt to ha.txt

a56abde (tag: old_practice, origin/master) Merge commit '9eb33d3c55803cd9e989859e91af547eefb9a4b3'

9eb33d3 haha

50df03d -

8b0d08c (tag: A) touch .txt
git show 标签名字
[root@chehce git]# git show version1.

tag version1.

Tagger: che <che@example.com>

Date:   Fri Jun  ::  +

version 1.0

commit 9b526cb779001a371b252a180d9403da5d391ce8

Author: che <che@example.com>

Date:   Fri Jun  ::  +

    修改ha.txt

diff --git a/ha.txt b/ha.txt

index 3740b8b..89f2424

--- a/ha.txt

+++ b/ha.txt

@@ - +, @@

 afaf

+afsf

+
2. 打标签
给当前这点打标签,不用跟其它的
git tag "标签名字" -m "说明"
[root@chehce git]# git tag  "version1.0" -m "version 1.0"

[root@chehce git]# git describe

version1.

[root@chehce git]# git log --oneline --decorate

9b526cb (HEAD, tag: version1., master) 修改ha.txt

990c9e0 mv haha.txt to ha.txt

a56abde (tag: old_practice, origin/master) Merge commit '9eb33d3c55803cd9e989859e91af547eefb9a4b3'

9eb33d3 haha

50df03d -

8b0d08c (tag: A) touch .txt
给某一个 commmint id 打标签
git tag "标签名字" commintID -m "说明"
[root@chehce git]# git tag "version1.2" e7bb519a7b89c85e52c5e2fea076d19e072abe34 -m "version 1.2"

[root@chehce git]# git tag

A

old_practice

version1.

version1.

version1.

[root@chehce git]# git log --oneline  --decorate

e7bb519 (HEAD, tag: version1., master) add .txt

a80132d (tag: version1.) add .txt

9b526cb (tag: version1.) 修改ha.txt

990c9e0 mv haha.txt to ha.txt

a56abde (tag: old_practice, origin/master) Merge commit '9eb33d3c55803cd9e989859e91af547eefb9a4b3'

9eb33d3 haha

50df03d -

8b0d08c (tag: A) touch .txt
3. 切换到标签(就相当于直接切换到某个commint ID)
[root@chehce git]# git tag

A

old_practice

version1.

version1.

[root@chehce git]# ls

.txt  .txt  .txt  .txt  .txt  ha.txt

[root@chehce git]# git checkout version1.0   #切换到version1.0所引用的commint id。

Note: checking out 'version1.0'.

You are in 'detached HEAD' state. You can look around, make experimental

changes and commit them, and you can discard any commits you make in this

state without impacting any branches by performing another checkout.

If you want to create a new branch to retain commits you create, you may

do so (now or later) by using -b with the checkout command again. Example:

  git checkout -b new_branch_name

HEAD is now at 9b526cb... 修改ha.txt

[root@chehce git]# git branch

* (detached from version1.)

  dev1

  master

[root@chehce git]# ls

.txt  .txt  .txt  .txt  ha.txt
4. 删除标签
git tag -d "标签名字"
[root@chehce git]# git tag  -d "version1.2"

Deleted tag 'version1.2' (was da064c9)

[root@chehce git]# git tag

A

old_practice

version1.

version1.
5. 标签发布(提交,默认是不会提交到git服务器的)
git push origin v0.1.2 # 将v0.1.2标签提交到git服务器
git push origin –tags # 将本地所有标签一次性提交到git服务器
[root@chehce git]# git push  --tags

Counting objects: , done.

Delta compression using up to  threads.

Compressing objects: % (/), done.

Writing objects: % (/),  bytes |  bytes/s, done.

Total  (delta ), reused  (delta )

To 172.10.30.228:/root/test/git

 * [new tag]         A -> A

 * [new tag]         old_practice -> old_practice

 * [new tag]         version1. -> version1.

 * [new tag]         version1. -> version1.
7. git服务器搭建
git服务端
git服务器端和客户端可以位于同一台机器上。服务器端时用来协同多个开发客户端进行版本的同步,提供共享功能。
第一步,安装git:
$ sudo apt-get install git
第二步,创建一个git用户,用来运行git服务:
$ sudo adduser git
第三步,创建证书登录:(也可直接用密码忽略这一步)
收集所有需要登录的用户的公钥,就是他们自己的id_rsa.pub文件,

把所有公钥导入到/home/git/.ssh/authorized_keys文件里,一行一个。
第四步,初始化Git仓库:
服务器上的Git仓库通常都以.git结尾。然后,把owner改为git

$ sudo git init --bare sample.git  #--bare创建一个裸仓库,git服务器端使用。
git权限配置
sudo chown -R git:git sample.git

usermod -s /usr/bin/git-shell git #出于安全考虑,第二步创建的git用户不允许登录shell.

git用户可以正常通过ssh使用git,但无法登录shell,因为git用户指定的git-shell每次一登录就自动退出。
git 客户端
第一步:从服务器端克隆git版本库。
git clone git@172.10.30.228:/opt/gamesoul.git
第二步: 更改配置文件用于表明客户端的身份,要不然会跟服务端一样
git config --global user.email "you@example.com"  #根据实际情况填写

git config --global user.name "Your Name"

git config -l
第三步:git 客户端push一些文件到服务器。
echo >.txt

git add .txt

git commit -m "1.txt"

git push  #客户端1 push到服务器

git pull #客户端2 pull更新的文件到本地
开发时,我认为一般是在master以外的分支上作开发,然后合并到本地master分支,再push到远程仓库
git 报错
 Git push 报错1:warning: push.default is unset; 解决如下

    //设置默认行为为simple。 Git2.0以后

     git config --global push.default simple

     //设置默认行为为matching。Git2.0以前

     git config --global push.default matching

git push报错2:

     ! [rejected]        master -> master (fetch first)

    error: failed to push some refs to 'git@172.10.30.228:/opt/gamesoul.git'

    原因: 因为本地的内容和服务器上不同(服务器上有本地没有),解决

    先 git pull  ,在git push
git之一: git基础的更多相关文章
- GIT之二 基础篇(1)
GIT基础 取得项目的 Git 仓库 有两种取得 Git 项目仓库的方法.第一种是在现存的目录下,通过导入所有文件来创建新的 Git 仓库.第二种是从已有的 Git 仓库克隆出一个新的镜像仓库来. 在 ...
- Git命令汇总(基础篇)
自己用Git有一段时间了,随着项目越来越多,功能分支也随之增加,从简单的基础命令到随心所欲,需要自己不断地去尝试总结,下面来分享一下我的Git使用总结. 本章基础篇主要讲解一些Git代码提交流程和Gi ...
- Windows 下安装Git工具及基础使用
Git简介 git是很好一个工具使用,可以执行liunx命令,有git环境后windows系统就可以进行shell命令操作,就可以添加其他liunx辅助软件进行执行,git也代码库管理工具,无论是上传 ...
- Git的常见基础操作命令
Git的常见基础操作命令 1安装初始化 1.1安装git本地安装Windows版本 下载地址: https://git-scm.com/downloads/ 1.2初始化Git用户信息配置 配置git ...
- 3分钟学会git命令的基础使用
前言废话 下面我们就来看看gitlab服务器搭建好(http://www.cnblogs.com/JeremyWYL/p/8258368.html) 之后,git命令的基础使用,基本上就能满足我们平时 ...
- Git操作(基础篇)
Git操作(基础篇) Git是一款免费.开源的分布式版本控制系统,用于敏捷高效地处理任何或小或大的项目.Git的读音为/gɪt/.Git是一个开源的分布式版本控制系统,用以有效.高速的处理从很小到非常 ...
- Git学习笔记----基础运用
安装Git Windows: 进入官网下载或百度网盘下载 Git(V2.23_x64) 提取码:uf2x Ubuntu: sudo apt-get -install git 安装完成之后打开git命令 ...
- 【Git 系列】基础知识全集
Git 是一种分布式版本控制系统,它可以不受网络连接的限制,加上其它众多优点,目前已经成为程序开发人员做项目版本管理时的首选,非开发人员也可以用 Git 来做自己的文档版本管理工具. 一.Git 基础 ...
- Git Pro - (1) 基础
近乎所有操作都可本地执行 在Git中的绝大多数操作都只需要访问本地文件和资源,不用连网. 三种状态 对于任何一个文件,在 Git 内都只有三 种状态:已提交(committed),已修改(modifi ...
随机推荐
- 最新sublime text 3 注册码license分享(亲测有效)
—– BEGIN LICENSE —– TwitterInc 200 User License EA7E-890007 1D77F72E 390CDD93 4DCBA022 FAF60790 61AA ...
- 前端----css 选择器
css 为了修饰页面作用, 让页面好看 ⑴ css的引入方式1,行内样式body里面2,内接样式在html里面的 style 里面3,外接样式两种:①链接式: <link rel=" ...
- 手机CPU架构体系分类及各大厂商
手机cpu相关知识,这对于开发Android应用程序适应各个机型有一定的辅助作用 . 手机cpu架构体系分类 指令集可分为复杂指令集(CISC)和精简指令集(RISC)两部分,代表架构分别是x86.A ...
- JS和Jquery获取和修改label的值的示例代码
abel标签在JS和Jquery中使用不能像其他标签一样用value获取它的值,下面有个不错的示例,希望大家可以学习下 来源: < JS和Jquery获取和修改label的值的示例代码 & ...
- Confluence 6 访问日志脚本
日志访问脚本在连接:https://confluence.atlassian.com/download/attachments/133267635/Atlassian-accessLogScripts ...
- Swift DispatchQueue
延迟2s执行 DispatchQueue.main.asyncAfter(deadline: DispatchTime.now()+2)
- Tomcat解决中文乱码并部署项目
1.在Tomcat下的server.xml中添加URIEncoding="UTF-8"(解决中文乱码的问题) 2.在Tomcat下的server.xml中添加<Context ...
- mysql 视图 触发器 事物 存储过程 函数 流程控制
1.视图 *** 视图是有一条sql语句的查询结果构成的虚拟表 其不是物理存在的 使用方式与普通表相同 视图的作用1.简化sql语句的编写 2.限制可以查看的数据 可以使用权限来完成 权限某一个库 的 ...
- 【深度学习】吴恩达网易公开课练习(class1 week3)
知识点梳理 python工具使用: sklearn: 数据挖掘,数据分析工具,内置logistic回归 matplotlib: 做图工具,可绘制等高线等 绘制散点图: plt.scatter(X[0, ...
- lightoj1234 打表技巧:分块打表
/* 打不了那么大的表,所以只记录分块的信息即可 */ #include<bits/stdc++.h> using namespace std; #define maxn 1000005 ...