使用Qt5+CMake实现图片的区域选择(附源码)
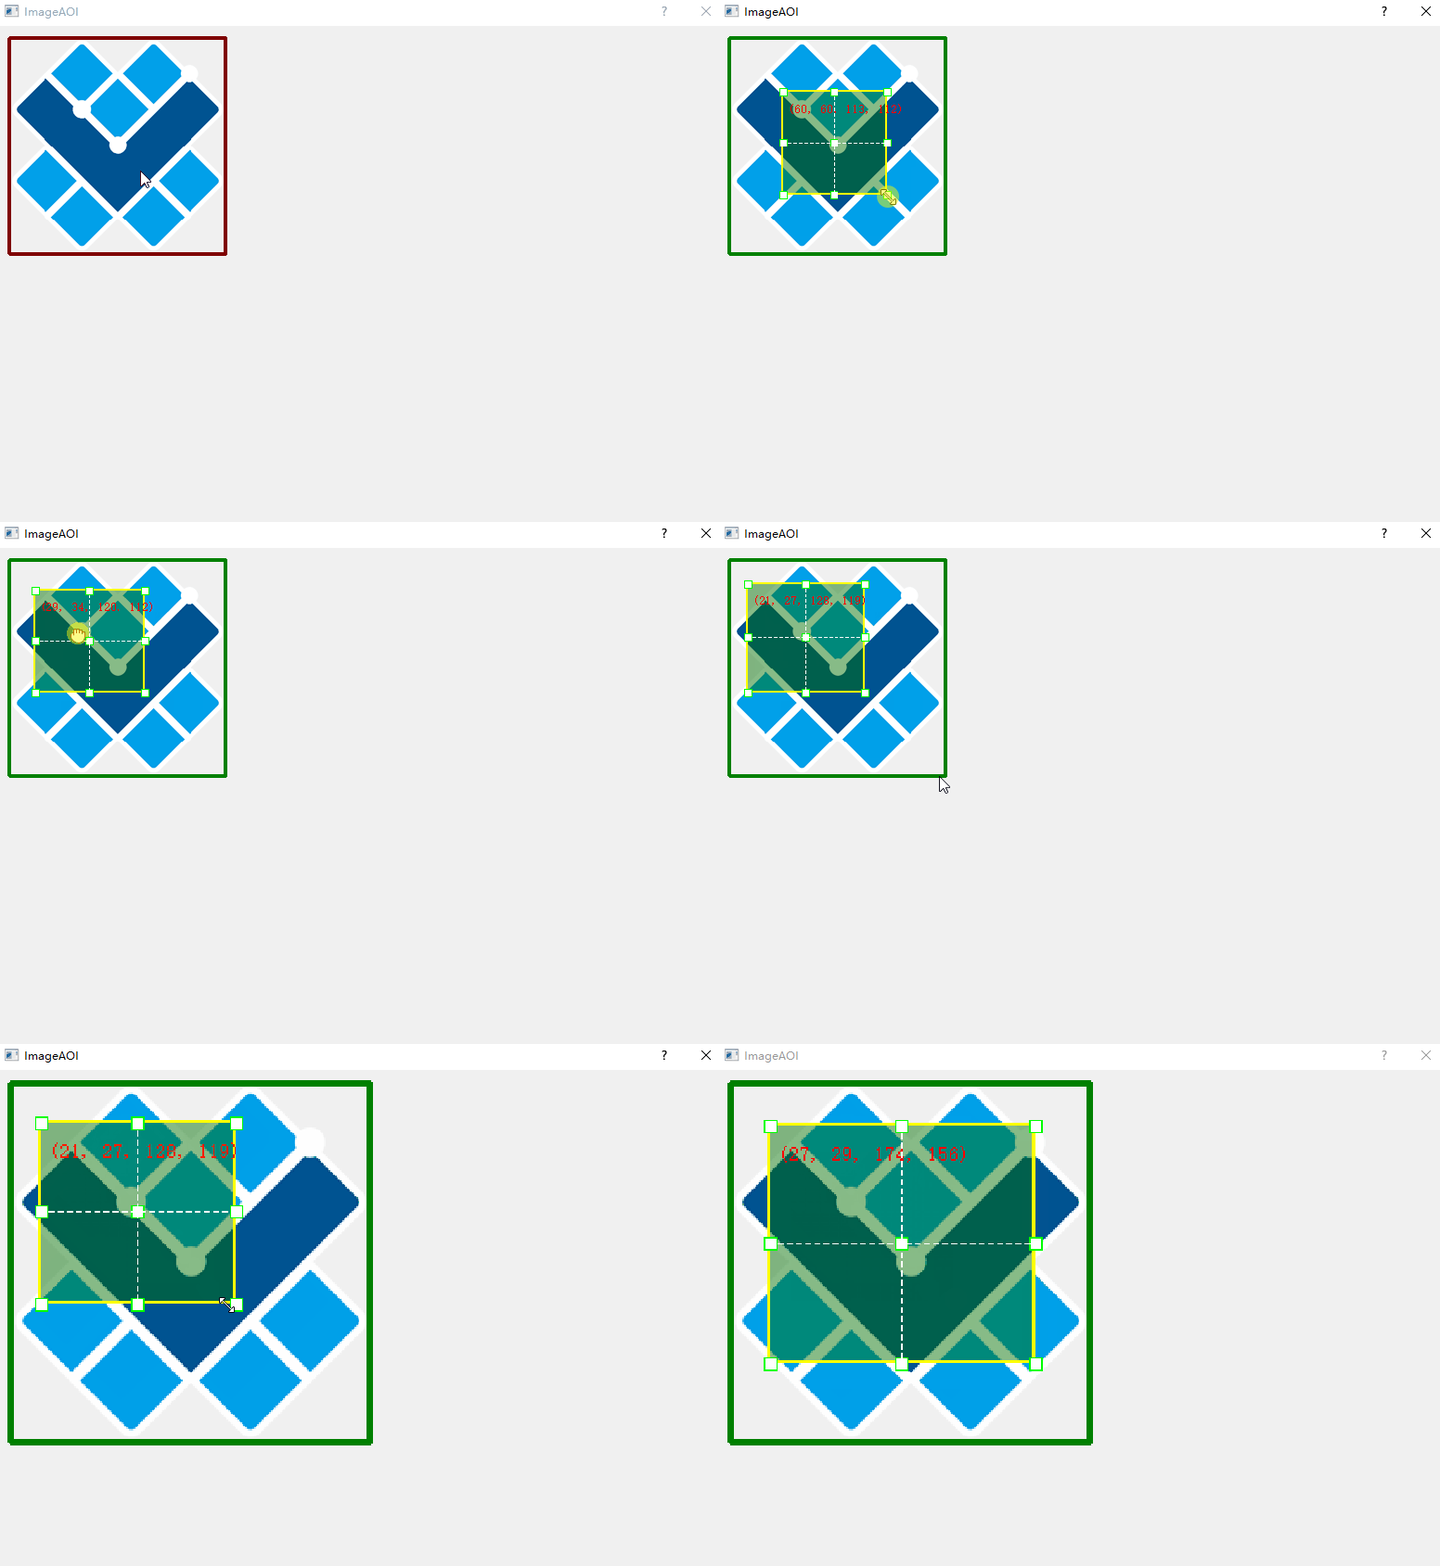
近期研发涉及到了图片的区域选择,找来一些资料一直不能很满意,所以自己实现了一个。
实现步骤如下。源码可以点击ImageAOI获取。
Gitee clone: ImageAOI.
如下资料来自源码的README。
ImageAOI (XLabel): AOI Selection Based on Qt5
Dependency
Qt >= 5.0
Usage
- Double click to trigger the selector
- Mouse scrolling t zoom in/out

Reference (Appreciation)
本工具的实现灵感来自ImageCropper。部分源码也做了参考,在此表示非常感。
实现功能如上面图片所示,方面,快捷。操作起来很有快感。
实现步骤
1. 创建一个基于QLabel的类XLabel。
注意需要引用#include <QLabel>。此段代码主要在xlabel.h文件中。
class XLabel : public QLabel

{

    Q_OBJECT

public:

    explicit XLabel(QWidget* parent = Q_NULLPTR, Qt::WindowFlags f = Qt::WindowFlags());

    ~XLabel();

}
注意 ·Q_OBJECT·必须不能忘记,否则无法顺利生成。
2. 加入所必须的一些临时变量。
image是图片本身,需要载入。scale为缩放变量。selection_mode是用来决定是否显示区域的变量,双击图片区域激活或取消显示。
private:

	QImage image;

	float scale;

	// area selection

	bool selection_mode;

	QRectF croppingRect;

	bool mouse_pressed;

	QPoint start_mouse_pos;

	QRectF last_static_rect;

	CursorPosition cursor_pos;
3. 加入图片的鼠标事件和绘图事件函数。
函数主要继承自QWidget。只有捕获到事件,才能顺利操作。
protected:

	virtual void mousePressEvent(QMouseEvent* event);

	virtual void mouseMoveEvent(QMouseEvent* event);

	virtual void mouseReleaseEvent(QMouseEvent* event);

    virtual void wheelEvent(QWheelEvent* e);

	// double click

	virtual void mouseDoubleClickEvent(QMouseEvent *event);

	void paintEvent(QPaintEvent* _event) override;
4. 实现事件函数。
这里分为两部分,鼠标事件用于更新变量。绘图事件中变量的基础上,完成绘制和渲染。
- 鼠标事件如下
void XLabel::mousePressEvent(QMouseEvent* event)

{

	if (Qt::LeftButton == event->button())

	{

		mouse_pressed = true;

		start_mouse_pos = originPoint(event->pos());

		last_static_rect = croppingRect;

	}

	updateCursorIcon(originPoint(event->pos()));

}

void XLabel::mouseMoveEvent(QMouseEvent* event)

{

	auto origin_p = originPoint(event->pos());

	if (!mouse_pressed)

	{

		cursor_pos = cursorPosition(croppingRect, origin_p);

		updateCursorIcon(origin_p);

	}

	else if (cursor_pos != CursorPositionUndefined)

	{

		QPointF mouseDelta;

		mouseDelta.setX(origin_p.x() - start_mouse_pos.x());

		mouseDelta.setY(origin_p.y() - start_mouse_pos.y());

		int dx = WIDGET_MINIMUM_SIZE.width() / 2;

		int dy = WIDGET_MINIMUM_SIZE.height() / 2;

		//

		if (cursor_pos != CursorPositionMiddle)

		{

			QRectF newGeometry =

				calculateGeometry(

					last_static_rect,

					cursor_pos,

					mouseDelta);

			if (!newGeometry.isNull())

			{

				// boudary check

				if (newGeometry.x() < image.width() - dx && newGeometry.y () < image.height() - dy

					&& newGeometry.width() + newGeometry.x() > dx

					&& newGeometry.height() + newGeometry.y() > dy)

				{

					if (newGeometry.width() >= WIDGET_MINIMUM_SIZE.width() && newGeometry.height() >= WIDGET_MINIMUM_SIZE.height())

					{

						croppingRect = newGeometry;

					}

				}

			}

		}

		else

		{

			auto new_pt = last_static_rect.topLeft() + mouseDelta;

			if (new_pt.x() < image.width() - dx && new_pt.y() < image.height() - dy

				&& croppingRect.width() + new_pt.x() > dx

				&& croppingRect.height() + new_pt.y() > dy)

			{

				croppingRect.moveTo(last_static_rect.topLeft() + mouseDelta);

			}

		}

		update();

	}

}

void XLabel::mouseReleaseEvent(QMouseEvent* event)

{

	mouse_pressed = false;

	updateCursorIcon(originPoint(event->pos()));

	// single-click signal

    //emit clicked(int(0.5 + event->x()/scale), int(0.5+event->y()/scale));

	printf("[ %d, %d] \n", (int)event->x(), (int)event->y());

}

void XLabel::wheelEvent(QWheelEvent * e)

{

	int numDegrees = e->delta() / 8;

	int numSteps = numDegrees / 15;

	float k = numDegrees > 0 ? 1.09 : 0.90;

	k = k *scale;

	setScale(k );

}

void XLabel::mouseDoubleClickEvent(QMouseEvent * event)

{

	selection_mode = !selection_mode;

	update();

}
- 绘图事件如下,核心的绘制都在此处。
void XLabel::paintEvent(QPaintEvent * _event)

{

	QLabel::paintEvent(_event);

	if (image.isNull()) return;

	int width = image.width();

	//printf("Selection: %d\n", (int)selection_mode);

	QPixmap rawImage = QPixmap::fromImage(image);

	QPainter widgetPainter;

	widgetPainter.begin(&rawImage);

	// Image boundary

	QRectF rect(2, 2, image.width()-4, image.height()-4);

	QPen pen0(Qt::darkRed);

	if (selection_mode)

	{

		pen0 = QPen(Qt::darkGreen);

	}

	pen0.setWidth(4);

	widgetPainter.setPen(pen0);

	widgetPainter.drawRect(rect);

	if (selection_mode)

	{

		if (croppingRect.isNull()) {

			const int width = image.width() / 2  - 4;

			const int height = image.height() / 2 - 4;

			croppingRect.setSize(QSize(width, height));

			float x = (image.width() - croppingRect.width()) / 2-2;

			float y = (image.height() - croppingRect.height()) / 2-2;

			croppingRect.moveTo(x, y);

		}

		//qDebug() << "H: " << croppingRect.height();

		// 1. bg color

		widgetPainter.setBrush(QBrush(QColor(0, 0x6f, 0, 120)));

		QPen pen;

		pen.setColor(Qt::yellow);

		pen.setWidth(2);

		widgetPainter.setPen(pen);

		widgetPainter.drawRect(croppingRect);

		// pos

		widgetPainter.setPen(Qt::red);

		QFont font;

		font.setPointSize(croppingRect.width() >240 ? 16 : 10);

		widgetPainter.setFont(font);

		auto tl = croppingRect.topLeft();

		widgetPainter.drawText(QPoint(tl.x() + 6, tl.y() + 24), QString("(%1, %2, %3, %4)").arg(croppingRect.x()).arg(croppingRect.y())\

			.arg(croppingRect.width()).arg(croppingRect.height()));

		// 2. corner boxes

		{

			widgetPainter.setPen(Qt::green);

			widgetPainter.setBrush(QBrush(Qt::white));

			const int edgelen = 8;

			// Вспомогательные X координаты

			int leftXCoord = croppingRect.left() - edgelen/2+1;

			int centerXCoord = croppingRect.center().x() - edgelen / 2;

			int rightXCoord = croppingRect.right() - edgelen / 2+1;

			// Вспомогательные Y координаты

			int topYCoord = croppingRect.top() - edgelen / 2+1;

			int middleYCoord = croppingRect.center().y() - edgelen / 2;

			int bottomYCoord = croppingRect.bottom() - edgelen / 2+1;

			//

			const QSize pointSize(edgelen, edgelen);

			//

			QVector<QRect> points;

			points

				// левая сторона

				<< QRect(QPoint(leftXCoord, topYCoord), pointSize)

				<< QRect(QPoint(leftXCoord, middleYCoord), pointSize)

				<< QRect(QPoint(leftXCoord, bottomYCoord), pointSize)

				// центр

				<< QRect(QPoint(centerXCoord, topYCoord), pointSize)

				<< QRect(QPoint(centerXCoord, middleYCoord), pointSize)

				<< QRect(QPoint(centerXCoord, bottomYCoord), pointSize)

				// правая сторона

				<< QRect(QPoint(rightXCoord, topYCoord), pointSize)

				<< QRect(QPoint(rightXCoord, middleYCoord), pointSize)

				<< QRect(QPoint(rightXCoord, bottomYCoord), pointSize);

			//

			widgetPainter.drawRects(points);

		}

		// 3. center dash lines

		{

			QPen dashPen(Qt::white);

			dashPen.setStyle(Qt::DashLine);

			widgetPainter.setPen(dashPen);

			widgetPainter.drawLine(

				QPoint(croppingRect.center().x(), croppingRect.top()),

				QPoint(croppingRect.center().x(), croppingRect.bottom()));

			// ... горизонтальная

			widgetPainter.drawLine(

				QPoint(croppingRect.left(), croppingRect.center().y()),

				QPoint(croppingRect.right(), croppingRect.center().y()));

		}

	}

	widgetPainter.end();

	this->setPixmap(rawImage.scaledToWidth(scale*width));

}
4. 实现主函数,完成一个界面,测试此类是否可行。
实现一个最简单的QLabel,完成显示,并加入XLabel显示到界面上,完成鼠标拖动测试。
#include <QApplication>

#include <QDialog>

#include <QVBoxLayout>

#include <QLabel>

#include "src/xlabel.h"

int main(int argc, char *argv[])

{

	QApplication a(argc, argv);

	QDialog wgt;

	wgt.setMouseTracking(true);

	QVBoxLayout* layout = new QVBoxLayout(&wgt);

	wgt.setLayout(layout);

	auto xlabel = new XLabel(&wgt);

	layout->addWidget(xlabel);

	layout->addStretch();

	QImage img("../logo_s.png");

	xlabel->setImageMap(img);

	wgt.resize(640, 480);

	wgt.show();

	return a.exec();

}
完整代码可访问ImageAOI。
Gitee clone: ImageAOI.
使用Qt5+CMake实现图片的区域选择(附源码)的更多相关文章
- wpf 模拟3D效果(和手机浏览图片效果相似)(附源码)
原文 wpf 模拟3D效果(和手机浏览图片效果相似)(附源码) pf的3D是一个很有意思的东西,类似于ps的效果,类似于电影动画的效果,因为动画的效果,(对于3D基础的摄像机,光源,之类不介绍,对于依 ...
- 使用 CSS3 实现 3D 图片滑块效果【附源码下载】
使用 CSS3 的3D变换特性,我们可以通过让元素在三维空间中变换来实现一些新奇的效果. 这篇文章分享的这款 jQuery 立体图片滑块插件,利用了 3D transforms(变换)属性来实现多种不 ...
- asp.net+swfupload 多图片批量上传(附源码下载)
asp.net的文件上传都是单个文件上传方式,无法执行一次性多张图片批量上传操作,要实现多图片批量上传需要借助于flash,通过flash选取多个图片(文件),然后再通过后端服务进行上传操作. 本次教 ...
- Qt5位置相关函数异同详解(附源码)
Qt5中提供了丰富的位置和区域大小相关函数.下面讲一讲他们的区别. 主要函数: 1.x(),y(),pos():获取整个窗体左上角的坐标位置. 2.frameGeometry():获取整个窗体左上角的 ...
- javacript 实现瀑布流原理和效果, 滚动加载图片【图文解析 附源码】
先科普下瀑布流吧 瀑布流,又称瀑布流式布局.是比较流行的一种网站页面布局,视觉表现为参差不齐的多栏布局,随着页面滚动条向下滚动,这种布局还会不断加载数据块并附加至当前尾部.最早采用此布局的网站是Pin ...
- Qt5.5.0使用mysql编写小软件源码讲解---顾客信息登记表
Qt5.5.0使用mysql编写小软件源码讲解---顾客信息登记表 一个个人觉得比较简单小巧的软件. 下面就如何编写如何发布打包来介绍一下吧! 先下载mysql的库文件链接:http://files. ...
- 使用百度UMeditor富文本编辑器,修改自定义图片上传,修改源码
富文本编辑器,不多说了,这个大家应该都用到过,至于用到的什么版本,那就分很多种 CKEditor:很早以前叫FCK,那个时候也用过,现在改名了,比较流行的一个插件,国外很多公司在用 UEDITOR:百 ...
- 图片按日期分类和查看程序(WPF开发)(附源码)
手机方便了我们的生活,可以随时随地拍摄.越来越多的图片堆砌在电脑里.看到杂乱无章的图片,实在感到头痛.手动整理太复杂.基于此,我写了一个小程序,可以将图片按日期整理和查看.按日期查看图片,回忆过去的点 ...
- 一个web图片热点生成工具(winform开发) 附源码
给图片加热点是web开发中经常用到的一个功能.这方面的工具也不少. 为了更好的满足自己的需求,写了一个winform程序. 可以方便的给图片加热点,更方便灵活! 源码下载 http://downloa ...
随机推荐
- C++20 的 Modules
最近看了两篇关于 C++ 20 Modules 很有意思的文章,戳: <Understanding C++ Modules: Part 1: Hello Modules, and Module ...
- [AI开发]目标跟踪之计数
基于视频结构化的应用中,目标在经过跟踪算法后,会得到一个唯一标识和它对应的运动轨迹,利用这两个数据我们可以做一些后续工作:测速(交通类应用场景).计数(交通类应用场景.安防类应用场景)以及行为检测(交 ...
- Pandas Series 与 DataFrame 数据创建
>>> import pandas as pd >>> import numpy as np >>> print(np.__version__), ...
- 数据结构-双向链表(Python实现)
数据结构在编程世界中一直是非常重要的一环,不管是开发还是算法,哪怕是单纯为了面试,数据结构都是必修课,今天我们介绍链表中的一种--双向链表的代码实现. 好了,话不多说直接上代码. 双向链表 首先,我们 ...
- WPF 入门笔记之控件内容控件
一.控件类 在WPF中和用户交互的元素,或者说.能够接受焦点,并且接收键盘鼠标输入的元素所有的控件都继承于Control类. 1. 常用属性: 1.1 Foreground:前景画刷/前景色(文本颜色 ...
- mybatis-generator生成数据表中注释
0.git clone https://github.com/backkoms/mybatis-generator-comments.git,编译打包,install到本地或delopy私服库中均可. ...
- 满足高密度设备存储需求 一颗ICMAXLPDDR4X 8GB就行
通讯技术在当代无疑更新越来越快速,随着5G时代即将到来,对通讯的设备的要求也将提出更高的要求.具备AI功能的硬件设备将普及化,其智能化程度也将越来越高,同时对手机等智能移动设备的内存容量和带宽也提出了 ...
- 【深入浅出-JVM】(8):TLAB
概念 TLAB(Thread Local Allocation Buffer)线程本地分配缓冲区(线程私有分配区,私有分配,公共查看),占用 Eden 区(缺省 Eden 的1%),默认开启,JVM ...
- WinForm控件之【ListView】
基本介绍 项列表控件,拥有五种不同视图的样式供展示项集合. 常设置属性 Columns:‘详细信息’视图中用来显示的列: Groups:ListView列表中的组,将列表各项分组区域展示: Horiz ...
- jmeter_遍历转换浮点时间戳
概述 近期帮朋友解决了一个浮点时间戳转换的问题,在这里记录一下. 具体场景是有一个十位浮点时间戳的list,需要遍历转换为当前的标准时间. list如下: 实现步骤 实现步骤其实很简单,只需要一个fo ...
