深入学习Spring框架(二)- 注解配置
1.为什么要学习Spring的注解配置?
基于注解配置的方式也已经逐渐代替xml。所以我们必须要掌握使用注解的方式配置Spring。
关于实际的开发中到底使用xml还是注解,每家公司有着不同的使用习惯。所以这两种配置方式都需要掌握。
学习基于注解的IoC配置,首先得有一个认知,即注解配置和xml配置要实现的功能都是一样的,都是要降低程序间的耦合。只是配置的形式不一样。
2.入门示例
步骤:
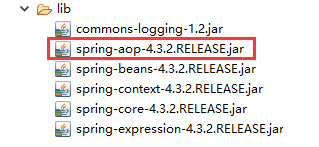
1.导入jar包,相对于之前的,在基于注解的配置中,我们还要多拷贝一个aop的jar包。
2.在classpath下创建一个配置文件applicationContext.xml,并导入约束,基于注解整合时,配置文件导入约束时需要多导入一个context名称空间下的约束
- <?xml version="1.0" encoding="UTF-8"?>
- <beans xmlns="http://www.springframework.org/schema/beans"
- xmlns:p="http://www.springframework.org/schema/p"
- xmlns:context="http://www.springframework.org/schema/context"
- xmlns:xsi="http://www.w3.org/2001/XMLSchema-instance"
- xsi:schemaLocation="http://www.springframework.org/schema/beans
- http://www.springframework.org/schema/beans/spring-beans.xsd
- http://www.springframework.org/schema/context
- http://www.springframework.org/schema/context/spring-context.xsd
- ">
- </beans>
3.创建一个用于测试的类,并且加入使用@Component注解,声明该类允许注入到Spring容器
- import org.springframework.stereotype.Component;
- /*
- * @Component 组件注解,spring在启动的时候扫描对应的包下面的所有类型
- * 如果哪一个类上只要有 @Component 注解,说明这个就需要被Spring管理
- * Spring在容器就创建这个类的对象
- *
- * @Component 属性介绍
- * @Component(value="id值")
- * value :指定 bean 的 id值
- * 可以不写,默认bean的id就是当前类名的 首字母小写
- * 如果写,“value=”可以省略,直接"id值"
- *
- */
- @Component("service")
- public class Service {
- public void say() {
- System.out.println("你好!Spring");
- }
- }
4.往配置文件加入扫描组件配置
- <?xml version="1.0" encoding="UTF-8"?>
- <beans xmlns="http://www.springframework.org/schema/beans"
- xmlns:p="http://www.springframework.org/schema/p"
- xmlns:context="http://www.springframework.org/schema/context"
- xmlns:xsi="http://www.w3.org/2001/XMLSchema-instance"
- xsi:schemaLocation="http://www.springframework.org/schema/beans
- http://www.springframework.org/schema/beans/spring-beans.xsd
- http://www.springframework.org/schema/context
- http://www.springframework.org/schema/context/spring-context.xsd
- ">
- <!-- 配置spring要进行扫描的组件注解的包(默认包含子包)的位置 -->
- <context:component-scan base-package="com.gjs.service"/>
- </beans>
5.测试代码
- import org.junit.Test;
- import org.springframework.context.ApplicationContext;
- import org.springframework.context.support.ClassPathXmlApplicationContext;
- import com.gjs.service.Service;
- public class TestSpring {
- @Test
- public void testName() throws Exception {
- ApplicationContext context = new ClassPathXmlApplicationContext("applicationContext.xml");
- Service service = context.getBean("service",Service.class);
- service.say();
- }
- }
3.常用注解说明
3.1 IOC相关注解
用于被扫描创建对象的注解,统称为组件注解。组件包括:@Component,@Controller,@Service,@Repository。它们的作用是标识类为注解的组件类,启动Spring框架的程序时,声明将这些组件类注入到Spring容器里面。功能类似原来配置文件的<bean>标签。
其他它们的功能是一样的并没有本质上的区别,哪为什么会有4个呢?
Spring第一版注解的实现(spring 2.5),就是使用一个@Component。从3.0以后,作者认为根据分层的需要,把它拆成了四个。为了可以让开发人员,可见即可得,一看到注解,立即知道类的性质。所以分成了四个。
规范:
@Controller:用于声明表示层的组件注解
@Service:用于声明服务层的组件注解
@Repository:用于声明持久层的组件注解
@Component:用于声明三层以外的组件注解
除了@Controller在SpringMVC里面有强制的要求,SpringMVC的表示层必须使用@Controller组件注解。其他情况不按规范使用也不会有问题,但既然是规范就要遵守。
@Scope:指定作用范围,等同于Xml配置<bean>标签中的scope
- @Component("service")
- @Scope("prototype")
- public class Service {
- public void say() {
- System.out.println("你好!Spring");
- }
- }
@PostConstruct:初始化方法注解,等同于Xml配置<bean>标签中的init-method
- @PostConstruct
- public void init() {
- System.out.println("初始化方法执行了");
- }
@PreDestroy:销毁方法注解,等同于Xml配置<bean>标签中的destroy-method
- @PreDestroy
- public void destroy() {
- System.out.println("销毁方法执行了");
- }
3.2 依赖注入的注解
Spring提供了两套用注解依赖注入的解决方案
1.@Autowired +@Qualifier():是Spring定义的标签
2.@Resouce:是J2EE的规范
@Autowired +@Qualifier()
@Autowired +@Qualifier()有三种注入的方式:
1.在字段上面注入
2.在方法上面注入
3.在构造方法上面注入
示例:
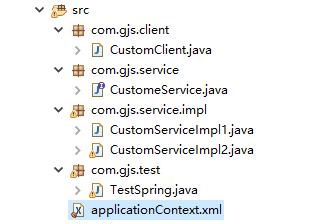
整体结构:
CustomeService接口:
- package com.gjs.service;
- public interface CustomeService {
- public void say();
- }
CustomServiceImpl1:
- package com.gjs.service.impl;
- import org.springframework.stereotype.Service;
- import com.gjs.service.CustomeService;
- @Service("service1")
- public class CustomServiceImpl1 implements CustomeService {
- @Override
- public void say() {
- System.out.println("CustomerServiceImpl1.say()");
- }
- }
CustomServiceImpl2:
- package com.gjs.service.impl;
- import org.springframework.stereotype.Service;
- import com.gjs.service.CustomeService;
- @Service("service2")
- public class CustomServiceImpl2 implements CustomeService {
- @Override
- public void say() {
- System.out.println("CustomerServiceImpl2.say()");
- }
- }
CustomController:
- package com.gjs.client;
- import org.springframework.beans.factory.annotation.Autowired;
- import org.springframework.beans.factory.annotation.Qualifier;
- import org.springframework.stereotype.Controller;
- import com.gjs.service.CustomeService;
- @Controller("client")
- public class CustomController {
- /*
- * 方式一(推荐) : 在字段(成员变量)上注入
- * @Autowired :
- * 默认会从Spring容器找对应类型的对象注入进来
- * 使用@Autowired 必须保证Spring容器中最少一个类型对应bean ,如果没有就会抛异常
- * org.springframework.beans.factory.NoSuchBeanDefinitionException
- * 可以使用 注解的 required属性(除特殊情况,一般不使用)
- * required = true/false 是否是必须有对应的对象,true 是必须有(默认),false 不是必须有
- *
- * 如果spring容器有多个相同类型的对象,默认无法注入也会抛异常
- * org.springframework.beans.factory.NoUniqueBeanDefinitionException 不是唯一的bean异常
- * 这时就需要配合使用 @Qualifier() 注解了
- * @Qualifier(value="对应bean的id值")可以在多个相同类型的对象中筛选指定唯一id的对象,“value=”可以省略
- */
- //@Autowired(required=false)
- //@Qualifier("service1")
- private CustomeService customeService;
- /*
- * 方式二 :使用setter方法(属性)注入
- * 将@Autowired直接贴在set方法上面即可,程序运行,会执行set方法
- * 将Spring容器对应的类型的参数赋值给 set方法的参数,类型不存在或存在多个,处理方式与方式一一样
- */
- //@Autowired()
- //@Qualifier("service1")
- public void setCustomeService(CustomeService customeService) {
- this.customeService = customeService;
- }
- /*
- * 方式三 : 构造器注入
- * 使用注解的IOC创建bean的情况下
- * 默认bean中有什么样的构造器,spring就调用那个构造器去创建对应的bean对象
- * 并且会自动注入 构造器中对应类型参数的对象,无须@Autowired()
- *
- * 如果构造函数的参数类型对应的bean有多个就在 在参数前面 使用 @Qualifier()注解,指定 对应的bean的id
- */
- public CustomController(@Qualifier("service1")CustomeService customeService) {
- this.customeService = customeService;
- }
- public void say() {
- customeService.say();
- }
- }
applicationContext.xml:
- <?xml version="1.0" encoding="UTF-8"?>
- <beans xmlns="http://www.springframework.org/schema/beans"
- xmlns:p="http://www.springframework.org/schema/p"
- xmlns:context="http://www.springframework.org/schema/context"
- xmlns:xsi="http://www.w3.org/2001/XMLSchema-instance"
- xsi:schemaLocation="http://www.springframework.org/schema/beans
- http://www.springframework.org/schema/beans/spring-beans.xsd
- http://www.springframework.org/schema/context
- http://www.springframework.org/schema/context/spring-context.xsd
- ">
- <!-- 配置spring要进行扫描的组件注解的包(默认包含子包)的位置 -->
- <context:component-scan base-package="com.gjs"/>
- </beans>
测试类TestSpring:
- package com.gjs.test;
- import org.junit.Test;
- import org.springframework.context.ApplicationContext;
- import org.springframework.context.support.ClassPathXmlApplicationContext;
- import com.gjs.client.CustomController;
- public class TestSpring {
- @Test
- public void testName() throws Exception {
- //1.读取配置文件,创建Spring容器
- ApplicationContext context = new ClassPathXmlApplicationContext("applicationContext.xml");
- //获取调用方 CustomClient对象
- CustomController client = context.getBean("client", CustomController.class);
- //调用CustomClient对象的say()方法
- client.say();
- }
- }
@Resouce
@Resource 功能等同 @Autowired + @Qualifier
@Resource只能注入字段和setter方法,不能注入构造方法
CustomController类,其他参考上面的
- package com.gjs.client;
- import javax.annotation.Resource;
- import org.springframework.beans.factory.annotation.Autowired;
- import org.springframework.beans.factory.annotation.Qualifier;
- import org.springframework.stereotype.Controller;
- import com.gjs.service.CustomeService;
- @Controller("client")
- public class CustomController {
- /*
- * 方式一: 字段注入
- * 也是默认会从Spring容器找对应类型的对象注入进来
- * 有多个相同类型时,可以使用@Resource(name="对应bean的id")指定注入哪个对象
- * @Resource 必须保证需要注入的类型在Spring容器中最少有一个对象,没有直接抛异常
- */
- //@Resource(name="service1")
- private CustomeService customeService;
- /*
- * 方式二: set方法(属性)注入
- */
- @Resource(name="service1")
- public void setCustomeService(CustomeService customeService) {
- this.customeService = customeService;
- }
- public void say() {
- customeService.say();
- }
- }
@Value注解
@Value注解:注入基本数据类型以及它们的包装类和String类型数据的,支持${}注入Properties文件的键值对,等同 <proprty name=”...” value=”${Key}”>。
- @Repository
- public class UserDaoImpl implements UserDao {
- /**
- * @Value(value="")
- * 可以从Spring容器读取 .properties 配置文件内容
- * value :配置文件的对应的key -->使用 ${key} 获取
- * 程序运行中自动将 properties 对应key的获取出来设置给字段
- *
- */
- //等价 <property name="driverClassName" value="${jdbc.driverClassName}">
- @Value("${jdbc.driverClassName}")
- private String driverClassName;
- @Value("${jdbc.url}")
- private String url;
- @Value("${jdbc.username}")
- private String username;
- @Value("${jdbc.password}")
- private String password;
- //@Value("${jdbc.maxActive}")
- @Value("10") //开发者也手动赋值
- private String maxActive;
- @Override
- public void insert(User user) {
- System.out.println(driverClassName);
- System.out.println(url);
- System.out.println(username);
- System.out.println(password);
- System.out.println(maxActive);
- }
- }
4.纯注解配置
虽然使用注解的方式,但我们还是离不开xml文件,因为我们还有配置组件扫描位置,如果这也能用注解配置,那么我们就可以脱离xml文件了。
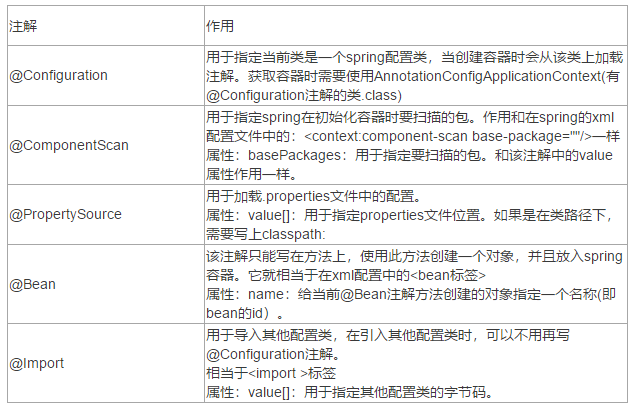
替换XML配置文件的注解:
- package com.gjs.config;
- import javax.sql.DataSource;
- import org.springframework.beans.factory.annotation.Value;
- import org.springframework.context.annotation.Bean;
- import org.springframework.context.annotation.ComponentScan;
- import org.springframework.context.annotation.Configuration;
- import org.springframework.context.annotation.PropertySource;
- import com.alibaba.druid.pool.DruidDataSource;
- /*
- * @Configuration
- * 说明把当前类当做成Spring框架的配置文件
- * @ComponentScan
- * 配置注解包扫描的位置
- * @PropertySource("classpath:db.properties")
- * 读取.peroperties 后缀的配置文件
- */
- @Configuration
- @ComponentScan("com.gjs")
- @PropertySource("classpath:db.properties")
- public class SpringConfig {
- /**
- * @Value(value="")
- * 可以从Spring容器读取 .properties 配置文件内容
- * value :配置文件的对应的key -->使用 ${key} 获取
- * 程序运行中自动将 properties 对应key的获取出来设置给字段
- *
- */
- //等价 <property name="driverClassName" value="${jdbc.driverClassName}">
- @Value("${jdbc.driverClassName}")
- private String driverClassName;
- @Value("${jdbc.url}")
- private String url;
- @Value("${jdbc.username}")
- private String username;
- @Value("${jdbc.password}")
- private String password;
- @Value("${jdbc.maxActive}")
- private Integer maxActive;
- //<bean id="dataSource" class="com.alibaba.druid.pool.DruidDataSource"
- //init-method="init" destroy-method="close">
- @Bean(name="dataSource",initMethod="init",destroyMethod="close")
- public DataSource getDataSource() {
- DruidDataSource dataSource = new DruidDataSource();
- dataSource.setDriverClassName(driverClassName);
- dataSource.setUrl(url);
- dataSource.setUsername(username);
- dataSource.setPassword(password);
- dataSource.setMaxActive(maxActive);
- return dataSource;
- }
- }
5. Spring的测试
5.1.传统的单元测试
存在的问题:
1,每个测试都要重新启动Spring容器,启动容器的开销大,测试效率低下。
2,不应该是测试代码管理Spring容器,应该是Spring容器在管理测试代码。
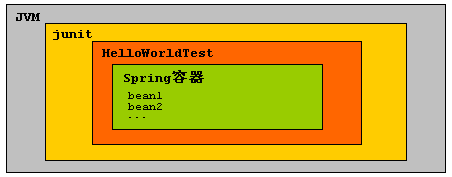
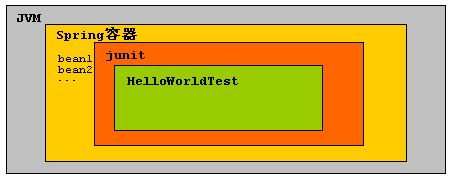
5.2 正确的Spring的测试
5.3 如何使用Spring测试
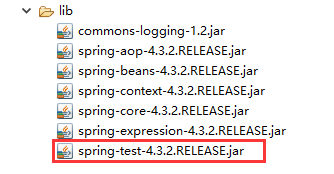
Spring测试必须保证Eclipse的单元测试的最低版本是 4.12版本,如果使用的Eclipse版本很低,那么单元测试版本可能低于4.12,那么需要开发者手动导入单元测试的jar包
要使用Spring测试就要先导入test的jar包
- package com.gjs.test;
- import org.junit.Test;
- import org.junit.runner.RunWith;
- import org.springframework.context.ApplicationContext;
- import org.springframework.context.support.ClassPathXmlApplicationContext;
- import org.springframework.test.context.ContextConfiguration;
- import org.springframework.test.context.junit4.SpringJUnit4ClassRunner;
- import com.gjs.client.CustomController;
- //表示先启动Spring容器,把junit运行在Spring容器中
- @RunWith(SpringJUnit4ClassRunner.class)
- //表示从哪里加载资源文件,默认从src(源目录)下面加载
- @ContextConfiguration("classpath:applicationContext.xml")
- public class TestSpring {
- @Test
- public void testName() throws Exception {
- //1.读取配置文件,创建Spring容器
- ApplicationContext context = new ClassPathXmlApplicationContext("applicationContext.xml");
- //获取调用方 CustomClient对象
- CustomController client = context.getBean("client", CustomController.class);
- //调用CustomClient对象的say()方法
- client.say();
- }
- }
深入学习Spring框架(二)- 注解配置的更多相关文章
- 跟着刚哥学习Spring框架--通过注解方式配置Bean(四)
组件扫描:Spring能够从classpath下自动扫描,侦测和实例化具有特定注解的组件. 特定组件包括: 1.@Component:基本注解,识别一个受Spring管理的组件 2.@Resposit ...
- spring框架 事务 注解配置方式
user=LF password=LF jdbcUrl=jdbc:oracle:thin:@localhost:1521:orcl driverClass=oracle.jdbc.driver.Ora ...
- 跟着刚哥学习Spring框架--通过XML方式配置Bean(三)
Spring配置Bean有两种形式(XML和注解) 今天我们学习通过XML方式配置Bean 1. Bean的配置方式 通过全类名(反射)的方式 √ id:标识容器中的bean.id唯一. √ cl ...
- 跟着刚哥学习Spring框架--Spring容器(二)
Spring容器 启动Spring容器(实例化容器) -- IOC容器读取Bean配置创建Bean实例之前,必须对它进行实例化(加载启动),这样才可以从容器中获取Bean的实例并使用. Bean是S ...
- 跟着刚哥学习Spring框架--事务配置(七)
事务 事务用来保证数据的完整性和一致性. 事务应该具有4个属性:原子性.一致性.隔离性.持久性.这四个属性通常称为ACID特性.1.原子性(atomicity).一个事务是一个不可分割的工作单位,事务 ...
- 跟着刚哥学习Spring框架--创建HelloWorld项目(一)
1.Spring框架简介 Spring是一个开源框架,Spring是在2003年兴起的一个轻量级的开源框架,由Rod johnson创建.主要对JavaBean的生命周期进行管理的轻量级框架,Spri ...
- 跟着刚哥学习Spring框架--AOP(五)
AOP AOP(Aspect Oriented Programming),即面向切面编程,可以说是OOP(Object Oriented Programming,面向对象编程)的补充和完善.OOP引入 ...
- 跟着刚哥学习Spring框架--JDBC(六)
Spring的JDBC框架 Spring JDBC提供了一套JDBC抽象框架,用于简化JDBC开发. Spring主要提供JDBC模板方式.关系数据库对象化方式.SimpleJdbc方式.事务管理来简 ...
- 深入浅出学习Spring框架(四):IoC和AOP的应用——事务配置
在前文 深入浅出学习Spring框架(一):通过Demo阐述IoC和DI的优势所在. 深入浅出学习Spring框架(三):AOP 详解 分别介绍了Spring的核心功能——IoC和AOP,光讲知识远远 ...
- 学习Spring框架等技术的方向、方法和动机
学习Spring框架最早学习Spring框架是在大二的时候,当时看了几本书,看了一些视频,主要是传智播客的.更多的,还是写代码,单独写Spring的,也有与Struts和Hibernate等框架整合的 ...
随机推荐
- C 语言main 函数终极探秘(&& 的含义是:如果 && 前面的程序正常退出,则继续执行 && 后面的程序,否则不执行)
所有的C程序必须定义一个称之为main的外部函数,这个函数是程序的入口,也就是当程序启动时所执行的第一个函数,当这个函数返回时,程序也将终止,并且这个函数的返回值被看成是程序成功或失败的 ...
- 【转载】使用Docker Hub官方gcc:latest镜像编译C/C++程序以及缩小镜像的方法
摘要:使用Docker Hub官方gcc:latest镜像(1.2GB)编译C/C++程序,以及缩小镜像的方法. 方法1: 在gcc容器里编译C/C++程序 将C/C++代码运行在gcc容器内的最简单 ...
- Socket_Internet 命名空间
英特网目前有两种地址格式:1.IPv4(32位地址格式)2.IPv6(128位地址格式).IPv4的命名空间为PF_INET,IPv6的命名空间则为PF_INET6. #incldue <sys ...
- 待修 Bug
# 乱码 ## 描述 环境:Tomcat 8 + Spring 4 + Spring Security. 问题描述: 在类 AbstractAnnotationConfigDispatcherServ ...
- Win8Metro(C#)数字图像处理--2.21二值图像腐蚀
原文:Win8Metro(C#)数字图像处理--2.21二值图像腐蚀 [函数名称] 二值图像腐蚀函数CorrosionProcess(WriteableBitmap src) [算法说明] 二值 ...
- Resources.resx 未将对象引用设置到对象的实例
原文:解决使用DevExpress开发错误:未将对象引用设置到对象的实例 在使用DevExpress是总是会出现一些状况.这次同事在他的机器上调试完毕的代码发过来,却出现“未将对象引用设置到对象的实例 ...
- Linux下如何查看高CPU占用率线程 专题
Java 系统性能分析 命令 1. cpu分析 top , pidstat(sysstat) pid -p PID -t 1 10 vmstat 1 CPU上下文切换.运行队列.利用率 ps Hh - ...
- Linux SD卡建立两个分区
本文主要介绍Linux 环境下 SD 卡建立两个分区的操作流程: 操作环境:Linux Ubuntu 2016.4 操作目的:将 SD 卡分为两个分区:第一分区格式为 FAT32,大小 500M.第二 ...
- 国外优秀的UI设计资源库收集
国外优秀的UI设计资源库 网站设计或者说UI设计对于Web上的运用是非常的关键,一个站做得好不好,能不能吸引人的眼球,设计占了不低的地位,但话又说回来,Web前端人员又有多少人是设计专业毕业,具有这方 ...
- linux程序机制入门
GCC环境 类debian系统运行 apt-get install build-essential 安装gcc环境. 编写c语言程序后,运行 gcc ./hello.c 会得到一个名为 a.out 的 ...