Django rest framework(1)----认证
目录
- Django组件库之(一) APIView源码
- Django restframework (1) ----认证
- Django rest framework(2)----权限
- Django rest framework(3)----节流
- Django rest framework(4)----版本
- Django rest framework(5)----解析器
- Django rest framework(6)----序列化
- Django rest framework(7)----分页
一、基础
1.1.安装
两种方式:
- github
- pip直接安装
- pip install djangorestframework
1.2.需要先了解的一些知识
理解下面两个知识点非常重要,django-rest-framework源码中到处都是基于CBV和面向对象的封装
(1)面向对象封装的两大特性
- 把同一类方法封装到类中
- 将数据封装到对象中
(2)CBV
基于反射实现根据请求方式不同,执行不同的方法
原理:url-->view方法-->dispatch方法(反射执行其它方法:GET/POST/PUT/DELETE等等)
二、简单实例
2.1.settings
先创建一个project和一个app(我这里命名为API)
首先要在settings的app中添加
- INSTALLED_APPS = [
- 'rest_framework',
- ]
2.2.url
- from django.contrib import admin
- from django.urls import path
- from API.views import AuthView
- urlpatterns = [
- path('admin/', admin.site.urls),
- path('api/v1/auth/',AuthView.as_view()),
- ]
2.3.models
一个保存用户的信息
一个保存用户登录成功后的token
- from django.db import models
- class UserInfo(models.Model):
- USER_TYPE = (
- (1,'普通用户'),
- (2,'VIP'),
- (3,'SVIP')
- )
- user_type = models.IntegerField(choices=USER_TYPE)
- username = models.CharField(max_length=32)
- password = models.CharField(max_length=64)
- class UserToken(models.Model):
- user = models.OneToOneField(UserInfo,on_delete=models.CASCADE)
- token = models.CharField(max_length=64)
2.4.views
用户登录(返回token并保存到数据库)
- from django.shortcuts import render
- from django.http import JsonResponse
- from rest_framework.views import APIView
- from API import models
- def md5(user):
- import hashlib
- import time
- #当前时间,相当于生成一个随机的字符串
- ctime = str(time.time())
- m = hashlib.md5(bytes(user,encoding='utf-8'))
- m.update(bytes(ctime,encoding='utf-8'))
- return m.hexdigest()
- class AuthView(object):
- def post(self,request,*args,**kwargs):
- ret = {'code':1000,'msg':None}
- try:
- user = request._request.POST.get('username')
- pwd = request._request.POST.get('password')
- obj = models.UserInfo.objects.filter(username=user,password=pwd).first()
- if not obj:
- ret['code'] = 1001
- ret['msg'] = '用户名或密码错误'
- #为用户创建token
- token = md5(user)
- #存在就更新,不存在就创建
- models.UserToken.objects.update_or_create(user=obj,defaults={'token':token})
- ret['token'] = token
- except Exception as e:
- ret['code'] = 1002
- ret['msg'] = '请求异常'
- return JsonResponse(ret)
2.5.利用postman发请求
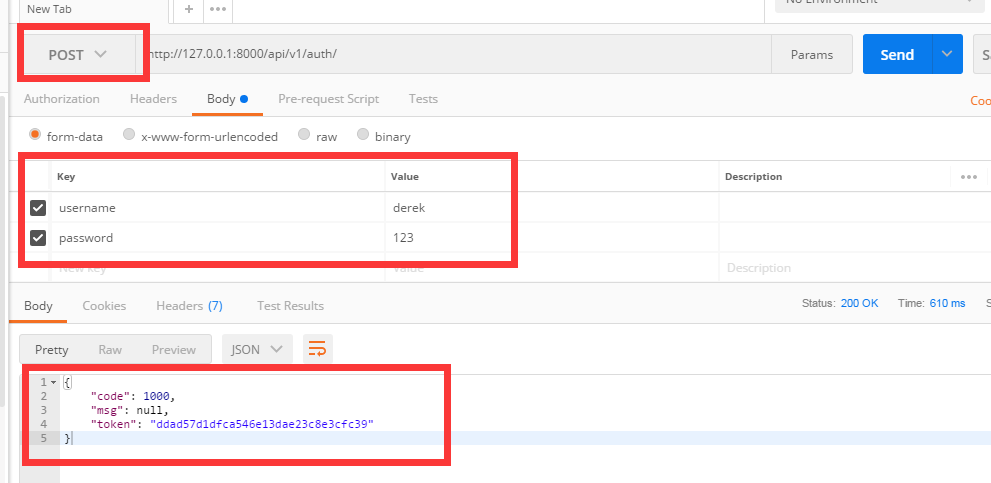
如果用户名和密码正确的话 会生成token值,下次该用户再登录时,token的值就会更新
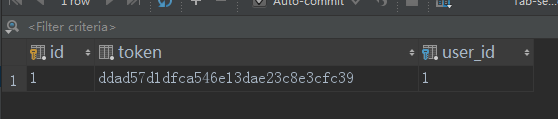
数据库中可以看到token的值
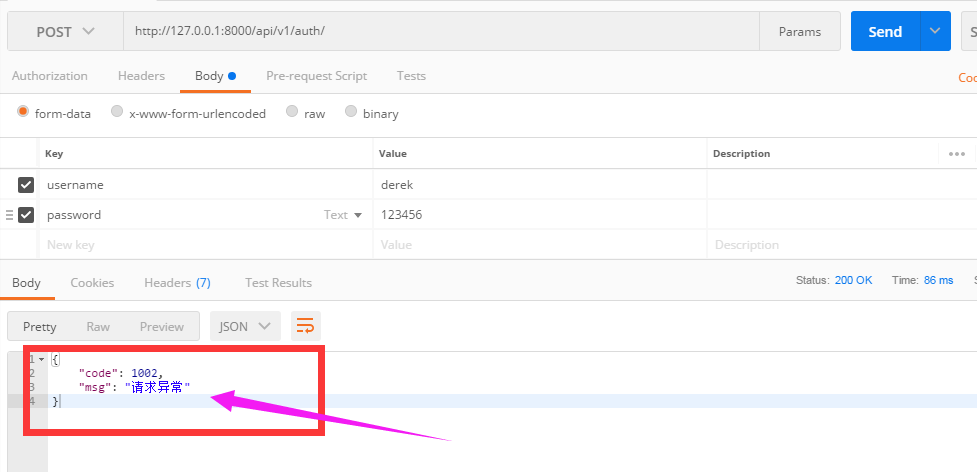
当用户名或密码错误时,抛出异常
三、添加认证
基于上面的例子,添加一个认证的类
3.1.url
- path('api/v1/order/',OrderView.as_view()),
3.2.views
- from django.shortcuts import render,HttpResponse
- from django.http import JsonResponse
- from rest_framework.views import APIView
- from API import models
- from rest_framework.request import Request
- from rest_framework import exceptions
- from rest_framework.authentication import BasicAuthentication
- ORDER_DICT = {
- 1:{
- 'name':'apple',
- 'price':15
- },
- 2:{
- 'name':'dog',
- 'price':100
- }
- }
- def md5(user):
- import hashlib
- import time
- #当前时间,相当于生成一个随机的字符串
- ctime = str(time.time())
- m = hashlib.md5(bytes(user,encoding='utf-8'))
- m.update(bytes(ctime,encoding='utf-8'))
- return m.hexdigest()
- class AuthView(object):
- '''用于用户登录验证'''
- def post(self,request,*args,**kwargs):
- ret = {'code':1000,'msg':None}
- try:
- user = request._request.POST.get('username')
- pwd = request._request.POST.get('password')
- obj = models.UserInfo.objects.filter(username=user,password=pwd).first()
- if not obj:
- ret['code'] = 1001
- ret['msg'] = '用户名或密码错误'
- #为用户创建token
- token = md5(user)
- #存在就更新,不存在就创建
- models.UserToken.objects.update_or_create(user=obj,defaults={'token':token})
- ret['token'] = token
- except Exception as e:
- ret['code'] = 1002
- ret['msg'] = '请求异常'
- return JsonResponse(ret)
- class Authentication(APIView):
- '''认证'''
- def authenticate(self,request):
- token = request._request.GET.get('token')
- token_obj = models.UserToken.objects.filter(token=token).first()
- if not token_obj:
- raise exceptions.AuthenticationFailed('用户认证失败')
- #在rest framework内部会将这两个字段赋值给request,以供后续操作使用
- return (token_obj.user,token_obj)
- def authenticate_header(self, request):
- pass
- class OrderView(APIView):
- '''订单相关业务'''
- authentication_classes = [Authentication,] #添加认证
- def get(self,request,*args,**kwargs):
- #request.user
- #request.auth
- ret = {'code':1000,'msg':None,'data':None}
- try:
- ret['data'] = ORDER_DICT
- except Exception as e:
- pass
- return JsonResponse(ret)
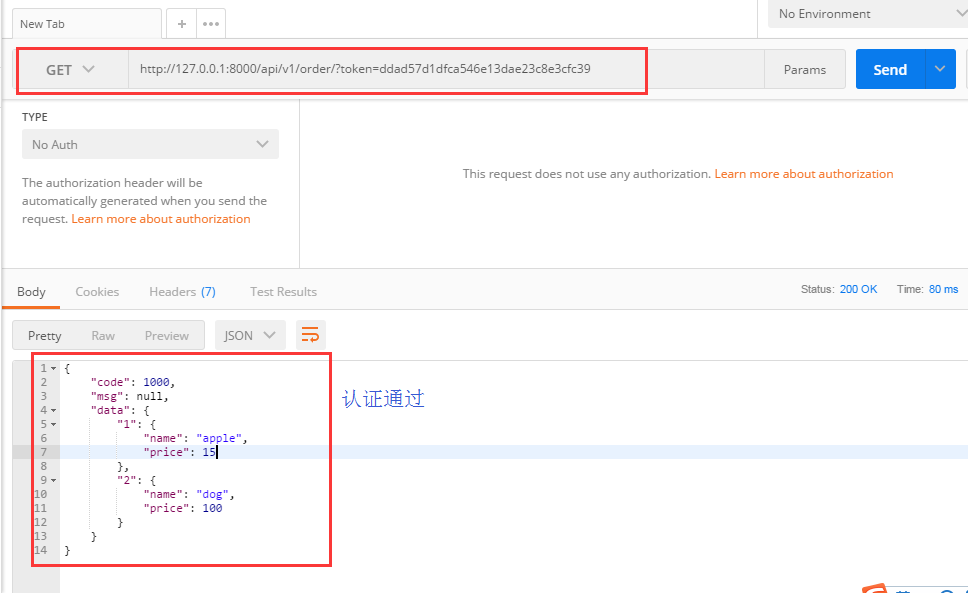
3.3用postman发get请求
请求的时候没有带token,可以看到会显示“用户认证失败”
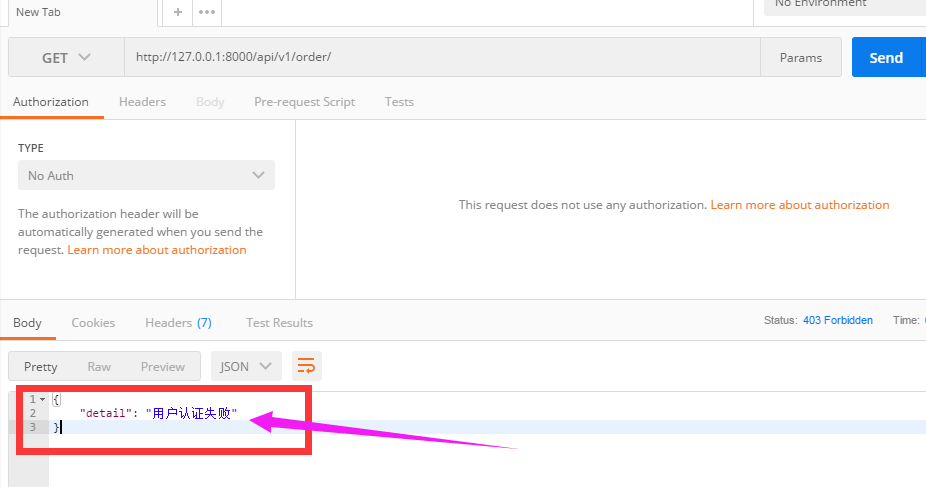
这样就达到了认证的效果,django-rest-framework的认证是怎么实现的呢,下面基于这个例子来剖析drf的源码。
四、drf的认证源码分析
源码流程图
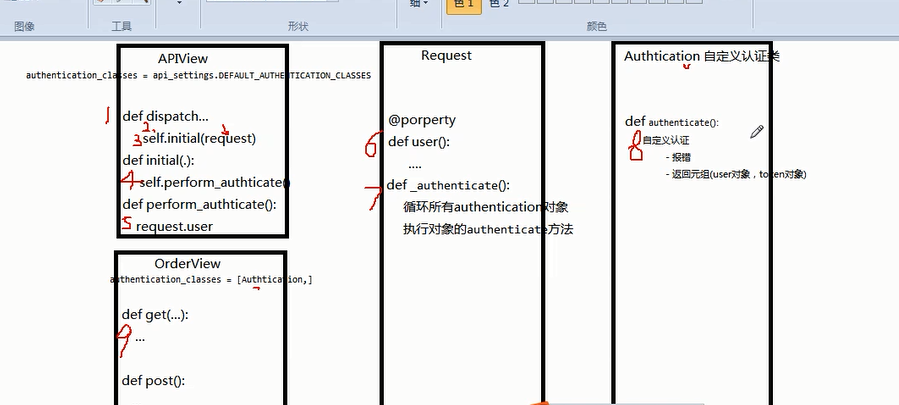
请求先到dispatch
dispatch()主要做了两件事
- 封装request
- 认证
具体看我写的代码里面的注释
- def dispatch(self, request, *args, **kwargs):
- """
- `.dispatch()` is pretty much the same as Django's regular dispatch,
- but with extra hooks for startup, finalize, and exception handling.
- """
- self.args = args
- self.kwargs = kwargs
- #对原始request进行加工,丰富了一些功能
- #Request(
- # request,
- # parsers=self.get_parsers(),
- # authenticators=self.get_authenticators(),
- # negotiator=self.get_content_negotiator(),
- # parser_context=parser_context
- # )
- #request(原始request,[BasicAuthentications对象,])
- #获取原生request,request._request
- #获取认证类的对象,request.authticators
- #1.封装request
- request = self.initialize_request(request, *args, **kwargs)
- self.request = request
- self.headers = self.default_response_headers # deprecate?
- try:
- #2.认证
- self.initial(request, *args, **kwargs)
- # Get the appropriate handler method
- if request.method.lower() in self.http_method_names:
- handler = getattr(self, request.method.lower(),
- self.http_method_not_allowed)
- else:
- handler = self.http_method_not_allowed
- response = handler(request, *args, **kwargs)
- except Exception as exc:
- response = self.handle_exception(exc)
- self.response = self.finalize_response(request, response, *args, **kwargs)
- return self.response
4.1.reuqest
(1)initialize_request()
可以看到initialize()就是封装原始request
- def initialize_request(self, request, *args, **kwargs):
- """
- Returns the initial request object.
- """
- parser_context = self.get_parser_context(request)
- return Request(
- request,
- parsers=self.get_parsers(),
- authenticators=self.get_authenticators(), #[BasicAuthentication(),],把对象封装到request里面了
- negotiator=self.get_content_negotiator(), parser_context=parser_context )
(2)get_authenticators()
通过列表生成式,返回对象的列表
- def get_authenticators(self):
- """
- Instantiates and returns the list of authenticators that this view can use.
- """
- return [auth() for auth in self.authentication_classes]
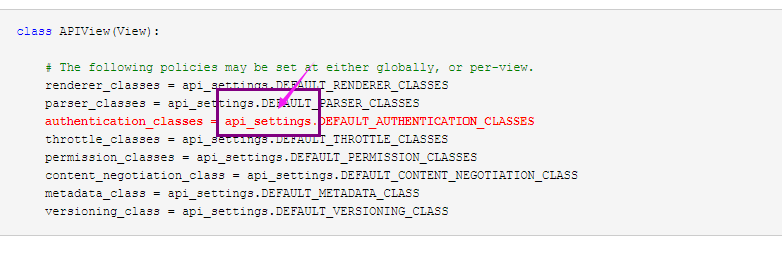
(3)authentication_classes
APIView里面有个 authentication_classes 字段
可以看到默认是去全局的配置文件找(api_settings)
- class APIView(View):
- # The following policies may be set at either globally, or per-view.
- renderer_classes = api_settings.DEFAULT_RENDERER_CLASSES
- parser_classes = api_settings.DEFAULT_PARSER_CLASSES
- authentication_classes = api_settings.DEFAULT_AUTHENTICATION_CLASSES
- throttle_classes = api_settings.DEFAULT_THROTTLE_CLASSES
- permission_classes = api_settings.DEFAULT_PERMISSION_CLASSES
- content_negotiation_class = api_settings.DEFAULT_CONTENT_NEGOTIATION_CLASS
- metadata_class = api_settings.DEFAULT_METADATA_CLASS
- versioning_class = api_settings.DEFAULT_VERSIONING_CLASS
4.2.认证
self.initial(request, *args, **kwargs)
- def dispatch(self, request, *args, **kwargs):
- """
- `.dispatch()` is pretty much the same as Django's regular dispatch,
- but with extra hooks for startup, finalize, and exception handling.
- """
- self.args = args
- self.kwargs = kwargs
- #对原始request进行加工,丰富了一些功能
- #Request(
- # request,
- # parsers=self.get_parsers(),
- # authenticators=self.get_authenticators(),
- # negotiator=self.get_content_negotiator(),
- # parser_context=parser_context
- # )
- #request(原始request,[BasicAuthentications对象,])
- #获取原生request,request._request
- #获取认证类的对象,request.authticators
- #1.封装request
- request = self.initialize_request(request, *args, **kwargs)
- self.request = request
- self.headers = self.default_response_headers # deprecate?
- try:
- #2.认证
- self.initial(request, *args, **kwargs)
- # Get the appropriate handler method
- if request.method.lower() in self.http_method_names:
- handler = getattr(self, request.method.lower(),
- self.http_method_not_allowed)
- else:
- handler = self.http_method_not_allowed
- response = handler(request, *args, **kwargs)
- except Exception as exc:
- response = self.handle_exception(exc)
- self.response = self.finalize_response(request, response, *args, **kwargs)
- return self.response
(1)initial()
主要看 self.perform_authentication(request),实现认证
- def initial(self, request, *args, **kwargs):
- """
- Runs anything that needs to occur prior to calling the method handler.
- """
- self.format_kwarg = self.get_format_suffix(**kwargs)
- # Perform content negotiation and store the accepted info on the request
- neg = self.perform_content_negotiation(request)
- request.accepted_renderer, request.accepted_media_type = neg
- # Determine the API version, if versioning is in use.
- version, scheme = self.determine_version(request, *args, **kwargs)
- request.version, request.versioning_scheme = version, scheme
- # Ensure that the incoming request is permitted
- #3.实现认证
- self.perform_authentication(request)
- self.check_permissions(request)
- self.check_throttles(request)
(2)perform_authentication()
调用了request.user
- def perform_authentication(self, request):
- """
- Perform authentication on the incoming request.
- Note that if you override this and simply 'pass', then authentication
- will instead be performed lazily, the first time either
- `request.user` or `request.auth` is accessed.
- """
- request.user
(3)user
request.user的request的位置

点进去可以看到Request有个user方法,加 @property 表示调用user方法的时候不需要加括号“user()”,可以直接调用:request.user
- @property
- def user(self):
- """
- Returns the user associated with the current request, as authenticated
- by the authentication classes provided to the request.
- """
- if not hasattr(self, '_user'):
- with wrap_attributeerrors():
- #获取认证对象,进行一步步的认证
- self._authenticate()
- return self._user
(4)_authenticate()
循环所有authenticator对象
- def _authenticate(self):
- """
- Attempt to authenticate the request using each authentication instance
- in turn.
- """
- #循环认证类的所有对象
- #执行对象的authenticate方法
- for authenticator in self.authenticators:
- try:
- #执行认证类的authenticate方法
- #这里分三种情况
- #1.如果authenticate方法抛出异常,self._not_authenticated()执行
- #2.有返回值,必须是元组:(request.user,request.auth)
- #3.返回None,表示当前认证不处理,等下一个认证来处理
- user_auth_tuple = authenticator.authenticate(self)
- except exceptions.APIException:
- self._not_authenticated()
- raise
- if user_auth_tuple is not None:
- self._authenticator = authenticator
- self.user, self.auth = user_auth_tuple
- return
- self._not_authenticated()
返回值就是例子中的:
- token_obj.user-->>request.user
- token_obj-->>request.auth
- #在rest framework内部会将这两个字段赋值给request,以供后续操作使用
- return (token_obj.user,token_obj) #例子中的return
当都没有返回值,就执行self._not_authenticated(),相当于匿名用户,没有通过认证
- def _not_authenticated(self):
- """
- Set authenticator, user & authtoken representing an unauthenticated request.
- Defaults are None, AnonymousUser & None.
- """
- self._authenticator = None
- if api_settings.UNAUTHENTICATED_USER:
- self.user = api_settings.UNAUTHENTICATED_USER() #AnonymousUser匿名用户
- else:
- self.user = None
- if api_settings.UNAUTHENTICATED_TOKEN:
- self.auth = api_settings.UNAUTHENTICATED_TOKEN() #None
- else:
- self.auth = None
面向对象知识:
子类继承 父类,调用方法的时候:
- 优先去自己里面找有没有这个方法,有就执行自己的
- 只有当自己里面没有这个方法的时候才会去父类找
因为authenticate方法我们自己写,所以当执行authenticate()的时候就是执行我们自己写的认证
父类中的authenticate方法
- def authenticate(self, request):
- return (self.force_user, self.force_token)
我们自己写的
- class Authentication(APIView):
- '''用于用户登录验证'''
- def authenticate(self,request):
- token = request._request.GET.get('token')
- token_obj = models.UserToken.objects.filter(token=token).first()
- if not token_obj:
- raise exceptions.AuthenticationFailed('用户认证失败')
- #在rest framework内部会将这两个字段赋值给request,以供后续操作使用
- return (token_obj.user,token_obj)
认证的流程就是上面写的,弄懂了原理,再写代码就更容易理解为什么了。
4.3.配置文件
继续解读源码
默认是去全局配置文件中找,所以我们应该在settings.py中配置好路径
api_settings源码
- api_settings = APISettings(None, DEFAULTS, IMPORT_STRINGS)
- def reload_api_settings(*args, **kwargs):
- setting = kwargs['setting']
- if setting == 'REST_FRAMEWORK':
- api_settings.reload()
setting中‘REST_FRAMEWORK’中找
全局配置方法:
API文件夹下面新建文件夹utils,再新建auth.py文件,里面写上认证的类
settings.py
- #设置全局认证
- REST_FRAMEWORK = {
- "DEFAULT_AUTHENTICATION_CLASSES":['API.utils.auth.Authentication',] #里面写你的认证的类的路径
- }
auth.py
- # API/utils/auth.py
- from rest_framework import exceptions
- from API import models
- class Authentication(object):
- '''用于用户登录验证'''
- def authenticate(self,request):
- token = request._request.GET.get('token')
- token_obj = models.UserToken.objects.filter(token=token).first()
- if not token_obj:
- raise exceptions.AuthenticationFailed('用户认证失败')
- #在rest framework内部会将这两个字段赋值给request,以供后续操作使用
- return (token_obj.user,token_obj)
- def authenticate_header(self, request):
- pass
在settings里面设置的全局认证,所有业务都需要经过认证,如果想让某个不需要认证,只需要在其中添加下面的代码:
- authentication_classes = [] #里面为空,代表不需要认证
- from django.shortcuts import render,HttpResponse
- from django.http import JsonResponse
- from rest_framework.views import APIView
- from API import models
- from rest_framework.request import Request
- from rest_framework import exceptions
- from rest_framework.authentication import BasicAuthentication
- ORDER_DICT = {
- 1:{
- 'name':'apple',
- 'price':15
- },
- 2:{
- 'name':'dog',
- 'price':100
- }
- }
- def md5(user):
- import hashlib
- import time
- #当前时间,相当于生成一个随机的字符串
- ctime = str(time.time())
- m = hashlib.md5(bytes(user,encoding='utf-8'))
- m.update(bytes(ctime,encoding='utf-8'))
- return m.hexdigest()
- class AuthView(APIView):
- '''用于用户登录验证'''
- authentication_classes = [] #里面为空,代表不需要认证
- def post(self,request,*args,**kwargs):
- ret = {'code':1000,'msg':None}
- try:
- user = request._request.POST.get('username')
- pwd = request._request.POST.get('password')
- obj = models.UserInfo.objects.filter(username=user,password=pwd).first()
- if not obj:
- ret['code'] = 1001
- ret['msg'] = '用户名或密码错误'
- #为用户创建token
- token = md5(user)
- #存在就更新,不存在就创建
- models.UserToken.objects.update_or_create(user=obj,defaults={'token':token})
- ret['token'] = token
- except Exception as e:
- ret['code'] = 1002
- ret['msg'] = '请求异常'
- return JsonResponse(ret)
- class OrderView(APIView):
- '''订单相关业务'''
- def get(self,request,*args,**kwargs):
- # self.dispatch
- #request.user
- #request.auth
- ret = {'code':1000,'msg':None,'data':None}
- try:
- ret['data'] = ORDER_DICT
- except Exception as e:
- pass
- return JsonResponse(ret)
API/view.py代码
再测试一下我们的代码
不带token发请求

带token发请求
五、drf的内置认证
rest_framework里面内置了一些认证,我们自己写的认证类都要继承内置认证类 "BaseAuthentication"
4.1.BaseAuthentication源码:
- class BaseAuthentication(object):
- """
- All authentication classes should extend BaseAuthentication.
- """
- def authenticate(self, request):
- """
- Authenticate the request and return a two-tuple of (user, token).
- """
- #内置的认证类,authenticate方法,如果不自己写,默认则抛出异常
- raise NotImplementedError(".authenticate() must be overridden.")
- def authenticate_header(self, request):
- """
- Return a string to be used as the value of the `WWW-Authenticate`
- header in a `401 Unauthenticated` response, or `None` if the
- authentication scheme should return `403 Permission Denied` responses.
- """
- #authenticate_header方法,作用是当认证失败的时候,返回的响应头
- pass
4.2.修改自己写的认证类
自己写的Authentication必须继承内置认证类BaseAuthentication
- # API/utils/auth/py
- from rest_framework import exceptions
- from API import models
- from rest_framework.authentication import BaseAuthentication
- class Authentication(BaseAuthentication):
- '''用于用户登录验证'''
- def authenticate(self,request):
- token = request._request.GET.get('token')
- token_obj = models.UserToken.objects.filter(token=token).first()
- if not token_obj:
- raise exceptions.AuthenticationFailed('用户认证失败')
- #在rest framework内部会将这两个字段赋值给request,以供后续操作使用
- return (token_obj.user,token_obj)
- def authenticate_header(self, request):
- pass
4.3.其它内置认证类
rest_framework里面还内置了其它认证类,我们主要用到的就是BaseAuthentication,剩下的很少用到

六、总结
自己写认证类方法梳理
(1)创建认证类
- 继承BaseAuthentication --->>1.重写authenticate方法;2.authenticate_header方法直接写pass就可以(这个方法必须写)
(2)authenticate()返回值(三种)
- None ----->>>当前认证不管,等下一个认证来执行
- raise exceptions.AuthenticationFailed('用户认证失败') # from rest_framework import exceptions
- 有返回值元祖形式:(元素1,元素2) #元素1复制给request.user; 元素2复制给request.auth
(3)局部使用
- authentication_classes = [BaseAuthentication,]
(4)全局使用
- #设置全局认证
- REST_FRAMEWORK = {
- "DEFAULT_AUTHENTICATION_CLASSES":['API.utils.auth.Authentication',]
- }
源码流程
--->>dispatch
--封装request
---获取定义的认证类(全局/局部),通过列表生成式创建对象
---initial
----peform_authentication
-----request.user (每部循环创建的对象)
Django rest framework(1)----认证的更多相关文章
- Django Rest framework 之 认证
django rest framework 官网 django rest framework 之 认证(一) django rest framework 之 权限(二) django rest fra ...
- django rest framework用户认证
django rest framework用户认证 进入rest framework的Apiview @classmethod def as_view(cls, **initkwargs): &quo ...
- Django rest framework 的认证流程(源码分析)
一.基本流程举例: urlpatterns = [ url(r'^admin/', admin.site.urls), url(r'^users/', views.HostView.as_view() ...
- Django REST Framework之认证组件
什么是认证 认证即需要知道是谁在访问服务器,需要有一个合法身份.认证的方式可以有很多种,例如session+cookie.token等,这里以token为例.如果请求中没有token,我们认为这是未登 ...
- Django Rest Framework之认证
代码基本结构 url.py: from django.conf.urls import url, include from web.views.s1_api import TestView urlpa ...
- DRF Django REST framework 之 认证组件(五)
引言 很久很久以前,Web站点只是作为浏览服务器资源(数据)和其他资源的工具,甚少有什么用户交互之类的烦人的事情需要处理,所以,Web站点的开发这根本不关心什么人在什么时候访问了什么资源,不需要记录任 ...
- Django REST framework 之 认证 权限 限制
认证是确定你是谁 权限是指你有没有访问这个接口的权限 限制主要是指限制你的访问频率 认证 REST framework 提供了一些开箱即用的身份验证方案,并且还允许你实现自定义方案. 接下类我们就自己 ...
- 基于django rest framework做认证组件
先导入要用到的类 from rest_framework.authentication import BaseAuthentication from rest_framework.exceptions ...
- 【django后端分离】Django Rest Framework之认证系统之redis数据库的token认证(token过期时间)
1:登录视图 redis_cli.py文件: import redis Pool= redis.ConnectionPool(host='localhost',port=6379,decode_res ...
- 源码剖析Django REST framework的认证方式及自定义认证
源码剖析Django REST framework的认证方式 在前面说过,请求到达REST framework的时候,会对request进行二次封装,在封装的过程中会对客户端发送过来的request封 ...
随机推荐
- AY写给国人的教程- VS2017 Live Unit Testing[2/2]-C#人爱学不学-aaronyang技术分享
原文:AY写给国人的教程- VS2017 Live Unit Testing[2/2]-C#人爱学不学-aaronyang技术分享 谢谢大家观看-AY的 VS2017推广系列 Live Unit Te ...
- WPF应用程序的启动画面[Splash Screen本质分析]
原文:WPF应用程序的启动画面[Splash Screen本质分析] 不经意间发现了wpf的这个小玩意,感觉蛮有意思的.我在项目中添加了一张图片 如图: wpf-1.JPG(10.73 K) 2010 ...
- Rxjava 学习(一)
Rxjava是什么? RxJava是由Netflix开发的响应式扩展(Reactive Extensions)的Java实现.引用MSDN上对它的定义,Reactive Extensions是这样一个 ...
- 关于WPF后台触发键盘按键
1.变向响应Tab按键 private void Grid_KeyUp(object sender, KeyEventArgs e) { UIElement e ...
- 微信小程序把玩(七)数据绑定
原文:微信小程序把玩(七)数据绑定 数据绑定有一部分前几个看着还行,后面的几个可能有几个不理解,界面展示的数据有的也因为条件没法显示.看不懂的可以先记着,后面真正用到时就会明白,反正我是这样想的.这里 ...
- redis入门笔记(3)
本篇文章介绍几个redis的应用场景. 1.取最新N个数据的操作 –比如典型的取你网站的最新文章,通过下面方式,我们可以将最新的5000条评论的ID放在Redis的List集合中,并将超出集合部分从数 ...
- Mongodb Compile C++ Driver
之前发现直接编译mongo源码中的驱动,静态库的驱动会很大,在链接使用的时候会报很多链接错误. 转而直接编译单独提供驱动源码,同样vc2008的版本也要做我的另一篇博文中修改,在这不多说,具体参见: ...
- Windows Phone 8加载外部动态链接库DLL(非安装包内的)
Windows Phone 8加载外部动态链接库DLL(非安装包内的) 在<动态加载与插件化>中大概介绍了下,wp8加载非安装包的下动态链接库,这次详细梳理下. 加载外部DLL主要的原理: ...
- 用Go语言异常机制模拟TryCatch异常捕捉1
有的同学看到Go和TryCatch一起出现,心里可能会说,难道Go语言升级了,加入了try...catch语句.哈哈,其实Go语言从创建之初就没打算加入try...catch语句,因为创建Go的那帮大 ...
- Using VNC on a debian/Ubuntu server with a OS X Mac
I got a brand new MacBook Pro 13" 2016. I used to work on GNU/Linux for decades. I don't want t ...