Spring MVC -- MVC设计模式(演示4个基于MVC框架的案例)
对于简单的Java Web项目,我们的项目仅仅包含几个jsp页面,由于项目比较小,我们通常可以通过链接方式进行jsp页面间的跳转。
但是如果是一个中型或者大型的项目,上面那种方式就会带来许多维护困难,代码复用率低等问题。因此,我们推荐使用MVC模式。
一 MVC概念
1、什么是MVC
MVC的全名是Model View Controller,是模型(model)-视图(view)-控制器(controller)的缩写,是一种软件设计模式。它是用一种业务逻辑、数据与界面显示分离的方法来组织代码,将众多的业务逻辑聚集到一个部件里面,在需要改进和个性化定制界面及用户交互的同时,不需要重新编写业务逻辑,达到减少编码的时间。
MVC开始是存在于桌面程序中的,M是指业务模型,V是指用户界面,C则是控制器。
使用的MVC的目的:在于将M和V的实现代码分离,从而使同一个程序可以使用不同的表现形式。比如Windows系统资源管理器文件夹内容的显示方式,下面两张图中左边为详细信息显示方式,右边为中等图标显示方式,文件的内容并没有改变,改变的是显示的方式。不管用户使用何种类型的显示方式,文件的内容并没有改变,达到M和V分离的目的。

在网页当中:
- V:即View视图是指用户看到并与之交互的界面。比如由html元素组成的网页界面,或者软件的客户端界面。MVC的好处之一在于它能为应用程序处理很多不同的视图。在视图中其实没有真正的处理发生,它只是作为一种输出数据并允许用户操纵的方式;
- M:即model模型是指模型表示业务规则。在MVC的三个部件中,模型拥有最多的处理任务。被模型返回的数据是中立的,模型与数据格式无关,这样一个模型能为多个视图提供数据,由于应用于模型的代码只需写一次就可以被多个视图重用,所以减少了代码的重复性;
- C:即controller控制器是指控制器接受用户的输入并调用模型和视图去完成用户的需求,控制器本身不输出任何东西和做任何处理。它只是接收请求并决定调用哪个模型构件去处理请求,然后再确定用哪个视图来显示返回的数据;
下图说明了三者之间的调用关系:

用户首先在界面中进行人机交互,然后请求发送到控制器,控制器根据请求类型和请求的指令发送到相应的模型,模型可以与数据库进行交互,进行增删改查操作,完成之后,根据业务的逻辑选择相应的视图进行显示,此时用户获得此次交互的反馈信息,用户可以进行下一步交互,如此循环。
常见的服务器端MVC框架有:Struts、Spring MVC、ASP.NET MVC、Zend Framework、JSF;常见前端MVC框架:vue、angularjs、react、backbone;由MVC演化出了另外一些模式如:MVP、MVVM。
注意:我们应该避免用户通过浏览器直接访问jsp页面。
2、MVC举例一(jsp+servlet+javabean)
最典型的MVC就是jsp+servlet+javabean模式:
- Serlvet作为控制器,用来接收用户提交的请求,然后获取请求中的数据,将之转换为业务模型需要的数据模型,然后调用业务模型相应的业务方法进行更新(这一块也就是Model层所做的事情),同时根据业务执行结果来选择要返回的视图;
- JavaBean作为模型,既可以作为数据模型来封装业务数据(对应实体类),又可以作为业务逻辑模型来包含应用的业务操作(对应Action类)。其中,数据模型用来存储或传递业务数据,而业务逻辑模型接收到控制器传过来的模型更新请求后,执行特定的业务逻辑处理,然后返回相应的执行结果;实践中会采用一个实体类来持有模型状态,并将业务逻辑放到一个Action类中。
- JSP作为表现层,负责提供页面为用户展示数据,提供相应的表单(Form)来用于用户的请求,并在适当的时候(点击按钮)向控制器发出请求来请求模型进行更新;
每个控制器中可以定义多个请求URL,每个用户请求都发送给控制器,请求中的URL标识出对应的Action。Action代表了Web应用可以执行的一个操作。一个提供了Action的Java对象称为Action对象。一个Action类型可以支持多个Action(在Spring MVC以及Struts2中),或一个Action(在struts1中)。
注意:Struts1、Spring MVC和JavaServer Fces使用Servlet作为控制器,而Struts2使用Filter作为控制器。
3、MVC举例二(Struts2框架)
Struts2框架:Struts2是基于MVC的轻量级的web应用框架。Struts2的应用范围是Web应用,注重将Web应用领域的日常工作和常见问题抽象化,提供一个平台帮助快速的完成Web应用开发。基于Struts2开发的Web应用自然就能实现MVC,Struts2着力于在MVC的各个部分为开发提供相应帮助。
下面通过代码来简单解释一下(这里只是简单使用):
Login.html(位于WebContent下)
<!DOCTYPE html>

<html>

<head>

<meta charset="UTF-8">

<title>Insert title here</title>

</head>

<body>

    <form id="form1" name="form1" action="/action/Login.action" method="post">

        登录<br>

        用户名:<input name="username" type="text"><br>

        密码:<input name="password" type="password"><br>

        <input type="submit" value="登录">

    </form>

</body>

</html>
LoginAction.Java(位于包com.dc365.s2下)
    if(username.equals("1") && password.equals("1")) {

            return "Success";

    }

    return "Error";
struts.xml(位于src下)
<struts>

    <package name="default" namespcase="/action" extends="struts-default">

        <action name="Login" class="com.dc365.s2.LoginAction">

            <result name="Success">Success.jsp</result>

            <result name="Error">Error.jsp</result>

        </action>

    </package>

</struts>
注意:除了上面代码,还需要在web.xml里面配置前端过滤器FilterDispatcher。
用户首先在Login.html中输入用户名和密码,点击登陆,用户请求(请求路径为/action/Login.action)首先到达前端控制器FilterDispatcher,FilterDispatcher根据用户请求的URL和配置在struts.xml找到对应的Login,然后根据对应的class的路径进入相应的login.Java,在这里判断之后,返回success或error,然后根据struts.xml中的result值,指向相应的jsp页面。

- 控制器——filterdispatcher:从上面这张图来看,用户请求首先到达前端控制器FilterDispatcher。FilterDispatcher负责根据用户提交的URL和struts.xml中的配置,来选择合适的动作(Action),让这个Action来处理用户的请求。FilterDispatcher其实是一个过滤器(Filter,servlet规范中的一种web组件),它是Struts2核心包里已经做好的类,不需要我们去开发,只是要在项目的web.xml中配置一下即可。FilterDispatcher体现了J2EE核心设计模式中的前端控制器模式。
- 动作——Action:在用户请求经过FilterDispatcher之后,被分发到了合适的动作Action对象。Action负责把用户请求中的参数组装成合适的数据模型,并调用相应的业务逻辑进行真正的功能处理,获取下一个视图展示所需要的数据。Struts2的Action,相比于别的web框架的动作处理,它实现了与Servlet API的解耦,使得Action里面不需要再直接去引用和使用HttpServletRequest与HttpServletResponse等接口。因而使得Action的单元测试更加简单,而且强大的类型转换也使得我们少做了很多重复的工作。
- 视图——Result:视图结果用来把动作中获取到的数据展现给用户。在Struts2中有多种优秀的结果展示方式,常规的jsp,模板freemarker、velocity,还有各种其它专业的展示方式,如图表jfreechart、报表JasperReports、将XML转化为HTML的XSLT等等。而且各种视图结果在同一个工程里面可以混合出现。
4、MVC优点
- 耦合性低:视图层和业务层分离,这样就允许更改视图层代码而不用重新编译模型和控制器代码,同样,一个应用的业务流程或者业务规则的改变只需要改动MVC的模型层即可。因为模型与控制器和视图相分离,所以很容易改变应用程序的数据层和业务规则;
- 重用性高:MVC模式允许使用各种不同样式的视图来访问同一个服务器端的代码,因为多个视图能共享一个模型,它包括任何WEB(HTTP)浏览器或者无线浏览器(wap),比如,用户可以通过电脑也可通过手机来订购某样产品,虽然订购的方式不一样,但处理订购产品的方式是一样的。由于模型返回的数据没有进行格式化,所以同样的构件能被不同的界面使用;
- 部署快,生命周期成本低:MVC使开发和维护用户接口的技术含量降低。使用MVC模式使开发时间得到相当大的缩减,它使程序员(Java开发人员)集中精力于业务逻辑,界面程序员(HTML和JSP开发人员)集中精力于表现形式上;
- 可维护性高:分离视图层和业务逻辑层也使得WEB应用更易于维护和修改;
5、MVC缺点
- 完全理解MVC比较复杂:由于MVC模式提出的时间不长,加上同学们的实践经验不足,所以完全理解并掌握MVC不是一个很容易的过程;
- 调试困难:因为模型和视图要严格的分离,这样也给调试应用程序带来了一定的困难,每个构件在使用之前都需要经过彻底的测试;
- 不适合小型,中等规模的应用程序:在一个中小型的应用程序中,强制性的使用MVC进行开发,往往会花费大量时间,并且不能体现MVC的优势,同时会使开发变得繁琐;
- 增加系统结构和实现的复杂性:对于简单的界面,严格遵循MVC,使模型、视图与控制器分离,会增加结构的复杂性,并可能产生过多的更新操作,降低运行效率;
- 视图与控制器间的过于紧密的连接并且降低了视图对模型数据的访问:视图与控制器是相互分离,但却是联系紧密的部件,视图没有控制器的存在,其应用是很有限的,反之亦然,这样就妨碍了他们的独立重用;依据模型操作接口的不同,视图可能需要多次调用才能获得足够的显示数据。对未变化数据的不必要的频繁访问,也将损害操作性能;
6、具体案例
接下来我们将会演示基于MVC框架的4个不同的示例:
- 第一个采用Servlet作为控制器;
- 第二个采用Filter作为控制器;
- 第三个引入校验器组件来校验用户输入数据的合法性;
- 第四个采用了一个自制的依赖注入器。在实际的应用中,我们应该使用Spring。
二 MVC案例(Serlvet作为控制器)
创建一个名为appdesign1的Dynamic Web Project项目,Servlet版本选择3.0,其功能设定为输入一个产品信息。具体为:
- 用户填写产品表单并提交;
- 保存产品并展示一个完成页面,显示已经保存的产品信息;
示例应用支持如下两个action(每个action对应一个URL):
- 展示”添加产品“表单,其对应的URL包含字符串input-product;
- 保存产品并返回完成界面,对应的URL包含字符串save-product;

示例应用由如下组件组成:
- 一个Product类,作为product的领域对象;
- 一个ProductForm类,封装了HTML表单的输入项;
- 一个ControllerServlet,本示例应用的控制器;
- 一个SaveProdtcuAction类;
- 两个jsp页面(ProductForm.jsp和ProductDetails.jsp)作为视图;
- 一个CSS文件,定义了两个jsp页面的显示风格。
示例应用目录结构如下:

注意:由于我们采用的是Servlet3.0版本,web.xml可以不需要,具体可以参考博客Servlet2.5版本和Servlet3.0版本。
项目右键属性、部署路径设置如下:

1、Product类
Product类是一个封装了产品信息的JavaBean。Product类包含三个属性:name,description和price:
package appdesign1.model;

import java.io.Serializable;

import java.math.BigDecimal;

public class Product implements Serializable {

    private static final long serialVersionUID = 748392348L;

    private String name;

    private String description;

    private BigDecimal price;

    public String getName() {

        return name;

    }

    public void setName(String name) {

        this.name = name;

    }

    public String getDescription() {

        return description;

    }

    public void setDescription(String description) {

        this.description = description;

    }

    public BigDecimal getPrice() {

        return price;

    }

    public void setPrice(BigDecimal price) {

        this.price = price;

    }

}
Product类实现了java.io.Serializable接口,其实例可以安全地将数据保存到HttpSession中。根据Serializable的要求,Product类实现了一个serialVersionUID 属性。
2、ProductForm表单类
表单类与HTML表单相对应,是后者在服务器的代表。ProductForm类看上去同Product类相似,这就引出一个问题:ProductForm类是否有存在的必要:
package appdesign1.form;

public class ProductForm {

    private String name;

    private String description;

    private String price;

    public String getName() {

        return name;

    }

    public void setName(String name) {

        this.name = name;

    }

    public String getDescription() {

        return description;

    }

    public void setDescription(String description) {

        this.description = description;

    }

    public String getPrice() {

        return price;

    }

    public void setPrice(String price) {

        this.price = price;

    }

}
实际上,通过表单对象可以将ServletRequest中的表单信息传递给其它组件,比如校验器Validator(后面会介绍,主要用于检查表单输入数据是否合法)。如果不使用表单对象,则应将ServletRequest传递给其它组件,然而ServletRequest是一个Servlet层的对象,是不应当暴露给应用的其它层。
另一个原因是,当数据校验失败时,表单对象将用于保存和显示用户在原始表单上的输入。
注意:大部分情况下,一个表单类不需要事先Serializable接口,因为表单对象很少保存在HttpSession中。
3、ControllerServlet类
ContrlooerServlet类继承自javax.servlet.http.HttpServlet类。其doGet()和doPost()方法最终调用process()方法,该方法是整个Servlet控制器的核心。
可能有人好奇,为何Servlet控制器命名为ControllerServlet,实际上,这里遵从了一个约定:所有Servlet的类名称都带有Servlet后缀。
package appdesign1.controller;

import java.io.IOException;

import javax.servlet.RequestDispatcher;

import javax.servlet.ServletException;

import javax.servlet.annotation.WebServlet;

import javax.servlet.http.HttpServlet;

import javax.servlet.http.HttpServletRequest;

import javax.servlet.http.HttpServletResponse;

import appdesign1.action.SaveProductAction;

import appdesign1.form.ProductForm;

import appdesign1.model.Product;

import java.math.BigDecimal;

//Servlet3.0使用注解指定访问Servlet的URL

@WebServlet(name = "ControllerServlet", urlPatterns = {

        "/input-product", "/save-product" })

public class ControllerServlet extends HttpServlet {

    private static final long serialVersionUID = 1579L;

    @Override

    public void doGet(HttpServletRequest request,

            HttpServletResponse response)

            throws IOException, ServletException {

        process(request, response);

    }

    @Override

    public void doPost(HttpServletRequest request,

            HttpServletResponse response)

            throws IOException, ServletException {

        process(request, response);

    }

    private void process(HttpServletRequest request,

            HttpServletResponse response)

            throws IOException, ServletException {

        String uri = request.getRequestURI();

        /*

         * uri is in this form: /contextName/resourceName,

         * for example: /appdesign1/input-product.

         * However, in the event of a default context, the

         * context name is empty, and uri has this form

         * /resourceName, e.g.: /input-product

         */

        int lastIndex = uri.lastIndexOf("/");

        String action = uri.substring(lastIndex + 1);

        // execute an action  根据不同的uri执行不同的action

        String dispatchUrl = null;

        if ("input-product".equals(action)) {

            // no action class, just forward

            dispatchUrl = "/jsp/ProductForm.jsp";

        } else if ("save-product".equals(action)) {

            // create form 创建一个表单对象、保存表单信息

            ProductForm productForm = new ProductForm();

            // populate action properties

            productForm.setName(request.getParameter("name"));

            productForm.setDescription(

                    request.getParameter("description"));

            productForm.setPrice(request.getParameter("price"));

            // create model 创建一个Model类

            Product product = new Product();

            product.setName(productForm.getName());

            product.setDescription(productForm.getDescription());

            try {

                product.setPrice(new BigDecimal(productForm.getPrice()));

            } catch (NumberFormatException e) {

            }

            // execute action method     保存表单

            SaveProductAction saveProductAction =

                    new SaveProductAction();

            saveProductAction.save(product);

            // store model in a scope variable for the view

            request.setAttribute("product", product);

            dispatchUrl = "/jsp/ProductDetails.jsp";

        }

        //请求转发

        if (dispatchUrl != null) {

            RequestDispatcher rd =

                    request.getRequestDispatcher(dispatchUrl);

            rd.forward(request, response);

        }

    }

}
ControllerServlet的process()方法处理所有输入请求。首先是获取URI和action名称:
        String uri = request.getRequestURI();

        int lastIndex = uri.lastIndexOf("/");

        String action = uri.substring(lastIndex + 1);
在本示例中,action值只会是input-product或sava-product。
接着,当action值为sava-product,process()方法执行如下步骤:
- 创建并更根据请求参数创建一个ProductForm表单对象。save-product操作涉及3个属性:name,description、price。然后创建一个product对象,并通过表单对象设置相应属性;
- 执行针对product对象的业务逻辑,保存表单;
- 转发请求到视图(jsp页面),显示输入的表单信息。
process()方法中判断action的if代码块如下:
  if ("input-product".equals(action)) {

            // no action class, just forward

            dispatchUrl = "/jsp/ProductForm.jsp";

        } else if ("save-product".equals(action)) {

            ....

    }
对于input-product,无需任何操作;而针对save-product,则创建一个ProductForm对象和Product对象,并将前者的属性值复制到后者。
再次,process()方法实例化SavaProductAction类,并调用其save()方法:
 // create form 创建一个表单对象、保存表单信息

            ProductForm productForm = new ProductForm();

            // populate action properties

            productForm.setName(request.getParameter("name"));

            productForm.setDescription(

                    request.getParameter("description"));

            productForm.setPrice(request.getParameter("price"));

            // create model 创建一个Model类

            Product product = new Product();

            product.setName(productForm.getName());

            product.setDescription(productForm.getDescription());

            try {

                product.setPrice(new BigDecimal(productForm.getPrice()));

            } catch (NumberFormatException e) {

            }

            // execute action method     保存表单

            SaveProductAction saveProductAction =

                    new SaveProductAction();

            saveProductAction.save(product);
然后,将Product对象放入HttpServletRequest对象中,以便对应的视图可以访问到:
            // store model in a scope variable for the view

            request.setAttribute("product", product);

            dispatchUrl = "/jsp/ProductDetails.jsp";
最后,process()方法转到视图,如果action是input-product,则转到ProductForm.jsp页面,否则转到ProductDetails.jsp页面:
        //请求转发

        if (dispatchUrl != null) {

            RequestDispatcher rd =

                    request.getRequestDispatcher(dispatchUrl);

            rd.forward(request, response);

        }
4、Action类
这个应用这有一个action类,负责将一个product对象持久化,例如数据库。这个action类名为SaveProductAction:
package appdesign1.action;

import appdesign1.model.Product;

public class SaveProductAction {

    public void save(Product product) {

        // insert Product to the database

    }

}
在这个示例中,SaveProductAction类的save()方法是一个空实现。
5、视图
示例应用包含两个jsp页面。第一个页面ProductForm.jsp对应input-product操作,第二个页面ProductDetails.jsp对应sava-product操作。
ProductForm.jsp:
<!DOCTYPE html>
<html>
<head>
<title>Add Product Form</title>
<style type="text/css">@import url(css/main.css);</style>
</head>
<body>
<form method="post" action="save-product">
<h1>Add Product
<span>Please use this form to enter product details</span>
</h1>
<label>
<span>Product Name :</span>
<input id="name" type="text" name="name"
placeholder="The complete product name"/>
</label>
<label>
<span>Description :</span>
<input id="description" type="text" name="description"
placeholder="Product description"/>
</label>
<label>
<span>Price :</span>
<input id="price" name="price" type="number" step="any"
placeholder="Product price in #.## format"/>
</label>
<label>
<span> </span>
<input type="submit"/>
</label>
</form>
</body>
</html>
注意:不要用HTML table标签来布局表单,使用CSS。
ProductDetails.jsp:
<!DOCTYPE html>

<html>

<head>

<title>Save Product</title>

<style type="text/css">@import url(css/main.css);</style>

</head>

<body>

<div id="global">

    <h4>The product has been saved.</h4>

    <p>

        <h5>Details:</h5>

        Product Name: ${product.name}<br/>

        Description: ${product.description}<br/>

        Price: $${product.price}

    </p>

</div>

</body>

</html>
ProductForm页面包含了一个HTML表单。ProductDetails页面通过EL表达式语言访问HttpServletRequest所包含的product对象。
此外,该实例存在一个问题,即用户可以直接通过浏览器访问这两个jsp页面,我们可以通过以下方式避免这种直接访问:
- 将jsp页面都放在WEB-INF目录下。WEB-INF目录下的任何文件和子目录都受保护、无法通过浏览器直接访问,但控制器仍然可以转发请求到这些页面;
- 利用一个servlet filter过滤jsp页面;
- 在部署描述符中为jsp压面增加安全限制。这种方式相对简单,无需编写filter代码;
main.css:
form {

    margin-left:auto;

    margin-right:auto;

    max-width: 450px;

    background: palegreen;

    padding: 25px 15px 25px 10px;

    border:1px solid #dedede;

    font: 12px Arial;

}

h1 {

    padding: 20px;

    display: block;

    border-bottom:1px solid grey;

    margin: -20px 0px 20px 0px;

    color: mediumpurple;

}

h1>span {

    display: block;

    font-size: 13px;

}

label {

    display: block;

}

label>span {

    float: left;

    width: 20%;

    text-align: right;

    margin: 14px;

    color: mediumpurple;

    font-weight:bold;

}

input[type="text"], input[type="number"] {

    border: 1px solid #dedede;

    height: 30px;

    width: 70%;

    font-size: 12px;

    border-radius: 3px;

    margin: 5px;

}

input[type="submit"] {

    background: mediumseagreen;

    font-weight: bold;

    border: none;

    padding: 8px 20px 8px 20px;

    color: black;

    border-radius: 5px;

    cursor: pointer;

    margin-left:4px;

}

input[type="submit"]:hover {

    background: red;

    color: yellow;

}
6、测试应用
将项目部署到tomcat服务器,然后启动服务器,假设示例应用运行在本机的8000端口上,则可以通过如下URL访问应用:
http://localhost:8008/appdesign1/input-product
完成表单输入后,表单提交到如下服务器URL上:
http://localhost:8008/appdesign1/save-product
三 MVC案例(Filter作为控制器)
虽然Servlet是MVC框架中最常见的控制器,但是过滤器也可以充当控制器。Struts2就是使用过滤器作为控制器,是因为该过滤波器也可用于提供静态页面。

public void init(FilterConfig filterConfig) throws ServletException
public void doFilter(ServletRequest request,ServletResponse response,FilterChain chain) throws IOException,ServletException
public void destroy();
public void doFilter(ServletRequest request,ServletResponse response) throws IOException,ServletException
注意:过滤器没有作为欢迎页面(即仅仅在浏览器地址栏中输入域名)的权限,仅输入域名时不会调用过滤器分派器。
下面我们采用一个名为FilterDispactcher的过滤器替代appdesign1项目中的Servlet控制器,项目命名为appdesign2,目录结构如下:
package appdesign2.filter;

import java.io.IOException;

import javax.servlet.Filter;

import javax.servlet.FilterChain;

import javax.servlet.FilterConfig;

import javax.servlet.RequestDispatcher;

import javax.servlet.ServletException;

import javax.servlet.ServletRequest;

import javax.servlet.ServletResponse;

import javax.servlet.annotation.WebFilter;

import javax.servlet.http.HttpServletRequest;

import appdesign2.action.SaveProductAction;

import appdesign2.form.ProductForm;

import appdesign2.model.Product;

import java.math.BigDecimal;

//Servlet3.0新增了注解的特性,指定过滤器的访问URL

@WebFilter(filterName = "DispatcherFilter",

        urlPatterns = { "/*" })

public class DispatcherFilter implements Filter {

    //过滤器初始化

    @Override

    public void init(FilterConfig filterConfig)

            throws ServletException {

    }

    //过滤器销毁

    @Override

    public void destroy() {

         System.out.println("** 过滤器销毁。");

    }

    //执行过滤操作

    @Override

    public void doFilter(ServletRequest request,

            ServletResponse response, FilterChain filterChain)

            throws IOException, ServletException {

        System.out.println("** 执行doFilter()方法之前。");

        HttpServletRequest req = (HttpServletRequest) request;

        String uri = req.getRequestURI();

        /*

         * uri is in this form: /contextName/resourceName, for

         * example /appdesign2/input-product. However, in the

         * case of a default context, the context name is empty,

         * and uri has this form /resourceName, e.g.:

         * /input-product

         */

        // action processing

        int lastIndex = uri.lastIndexOf("/");

        String action = uri.substring(lastIndex + 1);

        String dispatchUrl = null;

        if ("input-product".equals(action)) {

            // do nothing

            dispatchUrl = "/jsp/ProductForm.jsp";

        } else if ("save-product".equals(action)) {

            // create form

            ProductForm productForm = new ProductForm();

            // populate action properties

            productForm.setName(request.getParameter("name"));

            productForm.setDescription(

                    request.getParameter("description"));

            productForm.setPrice(request.getParameter("price"));

            // create model

            Product product = new Product();

            product.setName(productForm.getName());

            product.setDescription(product.getDescription());

            try {

                product.setPrice(new BigDecimal(productForm.getPrice()));

            } catch (NumberFormatException e) {

            }

            // execute action method

            SaveProductAction saveProductAction =

                    new SaveProductAction();

            saveProductAction.save(product);

            // store model in a scope variable for the view

            request.setAttribute("product", product);

            dispatchUrl = "/jsp/ProductDetails.jsp";

        }

        // forward to a view

        if (dispatchUrl != null) {

            RequestDispatcher rd = request

                    .getRequestDispatcher(dispatchUrl);

            rd.forward(request, response);

        } else {

            // let static contents pass

            filterChain.doFilter(request, response);

        }

        System.out.println("** 执行doFilter()方法之后。");

    }

}
doFilter()方法的内容同appdesign1中的process()方法。
由于过滤器的过滤目标是包括静态内容在内的所有网址,因此,若没有相应的action,则需要调用filterChain.doFilter();
else {

            // let static contents pass

            filterChain.doFilter(request, response);

        }
要测试应用,将项目配置到tomcat服务器,启动服务器,并在浏览器输入如下URL:
http://localhost:8008/appdesign2/input-product


四 表单输入校验器
在Web应用执行action时,很重要的一个步骤就是进行输入校验。检验的内容可以是简单的,如检查一个输入是否为空,也可以是复杂的,如检验信用卡号。实际上,因为校验工作如此重要,Java社区专门发布了JSR 303 Bean Validation以及JSR 349 Bean Validation 1.1版本,将Java世界的输入校验进行标准化。现代的MVC框架通常同时支持编程式和声明式两种校验方式。在编程式中,需要通过编码进行用户输入校验;而在声明式中,则需要提供包含校验规则的XML文档或者属性文件。
注意:即使您可以使用HTML5或JavaScript执行客户端输入校验,也不要依赖它,因为精明的用户可以轻松地绕过它。始终执行服务器端输入验证!
本节的新应用(appdesign3)扩展自appdesign1,但是多了一个ProductValidator类:

1、ProductValidator类
package appdesign3.validator;

import java.util.ArrayList;

import java.util.List;

import appdesign3.form.ProductForm;

//对表单进行输入校验

public class ProductValidator {

    public List<String> validate(ProductForm productForm) {

        List<String> errors = new ArrayList<>();

        //商品名不能为空

        String name = productForm.getName();

        if (name == null || name.trim().isEmpty()) {

            errors.add("Product must have a name");

        }

        //商品价格不能为空、也不能是非法数字

        String price = productForm.getPrice();

        if (price == null || price.trim().isEmpty()) {

            errors.add("Product must have a price");

        } else {

            try {

                Float.parseFloat(price);

            } catch (NumberFormatException e) {

                errors.add("Invalid price value");

            }

        }

        return errors;

    }

}
注意:ProductValidator类中有一个操作ProductForm对象的validate()方法,确保产品的名字非空,其价格是一个合理的数字。validate()方法返回一个包含错误信息的字符串列表,若返回一个空列表,则表示输入合法。
现在需要让控制器使用这个校验器了,ControllerServlet代码如下:
package appdesign3.controller;

import java.io.IOException;

import java.util.List;

import javax.servlet.RequestDispatcher;

import javax.servlet.ServletException;

import javax.servlet.annotation.WebServlet;

import javax.servlet.http.HttpServlet;

import javax.servlet.http.HttpServletRequest;

import javax.servlet.http.HttpServletResponse;

import appdesign3.action.SaveProductAction;

import appdesign3.form.ProductForm;

import appdesign3.model.Product;

import appdesign3.validator.ProductValidator;

import java.math.BigDecimal;

//Servlet3.0使用注解指定访问Servlet的URL

@WebServlet(name = "ControllerServlet", urlPatterns = {

        "/input-product", "/save-product" })

public class ControllerServlet extends HttpServlet {

    private static final long serialVersionUID = 98279L;

    @Override

    public void doGet(HttpServletRequest request,

            HttpServletResponse response)

            throws IOException, ServletException {

        process(request, response);

    }

    @Override

    public void doPost(HttpServletRequest request,

            HttpServletResponse response)

            throws IOException, ServletException {

        process(request, response);

    }

    private void process(HttpServletRequest request,

            HttpServletResponse response)

            throws IOException, ServletException {

        String uri = request.getRequestURI();

        /*

         * uri is in this form: /contextName/resourceName,

         * for example: /appdesign1/input-product.

         * However, in the case of a default context, the

         * context name is empty, and uri has this form

         * /resourceName, e.g.: /input-product

         */

        int lastIndex = uri.lastIndexOf("/");

        String action = uri.substring(lastIndex + 1);

        // execute an action  根据不同的uri执行不同的action

        String dispatchUrl = null;

        if ("input-product".equals(action)) {

            // no action class, there is nothing to be done

            dispatchUrl = "/jsp/ProductForm.jsp";

        } else if ("save-product".equals(action)) {

            // instantiate action class 创建一个表单对象、保存表单信息

            ProductForm productForm = new ProductForm();

            // populate action properties

            productForm.setName(

                    request.getParameter("name"));

            productForm.setDescription(

                    request.getParameter("description"));

            productForm.setPrice(request.getParameter("price"));

            // validate ProductForm 表单输入校验

            ProductValidator productValidator = new

                    ProductValidator();

            List<String> errors =

                    productValidator.validate(productForm);

            if (errors.isEmpty()) {   //表单输入正确

                // create Product from ProductForm  创建一个Model类

                Product product = new Product();

                product.setName(productForm.getName());

                product.setDescription(

                        productForm.getDescription());

                product.setPrice(new BigDecimal(productForm.getPrice()));

                // no validation error, execute action method 保存表单

                SaveProductAction saveProductAction = new

                        SaveProductAction();

                saveProductAction.save(product);

                // store action in a scope variable for the view

                request.setAttribute("product", product);

                dispatchUrl = "/jsp/ProductDetails.jsp";

            } else {         //表单输入有误,重新加载该页面

                request.setAttribute("errors", errors);

                request.setAttribute("form", productForm);

                dispatchUrl = "/jsp/ProductForm.jsp";

            }

        }

        // forward to a view   请求转发

        if (dispatchUrl != null) {

            RequestDispatcher rd =

                    request.getRequestDispatcher(dispatchUrl);

            rd.forward(request, response);

        }

    }

}
新版的ControllerServlet类添加了初始化ProductValidator类,并调用了validate()方法的代码:
 // validate ProductForm 表单输入校验

            ProductValidator productValidator = new

                    ProductValidator();

            List<String> errors =

                    productValidator.validate(productForm);
validate()方法接受一个ProductForm参数,它分装了输入到HTML表单的产品信息。如果不用ProductForm,则应将ServletRequest传递给校验器。
如果校验成功,validate()方法返回一个空列表,在这种情况下,将创建一个产品并传递给SaveProductAction,然后,控制器将Product对象存储在ServletRequest中,并转发到ProductDetails.jsp页面,显示产品的详细信息。如果校验失败,控制器将错误列表和ProductForm对象存储在ServletRequest中,并返回到ProductForm.jsp中。
 if (errors.isEmpty()) {   //表单输入正确

                // create Product from ProductForm  创建一个Model类

                Product product = new Product();

                product.setName(productForm.getName());

                product.setDescription(

                        productForm.getDescription());

                product.setPrice(new BigDecimal(productForm.getPrice()));

                // no validation error, execute action method 保存表单

                SaveProductAction saveProductAction = new

                        SaveProductAction();

                saveProductAction.save(product);

                // store action in a scope variable for the view

                request.setAttribute("product", product);

                dispatchUrl = "/jsp/ProductDetails.jsp";

            } else {         //表单输入有误,重新加载该页面

                request.setAttribute("errors", errors);

                request.setAttribute("form", productForm);

                dispatchUrl = "/jsp/ProductForm.jsp";

            }

        }
2、ProductForm.jsp
现在,需要修改appdesign3应用的ProductForm.jsp页面,使其可以显示错误信息以及错误的输入:
<!DOCTYPE html>
<html>
<head>
<title>Add Product Form</title>
<style type="text/css">@import url(css/main.css);</style>
</head>
<body>
<form method="post" action="save-product">
<h1>Add Product
<span>Please use this form to enter product details</span>
</h1>
${empty requestScope.errors? "" : "<p id='errors'>"
+= "Error(s)!"
+= "<ul>"}
<!--${requestScope.errors.stream().map(
x -> "--><li>"+=x+="</li><!--").toList()}-->
${empty requestScope.errors? "" : "</ul></p>"}
<label>
<span>Product Name :</span>
<input id="name" type="text" name="name"
placeholder="The complete product name"
value="${form.name}"/>
</label>
<label>
<span>Description :</span>
<input id="description" type="text" name="description"
placeholder="Product description"
value="${form.description}"/>
</label>
<label>
<span>Price :</span>
<input id="price" name="price" type="number" step="any"
placeholder="Product price in #.## format"
value="${form.price}"/>
</label>
<label>
<span> </span>
<input type="submit"/>
</label>
</form>
</body>
</html>
3、测试应用
将项目配置到tomcat服务器,启动服务器,并在浏览器输入如下URL:
http://localhost:8008/appdesign3/input-product
若产品表单提交了无效数据,页面将显示错误信息,如下:
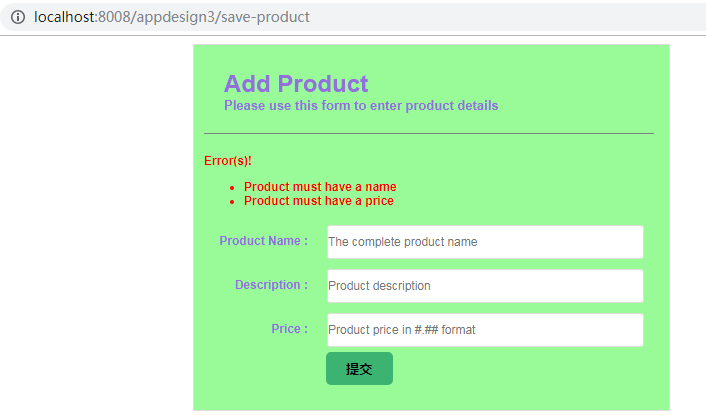
五 自制的依赖注入
什么是依赖注入技术?如果不了解的话,可以参考博客:Spring MVC -- Spring框架入门(IoC和DI)。
示例appdesign4使用了一个自制的依赖注入器。在实际的应用中,我们应该使用Spring。该示例用来生成pdf。它有两个action:
- form:没有action类,只是将请求转发到用来输入一些文本的表单;
- pdf:生成pdf文件并使用PDFAction类,PDFAction类依赖于PDFService类;
该应用的目录结构如下:

1、PDFAction类和PDFService
PDFAction类:
package action;

import service.PDFService;

public class PDFAction {

    private PDFService pdfService;

    public void setPDFService(PDFService pdfService) {

        this.pdfService = pdfService;

    }

    public void createPDF(String path, String input) {

        pdfService.createPDF(path, input);

    }

}
PDFService类:
package service;

import util.PDFUtil;

public class PDFService {

    public void createPDF(String path, String input) {

        PDFUtil.createDocument(path, input);

    }

}
PDFService使用了PDFUtil类,PDFUtil最终采用了apache pdfbox库来创建pdf文档,如果对创建pdf的具体代码有兴趣,可以进一步查看PDFUtil类。
package util;

import org.apache.pdfbox.pdmodel.PDDocument;

import org.apache.pdfbox.pdmodel.PDPage;

import org.apache.pdfbox.pdmodel.common.PDRectangle;

import org.apache.pdfbox.pdmodel.edit.PDPageContentStream;

import org.apache.pdfbox.pdmodel.font.PDFont;

import org.apache.pdfbox.pdmodel.font.PDType1Font;

public class PDFUtil {

    public static void createDocument(String path, String input) {

        PDDocument doc = null;

        try {

            doc = new PDDocument();

            PDFont font = PDType1Font.HELVETICA;

            PDPage page = new PDPage();

            doc.addPage(page);

            float fontSize = 12.0f;

            PDRectangle pageSize = page.getMediaBox();

            float centeredXPosition = (pageSize.getWidth() - fontSize

                    / 1000f) / 2f;

            float stringWidth = font.getStringWidth(input);

            PDPageContentStream contentStream = new PDPageContentStream(doc, page);

            contentStream.setFont(font, fontSize);

            contentStream.beginText();

            contentStream.moveTextPositionByAmount(centeredXPosition, 600);

            contentStream.drawString(input);

            contentStream.endText();

            contentStream.close();

            doc.save(path);

            doc.close();

        } catch (Exception ex) {

            ex.printStackTrace();

        }

    }

}
这里的关键在于,PDFAction需要一个PDFService来完成它的工作,换句话说,PDFAction依赖于PDFService。没有依赖注入,你必须在PDFAction类中实例化PDFService类,这将使PDFAction更不可测试。除此之外,如果需要更改PDFService的实现,必须重新编译PDFAction。
使用依赖注入,每个组件都有注入它的依赖项,这使得测试每个组件更容易。对于在依赖注入环境中的类,必须使其支持注入。一种方法是为每个依赖关系创建一个set方法。例如,PDFAction类有一个setPDFService方法,可以调用它来传递PDFService。注入也可以通过构造方法或者类属性进行。
一旦所有的类都支持注入,则可以选择一个依赖注入框架并将其导入项目。比如Spring框架、Google Guice、Weld和PicoContainer是一些好的选择。
2、DependencyInjector类
appdesign4应用使用DependencyInjector类来代替依赖注入框架(在实际应用中,我们应该使用一个合适的框架)。这个类专为appdesign4应用设计,利用Java的反射机制来实现(不懂的可以参考博客:Java基础 -- 深入理解Java类型信息(Class对象)与反射机制),可以容易的实例化。一旦实例化,必须调用其start()方法来执行初始哈,使用后,应调其shutdown()方法来释放资源。在此示例中,start()和shutdown()都没有实现。
package util;

import action.PDFAction;

import service.PDFService;

public class DependencyInjector {

    public void start() {

        // initialization code

    }

    public void shutDown() {

        // clean-up code

    }

    /*

     * Returns an instance of type. type is of type Class

     * and not String because it's easy to misspell a class name

     */

    public Object getObject(Class type) {

        if (type == PDFService.class) {

            return new PDFService();

        } else if (type == PDFAction.class) {

            PDFService pdfService = (PDFService)

                    getObject(PDFService.class);

            PDFAction action = new PDFAction();

            action.setPDFService(pdfService);

            return action;

        }

        return null;

    }

}
要从DependencyInjector获取对象,需要调用其getObject()方法,并传递目标类对应的Class对象,DependencyInjector支持两种类型,即PDFAction和PDFService。例如,要获取PDFAction实例,你可以通过传递PDFAction.class来调用getObject():
        PDFAction pdfAction = (PDFAction) dependencyInjector

                    .getObject(PDFAction.class);
DependencyInjector(和所有依赖注入框架)的优雅之处在于它返回的对象注入了依赖。如果返回的对象所依赖的对象也有依赖,则所依赖的对象也会注入其自身的依赖。例如,从DependencyInjector获取的PDFAction已包含PDFService。无需在PDFAction类中自己创建PDFService。
3、ControllerServlet
appdesign4应用的Servlet控制器如下所示。请注意:在其init()方法中实例化DependencyInjector,并在其destroy()方法中调用DependencyInjector的shutdown()方法。Servlet不再创建它自身的依赖项,相反,它从DependencyInjector获取这些依赖。
package servlet;

import action.PDFAction;

import java.io.IOException;

import javax.servlet.ReadListener;

import javax.servlet.RequestDispatcher;

import javax.servlet.ServletException;

import javax.servlet.annotation.WebServlet;

import javax.servlet.http.HttpServlet;

import javax.servlet.http.HttpServletRequest;

import javax.servlet.http.HttpServletResponse;

import javax.servlet.http.HttpSession;

import util.DependencyInjector;

//Servlet3.0使用注解指定访问Servlet的URL

@WebServlet(name = "ControllerServlet", urlPatterns = {

    "/form", "/pdf"})

public class ControllerServlet extends HttpServlet {

private static final long serialVersionUID = 6679L;

    private DependencyInjector dependencyInjector;

    @Override

    public void init() {

        //实例化DependencyInjector

        dependencyInjector = new DependencyInjector();

        dependencyInjector.start();

    }

    @Override

    public void destroy() {

        //关闭DependencyInjector实例

        dependencyInjector.shutDown();

    }

    protected void process(HttpServletRequest request,

            HttpServletResponse response)

            throws ServletException, IOException {

        ReadListener r = null;

        String uri = request.getRequestURI();

        /*

         * uri is in this form: /contextName/resourceName,

         * for example: /app10a/product_input.

         * However, in the case of a default context, the

         * context name is empty, and uri has this form

         * /resourceName, e.g.: /product_input

         */

        int lastIndex = uri.lastIndexOf("/");

        String action = uri.substring(lastIndex + 1);

        if ("form".equals(action)) {

            String dispatchUrl = "/jsp/Form.jsp";

            RequestDispatcher rd =

                    request.getRequestDispatcher(dispatchUrl);

            rd.forward(request, response);

        } else if ("pdf".equals(action)) {

            //创建pdf文档

            HttpSession session = request.getSession(true);

            String sessionId = session.getId();

            //利用dependencyInjector创建PDFAction对象

            PDFAction pdfAction = (PDFAction) dependencyInjector

                    .getObject(PDFAction.class);

            String text = request.getParameter("text");

            //设置pdf在磁盘上文件路径E:\tomcat\wtpwebapps\appdesign4\result\sessionId.pdf

            String path = request.getServletContext()

                    .getRealPath("/result/") + sessionId + ".pdf";

            //System.out.println(path);

            //生成pdf文件,保存在path路径下

            pdfAction.createPDF(path, text);

            // redirect to the new pdf

            StringBuilder redirect = new

                    StringBuilder();

            redirect.append(request.getScheme() + "://");       // http://

            redirect.append("localhost");                       // http://localhost

            int port = request.getLocalPort();

            if (port != 80) {

                redirect.append(":" + port);                   // http://localhost:8008

            }

            String contextPath = request.getContextPath();     // /appdesign4

            if (!"/".equals(contextPath)) {

                redirect.append(contextPath);                  // http://localhost:8008/appdesign4

            }

            redirect.append("/result/" + sessionId + ".pdf");

            //System.out.println(redirect.toString());

            response.sendRedirect(redirect.toString());

        }

    }

    @Override

    protected void doGet(HttpServletRequest request,

            HttpServletResponse response)

            throws ServletException, IOException {

        process(request, response);

    }

    @Override

    protected void doPost(HttpServletRequest request,

            HttpServletResponse response)

            throws ServletException, IOException {

        process(request, response);

    }

}
Servlet控制器支持两种URL模式:
- form:对于表单模式,Servlet控制器将请求转发到表单/jsp/Form.jsp;
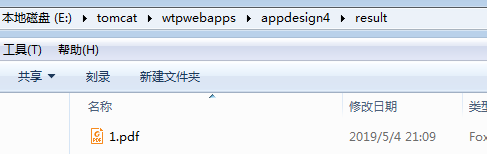
- pdf:对于pdf模式,Servlet控制器使用DependencyInjector创建PDFAction对象,并调用其createDocument()方法生成pdf文档,保存在当前项目的result文件夹下。此方法有两个参数:文件保存在磁盘上的路径和文本输入。所有PDF存储在应用项目目录下的result文件夹中,用户的会话标识符用做文件名,而文本输入作为pdf文件的内容;最后,重定向到生成的pdf文件,以下是创建重定向URL并将浏览器重定向到新URL的代码:
 // redirect to the new pdf

            StringBuilder redirect = new

                    StringBuilder();

            redirect.append(request.getScheme() + "://");       // http://

            redirect.append("localhost");                       // http://localhost

            int port = request.getLocalPort();

            if (port != 80) {

                redirect.append(":" + port);                   // http://localhost:8008

            }

            String contextPath = request.getContextPath();     // /appdesign4

            if (!"/".equals(contextPath)) {

                redirect.append(contextPath);                  // http://localhost:8008/appdesign4

            }

            redirect.append("/result/" + sessionId + ".pdf");

            //System.out.println(redirect.toString());

            response.sendRedirect(redirect.toString());
4、PDFActionTest和PdfBoxTest
该应用提供了两个测试类PDFActionTest和PdfBoxTest,由于依赖注入器,appdesign4中的每个组件都可以独立测试,比如可以运行PDFActionTest类来测试类的createDocument()方法。
PDFActionTest类:
package test;

import action.PDFAction;

import util.DependencyInjector;

public class PDFActionTest {

    public static void main(String[] args) {

        //创建DependencyInjector对象

        DependencyInjector dependencyInjector = new DependencyInjector();

        dependencyInjector.start();

        //利用DependencyInjector创建PDFAction对象

        PDFAction pdfAction = (PDFAction) dependencyInjector.getObject(

                PDFAction.class);

        //生成pdf文档

        pdfAction.createPDF("E:/tomcat/wtpwebapps/appdesign4/result/1.pdf",

                "Testing PDFAction....");

        dependencyInjector.shutDown();

    }

}
输出如下:
PdfBoxTest类:
package test;

import util.PDFUtil;

public class PdfBoxTest {

    public static void main(String[] args) {

        PDFUtil.createDocument("E:/tomcat/wtpwebapps/appdesign4/result/2.pdf",

                "Tod late");

    }

}
输出如下:

5、视图
Form.jsp:
<!DOCTYPE html>
<html>
<head>
<title>Add Product Form</title>
<style type="text/css">@import url(css/main.css);</style>
</head>
<body>
<form method="post" action="pdf">
<h1>Create PDF
<span>Please use this form to enter the text</span>
</h1>
<label>
<span>Text :</span>
<input type="text" name="text"
placeholder="Text for PDF"/>
</label>
<label>
<span> </span>
<input type="submit"/>
</label>
</form>
</body>
</html>
main.css:
form {

    margin-left:auto;

    margin-right:auto;

    max-width: 450px;

    background: palegreen;

    padding: 25px 15px 25px 10px;

    border:1px solid #dedede;

    font: 12px Arial;

}

h1 {

    padding: 20px;

    display: block;

    border-bottom:1px solid grey;

    margin: -20px 0px 20px 0px;

    color: mediumpurple;

}

h1>span {

    display: block;

    font-size: 13px;

}

label {

    display: block;

}

label>span {

    float: left;

    width: 20%;

    text-align: right;

    margin: 14px;

    color: mediumpurple;

    font-weight:bold;

}

input[type="text"], input[type="number"] {

    border: 1px solid #dedede;

    height: 30px;

    width: 70%;

    font-size: 12px;

    border-radius: 3px;

    margin: 5px;

}

input[type="submit"] {

    background: mediumseagreen;

    font-weight: bold;

    border: none;

    padding: 8px 20px 8px 20px;

    color: black;

    border-radius: 5px;

    cursor: pointer;

    margin-left:4px;

}

input[type="submit"]:hover {

    background: red;

    color: yellow;

}
6、应用测试
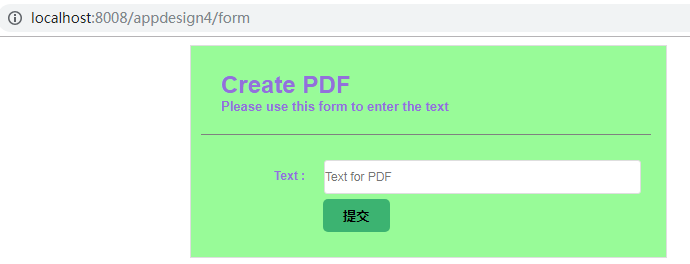
将项目配置到tomcat服务器,启动服务器,并在浏览器输入如下URL来测试应用:
http://localhost:8008/appdesign4/form
应用将展示一个表单:
如果在文本字段中输入一些内容并按提交按钮,服务器将创建一个pdf文件并发送重定向到浏览器:
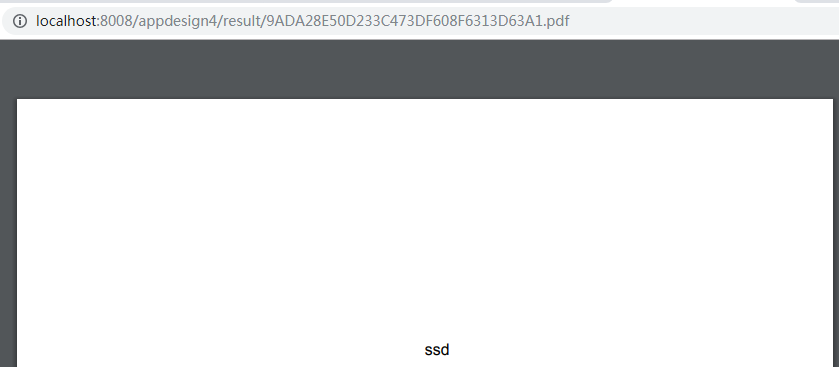
请注意:重定向网址将采用此格式:
http://localhost:8008/appdesign4/result/sessionId.pdf
参考文章
[1]MVC简介(部分转载)
[2]Spring MVC 学习总结(一)——MVC概要与环境配置(IDea与Eclipse示例)(推荐)
[3]Spring MVC 学习总结(三)——请求处理方法Action详解
[4]Spring MVC学习指南
Spring MVC -- MVC设计模式(演示4个基于MVC框架的案例)的更多相关文章
- 基于MVC设计模式的Web应用框架:struts2的简单搭建(一)
Struts2的初步介绍 Struts2是apache项目下的一个web 框架,普遍应用于阿里巴巴.京东等互联网.政府.企业门户网站.虽然之前存在了很大的安全漏洞,在2013年让苹果.中国移动.中国联 ...
- iOS 基于MVC设计模式的基类设计
iOS 基于MVC设计模式的基类设计 https://www.jianshu.com/p/3b580ffdae00
- Struts2是一个基于MVC设计模式的Web应用框架
Struts2是一个基于MVC设计模式的Web应用框架,它本质上相当于一个servlet,在MVC设计模式中,Struts2作为控制器(Controller)来建立模型与视图的数据交互. Struts ...
- ASP.NET Core 6框架揭秘实例演示[02]:基于路由、MVC和gRPC的应用开发
ASP.NET Core可以视为一种底层框架,它为我们构建出了基于管道的请求处理模型,这个管道由一个服务器和多个中间件构成,而与路由相关的EndpointRoutingMiddleware和Endpo ...
- iOS中MVC等设计模式详解
iOS中MVC等设计模式详解 在iOS编程,利用设计模式可以大大提高你的开发效率,虽然在编写代码之初你需要花费较大时间把各种业务逻辑封装起来.(事实证明这是值得的!) 模型-视图-控制器(MVC)设计 ...
- MVC的设计模式在JavaWeb中的实现
JSP开发模式 jsp开发模式的发展 1.模式1:(适合小型项目的技术的开发) a.第一版本号,纯jsp(封装数据.处理数据,显示数据) b.第二版本号,Jsp+JavaBean. ...
- 【Unity】基于MVC模式的背包系统 UGUI实现
前言 本文基于MVC模式,用UGUI初步实现了背包系统. Control层包括了点击和拖拽两种逻辑. 博文首发:http://blog.csdn.net/duzixi 下载地址:https://git ...
- 服务器文档下载zip格式 SQL Server SQL分页查询 C#过滤html标签 EF 延时加载与死锁 在JS方法中返回多个值的三种方法(转载) IEnumerable,ICollection,IList接口问题 不吹不擂,你想要的Python面试都在这里了【315+道题】 基于mvc三层架构和ajax技术实现最简单的文件上传 事件管理
服务器文档下载zip格式 刚好这次项目中遇到了这个东西,就来弄一下,挺简单的,但是前台调用的时候弄错了,浪费了大半天的时间,本人也是菜鸟一枚.开始吧.(MVC的) @using Rattan.Co ...
- iOS 基于 MVC 的项目重构总结
关于MVC的争论 关于MVC的争论已经有非常多,对此我的观点是:对于iOS开发中的绝大部分场景来说,MVC本身是没有问题的,你觉得的MVC的问题,一定是你自己理解的问题(资深架构师请自己主动忽略本文) ...
随机推荐
- poj3268 Silver Cow Party(最短路)
非常感谢kuangbin专题啊,这道题一开始模拟邻接表做的,反向边不好处理,邻接矩阵的话舒服多了. 题意:给n头牛和m条有向边,每头牛1~n编号,求所有牛中到x编号去的最短路+回来的最短路的最大值. ...
- adb命令过滤w级别日志命令
adb logcat *:W 过滤某关键字日志 adb logcat *:W | find "woyihome" 过滤某关键字日志,生成txt文档 adb logcat *:W | ...
- dt系统中tag如何使用like与%来进行模糊查询
在destoon中,如果一个品牌的详细显示页,如果要显示与品牌相关的供应的话,可以通过查询标题中带有品牌关键字的这一条件来进行查询,但是经过测试发现不能正确解析, 然后查看文件的源文件,发现 {tag ...
- jQuery 遍历 - 过滤
三个最基本的过滤方法是:first(), last() 和 eq(),它们允许您基于其在一组元素中的位置来选择一个特定的元素. 其他过滤方法,比如 filter() 和 not() 允许您选取匹配或不 ...
- 《团队作业第三、四周》五阿哥小组Scrum 冲刺阶段---Day2
<团队作业第三.四周>五阿哥小组Scrum 冲刺阶段---Day2 一.项目燃尽图 二.项目进展 20182310周烔今日进展: 主要任务一览:完成总博客的提交,制定接下来的计划,编写博客 ...
- 四行公式推完神经网络BP
据说多推推公式可以防止老年痴呆,(●ˇ∀ˇ●) 偶尔翻到我N年前第一次推导神经网络的博客居然四页纸,感慨毅力! http://blog.sina.com.cn/s/blog_1442877660102 ...
- width: calc(100% - 80px); 屏幕自适应方法
width: calc(100% - 80px); 屏幕自适应方法
- CI持续集成 -- git 与 gitlab
版本控制系统概述 git Git基本概述 Git是一个免费的开源分布式版本控制系统,旨在快速高效地处理从小型到大型项目的所有内容. Git安装配置 #安装Git yum install -y git ...
- php解决大文件断点续传
核心原理: 该项目核心就是文件分块上传.前后端要高度配合,需要双方约定好一些数据,才能完成大文件分块,我们在项目中要重点解决的以下问题. * 如何分片: * 如何合成一个文件: * 中断了从哪个分片开 ...
- git create remote branch (五)
admin@PC-panzidong MINGW64 ~/WebstormProjects/backEndServer (master) 查看本地分支信息$ git branch* master ad ...