201871010105-曹玉中《面向对象程序设计(java)》第十六周学习总结
201871010105-曹玉中《面向对象程序设计(java)》第十六周学习总结
| 项目 | 内容 |
| 这个作业属于哪个过程 | https://www.cnblogs.com/nwnu-daizh/ |
| 这个作业的要求在哪里 | https://www.cnblogs.com/zyja/p/11963340.html |
| 作业学习目标 |
(1) 掌握Java应用程序的打包操作; (2) 掌握线程概念; (3) 掌握线程创建的两种技术。 |
第一部分:理论知识。
进程:指一个内存中运行的应用程序。例如运行QQ那么它就是一个进程,而且一个应用程序可以同时运行多个进程
线程:线程是进程中的一个执行单元,就比如用360我们可以让它一边杀毒一边清理垃圾,那么360它就是一个进程,那么杀毒和清理垃圾就是进程下的两个线程
注:一个程序运行后至少有一个进程,一个进程中可以包含多个线程
Thread类
构造方法:
public Thread() :分配一个新的线程对象。
public Thread(String name) :分配一个指定名字的新的线程对象。
public Thread(Runnable target) :分配一个带有指定目标新的线程对象。
public Thread(Runnable target,String name) :分配一个带有指定目标新的线程对象并指定名字。
常用方法:
public String getName() :获取当前线程名称。
public void start() :导致此线程开始执行; Java虚拟机调用此线程的run方法。
public void run() :此线程要执行的任务在此处定义代码。
public static void sleep(long millis) :使当前正在执行的线程以指定的毫秒数暂停
public static Thread currentThread() :返回对当前正在执行的线程对象的引用。
创建线程的方式总共有两种:
1.是继承Thread类方式
2.是实现Runnable接口
创建线程的方式一:
定义Thread类子类,并重写该类的run()方法,run()方法的方法体就代表了线程需要完成的任务,
创建Thread子类的实例3. 调用Thread的start()方法来启动该线程
代码如下:
- public class Test {
- public static void main(String[] args) {
- MyThread mt = new MyThread();
- Thread t1 = new Thread(mt);
- t1.start();
- }
- }
- class MyThread extends Thread{
- @Override
- public void run(){
- System.out.println("第一种方式创建线程");
- }
- }
创建线程的方式二:
定义Runnable接口的实现类,并重写该接口的run()方法,run()方法的方法体代表线程完成的任务
创建Runnable实现类的实例。
调用Thread的start()方法来启动线程。
代码如下:
- public class Test {
- public static void main(String[] args) {
- MyRunnable mr = new MyRunnable();
- Thread t1 = new Thread(mr);
- t1.start();
- }
- }
- class MyRunnable implements Runnable{
- @Override
- public void run(){
- System.out.println("第二种方式创建线程");
- }
- }
Thread和Runnable的区别
因为类都是单继承的,如果一个类继承Thread,就不可以继承其他类了。但是如果实现了Runnable接口的话,则很容易的实现资源共享,避免了java中的单继承的局限性,所以Runnable比Thread更有优势
用匿名内部类创建线程
使用匿名内部类的方式实现Runnable接口,重写Runnable接口中的run方法:
代码如下:
- public class Test {
- public static void main(String[] args) {
- new Thread(new Runnable(){
- @Override
- public void run() {
- System.out.println("匿名内部类创建线程");
- }
- }).start();
- }
- }
线程安全问题的概述
如果有多个线程在同时运行,而这些线程可能会同时运行这段代码。程序每次运行结果和单线程运行的结果是一样的,而且其他的变量的值也和预期的是一样的,就是线程安全的。
那么什么是线程不安全的呢?我们由一段代码看一下:
这里我想打印的是1-100之间的整数:
- public class Test {
- public static void main(String[] args) {
- MyRunnable r = new MyRunnable();
- Thread t1 = new Thread(r);
- Thread t2 = new Thread(r);
- Thread t3 = new Thread(r);
- t1.start();
- t2.start();
- t3.start();
- }
- }
- class MyRunnable implements Runnable{
- private int sum = ;
- public void run(){
- while(true){
- if(sum>){
- try {
- Thread.sleep();
- catch (InterruptedException e) {
- e.printStackTrace();
- }
- System.out.println(sum);
- sum--;
- }
- }
- }
- }
运行结果出现了很多重复的,甚至还有-1,结果和预期是不一样的,这就是线程不安全情况。那么为什么会出现这种情况呢?是因为这三个线程在执行过程中不断抢夺CPU的执行权,当某一个线程运行到Thread.sleep(10)的时候处于睡眠状态,那么CPU的执行权交给了另外两个线程以此类推,三个线程都执行到了这里,这时代码就不是一条判断一条输出了,当睡眠结束后三条线程面临的都是一条输出语句一个sum–不再判断sum的值,若最后判断sum的值为1,最后sum的值将被–三次,所以才会导致最终的结果出现0和-1的情况(最终sum的值为-2),这里的Thread.sleep()其实是为了增加线程安全问题出现的概率。
第二部分:实验。
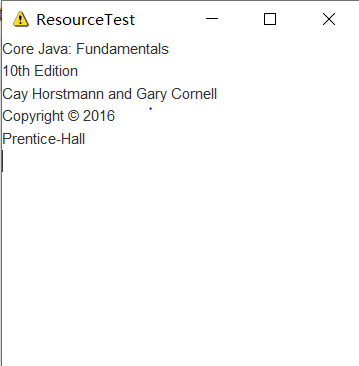
测试程序1
l 在elipse IDE中调试运行教材585页程序13-1,结合程序运行结果理解程序;
l 将所生成的JAR文件移到另外一个不同的目录中,再运行该归档文件,以便确认程序是从JAR文件中,而不是从当前目录中读取的资源。
l 掌握创建JAR文件的方法;
代码如下:
- package resource;
- import java.awt.*;
- import java.io.*;
- import java.net.*;
- import java.util.*;
- import javax.swing.*;
- /**
- * @version 1.41 2015-06-12
- * @author Cay Horstmann
- */
- public class ResourceTest
- {
- public static void main(String[] args)
- {
- EventQueue.invokeLater(() -> {
- JFrame frame = new ResourceTestFrame();
- frame.setTitle("ResourceTest");
- frame.setDefaultCloseOperation(JFrame.EXIT_ON_CLOSE);
- frame.setVisible(true);
- });
- }
- }
- /**
- * A frame that loads image and text resources.
- */
- class ResourceTestFrame extends JFrame
- {
- private static final int DEFAULT_WIDTH = ;
- private static final int DEFAULT_HEIGHT = ;
- public ResourceTestFrame()
- {
- setSize(DEFAULT_WIDTH, DEFAULT_HEIGHT);
- URL aboutURL = getClass().getResource("about.gif");
- Image img = new ImageIcon(aboutURL).getImage();
- setIconImage(img);
- JTextArea textArea = new JTextArea();
- InputStream stream = getClass().getResourceAsStream("about.txt");
- try (Scanner in = new Scanner(stream, "UTF-8"))
- {
- while (in.hasNext())
- textArea.append(in.nextLine() + "\n");
- }
- add(textArea);
- }
- }
- Main-Class: resource.ResourceTest
Core Java: Fundamentals
10th Edition
Cay Horstmann and Gary Cornell
Copyright 漏 2016
Prentice-Hall

运行结果如下:
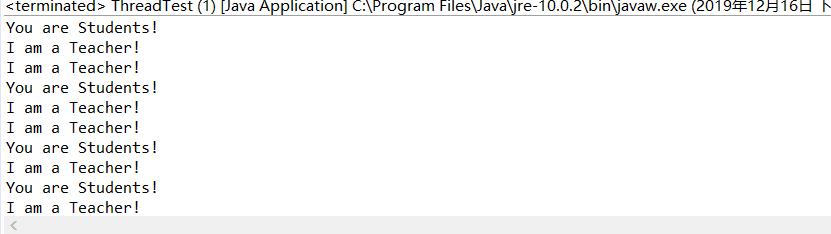
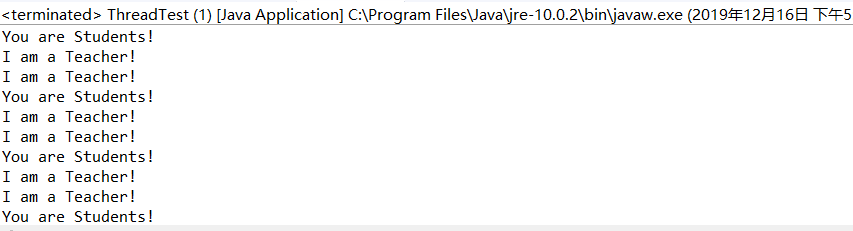
测试程序2:
l 在elipse IDE中调试运行ThreadTest,结合程序运行结果理解程序;
l 掌握线程概念;
l 掌握用Thread的扩展类实现线程的方法;
l 利用Runnable接口改造程序,掌握用Runnable接口创建线程的方法。
代码如下:
- class Lefthand extends Thread {
- public void run()
- {
- for(int i=;i<=;i++)
- { System.out.println("You are Students!");
- try{ sleep(); }
- catch(InterruptedException e)
- { System.out.println("Lefthand error.");}
- }
- }
- }
- class Righthand extends Thread {
- public void run()
- {
- for(int i=;i<=;i++)
- { System.out.println("I am a Teacher!");
- try{ sleep(); }
- catch(InterruptedException e)
- { System.out.println("Righthand error.");}
- }
- }
- }
- public class ThreadTest
- {
- static Lefthand left;
- static Righthand right;
- public static void main(String[] args)
- { left=new Lefthand();
- right=new Righthand();
- left.start();
- right.start();
- }
- }
运行结果如下:
Runnable接口创建线程的方法
- class Lefthand implements Runnable {
- public void run() {
- for (int i = ; i <= ; i++) {
- System.out.println("You are Students!");
- try {
- Thread.sleep();
- } catch (InterruptedException e) {
- System.out.println("Lefthand error.");
- }
- }
- }
- }
- class Righthand implements Runnable {
- public void run() {
- for (int i = ; i <= ; i++) {
- System.out.println("I am a Teacher!");
- try {
- Thread.sleep();
- } catch (InterruptedException e) {
- System.out.println("Righthand error.");
- }
- }
- }
- }
- public class ThreadTest {
- public static void main(String[] args) {
- Runnable left = new Lefthand();
- Thread a = new Thread(left);
- Runnable right = new Righthand();
- Thread b = new Thread(right);
- a.start();
- b.start();
- }
- }
运行结果如下:
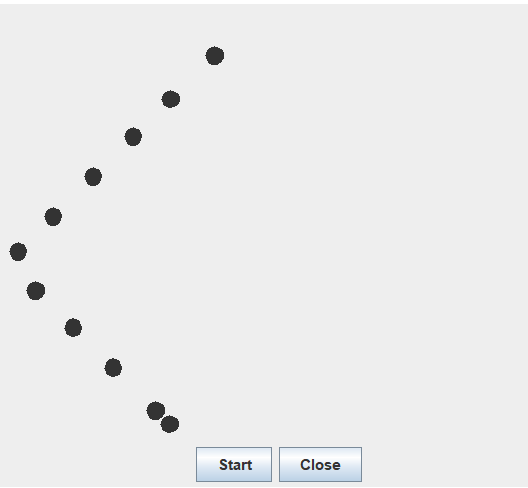
测试程序3:
在Elipse环境下调试教材625页程序14-1、14-2 、14-3,结合程序运行结果理解程序;
代码如下:
- package bounceThread;
- import java.awt.geom.*;
- /**
- A ball that moves and bounces off the edges of a
- rectangle
- * @version 1.33 2007-05-17
- * @author Cay Horstmann
- */
- public class Ball
- {
- private static final int XSIZE = ;
- private static final int YSIZE = ;
- private double x = ;
- private double y = ;
- private double dx = ;
- private double dy = ;
- /**
- Moves the ball to the next position, reversing direction
- if it hits one of the edges
- */
- //定义了移动方法
- public void move(Rectangle2D bounds)
- {
- x += dx;
- y += dy;
- if (x < bounds.getMinX())
- {
- x = bounds.getMinX();
- dx = -dx;
- }
- if (x + XSIZE >= bounds.getMaxX())
- {
- x = bounds.getMaxX() - XSIZE;
- dx = -dx;
- }
- if (y < bounds.getMinY())
- {
- y = bounds.getMinY();
- dy = -dy;
- }
- if (y + YSIZE >= bounds.getMaxY())
- {
- y = bounds.getMaxY() - YSIZE;
- dy = -dy;
- }
- }
- /**
- Gets the shape of the ball at its current position.
- */
- //定义球外形
- public Ellipse2D getShape()
- {
- return new Ellipse2D.Double(x, y, XSIZE, YSIZE);
- }
- }
- package bounce;
- import java.awt.*;
- import java.awt.event.*;
- import javax.swing.*;
- /**
- * Shows an animated bouncing ball.
- * @version 1.34 2015-06-21
- * @author Cay Horstmann
- */
- public class Bounce
- {
- public static void main(String[] args)
- {
- EventQueue.invokeLater(() -> {
- JFrame frame = new BounceFrame();
- frame.setDefaultCloseOperation(JFrame.EXIT_ON_CLOSE);
- frame.setVisible(true);
- });
- }
- }
- /**
- * The frame with ball component and buttons.
- */
- class BounceFrame extends JFrame
- {
- private BallComponent comp;
- public static final int STEPS = ;
- public static final int DELAY = ;
- /**
- * Constructs the frame with the component for showing the bouncing ball and
- * Start and Close buttons
- */
- public BounceFrame()
- {
- setTitle("Bounce");
- comp = new BallComponent();
- add(comp, BorderLayout.CENTER);
- JPanel buttonPanel = new JPanel();
- addButton(buttonPanel, "Start", event -> addBall());//将按钮放入buttonPanel
- addButton(buttonPanel, "Close", event -> System.exit());
- add(buttonPanel, BorderLayout.SOUTH);//将buttonPanel放入边界管理器的南端
- pack();
- }
- /**
- * Adds a button to a container.
- * @param c the container
- * @param title the button title
- * @param listener the action listener for the button
- */
- public void addButton(Container c, String title, ActionListener listener)
- {
- //生成按钮对象
- JButton button = new JButton(title);
- c.add(button);
- button.addActionListener(listener);//注册监听器事件
- }
- /**
- * Adds a bouncing ball to the panel and makes it bounce 1,000 times.
- */
- public void addBall()
- {
- try
- {
- Ball ball = new Ball();
- comp.add(ball);
- for (int i = ; i <= STEPS; i++)
- {
- ball.move(comp.getBounds());
- comp.paint(comp.getGraphics());
- Thread.sleep(DELAY);//在两个球显示之间有延迟
- }
- }
- catch (InterruptedException e)//中断异常
- {
- }
- }
- }
- Bounce
- Bounce
运行结果如下:

l 在Elipse环境下调试教材631页程序14-4,结合程序运行结果理解程序;
l 对比两个程序,理解线程的概念和用途;
l 掌握线程创建的两种技术。
代码如下:
- package bounceThread;
- import java.awt.*;
- import java.awt.event.*;
- import javax.swing.*;
- /**
- * 显示动画弹跳球
- * @version 1.34 2015-06-21
- * @author Cay Horstmann
- */
- public class BounceThread {
- public static void main(String[] args) {
- EventQueue.invokeLater(() -> {
- JFrame frame = new BounceFrame();
- frame.setTitle("BounceThread");
- frame.setDefaultCloseOperation(JFrame.EXIT_ON_CLOSE);
- frame.setVisible(true);
- });
- }
- }
- /**
- * 框架与球组件和按钮
- */
- class BounceFrame extends JFrame {
- private BallComponent comp;
- public static final int STEPS = ;
- public static final int DELAY = ;
- /**
- * 用显示弹跳球以及开始和关闭按钮的组件构建框架
- */
- public BounceFrame() {
- comp = new BallComponent();
- add(comp, BorderLayout.CENTER);
- JPanel buttonPanel = new JPanel();
- addButton(buttonPanel, "Start", event -> addBall());
- addButton(buttonPanel, "Close", event -> System.exit());
- add(buttonPanel, BorderLayout.SOUTH);
- pack();
- }
- /**
- * 向容器添加按钮
- *
- * @param c
- * the container
- * @param title
- * the button title
- * @param listener
- * the action listener for the button
- */
- public void addButton(Container c, String title, ActionListener listener) {
- JButton button = new JButton(title);
- c.add(button);
- button.addActionListener(listener);
- }
- /**
- * 在画布上添加一个弹跳球,并启动一个线程使其弹跳
- */
- public void addBall() {
- Ball ball = new Ball();
- comp.add(ball);
- Runnable r = () -> {
- try {
- for (int i = ; i <= STEPS; i++) {
- ball.move(comp.getBounds());//将球移动到下一个位置,如果碰到其中一个边缘则反转方向
- comp.repaint();//重绘此组件。
- Thread.sleep(DELAY);//在指定的毫秒数内让当前正在执行的线程休眠
- }
- } catch (InterruptedException e) {
- }
- };
- Thread t = new Thread(r);
- t.start();
- }
- }
运行结果如下:
第三部分:学习总结
通过本章的学习,掌握了一些关于线程的相关知识,在学习的时候学的一片混乱,好在课下通过看书
和在Mooc上 看翁凯老师的课才对本章内容有了一定的了解,但还需要再做一些练习才能够掌握本章内容
的精髓,在做验证性实验部分内容的时候,并没有遇到很多困难,同时体验到了本章实验内容的重要性,
但实验课的时候遇到较多问题,好在在助教学长的帮助下得以解决,我也会在课下多多学习,加强巩固
基础知识。
201871010105-曹玉中《面向对象程序设计(java)》第十六周学习总结的更多相关文章
- 201571030332 扎西平措 《面向对象程序设计Java》第八周学习总结
<面向对象程序设计Java>第八周学习总结 项目 内容 这个作业属于哪个课程 https://www.cnblogs.com/nwnu-daizh/ 这个作业的要求在哪里 https: ...
- 201771010118马昕璐《面向对象程序设计java》第八周学习总结
第一部分:理论知识学习部分 1.接口 在Java程序设计语言中,接口不是类,而是对类的一组需求描述,由常量和一组抽象方法组成.Java为了克服单继承的缺点,Java使用了接口,一个类可以实现一个或多个 ...
- 201771010134杨其菊《面向对象程序设计java》第八周学习总结
第八周学习总结 第一部分:理论知识 一.接口.lambda和内部类: Comparator与comparable接口: 1.comparable接口的方法是compareTo,只有一个参数:comp ...
- 201771010134杨其菊《面向对象程序设计java》第七周学习总结
第七周学习总结 第一部分:理论知识 1.继承是面向对象程序设计(Object Oriented Programming-OOP)中软件重用的关键技术.继承机制使用已经定义的类作为基础建立新的类定义,新 ...
- 201771010123汪慧和《面向对象程序设计JAVA》第六周实验总结
一.理论部分: 1.继承 用已有类来构建新类的一种机制.当定义了一个新类继承了一个类时,这个新类就继承了这个类的方法和域,同时在新类中添加新的方法和域以适应新的情况. 2.类.超类.子类 (1)类继承 ...
- 201771010128 王玉兰《面象对象程序设计 (Java) 》第六周学习总结
---恢复内容开始--- 第一部分:基础知识总结: 1.继承 A:用已有类来构建新类的一种机制,当定义了一个新类继承一个类时,这个新类就继承了这个类的方法和域以适应新的情况: B:特点:具有层次结构. ...
- 周强201771010141《面向对象程序设计Java》第八周学习总结
一.理论知识学习部分 Java为了克服单继承的缺点,Java使用了接口,一个类可以实现一个或多个接口. 接口体中包含常量定义和方法定义,接口中只进行方法的声明,不提供方法的实现. 类似建立类的继承关系 ...
- 201871010126 王亚涛《面向对象程序设计 JAVA》 第十三周学习总结
内容 这个作业属于哪个课程 https://www.cnblogs.com/nwnu-daizh/ 这个作业的要求在哪里 https://www.cnblogs.com/nwnu-daizh/p/ ...
- 马凯军201771010116《面向对象程序设计Java》第八周学习总结
一,理论知识学习部分 6.1.1 接口概念 两种含义:一,Java接口,Java语言中存在的结构,有特定的语法和结构:二,一个类所具有的方法的特征集合,是一种逻辑上的抽象.前者叫做“Java接口”,后 ...
- 201777010217-金云馨《面向对象程序设计Java》第八周学习总结
项目 内容 这个作业属于哪个课程 https://www.cnblogs.com/nwnu-daizh/ 这个作业的要求在哪里 https://www.cnblogs.com/nwnu-daizh/p ...
随机推荐
- aiohttp_spider
aiohttp_spider_def: import asyncio import re import aiohttp import aiomysql from pyquery import PyQu ...
- input 控件常用属性
- 201871010113-刘兴瑞《面向对象程序设计(java)》第四周学习总结
项目 内容 这个作业属于哪个课程 <任课教师博客主页链接>https://www.cnblogs.com/nwnu-daizh/ 这个作业的要求在哪里 <作业链接地址>http ...
- 《京东到家订单中心 Elasticsearch 演进历程》----阅读
上篇通过阅读文章对京东到家的架构分析有了初步了解,这次对文章(https://mp.weixin.qq.com/s?__biz=MzU1MzE2NzIzMg==&mid=2247486889& ...
- layui中form表单渲染的问题
layui 官网的这部分文档介绍:http://www.layui.com/doc/modules/form.html#render 注意:针对的是表单元素,input select textare ...
- 端口转发之 nc
nc使用方法: Ncat 7.50 ( https://nmap.org/ncat ) Usage: ncat [options] [hostname] [port] Options taking a ...
- Nginx+Tomcat+Memcache 实现session共享
Nginx + Tomcat + Memcache 实现session共享 1. Nginx 部署 1.上传源码包到服务器,解压安装 下载地址:http://nginx.org/en/download ...
- centos6利用cgroup冻结一个程序运行
操作步骤: 安装cgroup服务 yum install libcgroup 配置cgroup vim /etc/cgconfig.conf group stopit{ #添加一个cgroup组 fr ...
- [Zabbix] 安装MySQL5.7, 部署Zabbix到CentOS 7日记
安装环境:CentOS7 64位,安装MySQL5.7 一.安装 MySQL 1.配置YUM源 在MySQL官网中下载YUM源rpm安装包:http://dev.mysql.com/downloads ...
- 千万级MySQL数据库建立索引,提高性能的秘诀
实践中如何优化MySQL 实践中,MySQL的优化主要涉及SQL语句及索引的优化.数据表结构的优化.系统配置的优化和硬件的优化四个方面,如下图所示: SQL语句及索引的优化 SQL语句的优化 SQL语 ...