zabbix使用自动发现功能批量监控服务器端口的可用性
使用自动发现脚本批量监控服务器端口的可用性

.编写自动发现脚本

# cat /usr/local/zabbix_agents_3.2.0/scripts/web_site_code_status.sh

#!/bin/bash

UrlFile="/usr/local/zabbix_agents_3.2.0/scripts/WEB.txt"

IFS=$'\n'

web_site_discovery () {

    WEB_SITE=($(cat $UrlFile|grep -v "^#"))

    printf '{\n'

    printf '\t"data":[\n'

    num=${#WEB_SITE[@]}

    for site in ${WEB_SITE[@]}

    do

        num=$(( $num -  ))

        url=$(echo $site|awk '{print $1}')

        ip=$(echo $site|awk '{print $2}')

        if [ $num -ne  ] ; then

            printf "\t\t{\"{#SITENAME}\":\""%s"\",\"{#PROXYIP}\":\""${ip}"\"},\n" ${url}

        else

            printf "\t\t{\"{#SITENAME}\":\""%s"\",\"{#PROXYIP}\":\""${ip}"\"}\n" ${url}

            printf '\t]\n'

            printf '}\n'

        fi

    done

}

web_site_code () {

/usr/bin/nmap $ -p  >/dev/null | grep -c open

}

case "$1" in

    web_site_discovery)

        web_site_discovery

        ;;

    web_site_code)

        web_site_code $

        ;;

    *)

        echo "Usage:$0 {web_site_discovery|web_site_code [URL]}"

        ;;

esac

.需要监控的服务器列表

[root@cbs_logs_master:/usr/local/zabbix_agents_3.2.0/scripts]# cat WEB.txt

ws_cbs_frontend_web01 1.1.1.1

ws_cbs_frontend_web02 1.1.1.2

# 监控选项

[root@cbs_logs_master:/usr/local/zabbix_agents_3.2.0/conf/zabbix_agentd]# more web_site_discovery.conf

UserParameter=web.site.discovery,/usr/local/zabbix_agents_3.2.0/scripts/web_site_code_status.sh web_site_discovery

UserParameter=web.site.code[*],/usr/local/zabbix_agents_3.2.0/scripts/web_site_code_status.sh web_site_code $

# 本机测试

[root@cbs_logs_master:/usr/local/zabbix_agents_3.2.0/conf/zabbix_agentd]# /usr/local/zabbix_agents_3.2.0/scripts/web_site_code_status.sh web_site_code 1.1.1.1

# zabbix服务端测试

# zabbix_get -s 192.168.11.42 -k 'web.site.code[1.1.1.1]'
监控模板


<?xml version="1.0" encoding="UTF-8"?>
<zabbix_export>
<version>3.4</version>
<date>2019-11-08T12:33:05Z</date>
<groups>
<group>
<name>Templates</name>
</group>
</groups>
<templates>
<template>
<template>urls_monitor_port</template>
<name>urls_monitor_port</name>
<description/>
<groups>
<group>
<name>Templates</name>
</group>
</groups>
<applications/>
<items/>
<discovery_rules>
<discovery_rule>
<name>web.site.discovery</name>
<type>0</type>
<snmp_community/>
<snmp_oid/>
<key>web.site.discovery</key>
<delay>180;180/1-7,00:00-24:00</delay>
<status>0</status>
<allowed_hosts/>
<snmpv3_contextname/>
<snmpv3_securityname/>
<snmpv3_securitylevel>0</snmpv3_securitylevel>
<snmpv3_authprotocol>0</snmpv3_authprotocol>
<snmpv3_authpassphrase/>
<snmpv3_privprotocol>0</snmpv3_privprotocol>
<snmpv3_privpassphrase/>
<params/>
<ipmi_sensor/>
<authtype>0</authtype>
<username/>
<password/>
<publickey/>
<privatekey/>
<port/>
<filter>
<evaltype>0</evaltype>
<formula/>
<conditions/>
</filter>
<lifetime>30d</lifetime>
<description/>
<item_prototypes>
<item_prototype>
<name>web.site.discovery</name>
<type>0</type>
<snmp_community/>
<snmp_oid/>
<key>web.site.code[{#PROXYIP},]</key>
<delay>30</delay>
<history>90d</history>
<trends>365d</trends>
<status>0</status>
<value_type>3</value_type>
<allowed_hosts/>
<units/>
<snmpv3_contextname/>
<snmpv3_securityname/>
<snmpv3_securitylevel>0</snmpv3_securitylevel>
<snmpv3_authprotocol>0</snmpv3_authprotocol>
<snmpv3_authpassphrase/>
<snmpv3_privprotocol>0</snmpv3_privprotocol>
<snmpv3_privpassphrase/>
<params/>
<ipmi_sensor/>
<authtype>0</authtype>
<username/>
<password/>
<publickey/>
<privatekey/>
<port/>
<description/>
<inventory_link>0</inventory_link>
<applications/>
<valuemap/>
<logtimefmt/>
<preprocessing/>
<jmx_endpoint/>
<application_prototypes/>
<master_item_prototype/>
</item_prototype>
</item_prototypes>
<trigger_prototypes>
<trigger_prototype>
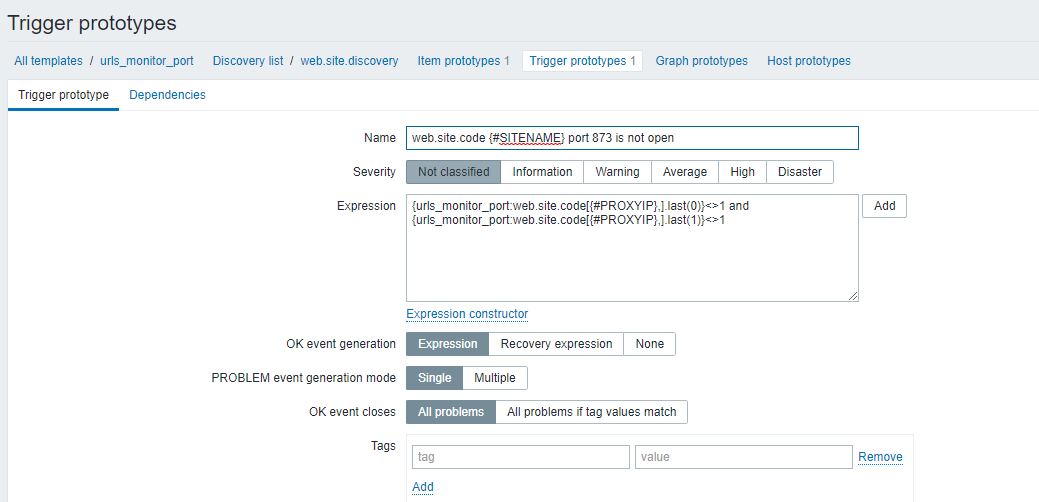
<expression>{urls_monitor_port:web.site.code[{#PROXYIP},].last(0)}<>1 and {urls_monitor_port:web.site.code[{#PROXYIP},].last(1)}<>1</expression>
<recovery_mode>0</recovery_mode>
<recovery_expression/>
<name>web.site.code {#SITENAME} port 873 is not open</name>
<correlation_mode>0</correlation_mode>
<correlation_tag/>
<url/>
<status>0</status>
<priority>0</priority>
<description/>
<type>0</type>
<manual_close>0</manual_close>
<dependencies/>
<tags/>
</trigger_prototype>
</trigger_prototypes>
<graph_prototypes/>
<host_prototypes/>
<jmx_endpoint/>
</discovery_rule>
</discovery_rules>
<httptests/>
<macros/>
<templates/>
<screens/>
</template>
</templates>
</zabbix_export>
zabbix使用自动发现功能批量监控服务器端口的可用性的更多相关文章
- zabbix实现自动发现功能添加磁盘监控
zabbix实现对磁盘动态监控 - Lenwood 原文 http://www.cnblogs.com/baizhantang/p/3253246.html 主题 Linux命令 zabbix 前言 ...
- zabbix的自动发现、自定义添加监控项目、配置邮件告警
1.zabbix的自动发现这里的自动发现,所显示出来的是规则的上自动了现 然后 可以对其内容进行相关的配制,如时间或周期 注意:对于单个主机的规则,可以自行添加或删除, 但对于已经添加好了的规则,若需 ...
- zabbix3.2利用自动发现功能对fastcgi模式的php状态进行集中监控
zabbix3.2利用自动发现功能对fastcgi模式的php状态进行集中监控 前端nginx虚拟主机引用后端多个php接口,为了方便监控,将后端服务器集中配置在nginx中,具体配置如下: [roo ...
- 【Zabbix】Zabbix Server自动发现
Zabbix自动发现 由于有上百台的虚拟机需要监控,如果一个个去添加配置,费时费力.Zabbix的自动发现,可以自动发现需要监控的机器,监控相应指标. 前置条件 安装部署好Zabbix Server. ...
- 01 - zabbix | LLD自动发现
01 - zabbix | LLD自动发现 1. 原理 zabbix支持设置变量,用{#VAR_NAME}来表示.然后有一些系统保留的变量 2. 设置 2.1 交换机电源自动发现 名字写好后进进入 ...
- zabbix使用自动发现监控esxi的磁盘存储storage
zabbix使用自动发现监控esxi的磁盘存储storage 在任意一台可以访问vcenter的zabbix-agent服务器上添加exsi的磁盘监控模板即可 创建模板过程: custom.esxi. ...
- zabbix自动发现功能实现批量web url监控
需求: 现在有大量url需要监控,形式如http://www.baidu.com ,要求url状态不为200即报警. 需求详细分析: 大量的url,且url经常变化,现在监控用的是zabbix,如果手 ...
- zabbix 添加自动发现端口并监控
最近在部署zabbix监控 有些服务器上开启的服务端口非常多 如果一个个添加监控会很繁琐,于是想到了自动发现规则 自动发现服务器上的服务端口并进行监控. 在zabbix客户端服务器上进行操作 1 ...
- Zabbix实现自动发现端口并监控
1.新建客户端需要的脚本 # vim discovertcpport.sh #!/bin/bash portarray=(`sudo netstat -tnlp|egrep -i "$1&q ...
随机推荐
- Mac 设置redis开机启动
1.创建一个plist文件 首先我们需要在/Library/LaunchDaemons目录下创建一个plist文件,使用如下命令: 复制代码代码如下: sudo vim /Library/Launch ...
- Xinetd超级守护进程
Xinetd超级守护进程 00.什么是xinetd服务 xinetd(extended Internet services daemon), 是新一代网络守护进程服务程序, 又叫超级守护进程. 经常用 ...
- Odoo采购模块
转载请注明原文地址:https://www.cnblogs.com/ygj0930/p/10825976.html 一:采购过程 采购业务可以分为以下几个流程: 1)建立供应商信息 企业需要与供应商建 ...
- 剑指Offer(十七):树的子结构
剑指Offer(十七):树的子结构 搜索微信公众号:'AI-ming3526'或者'计算机视觉这件小事' 获取更多算法.机器学习干货 csdn:https://blog.csdn.net/baidu_ ...
- spring boot flyway 配置说明(摘抄)
flyway.baseline-description对执行迁移时基准版本的描述. flyway.baseline-on-migrate当迁移时发现目标schema非空,而且带有没有元数据的表时,是否 ...
- Elasticsearch 日期类型的自动监测,官方文档
资料 网址 Elasticsearch Reference [7.3] » Mapping » Field datatypes » Date datatype https://www.elastic. ...
- spring mvc @RequestMapping method 不写的话,默认GET、POST都支持,根据前端方式自动适应
@RequestMapping(value="/") method 不写的话,默认GET.POST都支持,根据前端方式自动适应.
- MySQL 中的默认数据库介绍
MySQL 中的默认数据库介绍:https://dataedo.com/kb/databases/mysql/default-databases-schemas 默认数据库 官方文档 informat ...
- Linux正则表达式与通配符
在linux中,有通配符和正则表达式,这是两个不同的概念通配符:它是由shell解析,并且一般用于匹配文件名.如:ls正则表达式:是一个字符匹配标准,可以匹配文本中的内容一些命令工具按此标准实现字符匹 ...
- space-cloud 学习一 基本试用
space-cloud 是一个支持多数据库,以下是一个简单的基于官方文档的试用 使用docker-compose 运行 环境准备 下载docker-compose文件 wget https://raw ...
