Linux(15):shell 编程
shell基础
什么是 shell ?
Shell是一个命令解释器,它的作用是解释执行用户输入的命令及程序等,用户输入一条命令, Shell 就解释执行一条。

这种从键盘一输入命令,就可以立即得到回应的对话方式,被称之为交互的方式。

Shell存在于操作系统的最外层,负责直接与用户对话,把用户的输入解释给操作系统,并处理各种各样的操作,

系统的输出结果,输出到屏幕返回给用户,当我们输入系统用户名和密码,登录到 Linux 后的所有操作都是由Shell 解释并执行的。
什么是 shell 脚本?
当命令或程序语句不在命令行下执行,而是通过一个程序文件执行时,该程序就被称为 Shell 脚本。

如果在 Shell 脚本里内置了很多条命令、语句及循环控制,然后一次性把这些命令执行完,这种通过文件执行脚本的方式,称为非交互的方式。

Shell 脚本类似于 DOS 系统下的批处理程序。用户可以在 Shell 脚本中敲入一系列的命令及命令语句组合。

这些命令、变量和流程控制语句等有机地结合起来就形成了一个 Shell 脚本。

# 示例:清除/var/log下messages日志文件的Shell脚本(含命令、变量和流程控制语句)

#!/bin/bash

LOG_DIR=/var/log

ROOT_UID=0

# 第一步:必须是 root 用户才能执行脚本,否则给出提示并终止脚本运行

if [ "$UID" -ne "$ROOT_UID" ]                    # $UID 是系统变量

then

    echo "only root user can run this script"

    exit 1

fi

# 第二步:成功切换到目录 /var/log ,否则给出提示并终止脚本运行

cd $LOG_DIR || {                                # || 的作用:前面的命令执行失败了,则执行后面的操作

    echo "change dir failed"

    exit 1

}

# 第三步:清理日志 /var/log/message ,清理成功,给出正确提示

cat /dev/null>messages && {                        # && 的作用:前面的操作执行成功了,再执行后面的操作

    echo "Logs cleaned up."

    exit 0

}

# 第四步:清理失败,给出相应提示

echo "Logs cleaned up failed"

exit 1
Shell脚本在Linux运维工作中地位
Shell脚本语言很擅长处理纯文本类型的数据,而Linux系统中几乎所有的配置文件、日志文件(如NFS、Rsync、Httpd、Nginx、LVS、MySQL等),以及绝大多数的启动文件都是纯文本类型的文件。自然学好Shell脚本语言,就可以利用它在Linux系统中发挥巨大的作用。
Shell脚本语言和3P语言对比
Shell脚本语言的优势在于处理偏操作系统底层的业务,例如:Linux系统内部的很多应用,对于一些常见的企业业务,使用Shell开发会更简单快速,例如:让软件一键自动化安装、优化,监控报警脚本,软件启动脚本,
日志分析脚本等,虽然PHP/Python语言也能够做到,但是,考虑到掌握难度、开发效率、开发习惯等,它们可能就不如用Shell脚本语言流行及有优势了。对于一些常规的业务应用,使用Shell更符合Linux运维简单、易用、
高效的三大基本原则。

PHP语言:

PHP是网页程序语言,也是脚本语言。是一款更注于Web页面开发(前端展示)的语言,例如:wordpress、dedecms、discuz等著名开源产品都是用PHP语言开发的。

Perl语言:

Perl脚本语言,语法灵活、复杂,缺点是不易读,团队协作困难,存世的大量相关程序软件(比如,xtrabackup热备工具、MySQL MHA集群高可用软件等都有Perl语言的身影)。

Python语言:

Python是当下流行的语言,不但可以用于脚本程序开发,也可实现Web程序开发(例如:CMDB管理系统),还可以做软件开发( OpenStack)、游戏开发、大数据开发、移动端开发。
shell脚本的注释
#号后面表示注释

# 多行注释:

# 方式1:

插入注释:

按CTL+v(win下面ctrl+q)进入列模式;

按大些“I”进入插入模式,输入注释符“#”或者是"//",然后立刻按下ESC(两下)

取消注释:

Ctrl + v 进入块选择模式,选中你要删除的行首的注释符号,注意// 要选中两个,选好之后按d即可删除注释

# 方式2:

把需要注释的代码放到 :<<EOF...EOF 中,如下所示:

:<<EOF

echo "hello world"

echo "hello world"

EOF

# 方式2 的原理:冒号在shell里面也是命令,表示什么都不做

# 方式3:

把需要注释的代码放到 cat >/dev/null<<EOF...EOF 中,如下:

cat >/dev/null<<EOF

echo "hello world"

echo "hello world"

EOF
Shell脚本的执行
# 方式1. bash script name 或 sh script name
这是当脚本文件本身没有可执行权限(即文件权限属性x位为 - 号)时常使用的方法,或者脚本文件开头没有指定解释器时需要使用的方法(推荐) # 方式2. path/script name 或 ./script name
指在当前路径下执行脚本(脚本要有执行权限),需要先将脚本文件的权限改为可执行(即文件权限属性加 x),具体方法为 chmod +x script name 。然后通过脚本绝对路径或相对路径就可以直接执行脚本了。 # 方式3. source script name 或 . script name # 方式4. sh <script name 或 cat scripts name|sh # 示例:关闭开机自启动的程序
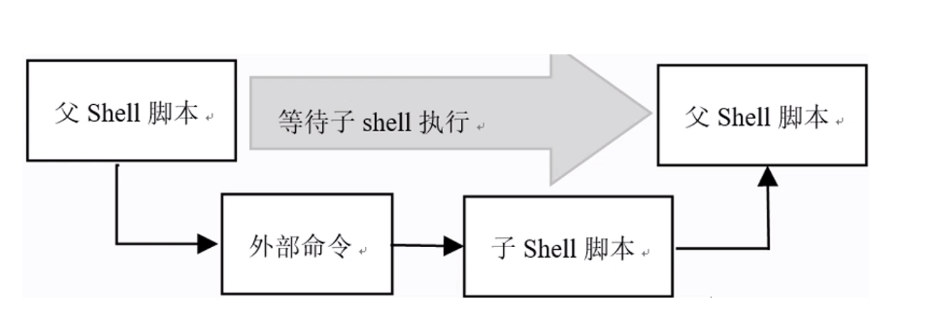
chkconfig --list|grep 3:on|awk '{print "chkconfig",$1,"off"}'|bash # 非循环的方法 # Shell脚本执行过程及父子Shell知识和互相调用 # 登陆一个命令行时,就相当于开启了一个 shell
# 示例
[root@m01 scripts]# cat test.sh
user=`whoami` # 运行这个脚本时,`whoami` 会执行,即把 root 赋值给 user 变量
[root@m01 scripts]# sh test.sh # 此时的 sh test.sh 相当于 新开启了一个 shell (子shell),即在一开始登陆的shell下新开启了一个子shell
[root@m01 scripts]# echo $user # 这个 shell 是你一开始登陆时的 shell (父shell)
# 一开始登陆的 shell 中找不到 user 这个变量的值
[root@m01 scripts]# source test.sh # 当 source 执行一个脚本时,这个脚本相当于是在当前 shell 下运行(即一开始登陆的shell),即此时没有开启新的shell
[root@m01 scripts]# echo $user
root # 经过 source test.sh 之后,echo $user 就会有输出
[root@m01 scripts]# cat call_test.sh
sh test.sh # 在 call_test.sh 中又执行了一个新的子shell
echo $user
[root@m01 scripts]# sh call_test.sh # sh call_test.sh 执行了一个新的子shell
# call_test.sh 这个子shell 无法调用 test.sh 这个子shell中的变量(test.sh的shell相当于call_test.sh shell的子shell)
[root@m01 scripts]# cat call_test.sh
source ./test.sh # 利用 source 或 . 能让 test.sh 和 call_test.sh 在同一个shell下面执行脚本
echo $user
[root@m01 scripts]# sh call_test.sh
root # 利用 source 或 . 就能让 call_test.sh 中 shell 获取到 test.sh 的shell 中的内容
[root@m01 scripts]# OLDBOY=oldboy # 在一开始登陆的shell中定义一个变量 OLDBOY
[root@m01 scripts]# cat call_parent.sh
echo $OLDBOY # 在 call_parent.sh 的 shell 中调用父shell中的变量 OLDBOY
[root@m01 scripts]# sh call_parent.sh
# 无法调用 父shell 中的变量
[root@m01 scripts]# source call_parent.sh # 利用 source 也能让 子shell调用父shell 中的变量
oldboy
[root@m01 scripts]# # 使用 source 或 . 来执行脚本,相当于在同一个shell下面执行脚本,此时变量可以相互调用;
# bash 或 sh 来执行脚本,会开启一个新的 shell (一个子shell,父shell调用不了子shell中的变量) # 父shell和子shell的概念:
在脚本A中运行的脚本B就称为脚本A的子shell, A 是 B 的父shell;
父shell和子shell之间默认不能互相调用
shell执行流程图:
Shell脚本的编程规范和习惯
1. 开头加脚本解释器

2. 附带作者及版权信息

3. 脚本扩展名为 sh

4. 脚本存放在固定的目录下

5. 脚本中不用中文

6. 成对的符号一次书写完成

7. 循环格式一次性输入完成
shell 变量:
默认情况下,在bash Shell 中是不会区分变量是什么类型的,例如:常见的变量类型为整数、字符串、小数等。
变量可分为两类:环境变量(全局变量)和普通变量(局部变量)。环境变量也可称为全局变量,可以在创建他们的 Shell 及其派生出来的任意子进程 Shell 中使用,环境变量又可分为自定义环境变量和 bash 内置的环境变量。
普通变量也可称为局部变量,只能在创建他们的Shell 函数或 Shell 脚本中使用。普通变量一般由开发者在开发脚本程序时创建。 (1) 环境变量
# 显示环境变量:
1、echo $变量名字
2、env
3. set # 定义环境变量:(定义变量时 = 两边不能有空格)
# 3种方法
环境变量尽量大写,环境变量全局生效。
#方式1:
export OLDBOY=1 # 方式2:
OLDGIRL=2
export OLDGIRL # 方式3: declare -x
declare -x A=1 # 上面3种方法是临时定义环境变量,想要永久定义环境变量,可修改 /etc/profile 文件
[root@web01 scripts]# tail -1 /etc/profile
export OLDBOY=1
[root@web01 scripts]# . /etc/profile
[root@web01 scripts]# echo $OLDBOY
1 # 环境变量取消: unset 环境变量名称
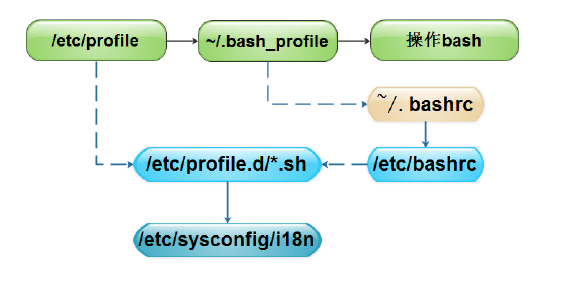
unset OLDBOY # 环境变量的文件:
全局文件
/etc/profile
/etc/bashrc
用户环境变量文件
~/.bashrc
~/.bash_profile # 环境变量初始化与对应文件生效顺序:(即环境变量文件生效顺序的优先级)
/etc/bashrc > ~/.bashrc > ~/.bash_profile > /etc/profile # 登录shell时,优先/etc/profile,然后加载~/.bash_profile ,再次加载~/.bashrc,最后加载/etc/bashrc (越往后的文件,生效的优先级越高)
# 建议环境变量放在 /etc/bashrc 中 (2)普通变量
当前用户或者脚本中生效,离开当前用户或者脚本就会失效。
# 变量名:
规则:字母、数字、下划线,3者组合,以字母开头。
要求:见名知意
格式:
1)OldboyAge=1
2)oldboy_age=1
3) oldboyAge=1 ###驼峰语法 # 变量内容:
字符串:
变量名=value # 不加引号。 ## 解析变量或者命令,然后输出;纯数字选择不加引号。
变量名=’value’ # 加单引号。 ## 所见即所得
变量名=”value” # 加双引号。 ## 解析变量或者命令,然后输出;自己定义字符串变量时可默认选择双引号;会把要定义的内容作为一个整体。 命令变量
变量名=`ls`
变量名=$(ls) # 普通变量总结:
针对变量名:
1)变量名的定义要有一定的命令规范,并且要见名知意 OldboyAge=1 ,推荐使用驼峰语法。
2)变量名仅能使用字母、数字、下划线中的任意多个字符,并且要字母开头。 针对变量内容:
3)在脚本中定义普通字符串变量,尽量把变量的内容用双引号括起来。
4)单纯数字的变量内容可以不加引号。
5)希望变量的内容原样输出需加单引号。
6)希望变量值引用命令并获取命令的结果就用反引号或 $() 。 针对赋值符号:
7)变量定义使用赋值符号 (=),赋值符号两端不要有空格。 针对变量输出:
8)使用或者输出变量的内容,可用 $变量名,例如 :echo $OldboyAge 。
9)若变量 (db) 后面有其他字符连接的时候,就必须给变量名 加上大括号 {},例如: $db_t 就要改成 ${db}_t # 特殊位置变量:
$0 获取脚本的名字,如果脚本前面跟着路径的话,那就获取路径加上脚本名字。
[root@m01 scripts]# cat test.sh
echo $0
[root@m01 scripts]# pwd
/server/scripts
[root@m01 scripts]# sh test.sh
test.sh
[root@m01 ~]# sh /server/scripts/test.sh
/server/scripts/test.sh # $0 企业应用:
一般在启动脚本的结尾会使用$0获取脚本的路径和名字给用户提示用;如 /etc/init.d/crond 中:
echo $"Usage: $0 {start|stop|status|restart|condrestart|try-restart|reload|force-reload}" $1,$2 --- $n
$1表示脚本后的第一个参数
$2表示脚本后的第二个参数
...
超过$9时,要想获取到后面的参数时,就要加上{},如 ${10}
企业应用:
case "$1" in # 启动脚本的参数
start)
rh_status_q && exit 0
$1
;;
stop) $# 表示脚本后面所有参数的总个数
企业应用:
[root@web01 scripts]# cat test.sh
#!/bin/bash
if [ $# -ne 2 ] # 获取参数的总个数
then
echo "Usage:$0 arg1 arg2"
exit 1
fi
echo ok $* 获取脚本的所有参数,格式为: "$1 $2 $3" (即所有参数为一个整体)
$@ 获取脚本的所有参数,格式为: "$1" "$2" "$3" (每个参数都是一个单独的个体)
# 应用场景:当需要接收脚本后面所有参数时,但是又不知道参数个数就用这两个变量。 区别:
[root@m01 test]# cat test.sh
#!/bin/bash for arg1 in "$*"
do
echo $arg1
done echo ---------------------
for arg2 in "$@"
do
echo $arg2
done
[root@m01 test]# sh test.sh "I am" neo coder.
I am neo coder.
---------------------
I am
neo
coder. # shell进程特殊状态变量:
$? 表示获取上一个命令的返回值,如果返回值为0就证明上一个命令执行正确,非0,就证明上一个命令执行失败的。如下:
echo $? $$ 表示获取当前执行脚本的进程号。如下:
[root@m01 test]# cat test2.sh
#!/bin/bash
echo $$|tee /tmp/a.log # tee 的作用:让 echo 输出,同时也让输出的结果打印到一个 log中
sleep 100
[root@m01 test]# sh test2.sh & # & 的作用表示后台进行
[1] 4695
[root@m01 test]# [root@m01 test]# ps -ef|grep test2.sh
root 4695 3595 0 01:55 pts/2 00:00:00 sh test2.sh
root 4702 3595 0 01:55 pts/2 00:00:00 grep --color=auto test2.sh
[root@m01 test]# cat /tmp/a.log
4695
[root@m01 test]# kill `cat /tmp/a.log` # 通过 $$ 对进程进行管理 $! 表示获取上一个后台工作进程的进程号 $_ 表示获取上一个执行脚本的最后一个参数 # Shell变量子串
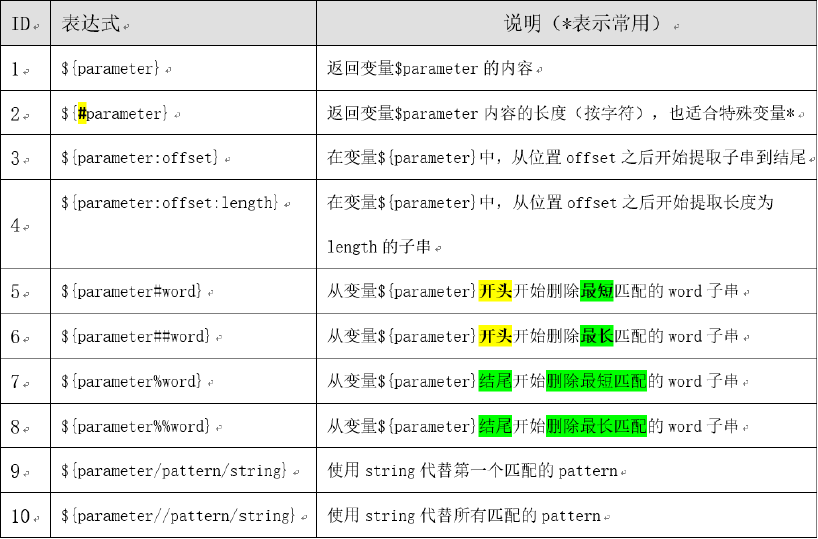
${#parameter} ---> 返回变量 $parameter 内容的长度(按字符),也适用于特殊变量
# 应用:查看字符串的长度
[root@m01 ~]# oldboy="I am oldboy"
[root@m01 ~]# echo ${oldboy}
I am oldboy
[root@m01 ~]# echo $oldboy |wc -L
11
[root@m01 ~]# expr length "$oldboy"
11
[root@m01 ~]# echo $oldboy |awk '{print length}'
11
[root@m01 ~]# echo $oldboy |awk '{print length ($0)}'
11 练习题:
I am oldboy I teach linux
打印这些字符串中字符数小于3的单词。
涉及知识点:取字符串长度,for,if。 [root@m01 ~]# echo ${oldboy:3}
m oldboy
[root@m01 ~]# echo ${oldboy:2:2}
am
[root@m01 ~]# echo ${oldboy:3:3}
m o
[root@m01 ~]# OLDBOY=abcABC123ABCabc
[root@m01 ~]# echo ${OLDBOY}
abcABC123ABCabc
[root@m01 ~]# echo ${OLDBOY#a*C}
123ABCabc
[root@m01 ~]# echo ${OLDBOY##a*C}
abc
[root@m01 ~]# echo ${OLDBOY%a*C}
abcABC123ABCabc
[root@m01 ~]# echo ${OLDBOY%a*c}
abcABC123ABC
[root@m01 ~]# echo ${OLDBOY%%a*c} [root@m01 ~]# [root@m01 ~]# OLDBOY="I am oldboy oldboy"
[root@m01 ~]# echo ${OLDBOY}
I am oldboy oldboy
[root@m01 ~]# echo ${OLDBOY/oldboy/oldgirl}
I am oldgirl oldboy
[root@m01 ~]# echo ${OLDBOY//oldboy/oldgirl}
I am oldgirl oldgirl
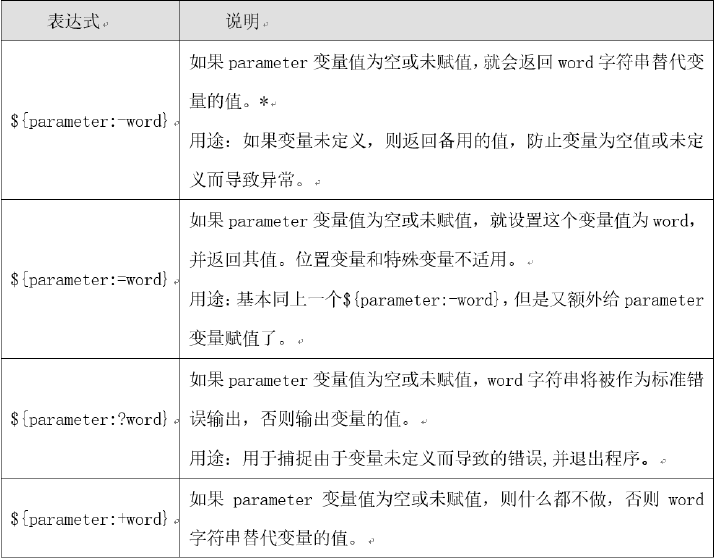
[root@m01 ~]# ${parameter:-word} 表示如果 parameter 变量值为空或未赋值,就会返回 word 字符串替代变量的值。 [root@m01 ~]# result=${test:-UNSET}
[root@m01 ~]# echo $result
UNSET
[root@m01 ~]# echo $test [root@m01 ~]#
shell变量执行顺序:
shell特殊变量:
shell变量子串:
Bash编程常见运算命令汇总
# 只适合整数运算:

1、(()) 推荐

2、let 次推荐

3、expr

4、$[]
5、declare -i

# 既适合整数,又适合小数运算:

1、bc

2、awk 推荐

示例:

############# 整数 ###############

# 1、(()) 推荐

[root@m01 ~]# a=1

[root@m01 ~]# b=2

[root@m01 ~]# a=$b+1        # 此时 $b+1 并不会进行数值上的相加

[root@m01 ~]# echo $a

2+1

[root@m01 ~]# a=$((b+1))    # 把要计算的内容用 (()) 括起来,就能进行数值上的运算

[root@m01 ~]# echo $a

3

[root@m01 ~]# echo $((b+3))

5

[root@m01 ~]# echo 2**3

2**3

[root@m01 ~]# echo $((2**3))

8

[root@m01 ~]# echo $((5/3))

1

[root@m01 ~]# echo $((1+2**3-5/3))

8

[root@m01 ~]# echo $((1+2**3-5%3))

7

[root@m01 ~]# ((i++))        # i 自加1,前面不用加 $符号

[root@m01 ~]# echo $i

2

[root@m01 ~]# ((i++))

[root@m01 ~]# echo $i

3

# 2、let 次推荐

[root@m01 ~]# a=2

[root@m01 ~]# i=$a+1

[root@m01 ~]# echo $i

2+1

[root@m01 ~]# let i=$a+1    # let 用来运算

[root@m01 ~]# echo $i

3

# 3、expr用于运算(expr做运算时,运算符号两边必须都有空格)

[root@m01 ~]# expr 50 / 30

1

[root@m01 ~]# expr 1 + 2

3

[root@m01 ~]# expr 2 \* 3        # expr 在进行乘法时,要先将 * 进行转义

6

[root@m01 ~]# expr 2 '*' 3        # expr 乘法时,也可给 * 加上引号

6

# 4、$[]

[root@m01 ~]# echo $[2+ 3]

5

[root@m01 ~]# echo $[2*2]

4

# 5、declare -i
[root@m01 ~]# declare -i a=3+4
[root@m01 ~]# echo $a
7

############### 小数 #################

# 1、 bc

[root@m01 ~]# echo 1+2|bc        # 通过 | 给 bc

3

[root@m01 ~]# echo 1.3+2.5|bc    # 能进行小数的运算

3.8

[root@m01 ~]# echo 5/3|bc

1

# 2、 awk (推荐使用awk)

[root@m01 ~]# echo 2.1 1.4|awk '{print $1-$2}'

0.7

[root@m01 ~]# echo 2.1 1.4|awk '{print $1*$2}'

2.94

[root@m01 ~]# echo 2.1 1.4|awk '{print $1/$2}'

1.5

[root@m01 ~]# echo 5 3|awk '{print $1/$2}'

1.66667
expr实战案例:
# 1、 判断一个变量值或字符串是否为整数

# 在shell编程里,由于函数库很少,因此在判断字符串是否为整数时就不是很容易。判断一个字符串是否为整数的方法如下:

# 实现原理:利用以 expr 做计算时必须是整数的规则,把一个变量或字符串和一个已知的整数(非0)相加,看命令返回值是否为0,如果为0,

# 就认为做加法的变量是整数,反之则不为整数

# 示例如下:

[root@m01 scripts]# cat judge_int.sh

#!/bin/bash

expr 2 + $1 &>/dev/null   # $1 表示接收到的第一个参数; &>/dev/null 表示结果丢到空里面

if [ $? -eq 0 ]

then

    echo "$1 is integer"

else

    echo "$1 is not integer"

fi

[root@m01 scripts]# sh judge_int.sh 123

123 is integer

[root@m01 scripts]# sh judge_int.sh neo

neo is not integer

[root@m01 scripts]#

# 2、 判断文件扩展名是否符合要求

# 补充知识点: expr "变量" : "ReExp"    # 可用于匹配; : 两边都要有空格

# 示例如下:

[root@m01 scripts]# cat judge_suffix.sh

#!/bin/bash

expr "$1" : ".*\.txt" &>/dev/null   # 匹配文件文件;若匹配则返回值为0,反之则为非0

if [ $? -eq 0 ]

then

    echo "$1 is text file"

else

    echo "$1 is not text file"

fi

[root@m01 scripts]# bash judge_suffix.sh abc.txt

abc.txt is text file

[root@m01 scripts]# bash judge_suffix.sh abc.mp3

abc.mp3 is not text file

[root@m01 scripts]#

# 3、 expr length "字符串"  ---> 也可用于获取字符串的长度

[root@m01 ~]# OLDBOY="I am oldboy"

[root@m01 ~]# expr length "$OLDBOY"

11

[root@m01 ~]#
bash内置核心命令read
# 变量的赋值:

# 1. 定义法: 如 a=1

# 2. 传参法: 如 $1、$2 等

# 3. read读入: 即读取用户输入

        -p  提示

        -t  等待用户输入的时间

# read 示例:

[root@m01 ~]# read -t 5 -p "pls input a integer:"    # -t 表示超时时间

...

[root@m01 ~]# read -t 5 -p "pls input a integer:" OLDBOY  # 用户输入的变量赋值给了 OLDBOY;OLDBOY前面一定要有空格,而且 OLDBOY前不能有 $

pls input a integer:1

[root@m01 ~]# echo $OLDBOY

1

[root@m01 ~]#

# read读入的作用: 和用户交互

# 示例如下:

[root@m01 scripts]# cat read_cal.sh

#!/bin/bash

#read -t 30 -p "pls input the value of a:" a

#read -t 30 -p "pls input the value of b:" b

read -p "pls input two integers:" a b

echo "a+b=$((a+b))"

echo "a-b=$((a-b))"

echo "a*b=$((a*b))"

echo "a/b=$((a/b))"

echo "a**b=$((a**b))"

echo "a%b=$((a%b))"

[root@m01 scripts]# bash read_cal.sh

pls input two integers:4 6

a+b=10

a-b=-2

a*b=24

a/b=0

a**b=4096

a%b=4

[root@m01 scripts]#

# read的企业应用:

[root@m01 scripts]# cat read_pratice.sh

#!/bin/bash

cat <<EOF                # 输入追加

    1. install lamp        # 菜单

    2. install lnmp

    3. exit

EOF

[root@m01 scripts]# sh read_pratice.sh

    1. install lamp

    2. install lnmp

    3. exit

[root@m01 scripts]# cat read_pratice.sh

#!/bin/bash

cat <<EOF

    1. install lamp

    2. install lnmp

    3. exit

EOF

read -p "pls input an integer from above:" num

# 1. 判断是否为数字

expr 2 + $num &>/dev/null

if [ $? -ne 0 ]

then

    echo "Usage:$0 {1|2|3}"

    exit 1

fi

# 判断执行处理

if [ $num -eq 1 ]

then

    echo "install lamp..."

elif [ $num -eq 2 ]

then

    echo "install lnmp..."

elif [ $num -eq 3 ]

then

    echo "bye."

    exit          # 退出脚本

else

    echo "Usage:$0 {1|2|3}"

    exit 1

fi

[root@m01 scripts]# sh read_pratice.sh

    1. install lamp

    2. install lnmp

    3. exit

pls input an integer from above:1

install lamp...

[root@m01 scripts]# sh read_pratice.sh

    1. install lamp

    2. install lnmp

    3. exit

pls input an integer from above:3

bye.

[root@m01 scripts]# sh read_pratice.sh

    1. install lamp

    2. install lnmp

    3. exit

pls input an integer from above:4

Usage:read_pratice.sh {1|2|3}

[root@m01 scripts]# sh read_pratice.sh

    1. install lamp

    2. install lnmp

    3. exit

pls input an integer from above:abmvdo

Usage:read_pratice.sh {1|2|3}

[root@m01 scripts]#
条件表达式
通常,在bash的各种条件结构和流程控制结构中都要进行各种测试,然后根据测试结果执行不同的操作,有时也会与if等条件语句相结合,
来完成测试判断,减少程序运行的错误。
执行测试条件表达式后通常会返回“真”或“假”,就像执行命令后的返回值为0表示真,非0表示假一样 语法1: test 测试表达式
语法2: [ 测试表达式 ] #两端有空格
语法3:[[ 测试表达式 ]] #两端有空格
语法4:((测试表达式)) #不需要空格 语法5:(命令表达式)
语法6:`命令表达式` # 条件表达式的编程语法:
[ 测试表达式 ] && 命令1
# 如果前面表达式成功,那么就执行后面命令。 [ 测试表达式 ] || 命令1
# 如果前面表达式失败,那么就执行后面命令。 [ 测试表达式 ] && {
命令1
命令2
命令3
}
# 如果前面表达式成功,那么就执行后面命令。 [ 测试表达式 ] && 命令1 || 命令2
# 如果前面表达式成功,那么就执行命令1,否则执行命令2(相当于一个if...else...语句),如下:
if [ 测试表达式 ]
then
命令1
else
命令2
fi [ 测试表达式 ] && {
命令1
命令2
}||{
命令3
命令4
}
# 如果前面表达式成功,那么就执行命令1,2,否则执行命令3,4。 # 示例如下:
[root@m01 ~]# [ -d /etc/hosts ] && echo "is directory" || echo "not directory" # -d --> 是否存在且为目录
not directory
[root@m01 ~]# [ -d /etc ] && echo "is directory" || echo "not directory"
is directory
[root@m01 ~]# [ -e /etc/host ] && echo "exist" || echo "not exist" # -e --> 是否存在
not exist
[root@m01 ~]# [ -e /etc/hosts ] && echo "exist" || echo "not exist"
exist
[root@m01 ~]# [ -r /etc/hosts ] && echo readable || echo "not readable" # -r --> 是否可读
readable
[root@m01 ~]# [ -x /etc/hosts ] && echo "executable" || echo "not executalbe" # -x --> 是否可执行; 是否可读、可执行等的依据是看文件属性的
not executalbe
[root@m01 ~]# [ -s /etc/hosts ] && echo "file size not 0" || echo "file size is 0" # -s --> 文件大小不为0,则返回真(返回值为0)
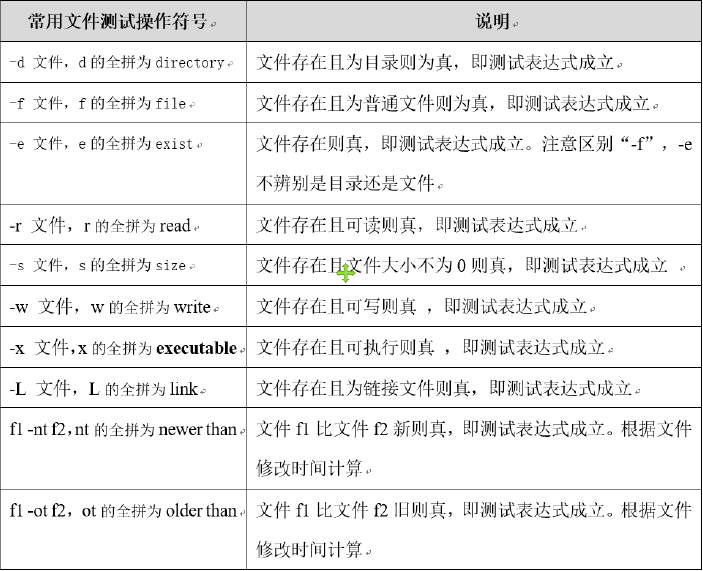
file size not 0 文件测试表达式:
为什么需要文件测试表达式?
操作一个对象,就要看对象条件是否满足,否则不要操作。
1、常见功能
2、实践
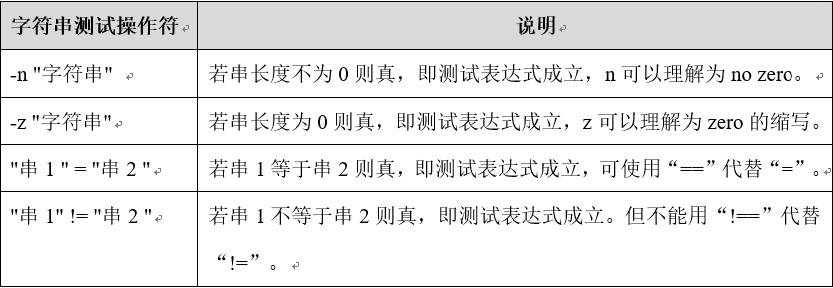
3、企业应用:启动脚本中的应用。 # 字符串测试表达式:
[ -n "字符串" ] # 字符串长度[不]为0,表达式为真。 not zero。
[ -z "字符串" ] # 字符串长度为0,表达式为真。 zero。
[ "字符串1" == "字符串2" ] # 两个字符串相同则为真。
[ "字符串1" !== "字符串2" ] # 两个字符串不相同则为真。 注意:
1、字符串要用双引号
2、等号可以用一个或者两个。
3、=号两端必须要有空格。 # 示例如下:
[root@m01 ~]# [ -n "neo" ] && echo "length not zero" || echo "length zero"
length not zero
[root@m01 ~]# [ -z "neo" ] && echo "length is zero" || echo "length is not zero"
length is not zero
[root@m01 ~]# char="neo"
[root@m01 ~]# [ -n "$char" ] && echo "length not zero" || echo "length zero"
length not zero
[root@m01 ~]# unset char
[root@m01 ~]# [ -n "$char" ] && echo "length not zero" || echo "length zero"
length zero
[root@m01 ~]# # 应用示例:
[root@m01 scripts]# cat read_cal.sh
#!/bin/bash read -p "pls input two integers:" a b # 1. 先判断是否输入了两个参数
[ -z "$b" ] &&{ # 如果变量b没有值,则输入的变量数量一定是不够2个
echo "pls input two args"
exit 1
} # 判断输入的变量是否为数字
expr $a + $b + 1 &>/dev/null
if [ $? -ne 0 ]
then
echo "Usage:$0 arg1 and arg2 must be integers"
exit 1
fi # 3. 进行运算
echo "a+b=$((a+b))"
echo "a-b=$((a-b))"
echo "a*b=$((a*b))"
echo "a/b=$((a/b))"
echo "a**b=$((a**b))"
echo "a%b=$((a%b))"
[root@m01 scripts]# bash read_cal.sh
pls input two integers:
pls input two args
[root@m01 scripts]# bash read_cal.sh
pls input two integers:1
pls input two args
[root@m01 scripts]# bash read_cal.sh
pls input two integers:ab 1
Usage:read_cal.sh arg1 and arg2 must be integers
[root@m01 scripts]# bash read_cal.sh
pls input two integers:2 3
a+b=5
a-b=-1
a*b=6
a/b=0
a**b=8
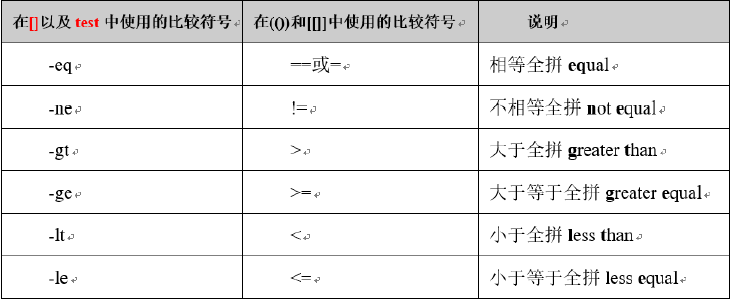
a%b=2 # 整数测试表达式:
# 示例如下:
[root@m01 scripts]# [ 1 -eq 1 ] && echo "equal" || echo "not equal"
equal
[root@m01 scripts]# [[ 1 > 2 ]] && echo "greater than" || echo "less than"
less than
[root@m01 scripts]# (( 3>2 )) && echo "greater than" || echo "less than"
greater than
[root@m01 scripts]# [[ 1 -gt 2 ]] && echo "greater than" || echo "less than"
less than # 整数表达式的应用:
# 使用 read 的交互式方式,来比较两个整数的大小
# 分析如下:
1、2个数
2、整数
3、比较大小
大于
等于
小于 [root@m01 scripts]# cat compare_int.sh
#!/bin/bash
read -p "pls input two integers:" a b # 1. 必须至少是两个参数
[ -z "$b" ] &&{
echo "pls input at least two integers"
exit 1
} # 2. 两个参数得是整数
expr $a + $b + 1 &>/dev/null
if [ $? -ne 0 ]
then
echo "two args must be integers"
exit 2
fi # 3. 比较大小
[ $a -gt $b ] && {
echo "$a > $b"
exit 0
}
[ $a -eq $b ] &&{
echo "$a == $b"
exit 0
}
#[ $a -lt $b ] &&{
# echo "$a < $b"
# exit 0
#} echo "$a < $b"
[root@m01 scripts]# bash compare_int.sh
pls input two integers:a
pls input at least two integers
[root@m01 scripts]# bash compare_int.sh
pls input two integers:1 b
two args must be integers
[root@m01 scripts]# bash compare_int.sh
pls input two integers:1 5
1 < 5
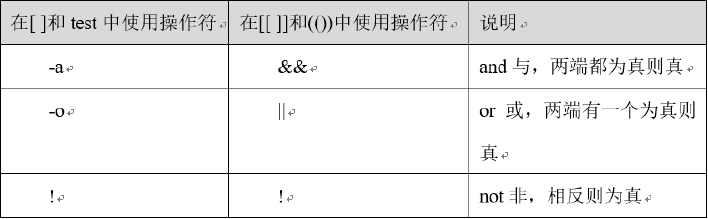
[root@m01 scripts]# # 逻辑测试表达式:
# 示例如下:
[root@m01 scripts]# [ 1 -eq 2 -a -f /etc/hosts ] && echo "all are true" || echo "not all are true" # -a 连接两个测试条件
not all are true
[root@m01 scripts]# [ 1 -eq 2 -o -f /etc/hosts ] && echo "at least one is true" || echo "all are false"
at least one is true
[root@m01 scripts]# [ ! 1 -eq 2 ] && echo 1 || echo 0 # ! ---> 取反
1
[root@m01 scripts]#
文件测试表达式的常见功能说明:
字符串测试表达式的常见功能说明:
整数测试表达式知识:
逻辑测试表达式:
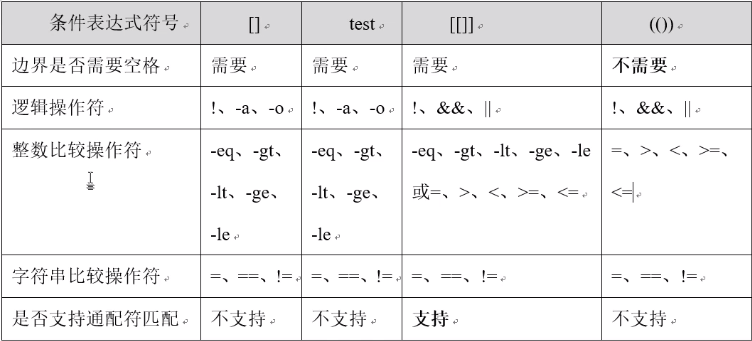
不同符号测试表达式[ ] 、 [[ ]] 、 (( ))、test的区别:
Linux(15):shell 编程的更多相关文章
- Linux 下shell 编程学习脚手架
linux body { font-family: Helvetica, arial, sans-serif; font-size: 14px; line-height: 1.6; padding-t ...
- Linux下Shell编程
Linux的shell编程 1.什么是shell? 当一个用户登录Linux系统之后,系统初始化程序init就为每个用户执行一个称为shell(外壳)的程序. shell就是一个命令行解释器,它为用户 ...
- 【Hadoop离线基础总结】linux的shell编程
linux的shell编程 基本了解 概述 Shell是一个用C语言编写的程序,通过shell用户可以访问操作系统内核服务,它类似于DOS下的command和后来的cmd.exe.Shell既是一种命 ...
- linux中shell编程
shell编程 1 echo -e 识别\转义符 \a \b \t \n \x十六进制 \0八进制 等等 #!/bin/bash echo -e "hello world" 执行脚 ...
- linux下shell编程示例-获取进程id
今天初步学习了一下linux下的shell编程,简单记录一下测试用例 1.编辑shell脚本文件如下: #!/bin/bashecho "hello bash linux"echo ...
- linux之shell编程基本语法
Shell是用户与内核进行交互操作的一种接口,目前最流行的Shell称为bash Shell.Shell也是一门编程语言<解释型的编程语言>,即shell脚本<就是在用linux的s ...
- Linux学习——shell编程之变量
shell编程之变量:Linux shell编程基础中的变量. 包括Bash变量的分类和各变量的详细使用,如:用户自定义变量.环境变量.语系变量.位置参数变量和预定义变量. 1:什么是Bash变量? ...
- 3. Linux的shell编程
Shell 是一个用 C 语言编写的程序, 通过 Shell 用户可以访问操作系统内核服务.它类似于 DOS 下的 command 和后来的 cmd.exe.Shell 既是一种命令语言,又是一种程序 ...
- Linux之shell编程的基本使用
1.Shell shell是一个命令行解释器,它为用户提供了一个向 Linux 内核发送请求以便运行程序的系统级程序 2.shell编程打印hello world 2.1 代码部分 #!/bin/ba ...
- Linux学习——shell编程之正则表达式和字符处理命令
shell编程之正则表达式 一 正则表达式 1 什么是正则表达式 正则表达式用于描述字符排列和匹配模式的一种语法规则.它主要用于字符串的模式分隔.匹配.查找及替换操作. 2 shell编程之正则表达式 ...
随机推荐
- 洛谷 P2872 [USACO07DEC]道路建设Building Roads
题目描述 Farmer John had just acquired several new farms! He wants to connect the farms with roads so th ...
- Servlet和JSP之标签文件学习
在上一篇文章中介绍了自定义标签的用法,接下来介绍标签文件的用法啦. tag file指令 tag file简介 用tag file的方式,无需编写标签处理类和标签库描述文件,也可以自定义标签.tag ...
- java多线程---ReentrantLock源码分析
ReentrantLock源码分析 基础知识复习 synchronized和lock的区别 synchronized是非公平锁,无法保证线程按照申请锁的顺序获得锁,而Lock锁提供了可选参数,可以配置 ...
- Freemarker入门小案例(生成静态网页的其中一种方式)
其实生成静态网页的方式有好多种,我昨天看了一下,Freemarker是其中一种,但是Freemarker现在我们都用得比较少了,现在用得ActiveMQ用来发送信息到静态页面,不过想了一下这个小东西, ...
- CPP-基础:C++中为什么需要一个头文件,一个cpp文件
把文件分成头文件和源文件完全是为了方便扩展和组织程序 这么说吧 我们可能会自定义很多函数 而这些函数分别会在不同的地方被调用 甚至有些时候我们需要把一堆函数打包起来一起调用 比如#include &q ...
- ASP.NET 开发人员不必担心 Node 的五大理由
哦别误会……我真的很喜欢 Node,而且我觉得它提出的概念和模式将在很长一段时间内,对服务端 Web 编程产生深远的影响.即使随着时间的推移 Node 过气了,我们肯定可以从下一个牛逼玩意身上或多或少 ...
- Leetcode 9 回文数Palindrome Number
判断一个整数是否是回文数.回文数是指正序(从左向右)和倒序(从右向左)读都是一样的整数. 示例 1: 输入: 121 输出: true 示例 2: 输入: -121 输出: false 解释: 从左向 ...
- Django项目部署:使用uwsgi和nginx的方式
一.背景 前两天制作的个人博客网站基本完工,大致功能具备.但是在部署环节却也处处碰壁,这里也来总结以下,以备将来不时查看以及完善. 二.前提 2.1 需要的知识 django Django是一个基于p ...
- ps命令查看子进程
[root@centos7 log]# ps -f -e -o pid,ppid,pgid,comm PID PPID PGID COMMAND 5070 5068 5070 bash 7169 50 ...
- Java测试技巧
快捷键 修改快捷键 window->preference->general->keys: 查找引用:ctrl+shift+g 覆盖测试:alt+shift+E,T 复制一行:ctrl ...