Linux监控平台搭建
Linux监控平台介绍

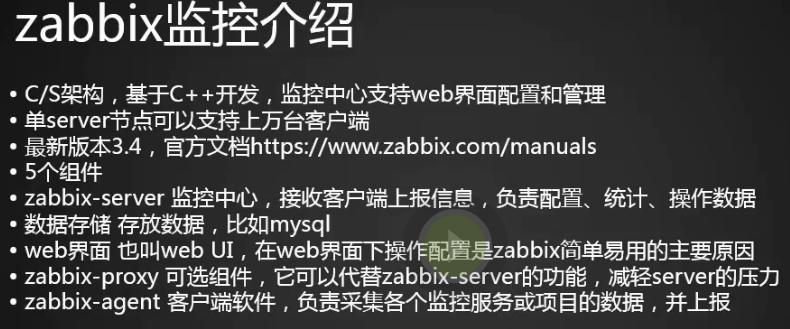
zabbix监控介绍
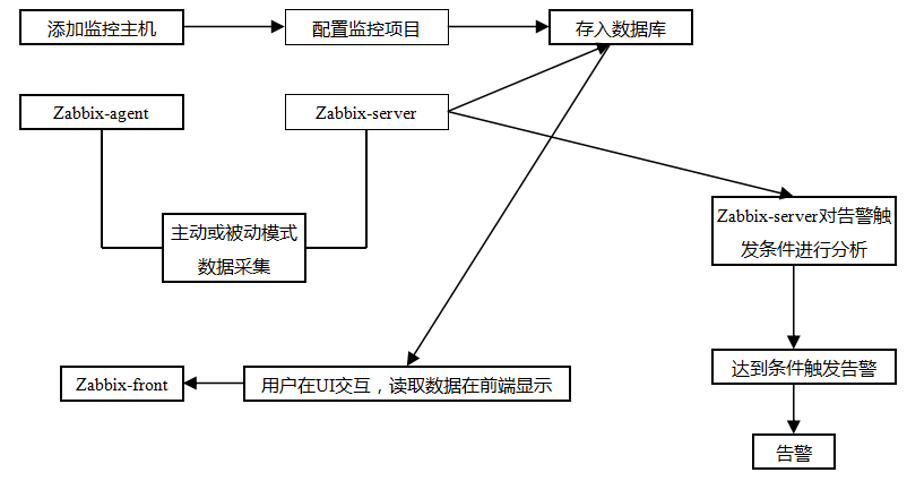
zabbix监控流程图
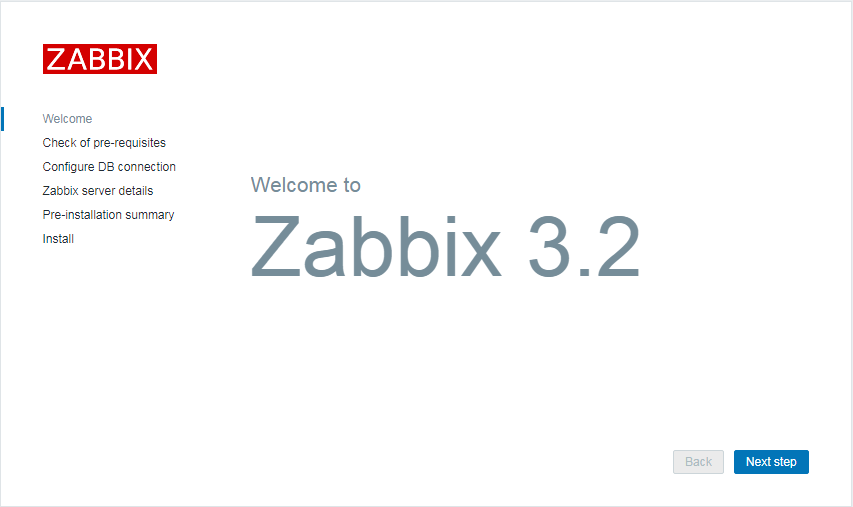
安装zabbix

准备两台主机:
zabbix服务端:192.168.133.88
zabbix客户端:192.168.133.66
我们epl的yum仓库里存放的zabbix的版本较低,所以我们先搭建一个zabbix的yum仓库,服务端和客户端上都要做这个步骤。
1.下载zabbix yum包地址https://www.zabbix.com/download?zabbix=3.2&os_distribution=centos&os_version=7&db=MySQL
2.安装完zabbix发现就是多了一个zabbix yum源
[root@centos-03 ~]# rpm -ivh http://repo.zabbix.com/zabbix/3.2/rhel/7/x86_64/zabbix-release-3.2-1.el7.noarch.rpm

获取http://repo.zabbix.com/zabbix/3.2/rhel/7/x86_64/zabbix-release-3.2-1.el7.noarch.rpm

警告:/var/tmp/rpm-tmp.OiXov8: 头V4 RSA/SHA512 Signature, 密钥 ID a14fe591: NOKEY

准备中...                          ################################# [100%]

正在升级/安装...

   1:zabbix-release-3.2-1.el7         ################################# [100%]

[root@centos-03 ~]# ls /etc/yum.repos.d/

CentOS-Base.repo       CentOS-Debuginfo.repo  CentOS-Media.repo      CentOS-Vault.repo      epel-testing.repo

CentOS-CR.repo         CentOS-fasttrack.repo  CentOS-Sources.repo    epel.repo              zabbix.repo

[root@centos-03 ~]# ls /etc/yum.repos.d/
3.有了这个源之后就可以安装zabbix了
服务端
[root@centos-02 ~]# yum install -y zabbix-agent zabbix-get zabbix-server-mysql zabbix-web zabbix-web-mysql
zabbix-agent:zabbix客户端软件

zabbix-get:服务端的一个应用工具,通过命令行的形式,获得客户端的某些监控项目数据

zabbix-server-mysql:一些和mysql相关的文件

zabbix-web:web界面

zabbix-web-mysql:web还要和mysql打交道,一些MySQL和web的文件
客户端
[root@centos-03 /]# yum install -y zabbix-agent
客户端只需要安装zabbix-agent就可以了
两台机子如果MySQL没有安装,参照之前lamp章节的安装
启动mysql如果失败查看mysql错误日志文件提示不能read-write可能是因为数据库文件目录/data/mysql的权限是root需要改成mysql
chown -R mysql:mysql /data/mysql/
yum安装mysql
安装前看是否安装过mysql,
yum list installed mysql*
如果有就用yum remove卸载mysql
查看yum库下是否有mysql-server
yum list | grep mysql 或 yum -y list mysql*
如果没有(一般在centos7下没有)
wget http://repo.mysql.com/mysql-community-release-el7-5.noarch.rpm
rpm -ivh mysql-community-release-el7-5.noarch.rpm
然后安装mysql
yum install mysql-server
yum install mysql-devel
如果有mysql-server,则按下面步骤
安装mysql客户端:
[root@centos-03 /]# rpm -ivh http://repo.mysql.com/mysql-community-release-el7-5.noarch.rpm

获取http://repo.mysql.com/mysql-community-release-el7-5.noarch.rpm

准备中...                          ################################# [100%]

正在升级/安装...

   1:mysql-community-release-el7-5    ################################# [100%]

[root@centos-03 /]# yum install -y mysql-server

[root@centos-03 /]# yum install -y mysql-devel

[root@centos-03 /]# service mysqld start

Redirecting to /bin/systemctl start  mysqld.service

[root@centos-03 /]# mysql -uroot -p

Enter password: 直接回车
[root@centos-02 mysql]# ps aux|grep mysqld

mysql      3276  0.0  0.1 113256  1556 ?        Ss   16:44   0:00 /bin/sh /usr/bin/mysqld_safe --basedir=/usr

mysql      3443  0.7 11.9 961120 119848 ?       Sl   16:44   0:11 /usr/sbin/mysqld --basedir=/usr --datadir=/var/lib/mysql --plugin-dir=/usr/lib64/mysql/plugin --log-error=/var/log/mysqld.log --pid-file=/var/run/mysqld/mysqld.pid --socket=/var/lib/mysql/mysql.sock

root       3515  0.0  0.0 112664   932 pts/0    S+   17:09   0:00 grep --color=auto mysqld

[root@centos-02 mysql]#
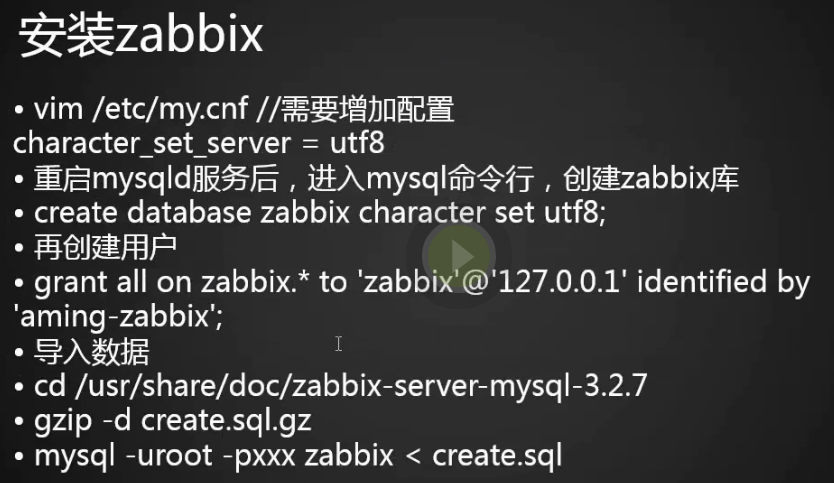
1.编辑mysql的配置文件设置默认字符集
[root@centos-02 mysql]# vim /etc/my.cnf

[root@centos-02 mysql]#

character_set_server = utf8       (设置字符级,不设置的话,web界面设置中文可能会出现乱码)
2.重启mysql,创建zabbix库在服务端的MySQL上创建zabbix的库和用户,用户是需要php代码连接mysql,zabbix-server也是需要链接的
[root@centos-02 mysql]# service mysqld restart

Redirecting to /bin/systemctl restart  mysqld.service

[root@centos-02 mysql]# mysql -uroot -p

Enter password:

Welcome to the MySQL monitor.  Commands end with ; or \g.

Your MySQL connection id is 2

Server version: 5.6.39 MySQL Community Server (GPL)

Copyright (c) 2000, 2018, Oracle and/or its affiliates. All rights reserved.

Oracle is a registered trademark of Oracle Corporation and/or its

affiliates. Other names may be trademarks of their respective

owners.

Type 'help;' or '\h' for help. Type '\c' to clear the current input statement.

mysql>
mysql> create database zabbix character set utf8;

Query OK, 1 row affected (0.01 sec)

mysql> grant all on zabbix.* to 'zabbix'@'127.0.0.1' identified by 'zabbix';

Query OK, 0 rows affected (0.10 sec)

mysql> quit;

Bye

[root@centos-02 mysql]#
3.导入一些原始的数据,没有这些数据,zabbix没办法工作
[root@centos-02 mysql]# cd /usr/share/doc/zabbix-server-mysql-3.2.11/

[root@centos-02 mysql]# cd /usr/share/doc/zabbix-server-mysql-3.2.11/

[root@centos-02 zabbix-server-mysql-3.2.11]# ls

AUTHORS  ChangeLog  COPYING  create.sql.gz  NEWS  README

[root@centos-02 zabbix-server-mysql-3.2.11]# gzip -d create.sql.gz

[root@centos-02 zabbix-server-mysql-3.2.11]# ls

AUTHORS  ChangeLog  COPYING  create.sql  NEWS  README

[root@centos-02 zabbix-server-mysql-3.2.11]# mysql -uroot -p zabbix < create.sql

Enter password:

[root@centos-02 zabbix-server-mysql-3.2.11]#
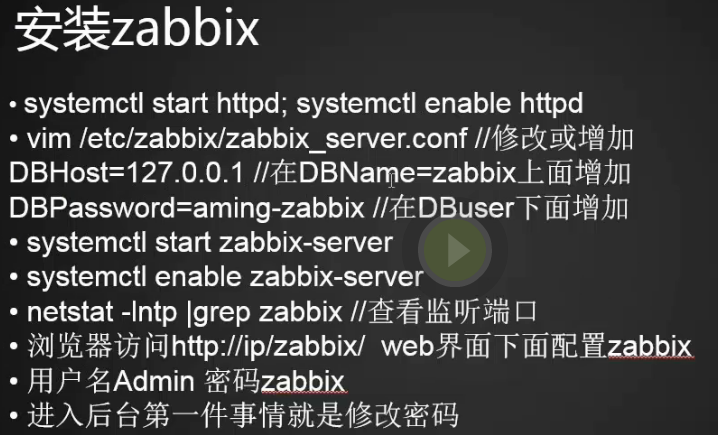
4.启动zabbix和httpd服务,再启动httpd前,先看一下有没有启动nginx服务,如果有的话需要停掉
[root@centos-02 zabbix-server-mysql-3.2.11]# systemctl start zabbix-server

[root@centos-02 zabbix-server-mysql-3.2.11]#
[root@centos-02 zabbix-server-mysql-3.2.11]# ps aux|grep nginx

root       3793  4.0  0.0 112664   932 pts/0    S+   17:43   0:00 grep --color=auto nginx

[root@centos-02 zabbix-server-mysql-3.2.11]# /etc/init.d/nginx stop
[root@centos-02 zabbix-server-mysql-3.2.11]# netstat -lntp

Active Internet connections (only servers)

Proto Recv-Q Send-Q Local Address           Foreign Address         State       PID/Program name

tcp        0      0 0.0.0.0:22              0.0.0.0:*               LISTEN      871/sshd

tcp        0      0 127.0.0.1:25            0.0.0.0:*               LISTEN      1320/master

tcp6       0      0 :::3306                 :::*                    LISTEN      3734/mysqld

tcp6       0      0 :::22                   :::*                    LISTEN      871/sshd

tcp6       0      0 ::1:25                  :::*                    LISTEN      1320/master

[root@centos-02 zabbix-server-mysql-3.2.11]#
5.启动http服务
[root@centos-02 zabbix-server-mysql-3.2.11]# systemctl start httpd

[root@centos-02 zabbix-server-mysql-3.2.11]# netstat -lntp

Active Internet connections (only servers)

Proto Recv-Q Send-Q Local Address           Foreign Address         State       PID/Program name

tcp        0      0 0.0.0.0:22              0.0.0.0:*               LISTEN      871/sshd

tcp        0      0 127.0.0.1:25            0.0.0.0:*               LISTEN      1320/master

tcp6       0      0 :::3306                 :::*                    LISTEN      3734/mysqld

tcp6       0      0 :::80                   :::*                    LISTEN      3817/httpd

tcp6       0      0 :::22                   :::*                    LISTEN      871/sshd

tcp6       0      0 ::1:25                  :::*                    LISTEN      1320/master

[root@centos-02 zabbix-server-mysql-3.2.11]#
6.如果要开启启动,需要添加到服务的启动列表里
[root@centos-02 zabbix-server-mysql-3.2.11]# systemctl enable httpd

Created symlink from /etc/systemd/system/multi-user.target.wants/httpd.service to /usr/lib/systemd/system/httpd.service.

[root@centos-02 zabbix-server-mysql-3.2.11]# systemctl enable zabbix-server

Created symlink from /etc/systemd/system/multi-user.target.wants/zabbix-server.service to /usr/lib/systemd/system/zabbix-server.service.

[root@centos-02 zabbix-server-mysql-3.2.11]# systemctl disable nginx^C

[root@centos-02 zabbix-server-mysql-3.2.11]# chkconfig nginx off^C

[root@centos-02 zabbix-server-mysql-3.2.11]# ps aux|grep zabbix

zabbix     4039  1.0  0.0      0     0 ?        Zs   18:14   0:00 [zabbix_server] <defunct>

zabbix     4040  2.0  0.0      0     0 ?        Z    18:14   0:00 [zabbix_server] <defunct>

root       4042  1.0  0.0 112664   932 pts/0    R+   18:14   0:00 grep --color=auto zabbix
7.没有zabbix的服务
[root@centos-02 ~]# netstat -nvlt

Active Internet connections (only servers)

Proto Recv-Q Send-Q Local Address           Foreign Address         State

tcp        0      0 0.0.0.0:22              0.0.0.0:*               LISTEN

tcp        0      0 127.0.0.1:25            0.0.0.0:*               LISTEN

tcp6       0      0 :::3306                 :::*                    LISTEN

tcp6       0      0 :::80                   :::*                    LISTEN

tcp6       0      0 :::22                   :::*                    LISTEN

tcp6       0      0 ::1:25                  :::*                    LISTEN

[root@centos-02 ~]#
8.我们启动了zabbix,用ps发现进程在,但是用natstat查看,没有zabbix的端口,是因为没有连接MySQL,需要配置zabbix的配置文件
[root@centos-02 ~]# less /var/log/zabbix/zabbix_server.log (这是zabbix的日志文件)
9.编辑配置文件
[root@centos-02 ~]# vim /etc/zabbix/zabbix_server.conf

DBHost=127.0.0.1  (搜索DBHost,指定数据库所在机器的IP,不是创建用户时的来源ip)
默认DBname=zabbix               (数据库名字)
DBuser=zabbix                 (登录数据库的用户名)
DBPassword=zabbix (这个密码是授权时候设置的密码,登录数据库的密码)
10.重启zabbix_server服务,查看zabbix服务
[root@centos-02 ~]# systemctl restart zabbix-server

[root@centos-02 ~]# ps aux|grep zabbix

zabbix     6430  0.1  0.3 183380  3916 ?        S    21:52   0:00 /usr/sbin/zabbix_server -c /etc/zabbix/zabbix_server.conf

zabbix     6432  0.2  0.3 183388  3244 ?        S    21:52   0:01 /usr/sbin/zabbix_server: configuration syncer [synced configuration in 0.090700 sec, idle 60 sec]

zabbix     6433  0.0  0.2 183380  2992 ?        S    21:52   0:00 /usr/sbin/zabbix_server: db watchdog [synced alerts config in 0.092265 sec, idle 60 sec]

zabbix     6434  0.0  0.5 290300  5348 ?        S    21:52   0:00 /usr/sbin/zabbix_server: poller #1 [got 0 values in 0.000040 sec, idle 5 sec]

zabbix     6435  0.1  0.5 290300  5348 ?        S    21:52   0:00 /usr/sbin/zabbix_server: poller #2 [got 0 values in 0.000094 sec, idle 5 sec]

zabbix     6436  0.1  0.5 290300  5348 ?        S    21:52   0:00 /usr/sbin/zabbix_server: poller #3 [got 0 values in 0.000038 sec, idle 5 sec]

zabbix     6437  0.1  0.5 290300  5348 ?        S    21:52   0:00 /usr/sbin/zabbix_server: poller #4 [got 0 values in 0.000040 sec, idle 5 sec]
[root@centos-02 ~]# netstat -lntp

Active Internet connections (only servers)

Proto Recv-Q Send-Q Local Address           Foreign Address         State       PID/Program name

tcp        0      0 0.0.0.0:22              0.0.0.0:*               LISTEN      871/sshd

tcp        0      0 127.0.0.1:25            0.0.0.0:*               LISTEN      1320/master

tcp        0      0 0.0.0.0:10051           0.0.0.0:*               LISTEN      6430/zabbix_server

tcp6       0      0 :::3306                 :::*                    LISTEN      3734/mysqld

tcp6       0      0 :::80                   :::*                    LISTEN      3817/httpd

tcp6       0      0 :::22                   :::*                    LISTEN      871/sshd

tcp6       0      0 ::1:25                  :::*                    LISTEN      1320/master

tcp6       0      0 :::10051                :::*                    LISTEN      6430/zabbix_server

[root@centos-02 ~]#
11.配置web界面,直接访问服务端主机名加zabbix。例如(192.168.133.88/zabbix),如果不能访问可能是iptables防火墙没关闭
12.点next step 我们发现只有这一行是错误的
PHP option "date.timezone"unknown
Fail
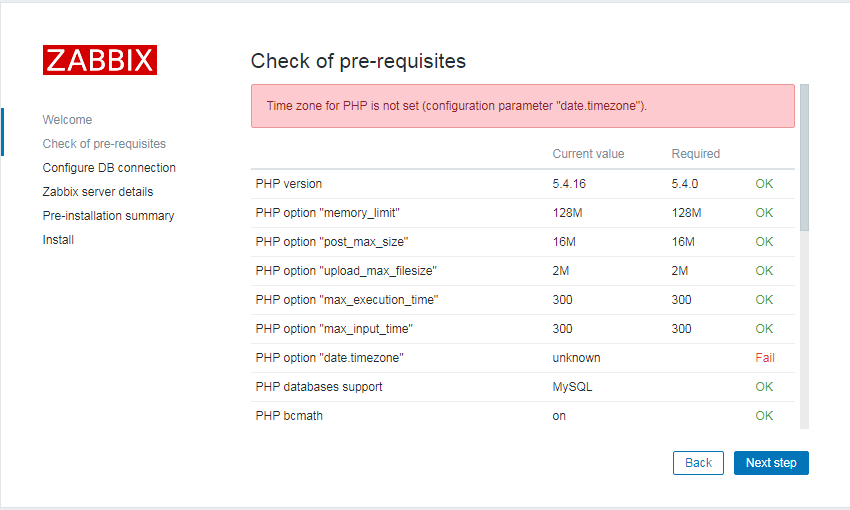
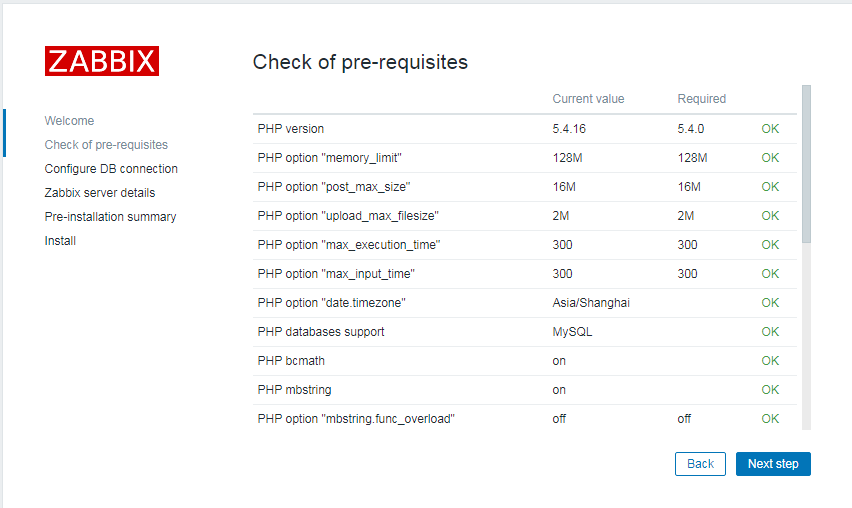
13.编辑php配置文件设置时区为Asia/Shanghai,重启httpd服务
[root@centos-02 ~]# vim /etc/php.ini

[root@centos-02 ~]#

date.timezone = Asia/Shanghai

[root@centos-02 ~]# systemctl restart httpd
14.刷新页面,变成ok了
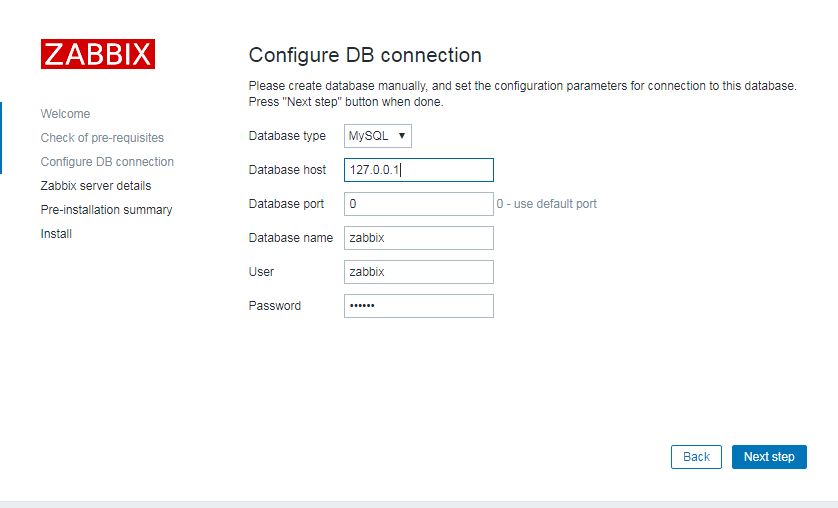
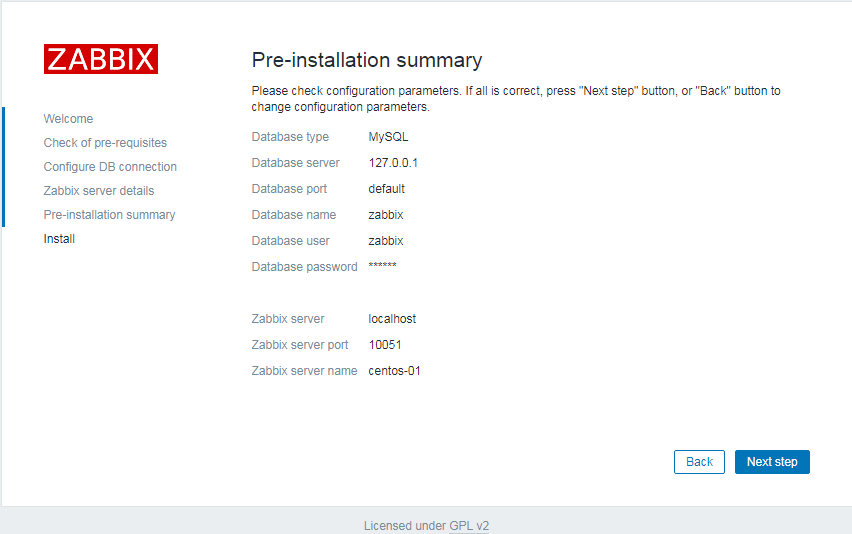
15.继续web界面的下一步(也就是MySQL的界面了)
port端口号:3360
密码写在数据库中创建用户的密码。
如果显示sock文件不存在,则把用户改成127.0.0.1
16.定义zabbix server的界面
自定义Name
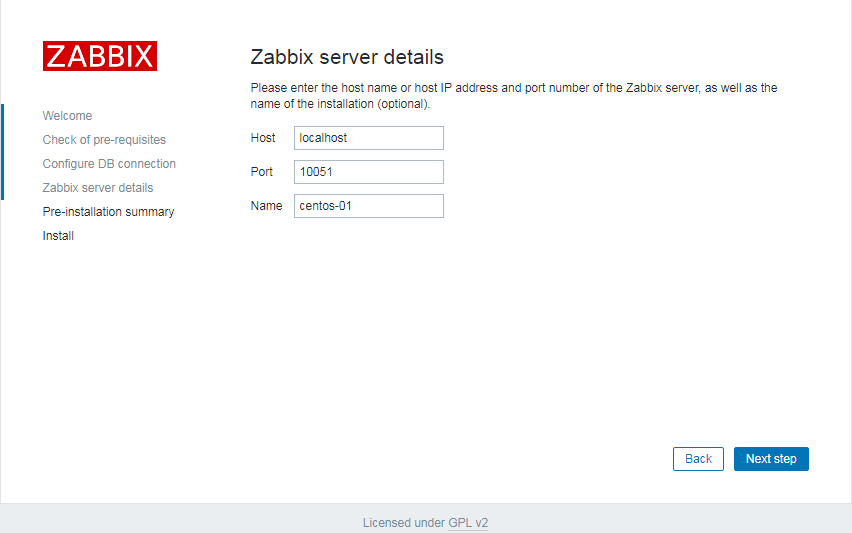
17.继续下一步
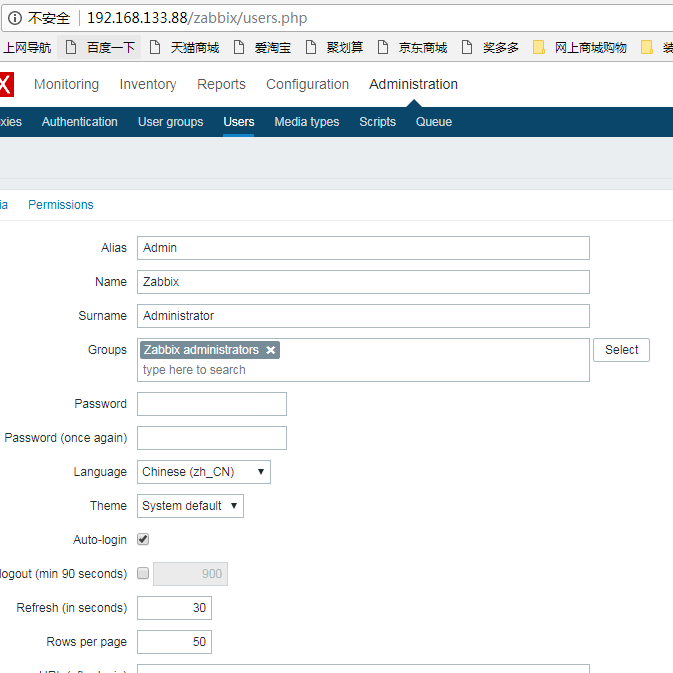
18、登录zabbix
(一)默认用户为admin
默认登陆密码为zabbix
19.修改密码,设置语言
忘记Admin密码如何做

[root@centos-02 ~]# mysql -uroot -p

Enter password:

Welcome to the MySQL monitor.  Commands end with ; or \g.

Your MySQL connection id is 696

Server version: 5.6.39 MySQL Community Server (GPL)

Copyright (c) 2000, 2018, Oracle and/or its affiliates. All rights reserved.

Oracle is a registered trademark of Oracle Corporation and/or its

affiliates. Other names may be trademarks of their respective

owners.

Type 'help;' or '\h' for help. Type '\c' to clear the current input statement.

mysql> use zabbix;

Reading table information for completion of table and column names

You can turn off this feature to get a quicker startup with -A

Database changed

mysql>
mysql> show tables;

+----------------------------+

| Tables_in_zabbix           |

+----------------------------+

| acknowledges               |

| actions                    |

| alerts                     |

| application_discovery      |

| application_prototype      |

| application_template       |

| applications               |

| auditlog                   |

| auditlog_details           |

| autoreg_host               |

| conditions                 |

| config                     |

| corr_condition             |

| corr_condition_group       |

| corr_condition_tag         |

| corr_condition_tagpair     |

| corr_condition_tagvalue    |

| corr_operation             |

| correlation                |

| dbversion                  |

| dchecks                    |

| dhosts                     |

| drules                     |

| dservices                  |

| escalations                |

| event_recovery             |

| event_tag                  |

| events                     |

| expressions                |

| functions                  |

| globalmacro                |

| globalvars                 |

| graph_discovery            |

| graph_theme                |

| graphs                     |

| graphs_items               |

| group_discovery            |

| group_prototype            |

| groups                     |

| history                    |

| history_log                |

| history_str                |

| history_text               |

| history_uint               |

| host_discovery             |

| host_inventory             |

| hostmacro                  |

| hosts                      |

| hosts_groups               |

| hosts_templates            |

| housekeeper                |

| httpstep                   |

| httpstepitem               |

| httptest                   |

| httptestitem               |

| icon_map                   |

| icon_mapping               |

| ids                        |

| images                     |

| interface                  |

| interface_discovery        |

| item_application_prototype |

| item_condition             |

| item_discovery             |

| items                      |

| items_applications         |

| maintenances               |

| maintenances_groups        |

| maintenances_hosts         |

| maintenances_windows       |

| mappings                   |

| media                      |

| media_type                 |

| opcommand                  |

| opcommand_grp              |

| opcommand_hst              |

| opconditions               |

| operations                 |

| opgroup                    |

| opinventory                |

| opmessage                  |

| opmessage_grp              |

| opmessage_usr              |

| optemplate                 |

| problem                    |

| problem_tag                |

| profiles                   |

| proxy_autoreg_host         |

| proxy_dhistory             |

| proxy_history              |

| regexps                    |

| rights                     |

| screen_user                |

| screen_usrgrp              |

| screens                    |

| screens_items              |

| scripts                    |

| service_alarms             |

| services                   |

| services_links             |

| services_times             |

| sessions                   |

| slides                     |

| slideshow_user             |

| slideshow_usrgrp           |

| slideshows                 |

| sysmap_element_url         |

| sysmap_url                 |

| sysmap_user                |

| sysmap_usrgrp              |

| sysmaps                    |

| sysmaps_elements           |

| sysmaps_link_triggers      |

| sysmaps_links              |

| task                       |

| task_close_problem         |

| timeperiods                |

| trends                     |

| trends_uint                |

| trigger_depends            |

| trigger_discovery          |

| trigger_tag                |

| triggers                   |

| users                      |

| users_groups               |

| usrgrp                     |

| valuemaps                  |

+----------------------------+

127 rows in set (0.01 sec)

mysql> desc users

    -> ;

+----------------+---------------------+------+-----+---------+-------+

| Field          | Type                | Null | Key | Default | Extra |

+----------------+---------------------+------+-----+---------+-------+

| userid         | bigint(20) unsigned | NO   | PRI | NULL    |       |

| alias          | varchar(100)        | NO   | UNI |         |       |

| name           | varchar(100)        | NO   |     |         |       |

| surname        | varchar(100)        | NO   |     |         |       |

| passwd         | char(32)            | NO   |     |         |       |

| url            | varchar(255)        | NO   |     |         |       |

| autologin      | int(11)             | NO   |     | 0       |       |

| autologout     | int(11)             | NO   |     | 900     |       |

| lang           | varchar(5)          | NO   |     | en_GB   |       |

| refresh        | int(11)             | NO   |     | 30      |       |

| type           | int(11)             | NO   |     | 1       |       |

| theme          | varchar(128)        | NO   |     | default |       |

| attempt_failed | int(11)             | NO   |     | 0       |       |

| attempt_ip     | varchar(39)         | NO   |     |         |       |

| attempt_clock  | int(11)             | NO   |     | 0       |       |

| rows_per_page  | int(11)             | NO   |     | 50      |       |

+----------------+---------------------+------+-----+---------+-------+

16 rows in set (0.26 sec)

mysql>
mysql> update users set passwd=md5('admin888') where alias='admin';

Query OK, 0 rows affected (0.25 sec)

Rows matched: 1  Changed: 0  Warnings: 0

mysql> select * from users;

+--------+-------+--------+---------------+----------------------------------+-----+-----------+------------+-------+---------+------+---------+----------------+------------+---------------+---------------+

| userid | alias | name   | surname       | passwd                           | url | autologin | autologout | lang  | refresh | type | theme   | attempt_failed | attempt_ip | attempt_clock | rows_per_page |

+--------+-------+--------+---------------+----------------------------------+-----+-----------+------------+-------+---------+------+---------+----------------+------------+---------------+---------------+

|      1 | Admin | Zabbix | Administrator | 7fef6171469e80d32c0559f88b377245 |     |         1 |          0 | zh_CN |      30 |    3 | default |              0 |            |             0 |            50 |

|      2 | guest |        |               | d41d8cd98f00b204e9800998ecf8427e |     |         0 |        900 | en_GB |      30 |    1 | default |              0 |            |             0 |            50 |

+--------+-------+--------+---------------+----------------------------------+-----+-----------+------------+-------+---------+------+---------+----------------+------------+---------------+---------------+

2 rows in set (0.00 sec)

mysql>
安装zabbix(下)
 1.
1.
1.安装yum源
[root@centos-03 ~]# rpm -ivh http://repo.mysql.com/mysql-community-release-el7-5.noarch.rpm
[root@centos-03 ~]# yum install -y zabbix-agent
2.编辑配置文件,在客户端上需要指定服务端的ip,(主动被动一起开启会比较好)
[root@centos-03 ~]# vim /etc/zabbix/zabbix_agentd.conf
Server=192.168.133.88 (被动模式):等待服务端来取数据
ServerActive=192.168.133.88 (主动模式):主动上报数据
Hostname=centos-03 (不能随便写,要写能够识别的主机名)
[root@centos-03 ~]# systemctl start zabbix-agent

[root@centos-03 ~]# ps aux|grep zabbix

zabbix     3377  0.9  0.1  80592  1276 ?        S    23:29   0:00 /usr/sbin/zabbix_agentd -c /etc/zabbix/zabbix_agentd.conf

zabbix     3378  0.1  0.1  80592  1284 ?        S    23:29   0:00 /usr/sbin/zabbix_agentd: collector [idle 1 sec]

zabbix     3379  0.0  0.1  80592  1840 ?        S    23:29   0:00 /usr/sbin/zabbix_agentd: listener #1 [waiting for connection]

zabbix     3380  0.0  0.1  80592  1840 ?        S    23:29   0:00 /usr/sbin/zabbix_agentd: listener #2 [waiting for connection]

zabbix     3381  0.0  0.1  80592  1840 ?        S    23:29   0:00 /usr/sbin/zabbix_agentd: listener #3 [waiting for connection]

zabbix     3382  0.1  0.2  80592  2124 ?        S    23:29   0:00 /usr/sbin/zabbix_agentd: active checks #1 [idle 1 sec]

root       3384  0.0  0.0 112664   932 pts/0    R+   23:29   0:00 grep --color=auto zabbix

[root@centos-03 ~]#
[root@centos-03 ~]# netstat -lntp

Active Internet connections (only servers)

Proto Recv-Q Send-Q Local Address           Foreign Address         State       PID/Program name

tcp        0      0 0.0.0.0:22              0.0.0.0:*               LISTEN      965/sshd

tcp        0      0 127.0.0.1:25            0.0.0.0:*               LISTEN      1402/master

tcp        0      0 0.0.0.0:10050           0.0.0.0:*               LISTEN      3377/zabbix_agentd

tcp6       0      0 :::3306                 :::*                    LISTEN      3038/mysqld

tcp6       0      0 :::22                   :::*                    LISTEN      965/sshd

tcp6       0      0 ::1:25                  :::*                    LISTEN      1402/master

tcp6       0      0 :::10050                :::*                    LISTEN      3377/zabbix_agentd

[root@centos-03 ~]#
3.加入到开机启动列表
[root@centos-03 ~]# systemctl enable zabbix-agent
主动模式和被动模式

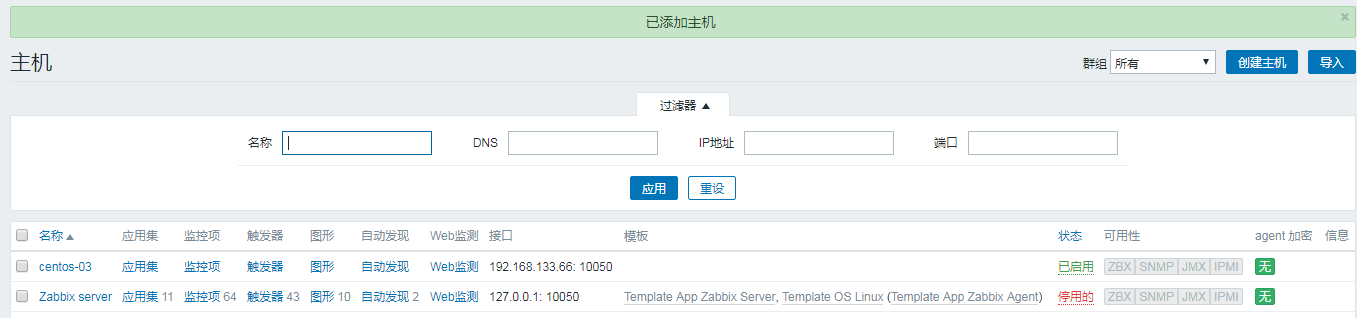
添加监控主机

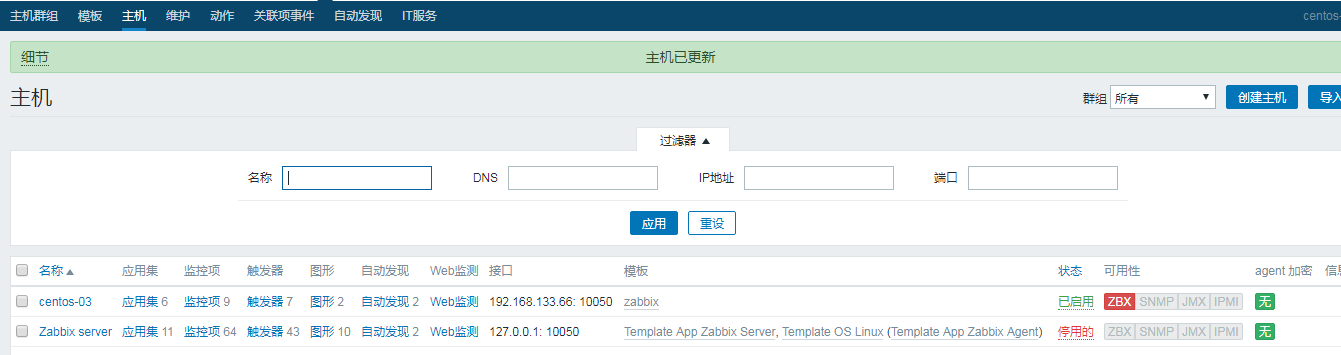
1.添加主机:在添加主机之前,我们要先添加一个主机群组,在配置中主机群组的右上角有一个创建主机群组,组名命名为zabbix,添加

2.然后再点主机,创建主机。

3.点击添加
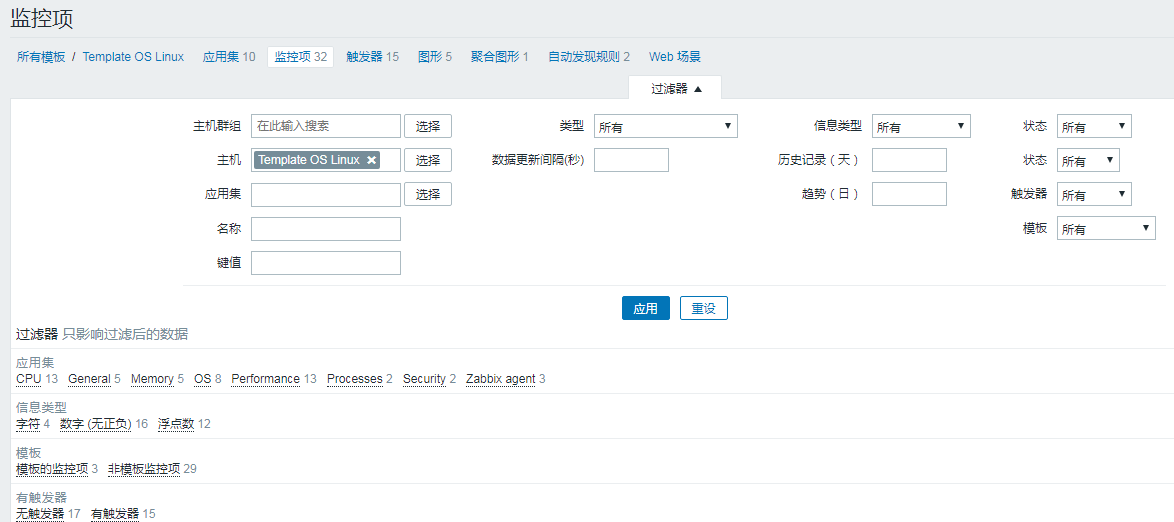
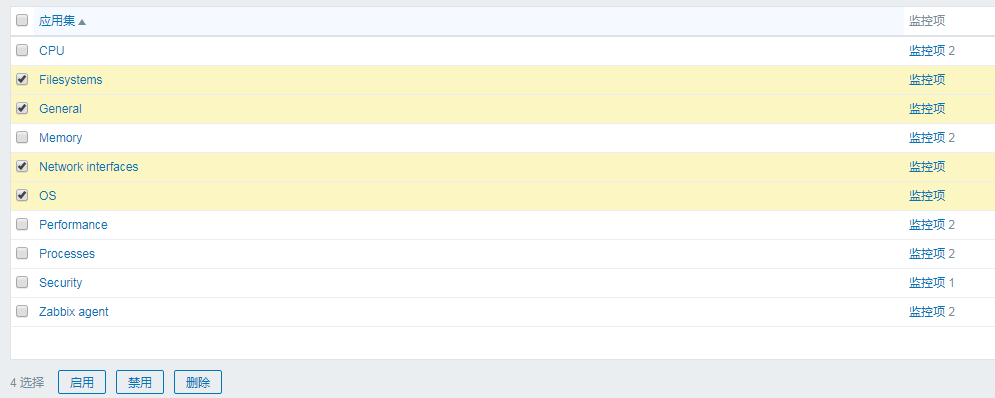
应用集;应用集就是监控项的集合,更加方便的管理监控项
监控项:每一项都是监控的数据
触发器:针对某一个监控项设置一个告警规则
图形:每一个数据zabbix都有记录,会形成一个图表
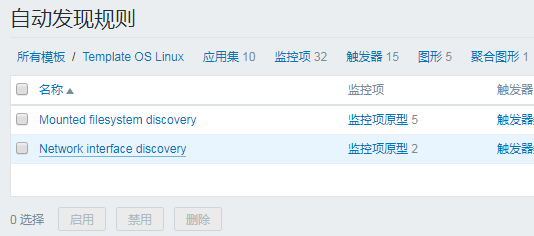
自动发现规则:自动发现的项目
web场景:监控一个网站或者一个网址。
添加自定义模板

1.可以自定义一个常用模板,方便给新增主机添加监控项目

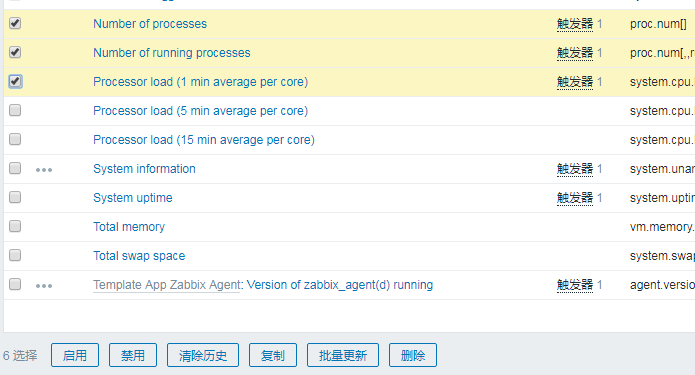
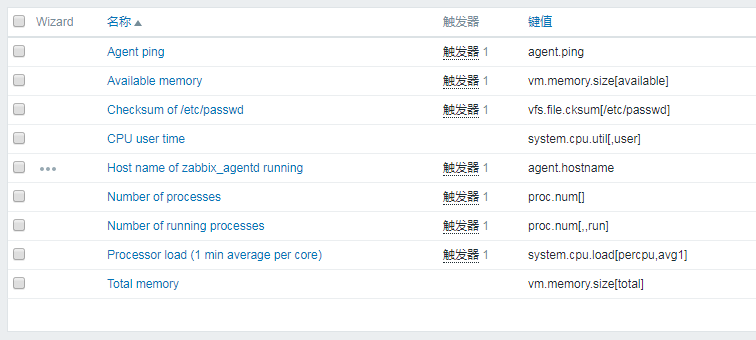
2.把其他自带模板里面的某些监控项目(比如cpu,内存等)复制到zabbix模板里


3.相同方法添加自动发现并没有复制按钮。
4.解决方法有两个:
一个是导出模板,生成了一个xml文件,将不需要的都删除,修改模板名,保留自动发现,然后导入。
二是用链接模板方式,详情见下文
5.删除刚刚导入的6项监控项,

6.选择链接的模板,点击添加,然后点更新

7.如图发现选项有点多,可以删除些选项

8.当我们要删除监控项时,提示无法删除,因为监控项在链接的模板里,无法删除

9.我们可以点击取消链接,更新,然后再删除就可以了

10.删除的话要先取消连接,更新后先删监控项(监控项保留下面的,其他的都删除),再删应用集。
11.应用集保留监控项后面有数字的
12.图形删除

13.这样模板就建成功了

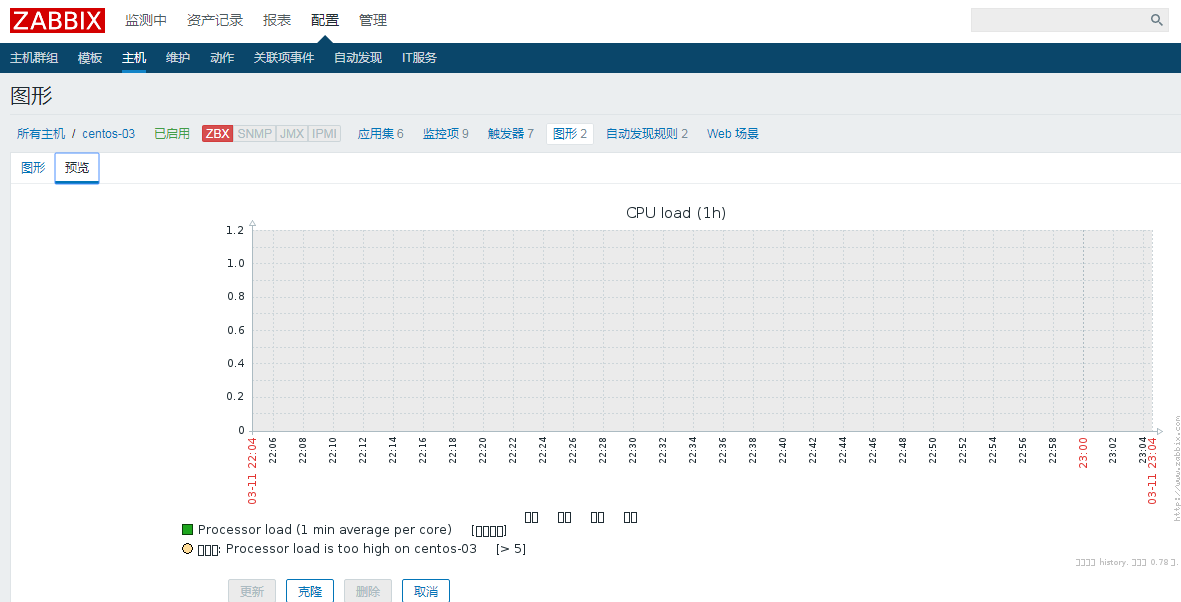
处理图形中的乱码
1.将模板和主机相连

2.更新
3.图形预览发现有乱码,这是因为在zabbix字体库中没有中文字体。需要从windows上借用一个过来。

4.查看字体存放路径
[root@centos-02 ~]# vim /usr/share/zabbix/include/defines.inc.php

[root@centos-02 ~]# ls /usr/share/zabbix/fonts/

graphfont.ttf

[root@centos-02 ~]# ls -l !$

ls -l /usr/share/zabbix/fonts/

总用量 0

lrwxrwxrwx 1 root root 33 3月  10 15:53 graphfont.ttf -> /etc/alternatives/zabbix-web-font

[root@centos-02 ~]# ls -l /etc/alternatives/zabbix-web-font

lrwxrwxrwx 1 root root 38 3月  10 15:53 /etc/alternatives/zabbix-web-font -> /usr/share/fonts/dejavu/DejaVuSans.ttf
5.从Windows上复制一个字体放到桌面,然后上传到centos-02服务器上的src目录
C:\Windows\Fonts
[root@centos-02 src]# rz

[root@centos-02 src]# ls

SIMLI.TTF

[root@centos-02 src]#
[root@centos-02 src]# mv SIMLI.TTF /usr/share/zabbix/fonts/

[root@centos-02 src]# cd !$

cd /usr/share/zabbix/fonts/

[root@centos-02 fonts]# ls

graphfont.ttf  SIMLI.TTF

[root@centos-02 fonts]# mv graphfont.ttf graphfont.ttf.bak; ln SIMLI.TTF graphfont.ttf

[root@centos-02 fonts]# ls -l

总用量 18016

-rw-r--r-- 2 root root 9223160 11月  5 2003 graphfont.ttf

lrwxrwxrwx 1 root root      33 3月  10 15:53 graphfont.ttf.bak -> /etc/alternatives/zabbix-web-font

-rw-r--r-- 2 root root 9223160 11月  5 2003 SIMLI.TTF

[root@centos-02 fonts]# rm -f graphfont.ttf

[root@centos-02 fonts]# ln -s SIMLI.TTF graphfont.ttf

[root@centos-02 fonts]# ls -l

总用量 9008

lrwxrwxrwx 1 root root       9 3月  11 23:29 graphfont.ttf -> SIMLI.TTF

lrwxrwxrwx 1 root root      33 3月  10 15:53 graphfont.ttf.bak -> /etc/alternatives/zabbix-web-font

-rw-r--r-- 1 root root 9223160 11月  5 2003 SIMLI.TTF

[root@centos-02 fonts]#
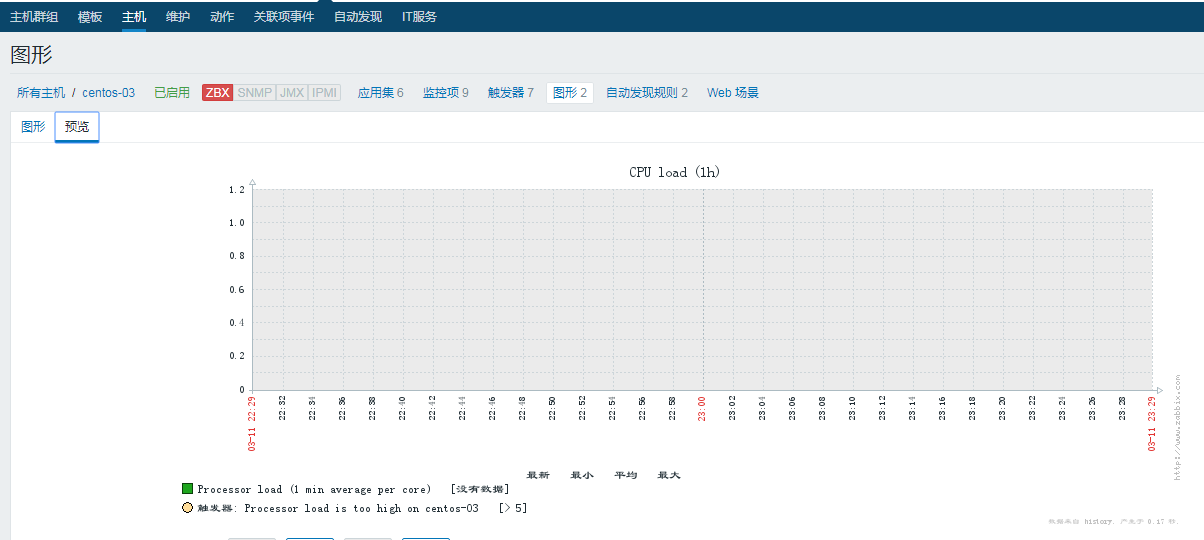
6.刷新网页,中文显示正常了
五、zabbix远程执行命令
概述
监控,有的人只把他当做报警使用,出现问题之后打开跑回家打开电脑处理掉,大多数时候都是一些已知问题,为何不让zabbix帮你把这些事情处理掉呢?
Zabbix远程执行命令可以做些什么:
1)重启应用(apache/nginx/mysql)。
2)自定义执行脚本。
3)使用IPMI接口重启服务器。
4)自动释放磁盘空间(删除老文件,清除/tmp目录等等)。
5)CPU过载时将一个虚拟机迁移到另外一个物理服务器。
6)云环境下,一台服务器CPU\硬盘\内存\其他硬件资源不足的情况下,可以自动添加过去。
Zabbix远程执行命令注意事项:
1)远程执行命令是server端向agent端执行,不支持主动模式的agent;
2)不支持代理模式;
3)zabbix用户必须对命令具有执行权限,可以使用sudo赋予root权限(配置sudo无密码方式);
4)远程命令只是执行,执行成功与否并不检测并确认,可在” Monitoring–>Events”中查看action执行时,或在”Reports–>Action log”中查看远程命令是否执行成功(成功为” Executed”)。
配置zabbix远程执行命令
创建一个报警,记得使用邮件报警吗?实际上,我们把发送邮件的操作改成执行远程命令就行了。
Zabbix agent不支持远程命令,远程命令最大长度为255字符,同时支持多个远程命令,如需要执行多条命令,只需要另起一行写命令即可,但最好自定在agent端定义一个脚本,直接让zabbix执行脚本即可。还有,远程命令可以使用宏变量。
1)配置zabbix-agent端
首先我们需要在zabbix agent端开启对远程命令的支持,修改配置文件zabbix_agentd.conf中的参数,然后重启客户端:
|
1 |
EnableRemoteCommands = 1 |
另外,在执行命令时确保你的zabbix用户有执行权限,如果某些命令需要root权限,那么请使用sudo。编辑sudoer文件,zabbix用户便可以执行nginx -s reload命令了。
|
1 2 |
zabbix ALL=NOPASSWD: ALL zabbix ALL=NOPASSWD: /etc/init.d/nginx stop,/etc/init.d/nginx start |
2)配置zabbix-server端
ConfigurationàActionsà Operation,其中operation type改成Remote Command,然后写上要在zabbix-agent执行的命令即可。如下图:
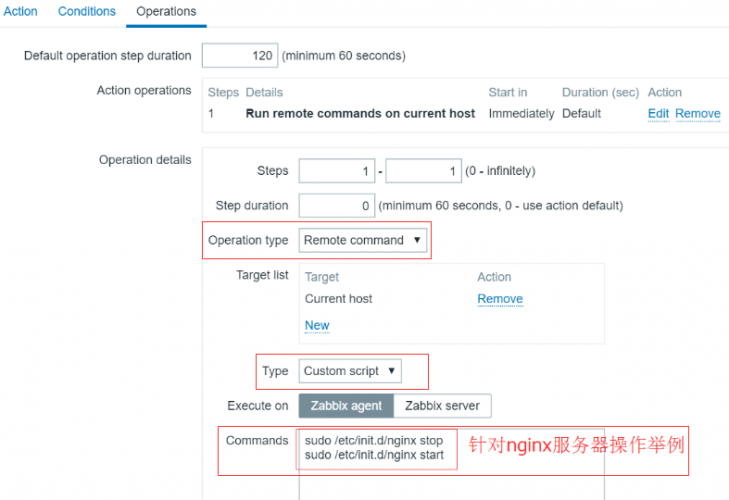
Type:IPMI、custom script、ssh、telnet、global script。
如果你要执行自定义的脚本,如下操作:
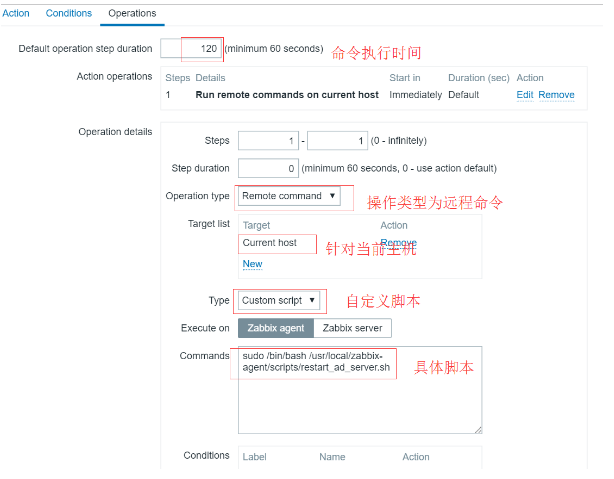
直接执行脚本即可。
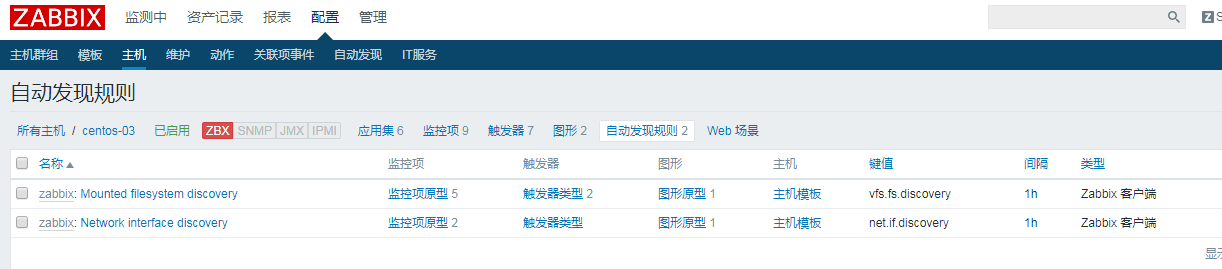
自动发现
1.修改自动发现间隔时间为60秒
 SHA
SHA
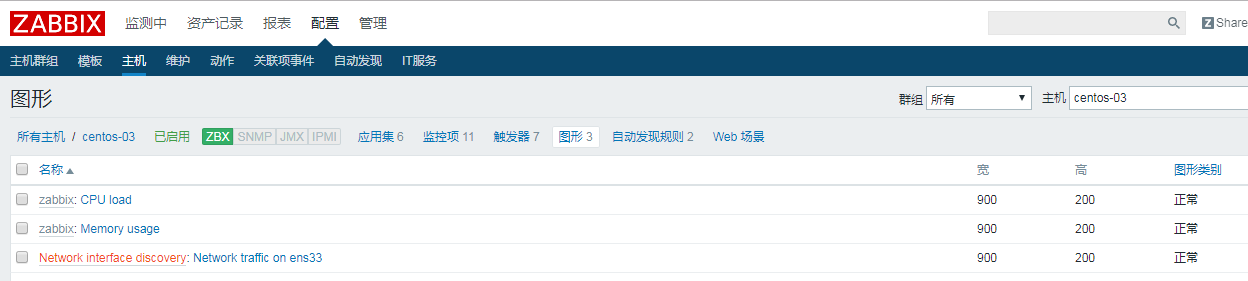
2.刷新页面图形变为3个了
3.重启下zabbix服务器和客户端,让效果更快显示
[root@centos-02 ~]# systemctl restart zabbix-server

[root@centos-02 ~]# ^C

[root@centos-02 ~]#

[root@centos-03 ~]# systemctl restart zabbix-agent

[root@centos-03 ~]#
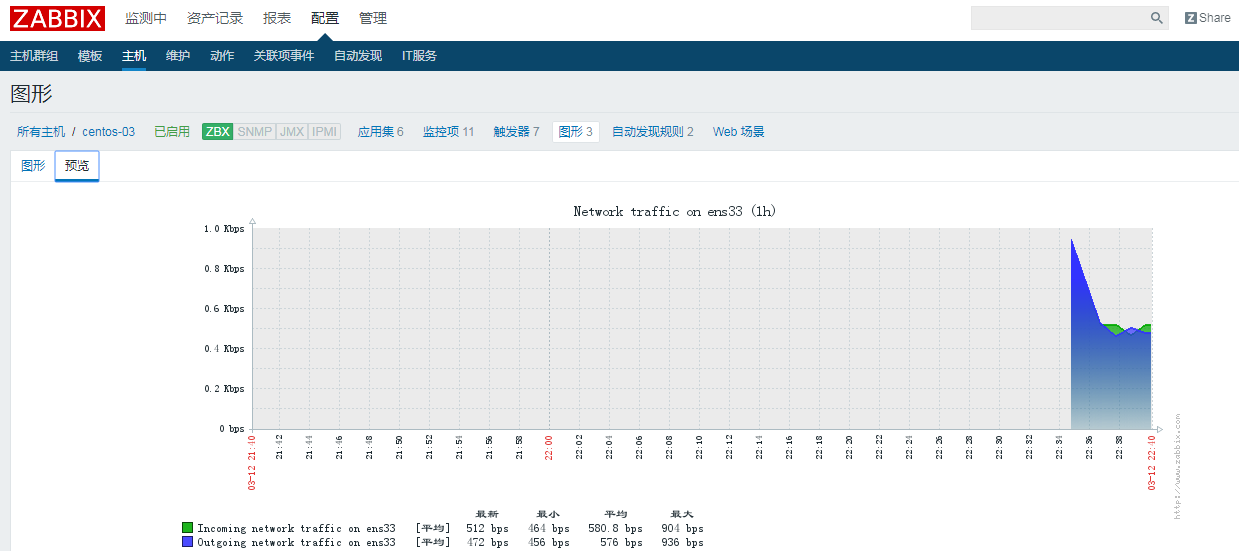
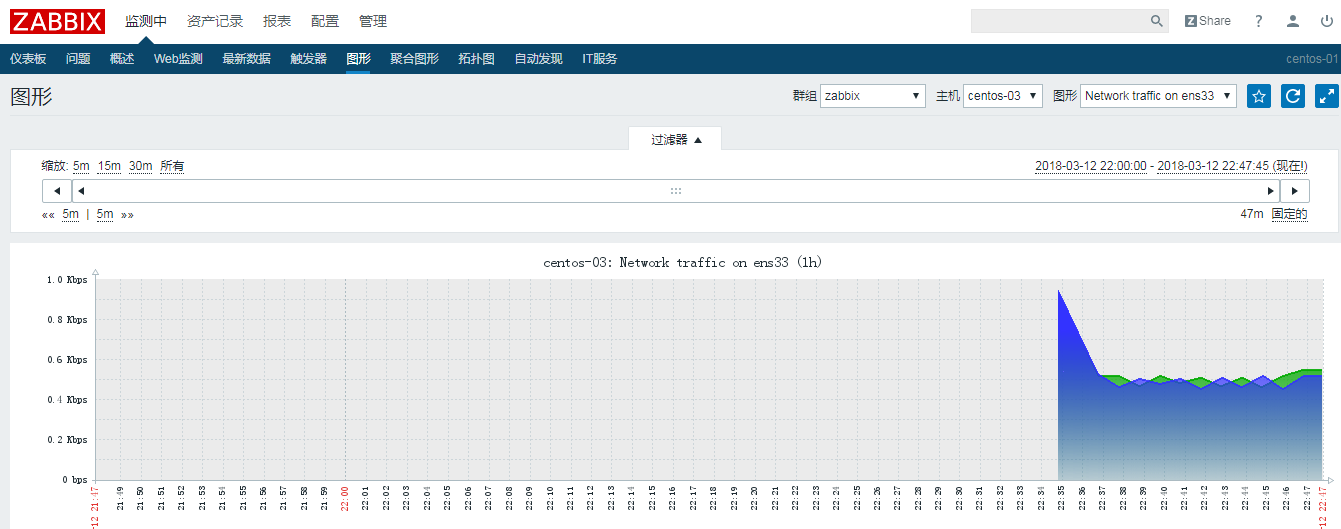
4.sar命令监测网卡流量
sar -n DEV 1 100
添加自定义监控项目
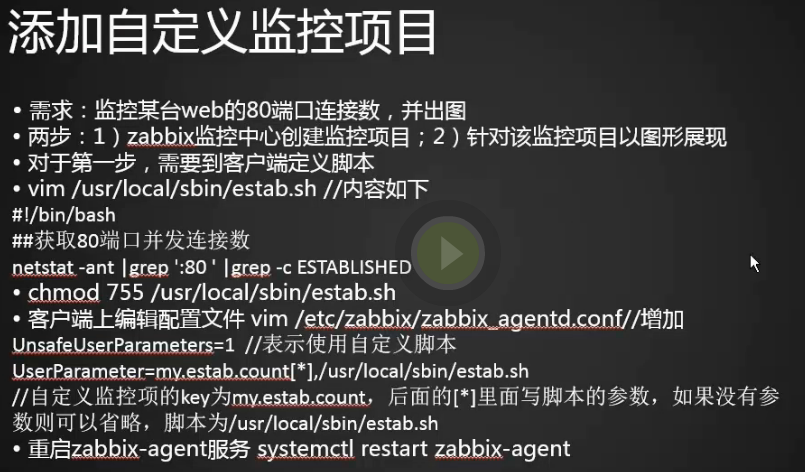
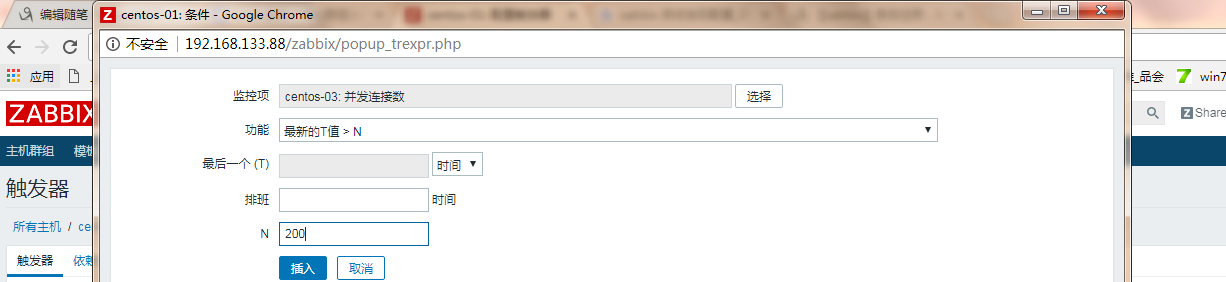
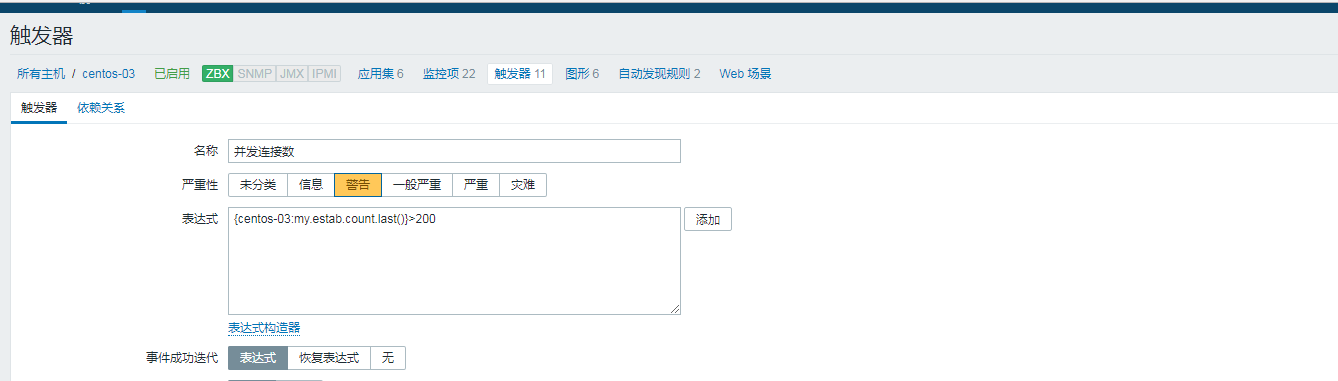
1.监控某台web的80端口连接数,并出图。
2.查看80端口的网络连接数
[root@centos-03 ~]# netstat -ant |grep ':80' |grep -c ESTABLISHED

0

[root@centos-03 ~]#
步骤:
1):zabbix监控中心创建监控项目
2):针对该监控项目以图形展现
3.编写脚本
[root@centos-02 ~]# vim /usr/local/sbin/estab.sh

[root@centos-02 ~]#

#!/bin/bash

##获取80端口并发连接数

netstat -ant |grep ':80 ' |grep -c ESTABLISHED
[root@centos-03 ~]# chmod 755 /usr/local/sbin/estab.sh
[root@centos-03 ~]# vim /etc/zabbix/zabbix_agentd.conf

[root@centos-03 ~]#

UnsafeUserParameters=1 去掉#号,并修改为1,表示开启使用自定义脚本

UserParameter=my.estab.count[*],/usr/local/sbin/estab.sh 自定义监控项的key为my.estab.count,后面的{*}里面写脚本的参数,如果没有参数可以省略,脚本为/usr/local/sbin/estab.sh
4.重启zabbix-agent服务
[root@centos-03 ~]# systemctl restart zabbix-agent

[root@centos-03 ~]#
5.验证

[root@centos-02 ~]# zabbix_get -s 192.168.133.66 -p 10050 -k 'my.estab.count'  到服务端验证,执行命令,结果返回为0,表示脚本定义成功

0

[root@centos-02 ~]#
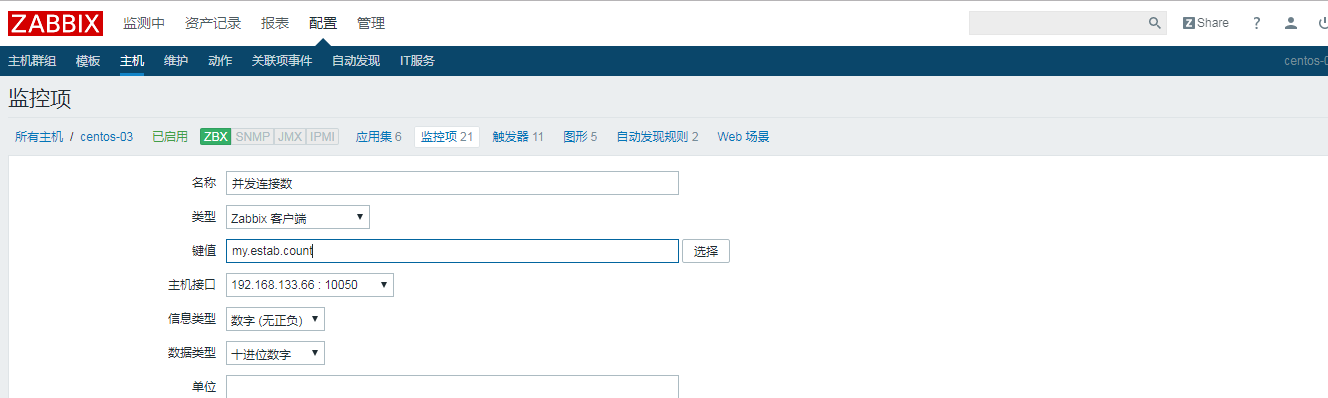
6.在zabbix监控中心(浏览器)配置增加监控项目
名称自定义
键值填写my.estab.count
历史数据保留时长 (数据存储多长时间)
趋势数据存储周期
7.还需要做一个图形

8.触发器-->创建触发器
配置邮件告警
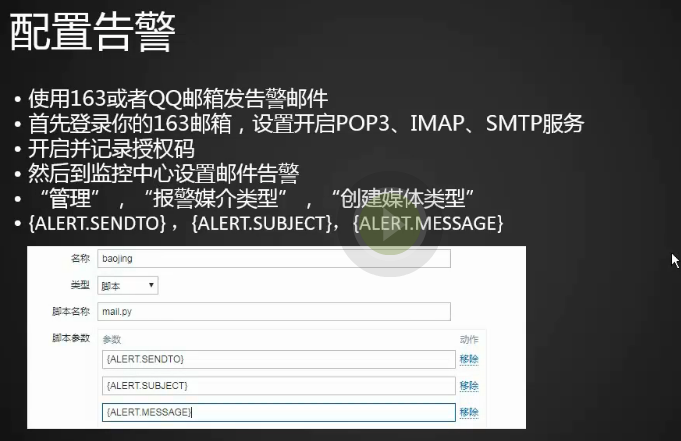
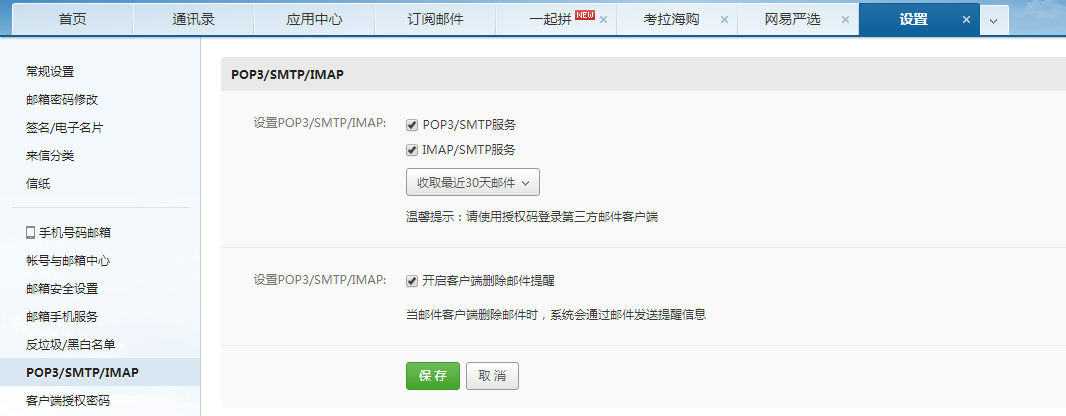
使用163或者qq邮箱发告警邮箱
因为qq邮箱有时候会收不到告警,所以我们选用163邮箱来做实验,勾选pop3设置授权码
1.在监控中心设置邮件告警
管理--> 报警没接类型-->创建媒体类型
(虽然zabbix给了我们email的模板,但是我们用python写一个脚本,用脚本的形式来实现)
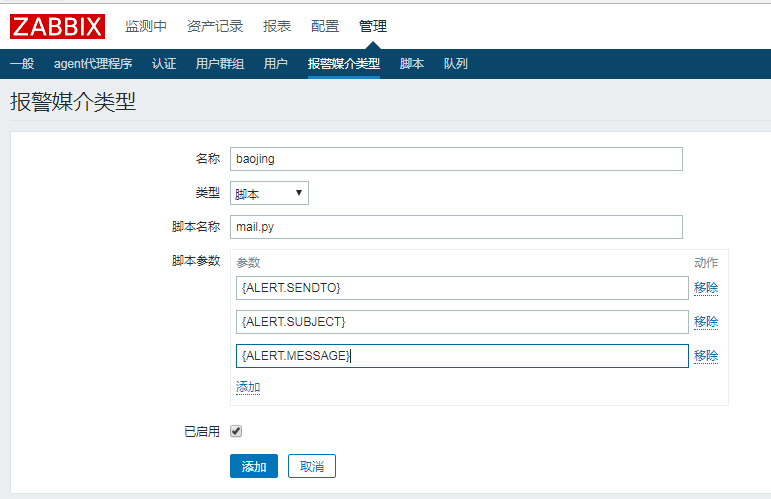
脚本的参数分别代表了
{ALERT.SENDTO} 收件人
{ALERT.SUBJECT} 主题
{ALERT.MESSAGE} 内容

1.创建报警脚本mail.py
首先我们要知道配置文件里,把自定义脚本放在哪个目录下。
[root@centos-02~]# vim /etc/zabbix/zabbix_server.conf //搜索alert
我们发现路径是
AlertScriptsPath=/usr/lib/zabbix/alertscripts
[root@centos-02 ~]# cd /usr/lib/zabbix/alertscripts/

[root@centos-02 alertscripts]# vi mail.py

[root@centos-02 alertscripts]#

#!/usr/bin/env python

#-*- coding: UTF-8 -*-

import os,sys

reload(sys)

sys.setdefaultencoding('utf8')

import getopt

import smtplib

from email.MIMEText import MIMEText

from email.MIMEMultipart import MIMEMultipart

from  subprocess import *

def sendqqmail(username,password,mailfrom,mailto,subject,content):

    gserver = 'smtp.163.com'

    gport = 25

    try:

        msg = MIMEText(unicode(content).encode('utf-8'))

        msg['from'] = mailfrom

        msg['to'] = mailto

        msg['Reply-To'] = mailfrom

        msg['Subject'] = subject

        smtp = smtplib.SMTP(gserver, gport)

        smtp.set_debuglevel(0)

        smtp.ehlo()

        smtp.login(username,password)

        smtp.sendmail(mailfrom, mailto, msg.as_string())

        smtp.close()

    except Exception,err:

        print "Send mail failed. Error: %s" % err

def main():

    to=sys.argv[1]

    subject=sys.argv[2]

    content=sys.argv[3]

##定义QQ邮箱的账号和密码,你需要修改成你自己的账号和密码(请不要把真实的用户名和密码放到网上公开,否则你会死的很惨

     sendqqmail('sunyu***_de@163.com', 'sunyujun163','sunyu***_de@163.com',to,subject,content)

if __name__ == "__main__":

    main()
[root@centos-02 alertscripts]# chmod 755 mail.py

[root@centos-02 alertscripts]# python mail.py sunyujun_de@163.com "title" "content"

[root@centos-02 alertscripts]#
2.成功

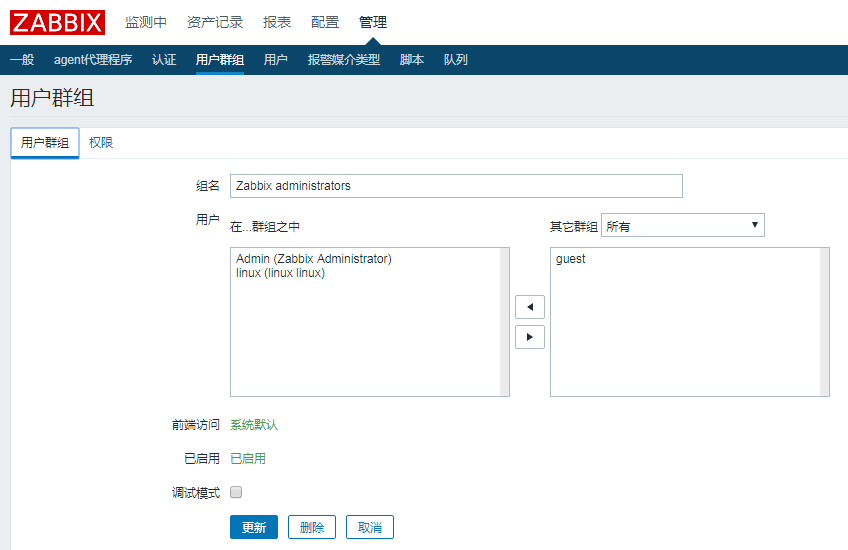
3.创建用户
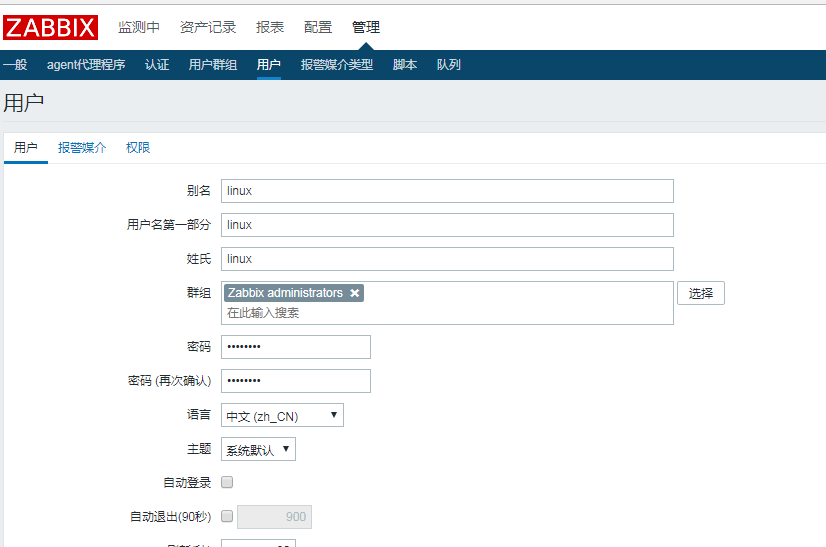
4.设置报警媒介

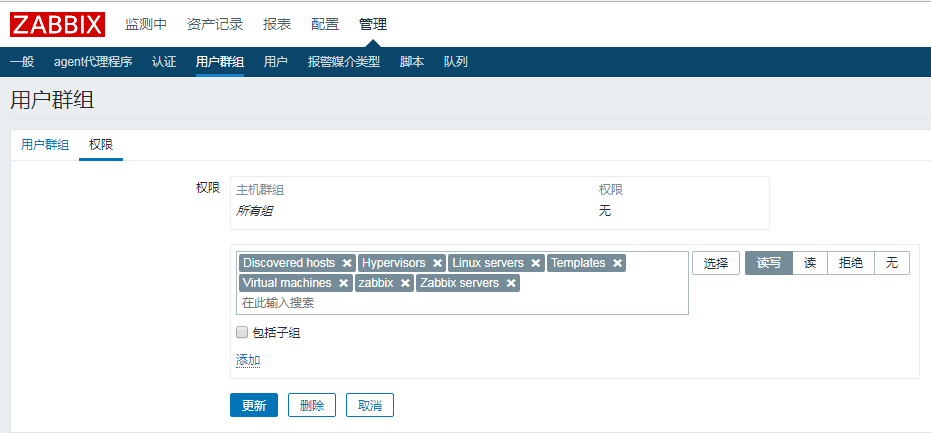
5.权限这里要注意了,现在所有组权限为无,需要修改组的权限

6.用户配置完了,还需要配置动作(触发器触发后我要做的事情)


测试告警
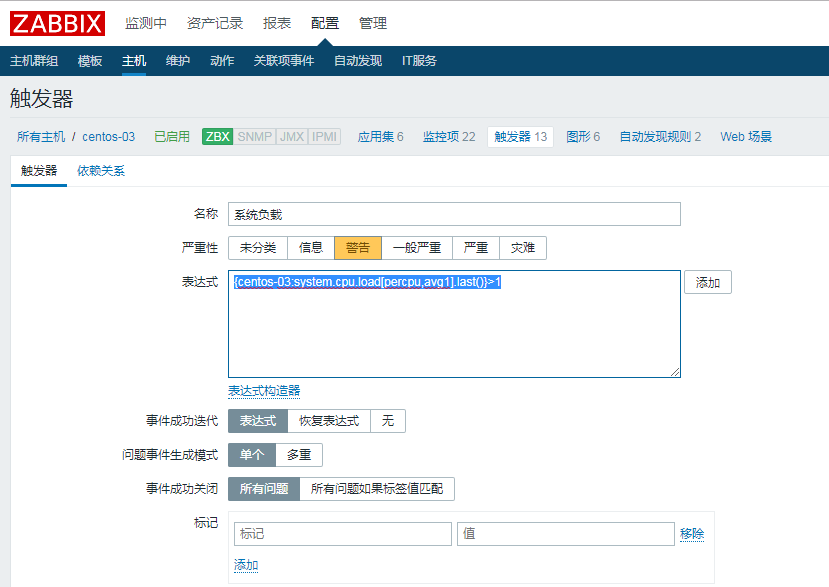
为了让zabbix报警,我们创建一个错误,创建一个触发器
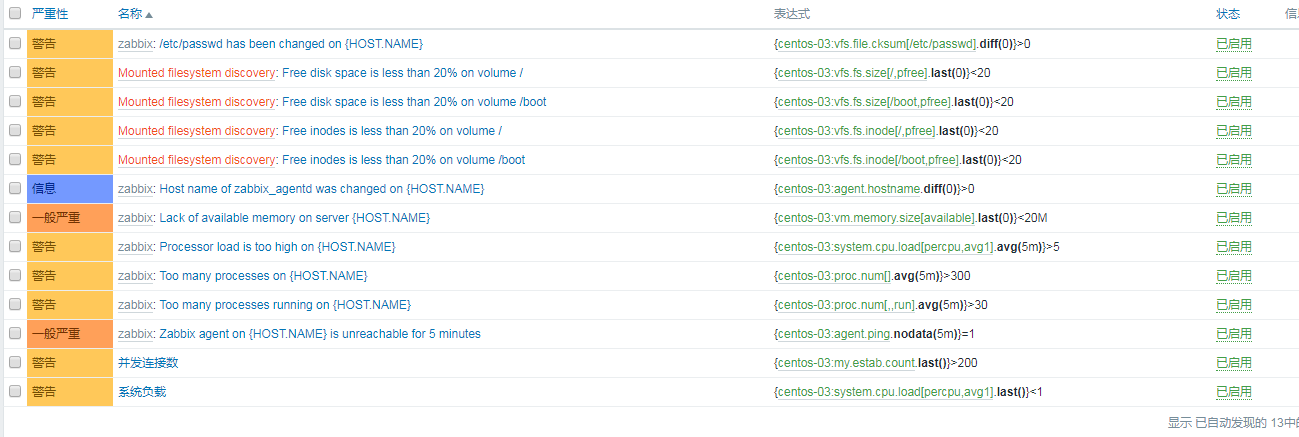
最近20个问题列表下出现了


修改监控项
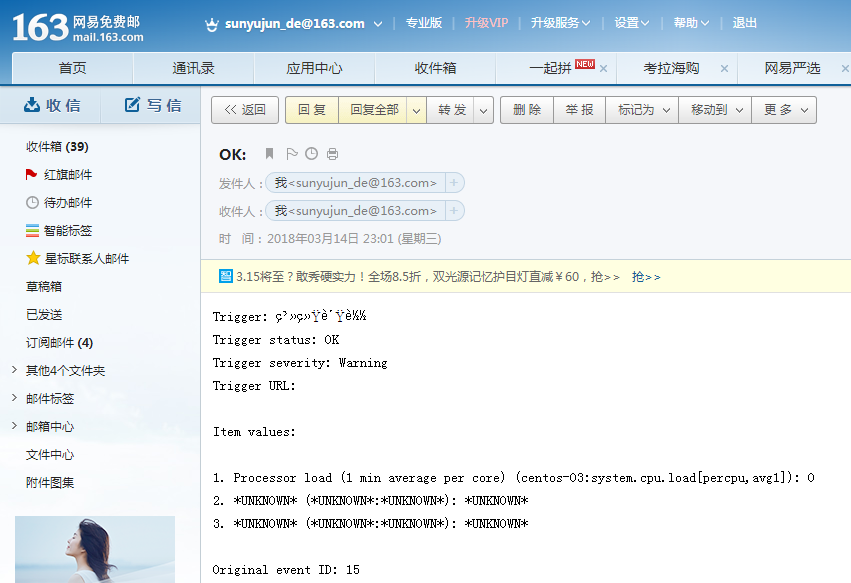
再查看邮件ok了
Linux监控平台搭建的更多相关文章
- linux监控平台搭建-cpu
linux监控平台搭建-cpu 目前服务器的主流CPU是intel或者AMD.到底主频是什么.多核.多线程.并发.并行.超频.一级缓存.二级缓存.三级缓存.i386.x86 cpu:含有算术逻辑.控制 ...
- linux监控平台搭建-内存
linux监控平台搭建-内存 上一篇文章说的硬盘.就写一下.更加重要的东西.在手机上面是RAM.机器是memory.内存是按照字节编址.每个地址的存储单元可以存放8bit的数据.cpu 通过内存地址获 ...
- linux监控平台搭建-磁盘
linux监控平台搭建-磁盘 磁盘:随着大数据快速发展.人工智能.自动化.云平台.数据量指数的增长.磁盘的使用量也在增长.目前的机器基本上采用SSD或者SATA盘,一直有人比较那个好.会不会使用时间短 ...
- inux监控平台搭建-监控项
linux监控平台搭建-监控项 本人运维某生态互联网监控平台服务.过程中遇见了很多问题.目前互联网有很多的开源监控工具:nagios.zabbix.falcon.cacti...各有优点.这里不讲解监 ...
- Linux监控平台、安装zabbix、修改zabbix的admin密码
1.Linux监控平台 2. zabbix监控 3.zabbix的安装下载:wget -c https://repo.zabbix.com/zabbix/3.4/rhel/7/x86_64/zabbi ...
- Linux监控平台介绍、zabbix监控介绍、安装zabbix、忘记Admin密码如何做
7月6日任务 19.1 Linux监控平台介绍19.2 zabbix监控介绍19.3/19.4/19.5 安装zabbix19.6 忘记Admin密码如何做 19.1 Linux监控平台介绍 一般大公 ...
- Linux centosVMware Linux监控平台介绍、zabbix监控介绍、安装zabbix、忘记Admin密码如何做
一.Linux监控平台介绍 cacti.nagios.zabbix.smokeping.open-falcon等等 cacti.smokeping偏向于基础监控,成图非常漂亮 cacti.nagios ...
- Docker系列——InfluxDB+Grafana+Jmeter性能监控平台搭建(三)
在之前系列博文中,已经介绍完了数据采集和数据存储,那数据如何展示呢?所以今天就专门来讲下数据如何展示的问题. 以前博文参考: Docker系列--InfluxDB+Grafana+Jmeter性能监控 ...
- Docker系列——InfluxDB+Grafana+Jmeter性能监控平台搭建(一)
在做性能测试的时候,重点关注点是各项性能指标,用Jmeter工具,查看指标数据,就是借助于聚合报告,但查看时也并不方便.那如何能更直观的查看各项数据呢?可以通过InfluxDB+Grafana+Jme ...
随机推荐
- Java并发(六):volatile的实现原理
synchronized是一个重量级的锁,volatile通常被比喻成轻量级的synchronized volatile是一个变量修饰符,只能用来修饰变量. volatile写:当写一个volatil ...
- [WikiOI "天梯"1281] Xn数列
题目描述Description 给你6个数,m, a, c, x0, n, g Xn+1 = ( aXn + c ) mod m,求Xn m, a, c, x0, n, g<=10^18 输入描 ...
- android中自定义checkbox的图片和大小
其实很简单,分三步: 1.在drawable中创建文件checkbox_selector.xml: <?xml version="1.0" encoding="ut ...
- 微信小程序,开发者工具更新以后wxss编译错误
出现上述错误,解决方法如下: 1.在控制台输入openVendor() : 2.清除里面的wcsc wcsc.exe 3.重启开发者工具 搞定!
- iOS- dispatch_semaphore和NSOperationQueue并发
并发:同一个时间内运行多个任务.又叫共行性,是指处理多个同时性活动的能力. 并行:是指两个并发的任务同时发生. 并发不一定并行,并发不一定要同时发生. 举个例子: 有两个快递分别要送到目的地,有以下两 ...
- 网络上的等待事件 —— SQL*Net message from client/dblink
SQL*Net message from client SQL> select event#,name,parameter1,parameter2,parameter3 from v$event ...
- .Net的差评
.NET平台很棒.真的很棒.直到它不再那么棒.我为什么不再用.NET?简单来说,它限制了我们选择的能力(对我来说很重要),转移了我们的注意力,使得我们向内认知它的安全性,替代了帮助我们认知外面广阔世界 ...
- 纯CSS实现多行文字垂直居中几种方法解析
场景:父元素 高度固定,如何使其中的文字垂直居中? 1.table布局: 利用display:table+display:table-cell的方法 <!DOCTYPE html> < ...
- 【License】一张图该诉你各种License的含义?
一张图该诉你各种License的含义:
- PHP Variable Scope
原文: https://phppot.com/php/variable-scope-in-php/ Last modified on March 24th, 2017 by Vincy. ------ ...