TessorFlow学习 之 神经网络的构建
1.建立一个神经网络添加层
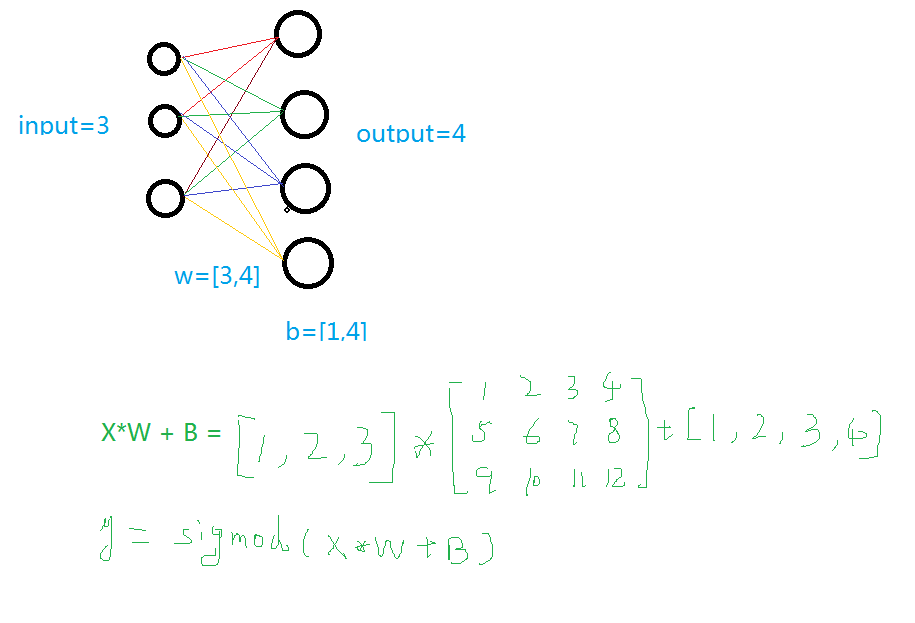
输入值、输入的大小、输出的大小和激励函数
学过神经网络的人看下面这个图就明白了,不懂的去看看我的另一篇博客
 def add_layer(inputs , in_size , out_size , activate = None):

     Weights = tf.Variable(tf.random_normal([in_size,out_size]))#随机初始化

     baises  = tf.Variable(tf.zeros([1,out_size])+0.1)#可以随机但是不要初始化为0,都为固定值比随机好点

     y = tf.matmul(inputs, Weights) + baises #matmul:矩阵乘法,multipy:一般是数量的乘法

     if activate:

         y = activate(y)

     return y
2.训练一个二次函数
 import tensorflow as tf

 import numpy as np

 def add_layer(inputs , in_size , out_size , activate = None):

     Weights = tf.Variable(tf.random_normal([in_size,out_size]))#随机初始化

     baises  = tf.Variable(tf.zeros([1,out_size])+0.1)#可以随机但是不要初始化为0,都为固定值比随机好点

     y = tf.matmul(inputs, Weights) + baises #matmul:矩阵乘法,multipy:一般是数量的乘法

     if activate:

         y = activate(y)

     return y

 if __name__ == '__main__':

     x_data = np.linspace(-1,1,300,dtype=np.float32)[:,np.newaxis]#创建-1,1的300个数,此时为一维矩阵,后面转化为二维矩阵===[1,2,3]-->>[[1,2,3]]

     noise = np.random.normal(0,0.05,x_data.shape).astype(np.float32)#噪声是(1,300)格式,0-0.05大小

     y_data = np.square(x_data) - 0.5 + noise #带有噪声的抛物线

     xs = tf.placeholder(tf.float32,[None,1]) #外界输入数据

     ys = tf.placeholder(tf.float32,[None,1])

     l1 = add_layer(xs,1,10,activate=tf.nn.relu)

     prediction = add_layer(l1,10,1,activate=None)

     loss = tf.reduce_mean(tf.reduce_sum(tf.square(ys - prediction),reduction_indices=[1]))#误差

     train_step = tf.train.GradientDescentOptimizer(0.1).minimize(loss)#对误差进行梯度优化,步伐为0.1

     sess = tf.Session()

     sess.run( tf.global_variables_initializer())

     for i in range(1000):

         sess.run(train_step, feed_dict={xs: x_data, ys: y_data})#训练

         if i%50 == 0:

             print(sess.run(loss, feed_dict={xs: x_data, ys: y_data}))#查看误差

3.动态显示训练过程
显示的步骤程序之中部分进行说明,其它说明请看其它博客
import tensorflow as tf
import numpy as np
import matplotlib.pyplot as plt def add_layer(inputs , in_size , out_size , activate = None):
Weights = tf.Variable(tf.random_normal([in_size,out_size]))#随机初始化
baises = tf.Variable(tf.zeros([1,out_size])+0.1)#可以随机但是不要初始化为0,都为固定值比随机好点
y = tf.matmul(inputs, Weights) + baises #matmul:矩阵乘法,multipy:一般是数量的乘法
if activate:
y = activate(y)
return y
if __name__ == '__main__':
x_data = np.linspace(-1,1,300,dtype=np.float32)[:,np.newaxis]#创建-1,1的300个数,此时为一维矩阵,后面转化为二维矩阵===[1,2,3]-->>[[1,2,3]]
noise = np.random.normal(0,0.05,x_data.shape).astype(np.float32)#噪声是(1,300)格式,0-0.05大小
y_data = np.square(x_data) - 0.5 + noise #带有噪声的抛物线
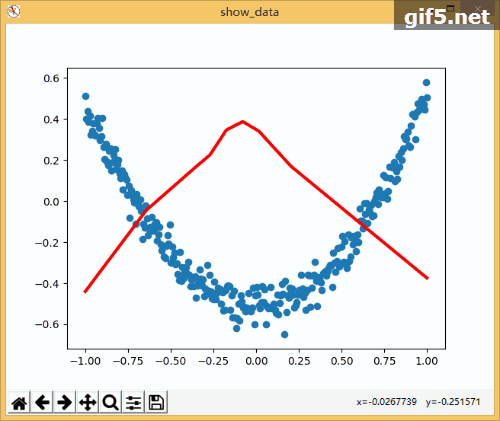
fig = plt.figure('show_data')# figure("data")指定图表名称
ax = fig.add_subplot(111)
ax.scatter(x_data,y_data)
plt.ion()
plt.show()
xs = tf.placeholder(tf.float32,[None,1]) #外界输入数据
ys = tf.placeholder(tf.float32,[None,1]) l1 = add_layer(xs,1,10,activate=tf.nn.relu)
prediction = add_layer(l1,10,1,activate=None) loss = tf.reduce_mean(tf.reduce_sum(tf.square(ys - prediction),reduction_indices=[1]))#误差
train_step = tf.train.GradientDescentOptimizer(0.1).minimize(loss)#对误差进行梯度优化,步伐为0.1 sess = tf.Session()
sess.run( tf.global_variables_initializer())
for i in range(1000):
sess.run(train_step, feed_dict={xs: x_data, ys: y_data})#训练
if i%50 == 0:
try:
ax.lines.remove(lines[0])
except Exception:
pass
prediction_value = sess.run(prediction, feed_dict={xs: x_data})
lines = ax.plot(x_data,prediction_value,"r",lw = 3)
print(sess.run(loss, feed_dict={xs: x_data, ys: y_data}))#查看误差
plt.pause(2)
while True:
plt.pause(0.01)
4.TensorBoard整体结构化显示
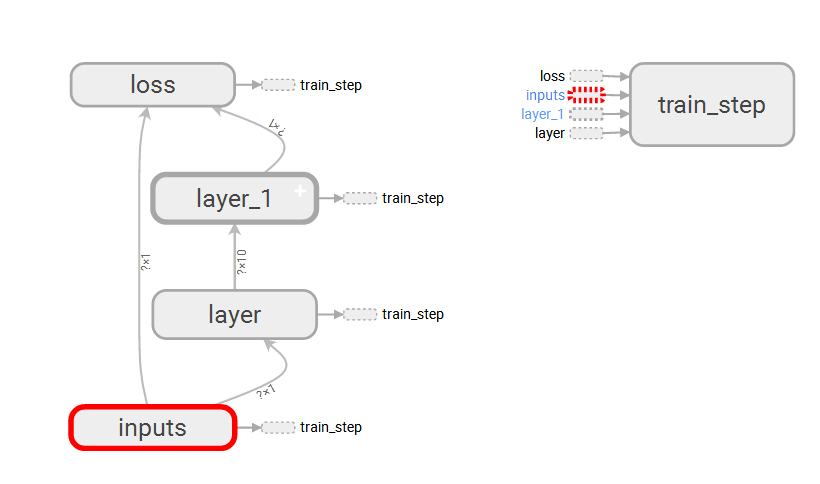
A.利用with tf.name_scope("name")创建大结构、利用函数的name="name"去创建小结构:tf.placeholder(tf.float32,[None,1],name="x_data")
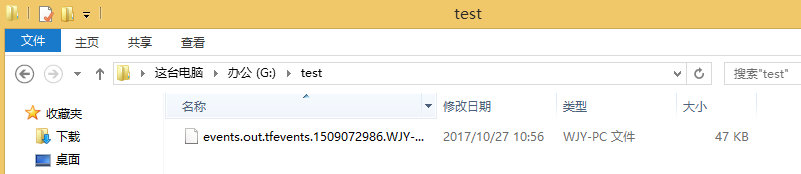
B.利用writer = tf.summary.FileWriter("G:/test/",graph=sess.graph)创建一个graph文件
C.利用TessorBoard去执行这个文件
这里得注意--->>>首先到你存放文件的上一个目录--->>然后再去运行这个文件
tensorboard --logdir=test

5.TensorBoard局部结构化显示
A. tf.summary.histogram(layer_name+"Weight",Weights):直方图显示
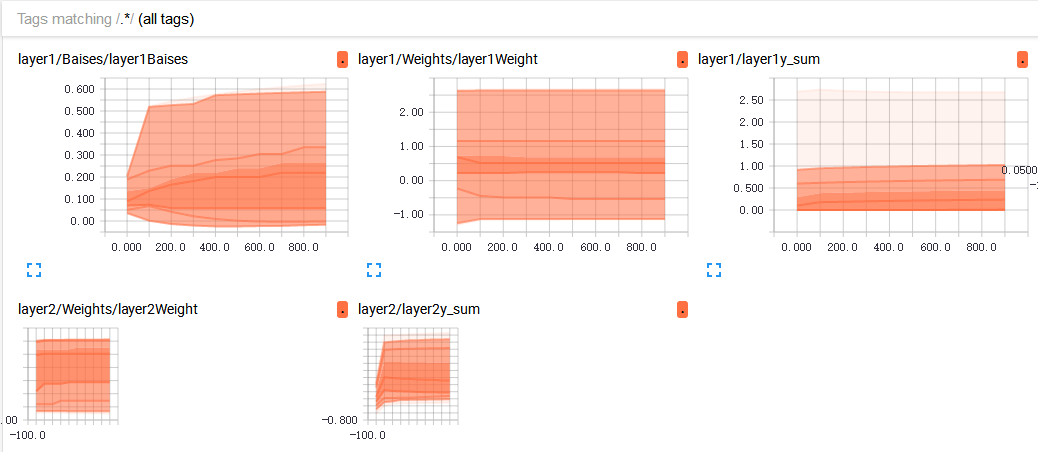
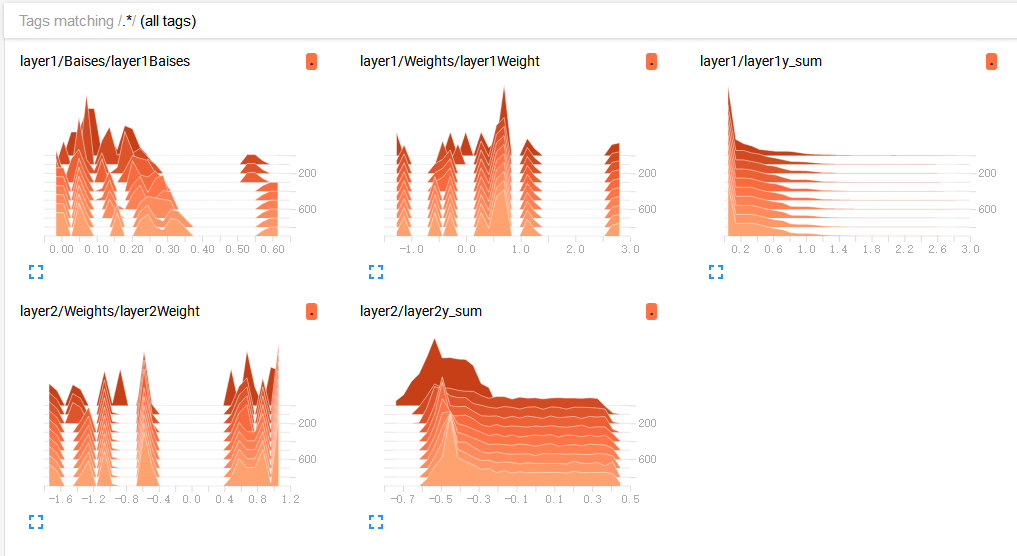
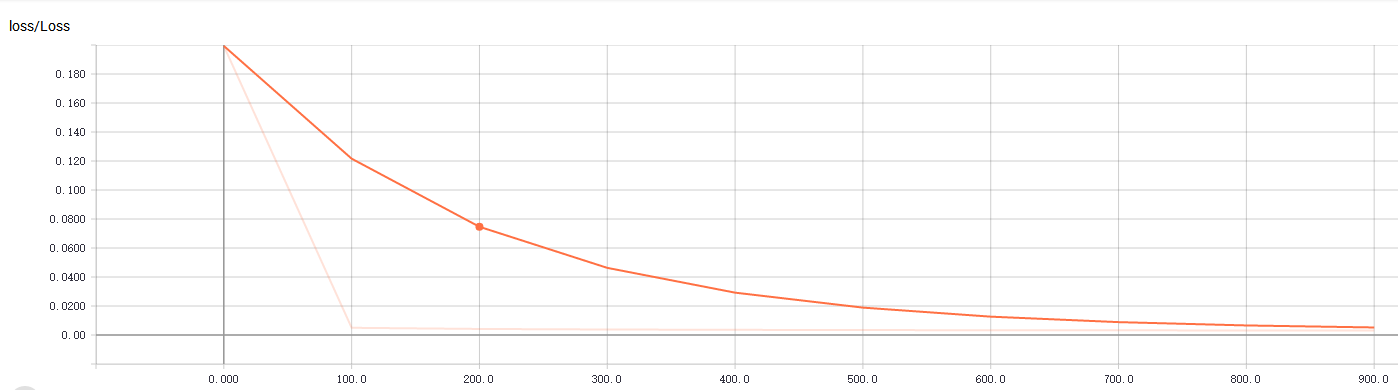
B. tf.summary.scalar("Loss",loss):折线图显示,loss的走向决定你的网络训练的好坏,至关重要一点
C.初始化与运行设定的图表
 merge = tf.summary.merge_all()#合并图表

 writer = tf.summary.FileWriter("G:/test/",graph=sess.graph)#写进文件

 result = sess.run(merge,feed_dict={xs:x_data,ys:y_data})#运行打包的图表merge

 writer.add_summary(result,i)#写入文件,并且单步长50
完整代码及显示效果:
 import tensorflow as tf

 import numpy as np

 import matplotlib.pyplot as plt

 def add_layer(inputs , in_size , out_size , n_layer = 1 , activate = None):

     layer_name = "layer" + str(n_layer)

     with tf.name_scope(layer_name):

         with tf.name_scope("Weights"):

             Weights = tf.Variable(tf.random_normal([in_size,out_size]),name="W")#随机初始化

             tf.summary.histogram(layer_name+"Weight",Weights)

         with tf.name_scope("Baises"):

             baises  = tf.Variable(tf.zeros([1,out_size])+0.1,name="B")#可以随机但是不要初始化为0,都为固定值比随机好点

             tf.summary.histogram(layer_name+"Baises",baises)

         y = tf.matmul(inputs, Weights) + baises #matmul:矩阵乘法,multipy:一般是数量的乘法

         if activate:

             y = activate(y)

         tf.summary.histogram(layer_name+"y_sum",y)

         return y

 if __name__ == '__main__':

     x_data = np.linspace(-1,1,300,dtype=np.float32)[:,np.newaxis]#创建-1,1的300个数,此时为一维矩阵,后面转化为二维矩阵===[1,2,3]-->>[[1,2,3]]

     noise = np.random.normal(0,0.05,x_data.shape).astype(np.float32)#噪声是(1,300)格式,0-0.05大小

     y_data = np.square(x_data) - 0.5 + noise #带有噪声的抛物线

     fig = plt.figure('show_data')# figure("data")指定图表名称

     ax = fig.add_subplot(111)

     ax.scatter(x_data,y_data)

     plt.ion()

     plt.show()

     with tf.name_scope("inputs"):

         xs = tf.placeholder(tf.float32,[None,1],name="x_data") #外界输入数据

         ys = tf.placeholder(tf.float32,[None,1],name="y_data")

     l1 = add_layer(xs,1,10,n_layer=1,activate=tf.nn.relu)

     prediction = add_layer(l1,10,1,n_layer=2,activate=None)

     with tf.name_scope("loss"):

         loss = tf.reduce_mean(tf.reduce_sum(tf.square(ys - prediction),reduction_indices=[1]))#误差

         tf.summary.scalar("Loss",loss)

     with tf.name_scope("train_step"):

         train_step = tf.train.GradientDescentOptimizer(0.1).minimize(loss)#对误差进行梯度优化,步伐为0.1

     sess = tf.Session()

     merge = tf.summary.merge_all()#合并

     writer = tf.summary.FileWriter("G:/test/",graph=sess.graph)

     sess.run( tf.global_variables_initializer())

     for i in range(1000):

         sess.run(train_step, feed_dict={xs: x_data, ys: y_data})#训练

         if i%100 == 0:

             result = sess.run(merge,feed_dict={xs:x_data,ys:y_data})#运行打包的图表merge

             writer.add_summary(result,i)#写入文件,并且单步长50
 注意: 假设你的py文件中写了tf的summary,并且存放在了此目录下“D:\test\logs” 调出cmd,cd到D:\test,然后输入tensorboard –logdir=logs。一定要cd到logs这个文件夹的上一级,其他会出现No graph definition files were found.问题。
主要参考莫凡大大:https://morvanzhou.github.io/
可视化出现问题了,参考这位大神:http://blog.csdn.net/fengying2016/article/details/54289931
TessorFlow学习 之 神经网络的构建的更多相关文章
- Spark MLlib Deep Learning Convolution Neural Network (深度学习-卷积神经网络)3.2
3.Spark MLlib Deep Learning Convolution Neural Network(深度学习-卷积神经网络)3.2 http://blog.csdn.net/sunbow0 ...
- 针对深度学习(神经网络)的AI框架调研
针对深度学习(神经网络)的AI框架调研 在我们的AI安全引擎中未来会使用深度学习(神经网络),后续将引入AI芯片,因此重点看了下业界AI芯片厂商和对应芯片的AI框架,包括Intel(MKL CPU). ...
- Spark MLlib Deep Learning Convolution Neural Network (深度学习-卷积神经网络)3.1
3.Spark MLlib Deep Learning Convolution Neural Network (深度学习-卷积神经网络)3.1 http://blog.csdn.net/sunbow0 ...
- ArcGIS案例学习笔记2_2_模型构建器和山顶点提取批处理
ArcGIS案例学习笔记2_2_模型构建器和山顶点提取批处理 计划时间:第二天下午 背景:数据量大,工程大 目的:自动化,批处理,定制业务流程,不写程序 教程:Pdf/343 数据:chap8/ex5 ...
- Spark MLlib Deep Learning Convolution Neural Network (深度学习-卷积神经网络)3.3
3.Spark MLlib Deep Learning Convolution Neural Network(深度学习-卷积神经网络)3.3 http://blog.csdn.net/sunbow0 ...
- ReLeQ:一种自动强化学习的神经网络深度量化方法
ReLeQ:一种自动强化学习的神经网络深度量化方法 ReLeQ:一种自动强化学习的神经网络深度量化方法ReLeQ: An Automatic Reinforcement Learning Ap ...
- 深度学习——卷积神经网络 的经典网络(LeNet-5、AlexNet、ZFNet、VGG-16、GoogLeNet、ResNet)
一.CNN卷积神经网络的经典网络综述 下面图片参照博客:http://blog.csdn.net/cyh_24/article/details/51440344 二.LeNet-5网络 输入尺寸:32 ...
- 【CV知识学习】神经网络梯度与归一化问题总结+highway network、ResNet的思考
这是一篇水货写的笔记,希望路过的大牛可以指出其中的错误,带蒟蒻飞啊~ 一. 梯度消失/梯度爆炸的问题 首先来说说梯度消失问题产生的原因吧,虽然是已经被各大牛说烂的东西.不如先看一个简单的网络结构 ...
- ML学习笔记- 神经网络
神经网络 有的模型可以有多种算法.而有的算法可能可用于多种模型.在神经网络中,对外部环境提供的模式样本进行学习训练,并能存储这种模式,则称为感知器;对外部环境有适应能力,能自动提取外部环境变化特征,则 ...
随机推荐
- java实现文件的上传和下载
1. servlet 如何实现文件的上传和下载? 1.1上传文件 参考自:http://blog.csdn.net/hzc543806053/article/details/7524491 通过前台选 ...
- jersey2+freemarker+spring3的集成
由于即将开始的新项目,是一个对外网开放访问权限的web应用.所以,公司技术管理层不允许使用struts以及spring mvc这一套.所以,我们开始转战曾经用作REST API的框架jersey及其周 ...
- XBOX360更新游戏封皮(FSD自制系统)
第一步,请记下上图左下角的IP地址第二步,打开电脑IE浏览器,输入“第二步”你记下的IP地址“回车”然后,就如下图所示了. 输入账号:f3http 密码:f3http 进入,然后你就进到你的360 F ...
- Ubuntu Docker安装
docker容器改变apt-get源 记得先:apt-get update 进入容器 cd /etc/apt echo "">sources.list echo " ...
- 黄聪:Pjax无刷新跳转页面实现,支持超链接与表单提交
什么是pjax? 当你点击一个站内的链接的时候,不是做页面跳转,而是只是站内页面刷新.这样的用户体验,比起整个页面都闪一下来说, 好很多. 其中有一个很重要的组成部分, 这些网站的ajax刷新是支持浏 ...
- centos 磁盘清理 /dev/vda1系统盘满了
df -h 检查一台服务器磁盘使用空间,发现磁盘已经使用了100% 思路是: 1.cd /usr 当然这里不一定是/usr目录,最好是cd到 根目录再执行下一步 2.du -sh * 看哪 ...
- SpringSecurity的Filter执行顺序在源码中的体现
在网上看各种SpringSecurity教程时,都讲到了SpringSecurity的Filter顺序.但是一直不知道这个顺序在源码中是如何体现的.今天一步一步的查找,最终找到顺序是在FilterCo ...
- bzoj4183: tree
Description 自底向上模拟,原地操作以节省空间 #include<bits/stdc++.h> unsigned n,a,b,c,v[],mx,ans=; int main(){ ...
- P2064进制转换
题目:https://www.luogu.org/problemnew/show/P2084 既然这道题放在字符串类型里,那么这里的N肯定得用字符数组来储存(这样也方便输出). 那么我们不妨定义一个字 ...
- openssl命令实例
基本知识 1,证书标准 X.509 X.509 - 这是一种证书标准,主要定义了证书中应该包含哪些内容.其详情可以参考RFC5280,SSL使用的就是这种证书标准. X.509的证书文件,一般以.cr ...