android sensor架构
Android Sensor 架构深入剖析
作者:倪键树,华清远见嵌入式学院讲师。
1、Android sensor架构
Android4.0系统内置对传感器的支持达13种,它们分别是:加速度传感器 (accelerometer)、磁力传感器(magnetic field)、方向传感器(orientation)、陀螺仪(gyroscope)、环境光照传感器(light)、压力传感器(pressure)、温度传感器(temperature)和距离传感器(proximity)等。
Android实现传感器系统包括以下几个部分:
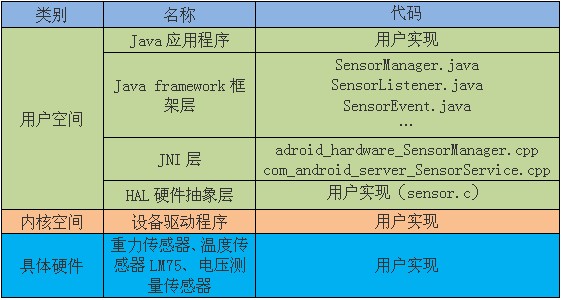
各部分之间架构图如下: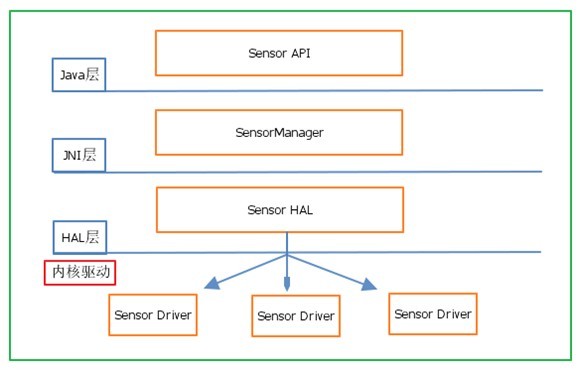
2、Sensor HAL层接口
Google为Sensor提供了统一的HAL接口,不同的硬件厂商需要根据该接口来实现并完成具体的硬件抽象层,Android中Sensor的HAL接口定义在:hardware/libhardware/include/hardware/sensors.h
对传感器类型的定义:
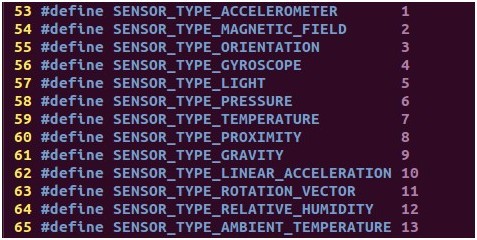
传感器模块的定义结构体如下:

该接口的定义实际上是对标准的硬件模块hw_module_t的一个扩展,增加了一个get_sensors_list函数,用于获取传感器的列表。
对任意一个sensor设备都会有一个sensor_t结构体,其定义如下:
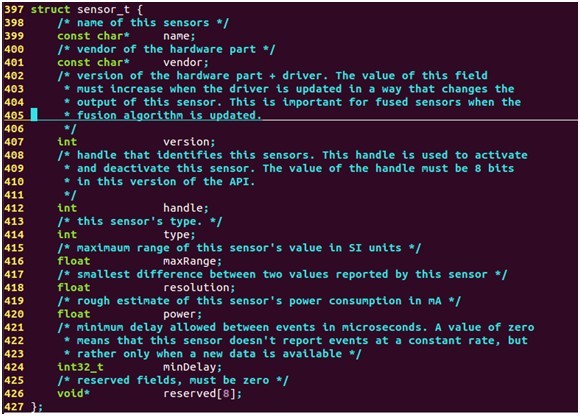
每个传感器的数据由sensors_event_t结构体表示,定义如下:
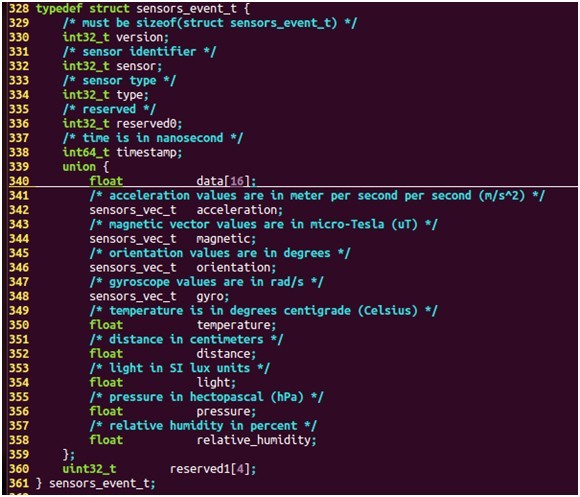
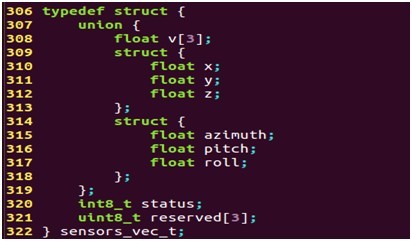
其中,sensor为传感器的标志符,而不同的传感器则采用union方式来表示,sensors_vec_t结构体用来表示不同传感器的数据,sensors_vec_t定义如下:
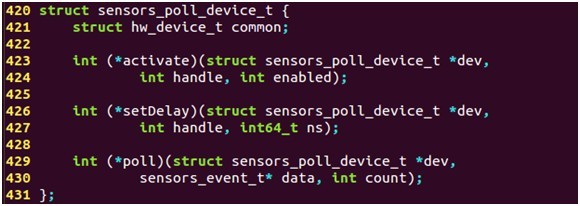
Sensor设备结构体sensors_poll_device_t,对标准硬件设备 hw_device_t结构体的扩展,主要完成读取底层数据,并将数据存储在struct sensors_poll_device_t结构体中,poll函数用来获取底层数据,调用时将被阻塞定义如下:
控制设备打开/关闭结构体定义如下:

3、Sensor HAL实现(以LM75温度传感器为例子)
(1)打开设备流程图
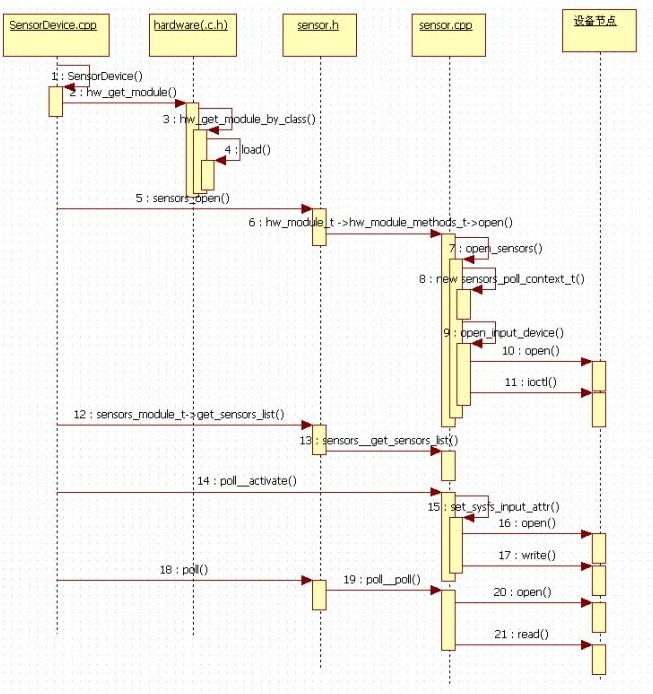
(2)实现代码分析
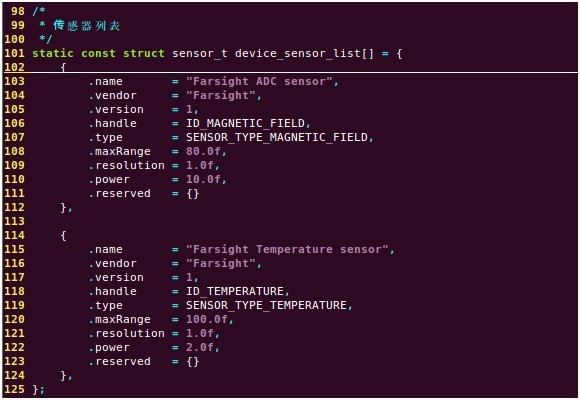
在代码中含有两个传感器ADC电位器和LM75温度传感器,所以在sensor.c中,首先需要定义传感器数组device_sensor_list[],其实就是初始化struct sensor_t结构体,初始化如下:
定义open_sensors函数,来打开Sensor模块,代码如下:
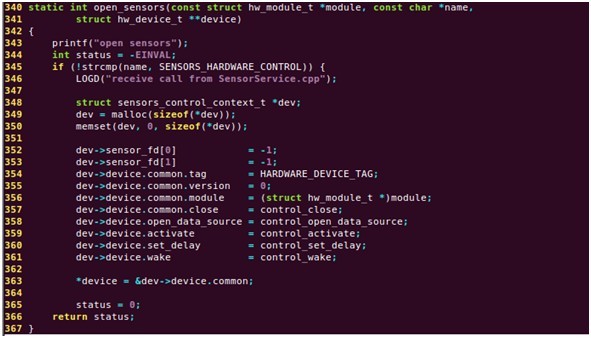
在这个方法中,首先需要为hw_device_t分配内存空间,并对其初始化,设置重要方法的实现。
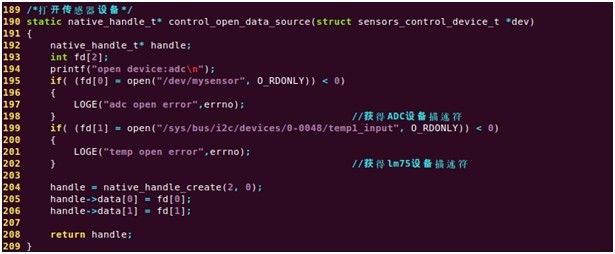
control_open_data_source()打开传感器并使能设备:
调用sensor__data_poll方法读取数据:
/*轮询读取数据*/
static int sensors__data_poll(struct sensors_data_context_t *dev, sensors_data_t * values)
{
int n;
int mag;
float temp;
char buf[10];
while (1) {
if(count % 3 == 2) // 读取ADC值
{
if( read(dev->event_fd[0], &mag, sizeof(mag)) < 0)
{
LOGE("read adc error");
}else{
dev->sensors[ID_MAGNETIC_FIELD].magnetic.v[0] =(float)mag;
LOGE("read adc %f\n",(float)mag);
*values = dev->sensors[ID_MAGNETIC_FIELD];
values->sensor = ID_MAGNETIC_FIELD;
count++;
}
usleep(500000);
return ID_MAGNETIC_FIELD;
}
else if(count%3 == 1) //读取温度传感器值
{
memset(buf, 0 ,sizeof(buf));
if((n = read(dev->event_fd[1], buf, 10)) < 0)
{
LOGE("read temp error");
}else{
buf[n - 1] = '\0';
temp =(float) (atoi(buf) / 1000);
dev->sensors[ID_TEMPERATURE].temperature = temp;
LOGE("read temp %f\n",temp);
*values = dev->sensors[ID_TEMPERATURE];
values->sensor = ID_TEMPERATURE;
count++;
}
close(dev->event_fd[1]);
dev->event_fd[1]= open("/sys/bus/i2c/devices/0-0048/temp1_input", O_RDONLY);
usleep(500000);
return ID_TEMPERATURE;
}
else if(count%3 == 0) //读取方向传感器模拟值
{
LOGI("read orientation\n");
/* fill up data of orientation */
dev->sensors[ID_ORIENTATION].orientation.azimuth = x + 5;
dev->sensors[ID_ORIENTATION].orientation.pitch = y + 5;
dev->sensors[ID_ORIENTATION].orientation.roll = z + 5;
*values = dev->sensors[ID_ORIENTATION];
values->sensor = ID_ORIENTATION;
count++;
x += 0.0001; y += 0.0001; z += 0.0001;
usleep (500000);
return ID_ORIENTATION;
}
}
}
1. 体系结构
2. 数据结构
3. 四大函数
本文以重力感应器装置G-sensor为例探索Android的各层次结构。
1. 体系结构
Android的体系结构可分为4个层次。
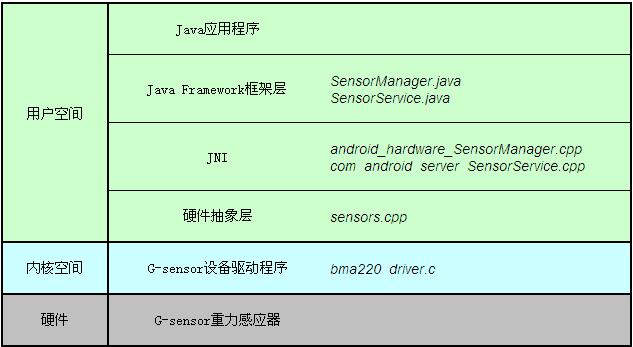
- 第一层次 底层驱动层,包括标准Linux,Android核心驱动,Android相关设备驱动,G-sensor的设备驱动程序即存在于此
- 第二层次 Android标准C/C++库,包括硬件抽象层,Android各底层库,本地库,JNI
- 第三层次 Android Java Framwork框架层
- 第四层次 Java应用程序
本文重点关注硬件抽象层,JNI以及Framework。
1.1 硬件抽象层
硬件抽象层通过例如open(), read(), write(), ioctl(), poll()等函数调用的方式,与底层设备驱动程序进行交互,而这些函数调用是底层设备驱动程序事先准备好的。
用于交互的关键是文件描述符fd,fd通过open()打开G-sensor设备节点而得到,即 fd = open ("/dev/bma220", O_RDONLY);而/dev/bma220这个设备节点是在底层设备驱动中注册完成的。
其他的函数调用如read(), write()等都通过该文件描述符fd对G-sensor设备进行操作。
1.2 JNI (Java Native Interface)
JNI层可以认为是整个体系结构中的配角,概括地讲,它就完成了一项任务,既实现从C++语言到Java语言的转换。JNI层为Java Framework层提供一系列接口,而这些接口函数的具体实现中,利用例如module->methods->open(), sSensorDevice->data_open(), sSensorDevice->poll()等回调函数与硬件抽象层进行交互。而这些open(), poll()回调函数在硬件抽象层中具体实现。
1.3 Java Framework
Framework层提供各种类和类的对象,可作为系统的守护进程运行,也可供上层应用程序的使用。
例如类SensorManager,它作为系统的守护进程在初始化的时候开始运行,其子类SensorThread中的子类SensorThreadRunnable通过sensors_data_poll()实现了对G-sensor数据的轮训访问,而sensors_data_poll()通过JNI层转换到硬件抽象层去具体实现poll()。
2 数据结构
一般境况下,硬件抽象层对硬件的描述都分为control和data两大类。
2.1 sensors_control_context_t
struct sensors_control_context_t {
struct sensors_control_device_t device;
int fd;
};
struct sensors_control_device_t {
struct
hw_device_t common;
int (*open_data_source)(struct sensors_control_device_t *dev);
int (*activate)(struct sensors_control_device_t *dev, int handle, int enabled);
int (*set_delay)(struct sensors_control_device_t *dev, int32_t ms);
int (*wake)(struct sensors_control_device_t *dev);
};
2.2 sensors_data_context_t
struct sensors_data_context_t {
struct sensors_data_device_t device;
int fd;
};
struct sensors_data_device_t {
struct hw_device_t common;
int (*data_open)(struct sensors_data_device_t *dev, int fd);
int (*data_close)(struct sensors_data_device_t *dev);
int (*poll)(struct sensors_data_device_t *dev,
sensors_data_t* data);
}
struct hw_device_t {
uint32_t tag; uint32_t version;
struct hw_module_t* module;
int (*close)(struct hw_device_t* device);
};
struct hw_module_t {
uint32_t tag; uint16_t version_major; uint16_t version_minor;
const char *id; const char *name; const char *author;
struct hw_module_methods_t* methods;
};
struct hw_module_methods_t {
int (*open)(const struct hw_module_t* module, const char* id,
struct hw_device_t** device);
};
下文将通过对(*open), (*open_data_source), (*data_open)和(*poll)的代码分析,探索Android的各层次架构。
3 四大函数
3.1 module->methods->open()
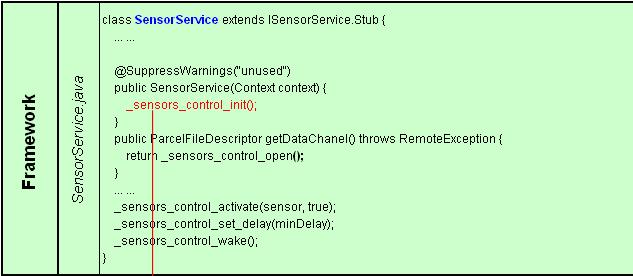

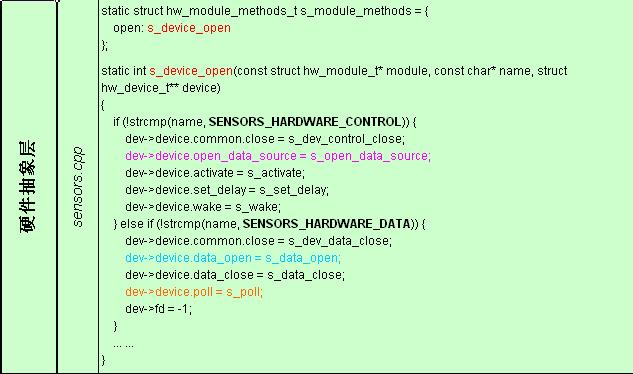
1) Framework
SensorService作为系统守护进程运行,其类的构造函数实现_sensors_control_init()。
2) JNI
为_sensors_control_init()提供接口android_init(),并执行回调函数module->methods->open();
3) 硬件抽象层
具体实现(*open),该函数为所有G-sensor回调函数的指针赋值。
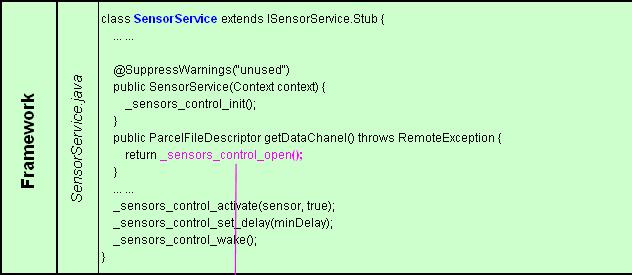
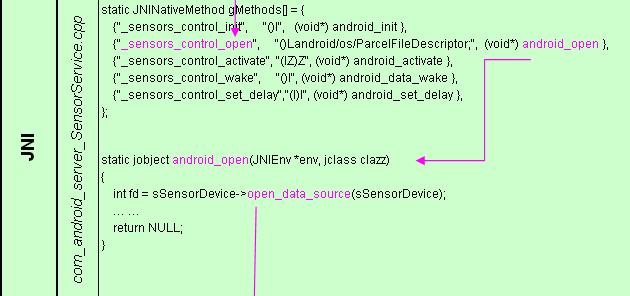
3.2 sSensorDevice->open_data_source()


1) Framework
SensorService作为系统守护进程运行,其类的一个公有成员ParcelFileDescriptor通过实现_sensors_control_open()得到设备的文件描述符。
2) JNI
为_sensors_control_open()提供接口android_open(),并执行回调函数sSensorDevice->open_data_source();
3) 硬件抽象层
具体实现(*open_data_source),该函数通过打开G-sensor的设备节点得到文件描述符fd = open ("/dev/bma220", O_RDONLY);
4) 设备驱动层
通过misc_register()对G-sensor设备进行注册,建立设备节点。
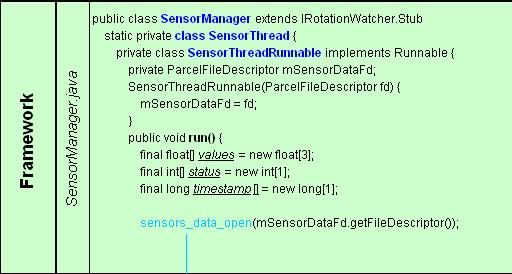
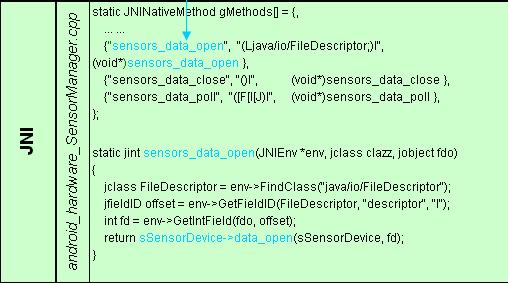
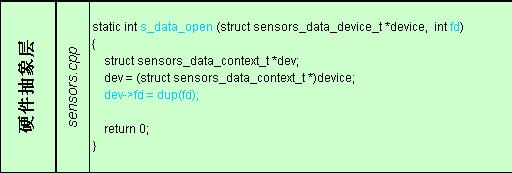
3.3 sSensorDevice->data_open()
1) Framework
SensorManager作为系统守护进程运行,其子类SensorThreadRunnable的行为函数run()实现sensors_data_open()。
2) JNI
为sensors_data_open()提供接口sensors_data_open(),并执行回调函数sSensorDevice->data_open();
3) 硬件抽象层
具体实现(*data_open),该函数的功能就是将已经得到的文件描述符fd复制一份到sensors_data_context结构体中的dev->fd,以便为处理数据的回调函数如(*poll)使用。
3.4 sSensorDevice->poll()


1) Framework
SensorManager作为系统守护进程运行,其子类SensorThreadRunnable的行为函数run()实现sensors_data_poll(values, status, timestamp),其目的是通过此函数得到从底层传上来的有关G-sensor的数据values, status和timestamp,再通过此类的一个行为函数listener.onSensorChangedLocked(sensorObject, values, timestamp, accuracy);为上层应用程序提供了得到G-sensor设备数据的接口函数。
2) JNI
为sensors_data_poll()提供接口sensors_data_poll(),并执行回调函数sSensorDevice->poll(sSensorDevice, &data);其中,得到的data就是从底层传上来的G-sensor数据,然后通过下图的方式将data中对应的数据分别赋给values, status和timestamp。

3) 硬件抽象层
具体实现(*poll),该函数通过ioctl()实现与底层驱动程序的交互。
ioctl(dev->fd, BMA220_GET_ORIENTATION, &orient_value);
其中,dev->fd即刚才由(*data_open)得到的文件描述符,BMA220_GET_ORIENTATION为ioctl的一个命令,具体实现由底层驱动程序完成,orient_value即得到的G-sensor数据,它通过下图的方式将相对应的数据赋给了data结构体中的values, status和time,从而最终实现了从底层到上层的数据通信。

4) 设备驱动层
与硬件抽象层交互的read(), write(), ioctl()函数由设备驱动实现。以ioctl()的一条命令BMA220_GET_ORIENTATION为例,

通过bma220_get_orientation(data)得到G-sensor的数据data,然后将其从内核空间上传到用户空间的arg.
继续添加一些基础知识
http://yueguc.iteye.com/blog/814000
下面关于sensor转自:
1. 简介
在了解Sensor工作流程以前,一直以为其事件是通过Event Hub来进行输送的,可是研究完Android4.0代码之后,才发现自己错了。
其主要框架如下图所示:
2.功能模块
2.1 SensorManager.java
与下层接口功能:
1) 在SensorManager函数中
(1) 调用native sensors_module_init初始化sensor list,即实例化native中的SensorManager
(2) 创建SensorThread线程
2) 在类SensorThread中
(1) 调用native sensors_create_queue创建队列
(2) 在线程中dead loop地调用native sensors_data_poll以从队列sQueue中获取事件(float[] values = new float[3];)
(3) 收到事件之后,报告sensor event给所有注册且关心此事件的listener
与上层的接口功能:
1) 在onPause时取消listener注册
2) 在onResume时注册listener
3) 把收到的事件报告给注册的listener
2.2 android_hardware_SensorManager.cpp
实现SensorManager.java中的native函数,它主要调用SenrsorManager.cpp和SensorEventQueue.cpp中的类来完成相关的工作。
2.3 SensorManager.cpp
- class SensorManager :
- public ASensorManager,
- public Singleton<SensorManager>
- {
- public:
- SensorManager(); //调用assertStateLocked
- ~SensorManager();
- //调用assertStateLocked,并返回mSensorList
- ssize_t getSensorList(Sensor const* const** list) const;
- // 返回mSensorList中第一个类型与type一致的sensor
- Sensor const* getDefaultSensor(int type);
- // 调用mSensorServer->createSensorEventConnection创建一个连接(ISensorEventConnection)
- // 并用此连接做为参数创建一个SensorEventQueue对象并返回
- sp<SensorEventQueue> createEventQueue();
- private:
- // DeathRecipient interface
- void sensorManagerDied();
- // 调用getService获取SensorService客户端并保存在mSensorServer中
- // 调用mSensorServer->getSensorList获取sensor列表,并保存在mSensors和mSensorList中
- status_t assertStateLocked() const;
- private:
- mutable Mutex mLock;
- mutable sp<ISensorServer> mSensorServer; // SensorService客户端
- mutable Sensor const** mSensorList; // sensor列表
- mutable Vector<Sensor> mSensors; // sensor列表
- mutable sp<IBinder::DeathRecipient> mDeathObserver;
- }
- class ISensorEventConnection : public IInterface
- {
- public:
- DECLARE_META_INTERFACE(SensorEventConnection);
- virtual sp<SensorChannel> getSensorChannel() const = 0;
- virtual status_t enableDisable(int handle, bool enabled) = 0;
- virtual status_t setEventRate(int handle, nsecs_t ns) = 0;
- };
2.4 SensorService.cpp
SensorService作为一个轻量级的system service,它运行于SystemServer内,即在system_init<system_init.cpp>调用SensorService::instantiate();
SensorService主要功能如下:
1) SensorService::instantiate创建实例对象,并增加到ServiceManager中,且创建并启动线程,并执行threadLoop
2) threadLoop从sensor驱动获取原始数据,然后通过SensorEventConnection把事件发送给客户端
3) BnSensorServer的成员函数负责让客户端获取sensor列表和创建SensorEventConnection
SensorService与客户端的接口定义如下:
- class ISensorServer : public IInterface
- {
- public:
- DECLARE_META_INTERFACE(SensorServer);
- virtual Vector<Sensor> getSensorList() = 0;
- virtual sp<ISensorEventConnection> createSensorEventConnection() = 0;
- };
SensorService定义如下:
- class SensorService :
- public BinderService<SensorService>, //创建SensorService对象,并增加到ServiceManager中
- public BnSensorServer, // 申明了SensorService与客户端(SensorManager)间的binder接口
- protected Thread // 线程辅助类,调用run创建并启动线程,然后在线程主函数内回调threadLoop函数,
- // 所以在使用它时,做一个派生,并根据需要重写threadLoop即可
- {
- friend class BinderService<SensorService>;
- static const nsecs_t MINIMUM_EVENTS_PERIOD = 1000000; // 1000 Hz
- SensorService();
- virtual ~SensorService();
- /*
- 在addService时,第一次构建sp强引用对象时,会调用onFirstRef函数
- 实现功能如下:
- 1) 获取SensorDevice实例
- 2) 调用SensorDevice.getSensorList获取sensor_t列表
- 3) 根据硬件sensor_t创建HardwareSensor,然后加入mSensorList(Sensor)
- 和mSensorMap(HardwareSensor)中
- 4) 根据硬件sensor_t创建对应的senosr(如GravitySensor),
- 然后加入mVirtualSensorList和mSensorList中
- 5) mUserSensorList = mSensorList;
- 6) run("SensorService", PRIORITY_URGENT_DISPLAY);运行线程,并执行threadLoop
- */
- virtual void onFirstRef();
- // Thread interface
- /*
- 1) 调用SensorDevice.poll获取sensors_event_t事件
- 2) 获取已经激活的sensor列表mActiveVirtualSensors
- 3) 对每一个事件,执行SensorFusion.process
- 4) 对每一个事件,执行HardwareSensor.process(事件无变化,直接copy)
- 5) 调用SensorService::SensorEventConnection::sendEvents,把事件发
- 送给所有的listener
- */
- virtual bool threadLoop();
- // ISensorServer interface
- // 返回mUserSensorList
- virtual Vector<Sensor> getSensorList();
- // 实例化SensorEventConnection并返回
- virtual sp<ISensorEventConnection> createSensorEventConnection();
- virtual status_t dump(int fd, const Vector<String16>& args);
- //====================================================================
- //============== SensorEventConnection start ========================
- class SensorEventConnection : public BnSensorEventConnection {
- virtual ~SensorEventConnection();
- virtual void onFirstRef();
- // 返回mChannel
- virtual sp<SensorChannel> getSensorChannel() const;
- // 调用SensorService::enable或SensorService::disable
- virtual status_t enableDisable(int handle, bool enabled);
- // 调用SensorService::setEventRate
- virtual status_t setEventRate(int handle, nsecs_t ns);
- sp<SensorService> const mService; // 保存当前SensorService实例
- sp<SensorChannel> const mChannel; // SensorChannel实例
- mutable Mutex mConnectionLock;
- // protected by SensorService::mLock
- SortedVector<int> mSensorInfo;
- public:
- /*
- 1) 把当前service保存在mService中
- 2) 创建SensorChannel实例,并保存在mChannel中
- (在SensorChannel::SensorChannel中创建pipe,并把收和发都设置非阻塞)
- */
- SensorEventConnection(const sp<SensorService>& service);
- // 调用连接中的mChannel->write (SensorChannel::write),把符合条件的事件写入pipe
- status_t sendEvents(sensors_event_t const* buffer, size_t count,
- sensors_event_t* scratch = NULL);
- bool hasSensor(int32_t handle) const; //检查handle是否在mSensorInfo中
- bool hasAnySensor() const; //检查mSensorInfo中是否有sensor
- bool addSensor(int32_t handle); //把handle增加到mSensorInfo列表中
- bool removeSensor(int32_t handle); //把handle从mSensorInfo中删除
- };
- //============== SensorEventConnection end ========================
- //====================================================================
- class SensorRecord {
- SortedVector< wp<SensorEventConnection> > mConnections;
- public:
- SensorRecord(const sp<SensorEventConnection>& connection);
- bool addConnection(const sp<SensorEventConnection>& connection);
- bool removeConnection(const wp<SensorEventConnection>& connection);
- size_t getNumConnections() const { return mConnections.size(); }
- };
- SortedVector< wp<SensorEventConnection> > getActiveConnections() const;
- DefaultKeyedVector<int, SensorInterface*> getActiveVirtualSensors() const;
- String8 getSensorName(int handle) const;
- void recordLastValue(sensors_event_t const * buffer, size_t count);
- static void sortEventBuffer(sensors_event_t* buffer, size_t count);
- void registerSensor(SensorInterface* sensor);
- void registerVirtualSensor(SensorInterface* sensor);
- // constants
- Vector<Sensor> mSensorList; // Sensor列表
- Vector<Sensor> mUserSensorList; //与mSensorList一样
- DefaultKeyedVector<int, SensorInterface*> mSensorMap; //其成员为HardwareSensor
- Vector<SensorInterface *> mVirtualSensorList; //其成员为HardwareSensor
- status_t mInitCheck;
- // protected by mLock
- mutable Mutex mLock;
- DefaultKeyedVector<int, SensorRecord*> mActiveSensors; //成员为SensorRecord
- DefaultKeyedVector<int, SensorInterface*> mActiveVirtualSensors; //成员为HardwareSensor
- SortedVector< wp<SensorEventConnection> > mActiveConnections;
- // The size of this vector is constant, only the items are mutable
- KeyedVector<int32_t, sensors_event_t> mLastEventSeen;
- public:
- static char const* getServiceName() { return "sensorservice"; }
- void cleanupConnection(SensorEventConnection* connection);
- /*
- 1) 调用HardwareSensor::activate,即SensorDevice::activate
- 2) 然后创建SensorRecord并增加到列表mActiveSensors
- 3) 把此HardwareSensor增加到连接的mSensorInfo
- 4) 把此连接增加到mActiveConnections中
- */
- status_t enable(const sp<SensorEventConnection>& connection, int handle);
- /*
- 1) 把此sensor从连接的mSensorInfo中删除
- 2) 把此连接从mActiveConnections中删除
- 3) 调用HardwareSensor::activate,即SensorDevice::activate
- */
- status_t disable(const sp<SensorEventConnection>& connection, int handle);
- /*
- 1)调用HardwareSensor::setDelay,即SensorDevice::setDelay
- */
- status_t setEventRate(const sp<SensorEventConnection>& connection, int handle, nsecs_t ns);
- }
2.5 SensorDevice.cpp
SensorDevice封装了对SensorHAL层代码的调用,主要包含以下功能:
1) 获取sensor列表(getSensorList)
2) 获取sensor事件(poll)
3) Enable或Disable sensor (activate)
4) 设置delay时间
- class SensorDevice : public Singleton<SensorDevice> {
- friend class Singleton<SensorDevice>;
- struct sensors_poll_device_t* mSensorDevice; // sensor设备
- struct sensors_module_t* mSensorModule;
- mutable Mutex mLock; // protect mActivationCount[].rates
- // fixed-size array after construction
- struct Info {
- Info() : delay(0) { }
- KeyedVector<void*, nsecs_t> rates;
- nsecs_t delay;
- status_t setDelayForIdent(void* ident, int64_t ns);
- nsecs_t selectDelay();
- };
- DefaultKeyedVector<int, Info> mActivationCount;
- /*
- 1) 调用hw_get_module(SENSORS_HARDWARE_MODULE_ID,..)获取sensors_module_t,
- 并保存在mSensorModule中
- 2) 调用mSensorModule->common->methods->open,以返回sensors_poll_device_t,
- 并保存在mSensorDevice中
- 3) 调用mSensorModule->get_sensors_list所有可访问的sensor_t
- 4) 调用mSensorDevice->activate激活所有的sensor
- */
- SensorDevice();
- public:
- // 调用mSensorModule->get_sensors_list实现
- ssize_t getSensorList(sensor_t const** list);
- status_t initCheck() const;
- // 调用mSensorDevice->poll实现
- ssize_t poll(sensors_event_t* buffer, size_t count);
- // 调用mSensorDevice->activate实现
- status_t activate(void* ident, int handle, int enabled);
- // 调用mSensorDevice->setDelay实现
- status_t setDelay(void* ident, int handle, int64_t ns);
- void dump(String8& result, char* buffer, size_t SIZE);
- };
2.6 Sensor HAL
定义:/hardware/libhardware/include/hardware/sensors.h
实现:/hardware/mychip/sensor/st/sensors.c
2.6.1 struct sensors_poll_device_t 定义
- struct sensors_poll_device_t {
- struct hw_device_t common;
- // Activate/deactivate one sensor.
- int (*activate)(struct sensors_poll_device_t *dev,
- int handle, int enabled);
- // Set the delay between sensor events in nanoseconds for a given sensor.
- int (*setDelay)(struct sensors_poll_device_t *dev,
- int handle, int64_t ns);
- // Returns an array of sensor data.
- int (*poll)(struct sensors_poll_device_t *dev,
- sensors_event_t* data, int count);
- };
2.6.2 struct sensors_module_t 定义
- struct sensors_module_t {
- struct hw_module_t common;
- /**
- * Enumerate all available sensors. The list is returned in "list".
- * @return number of sensors in the list
- */
- int (*get_sensors_list)(struct sensors_module_t* module,
- struct sensor_t const** list);
- };
2.6.3 struct sensor_t 定义
- struct sensor_t {
- /* name of this sensors */
- const char* name;
- /* vendor of the hardware part */
- const char* vendor;
- /* version of the hardware part + driver. The value of this field
- * must increase when the driver is updated in a way that changes the
- * output of this sensor. This is important for fused sensors when the
- * fusion algorithm is updated.
- */
- int version;
- /* handle that identifies this sensors. This handle is used to activate
- * and deactivate this sensor. The value of the handle must be 8 bits
- * in this version of the API.
- */
- int handle;
- /* this sensor's type. */
- int type;
- /* maximaum range of this sensor's value in SI units */
- float maxRange;
- /* smallest difference between two values reported by this sensor */
- float resolution;
- /* rough estimate of this sensor's power consumption in mA */
- float power;
- /* minimum delay allowed between events in microseconds. A value of zero
- * means that this sensor doesn't report events at a constant rate, but
- * rather only when a new data is available */
- int32_t minDelay;
- /* reserved fields, must be zero */
- void* reserved[8];
- };
2.6.4 struct sensors_event_t 定义
- typedef struct {
- union {
- float v[3];
- struct {
- float x;
- float y;
- float z;
- };
- struct {
- float azimuth;
- float pitch;
- float roll;
- };
- };
- int8_t status;
- uint8_t reserved[3];
- } sensors_vec_t;
- /**
- * Union of the various types of sensor data
- * that can be returned.
- */
- typedef struct sensors_event_t {
- /* must be sizeof(struct sensors_event_t) */
- int32_t version;
- /* sensor identifier */
- int32_t sensor;
- /* sensor type */
- int32_t type;
- /* reserved */
- int32_t reserved0;
- /* time is in nanosecond */
- int64_t timestamp;
- union {
- float data[16];
- /* acceleration values are in meter per second per second (m/s^2) */
- sensors_vec_t acceleration;
- /* magnetic vector values are in micro-Tesla (uT) */
- sensors_vec_t magnetic;
- /* orientation values are in degrees */
- sensors_vec_t orientation;
- /* gyroscope values are in rad/s */
- sensors_vec_t gyro;
- /* temperature is in degrees centigrade (Celsius) */
- float temperature;
- /* distance in centimeters */
- float distance;
- /* light in SI lux units */
- float light;
- /* pressure in hectopascal (hPa) */
- float pressure;
- /* relative humidity in percent */
- float relative_humidity;
- };
- uint32_t reserved1[4];
- } sensors_event_t;
2.6.5 struct sensors_module_t 实现
- #include <hardware/sensors.h>
- #include "nusensors.h"
- /*
- * the AK8973 has a 8-bit ADC but the firmware seems to average 16 samples,
- * or at least makes its calibration on 12-bits values. This increases the
- * resolution by 4 bits.
- */
- static const struct sensor_t sSensorList[] = {
- { "MMA8452Q 3-axis Accelerometer",
- "Freescale Semiconductor",
- 1, SENSORS_HANDLE_BASE+ID_A,
- SENSOR_TYPE_ACCELEROMETER, 4.0f*9.81f, (4.0f*9.81f)/256.0f, 0.2f, 0, { } },
- { "AK8975 3-axis Magnetic field sensor",
- "Asahi Kasei",
- 1, SENSORS_HANDLE_BASE+ID_M,
- SENSOR_TYPE_MAGNETIC_FIELD, 2000.0f, 1.0f/16.0f, 6.8f, 0, { } },
- { "AK8975 Orientation sensor",
- "Asahi Kasei",
- 1, SENSORS_HANDLE_BASE+ID_O,
- SENSOR_TYPE_ORIENTATION, 360.0f, 1.0f, 7.0f, 0, { } },
- { "ST 3-axis Gyroscope sensor",
- "STMicroelectronics",
- 1, SENSORS_HANDLE_BASE+ID_GY,
- SENSOR_TYPE_GYROSCOPE, RANGE_GYRO, CONVERT_GYRO, 6.1f, 1190, { } },
- { "AL3006Proximity sensor",
- "Dyna Image Corporation",
- 1, SENSORS_HANDLE_BASE+ID_P,
- SENSOR_TYPE_PROXIMITY,
- PROXIMITY_THRESHOLD_CM, PROXIMITY_THRESHOLD_CM,
- 0.5f, 0, { } },
- { "AL3006 light sensor",
- "Dyna Image Corporation",
- 1, SENSORS_HANDLE_BASE+ID_L,
- SENSOR_TYPE_LIGHT, 10240.0f, 1.0f, 0.5f, 0, { } },
- };
- static int open_sensors(const struct hw_module_t* module, const char* name,
- struct hw_device_t** device);
- static int sensors__get_sensors_list(struct sensors_module_t* module,
- struct sensor_t const** list)
- {
- *list = sSensorList;
- return ARRAY_SIZE(sSensorList);
- }
- static struct hw_module_methods_t sensors_module_methods = {
- .open = open_sensors
- };
- const struct sensors_module_t HAL_MODULE_INFO_SYM = {
- .common = {
- .tag = HARDWARE_MODULE_TAG,
- .version_major = 1,
- .version_minor = 0,
- .id = SENSORS_HARDWARE_MODULE_ID,
- .name = "MMA8451Q & AK8973A & gyro Sensors Module",
- .author = "The Android Project",
- .methods = &sensors_module_methods,
- },
- .get_sensors_list = sensors__get_sensors_list
- };
- static int open_sensors(const struct hw_module_t* module, const char* name,
- struct hw_device_t** device)
- {
- return init_nusensors(module, device); //待后面讲解
- }
2.6.6 struct sensors_poll_device_t 实现
实现代码位于:/hardware/mychip/sensor/st/nusensors.cpp
从上面的代码中可以看出,当调用init_nusensors时,它将返回sensors_poll_device_t,然后就可以调用sensors_poll_device_t 的以下方法进行相关操作:
1) activate
2) setDelay
3) poll
6.1) struct sensors_poll_context_t 定义
- struct sensors_poll_context_t {
- struct sensors_poll_device_t device; // must be first
- sensors_poll_context_t();
- ~sensors_poll_context_t();
- int activate(int handle, int enabled);
- int setDelay(int handle, int64_t ns);
- int pollEvents(sensors_event_t* data, int count);
- private:
- enum {
- light = 0,
- proximity = 1,
- mma = 2,
- akm = 3,
- gyro = 4,
- numSensorDrivers,
- numFds,
- };
- static const size_t wake = numFds - 1;
- static const char WAKE_MESSAGE = 'W';
- struct pollfd mPollFds[numFds];
- int mWritePipeFd;
- SensorBase* mSensors[numSensorDrivers];
- int handleToDriver(int handle) const {
- switch (handle) {
- case ID_A:
- return mma;
- case ID_M:
- case ID_O:
- return akm;
- case ID_P:
- return proximity;
- case ID_L:
- return light;
- case ID_GY:
- return gyro;
- }
- return -EINVAL;
- }
- }
6.2) init_nusensors 实现
- int init_nusensors(hw_module_t const* module, hw_device_t** device)
- {
- int status = -EINVAL;
- sensors_poll_context_t *dev = new sensors_poll_context_t();
- memset(&dev->device, 0, sizeof(sensors_poll_device_t));
- dev->device.common.tag = HARDWARE_DEVICE_TAG;
- dev->device.common.version = 0;
- dev->device.common.module = const_cast<hw_module_t*>(module);
- dev->device.common.close = poll__close;
- dev->device.activate = poll__activate;
- dev->device.setDelay = poll__setDelay;
- dev->device.poll = poll__poll;
- *device = &dev->device.common;
- status = 0;
- return status;
- }
由以上代码可见,sensors_poll_device_t的activate、setDelay和poll的实现函数分别为:
(1) poll__activate
(2) poll__setDelay
(3) poll__poll
下面讲解以上三个关键函数的实现
6.3) struct sensors_poll_context_t 的实现
- sensors_poll_context_t::sensors_poll_context_t()
- {
- mSensors[light] = new LightSensor();
- mPollFds[light].fd = mSensors[light]->getFd();
- mPollFds[light].events = POLLIN;
- mPollFds[light].revents = 0;
- mSensors[proximity] = new ProximitySensor();
- mPollFds[proximity].fd = mSensors[proximity]->getFd();
- mPollFds[proximity].events = POLLIN;
- mPollFds[proximity].revents = 0;
- mSensors[mma] = new MmaSensor(); //下面MmmaSensor为例进行分析
- mPollFds[mma].fd = mSensors[mma]->getFd();
- mPollFds[mma].events = POLLIN;
- mPollFds[mma].revents = 0;
- mSensors[akm] = new AkmSensor();
- mPollFds[akm].fd = mSensors[akm]->getFd();
- mPollFds[akm].events = POLLIN;
- mPollFds[akm].revents = 0;
- mSensors[gyro] = new GyroSensor();
- mPollFds[gyro].fd = mSensors[gyro]->getFd();
- mPollFds[gyro].events = POLLIN;
- mPollFds[gyro].revents = 0;
- int wakeFds[2];
- int result = pipe(wakeFds);
- LOGE_IF(result<0, "error creating wake pipe (%s)", strerror(errno));
- fcntl(wakeFds[0], F_SETFL, O_NONBLOCK);
- fcntl(wakeFds[1], F_SETFL, O_NONBLOCK);
- mWritePipeFd = wakeFds[1];
- mPollFds[wake].fd = wakeFds[0];
- mPollFds[wake].events = POLLIN;
- mPollFds[wake].revents = 0;
- }
- sensors_poll_context_t::~sensors_poll_context_t() {
- for (int i=0 ; i<numSensorDrivers ; i++) {
- delete mSensors[i];
- }
- close(mPollFds[wake].fd);
- close(mWritePipeFd);
- }
- int sensors_poll_context_t::activate(int handle, int enabled) {
- int index = handleToDriver(handle);
- if (index < 0) return index;
- int err = mSensors[index]->enable(handle, enabled);
- if (enabled && !err) {
- const char wakeMessage(WAKE_MESSAGE);
- int result = write(mWritePipeFd, &wakeMessage, 1);
- LOGE_IF(result<0, "error sending wake message (%s)", strerror(errno));
- }
- return err;
- }
- int sensors_poll_context_t::setDelay(int handle, int64_t ns) {
- int index = handleToDriver(handle);
- if (index < 0) return index;
- return mSensors[index]->setDelay(handle, ns);
- }
- int sensors_poll_context_t::pollEvents(sensors_event_t* data, int count)
- {
- int nbEvents = 0;
- int n = 0;
- do {
- // see if we have some leftover from the last poll()
- for (int i=0 ; count && i<numSensorDrivers ; i++) {
- SensorBase* const sensor(mSensors[i]);
- if ((mPollFds[i].revents & POLLIN) || (sensor->hasPendingEvents())) {
- int nb = sensor->readEvents(data, count); // num of evens received.
- D("nb = %d.", nb);
- if (nb < count) {
- // no more data for this sensor
- mPollFds[i].revents = 0;
- }
- count -= nb;
- nbEvents += nb;
- data += nb;
- }
- }
- if (count) {
- // we still have some room, so try to see if we can get
- // some events immediately or just wait if we don't have
- // anything to return
- n = poll(mPollFds, numFds, nbEvents ? 0 : -1);
- if (n<0) {
- LOGE("poll() failed (%s)", strerror(errno));
- return -errno;
- }
- if (mPollFds[wake].revents & POLLIN) {
- char msg;
- int result = read(mPollFds[wake].fd, &msg, 1);
- LOGE_IF(result<0, "error reading from wake pipe (%s)", strerror(errno));
- LOGE_IF(msg != WAKE_MESSAGE, "unknown message on wake queue (0x%02x)", int(msg));
- mPollFds[wake].revents = 0;
- }
- }
- // if we have events and space, go read them
- } while (n && count);
- return nbEvents;
- }
- /*****************************************************************************/
- static int poll__close(struct hw_device_t *dev)
- {
- sensors_poll_context_t *ctx = (sensors_poll_context_t *)dev;
- if (ctx) {
- delete ctx;
- }
- return 0;
- }
- static int poll__activate(struct sensors_poll_device_t *dev,
- int handle, int enabled) {
- sensors_poll_context_t *ctx = (sensors_poll_context_t *)dev;
- return ctx->activate(handle, enabled);
- }
- static int poll__setDelay(struct sensors_poll_device_t *dev,
- int handle, int64_t ns) {
- sensors_poll_context_t *ctx = (sensors_poll_context_t *)dev;
- return ctx->setDelay(handle, ns);
- }
- static int poll__poll(struct sensors_poll_device_t *dev,
- sensors_event_t* data, int count) {
- sensors_poll_context_t *ctx = (sensors_poll_context_t *)dev;
- return ctx->pollEvents(data, count);
- }
下面MmaSensor为例进行分析。
2.7 MmaSensor.cpp
1) SensorBase的实现(SensorBase.cpp)
- class SensorBase {
- protected:
- const char* dev_name; // "/dev/mma8452_daemon"
- const char* data_name; // "gsensor"
- int dev_fd; // 打开设备"/dev/mma8452_daemon"的fd
- // 打开事件"/dev/input/eventx"的fd,其驱动的名字为"gsensor"
- int data_fd;
- // 打开与"gsensor"对应的事件"/dev/input/eventx"
- static int openInput(const char* inputName);
- //通过clock_gettime获取当前时间
- static int64_t getTimestamp();
- static int64_t timevalToNano(timeval const& t) {
- return t.tv_sec*1000000000LL + t.tv_usec*1000;
- }
- int open_device(); //打开设备"dev/mma8452_daemon"
- int close_device(); //关闭设备"dev/mma8452_daemon"
- public:
- // 调用openInput
- SensorBase(
- const char* dev_name,
- const char* data_name);
- virtual ~SensorBase();
- virtual int readEvents(sensors_event_t* data, int count) = 0;
- virtual bool hasPendingEvents() const;
- virtual int getFd() const; //返回data_fd
- virtual int setDelay(int32_t handle, int64_t ns);
- virtual int enable(int32_t handle, int enabled) = 0;
- };
2) MmaSensor的实现
- class MmaSensor : public SensorBase {
- public:
- /*
- 1) 设置dev_name为 "/dev/mma8452_daemon"
- 2) 设置data_name为 "gsensor"
- 3) open设备 "/dev/mma8452_daemon"
- */
- MmaSensor();
- virtual ~MmaSensor();
- enum {
- Accelerometer = 0,
- numSensors
- };
- // 调用ioctl(MMA_IOCTL_APP_SET_RATE)
- virtual int setDelay(int32_t handle, int64_t ns);
- /*
- 1) Activate: ioctl(MMA_IOCTL_START)
- 2) Deactivate: ioctl(MMA_IOCTL_CLOSE)
- */
- virtual int enable(int32_t handle, int enabled);
- /*
- 1) 从data_fd read input_event
- 2) 调用processEvent对事件进行处理
- 3) 把事件通过data返回
- */
- virtual int readEvents(sensors_event_t* data, int count);
- void processEvent(int code, int value);
- private:
- int update_delay();
- uint32_t mEnabled;
- uint32_t mPendingMask;
- InputEventCircularReader mInputReader;
- sensors_event_t mPendingEvents[numSensors];
- uint64_t mDelays[numSensors];
- };
3. 加载HAL
HAL 为一个.so库,其加载过程相关代码如下:
- #define HAL_LIBRARY_PATH1 "/system/lib/hw"
- #define HAL_LIBRARY_PATH2 "/vendor/lib/hw"
- #define SENSORS_HARDWARE_MODULE_ID "sensors"
- SensorDevice::SensorDevice()
- : mSensorDevice(0),
- mSensorModule(0)
- {
- status_t err = hw_get_module(SENSORS_HARDWARE_MODULE_ID,
- (hw_module_t const**)&mSensorModule);
- ALOGE_IF(err, "couldn't load %s module (%s)",
- SENSORS_HARDWARE_MODULE_ID, strerror(-err));
- if (mSensorModule) {
- err = sensors_open(&mSensorModule->common, &mSensorDevice);
- ALOGE_IF(err, "couldn't open device for module %s (%s)",
- SENSORS_HARDWARE_MODULE_ID, strerror(-err));
- if (mSensorDevice) {
- sensor_t const* list;
- ssize_t count = mSensorModule->get_sensors_list(mSensorModule, &list);
- mActivationCount.setCapacity(count);
- Info model;
- for (size_t i=0 ; i<size_t(count) ; i++) {
- mActivationCount.add(list[i].handle, model);
- mSensorDevice->activate(mSensorDevice, list[i].handle, 0);
- }
- }
- }
- }
- int hw_get_module(const char *id, const struct hw_module_t **module)
- {
- return hw_get_module_by_class(id, NULL, module);
- }
- int hw_get_module_by_class(const char *class_id, const char *inst,
- const struct hw_module_t **module)
- {
- int status;
- int i;
- const struct hw_module_t *hmi = NULL;
- char prop[PATH_MAX];
- char path[PATH_MAX];
- char name[PATH_MAX];
- if (inst)
- snprintf(name, PATH_MAX, "%s.%s", class_id, inst);
- else
- strlcpy(name, class_id, PATH_MAX);
- /*
- * Here we rely on the fact that calling dlopen multiple times on
- * the same .so will simply increment a refcount (and not load
- * a new copy of the library).
- * We also assume that dlopen() is thread-safe.
- */
- /* Loop through the configuration variants looking for a module */
- for (i=0 ; i<HAL_VARIANT_KEYS_COUNT+1 ; i++) {
- if (i < HAL_VARIANT_KEYS_COUNT) {
- if (property_get(variant_keys[i], prop, NULL) == 0) {
- continue;
- }
- snprintf(path, sizeof(path), "%s/%s.%s.so",
- HAL_LIBRARY_PATH2, name, prop);
- if (access(path, R_OK) == 0) break;
- snprintf(path, sizeof(path), "%s/%s.%s.so",
- HAL_LIBRARY_PATH1, name, prop);
- if (access(path, R_OK) == 0) break;
- } else {
- snprintf(path, sizeof(path), "%s/%s.default.so",
- HAL_LIBRARY_PATH1, name);
- if (access(path, R_OK) == 0) break;
- }
- }
- status = -ENOENT;
- if (i < HAL_VARIANT_KEYS_COUNT+1) {
- /* load the module, if this fails, we're doomed, and we should not try
- * to load a different variant. */
- status = load(class_id, path, module);
- }
- return status;
- }
4. 启动SensorService
SensorService在SystemServer中启动(system_init.cpp),其相关代码如下:
- extern "C" status_t system_init()
- {
- ....
- property_get("system_init.startsensorservice", propBuf, "1");
- if (strcmp(propBuf, "1") == 0) {
- // Start the sensor service
- SensorService::instantiate();
- }
- ...
- return NO_ERROR;
- }
5. SensorManager注册Listener过程
- private SensorManager mSensorManager = (SensorManager) getSystemService(SENSOR_SERVICE);
- registerListener(SensorManager.java)->
- registerListenerImpl (SystemSensorManager.java)->
- enableSensorLocked(SystemSensorManager.java)->
- sensors_enable_sensor(android_hardware_SensorManager.cpp)->
- SensorEventQueue::enableSensor(SensorEventQueue.cpp)->
- 1>SensorService::SensorEventConnection::enableDisable(handle, true) (SensorService.cpp)->
- SensorService::enable(SensorService.cpp)->
- HardwareSensor::activate(SensorInterface.cpp)->
- SensorDevice::activate(SensorDevice.cpp)->
- sensors_poll_device_t::activate(HAL)
- 2>SensorService::SensorEventConnection::setEventRate(SensorService.cpp)->
android sensor架构的更多相关文章
- Android Sensor 架构深入剖析【转】
本文转载自: 1.Android sensor架构 Android4.0系统内置对传感器的支持达13种,它们分别是:加速度传感器 (accelerometer).磁力传感器(magnetic fiel ...
- Android sensor架构分析
一.其主要框架如下图所示: 二.sensor的JNI层:android_hardware_SensorManager.cpp (frameworks\base\core\jni) 注册JN ...
- Android Sensor详解(1)简介与架构【转】
本文转载自:https://blog.csdn.net/u013983194/article/details/53244686 最近在学习有关如何porting sensor的东西,仅借此机会写博客来 ...
- Android系统架构说明介绍
Android系统架构说明介绍 Android系统架构和一些普遍的操作系统差不多,都是采用了分层的架构,从他们之间的架构图看,Android系统架构分为四个层,从高层到低层分别是应用程序层.应用程序框 ...
- 转载: android 学习架构
http://www.cnblogs.com/forlina/archive/2011/06/29/2093332.html 引言 通过前面两篇: Android 开发之旅:环境搭建及HelloWor ...
- Android程序架构基本内容概述
在Android操作系统中开发的应用程序都有一个结构缜密的架构.我们今天就来对这一Android程序架构做一个详细的分析.帮助大家了解程序开发的特点,以方便将来在应用程序开中明确自己的程序架构. An ...
- Android MVPR 架构模式
最近我在尝试让 Google 的 IO App 变得可单元测试,我这样做的其中一个原因是验证 Freeman 和 Pryce 在引用中对单元测试的总结.即使现在我还是没有把 IOSched 中的任何一 ...
- 转:微信Android客户端架构演进之路
转自: http://www.infoq.com/cn/articles/wechat-android-app-architecture 微信Android客户端架构演进之路 作者 赵原 发布于 20 ...
- android体系架构
android体系架构总结: android体系架构分为四层 第一层:应用层:applications 第二层:开发层 第三层:
随机推荐
- Servlet技术 Cookie与Session
会话过程:用户打开浏览器,点击链接访问资源,最后到关闭浏览器的整个过程称之为会话. 会话使用:与服务器进行会话的过程中产生数据,数据被保存下来,服务器根据数据对客户进行辨别,做出个性化的响应. 介绍两 ...
- java怎样获取CPU占用率和硬盘占用率
通过jmx可以监控vm内存使用,系统内存使用等,以下是网上某博客代码,特点是通过window和linux命令获得CPU使用率. 利用java程序实现获取计算机cpu利用率和内存使用信息. packag ...
- 移动端web开发中对点透的处理,以及理解fastclick如何做到去除300ms延迟
一.点透问题以及处理办法 开发中遇到一个问题,就是点击layer弹出框的取消按钮之后,按钮下方的click事件就直接触发了.直接看代码: $('.swiper-slide').on('click', ...
- moment.js常用时间示例,时间管理
'今天': moment() '昨天': moment().subtract(1, 'days') '过去7天':moment().subtract(7, 'days'),moment() '上月': ...
- 底部导航栏实现一 Fragment-replace
[效果](这里下载的软件收费的试用有水印) [推荐]这里推荐一个图标网http://iconfont.cn/.以上图标来自此图标网 [项目结构] [步骤] ①创建布局文件,写底部导航栏 <?xm ...
- vue-cli搭建项目的目录结构及说明
vue-cli基于webpack搭建项目的目录结构 build文件夹 ├── build // 项目构建的(webpack)相关代码 │ ├── build.js ...
- 深入Java虚拟机(2)——Java的平台无关性
一.平台无关性的好处 Java技术在网络环境下非常有用,其中一个关键理由是,用Java创建的可执行二进制程序,能够不加改变地运行于多个平台. 这样的平台无关性随之带来许多的好处.这将极大地减轻系统管理 ...
- Android艺术开发探索第三章————View的事件体系(下)
Android艺术开发探索第三章----View的事件体系(下) 在这里就能学习到很多,主要还是对View的事件分发做一个体系的了解 一.View的事件分发 上篇大致的说了一下View的基础知识和滑动 ...
- DoesNotExist at /admin/
DoesNotExist at /admin/ User has no account. Request Method: GET Request URL: http://127.0.0.1:8000/ ...
- 在自己笔记本电脑上如何访问虚拟机的内容、包括可以使用ssh、访问tomcat、访问nginx
1.给自己的电脑设置一个回环网卡,关于如何配置回环网卡,可以百度搜索一下 设置好后的状态如下: 并把回环网卡的ipv4的值设置成192.168.1.1 配置如下: 2.将vmware中的"虚 ...


