WCF系列教程之WCF服务宿主与WCF服务部署
本文参考自http://www.cnblogs.com/wangweimutou/p/4377062.html,纯属读书笔记,加深记忆。
一、简介
任何一个程序的运行都需要依赖一个确定的进程中,WCF也不例外。如果我们需要使用WCF服务,那么我们就必须将服务寄宿与创建它并控制它的上下文和生存期的运行时环境当中,承载服务的环境,称之为宿主。WCF服务可以在支持托管代码的任意Windows进程中运行。WCF提供了统一编程模型,用于生成面向服务的应用程序。此编程模型保持一致且独立于部署服务的运行时环境。 实际上,这意味着不管使用什么宿主选项,服务的代码看起来都非常类似。
所以,WCF服务的宿主选项可以有多种选项:
(1)、控制台应用程序
(2)、服务器环境,如 Internet 信息服务 (IIS)
(3)、Windows 进程激活服务 (WAS) 管理的工作进程内运行的
(4)、Windows 服务
.
.
.
等等
开发人员可以选择满足服务部署要求的宿主环境。 这些要求可能源自部署应用程序的平台,它必须发送和接收消息的传输,或者进程回收的类型和为确保足够可用性所需的其他进程管理,或者某些其他管理或可靠性要求。
二、WCF宿主环境主要有以下几种
1、托管应用程序中的自承载
WCF服务可以承载与任何托管应用程序中,这是最灵活的选项,因为它需要部署的基础结构最少,在托管应用程序代码内嵌入服务代码,然后创建并打开 ServiceHost 的实例以使服务变为可用。
这种方式的方案主要有两个:
(1)、控制台应用程序
(2)、客户端应用程序
i、 Windows Presentation Foundation (WPF)
ii、 Windows 窗体 (WinForms) 应用程序
控制台的优势:
在应用程序的开发阶段中,将 WCF 服务承载于控制台应用程序内通常是很有用的。 这使服务变得容易调试,从中跟踪信息以查明应用程序内发生的情况变得更加方便,以及通过将其复制到新的位置进行来回移动变得更加轻松。
客户端应用程序的优势:
此宿主选项还使客户端应用程序(如 WPF 和 WinForms 应用程序)与外部世界的通信变得很容易。 例如,一个将 WPF 用于其用户界面并作为 WCF 服务主机的对等协作客户端,允许其他客户端连接到它并共享信息。
2、托管应用程序中的自承载代码实例
(1)、控制台应用程序代码实例
(2)、关于Windows Presentation Foundation (WPF)和Windows 窗体 (WinForms) 应用程序的代码实例,因为本人不常用这两种技术开发,所以不多做解释
3、托管Windows服务
此宿主选项注册WCF服务作为托管Windows服务(以前成为NT服务),承载与其中的应用程序域中,以便服务的进程生存期由 Windows 服务的服务控制管理器 (SCM) 控制。与自承载选项一样,此类型的宿主环境要求作为应用程序的一部分编写某些宿主代码。 通过使服务从 ServiceBase 类以及从 WCF 服务协定接口继承,将该服务同时实现为 Windows 服务和 WCF 服务。 然后创建 ServiceHost,在被重写的 OnStart(String[]) 方法内打开它并在被重写的 OnStop() 方法内关闭它。 还必须实现从 Installer 继承的安装程序类,以允许 Installutil.exe 工具将程序安装为 Windows 服务。在未激活消息的安全环境中,由托管 Windows 服务宿主选项启用的方案是承载于 IIS 之外、长时间运行的 WCF 服务的方案。 服务的生存期改由操作系统控制。 此宿主选项在 Windows 的所有版本中都是可用的。
3.1、Windows服务(以前成为NT服务)的优点:
(1)、承载在IIS外、长时间运行的WCF服务
(2)、受所有windows版本的支持
(3)、由操作系统控制控制服务进程的生存期
3.2、Windows服务(以前成为NT服务)支持的传输
(1)、HTTP
(2)、net.tcp
(3)、net.pipe
(4)、net.msmq
3.3、进程和AppDomain回收
不会被回收,除非手动关闭服务
4、托管Windows服务代码示例
第一步:创建服务契约层IService(类库),在新建两个契约接口ICalculate和IMessage,具体代码如下:
ICalculate.cs
using System;

using System.Collections.Generic;

using System.Linq;

using System.ServiceModel;

using System.Text;

using System.Threading.Tasks;

namespace IService

{

    [ServiceContract]

    public interface ICalculate

    {

        [OperationContract]

        int Add(int a, int b);

    }

}
IMessage.cs
using System;

using System.Collections.Generic;

using System.Linq;

using System.ServiceModel;

using System.Text;

using System.Threading.Tasks;

namespace IService

{

    [ServiceContract]

    public interface IMessage

    {

        [OperationContract]

        string ReturnMessage(string name);

    }

}
第二步:创建具体的服务层,并实现上面的契约接口,新建Calculate和Message两个类
Calculate.cs
using IService;

using System;

using System.Collections.Generic;

using System.Linq;

using System.Text;

using System.Threading.Tasks;

namespace Service

{

    public class Calculate : ICalculate

    {

        public int Add(int a, int b)

        {

            return a + b;

        }

    }

}
Message.cs
using IService;

using System;

using System.Collections.Generic;

using System.Linq;

using System.Text;

using System.Threading.Tasks;

namespace Service

{

    public class Message:IMessage

    {

        public string ReturnMessage(string name)

        {

            return "Hello" + name;

        }

    }

}
第三步:创建宿主NTHost,新建windows服务

双击该文件,右键添加安装程序,生成如下两个文件

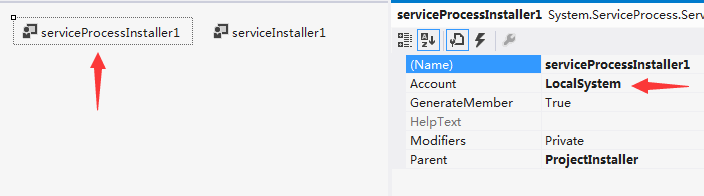
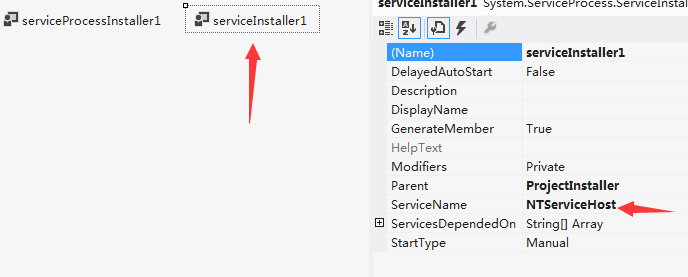
ok,服务配置完毕
第四步:编写服务主程序,Service1代码如下:
using Service;

using System;

using System.Collections.Generic;

using System.ComponentModel;

using System.Data;

using System.Diagnostics;

using System.Linq;

using System.ServiceModel;

using System.ServiceProcess;

using System.Text;

using System.Threading.Tasks;

namespace NTHost

{

    partial class Service1 : ServiceBase

    {

        public Service1()

        {

            InitializeComponent();

        }

        ServiceHost MessageHost = null;

        ServiceHost CalculatorHost = null;

        protected override void OnStart(string[] args)

        {

            MessageHost = new ServiceHost(typeof(Message));

            CalculatorHost = new ServiceHost(typeof(Calculate));

            MessageHost.Open();

            CalculatorHost.Open();

        }

        protected override void OnStop()

        {

            MessageHost.Close();

            CalculatorHost.Close();

            MessageHost = null;

            CalculatorHost = null;

        }

    }

}
第五步:编写控制台主程序,代码如下:
using System;

using System.Collections.Generic;

using System.Linq;

using System.ServiceProcess;

using System.Text;

namespace NTHost

{

    static class Program

    {

        /// <summary>

        /// 应用程序的主入口点。

        /// </summary>

        static void Main()

        {

            ServiceBase[] ServicesToRun;

            ServicesToRun = new ServiceBase[]

            {

                new Service1()

            };

            ServiceBase.Run(ServicesToRun);

        }

    }

}
第六步:配置配置文件,App.config文件代码如下:
<?xml version="1.0" encoding="utf-8"?>

<configuration>

  <system.serviceModel>

    <services>

      <service name="Service.Message" behaviorConfiguration="mexBehavior">

        <host>

          <baseAddresses>

            <add baseAddress="http://localhost:2234/Message/"/>

          </baseAddresses>

        </host>

        <endpoint address="" binding="wsHttpBinding" contract="IService.IMessage" />

        <endpoint address="mex" binding="mexHttpBinding" contract="IMetadataExchange" />

      </service>

      <service name="Service.Calculate" behaviorConfiguration="mexBehavior">

        <host>

            <baseAddresses>

              <add baseAddress="http://localhost:1235/ServiceCalculator/"/>

              <add baseAddress="net.tcp://localhost:1234/ServiceCalculator"/>

            </baseAddresses>

          </host>

         <endpoint address="" binding="netTcpBinding" bindingConfiguration="PortSharingBinding" contract="IService.ICalculate" >

          <identity>

            <dns value="localhost"/>

          </identity>

        </endpoint>

        <endpoint address="mex" binding="mexHttpBinding" contract="IMetadataExchange" />

      </service>

    </services>

    <bindings>

      <netTcpBinding>

        <binding name="PortSharingBinding" portSharingEnabled="true" >

          <security mode="None" />

        </binding>

      </netTcpBinding>

    </bindings>

    <behaviors>

      <serviceBehaviors>

        <behavior name="mexBehavior">

          <serviceMetadata httpGetEnabled="true" />

          <serviceDebug includeExceptionDetailInFaults="false" />

        </behavior>

      </serviceBehaviors>

    </behaviors>

  </system.serviceModel>

</configuration>
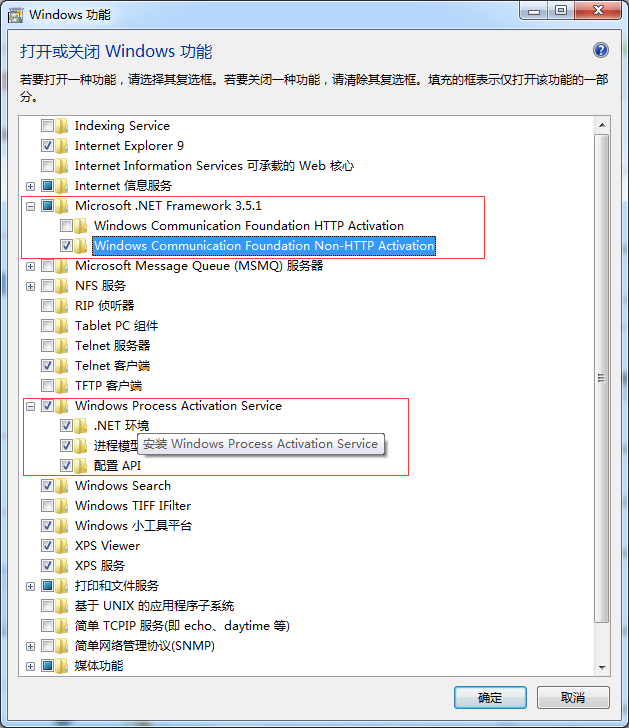
第七步:应为本实例启用的是net.tcp通讯,启用net.tcp通讯就必须依靠Windows 进程激活服务(也称为 WAS)在控制面板->程序和功能->打开或关闭windows功能勾选以下几个功能,安装WCF 激活组件
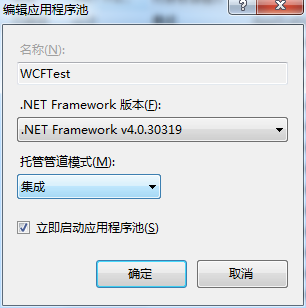
第八步:寄宿服务,生成NTHost工程,安装windows服务程序NTHost.exe
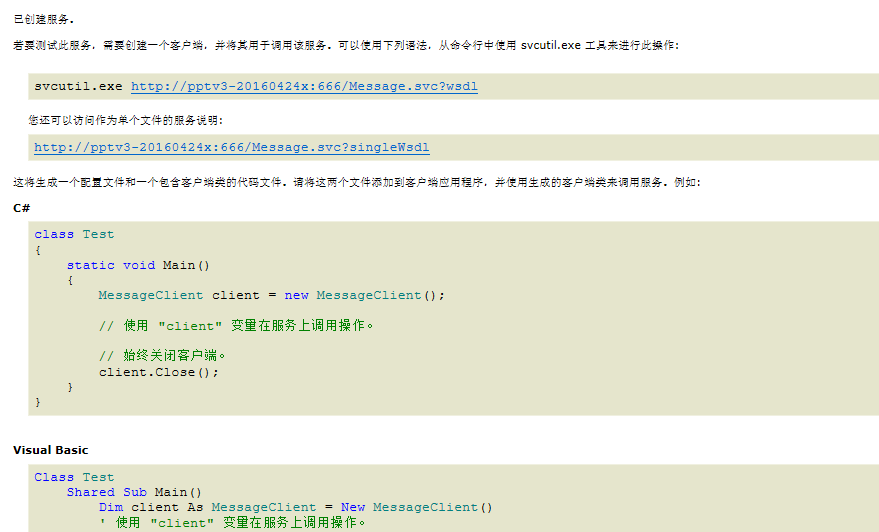
在命令行中输入Cd C:\Windows\Microsoft.NET\Framework\v4.0.30319,回车后输入installutil.exe 程序生成的bin目录绝对地址\NTHost.exe,回车后安装服务程序,程序注册成功后启动服务。
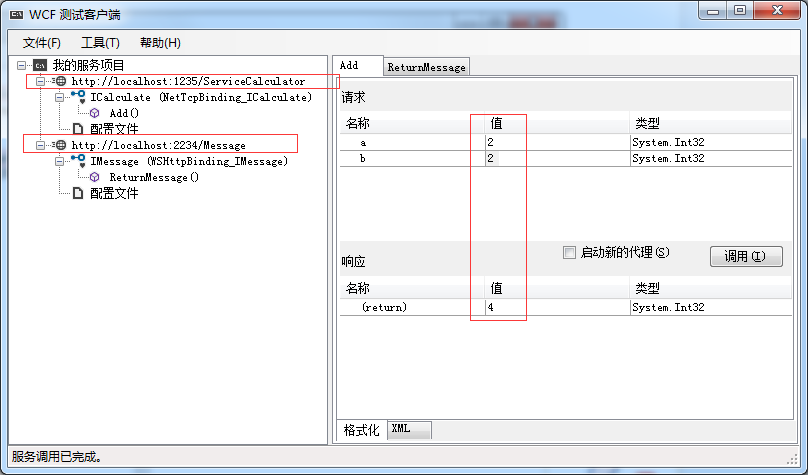
第九步:打开wcftestclient客户端进行测试
5、Internet信息服务(IIS)
在IIS中承载WCF服务,之前已经创建了契约层和服务层,这里就不创建了。
第一步:新建IISHost空Web应用程序,作为WCF服务的宿主
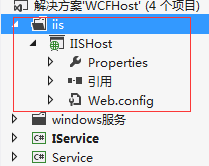
第二步:新建WebService服务
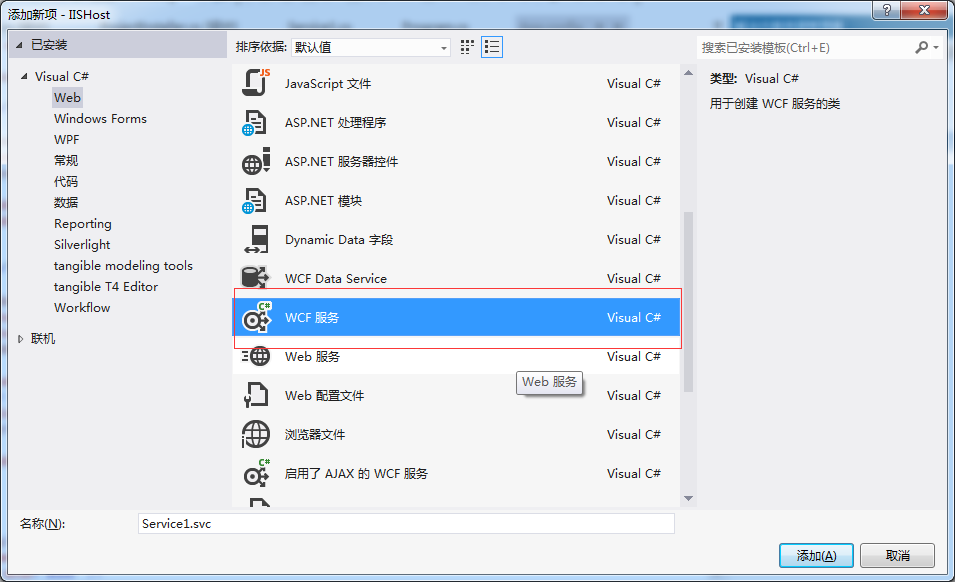
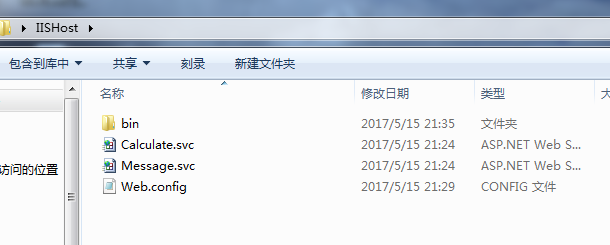
新建Calculate.svc,删除多余的文件,代码如下:
<%@ ServiceHost Language="C#" Debug="true" Service="Service.Calculate" %>
新建Message.svc,删除多余的文件,代码如下:
<%@ ServiceHost Language="C#" Debug="true" Service="Service.Message" %>
简单解释下上面代码的意思,Debug=true,表示当前服务可调式,Service="Service.Message"指定当前服务的类型为Service.Message
第三步:配置配置文件,这里配置两个服务一个是ServiceMessage用于Http通讯,一个是ServiceCalculator用于net.tcp通讯,Web.config文件代码如下:
<?xml version="1.0" encoding="utf-8"?>

<configuration>

  <system.serviceModel>

    <services>

      <service name="Service.Message" behaviorConfiguration="mexBehavior">

        <host>

          <baseAddresses>

            <add baseAddress="http://localhost:2234/Message/"/>

          </baseAddresses>

        </host>

        <endpoint address="" binding="wsHttpBinding" contract="IService.IMessage" />

        <endpoint address="mex" binding="mexHttpBinding" contract="IMetadataExchange" />

      </service>

      <service name="Service.Calculate" behaviorConfiguration="mexBehavior">

        <host>

            <baseAddresses>

              <add baseAddress="http://localhost:1235/ServiceCalculator/"/>

              <add baseAddress="net.tcp://localhost:1234/ServiceCalculator"/>

            </baseAddresses>

          </host>

         <endpoint address="" binding="netTcpBinding" bindingConfiguration="PortSharingBinding" contract="IService.ICalculate" >

          <identity>

            <dns value="localhost"/>

          </identity>

        </endpoint>

        <endpoint address="mex" binding="mexHttpBinding" contract="IMetadataExchange" />

      </service>

    </services>

    <bindings>

      <netTcpBinding>

        <binding name="PortSharingBinding" portSharingEnabled="true" >

          <security mode="None" />

        </binding>

      </netTcpBinding>

    </bindings>

    <behaviors>

      <serviceBehaviors>

        <behavior name="mexBehavior">

          <serviceMetadata httpGetEnabled="true" />

          <serviceDebug includeExceptionDetailInFaults="false" />

        </behavior>

      </serviceBehaviors>

    </behaviors>

  </system.serviceModel>

</configuration>
第四步:寄宿服务
生成IISHost程序,在生成前确保,IISHost引用了契约层和服务层,将bin文件目录、ServiceCalculator.svc、ServiceMessage.svc、Web.config拷贝到新建的IISHost文件夹(作为网站发布)中,然后IISHost以网站的形式发布到IIS服务器上。
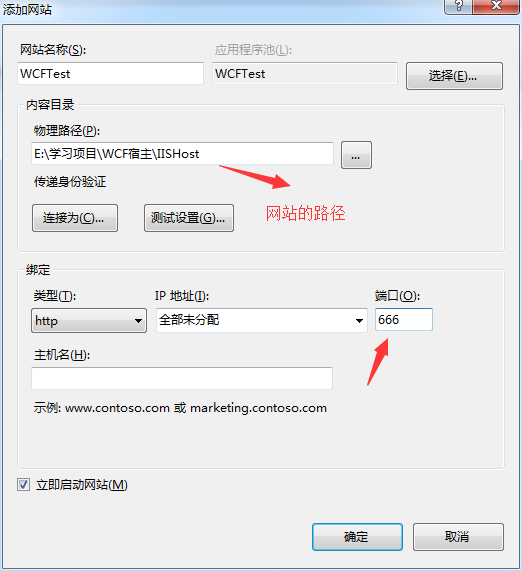
ok,网站配置完成
ok,说明Message.svc服务部署成功!
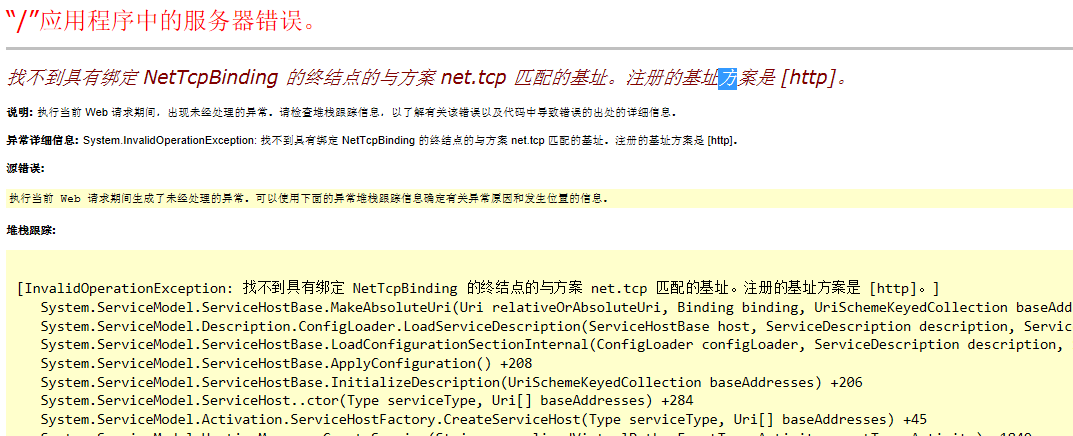
可以看到Calculate.svc服务寄宿失败,这是因为ServiceCalculator.svc启用的是net.tcp通讯,而在IIS中启用net.tcp通讯就必须依靠Windows 进程激活服务(也称为 WAS)
关于如何启用net.tcp通讯,上面已经介绍过了,所以这里就不说了,ok,在net.tcp通讯启用的情况下,配置承载服务的WCFHost网站,添加net.tcp通讯

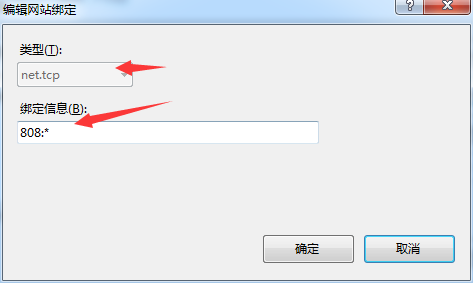
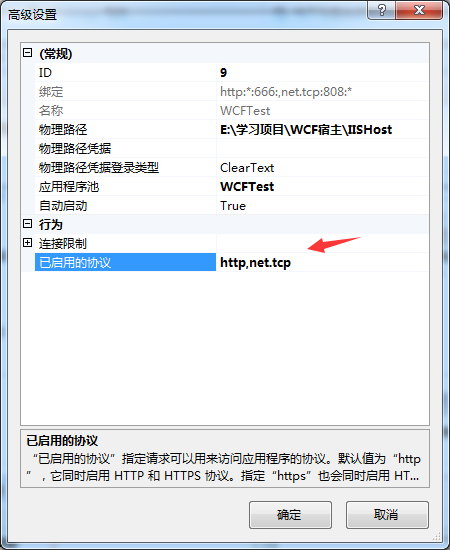
点击网站的高级设置,在已启用的协议后追加net.tcp协议
重新打开Calculate.svc

ok,说明Calculate服务部署成功!
第五步:使用wcftestclicnt进行测试
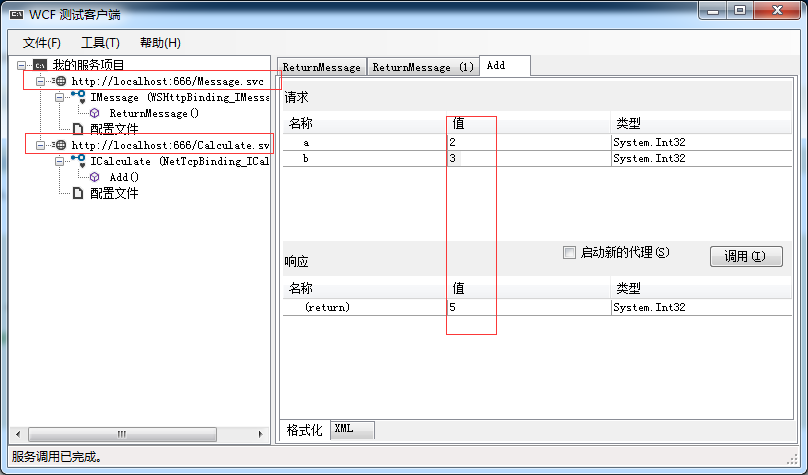
ok,IIS作为宿主部署WCF服务成功!
WCF系列教程之WCF服务宿主与WCF服务部署的更多相关文章
- WCF系列教程之WCF服务协定
本文参考自:http://www.cnblogs.com/wangweimutou/p/4422883.html,纯属读书笔记,加深记忆 一.服务协定简介: 1.WCF所有的服务协定层里面的服务接口, ...
- WCF系列教程之WCF服务配置工具
本文参考自http://www.cnblogs.com/wangweimutou/p/4367905.html Visual studio 针对服务配置提供了一个可视化的配置界面(Microsoft ...
- WCF系列教程之WCF客户端调用服务
1.创建WCF客户端应用程序需要执行下列步骤 (1).获取服务终结点的服务协定.绑定以及地址信息 (2).使用该信息创建WCF客户端 (3).调用操作 (4).关闭WCF客户端对象 二.操作实例 1. ...
- WCF系列教程之WCF服务配置
文本参考自:http://www.cnblogs.com/wangweimutou/p/4365260.html 简介:WCF作为分布式开发的基础框架,在定义服务以及消费服务的客户端时可以通过配置文件 ...
- WCF系列教程之WCF消息交换模式之单项模式
1.使用WCF单项模式须知 (1).WCF服务端接受客户端的请求,但是不会对客户端进行回复 (2).使用单项模式的服务端接口,不能包含ref或者out类型的参数,至于为什么,请参考C# ref与out ...
- WCF系列教程之WCF实例化
本文参考自http://www.cnblogs.com/wangweimutou/p/4517951.html,纯属读书笔记,加深记忆 一.理解WCF实例化机制 1.WCF实例化,是指对用户定义的服务 ...
- WCF系列教程之WCF中的会话
本文参考自http://www.cnblogs.com/wangweimutou/p/4516224.html,纯属读书笔记,加深记忆 一.WCF会话简介 1.在WCF应用程序中,回话将一组消息相互关 ...
- WCF系列教程之WCF客户端异常处理
本文参考自:http://www.cnblogs.com/wangweimutou/p/4414393.html,纯属读书笔记,加深记忆 一.简介 当我们打开WCF基础客户通道,无论是显示打开还是通过 ...
- WCF系列教程之WCF操作协定
一.简介 1.在定义服务协定时,在它的操作方法上都会加上OperationContract特性,此特性属于OperationContractAttribute 类,将OperationContract ...
随机推荐
- 排序:桶排序Bucket sort
补充说明三点 1,桶排序是稳定的 2,桶排序是常见排序里最快的一种,比快排还要快…大多数情况下 3,桶排序非常快,但是同时也非常耗空间,基本上是最耗空间的一种排序算法 无序数组有个要求,就是成员隶属于 ...
- Ubuntu 16.04调节屏幕显示字体大小
对于高分辨屏幕来说,Ubuntu的字体可能会有点小,反之,低分率的屏幕字体有点大,设置方法如下: [System Settings]->[Displays]->[ Scale for me ...
- Codeforces758D Ability To Convert 2017-01-20 10:29 231人阅读 评论(0) 收藏
D. Ability To Convert time limit per test 1 second memory limit per test 256 megabytes input standar ...
- [leetcode] 6. Balanced Binary Tree
这个题目纠结了一会儿,终于从二叉树转化到AVL了.题目如下: Given a binary tree, determine if it is height-balanced. For this pro ...
- UI 设计概念介绍
UI 设计概念介绍 http://www.slideshare.net/tedzhaoxa/ui-and-ue-design-basic
- 自我介绍和Github初次使用心得
姓名:许洪科 班级:网络工程142 学号:1413042047 爱好:足球 编写过的程序:0 编写过的代码:几乎为0(大多数为网上直接复制的) Github注册过程:. 1:进入Github网站后点击 ...
- Thread in depth 1: The basic
Every single thread has the follow elements: Execution Context:Every thread has a execution context ...
- Hibernate4获取Connection,ResultSet对象
项目中需要一个json对象,封装的时候,需要数据的列名. 在jdbc里面,可以有个ResultMetaData对象获取列名字.因为我用的是hibernate,这个框架已经封装了很多,一般是难以获得re ...
- C# 使用dynamic类型来访问JObject对象
dynamic是C#里面的动态类型,可在未知类型的情况访问对应的属性,非常灵活和方便. 使用Json.Net可以把一个Json字符串转换成一个JObject对象,如果有已知强类型,如果有已知对应的强类 ...
- JS DOM对象控制HTML元素详解
JS DOM对象控制HTML元素详解 方法: getElementsByName() 获取name getElementsByTagName() 获取元素 getAttribute() 获取元素 ...