RabbitMQ入门:在Spring Boot 应用中整合RabbitMQ
在上一篇随笔中我们认识并安装了RabbitMQ,接下来我们来看下怎么在Spring Boot 应用中整合RabbitMQ。
先给出最终目录结构:

搭建步骤如下:
- 新建maven工程amqp
- 修改pom文件,引入spring-boot-starter-amqp和spring-boot-starter-test
<project xmlns="http://maven.apache.org/POM/4.0.0"

    xmlns:xsi="http://www.w3.org/2001/XMLSchema-instance"

    xsi:schemaLocation="http://maven.apache.org/POM/4.0.0 http://maven.apache.org/xsd/maven-4.0.0.xsd">

    <modelVersion>4.0.0</modelVersion>

    <groupId>com.sam</groupId>

    <artifactId>amqp</artifactId>

    <version>0.0.1-SNAPSHOT</version>

    <parent>

        <groupId>org.springframework.boot</groupId>

        <artifactId>spring-boot-starter-parent</artifactId>

        <version>1.5.1.RELEASE</version>

    </parent>

    <properties>

        <javaVersion>1.8</javaVersion>

    </properties>

    <dependencies>

        <!-- 引入amqp依赖,它能很好的支持RabbitMQ -->

        <dependency>

            <groupId>org.springframework.boot</groupId>

            <artifactId>spring-boot-starter-amqp</artifactId>

        </dependency>

        <!-- 引入test依赖,这次需要用到JUnit -->

        <dependency>

            <groupId>org.springframework.boot</groupId>

            <artifactId>spring-boot-starter-test</artifactId>

        </dependency>

    </dependencies>

</project> - 新建application.properties配置文件,主要就是配置下连接RabbitMQ的信息:
spring.application.name=rabbitmq-hello

#config rabbitmq info

spring.rabbitmq.host=localhost

spring.rabbitmq.port=5672

spring.rabbitmq.username=guest

spring.rabbitmq.password=guest - 新建启动类,这里没什么特殊的,就是普通的spring boot启动类
/**

 * 这里没什么特殊的地方,就是普通的spring boot 配置

 *

 */

@SpringBootApplication

public class RabbitMQApp {

    public static void main(String[] args) {

        SpringApplication.run(RabbitMQApp.class, args);

    }

} - 创建生产者类,通过AmqpTemplate实现消息的发送,AmqpTemplate接口定义了一套针对AMQP协议的基础操作。在Spring Boot中会根据配置来注入具体的实现。这里我们会产生一个字符串,并发送到名为hello的队列中。
@Component

public class Sender {

    @Autowired

    AmqpTemplate rabbitmqTemplate;

    /**

     * 发送消息

     */

    public void send() {

        String content = "Sender says:" + "'hello, I'm sender'";

        System.out.println(content);

        rabbitmqTemplate.convertAndSend("hello", content);

    }

} - 创建消费者类,需要用到@RabbitListener来定义对hello队列的监听,并用@RabbitHandler注解来指定对消息处理的方法。我们这里实现了对hello队列的消费。
/**

 * 通过@RabbitListener对hello队列进行监听

 *

 */

@Component

@RabbitListener(queues="hello")

public class Receiver {

    /**

     * 通过@RabbitHandler声明的方法,对hello队列中的消息进行处理

     */

    @RabbitHandler

    public void receiver(String str) {

        System.out.println("Receiver says:[" + str + "]");

    }

} - 编写RabbitMQ的配置类,配置类可以配置队列、交换器、路由等高级信息。我们这里为了简单,只配置队列,其他的采用默认配置。
/**
* rabbitmq配置类,
* 为了简单,我们这里只配置了Queue
* 至于exchanges、brokers等用的默认配置
*
*/
@Configuration
public class RabbitConfig { @Bean
public Queue helloQueue() {
return new Queue("hello");
} } - 编写测试类,用来调用消息生产者
@RunWith(SpringJUnit4ClassRunner.class)

@SpringBootTest(classes=RabbitMQApp.class)

public class HelloTest {

    @Autowired

    private Sender sender;

    /**

     * 调用生产者进行消息发送

     */

    @Test

    public void hello() throws Exception{

        sender.send();

    }

} - 运行启动类,启动后控制台会有下面的提示内容:

- 执行测试类,在测试类的控制台会打印我们打的log内容

切换到amqp应用的控制台,能看到打印:

在管理页面中我们能看到Connections和Channels中包含了当前连接的条目: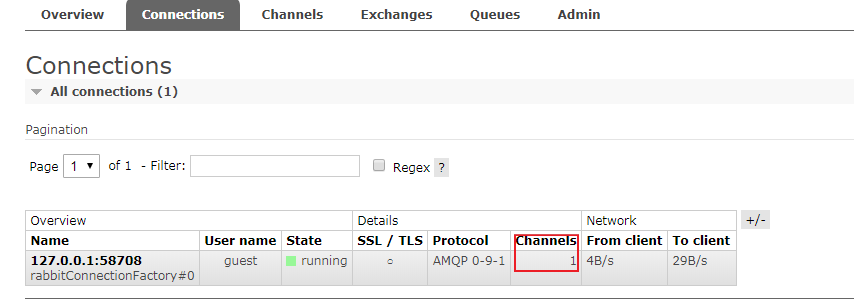
在整个生产和消费的过程中,生产和消费是一个异步操作,这是分布式系统中要使用消息代理的重要原因。
RabbitMQ入门:在Spring Boot 应用中整合RabbitMQ的更多相关文章
- Spring Boot入门 and Spring Boot与ActiveMQ整合
1.Spring Boot入门 1.1什么是Spring Boot Spring 诞生时是 Java 企业版(Java Enterprise Edition,JEE,也称 J2EE)的轻量级代替品.无 ...
- Kafka 入门和 Spring Boot 集成
目录 Kafka 入门和 Spring Boot 集成 标签:博客 概述 应用场景 基本概念 基本结构 和Spring Boot 集成 集成概述 集成环境 kafka 环境搭建 Spring Boot ...
- spring boot / cloud (九) 使用rabbitmq消息中间件
spring boot / cloud (九) 使用rabbitmq消息中间件 前言 rabbitmq介绍: RabbitMQ是一个在AMQP基础上完整的,可复用的企业消息系统.它可以用于大型软件系统 ...
- Spring Boot 2.x整合Redis
最近在学习Spring Boot 2.x整合Redis,在这里和大家分享一下,希望对大家有帮助. Redis是什么 Redis 是开源免费高性能的key-value数据库.有以下的优势(源于Redis ...
- spring boot 2.0 整合 elasticsearch6.5.3,spring boot 2.0 整合 elasticsearch NoNodeAvailableException
原文地址:spring boot 2.0 整合 elasticsearch NoNodeAvailableException 原文说的有点问题,下面贴出我的配置: 原码云项目地址:https://gi ...
- Spring Boot和Dubbo整合
provider端 POM依赖 <dependencies> <dependency> <groupId>org.springframework.boot</ ...
- 转-Hive/Phoenix + Druid + JdbcTemplate 在 Spring Boot 下的整合
Hive/Phoenix + Druid + JdbcTemplate 在 Spring Boot 下的整合 http://blog.csdn.net/balabalayi/article/detai ...
- spring boot入门教程——Spring Boot快速入门指南
Spring Boot已成为当今最流行的微服务开发框架,本文是如何使用Spring Boot快速开始Web微服务开发的指南,我们将使创建一个可运行的包含内嵌Web容器(默认使用的是Tomcat)的可运 ...
- Spring Boot项目中使用Mockito
本文首发于个人网站:Spring Boot项目中使用Mockito Spring Boot可以和大部分流行的测试框架协同工作:通过Spring JUnit创建单元测试:生成测试数据初始化数据库用于测试 ...
随机推荐
- PAT——1073. 多选题常见计分法(20)
批改多选题是比较麻烦的事情,有很多不同的计分方法.有一种最常见的计分方法是:如果考生选择了部分正确选项,并且没有选择任何错误选项,则得到50%分数:如果考生选择了任何一个错误的选项,则不能得分.本题就 ...
- PAT——1063. 计算谱半径
在数学中,矩阵的“谱半径”是指其特征值的模集合的上确界.换言之,对于给定的n个复数空间的特征值{a1+b1i, ..., an+bni},它们的模为实部与虚部的平方和的开方,而“谱半径”就是最大模. ...
- 【51nod 1685】 第K大区间2
题目描述: 定义一个长度为奇数的区间的值为其所包含的的元素的中位数.现给出n个数,求将所有长度为奇数的区间的值排序后,第K大的值为多少. 样例解释: [l,r]表示区间的值 [1]:3 [2]:1 [ ...
- [USACO08JAN]电话线$Telephone \ \ Lines$(图论$+SPFA+$ 二分答案)
#\(\mathcal{\color{red}{Description}}\) \(Link\) 给定一个图,请你求出在把其中自由选择的\(k\)条的权值都置为零的情况下,图中\(1-N\)最短路上的 ...
- 《Android应用测试与调试实战》读书笔记
一 本书概述 自动化测试篇:Android应用可以使用Java语言配合SDK,也可以使用HTML5技术,还可以用C/C++语言配合NDK技术编写,本书中涵盖了针对这三种技术编写的应用所采用的测试技术. ...
- 关于JavaScript 常见的面试题
关于JavaScript常见的面试题总结 一.JavaScript基本数据类型 null:空.无.表示不存在,当为对象的属性赋值为null,表示删除该属性 undefined:未定义.当声明变量却没有 ...
- Struts2学习总结——文件上传与下载
Struts2文件上传与下载 1.1.1新建一个Maven项目(demo02) 在此添加Web构面以及 struts2 构面 1.2.1配置Maven依赖(pom.xml 文件) <?xml v ...
- LINUX下安装pcre出现WARNING: 'aclocal-1.15' is missing on your system错误的解决办法
1.下载安装包 wget https://ftp.gnu.org/gnu/automake/automake-1.15.tar.gz 2.解压 tar -xzvf automake-1.15.tar. ...
- Beyond Compare 命令行生成目录下所有文件比对的Html网页report
MAC环境下,使用Beyond Compare命令行生成两个文件夹差异的html,按目录递归生成. #1. 创建compare #2. 创建compare/old #3. compare/new #4 ...
- 苹果IPad客户端安装测试软件
背景: 公司在开发一个App应用,需要部署在苹果IPad上进行测试,但是我负责后端开发对安装及测试相关流程不了解.经过一番学习得出以下结论: 1. 首先申请一个苹果的开发账号(一千块左右),大约能注册 ...