性能测试持续集成(Jenkins+Ant+Jmeter)
一、环境准备:
1、JDK:http://www.oracle.com/technetwork/java/javase/downloads/index.html
2、Jmeter:http://jmeter.apache.org/download_jmeter.cgi
3、Ant:http://ant.apache.org/bindownload.cgi
4、tomcat:http://tomcat.apache.org/
5、Jenkins:http://jenkins-ci.org/
三、Jemter脚本准备:
1、脚本内容:访问baidu首页
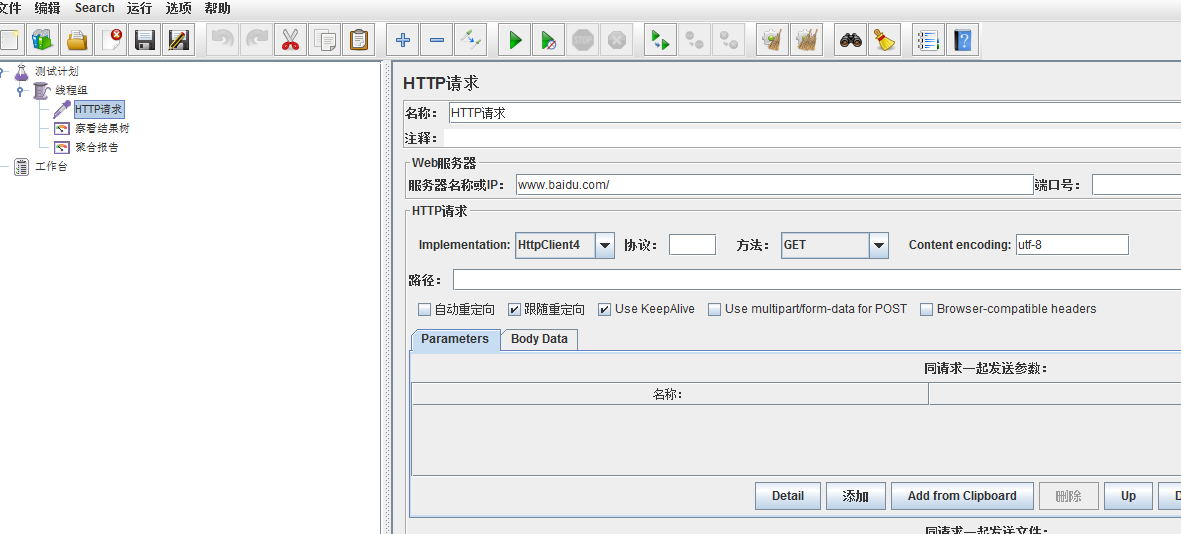
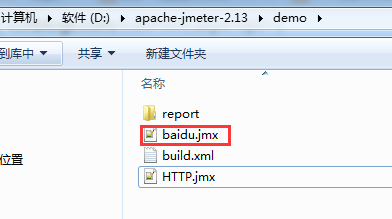
2、脚本路径:
D:\apache-jmeter-2.13\demo
三、通过ant的 build.xml执行性能脚本(以jmx结尾)生成测试报告
1、首先将 jmeter的extras目录中ant-jmeter-1.1.1.jar包拷贝至ant安装目录下的lib目录中;
其次修改Jmeter的bin目录下jmeter.properties文件的配置:jmeter.save.saveservice.output_format=xml
2、编写build.xml
<?xml version="1.0"?>

<!--

   Licensed to the Apache Software Foundation (ASF) under one or more

   contributor license agreements.  See the NOTICE file distributed with

   this work for additional information regarding copyright ownership.

   The ASF licenses this file to You under the Apache License, Version 2.0

   (the "License"); you may not use this file except in compliance with

   the License.  You may obtain a copy of the License at

       http://www.apache.org/licenses/LICENSE-2.0

   Unless required by applicable law or agreed to in writing, software

   distributed under the License is distributed on an "AS IS" BASIS,

   WITHOUT WARRANTIES OR CONDITIONS OF ANY KIND, either express or implied.

   See the License for the specific language governing permissions and

   limitations under the License.

-->

<project name="ant-jmeter" default="all" basedir=".">

    <tstamp>

        <format property="time" pattern="yyyyMMddhhmm" />

    </tstamp>

    <description>

        Sample build file for use with ant-jmeter.jar

        See http://www.programmerplanet.org/pages/projects/jmeter-ant-task.php

    To run a test and create the output report:

        ant -Dtest=script

    To run a test only:

        ant -Dtest=script run

    To run report on existing test output

        ant -Dtest=script report

    The "script" parameter is the name of the script without the .jmx suffix.

    Additional options:

        -Dshow-data=y - include response data in Failure Details

        -Dtestpath=xyz - path to test file(s) (default user.dir).

                         N.B. Ant interprets relative paths against the build file

        -Djmeter.home=.. - path to JMeter home directory (defaults to parent of this build file)

        -Dreport.title="My Report" - title for html report (default is 'Load Test Results')

        Deprecated:

        -Dformat=2.0 - use version 2.0 JTL files rather than 2.1

    </description>

    <property name="testpath" value="${user.dir}"/>

    <!-- 需要改成自己本地的 Jmeter 目录-->

    <property name="jmeter.home" value="D:\apache-jmeter-2.13" />

    <!-- 需要改成自己本地的 Jmeter 中demo的目录-->

    <property name="test.dir" value="D:\apache-jmeter-2.13\demo" />

    <!-- jmeter生成测试报告的title名称-->

    <property name="report.title" value="Jmeter Test Results"/>

    <!-- jmeter生成jtl、html格式的结果报告的路径-->

    <property name="jmeter.result.jtl.dir" value="D:\apache-jmeter-2.13\demo\report\jtl" />

    <property name="jmeter.result.html.dir" value="D:\apache-jmeter-2.13\demo\report\html" />

    <!-- 测试报告名称-->

    <property name="ReportName" value="Load Test Report" />

    <property name="jmeter.result.jtlName" value="${jmeter.result.jtl.dir}/${ReportName}.jtl" />

    <property name="jmeter.result.htmlName" value="${jmeter.result.html.dir}/index.html" />

    <target name="all">

        <echo message="start..."/>

        <!--<antcall target="clean" /> -->

        <antcall target="run" />

        <antcall target="xslt-report" />

       </target>

    <!-- Name of test (without .jmx) -->

    <property name="test" value="Test"/>

    <!-- Should report include response data for failures? -->

    <property name="show-data" value="n"/>

    <property name="format" value="2.1"/>

    <condition property="style_version" value="">

        <equals arg1="${format}" arg2="2.0"/>

    </condition>

    <condition property="style_version" value="_21">

        <equals arg1="${format}" arg2="2.1"/>

    </condition>

    <condition property="funcMode">

        <equals arg1="${show-data}" arg2="y"/>

    </condition>

    <condition property="funcMode" value="false">

      <not>

        <equals arg1="${show-data}" arg2="y"/>

      </not>

    </condition>

    <!-- Allow jar to be picked up locally -->

    <path id="jmeter.classpath">

        <fileset dir="${basedir}">

          <include name="ant-jmeter*.jar"/>

        </fileset>

    </path>

    <taskdef name="jmeter"

        classpathref="jmeter.classpath"

        classname="org.programmerplanet.ant.taskdefs.jmeter.JMeterTask"/>

    <target name="run">

        <echo>funcMode = ${funcMode}</echo>

        <delete file="${testpath}/${test}.html"/>

        <taskdef name="jmeter" classname="org.programmerplanet.ant.taskdefs.jmeter.JMeterTask" />

        <jmeter jmeterhome="${jmeter.home}" resultlog="${jmeter.result.jtlName}">
             <!-- 执行这个目录下边所有以.jmx结尾文件 -->

            <testplans dir="${test.dir}" includes="*.jmx" />

            <property name="jmeter.save.saveservice.output_format" value="xml"/>

            <property name="jmeter.save.saveservice.assertion_results" value="all"/>

            <property name="jmeter.save.saveservice.bytes" value="true"/>

            <property name="file_format.testlog" value="${format}"/>

            <property name="jmeter.save.saveservice.response_data.on_error" value="${funcMode}"/>

        </jmeter>

    </target>

    <property name="lib.dir" value="${jmeter.home}/lib"/>

    <!-- Use xalan copy from JMeter lib directory to ensure consistent processing with Java 1.4+ -->

    <path id="xslt.classpath">

        <fileset dir="${lib.dir}" includes="xalan*.jar"/>

        <fileset dir="${lib.dir}" includes="serializer*.jar"/>

    </path>

    <target name="xslt-report" depends="_message_xalan">

        <xslt

            classpathref="xslt.classpath"

            force="true"

            in="${jmeter.result.jtlName}"

            out="${jmeter.result.htmlName}"

            style="${jmeter.home}/extras/jmeter-results-detail-report_21.xsl">

            <param name="showData" expression="${show-data}"/>

            <param name="titleReport" expression="${ReportName}${time}"/>

            <param name="dateReport" expression="${ReportName}${time}"/>

        </xslt>

        <!-- 因为上面生成报告的时候,不会将相关的图片也一起拷贝至目标目录,所以,需要手动拷贝 -->

        <copy todir="${jmeter.result.html.dir}">

             <fileset dir="${jmeter.home}/extras">

                 <include name="collapse.png" />

                <include name="expand.png" />

             </fileset>

       </copy>

    </target>

    <target name="verify-images">

        <condition property="samepath">

                <equals arg1="${testpath}" arg2="${basedir}" />

        </condition>

    </target>

    <!-- Check that the xalan libraries are present -->

    <condition property="xalan.present">

          <and>

              <!-- No need to check all jars; just check a few -->

            <available classpathref="xslt.classpath" classname="org.apache.xalan.processor.TransformerFactoryImpl"/>

            <available classpathref="xslt.classpath" classname="org.apache.xml.serializer.ExtendedContentHandler"/>

          </and>

    </condition>

    <target name="_message_xalan" unless="xalan.present">

          <echo>Cannot find all xalan and/or serialiser jars</echo>

        <echo>The XSLT formatting may not work correctly.</echo>

        <echo>Check you have xalan and serializer jars in ${lib.dir}</echo>

    </target>

</project>
3、执行build.xml
1)cmd进入脚本目录:D:\apache-jmeter-2.13\demo
2)输入:ant 或 ant run(run为build.xml中的task名),执行结果:
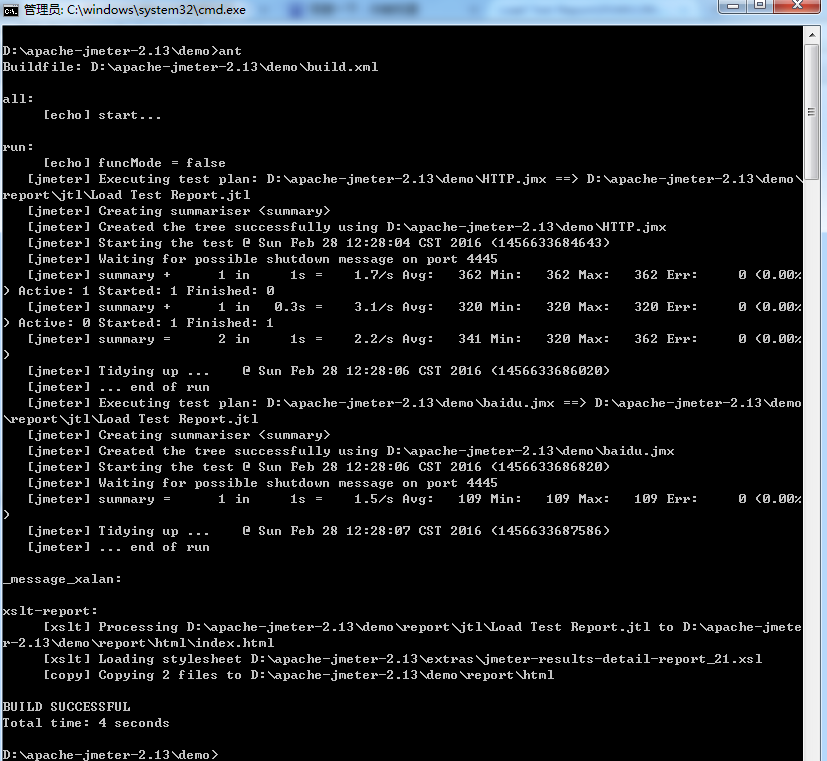
3)测试报告目录 D:\apache-jmeter-2.13\demo\report\html
因为在D:\apache-jmeter-2.13\demo目录下边有两个jmx文件,3个请求,所有结果如下3个url结果

三、Jenkins中集成ant,添加job在Jenkins中生成html样式性能测试报告
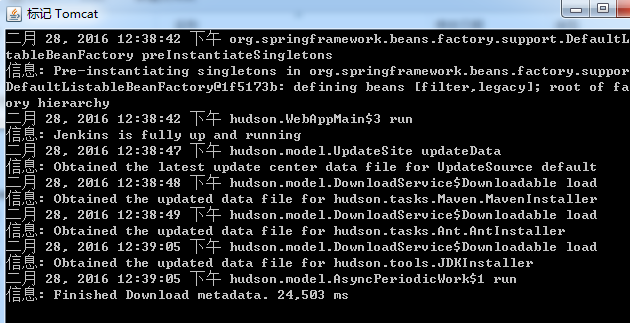
1、将Jenkins.war包放在tomcat目录D:\apache-tomcat-7.0.54\webapps下,并且启动D:\apache-tomcat-7.0.54\bin目录下边startup.bat脚本,如下表示启动成功:
2、访问Jenkins ,Jenkins在tomcat中默认启动端口8080 ,访问地址: http://localhost:8080/jenkins/
3、建立job 并且配置ant ,配置好信息进行保存;
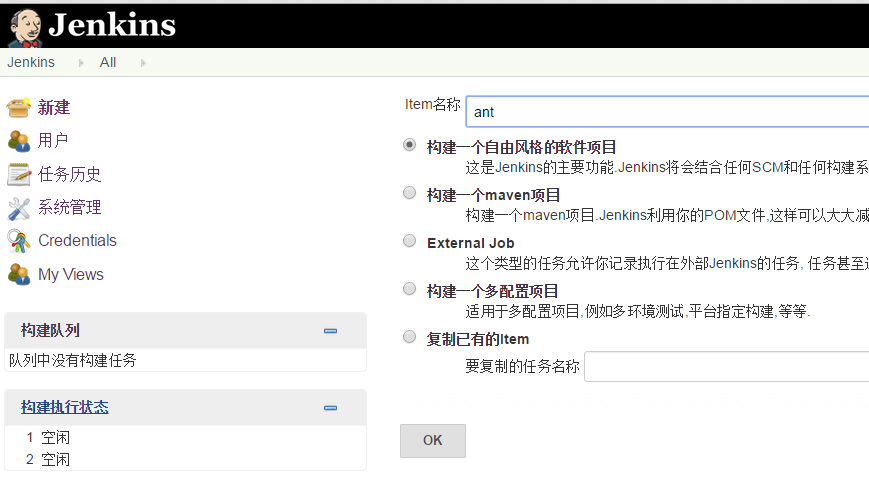
填写build.xml路径

4、在Jenkins里边添加Performance plugin 、 HTML Publisher plugin 、ant插件
在job配置 "增加构建后操作步骤"增加Publish HTML reports插件,并且添加报告目录,进行保存 如图:

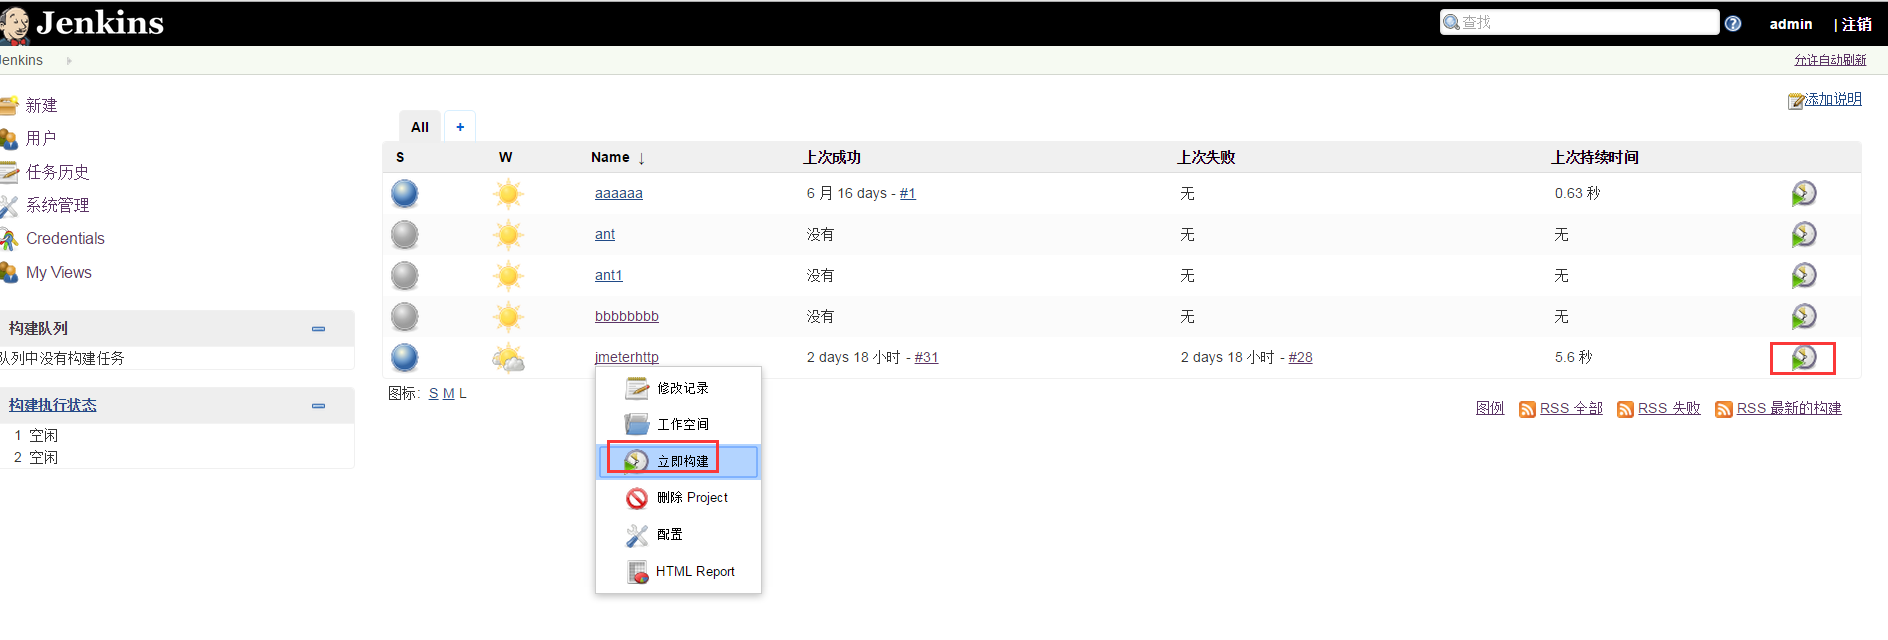
5、执行job
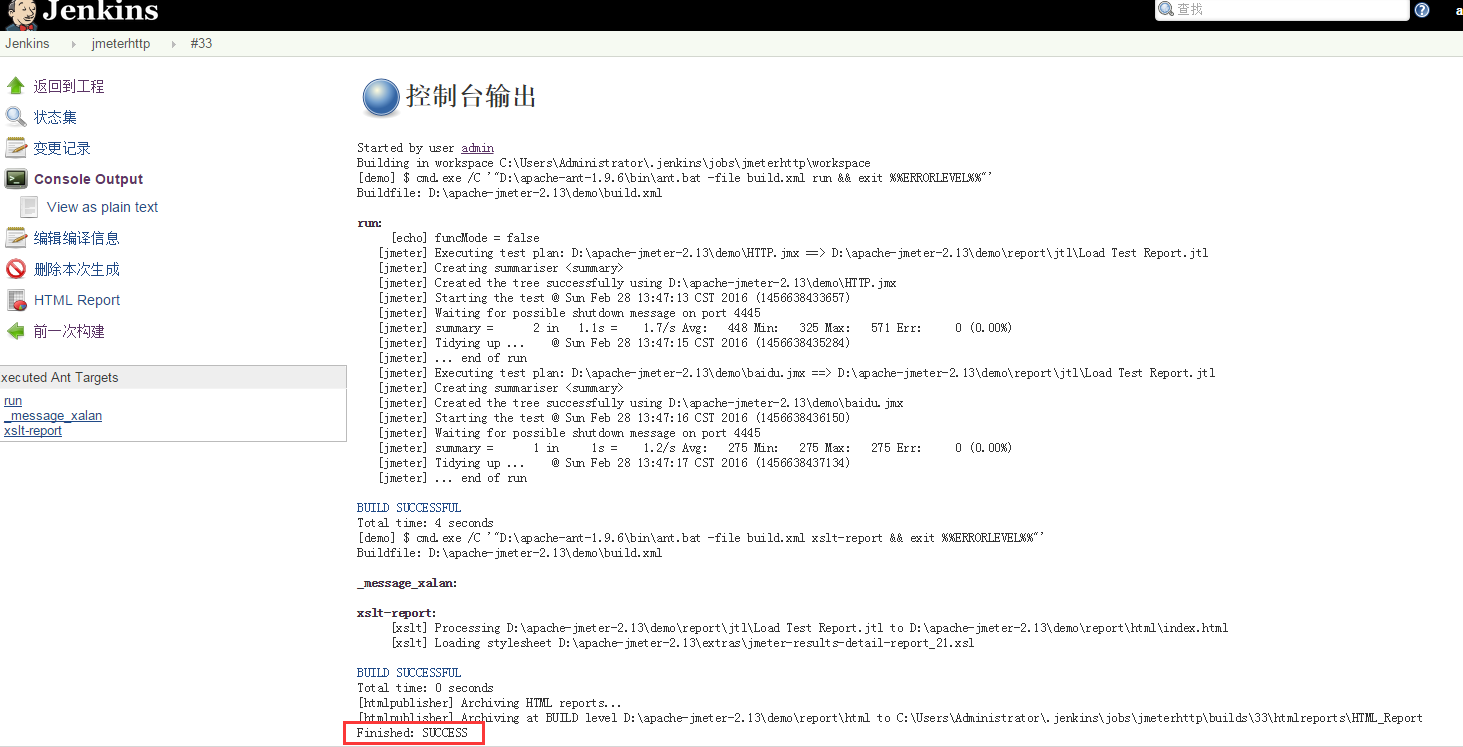
6、查看控制台,看到Finished: SUCCESS说明执行job成功已生成jtl和html报告;
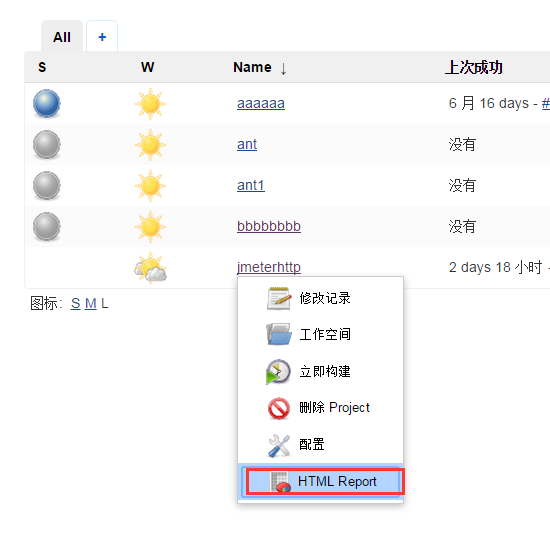
7、查看Jenkins生成html报告
路径:http://localhost:8080/jenkins/job/jmeterhttp/HTML_Report/
最终报告和用ant的build.xml效果一样 ,哈哈,大功搞成了;

参考地址博客: http://www.cnblogs.com/puresoul/p/4737716.html
性能测试持续集成(Jenkins+Ant+Jmeter)的更多相关文章
- jmeter --- 搭建持续集成接口测试平台(Jenkins+Ant+Jmeter)
jmeter --- 搭建持续集成接口测试平台(Jenkins+Ant+Jmeter) 一.环境准备: 1.JDK:http://www.oracle.com/technetwork/java/jav ...
- Jmeter+jenkins如何快速搭建接口和性能测试持续集成解决方案-[基于windows篇]
最近在用Jmeter本来想写一个详细的使用教程,突然看到有前辈已经写好了不错的教程,特此"借花献佛"整理出来分享给大家! Jenkins + Jmeter 构建接口.性能测试持续集 ...
- jenkins+ant+jmeter自动化性能测试平台
jenkins+ant+jmeter自动化性能测试平台 Jmeter是性能测试的工具,java编写.开源,小巧方便,可以图形界面运行也可以在命令行下运行.网上已经有人使用ant来运行,http://w ...
- Jenkins +Ant +Jmeter(apache-jmeter-5.1.1)自动化性能测试平台
1.安装配置好Jdk, 下载网址:https://www.cr173.com/soft/33894.html 2.Jmeter下载地址:http://jmeter.apache.org/downloa ...
- Jenkins+Ant+JMeter集成
Tomcat是jenkins运行的容器,jenkins实际上是依赖于Tomcat才能启动的.Jenkins可以调度ant的脚本. Ant和maven类似,maven是执行pom文件,ant是执行bui ...
- jenkins+ant+jmeter实现自动化集成(详解)
jenkins+ant+jmeter实现自动化集成 for window 一.jmeter 1.jmeter安装 二.ant 1.ant安装 三.ant运行 jmeter脚本 1.配置 四.jenki ...
- 性能测试四十八:Jenkins+Ant+Jmeter系统部署
工作步骤: 1.开发提交代码SVN/Git 2.代码编译.打war包 3.上传war包到服务器 4.重启web服务器 5.开始测试/自动化测试 6.发测试结果 Jenkins工作: 1.开发提交代码G ...
- Jenkins+Ant+Jmeter自动化测试平台
持续集成 持续集成是一种软件开发实践,即团队开发成员经常集成他们的工作,通常每个成员每天至少集成一次,也就意味着每天可能会发生多次集成.每次集成都通过自动化的构建(包括编译,发布,自动 ...
- Jenkins+Ant+JMeter报告自动化
1.参考Jenkins+Ant+JMeter集成,安装Jenkins(不需要安装Performance Plugin插件),建立Slave节点,连接Slave节点,创建任务等. 2.将Jenkins+ ...
- 这些年我们一起搞过的持续集成~Jenkins+Perl and Shell script
这些年我们一起搞过的持续集成~Jenkins+Perl and Shell script ##转载注明出处:http://www.cnblogs.com/wade-xu/p/4378224.html ...
随机推荐
- oracle定时器在项目中的应用
业务需求: 现在业务人员提出了一个需求: 在项目中的工作流,都要有一个流程编号,此编号有一定的规则: 前四五位是流程的字母缩写,中间是8位的日期,后面五位是流水码,要求流水码每天从00001开始.即: ...
- 处理Model
将Model对象归档解档 - CSDN博客 iOS archive(归档)的总结 - 苹果吧 - 博客园 IOS数据持久化之归档NSKeyedArchiver,iosnskeyedarchiver_I ...
- GPUImage源码解读之GLProgram
简述 GLProgram是GPUImage中代表openGL ES 中的program,具有glprogram功能.其实是作者对OpenGL ES program的面向对象封装 初始化 - (id)i ...
- Ubuntu16.04 解决matplotlib乱码或者中文显示不了的问题(可用)
一. 下载字体 SimHei.ttf 复制到linux字体库中 sudo cp ~/SimHei.ttf /usr/share/fonts/SimHei.ttf 二.查看matplotlib配置 In ...
- ubuntu 安装linux 下vmVMware tools 步骤及问题解决
一. 菜单栏 “虚拟机” ——> “设置 ” 使用linux.so镜像文件 此文件在vmware workstation 的安装目录.并且打开CD/DVD的连接. 二.终端 ...
- 11.1 js中级,数据类型、数据储存方式、作用域内存空间的区别以及例识别。
一. 基本数据类型和引用数据类型的区别. 1.基本数据类型:基本数据类型就是简单的操作值. 2.引用数据类型:就是把引用的地址赋给变量. 堆内存: 就是存放代码块的,存放形式有两种 1)对象以键值对的 ...
- Sppring MVC核心应用-2
一.Spring MVC框架中400状态码的请求错误:控制台BindException异常, 解决方法: 二.Sping 表单标签 三.数据校验 实现JSR 303验证步骤 四.REST风格 五.Sp ...
- scss基本用法
特别说明:scss函数名中的中划线和下划线是等同的,font-size和font_size指向同一个函数. 1.变量 2.选择器嵌套 3.属性嵌套 规则如下: (1).把属性名从中划线-的地方断开. ...
- spring data elasticsearch 使用
很久之前就安装了elasticsearch,一直没用java用过,最近看了一下spring data系列的elasticsearch,这里写一篇心得. 如果尚未安装elasticsearch,可以 参 ...
- PAT (Basic Level) Practice (中文)1001
1001 害死人不偿命的(3n+1)猜想 (15 分) 卡拉兹(Callatz)猜想: 对任何一个正整数 n,如果它是偶数,那么把它砍掉一半:如果它是奇数,那么把 (3n+1) 砍掉一半.这样一直反复 ...