uiautomator设备和选择器~Python详解
1、设备对象
引入uiautomator,获取设备对象<所谓设备对象可理解为:Android模拟器或者真机>
语法:from uiautomator import device as d
d 即为设备对象
1.1、获取设备信息
语法:d.info
返回值:
{ u'displayRotation': 0,

  u'displaySizeDpY': 640,

  u'displaySizeDpX': 360,

  u'currentPackageName': u'com.android.launcher',

  u'productName': u'takju',

  u'displayWidth': 720,

  u'sdkInt': 18,

  u'displayHeight': 1184,

  u'naturalOrientation': True

}
返回值解释如下:
displayRotation 0 代表竖屏 1 代表横屏
currentPackageName 当前的Activity的Package名字
productName 当前设备名称
displayWidth 当前设备屏幕宽度 当 displayRotation 取值为 1 时,也就是说当前是横屏状态时,displayWidth 取值会和 displayHeight 互换
displayHeight 当前设备屏幕高度 当 displayRotation 取值为 1 时,也就是说当前是横屏状态时,displayHeight 取值会和 displayWidth 互换
sdkInt 当前SDK版本
naturalOrientation 当 displayRotation 取值为 1 时,也就是说当前是横屏状态时,取值为False,为竖屏状态时,取值为:True
1.2、点亮或熄灭屏幕(Turn on/off screen)
# Turn on screen

d.screen.on()

# Turn off screen

d.screen.off()
# wakeup the device

d.wakeup()

# sleep the device, same as turning off the screen.

d.sleep()
检查屏幕状态,关闭OR点亮?
if d.screen == "on":  # of d.screen != "off"

    # do something in case of screen on

    pass

if d.screen == "off":  # of d.screen != "on"

    # do something in case of screen off

    pass
1.3、系统常用按键
# press home key

d.press.home()

# press back key

d.press.back()

# the normal way to press back key

d.press("back")

# press keycode 0x07('0') with META ALT(0x02) on

d.press(0x07, 0x02)
下面的这些按键也是被支持的,如下:
Next keys are currently supported:
home #手机Home键back #手机返回键left #对应键盘上的向右键<-right #对应键盘上的向右键->up #对应键盘上的向上键down #对应键盘上的向下键center #选中?menu #菜单search #查找?enter #对应键盘上的Enter键delete(ordel) #对应键盘上的DEL键 用于删除recent(recent apps) #任务切换volume_up #声音向上调整volume_down #声音向下调整volume_mute #静音按键camera #拍照power #电源键
1.4、与设备交互(单击、长按、滑动(手势密码)、拖拽)
单击屏幕坐标点
# click (x, y) on screen

d.click(x, y)
长按屏幕坐标点
# long click (x, y) on screen

d.long_click(x, y)
在屏幕上滑动
# swipe from (sx, sy) to (ex, ey)

d.swipe(sx, sy, ex, ey)

# swipe from (sx, sy) to (ex, ey) with 10 steps

d.swipe(sx, sy, ex, ey, steps=10)
在屏幕上拖拽
# drag from (sx, sy) to (ex, ey)

d.drag(sx, sy, ex, ey)

# drag from (sx, sy) to (ex, ey) with 10 steps

d.drag(sx, sy, ex, ey, steps=10)
1.5、屏幕操作及屏幕方向获取与控制<上述:displayRotation 0 代表竖屏 1 代表横屏>,竖屏分为 natural(自然的,正常的竖屏) 和 upsidedown(倒过来的竖屏),横屏分为向左和向右两个方向,分别为:left 和 right
设备属性:orientation 可能取得值为:
naturalornleftorlrightorrupsidedownoru(can not be set)
说明:在手机设备上,倒过来的屏幕很少见,因此:d.orientation 取值 upsidedown 的可能性几乎没有
# retrieve orientation, it may be "natural" or "left" or "right" or "upsidedown" 获取设备屏幕方向如下:

orientation = d.orientation

# set orientation and freeze rotation.

# notes: "upsidedown" can not be set until Android 4.3.                          设置设备屏幕方向如下:

d.orientation = "l" # or "left"

d.orientation = "r" # or "right"

d.orientation = "n" # or "natural"
锁屏/解除锁屏
# freeze rotation

d.freeze_rotation() #锁屏

# un-freeze rotation

d.freeze_rotation(False) #解锁
截屏操作
# take screenshot and save to local file "home.png", can not work until Android 4.2.

d.screenshot("home.png")
打开通知或快速设置
# open notification, can not work until Android 4.3.

d.open.notification()

# open quick settings, can not work until Android 4.3.

d.open.quick_settings()
注意:(如果notification已经打开了,调用d.open.quick_settings()不会打开快速设置)
等待空闲或窗口更新(Wait for idle or window update)
# wait for current window to idle

d.wait.idle()

# wait until window update event occurs

d.wait.update()
2、uiautomator 选择器
选择器是在当前窗口中标识特定的UI对象。可理解为:UiObject对象
目前,在uiautomator中支持以下属性选择器:
text, textContains, textMatches, textStartsWith

className, classNameMatches

description, descriptionContains, descriptionMatches, descriptionStartsWith

checkable, checked, clickable, longClickable

scrollable, enabled,focusable, focused, selected

packageName, packageNameMatches

resourceId, resourceIdMatches

index, instance
下面依次进行解读:
2.1、text选择器(支持在uiautomator中Text属性不为空的元素)
例如:
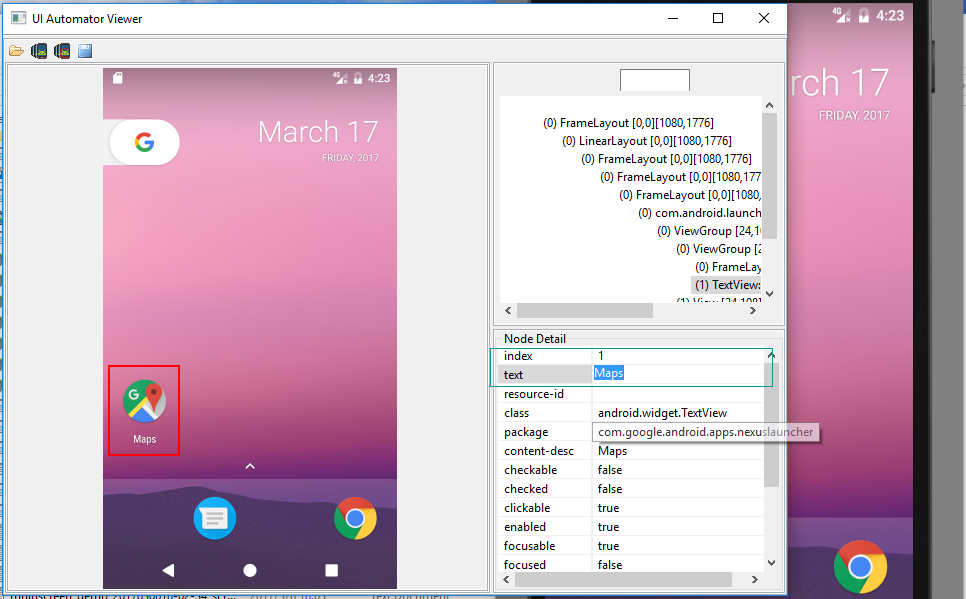
具体用法如下:
d(text="Maps").click()

#当然也可以多个属性在一块使用

d(text="Maps",className="android.widget.TextView").click()

#或者

d(text="Maps",className="android.widget.TextView",packageName="com.google.android.apps.nexuslauncher").click()
总之:要尽可能的使用选择器唯一确定一个被选择对象(UiObject)
除了可以进行选择UiObject对象以外,我们亦可以使用选择器设置某些元素的值,如下:
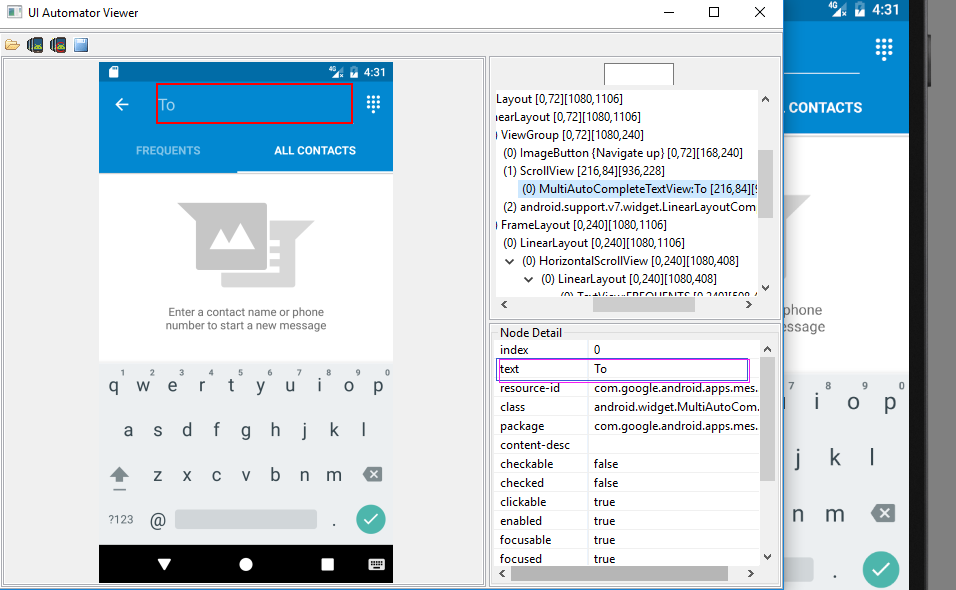
#输入短信目标手机号
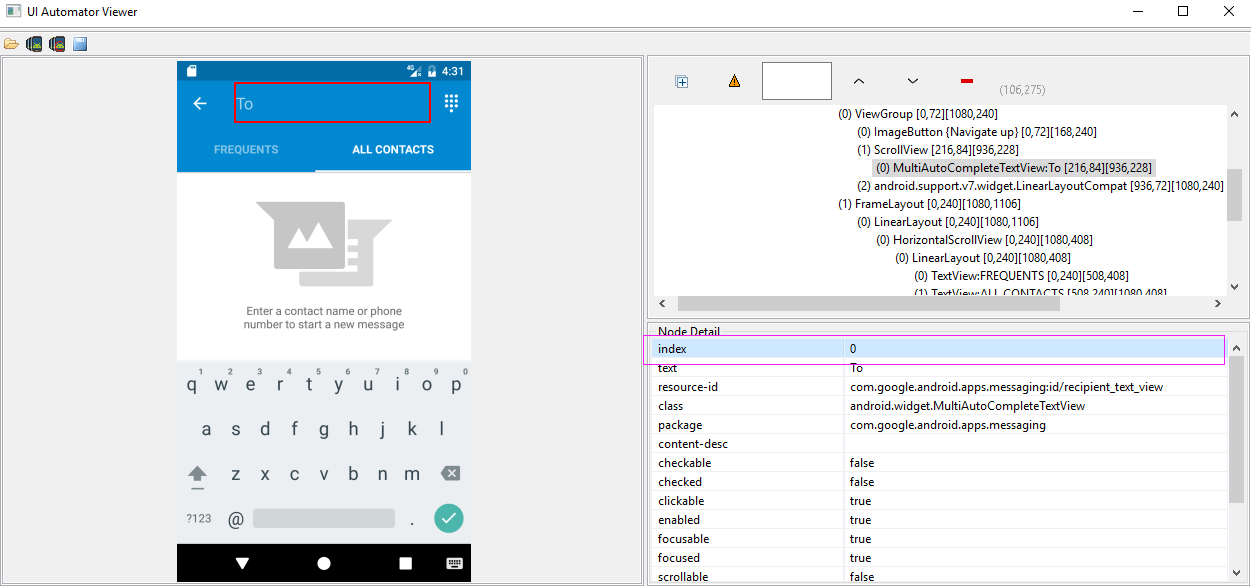
d(text="To").set_text("")
#如果本窗口中有多个text为To的元素,我们也可以使用多属性选择
d(text="To",packageName="com.google.android.apps.messaging").set_text("").set_text("")
textContains,textMaches,textStartsWith 分别代表:包含,正则表达式,以XXX开头等
例如:
d(text="Name").set_text("John")
d(textContains="ame").set_text("John")
d(textStartsWith="Nam").set_text("John")
2.2、className,classNameMatches 类选择器 及 description, descriptionContains, descriptionMatches, descriptionStartsWith 描述选择器 及 packageName, packageNameMatches 包选择器 及 resourceId, resourceIdMatches ResId选择器用法和text选择器类似,都可以多属性选择器结合在一起使用。
示例代码如下:
# To seleted the object ,text is 'Clock' and its className is 'android.widget.TextView'

d(text='Clock', className='android.widget.TextView')
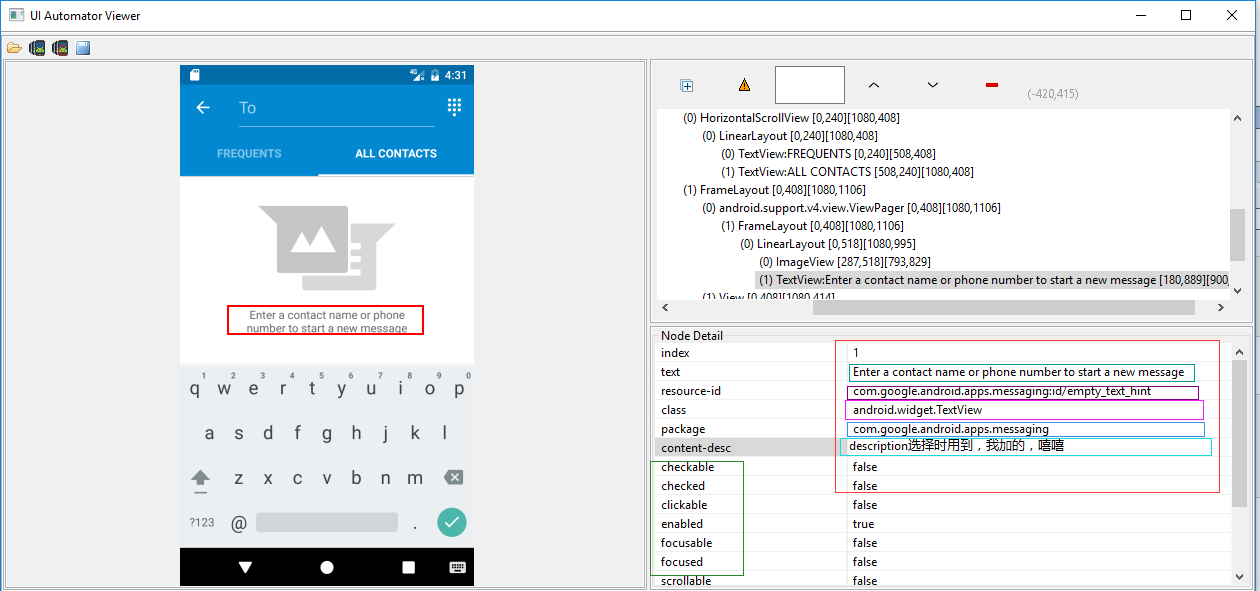
d(description="add new contact").click()

d(descriptionContains="new contact").click()

d(descriptionStartsWith="add new").click()
#resourceid选择器

d(resourceId="com.android.contacts:id/menu_save").click()

#text选择器

d(textStartsWith="Nam").set_text("John")

#描述选择器

d(descriptionContains="new contact").click()

#多属性结合

d(text="Name",className="android.widget.EditText").set_text("John")

#index选择器和child选择器

d(resourceId="com.android.settings:id/list").child(className="android.widget.LinearLayout", index=2).child(resourceId="android:id/widget_frame").child(resourceId="android:id/switch_widget").click()
在此,说明下child、sibling选择器和index选择器及instance选择器(严格讲instance不是选择器,仅仅只是在输出多个结果的情况下,可以通过索引(下标)进行选择)
首先说明child选择器,sibling选择器:分别可理解为:子选择器(可嵌套),兄弟姐妹选择器
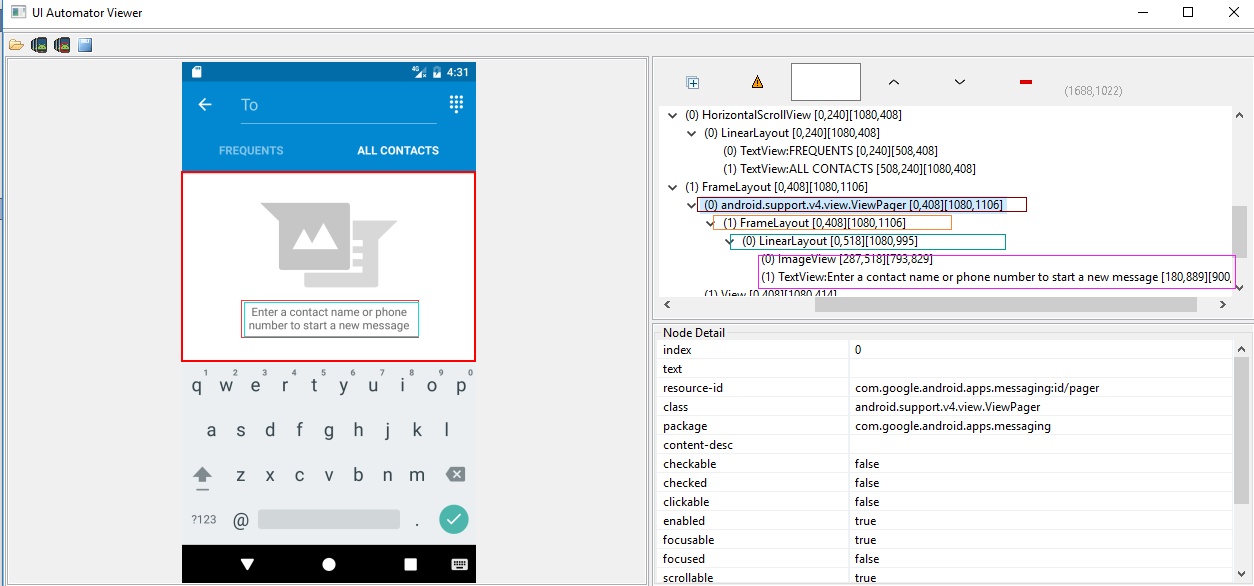
如上图右边部分,从上到下层次分为四层,最后一层的两个元素可理解为兄弟姐妹,在此,我们如果要选择最下面的那个元素就可以用到child选择器及sibling选择器,当然,本人不建议使用孩子,兄妹选择器,如果能用其他方法实现,建议用其他方法:
在此,我写的方法如下:<没有具体验证,仅仅只是演示>
#孩子选择器及兄弟姐妹选择器的用法:child/sibling

d(resourceId="id/pager").child(className="android.widget.FrameLayout").child(resourceId="id/empty_view").child(resourceId="id/empty_image_hint").sibling(packageName="com.google.android.apps.messaging")
2.3、index选择器及instance,比较容易混淆的两个,一个是选择器,一个代表索引,如下:
index选择器对应uiautomator的index属性,如下:
其用法和text选择器大同小异,不过在此需要指出的是,有些窗体中index取值会发生改变,因此,能不用index选择器的,尽可能不用!
#index选择器

d(className="android.widget.LinearLayout", index=2).click()
instance 的用法:当你的选择器返回的结果不是指向唯一元素时(两个或者多个),你可以通过instance进行选择。
贺晓聪原文:
Multiple instances
Sometimes the screen may contain multiple views with the same e.g. text, then you will have to use "instance" properties in selector like below:
d(text="Add new", instance=0) # which means the first instance with text "Add new"
However, uiautomator provides list like methods to use it.
# get the count of views with text "Add new" on current screen

d(text="Add new").count

# same as count property

len(d(text="Add new"))

# get the instance via index

d(text="Add new")[0]

d(text="Add new")[1]

...

# iterator

for view in d(text="Add new"):

    view.info  # ...
2.4、获取选定的UI对象状态及其信息(Get the selected ui object status and its information)
检测特定的UI对象是否存在(Check if the specific ui object exists)
两种写法,如下:
d(text="Settings").exists # True if exists, else False

d.exists(text="Settings") # alias of above property.
检索特定UI对象的信息(Retrieve the info of the specific ui object)
d(text="Settings").info
(结果为列表List),如下:
{ u'contentDescription': u'',

  u'checked': False,

  u'scrollable': False,

  u'text': u'Settings',

  u'packageName': u'com.android.launcher',

  u'selected': False,

  u'enabled': True,

  u'bounds': {u'top': 385,

              u'right': 360,

              u'bottom': 585,

              u'left': 200},

  u'className': u'android.widget.TextView',

  u'focused': False,

  u'focusable': True,

  u'clickable': True,

  u'chileCount': 0,

  u'longClickable': True,

  u'visibleBounds': {u'top': 385,

                     u'right': 360,

                     u'bottom': 585,

                     u'left': 200},

  u'checkable': False

}
设置/清除字段或编辑文本
d(text="Settings").clear_text()  # clear the text

d(text="Settings").set_text("My text...")  # set the text
执行单击特定的UI对象
# click on the center of the specific ui object

d(text="Settings").click()

# click on the bottomright corner of the specific ui object  单击右下方

d(text="Settings").click.bottomright()

# click on the topleft corner of the specific ui object   单击左上方

d(text="Settings").click.topleft()

# click and wait until the new window update  单击并等待窗体响应

d(text="Settings").click.wait()
长时间点击特定的ui对象,双击?
# long click on the center of the specific ui object

d(text="Settings").long_click()

# long click on the bottomright corner of the specific ui object 右下角

d(text="Settings").long_click.bottomright()

# long click on the topleft corner of the specific ui object 左上角

d(text="Settings").long_click.topleft()
将UI对象拖动到另一点
# notes : drag can not be set until Android 4.3.

# drag the ui object to point (x, y)

d(text="Settings").drag.to(x, y, steps=100)

# drag the ui object to another ui object(center)  拖拽到text='Clock'的对象位置上

d(text="Settings").drag.to(text="Clock", steps=50)
滑动UI对象
滑动分为四个方向:left ,right,top ,bottom 即:左滑动 右滑动 上滑动 及向下滑动
d(text="Settings").swipe.right()

d(text="Settings").swipe.left(steps=10)

d(text="Settings").swipe.up(steps=10)

d(text="Settings").swipe.down()
Two point gesture from one point to another
d(text="Settings").gesture((sx1, sy1), (sx2, sy2)) .to((ex1, ey1), (ex2, ey2))
Two point gesture on the specific ui object
Supports two gestures:
In, from edge to centerOut, from center to edge
# notes : pinch can not be set until Android 4.3.

# from edge to center. here is "In" not "in"

d(text="Settings").pinch.In(percent=100, steps=10)

# from center to edge

d(text="Settings").pinch.Out()
3 point gesture
d().gestureM((sx1, sy1), (sx2, sy2),(sx3, sy3)) \

                  .to((ex1, ey1), (ex2, ey2),(ex3,ey3))

d().gestureM((100,200),(300,200),(600,200),(100,600),(300,600),(600,900))
等到特定的UI对象出现或消失
# wait until the ui object appears

d(text="Settings").wait.exists(timeout=3000)

# wait until the ui object gone

d(text="Settings").wait.gone(timeout=1000)
在具体的UI对象执行甩(滚动)Perform scroll on the specific ui object(scrollable)
Possible properties:
horizorvertforwardorbackwardortoBeginningortoEnd
# fling forward(default) vertically(default)

d(scrollable=True).fling()

# fling forward horizentally

d(scrollable=True).fling.horiz.forward()

# fling backward vertically

d(scrollable=True).fling.vert.backward()

# fling to beginning horizentally

d(scrollable=True).fling.horiz.toBeginning(max_swipes=1000)

# fling to end vertically

d(scrollable=True).fling.toEnd()
Perform scroll on the specific ui object(scrollable)-在具体的UI对象执行甩(滚动)
Possible properties:
horizorvertforwardorbackwardortoBeginningortoEnd, orto
# scroll forward(default) vertically(default)

d(scrollable=True).scroll(steps=10)

# scroll forward horizentally

d(scrollable=True).scroll.horiz.forward(steps=100)

# scroll backward vertically

d(scrollable=True).scroll.vert.backward()

# scroll to beginning horizentally

d(scrollable=True).scroll.horiz.toBeginning(steps=100, max_swipes=1000)

# scroll to end vertically

d(scrollable=True).scroll.toEnd()

# scroll forward vertically until specific ui object appears

d(scrollable=True).scroll.to(text="Security")
uiautomator设备和选择器~Python详解的更多相关文章
- 安卓自动化测试,贺晓聪之uiautomator设备和选择器~Python详解
1.设备对象 引入uiautomator,获取设备对象<所谓设备对象可理解为:Android模拟器或者真机> 语法:from uiautomator import device as d ...
- [转载]python 详解re模块
原文地址:python 详解re模块作者:Rocky 正则表达式的元字符有. ^ $ * ? { [ ] | ( ) .表示任意字符 []用来匹配一个指定的字符类别,所谓的字符类别就是你想匹配的一个字 ...
- 33 Python 详解命令解析 - argparse--更加详细--转载
https://blog.csdn.net/lis_12/article/details/54618868 Python 详解命令行解析 - argparse Python 详解命令行解析 - arg ...
- CSS系列(7)CSS类选择器Class详解
这一篇文章,以笔记形式写. 1, CSS 类选择器详解 http://www.w3school.com.cn/css/css_selector_class.asp 知识点: (1) 使用类选择 ...
- CSS 选择器【详解】
转自:http://www.cnblogs.com/polk6/archive/2013/07/19/3142142.html CSS 选择器及各样式引用方式介绍 一个好的界面,是一个Web吸引人们最 ...
- python 详解re模块
正则表达式的元字符有. ^ $ * ? { [ ] | ( ).表示任意字符[]用来匹配一个指定的字符类别,所谓的字符类别就是你想匹配的一个字符集,对于字符集中的字符可以理解成或的关系.^ 如果放在字 ...
- css所有选择器的详解
----------------------------------------css 选择器---------------------------------------- 1,组合选择器: 1)e ...
- 【经典案例】Python详解设计模式:策略模式
完成一项任务往往有多种方式,我们将其称之为策略. 比如,超市做活动,如果你的购物积分满1000,就可以按兑换现金抵用券10元,如果购买同一商品满10件,就可以打9折,如果如果购买的金额超过500,就可 ...
- USB HID设备报告描述符详解(转)
转自:http://group.ednchina.com/93/198.aspx. 参考:USB HID usage table 概述: 报告在这里意思是数据传输(data transfer),而 ...
随机推荐
- POJ 3974 Palindrome (算竞进阶习题)
hash + 二分答案 数据范围肯定不能暴力,所以考虑哈希. 把前缀和后缀都哈希过之后,扫描一边字符串,对每个字符串二分枚举回文串长度,注意要分奇数和偶数 #include <iostream& ...
- Day046--JavaScript-- DOM操作, js中的面向对象, 定时
一. DOM的操作(创建,追加,删除) parentNode 获取父级标签 nextElementSibling 获取下一个兄弟节点 children 获取所有的子标签 <!DOCTYPEhtm ...
- Mock6 moco框架中如何加入header
新建一个 startupWithHeader.json,这次在request里面添加了headers属性 [ { "description": "这是一个带header的 ...
- 苹果手机iOS11中fixed弹出框中input光标错位问题
最近遇到了一个移动前端的BUG:手机弹出框中的输入框focus时光标可能会错位. 刚开始时我完全不知道错误原因是什么,在电脑上调试时完全没有问题,手机上出现问题时也没有找到规律.后来在网上搜索了大量的 ...
- 关于java集合的练习
关于java集合的练习 练习一:Collection集合练习 一.产生10个1-100的随机数,并放到一个数组中,把数组中大于等于10的数字放到一个list集合中,并打印到控制台. public cl ...
- 第三节:SignalR之PersistentConnection模型详解(步骤、用法、分组、跨域、第三方调用)
一. 承上声明 在上一个章节里,啰里啰嗦写了一堆关于介绍SignalR的“废话”,从这一篇开始往后正式撸代码,这期间不少人(包括 张善友大哥)建议我直接用.Net Core下的SignalR,关于此简 ...
- PLSQL Developer 远程连接Oracle数据库
下载.安装.激活PLSQL Developer,本例使用 PLSQL Developer 13 (64 bit). 下载Oracle即时客户端 Instant Client,本例使用11gR2 链接: ...
- JavaScript 基本包装类型,包装对象
前言 javascript对象是一种复合值,它是属性或已命名值的集合.通过'.'符号来引用属性值.当属性值是一个函数时,称其为方法.通过o.m()来调用对象o中的方法.我们发现,字符串也同样具有属性和 ...
- [物理学与PDEs]第5章第2节 变形的描述, 应变张量 2.1 变形梯度张量
$$\bex \rd{\bf y}={\bf F}\rd {\bf x}, \eex$$ 其中 ${\bf F}=\n_x{\bf y}=\sex{\cfrac{\p y_i}{\p x_j}}$ 为 ...
- [物理学与PDEs]第1章第2节 预备知识 2.3 Faraday 电磁感应定律
1. Faraday 电磁感应定律: 设 $l$ 为任一闭曲线, 则 $$\bex \oint_l{\bf E}\cdot\rd {\bf l} =-\int_S \cfrac{\p {\bf B} ...