C# 用户控件之温度计
本文以一个用户控件【User Control】实现温度计的小例子,简述用户控件的相关知识,以供学习分享使用,如有不足之处,还请指正。
概述
一般而言,用户控件【User Control】,是在Visual Studio提供的默认控件不能满足实际的工作需要,才需要在现有控件的基础之上进行新的扩展,来实现自己的功能。用户控件有自己特有的属性,事件,方法来支撑特定的功能。用户控件封装实现的细节,可以进行方便的复用。
用户控件分类
用户控件主要有以下三种分类,本例采用的是第三种。
- 复合控件(Composite Controls):将现有的各种控件组合起来,形成一个新的控件,来满足用户的需求。
- 扩展控件(Extended Controls):就是在现有的控件基础上,派生出一个新的控件,增加新的功能,或者修改原有功能,来满足用户需求。
- 自定义控件(Custom Controls):就是直接从UserControl类派生,也就是说完全由自己来设计、实现一个全新的控件,这是最灵活、最强大的方法。
涉及知识点
本例中主要涉及以下知识点:
- UserControl : 提供一个可用来创建其他控件的空控件。用户创建一个用户控件,会默认继承这个类。
- OnPaint :控件重绘方法,是protected修饰符,本例中需要重写此方法。
- Graphics : 密封类,不可被继承,用于绘制图形(包括矩形,扇形,直线等)。
- ToolTip : 表示一个长方形的小弹出窗口,该窗口在用户将指针悬停在一个控件上时显示有关该控件用途的简短说明。
- 鼠标事件函数:OnMouseHover 鼠标悬停时触发函数,OnMouseLeave鼠标离开时触发函数。
- DataGridView:在可自定义的网格中显示数据。
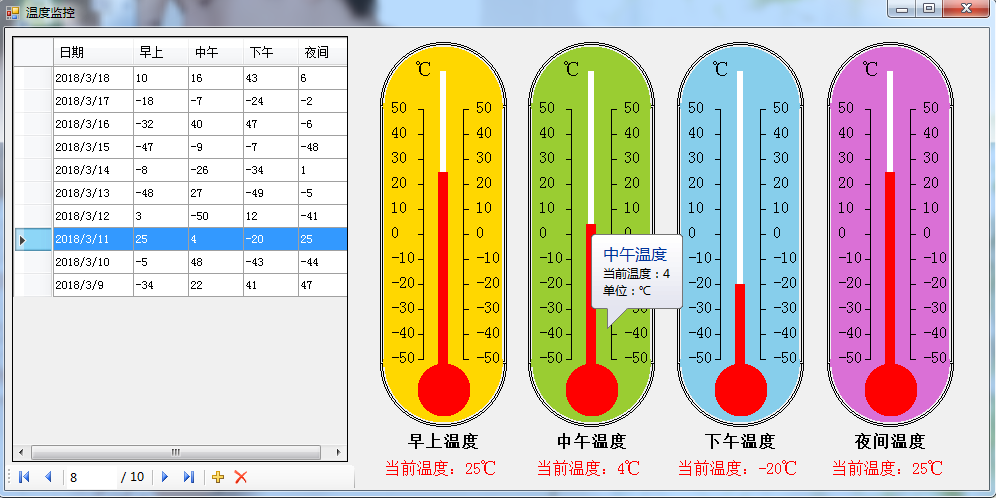
示例效果图
本例中示例效果图如下所示:

关键代码
本例中的关键代码如下:
 using System;

 using System.Collections.Generic;

 using System.ComponentModel;

 using System.Drawing;

 using System.Data;

 using System.Linq;

 using System.Text;

 using System.Threading.Tasks;

 using System.Windows.Forms;

 namespace DemoThermometer

 {

     public partial class Thermometer : UserControl

     {

         #region 属性与构造函数

         private int interval = ;

         /// <summary>

         /// 刻度间隔

         /// </summary>

         public int Interval

         {

             get { return interval; }

             set { interval = value; }

         }

         private int minValue = -;

         /// <summary>

         /// 最低温度

         /// </summary>

         public int MinValue

         {

             get { return minValue; }

             set { minValue = value; }

         }

         private int maxValue = ;

         /// <summary>

         /// 最高温度

         /// </summary>

         public int MaxValue

         {

             get { return maxValue; }

             set { maxValue = value; }

         }

         private float curValue = ;

         /// <summary>

         /// 当前温度

         /// </summary>

         public float CurValue

         {

             get { return curValue; }

             set { curValue = value; }

         }

         private Color thermoColor = Color.Red;

         /// <summary>

         /// 温度条颜色

         /// </summary>

         public Color ThermoColor

         {

             get { return thermoColor; }

             set { thermoColor = value; }

         }

         private Color backGroundColor = Color.SkyBlue;

         /// <summary>

         /// 温度计背景色

         /// </summary>

         public Color BackGroundColor

         {

             get { return backGroundColor; }

             set { backGroundColor = value; }

         }

         private Font thermoFont=new Font("宋体",,FontStyle.Regular);

         /// <summary>

         /// 温度计上字体

         /// </summary>

         public Font ThermoFont

         {

             get { return thermoFont; }

             set { thermoFont = value; }

         }

         private string thermoTitle = "温度计";

         /// <summary>

         /// 标题

         /// </summary>

         public string ThermoTitle

         {

             get { return this.thermoTitle; }

             set { this.thermoTitle = value; }

         }

         private bool showTip = false;

         /// <summary>

         /// 是否显示提示

         /// </summary>

         public bool ShowTip

         {

             get { return showTip; }

             set { showTip = value; }

         }

         private ToolTip tip=new ToolTip();

         public Thermometer()

         {

             InitializeComponent();

         }

         #endregion

         protected override void OnPaint(PaintEventArgs e)

         {

             //base.OnPaint(e);

             //this.BackColor = this.backGroundColor;

             int width = this.Width;

             int height = this.Height -  ;

             Graphics g = e.Graphics;

             int c_x = width / ;

             int c_y = height / ;

             int padding = this.Padding.All;//空白

             int r = (width -  * padding)/;//半径

             int d =  * r;//直径

             int dis = ;//两个半圆之间的间隔

             int dis2 =  * dis;//填充与边框之间的距离

             int startAngle1 = -;

             int startAngle2 = ;

             int sweepAngle1 = ;

             //首先画顶端一个半圆

             g.DrawPie(Pens.Black, new Rectangle(padding, padding, d, d),startAngle1, sweepAngle1);

             g.DrawPie(Pens.Black, new Rectangle(padding+ dis, padding+ dis, d-* dis, d-* dis), startAngle1, sweepAngle1);

             //填充背景色

             g.FillPie(new SolidBrush(this.backGroundColor), new Rectangle(padding + dis2, padding + dis2, d - *dis2, d - *dis2), startAngle1, sweepAngle1);

             //画底端一个半圆

             g.DrawPie(Pens.Black, new Rectangle(padding, height-d-padding, d, d), startAngle2, sweepAngle1);

             g.DrawPie(Pens.Black, new Rectangle(padding + dis, height-d-padding + dis, d - *dis, d - *dis), startAngle2, sweepAngle1);

             g.FillPie(new SolidBrush(this.backGroundColor), new Rectangle(padding + dis2, height - d - padding+dis2, d - *dis2, d - *dis2), startAngle2, sweepAngle1);

             //画一个矩形

             g.DrawRectangle(Pens.Black, new Rectangle(padding, padding + r, d, height - d -  * padding));

             g.DrawRectangle(Pens.Black, new Rectangle(padding+dis, padding + r+dis, d-*dis, height - d -  * padding-*dis));

             //背景色填充,去掉边界线

             g.FillRectangle(new SolidBrush(this.backGroundColor), new Rectangle(padding+, padding + r-,  * r-, ));

             g.FillRectangle(new SolidBrush(this.backGroundColor), new Rectangle(padding + , height-r-padding-,  * r - , ));

             //背景色填充中间部分

             g.FillRectangle(new SolidBrush(this.backGroundColor), new Rectangle(padding + dis2, padding + r + dis2, d - *dis2, height -d -  * padding - *dis2));

             //画刻度

             int s_s_x_1 = padding + r - ;

             int s_s_x_2 = width-padding - r + ;

             int s_s_y = padding + r+;

             int total = this.maxValue - this.minValue;

             int scale_width = ;//刻度宽度

             int scale = total / this.interval;

             int pscale = (height -  * r -  * padding) / this.interval;//像素间隔

             //竖线

             g.DrawLine(Pens.Black, new Point(s_s_x_1, s_s_y ), new Point(s_s_x_1, s_s_y + this.interval* pscale));

             g.DrawLine(Pens.Black, new Point(s_s_x_2, s_s_y), new Point(s_s_x_2, s_s_y + this.interval * pscale));

             for (int i = ; i <= this.interval; i++) {

                 //横线刻度

                 g.DrawLine(Pens.Black, new Point(s_s_x_1- scale_width, s_s_y + i * pscale), new Point(s_s_x_1, s_s_y + i * pscale));

                 g.DrawLine(Pens.Black, new Point(s_s_x_2, s_s_y + i * pscale), new Point(s_s_x_2 + scale_width, s_s_y + i * pscale));

                 //画刻度数字

                 g.DrawString((this.maxValue - (scale * i)).ToString(), this.thermoFont, new SolidBrush( this.ForeColor), new Point(s_s_x_1-, s_s_y + i * pscale-));

                 g.DrawString((this.maxValue - (scale * i)).ToString(), this.thermoFont, new SolidBrush(this.ForeColor), new Point(s_s_x_2 + , s_s_y + i * pscale-));

             }

             int white_width = ;//中间白色线宽度

             //画条白色细线

             g.FillRectangle(Brushes.White, new Rectangle(c_x- white_width, r/, white_width*, height-r));

             //在底部画一个圆球

             g.FillPie(new SolidBrush(this.thermoColor), new Rectangle(c_x-r/+, height -  r - padding,  r-, r-), , );

             //根据当前温度画红色线

             int red_width = ;//红色温度线宽度

             float ii = ( this.curValue-this.minValue) / this.interval;

             g.FillRectangle(new SolidBrush(this.thermoColor), new RectangleF(c_x - red_width, height - r - padding- (ii * pscale)-, * red_width,  ii * pscale+));//此处有一像素的误差

             //画标志字符单℃位

             g.DrawString("℃", this.thermoFont, new SolidBrush(this.ForeColor), new Point(c_x - , r /  - ));

             Font titleFont = new Font("宋体", , FontStyle.Bold);

             //绘制标题

             SizeF tsize = g.MeasureString(this.thermoTitle, titleFont);

             g.DrawString(this.thermoTitle, titleFont, new SolidBrush(this.ForeColor), new PointF(c_x- (tsize.Width/), height + ));

             string cur = string.Format("当前温度:{0}℃", this.curValue);

             SizeF tsize2 = g.MeasureString(cur, this.thermoFont);

             g.DrawString(cur, this.thermoFont, new SolidBrush(this.thermoColor), new PointF(c_x - (tsize2.Width / ), height + +tsize.Height));

         }

         /// <summary>

         /// 当鼠标覆盖进去时

         /// </summary>

         /// <param name="e"></param>

         protected override void OnMouseHover(EventArgs e)

         {

             this.showTip = true;

             //需要显示的内容

             int x = this.Width / ;

             int y = (this.Height-) / ;

             StringBuilder sbTips = new StringBuilder();

             //sbTips.AppendLine(this.ThermoTitle);

             sbTips.AppendLine(string.Format("当前温度:{0}", this.curValue));

             sbTips.AppendLine("单位:℃");

             tip.ToolTipTitle = this.ThermoTitle;

             tip.IsBalloon = true;

             tip.UseFading = true;

             //t.SetToolTip(this, sbTips.ToString());

             tip.Show(sbTips.ToString(), this, x, y);

         }

         protected override void OnMouseLeave(EventArgs e)

         {

             this.showTip = false;

             tip.Hide(this);

         }

     }

 }
关于页面调用控件刷新代码如下:
 private void dgDetail_SelectionChanged(object sender, EventArgs e)

         {

             foreach (DataGridViewRow row in this.dgDetail.Rows)

             {

                 if (row.Selected)

                 {

                     DataRowView drv = row.DataBoundItem as DataRowView;

                     DataRow dr = drv.Row;

                     this.t1.CurValue = int.Parse(dr["Morning"].ToString());

                     this.t1.ThermoTitle = string.Format("{0}温度",dgDetail.Columns["colMorning"].HeaderText);

                     this.t1.Refresh();

                     this.t2.CurValue = int.Parse(dr["Middle"].ToString());

                     this.t2.ThermoTitle = string.Format("{0}温度", dgDetail.Columns["colMiddle"].HeaderText);

                     this.t2.Refresh();

                     this.t3.CurValue = int.Parse(dr["After"].ToString());

                     this.t3.ThermoTitle = string.Format("{0}温度", dgDetail.Columns["colAfter"].HeaderText);

                     this.t3.Refresh();

                     this.t4.CurValue = int.Parse(dr["Night"].ToString());

                     this.t4.ThermoTitle = string.Format("{0}温度", dgDetail.Columns["colNight"].HeaderText);

                     this.t4.Refresh();

                 }

             }

         }
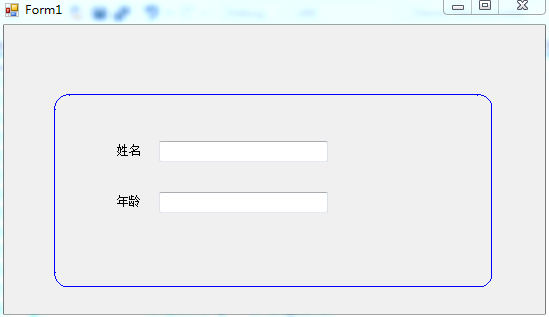
圆角Panel
关于要实现圆角Panel【扩展控件】,需要以下几个步骤
- 定义一个用户控件,继承于Panel,主要是为了继承Panel的其他容器特性。
- 重写Panel的OnPaint方法,进行绘制四个圆角。
圆角Panel效果图如下:

圆角Panel核心代码如下
 using System;

 using System.Collections.Generic;

 using System.ComponentModel;

 using System.Drawing;

 using System.Data;

 using System.Linq;

 using System.Text;

 using System.Threading.Tasks;

 using System.Windows.Forms;

 namespace DemoThermometer

 {

     public partial class UPanelControl : Panel

     {

         private int radius = ;//弧度半径

         public int Radius

         {

             get { return radius; }

             set { radius = value; }

         }

         private Color borderColor = Color.Red;

         public Color BorderColor

         {

             get { return borderColor; }

             set { borderColor = value; }

         }

         public UPanelControl()

         {

             InitializeComponent();

         }

         protected override void OnPaint(PaintEventArgs e)

         {

             base.OnPaint(e);

             Graphics g = e.Graphics;

             int width = this.Width;

             int height = this.Height;

             int d =  * radius;

             int p = ;//偏移量

             Pen borderPen = new Pen(borderColor,);

             Brush brush= new SolidBrush(this.BackColor);

             //左上

             g.DrawPie(borderPen, new Rectangle(, , d, d), , );

             g.FillPie(brush, new Rectangle(p, p, d, d), , );

             //左下

             g.DrawPie(borderPen, new Rectangle(, height-d, d, d), , );

             g.FillPie(brush, new Rectangle(p, height-d-p, d , d ), , );

             //右上

             g.DrawPie(borderPen, new Rectangle(width-d, , d, d), , );

             g.FillPie(brush, new Rectangle(width-d-p, p, d, d), , );

             //右下

             g.DrawPie(borderPen, new Rectangle(width - d, height - d, d, d), , );

             g.FillPie(brush, new Rectangle(width - d - p, height-d-p, d, d), , );

             //左边竖线

             g.DrawLine(borderPen, , radius, , height - radius);

             //上边竖线

             g.DrawLine(borderPen, radius, , width-radius, );

             //右边竖线

             g.DrawLine(borderPen, width-, radius-, width-, height - radius+);

             //下边竖线

             g.DrawLine(borderPen, radius-, height-, width - radius+, height-);

         }

     }

 }
C# 用户控件之温度计的更多相关文章
- C# 自定义控件VS用户控件
1 自定义控件与用户控件区别 WinForm中, 用户控件(User Control):继承自 UserControl,主要用于开发 Container 控件,Container控件可以添加其他Con ...
- .net 用户控件ascx.cs注册js脚本代码无效果
在.net web项目中碰到一个比较奇怪的问题,网上没找到解决方案,先自己mark一下 问题描述: 添加一个用户控件ascx,在后端.cs添加js注册脚本,执行后没有弹出框 注册脚本为: this.P ...
- winform 用户控件、 动态创建添加控件、timer控件、控件联动
用户控件: 相当于自定义的一个panel 里面可以放各种其他控件,并可以在后台一下调用整个此自定义控件. 使用方法:在项目上右键.添加.用户控件,之后用户控件的编辑与普通容器控件类似.如果要在后台往窗 ...
- C#窗体程序【用户控件-窗体】委托事件
这里的自定义控件是由普通控件组合而成的.希望事件响应代码推迟到使用自定义控件的窗体里写.步骤一:新建一个用户控件,放两个按钮,Tag分别是btn1,btn2.这两个按钮的共用单击事件处理代码如下: u ...
- WinForm用户控件、动态创建添加控件、timer控件--2016年12月12日
好文要顶 关注我 收藏该文 徐淳 关注 - 1 粉丝 - 3 0 0 用户控件: 通过布局将多个控件整合为一个控件,根据自己的需要进行修改,可对用户控件内的所有控件及控件属性进行修 ...
- wpf的UserControl用户控件怎么添加到Window窗体中
转载自 http://www.cnblogs.com/shuang121/archive/2013/01/09/2853591.html 我们来新建一个用户控件UserControl1.xaml &l ...
- winfrom获取用户控件里的控件对象
如何获取用户控件里的控件对象呢,其实思路也是很简单的, 比如有一个panel 用户控件 里面有许多的其他控件. 那么要找出一个Label控件怎么找呢,好的.现在我们就开始 首先,一个foreach循环 ...
- winform用户控件、动态创建添加控件、timer控件、控件联动
用户控件: 相当于自定义的一个panel 里面可以放各种其他控件,并可以在后台一下调用整个此自定义控件. 使用方法:在项目上右键.添加.用户控件,之后用户控件的编辑与普通容器控件类似.如果要在后台往窗 ...
- 039. asp.netWeb用户控件之七实现具有虚拟键盘的功能的用户控件
用户控件ascx代码: <%@ Control Language="C#" AutoEventWireup="true" CodeFile="K ...
随机推荐
- Java中的线程协作之Condition
一.Condition接口 1.Condition接口的常用方法介绍 /** * 已经获取到锁的线程调用该方法会进入等待状态,知道其他持有锁的线程通知(signal)等待队列中的线程或者被中断退出等待 ...
- MySQL数据备份方法
MySQL的备份和还原 备份:副本 RAID1,RAID10:保证硬件损坏而不会业务中止: DROP TABLE mydb.tb1; 备份类型: 热备份.温备份和冷备 ...
- 深入理解JVM垃圾收集机制,下次面试你准备好了吗
程序计数器.虚拟机栈和本地方法栈这三个区域属于线程私有的,只存在于线程的生命周期内,线程结束之后也会消失,因此不需要对这三个区域进行垃圾回收.垃圾回收主要是针对 Java 堆和方法区进行. 判断一个对 ...
- [Swift]LeetCode139. 单词拆分 | Word Break
Given a non-empty string s and a dictionary wordDict containing a list of non-empty words, determine ...
- jquery监听video标签视频播放暂停状态
由于jquery中没有video的paly,pause方法,所以在使用jquery来控制视频的播放的播放状态时会出现问题 之前的代码: let $video = $('#video'); $('.pl ...
- RabbitMQ面试题
1.为什么要引入MQ系统,直接读写数据库不行吗?其实就是问问你消息队列都有哪些使用场景,然后你项目里具体是什么场景,说说你在这个场景里用消息队列是什么? 面试官问你这个问题,期望的一个回答是说,你们公 ...
- Spark中SQL列和并为一行
在使用数据库的时候,需要将查询出来的一列按照逗号合并成一行. 原表名字为 TABLE ,表中的部分原始数据为: +---------+------------------------+ | BASIC ...
- EFCore合并多条迁移记录
方法来自 merge-migrations-in-entity-framework-core 更新数据库到最新结构 删除迁移目录下的所有迁移脚本 新建一个迁移 注释掉Up()和Down()方法中的代码 ...
- [Leetcode]674. Longest Continuous Increasing Subsequence
Given an unsorted array of integers, find the length of longest continuous increasing subsequence. E ...
- 版本管理工具Git(三)Gitlab高可用
高可用模式 企业版 社区版 我们这里说一下成本比较低的主备模式,它主要依赖的是DRBD方式进行数据同步,需要2台ALL IN ONE的GitLab服务器,也就是通过上面安装方式把所有组件都安装在一起的 ...
