MySQLSource-Flume
1. 自定义Source说明
实时监控MySQL,从MySQL中获取数据传输到HDFS或者其他存储框架,所以此时需要我们自己实现MySQLSource。
2. 自定义MySQLSource步骤
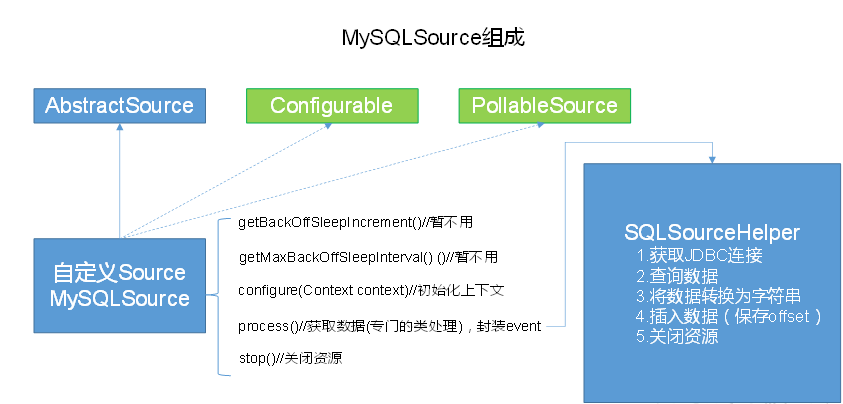
根据官方说明自定义mysqlsource需要继承AbstractSource类并实现Configurable和PollableSource接口。
实现相应方法:
getBackOffSleepIncrement()//暂不用
getMaxBackOffSleepInterval()//暂不用
configure(Context context)//初始化context
process()//获取数据(从mysql获取数据,业务处理比较复杂,所以我们定义一个专门的类——SQLSourceHelper来处理跟mysql的交互),封装成event并写入channel,这个方法被循环调用
stop()//关闭相关的资源
PollableSource:从source中提取数据,将其发送到channel。
Configurable:实现了Configurable的任何类都含有一个context,使用context获取配置信息。
3. 代码实现
1、导入pom依赖
   <build>

        <plugins>

            <plugin>

                <groupId>org.apache.maven.plugins</groupId>

                <artifactId>maven-compiler-plugin</artifactId>

                <configuration>

                    <source>8</source> #JDK版本

                    <target>8</target>

                </configuration>

            </plugin>

        </plugins>

    </build>

    <dependencies>

        <dependency>

            <groupId>org.apache.flume</groupId>

            <artifactId>flume-ng-core</artifactId>

            <version>1.7.0</version>

        </dependency>

        <dependency>

            <groupId>mysql</groupId>

            <artifactId>mysql-connector-java</artifactId>

            <version>5.1.27</version>

        </dependency>

    </dependencies>
2、添加配置信息
在classpath下添加jdbc.properties和log4j.properties
jdbc.properties
dbDriver=com.mysql.jdbc.Driver

dbUrl=jdbc:mysql://hadoop101:3306/mysqlsource?useUnicode=true&characterEncoding=utf-8

dbUser=root

dbPassword=123456
log4j.properties
#--------console-----------

log4j.rootLogger=info,myconsole,myfile

log4j.appender.myconsole=org.apache.log4j.ConsoleAppender

log4j.appender.myconsole.layout=org.apache.log4j.SimpleLayout

#log4j.appender.myconsole.layout.ConversionPattern =%d [%t] %-5p [%c] - %m%n

#log4j.rootLogger=error,myfile

log4j.appender.myfile=org.apache.log4j.DailyRollingFileAppender

log4j.appender.myfile.File=/tmp/flume.log

log4j.appender.myfile.layout=org.apache.log4j.PatternLayout

log4j.appender.myfile.layout.ConversionPattern =%d [%t] %-5p [%c] - %m%n
3、SQLSourceHelper
1) 属性说明:
属性            说明(括号中为默认值)

runQueryDelay      查询时间间隔(10000)

batchSize          缓存大小(100)

startFrom          查询语句开始id(0)

currentIndex        查询语句当前id,每次查询之前需要查元数据表

recordSixe          查询返回条数

table             监控的表名

columnsToSelect        查询字段(*)

customQuery          用户传入的查询语句

query              查询语句

defaultCharsetResultSet    编码格式(UTF-8)
2)方法说明:
2) 方法说明:

方法                                  说明

SQLSourceHelper(Context context)                构造方法,初始化属性及获取JDBC连接

InitConnection(String url, String user, String pw)      获取JDBC连接

checkMandatoryProperties()                    校验相关属性是否设置(实际开发中可增加内容)

buildQuery()                             根据实际情况构建sql语句,返回值String

executeQuery()                            执行sql语句的查询操作,返回值List<List<Object>>

getAllRows(List<List<Object>> queryResult)           将查询结果转换为String,方便后续操作

updateOffset2DB(int size)                     根据每次查询结果将offset写入元数据表

execSql(String sql)                         具体执行sql语句方法

getStatusDBIndex(int startFrom)                  获取元数据表中的offset

queryOne(String sql)                         获取元数据表中的offset实际sql语句执行方法

close()                                关闭资源
3) 代码实现:
SQLSourceHelper .java
package com.atguigu.source;

import org.apache.flume.Context;

import org.apache.flume.conf.ConfigurationException;

import org.slf4j.Logger;

import org.slf4j.LoggerFactory;

import java.io.IOException;

import java.sql.*;

import java.text.ParseException;

import java.util.ArrayList;

import java.util.List;

import java.util.Properties;

public class SQLSourceHelper {

    private static final Logger LOG = LoggerFactory.getLogger(SQLSourceHelper.class);

    private int runQueryDelay, //两次查询的时间间隔

            startFrom,            //开始id

            currentIndex,         //当前id

            recordSixe = 0,      //每次查询返回结果的条数

            maxRow;                //每次查询的最大条数

    private String table,       //要操作的表

            columnsToSelect,     //用户传入的查询的列

            customQuery,          //用户传入的查询语句

            query,                 //构建的查询语句

            defaultCharsetResultSet;//编码集

    //上下文,用来获取配置文件

    private Context context;

    //为定义的变量赋值(默认值),可在flume任务的配置文件中修改

    private static final int DEFAULT_QUERY_DELAY = 10000;

    private static final int DEFAULT_START_VALUE = 0;

    private static final int DEFAULT_MAX_ROWS = 2000;

    private static final String DEFAULT_COLUMNS_SELECT = "*";

    private static final String DEFAULT_CHARSET_RESULTSET = "UTF-8";

    private static Connection conn = null;

    private static PreparedStatement ps = null;

    private static String connectionURL, connectionUserName, connectionPassword;

    //加载静态资源

    static {

        Properties p = new Properties();

        try {

            p.load(SQLSourceHelper.class.getClassLoader().getResourceAsStream("jdbc.properties"));

            connectionURL = p.getProperty("dbUrl");

            connectionUserName = p.getProperty("dbUser");

            connectionPassword = p.getProperty("dbPassword");

            Class.forName(p.getProperty("dbDriver"));

        } catch (IOException | ClassNotFoundException e) {

            LOG.error(e.toString());

        }

    }

    //获取JDBC连接

    private static Connection InitConnection(String url, String user, String pw) {

        try {

            Connection conn = DriverManager.getConnection(url, user, pw);

            if (conn == null)

                throw new SQLException();

            return conn;

        } catch (SQLException e) {

            e.printStackTrace();

        }

        return null;

    }

    //构造方法

    SQLSourceHelper(Context context) throws ParseException {

        //初始化上下文

        this.context = context;

        //有默认值参数:获取flume任务配置文件中的参数,读不到的采用默认值

        this.columnsToSelect = context.getString("columns.to.select", DEFAULT_COLUMNS_SELECT);

        this.runQueryDelay = context.getInteger("run.query.delay", DEFAULT_QUERY_DELAY);

        this.startFrom = context.getInteger("start.from", DEFAULT_START_VALUE);

        this.defaultCharsetResultSet = context.getString("default.charset.resultset", DEFAULT_CHARSET_RESULTSET);

        //无默认值参数:获取flume任务配置文件中的参数

        this.table = context.getString("table");

        this.customQuery = context.getString("custom.query");

        connectionURL = context.getString("connection.url");

        connectionUserName = context.getString("connection.user");

        connectionPassword = context.getString("connection.password");

        conn = InitConnection(connectionURL, connectionUserName, connectionPassword);

        //校验相应的配置信息,如果没有默认值的参数也没赋值,抛出异常

        checkMandatoryProperties();

        //获取当前的id

        currentIndex = getStatusDBIndex(startFrom);

        //构建查询语句

        query = buildQuery();

    }

    //校验相应的配置信息(表,查询语句以及数据库连接的参数)

    private void checkMandatoryProperties() {

        if (table == null) {

            throw new ConfigurationException("property table not set");

        }

        if (connectionURL == null) {

            throw new ConfigurationException("connection.url property not set");

        }

        if (connectionUserName == null) {

            throw new ConfigurationException("connection.user property not set");

        }

        if (connectionPassword == null) {

            throw new ConfigurationException("connection.password property not set");

        }

    }

    //构建sql语句

    private String buildQuery() {

        String sql = "";

        //获取当前id

        currentIndex = getStatusDBIndex(startFrom);

        LOG.info(currentIndex + "");

        if (customQuery == null) {

            sql = "SELECT " + columnsToSelect + " FROM " + table;

        } else {

            sql = customQuery;

        }

        StringBuilder execSql = new StringBuilder(sql);

        //以id作为offset

        if (!sql.contains("where")) {

            execSql.append(" where ");

            execSql.append("id").append(">").append(currentIndex);

            return execSql.toString();

        } else {

            int length = execSql.toString().length();

            return execSql.toString().substring(0, length - String.valueOf(currentIndex).length()) + currentIndex;

        }

    }

    //执行查询

    List<List<Object>> executeQuery() {

        try {

            //每次执行查询时都要重新生成sql,因为id不同

            customQuery = buildQuery();

            //存放结果的集合

            List<List<Object>> results = new ArrayList<>();

            if (ps == null) {

                //

                ps = conn.prepareStatement(customQuery);

            }

            ResultSet result = ps.executeQuery(customQuery);

            while (result.next()) {

                //存放一条数据的集合(多个列)

                List<Object> row = new ArrayList<>();

                //将返回结果放入集合

                for (int i = 1; i <= result.getMetaData().getColumnCount(); i++) {

                    row.add(result.getObject(i));

                }

                results.add(row);

            }

            LOG.info("execSql:" + customQuery + "\nresultSize:" + results.size());

            return results;

        } catch (SQLException e) {

            LOG.error(e.toString());

            // 重新连接

            conn = InitConnection(connectionURL, connectionUserName, connectionPassword);

        }

        return null;

    }

    //将结果集转化为字符串,每一条数据是一个list集合,将每一个小的list集合转化为字符串

    List<String> getAllRows(List<List<Object>> queryResult) {

        List<String> allRows = new ArrayList<>();

        if (queryResult == null || queryResult.isEmpty())

            return allRows;

        StringBuilder row = new StringBuilder();

        for (List<Object> rawRow : queryResult) {

            Object value = null;

            for (Object aRawRow : rawRow) {

                value = aRawRow;

                if (value == null) {

                    row.append(",");

                } else {

                    row.append(aRawRow.toString()).append(",");

                }

            }

            allRows.add(row.toString());

            row = new StringBuilder();

        }

        return allRows;

    }

    //更新offset元数据状态,每次返回结果集后调用。必须记录每次查询的offset值,为程序中断续跑数据时使用,以id为offset

    void updateOffset2DB(int size) {

        //以source_tab做为KEY,如果不存在则插入,存在则更新(每个源表对应一条记录)

        String sql = "insert into flume_meta(source_tab,currentIndex) VALUES('"

                + this.table

                + "','" + (recordSixe += size)

                + "') on DUPLICATE key update source_tab=values(source_tab),currentIndex=values(currentIndex)";

        LOG.info("updateStatus Sql:" + sql);

        execSql(sql);

    }

    //执行sql语句

    private void execSql(String sql) {

        try {

            ps = conn.prepareStatement(sql);

            LOG.info("exec::" + sql);

            ps.execute();

        } catch (SQLException e) {

            e.printStackTrace();

        }

    }

    //获取当前id的offset

    private Integer getStatusDBIndex(int startFrom) {

        //从flume_meta表中查询出当前的id是多少

        String dbIndex = queryOne("select currentIndex from flume_meta where source_tab='" + table + "'");

        if (dbIndex != null) {

            return Integer.parseInt(dbIndex);

        }

        //如果没有数据,则说明是第一次查询或者数据表中还没有存入数据,返回最初传入的值

        return startFrom;

    }

    //查询一条数据的执行语句(当前id)

    private String queryOne(String sql) {

        ResultSet result = null;

        try {

            ps = conn.prepareStatement(sql);

            result = ps.executeQuery();

            while (result.next()) {

                return result.getString(1);

            }

        } catch (SQLException e) {

            e.printStackTrace();

        }

        return null;

    }

    //关闭相关资源

    void close() {

        try {

            ps.close();

            conn.close();

        } catch (SQLException e) {

            e.printStackTrace();

        }

    }

    int getCurrentIndex() {

        return currentIndex;

    }

    void setCurrentIndex(int newValue) {

        currentIndex = newValue;

    }

    int getRunQueryDelay() {

        return runQueryDelay;

    }

    String getQuery() {

        return query;

    }

    String getConnectionURL() {

        return connectionURL;

    }

    private boolean isCustomQuerySet() {

        return (customQuery != null);

    }

    Context getContext() {

        return context;

    }

    public String getConnectionUserName() {

        return connectionUserName;

    }

    public String getConnectionPassword() {

        return connectionPassword;

    }

    String getDefaultCharsetResultSet() {

        return defaultCharsetResultSet;

    }

}
MySQLSource.java
package com.atguigu.source;

import org.apache.flume.Context;

import org.apache.flume.Event;

import org.apache.flume.EventDeliveryException;

import org.apache.flume.PollableSource;

import org.apache.flume.conf.Configurable;

import org.apache.flume.event.SimpleEvent;

import org.apache.flume.source.AbstractSource;

import org.slf4j.Logger;

import org.slf4j.LoggerFactory;

import java.text.ParseException;

import java.util.ArrayList;

import java.util.HashMap;

import java.util.List;

public class MySQLSource extends AbstractSource implements Configurable, PollableSource {

    //打印日志

    private static final Logger LOG = LoggerFactory.getLogger(MySQLSource.class);

    //定义sqlHelper

    private SQLSourceHelper sqlSourceHelper;

    @Override

    public long getBackOffSleepIncrement() {

        return 0;

    }

    @Override

    public long getMaxBackOffSleepInterval() {

        return 0;

    }

    @Override

    public void configure(Context context) {

        try {

            //初始化

            sqlSourceHelper = new SQLSourceHelper(context);

        } catch (ParseException e) {

            e.printStackTrace();

        }

    }

    @Override

    public Status process() throws EventDeliveryException {

        try {

            //查询数据表

            List<List<Object>> result = sqlSourceHelper.executeQuery();

            //存放event的集合

            List<Event> events = new ArrayList<>();

            //存放event头集合

            HashMap<String, String> header = new HashMap<>();

            //如果有返回数据,则将数据封装为event

            if (!result.isEmpty()) {

                List<String> allRows = sqlSourceHelper.getAllRows(result);

                Event event = null;

                for (String row : allRows) {

                    event = new SimpleEvent();

                    event.setBody(row.getBytes());

                    event.setHeaders(header);

                    events.add(event);

                }

                //将event写入channel

                this.getChannelProcessor().processEventBatch(events);

                //更新数据表中的offset信息

                sqlSourceHelper.updateOffset2DB(result.size());

            }

            //等待时长

            Thread.sleep(sqlSourceHelper.getRunQueryDelay());

            return Status.READY;

        } catch (InterruptedException e) {

            LOG.error("Error procesing row", e);

            return Status.BACKOFF;

        }

    }

    @Override

    public synchronized void stop() {

        LOG.info("Stopping sql source {} ...", getName());

        try {

            //关闭资源

            sqlSourceHelper.close();

        } finally {

            super.stop();

        }

    }

}
4. 测试
1、jar包准备
1) 将mysql驱动包放入flume的lib目录下
[kris@hadoop101 flume]$ cp /opt/software/mysql-connector-java-5.1./mysql-connector-java-5.1.-bin.jar ./lib
2) 打包项目并将jar包放入flume的lib目录下
2、配置文件准备
1)创建配置文件并打开
vim mysql.conf
# Name the components on this agent

a1.sources = r1

a1.sinks = k1

a1.channels = c1

# Describe/configure the source

a1.sources.r1.type = com.atguigu.source.MySQLSource

a1.sources.r1.connection.url = jdbc:mysql://192.168.1.101:3306/mysqlsource

a1.sources.r1.connection.user = root

a1.sources.r1.connection.password =

a1.sources.r1.table = student

a1.sources.r1.columns.to.select = *

#a1.sources.r1.incremental.column.name = id

#a1.sources.r1.incremental.value =

a1.sources.r1.run.query.delay=

# Describe the sink

a1.sinks.k1.type = logger

# Describe the channel

a1.channels.c1.type = memory

a1.channels.c1.capacity =

a1.channels.c1.transactionCapacity =

# Bind the source and sink to the channel

a1.sources.r1.channels = c1

a1.sinks.k1.channel = c1
3、mysql表准备
1) 创建mysqlsource数据库
CREATE DATABASE mysqlsource;
2) 在mysqlsource数据库下创建数据表student和元数据表flume_meta
CREATE DATABASE mysqlsource;

USE mysqlsource;

CREATE TABLE student(

id INT(11) NOT NULL AUTO_INCREMENT,

`name` VARCHAR(255) NOT NULL,

PRIMARY KEY(id));

CREATE TABLE flume_meta (

source_tab VARCHAR(255) NOT NULL,

currentIndex VARCHAR(255) NOT NULL,

PRIMARY KEY(source_tab));
3) 向数据表中添加数据
1 kris

2 egon

3 alex
5、测试并查看结果
1) 任务执行
[kris@hadoop101 flume]$ bin/flume-ng agent -c conf/ -n a1 -f job/mysql.conf -Dflume.root.logger=INFO,console
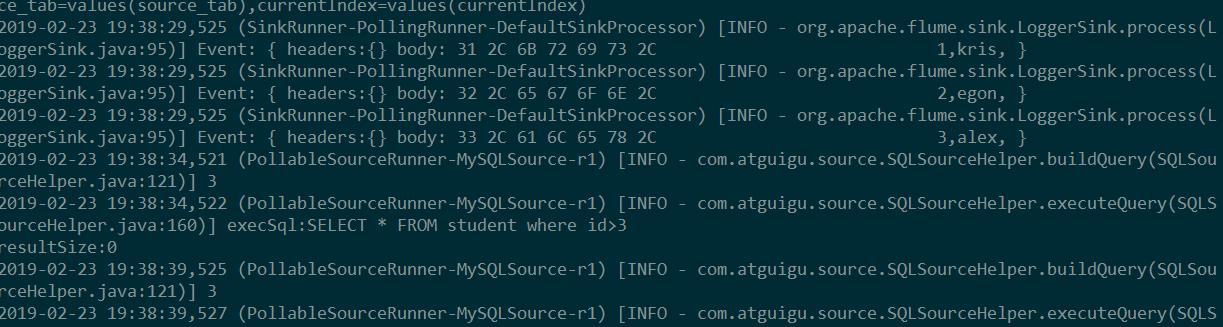
2) 结果展示,如图所示:
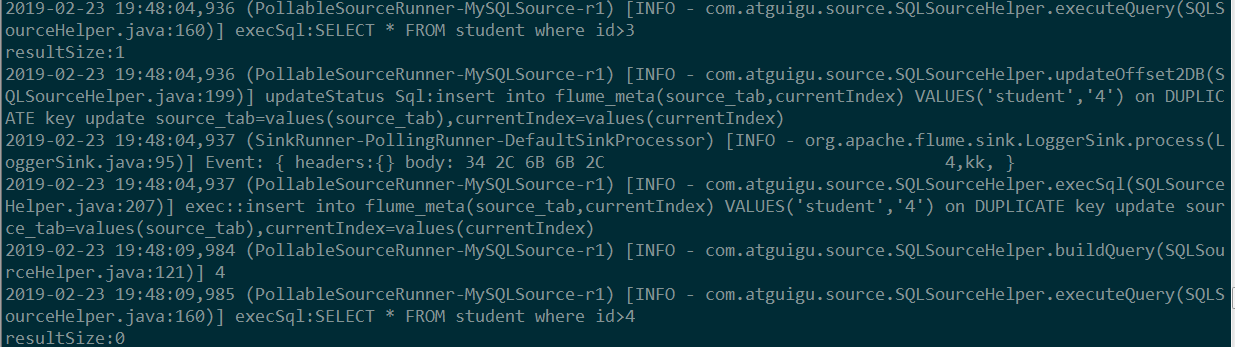
往studnet表中更新数据:
MySQLSource-Flume的更多相关文章
- 大数据技术之_09_Flume学习_Flume概述+Flume快速入门+Flume企业开发案例+Flume监控之Ganglia+Flume高级之自定义MySQLSource+Flume企业真实面试题(重点)
第1章 Flume概述1.1 Flume定义1.2 Flume组成架构1.2.1 Agent1.2.2 Source1.2.3 Channel1.2.4 Sink1.2.5 Event1.3 Flum ...
- Flume高级之自定义MySQLSource
1 自定义Source说明 Source是负责接收数据到Flume Agent的组件.Source组件可以处理各种类型.各种格式的日志数据,包括avro.thrift.exec.jms.spoolin ...
- Flume案例Ganglia监控
Flume案例和Flume监控系统的使用: 安装 将apache-flume-1.7.0-bin.tar.gz上传到linux的/opt/software目录下 解压apache-flume-1.7. ...
- [数据同步]Flume 抽取Mysql历史数据
一.Flume安装目录 1.安装部署目录 [admin@test01 apache-flume-1.9.0-bin]$ pwd /opt/apache-flume-1.9.0-bin 2.将所需jar ...
- Flume组件
1.什么是Flume:apache顶级项目,主要用来做数据采集.分布式.高可用,将海量日志进行采集.聚合.传输的系统.能够对数据进行简单处理在发送到接收方. 2.Flume组件:source.chan ...
- 大数据技术之Flume
第1章 概述 1.1 Flume定义 Flume是Cloudera提供的一个高可用的,高可靠的,分布式的海量日志采集.聚合和传输的系统.Flume基于流式架构,灵活简单. 1.2 Flume组成架构 ...
- 如何远程调试自定义开发的Flume应用
一.前言 Flume作为当下最流行的大数据采集组件之一.其本身拥有分布式/高可靠/高可用等优点,但相比较于Flink/Spark/Kafka等大数据组件,其对于本地调试的功能支持度并不高,如果我们没有 ...
- Flume1 初识Flume和虚拟机搭建Flume环境
前言: 工作中需要同步日志到hdfs,以前是找运维用rsync做同步,现在一般是用flume同步数据到hdfs.以前为了工作简单看个flume的一些东西,今天下午有时间自己利用虚拟机搭建了 ...
- Flume(4)实用环境搭建:source(spooldir)+channel(file)+sink(hdfs)方式
一.概述: 在实际的生产环境中,一般都会遇到将web服务器比如tomcat.Apache等中产生的日志倒入到HDFS中供分析使用的需求.这里的配置方式就是实现上述需求. 二.配置文件: #agent1 ...
- Flume(3)source组件之NetcatSource使用介绍
一.概述: 本节首先提供一个基于netcat的source+channel(memory)+sink(logger)的数据传输过程.然后剖析一下NetcatSource中的代码执行逻辑. 二.flum ...
随机推荐
- 【自动化测试】robotframework中一些建议可能需要掌握的关键字
这是2019年的第一篇文章,因公司事情较多,导致更新缓慢.这次主要推荐一些可能在使用rf工具的时候需要掌握的关键字. 1. @{cloose_ele} get webelements xpath= ...
- 最短路径问题—Dijkstra算法
算法: import java.util.*; public class Main6 { public static int N = 1050; public static final int INF ...
- 我在B站投稿啦、、、
我在B站投稿啦....欢迎评论交流... https://www.bilibili.com/video/av31539882/ 怎样激活Win10系统修改windows系统账户的名称-mp4 外链: ...
- css中文字体解决方案
html { font-family: -apple-system, "Noto Sans", "Helvetica Neue", Helvetica, &qu ...
- 封装ajax原理
封装ajax原理 首先处理 用户如果不传某些参数,设置默认值 type默认get 默认url为当前页 默认async方式请求 data数据默认为{} 处理用户传进来的参数对象 遍历,拼接成key=va ...
- cf 744D
一开始没看懂题解,想了好久(一整天)才想明白是枚举弦上点二分半径check角度,看了下clj的代码发现思路都一样就开始写了. 借鉴了一下clj的代码. 调了一个多小时. 几个注意点:看到好多 rand ...
- Js 运行机制和Event Loop
一.为什么JavaScript是单线程? JavaScript语言的一大特点就是单线程,也就是说,同一个时间只能做一件事.那么,为什么JavaScript不能有多个线程呢?这样能提高效率啊. Java ...
- 干货分享: 长达150页的openvswitch的ppt,不实验无真相
下载链接: Openvswitch实验教程 http://files.cnblogs.com/popsuper1982/Openvswtich.pptx 一.概论 Software Defined N ...
- ASP.NET Core知多少(7):对重复编译说NO -- dotnet watch
ASP.NET Core知多少系列:总体介绍及目录 1. 引言 我们一般的开发过程,就是编码-->编译-->运行-->调试-->定位问题--->修改代码-->编译- ...
- 在线生成透明ICO图标神器
此神器的链接为:http://ico.duduxuexi.com/ 大家可以将这个网址收藏好,本人亲测十分好用!对我们的ios,安卓以及windows开发都有极大的好处.