AppCan
启动服务


将app程序寄宿在计算机上,在计算机上调试:访问服务地址,将appToken值复制一下

在浏览器输入192.168.2.102:3000/appToken的值/文件路径后即可调试
入口文件
项目必须有一个放在根目录下的入口页面,否则在手机上无法进入app模块。比如在根目录下放一个appcan页面,命名为Login,然后在config.xml配置文件中注册(右击xml - 以xml方式打开)
文件结构
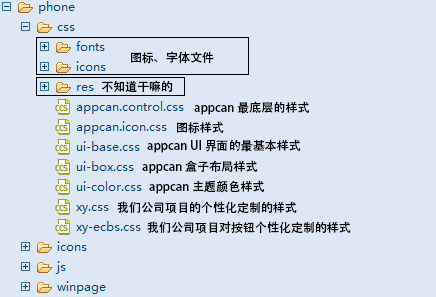

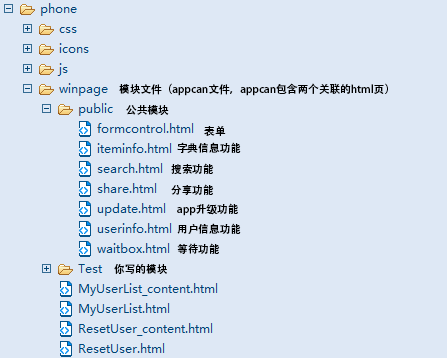
常用文件
<link rel="stylesheet" href="css/ui-box.css">
<link rel="stylesheet" href="css/ui-base.css">
<link rel="stylesheet" href="css/ui-color.css">
<link rel="stylesheet" href="css/appcan.icon.css">
<link rel="stylesheet" href="css/appcan.control.css">
<link rel="stylesheet" href="css/xy.css">
<script src="js/appcan.js"></script>
<script src="js/appcan.control.js"></script>
<script src="js/pc.js"></script>
<script src="js/base.js"></script>
<script src="js/ec.js"></script>
<script src="js/uf.js"></script>
<script src="js/login.js"></script>
配置文件
具体配置,可参考官方文档。注意,使用外面的插件时,需要注册。
<widget appId="test1001" channelCode="0000" height="480" pid="" sreensize="4.5" version="00.00.0000" viewmode="application" widgetId="" width="320">
<name>测试App</name>
<description/>
<author email=""/>
<icon src="icon.png"/>
<license href=""/>
<content encoding="utf-8" src="MyLogin.html"/>
<updateurl/>
<logserverip/>
<showmyspace>false</showmyspace>
<obfuscation>true</obfuscation>
<bgcolor>#fefefe</bgcolor>
<orientation>1</orientation>
<debug>true</debug>
<!--极光推送配置-->
<config desc="uexJPush" type="KEY">
<param name="$UEXJPUSH_PACKAGE$" platform="Android" value="com.xuyong.xyzls.worker"/>
<param name="$UEXJPUSH_APPKEY$" platform="Android" value="303759edfd226f8e5dd4fe80"/>
<param file="uexGroupfolder/PushConfig.plist" name="$UEXJPUSH_APP_KEY$" platform="iOS" value="303759edfd226f8e5dd4fe80"/>
<param file="uexGroupfolder/PushConfig.plist" name="$UEXJPUSH_PUSH_CHANNEL$" platform="iOS" value="c1"/>
<param file="uexGroupfolder/PushConfig.plist" name="$UEXJPUSH_APS_ENVIRONMENT$" platform="iOS" value="0"/>
</config>
<!--百度地图配置-->
<config desc="uexBaiduMap" type="KEY">
<param name="$uexBaiduMap_APIKey$" platform="Android" value="mncGL5qjo78HImOXDPcaWtHPdPBATVbz"/>
<param name="$uexBaiduMap_APIKey$" platform="iOS" value="iXfGyztf4xnUv4pmMBuq5LkPyzC8c3xP"/>
</config>
<partobfuscation/>
<webapp/>
<!--分享功能白名单-->
<config desc="whiteList" type="AUTHORITY">
<permission info="urlSchemeWhiteList" platform="iOS">
<string>wechat</string>
<string>weixin</string>
<string>mqzoneopensdk</string>
<string>mqzoneopensdkapi</string>
<string>mqzoneopensdkapi19</string>
<string>mqzoneopensdkapiV2</string>
<string>mqqOpensdkSSoLogin</string>
<string>mqqopensdkapiV2</string>
<string>mqqopensdkapiV3</string>
<string>wtloginmqq2</string>
<string>mqqapi</string>
<string>mqqwpa</string>
<string>mqzone</string>
<string>mqq</string>
</permission>
</config>
</widget>
创建Html页面(appcan页面)
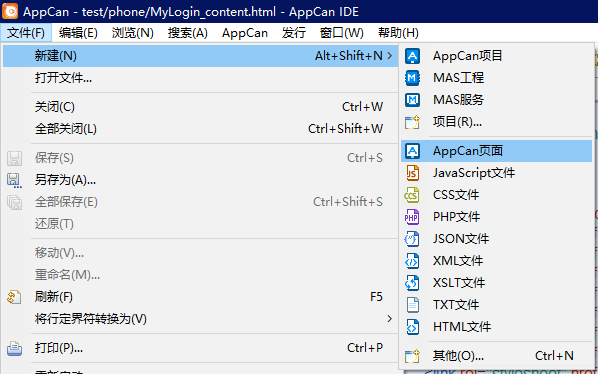
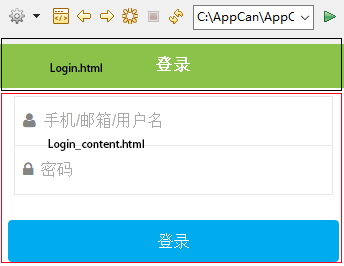
这会生成两个文件,一个是框架文件,一个是嵌入框架的子文件。框架文件只显示一个标题栏,如图

子文件是具体的内容区域,如图的Login_content.html
盒子布局
传统的流式布局是指父容器的大小由子元素所决定,而盒子模型是指将其他元素放入盒子后,其他元素的大小、布局方式都统一交给盒子来分配掌控。
ub
使子元素横向排列

#box {background: red; color: white; }
.child1 {background: #8F5219; }
.child2 {background: #008FF5; }
.child3 { background: #9BA22D; }
</style>
<body class="um-vp bc-bg" ontouchstart>
<div id="page_你的文件路径名" class="up ub ub-ver bc-bg" tabindex="0">
<!--content开始-->
<div id="id_content" class="ub-f1 tx-l">
<div class="ub" id="box">
<div class="child1">1</div>
<div class="child2">2</div>
<div class="child3">3</div>
</div>
</div>
<!--content结束-->
</div>
</body>
ub-ver
使子元素纵向排列
ub-f1
计算其它元素所占用的空间大小,将剩余空间分配给当前元素。
如果多个元素都使用了ub-f1,则将剩余空间划分成均等的份,每个元素占一份。
ub-f2、ub-f3、ub-f4,数字表示份数,数字越大占用空间越大。

#box{background: red;color:white;}
.child1{background:#8F5219;}
.child2{background:#008FF5;}
.child3{background:#9BA22D;}
</style>
<body class="um-vp bc-bg" ontouchstart>
<div id="page_你的文件路径名" class="up ub ub-ver bc-bg" tabindex="0">
<!--content开始-->
<div id="id_content" class="ub-f1 tx-l">
<div class="ub" id="box">
<div class="child1 ub-f">1</div>
<div class="child2 ub-f1">2</div>
<div class="child3">3</div>
</div>
</div>
<!--content结束-->
</div>
</body>

<div id="page_你的文件路径名" class="up ub ub-ver bc-bg" tabindex="0">
<!--content开始-->
<div id="id_content" class="ub-f1 tx-l">
<div class="ub ub-ver" id="box" style="height:13em;"> //由于div默认宽度是和浏览器一样宽,但高度默认是按照div所包含的文本、子元素来决定,所以此处需要手动设定盒子的高度才能看出ub-fx的效果
<div class="child1 ub-f">1</div>
<div class="child2 ub-f1">2</div>
<div class="child3">3</div>
</div>
</div>
<!--content结束-->
</div>
</body>
up
使当前元素完全占满盒子
<div id="page_你的文件路径名" class="up ub ub-ver" tabindex="0">
<!--content开始-->
<div class="child1 up" style="height:3em;">1</div>
<!--content结束-->
</div>
</body>
常用方法
appcan.frame.open()
将参数指定的目标页面嵌入到当前页面中
appcan.ready(function () {
var titHeight = $('#header').offset().height;
appcan.frame.open("content", "mylogin_content.html", 0, titHeight);
window.onorientationchange = window.onresize = function () {
appcan.frame.resize("content", 0, titHeight);
}
});
b.show()
用参数指定的目标页面替换当前页面,需要引入公司的js文件,参数3可指定要向目标页传递的数据
/*在login_content.html页面*/
var obj = { name: "sam" }; /*定义需要跨页传递的数据*/
b.click("#Btn", function () {
/*打开参数路径指定的页面*/
b.show("home.html", "winpage_home", { //页面、页面的body下的第一个div(包含所有元素的div)的id,一般格式如:page_winpage_editUser_content
data: obj /*传递的参数*/
});
});
/*在home.html中获取参数*/
var fromLoginPageData = b.geturlparam();
var name = fromLoginPageData.data.name;
alert(name);
/*home页面向home._content页面传递数据也是同样的写法*/
appcan.window.alert()
弹出确认对话框
title: "提醒",
content: "表单未填完整",
buttons: '确定',
callback: function (err, data, dataType, optId) {
}
});
b.click()
点击事件,类似的有b.long.click()
b.close()
回退到上一个页面,等同于appcan.window.close(-1);
每个框架页都有回退按钮,需要自己手动设置,具体是在Header部分添加一个div按钮,如:
<div id="header" class="uh bc-text-head ub bc-head">
<div class="nav-btn" id="nav-left">
<div class="fa fa-angle-left fa-2x"></div>
</div>
<h1 class="ut ub-f1 ulev-3 ut-s tx-c" tabindex="0">登录</h1>
<div class="nav-btn nav-bt" id="nav-right"></div>
</div>
<!--header结束-->

b.close(); //可以访问this
});
常用样式
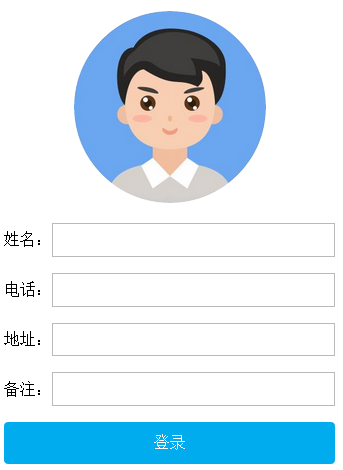
缩小元素
设置左右边距可以缩小元素
margin-top: 1em;
margin-left:0.5em;
margin-right:0.5em;
}
设置圆角
border-radius: 3em;
}

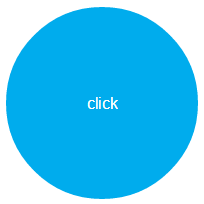
圆形按钮
width: 12em;
height: 12em;
border-radius: 50%;
}
<div class="btn/*删掉btn,否则是椭圆*/ ub ub-ac bc-text-head ub-pc bc-btn" id="raBtn">
click
</div>
</div>
列表
需要引入
<link rel="stylesheet" href="css/res/xy-ecbs.css">
<script src="js/appcan.listview.js"></script>
<script src="js/ec.js"></script>

选择列表控件,这会在页面插入一个列表div,接着需要创建列表对象
selector: "#MylistBox", //插入页面的列表元素的id
type: "thickLine", //复杂列表 简单列表:thinLine
dataType: "local", //本地数据源
logoSize: 1.5,
hasSubTitle: true, //右侧是否显示文本
subTitleCss: "setFont", //右侧文本的额css类名
logoCss: "setLogo",
titleCss: "setFont", //左侧文本的css类名
data: [{
id: 1,
logo: "fa-user",
title: "leo",
subTitle: "023789"
},
{
id: 2,
logo: "fa-user",
title: "tim",
subTitle: "90950"
}],
events: {
click: function (el, data) {
b.show("ResetUser.html", "winpage_ResetUser", {
data: data
});
}
}
});
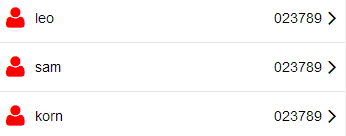
复杂列表只是在左侧和右侧文本下方多出了说明性文本
describe: "用户名",
subTitle : "023789",
subDescribe: "电话号码",

编码约定
框架页约定
在body之下,所有编码的html都应包含在以下的红色div中,注意下面的id_header,如果你是按模板创建的登陆界面,不要修改模板生成的id,其它空白页应按照这个约定来设定id,id_xx。
<!--header开始-->
<div id="header" class="uh bc-text-head ub bc-head">
<!--header左部开始-->
<div class="nav-btn" id="nav-left">
<div class="fa fa-angle-left fa-2x"></div><!--回退按钮-->
</div>
<!--header左部结束-->
<!--header中部开始-->
<h1 class="ut ub-f1 ulev-3 ut-s tx-c" tabindex="0">登录</h1>
<!--header中部结束-->
<!--header右部开始-->
<div class="nav-btn nav-bt" id="nav-right">
<div class="fa fa-gear fa-1x"></div> <!--设置按钮-->
</div>
<!--header右部结束-->
</div>
<!--header结束-->
<!--content开始-->
<div id="id_content" class="ub-f1 tx-l"></div>
<!--content结束-->
<!--footer开始-->
<div id="id_footer"></div>
<!--footer结束-->
</div>
子页面约定
在body之下,所有编码的html都应包含在以下的红色div中
<!--content开始-->
<div id="id_content" class="ub-f1 tx-l">
</div>
<!--content结束-->
</div>
Js约定
框架页的js区域约定
描述:xxx
作者:寒食
日期:2018-4-14
*/
/******************************定义当前页面全局变量************************************/
/*后台地址*/
var str_url = "";
/*其它变量*/
var str_windowName = "winpage_mylogin";
var str_frameName = "winpage_mylogin_content";
var json_params = b.geturlparams();
/******************************相关插件及其他设置的初始化*******************************/
appcan.ready(function() {
b.showframe("mylogin_content.html", str_frameName, json_params);
});
/******************************控件定义代码段************************************/
//比如new出列表控件等,最好将创建控件的代码封装到函数中,将函数调用放在appcan.ready方法中
/******************************自定义方法代码段************************************/
/******************************给页面按钮注册事件******************************************/
b.click(".nav-btn", function() {
b.close();
});
子页面的js区域约定
描述:xxx
作者:寒食
日期:2018-4-14
*/
/******************************定义当前页面全局变量************************************/
/*后台地址*/
var str_url = "";
/*其它变量*/
/******************************相关插件及其他设置的初始化*******************************/
appcan.ready(function () {
});
/******************************控件定义代码段************************************/
/******************************自定义方法代码段************************************/
/******************************给页面按钮注册事件******************************************/
变量约定
变量的类型做前缀,如:str_name、int_id、dt_time、json_data、array_list、bool_isTrue、el_div,不是前面约定的类型则使用obj_obj
快捷键
Ctrl+Shift+F:格式化代码
Ctrl+Shift+/:注释
Ctrl+/:取消注释
在visual studio中编码

获取后端数据
pc.js是公司封装的代码,具体如下:
var pc = {
namespace : "pc",
/*当前的环境(1:开发环境,2:测试环境,3:正式环境)*/
SIPTYPE : 2,
/*服务器地址*/
SIP : "",
/*服务端名称空间*/
SNS : "BLL.YS.API_APP_WORKER",) {
//开发环境地址
pc.SIP = "http://192.168.1.12:4012/Dynamic/Dynamic.ashx";
} else if (pc.SIPTYPE == 2) {
//测试环境地址
pc.SIP = "http://192.168.1.27:4012/Dynamic/Dynamic.ashx";
} else if (pc.SIPTYPE == 3) {
//正式环境地址
pc.SIP = "http://192.168.1.27:4012/Dynamic/Dynamic.ashx";
}
},
封装的ajax方法
action: "Task.GetJoinTaskInfo",
}, function (state, obj) {
state == true ? alert(obj.data) : alert('error');
});
不用以上方法,则直接使用appcan提供的ajax方法
创建一个空web项目,创建一般处理程序:
{
public class MyHttpHandler : IHttpHandler
{
public void ProcessRequest( HttpContext context )
{
context.Response.ContentType = "text/plain";
context.Response.Write( "{data:'hello'}");
}
}
}
<httpProtocol>
<customHeaders>
<add name="Access-Control-Allow-Origin" value="*" />
<add name="Access-Control-Allow-Headers" value="*" />
<add name="Access-Control-Allow-Methods" value="GET, POST, PUT, DELETE" />
</customHeaders>
</httpProtocol>
</system.webServer>
url: 'http://192.168.1.4:8080/myHttpHandler.ashx',
type: 'GET',
data: {
param1: ''
},
success: function (data) { //注意此处只有一个参数,而公司封装的ajax其success有两个参数
var json_obj = eval("(" + data + ")");
alert(json_obj.data);
},
error: function (e) {
alert(e);
}
});
上下拉刷新
在子页面编码即可。下拉是重新装载数据,上拉是追加数据。bounce刷新、resetbounce重置刷新。
var setBounce = function () {
setTimeout(function () { b.resetbounce(); }, 2000); //2秒重置,否则会一直显示刷新的提示文字
}
b.bounce({
top: function () { setBounce(); },
bottom: function () { setBounce(); }
});
});
Ajax上下拉刷新的例子
下拉时应刷新listView,页码永远是0,而上拉则追加数据到listView,页码变换
var pageIndex = 0; //页码
GetData(pageIndex);
//上下拉刷新
var setBounce = function () {
setTimeout(function () {
b.resetbounce()
}, 200);
}
b.bounce({
top: function () {
setBounce();
pageIndex = 0;
GetData(pageIndex, true)
},
bottom: function () { setBounce(); GetData(++pageIndex); }
})
});
function GetData(pageIndex, refresh) {
alert(pageIndex);
//下拉,清空列表
if (refresh) {
list = null;
$("#listview").empty();
}
appcan.ajax({
url: "http://192.168.2.103:8080/myhttphandler.ashx",
type: "GET",
data: {
start: pageIndex,
limit: 10, //每页显示记录条数
},
success: function (obj) {
var json = eval("(" + obj + ")");
list = new ec.listview({
selector: "#listview",
type: "thickLine",
logoSize: 1.5,
dataType: "local",
hasSubTitle: true,
data: json
});
},
error: function (e) {
}
});
}
如果在手机上调试Ajax参数,可将服务程序寄宿到IIS托管,然后以管理员身份运行visual studio,然后断点,编译,附加到进程进行调试,手机访问pc的ip地址,也要注意先关闭防火墙,否则手机端无法访问服务程序,服务程序如下:
{
public void ProcessRequest( HttpContext context )
{
var response = context.Response;
var request = context.Request;
response.ContentType = "text/plain";
var pageIndex = request["start"] == "0" ? 0 : Convert.ToInt32( request["start"] );
var limit = Convert.ToInt32( request["limit"] );
dynamic[] dynamics =
{
new { id =1,logo="fa-user",title="leo",subTitle="1001000"},
new { id =2,logo="fa-user",title="sam",subTitle="2001033"},
new { id =3,logo="fa-user",title="korn",subTitle="38974729"},
new { id =4,logo="fa-user",title="tim",subTitle="94371923"},
new { id =5,logo="fa-user",title="leo",subTitle="1001000"},
new { id =6,logo="fa-user",title="michael",subTitle="4533536"},
new { id =7,logo="fa-user",title="Jerry",subTitle="56565"},
new { id =8,logo="fa-user",title="abelard",subTitle="94375641923"},
new { id =9,logo="fa-user",title="adrian",subTitle="36656"},
new { id =10,logo="fa-user",title="aaron",subTitle="89755"},
//第二页
new { id =11,logo="fa-user",title="xx",subTitle="1001000"},
new { id =12,logo="fa-user",title="xxx",subTitle="2001033"},
new { id =13,logo="fa-user",title="xxxx",subTitle="38974729"},
new { id =14,logo="fa-user",title="xxxxx",subTitle="94371923"},
new { id =15,logo="fa-user",title="xxxxxx",subTitle="1001000"},
new { id =16,logo="fa-user",title="xxxxxxxx",subTitle="4533536"},
new { id =17,logo="fa-user",title="xxxxxxxxx",subTitle="56565"},
new { id =18,logo="fa-user",title="xxxxxxxxxx",subTitle="94375641923"},
new { id =19,logo="fa-user",title="xxxxxxxxxxx",subTitle="36656"},
new { id =20,logo="fa-user",title="xxxxxxxxxxxxx",subTitle="89755"},
//第三页
new { id =21,logo="fa-user",title="yy",subTitle="346475567"},
new { id =22,logo="fa-user",title="yyyy",subTitle="2001877033"},
new { id =23,logo="fa-user",title="yyyyyyyy",subTitle="43454"},
new { id =24,logo="fa-user",title="yyyyyyyyyyyy",subTitle="94371567576923"},
new { id =25,logo="fa-user",title="yyyyyyyyyyyyyy",subTitle="224756"},
new { id =26,logo="fa-user",title="yyyyyyyyyyyyyyyyyy",subTitle="4533787788536"},
new { id =27,logo="fa-user",title="yyyyyyyyyyyyyyyyyyyy",subTitle="4565675687"},
new { id =28,logo="fa-user",title="yyyyyyyyyyyyyyyyyyyyyyyy",subTitle="94375641676923"},
new { id =29,logo="fa-user",title="yyyyyyyyyyyyyyyyyyyyyyyy",subTitle="24357687"},
new { id =30,logo="fa-user",title="yyyyyyyyyyyyyyyyyyyyyyyyyyy",subTitle="5657687"},
};
var list = dynamics.Skip( pageIndex * limit ).Take( limit );
string json = JsonConvert.SerializeObject( list );
response.Write( json );
response.End( );
}
public bool IsReusable
{
get
{
return false;
}
}
}
插件
appcan官方提供的插件不需要再配置文件中配置,但调用外部app功能的插件属于第三方插件,这些插件已经集成到打包平台,如果你要在项目中使用百度地图、微信登陆、极光推送、支付宝付款等外部功能,则需要先注册对应的开放平台,然后获取appkey,将key配置在config.xml文件中,然后在打包平台(appcan sdk移动应用开发系统)打包时选择已经为你列出的插件列表即可。
<widget appId="test1001" channelCode="0000" height="480" pid="" sreensize="4.5" version="00.00.0000" viewmode="application" widgetId="" width="320">
<name>寒食-Ajax</name> <!--app名称-->
<description/>
<author email=""/>
<icon src="icon.png"/><!--app的logo-->
<license href=""/>
<content encoding="utf-8" src="index.html"/><!--app入口页面-->
<updateurl/>
<logserverip/>
<showmyspace>false</showmyspace>3
<obfuscation>true</obfuscation>
<bgcolor>#fefefe</bgcolor>
<orientation>1</orientation>
<debug>true</debug>
<!--项目用到的插件,比如QQ、微信分享、百度地图、极光推送等的功能必须在此处配置,调用插件的功能可参考appcan文档左侧菜单 - 第三方SDK-->
<!--极光推送配置-->
<config desc="uexJPush" type="KEY">
<param name="$UEXJPUSH_PACKAGE$" platform="Android" value="com.xuyong.xyzls.worker"/><!--程序包名称-->
<param name="$UEXJPUSH_APPKEY$" platform="Android" value="303759edfd226f8e5dd4fe80"/>
<param file="uexGroupfolder/PushConfig.plist" name="$UEXJPUSH_APP_KEY$" platform="iOS" value="303759edfd226f8e5dd4fe80"/>
<param file="uexGroupfolder/PushConfig.plist" name="$UEXJPUSH_PUSH_CHANNEL$" platform="iOS" value="c1"/>
<param file="uexGroupfolder/PushConfig.plist" name="$UEXJPUSH_APS_ENVIRONMENT$" platform="iOS" value="0"/>
</config>
<!--百度地图配置--><!--需要在web上注册账户再申请appkey,最后将appkey粘贴到此处即可-->
<config desc="uexBaiduMap" type="KEY">
<param name="$uexBaiduMap_APIKey$" platform="Android" value="mncGL5qjo78HImOXDPcaWtHPdPBATVbz"/>
<param name="$uexBaiduMap_APIKey$" platform="iOS" value="iXfGyztf4xnUv4pmMBuq5LkPyzC8c3xP"/>
</config>
<partobfuscation/>
<webapp/>
<!--针对ios的分享、调用外部app的功能,这需要一个白名单-->
<config desc="whiteList" type="AUTHORITY">
<permission info="urlSchemeWhiteList" platform="iOS">
<string>wechat</string>
<string>weixin</string>
<string>mqzoneopensdk</string>
<string>mqzoneopensdkapi</string>
<string>mqzoneopensdkapi19</string>
<string>mqzoneopensdkapiV2</string>
<string>mqqOpensdkSSoLogin</string>
<string>mqqopensdkapiV2</string>
<string>mqqopensdkapiV3</string>
<string>wtloginmqq2</string>
<string>mqqapi</string>
<string>mqqwpa</string>
<string>mqzone</string>
<string>mqq</string>
</permission>
</config>
</widget>
打包
登陆appcan sdk移动应用开发系统,应用管理 - 管理 - 软件版本管理 - hybrid打包:
图标设置、状态栏设置、启动页设置:略
引擎选择:对插件进行手机适配、默认即可
插件选择:选择平台提供的封装好的第三方插件
开关设置:默认即可
AppCan的更多相关文章
- APPCAN开发笔记:html页面之间的参数传递:使用js获取url中的参数,以及在APPCAN中不能使用的解决方法
用PHP的GET/POST方式来传递方式已经是司空见惯了,但是如果我的页面是一个静态的html的页面,想传递参数的时候要怎么办呢?在APPCAN的开发中我们会经常遇到这样的问题,因为所有的页面都是静态 ...
- AppCan学习笔记----关闭页面listview动态加载数据
AppCan页面关闭 AppCan 的页面是由两个HTML组成,如果要完全关闭的话需要在主HTML eg.index.html中关闭,关闭方法:appcan.window.close(-1); 管道 ...
- AppCan学习笔记----Request和登录功能简单实现
appcan.ajax(options) 实现appcan中网络数据的上传和获取 发起一个ajax请求,并获取相应的内容 常用参数 options.type: 请求的类型,包括GET.POST等 op ...
- AppCan学习笔记--数据存储及listview简单应用
AppCan AppCan开发平台简介 AppCan是Hybrid App开发框架即混合开发框架,有官方提供底层功能使用API HTML5和JavaScript只是作为一种解析语言,真正调用的都是Na ...
- AppCan JSSDK模块扩展
1. 从源码开始: 我们先看源码的8188行到9525行: window.appcan && appcan.define('window',function($,export ...
- 学习记录之APPCan
2015年5月28的笔记,整理笔记搬了过来,好坏是自己当时的小成果,以后有想法继续补充 APPCan移动开发服务平台,有内置模板,列表样式,主页样式等供选择,适合开发简单布局或与内置模板布局相同的项目 ...
- appcan.slider.js探索
1:-moz代表firefox浏览器私有属性 -ms代表IE浏览器私有属性 -webkit代表chrome.safari私有属性 2:定义新模块:appcan.define(name,function ...
- 【AppCan 开发者】北京开发者交流会之行
不久前AppCan官方组织了开发者交流会活动,我有幸参加了这次活动,官方报销全部费用,还有妹子相伴,哇哇,这是光明正大打FB的节奏啊~ (呃,说实话,这是俺第一次去帝都~心里挺激动的~) 10.25帝 ...
- APPCAN MAS接口之SOAP
APPCAN MAS接口中使用webservice接口形式,示例代码如下: 1 var MEAP=require("meap"); 2 3 function run(Par ...
- 使用APPCAN开发移动应用APP心得
要想使用APPCAN开发移动应用,首先要弄明白什么是APPCAN,APPCAN都具有哪些功能. 1.什么是APPCAN? APPCAN是正益无线公司开发的一套Hybrid混合应用开发平台(AppCan ...
随机推荐
- FLIR 相机采集程序
https://www.ptgrey.com/Downloads/GetSecureDownloadItem/11048 Grasshopper3 4.1 MP Mono USB3 Vision (C ...
- commons-lang3 事件机制 <EventListenerSupport>
俗话说,站在巨人肩上,可以使我们走的更远 使用已有的java组件,可以提高我们的开发效率,减少出错几率,apache commons中包含有很多这样的组将,commons-lang3就是其中的一个,当 ...
- jQuery 中的事件绑定
一.事件概念 和数据库中的触发器一样,当操作了数据的时候会引发对应的触发器程序执行 一样,JS 中的事件就是对用户特定的行为作出相应的响应的过程,其实上就是浏览器 监听到用户的某些行为的时候会执行对应 ...
- 江苏省选2019Round2游记
JSOI2019R2过去了. 翻盘变翻车... Day 0 打板子.写了几棵主席树. 然后啃CF 331D3.啃不动 Day 1 开T1.这什么玩意啊...换换换 开T2.一眼\(10\)分的状压,码 ...
- SkiaSharp图像处理
SkiaSharp图像处理 .NET Core使用skiasharp文字头像生成方案(基于docker发布) 一.问题背景 目前.NET Core下面针对于图像处理的库微软并没有集成,在.NET ...
- linux 下ab压力测试
1.ab的简介 ab是apachebench命令的缩写. ab是apache自带的压力测试工具.ab非常实用,它不仅可以对apache服务器进行网站访问压力测试,也可以对或其它类型的服务器进行压力测试 ...
- pstree:command not found
centos7默认并没有安装pstree,所以会有pstree:command not found yum -y install psmisc
- Flex弹性布局以及box-sizing
(本篇内容代表本人理解,如有错误请指出!) box-sizing box-sizing 属性用于更改用于计算元素宽度和高度的默认的 CSS 盒子模型.可以使用此属性来模拟不正确支持CSS盒子模型规范的 ...
- 树 相关知识总结以及Java实现
最近在温习树相关的知识,并且用java实现了一下树的遍历相关,先贴上代码供大家参考吧. package tree_problems; import java.util.ArrayDeque; impo ...
- Error:Failed to resolve: com.android.support.constraint:constraint-layout:1.0.2
可以换个maven库: allprojects { repositories { jcenter() //maven { url "https://jitpack.io" } ma ...
