Android Studio的串口通讯开发
前言
软件代码写久了,总会对嵌入式开发感兴趣,因为软件的东西写来写去看不见摸不着,而嵌入式硬件开发,可以捣鼓一些机械设备玩,电子感应灯,遥控车啥的,这也就是传说中的创客啊!后面索性买了一套单片机教程《手把手教你学51单片机》和板子学习,作为入门书来说,确实挺不错,配合上官方的板子,把单片机的基础原理都将的挺透彻,其中还包括了C语言的讲解,为嵌入式开发打下基础。
共花了2个月把单片机学了一遍,最后觉得也没有想象中的难,因为其实到头来还是像在使用工具,只是知识体系会有些不一样,主要就是基于C/汇编语言通过单片机对寄存器、定时器、每个引脚的高低电平的使用,然后参考硬件手册,对每个硬件进行操作,以达到想要实现的效果。而如果想要实现自己的最小系统,或者弄出一些好玩的东西,还要自己根据物力电气原理选原件、画PCB板子,这就是硬件工程师要干的事情了。
刚好公司项目里基于Android板子开发了一些串口通讯的应用,得益于之前单片机的学习,没有遇到太多困难,记录分享一下。
RS232标准接口
也就是PC电脑上所说的COM口,RS232是负逻辑电平,它定义+5~+12V为低电平,而-12~-5V为高电平。
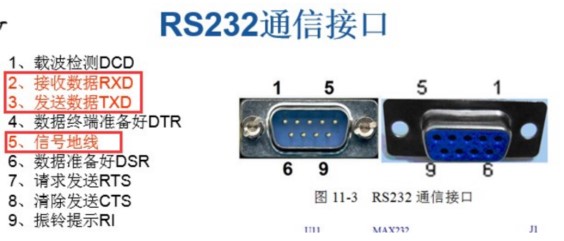
正常情况下,PC台式主机机箱都会有一个RS232的通讯接口(别和VGI的口搞错啦!),而目前笔记本几乎不会带有了,所以都是用USB转接口。
UART
及Universal Asynchronous Receiver Transmitter:通用异步收发器,通常ARM嵌入式板子都会集成此接口
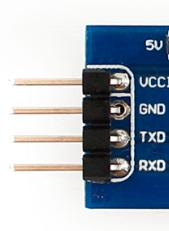
UART有4个pin(VCC, GND, RX, TX), 用的TTL电平, 低电平为0(0V),高电平为1(3.3V或以上)。
RS232与UART转接
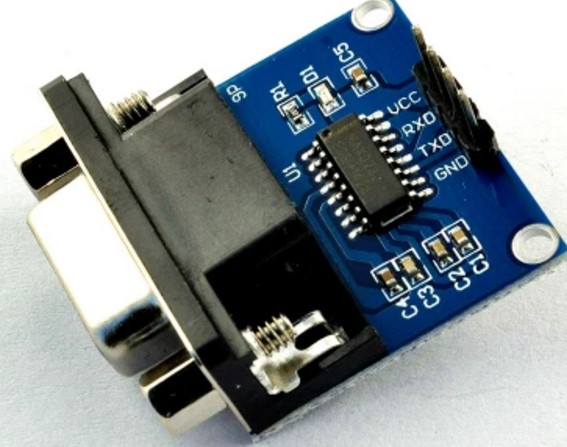
通常嵌入式里所说的串口,是指UART口,但硬件众多,大多数都是基于RS232和UART,有时候这两种口之间需要通讯,最主要不同的其实也就是电平不一样,所以需要转接口,某宝上MAX3232种类繁多。
下载 NDK 和构建工具
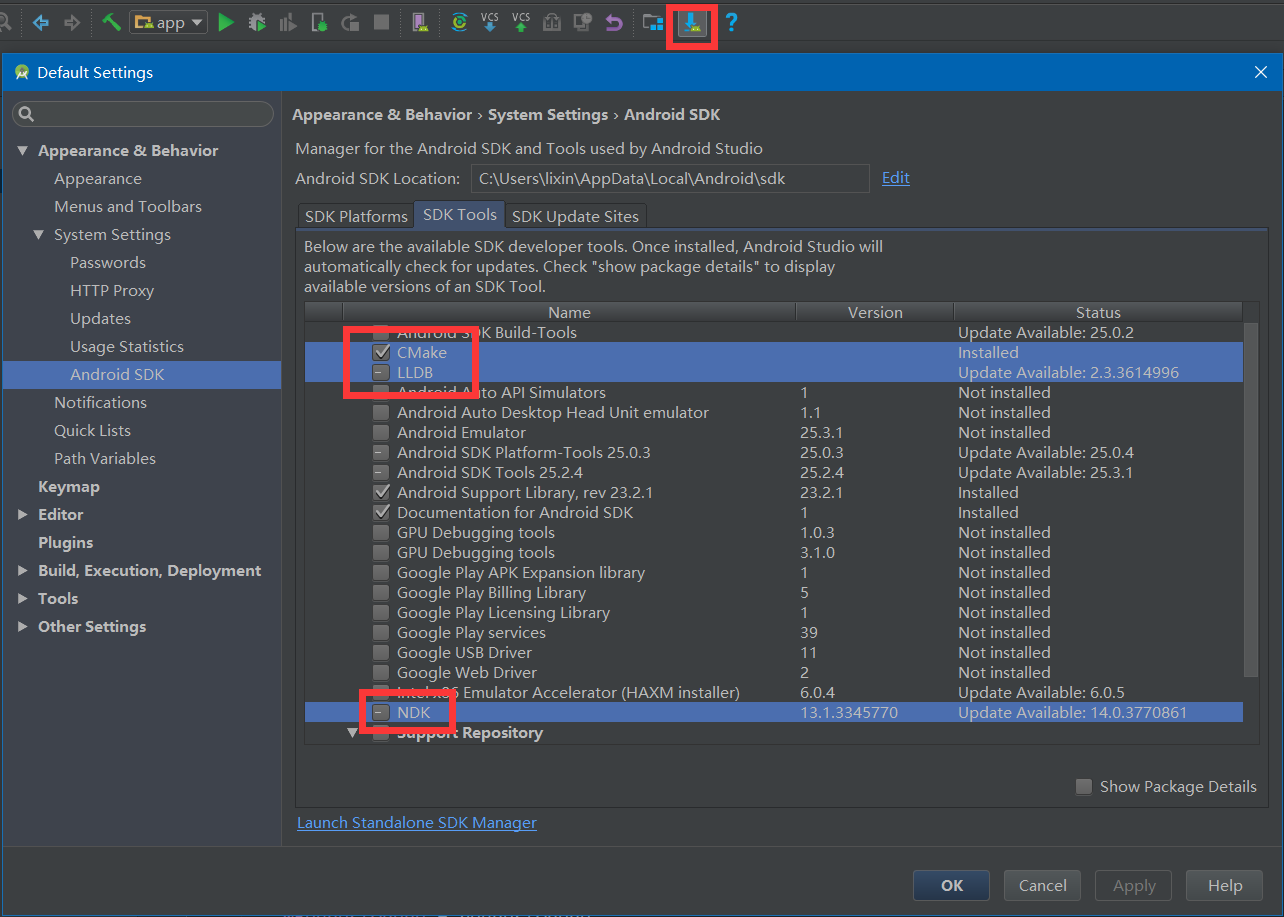
由于是使用JNI直接进行串口设备的读写,所以需要下载工具。android studio版本务必要2.2以上
运行SDK Manager,下载3个工具,CMake、LLDB、NDK
PS:如果下载进度很慢,请使用国内镜像
创建支持 C/C++ 的新项目
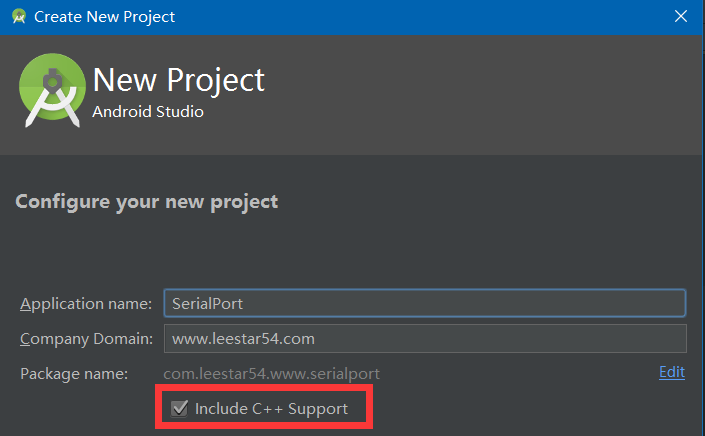
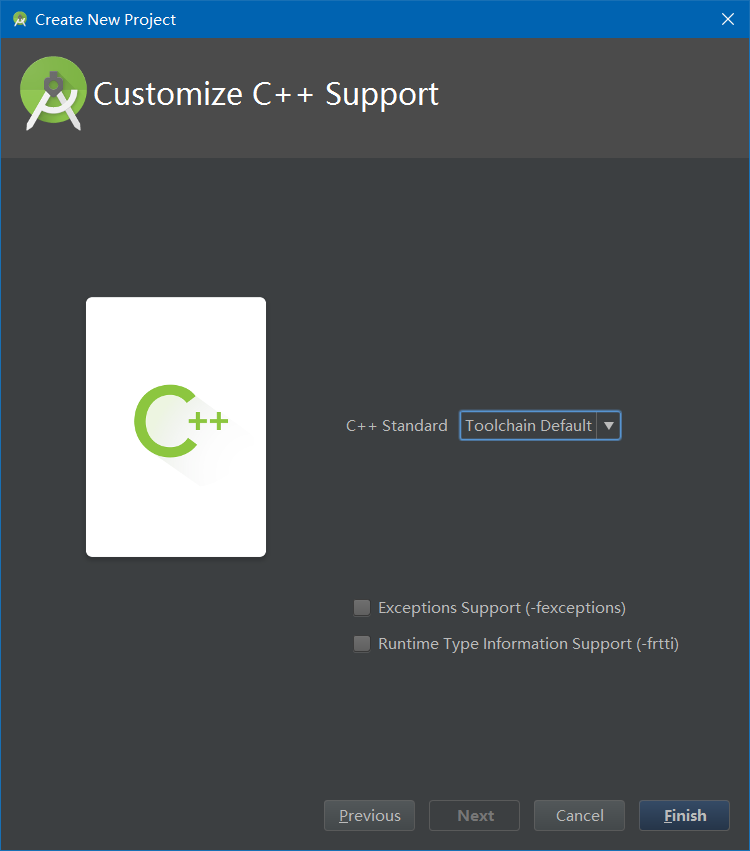
在 Customize C++ Support 选项卡中。你有下面几种方式来自定义你的项目:
- C++ Standard:点击下拉框,可以选择标准 C++,或者选择默认 CMake 设置的 Toolchain Default 选项。
- Exceptions Support:如果你想使用有关 C++ 异常处理的支持,就勾选它。勾选之后,Android Studio 会在 module 层的 build.gradle 文件中的 cppFlags 中添加 -fexcetions 标志。
- Runtime Type Information Support:如果你想支持 RTTI,那么就勾选它。勾选之后,Android Studio 会在 module 层的 build.gradle 文件中的 cppFlags 中添加 -frtti 标志。

新建成功之后,相对于以前的项目目录,多了几个地方。
- cpp 目录存放你所有 native code 的地方,包括源码,头文件,预编译项目等。对于新项目,Android Studio 创建了一个 C++ 模板文件:native-lib.cpp,并且将该文件放到了你的 app 模块的 src/main/cpp/ 目录下。这份模板代码提供了一个简答的 C++ 函数:stringFromJNI(),该函数返回一个字符串:”Hello from C++”。
- External Build Files 目录是存放 CMake 或 ndk-build 构建脚本的地方。有点类似于 build.gradle 文件告诉 Gradle 如何编译你的 APP 一样,CMake 和 ndk-build 也需要一个脚本来告知如何编译你的 native library。对于一个新的项目,Android Studio 创建了一个 CMake 脚本:CMakeLists.txt,并且将其放到了你的 module 的根目录下。
- gradle的脚本下也加入了externalNativeBuild字段来显示指定CMake。
PS:如果现有项目需要添加C/C++ 代码,则参考项目模板添加相应文件即可。
编译C/C++代码
CMakeLists.txt
# Sets the minimum version of CMake required to build the native# library. You should either keep the default value or only pass a# value of 3.4.0 or lower.cmake_minimum_required(VERSION 3.4.1)# Creates and names a library, sets it as either STATIC# or SHARED, and provides the relative paths to its source code.# You can define multiple libraries, and CMake builds it for you.# Gradle automatically packages shared libraries with your APK.add_library( # Sets the name of the library.serial_port# Sets the library as a shared library.SHARED# Provides a relative path to your source file(s).# Associated headers in the same location as their source# file are automatically included.src/main/cpp/SerialPort.c )# Searches for a specified prebuilt library and stores the path as a# variable. Because system libraries are included in the search path by# default, you only need to specify the name of the public NDK library# you want to add. CMake verifies that the library exists before# completing its build.find_library( # Sets the name of the path variable.log-lib# Specifies the name of the NDK library that# you want CMake to locate.log )# Specifies libraries CMake should link to your target library. You# can link multiple libraries, such as libraries you define in the# build script, prebuilt third-party libraries, or system libraries.target_link_libraries( # Specifies the target library.serial_port# Links the target library to the log library# included in the NDK.${log-lib} )
SerialPort.h
/* DO NOT EDIT THIS FILE - it is machine generated */#include <jni.h>/* Header for class android_serialport_api_SerialPort */#ifndef _Included_android_serialport_api_SerialPort#define _Included_android_serialport_api_SerialPort#ifdef __cplusplusextern "C" {#endif/** Class: android_serialport_api_SerialPort* Method: open* Signature: (Ljava/lang/String;II)Ljava/io/FileDescriptor;*/JNIEXPORT jobject JNICALL Java_android_1serialport_1api_SerialPort_open(JNIEnv *, jclass, jstring, jint, jint);/** Class: android_serialport_api_SerialPort* Method: close* Signature: ()V*/JNIEXPORT void JNICALL Java_android_1serialport_1api_SerialPort_close(JNIEnv *, jobject);#ifdef __cplusplus}#endif#endif
SerialPort.c
/** Copyright 2009-2011 Cedric Priscal** Licensed under the Apache License, Version 2.0 (the "License");* you may not use this file except in compliance with the License.* You may obtain a copy of the License at** http://www.apache.org/licenses/LICENSE-2.0** Unless required by applicable law or agreed to in writing, software* distributed under the License is distributed on an "AS IS" BASIS,* WITHOUT WARRANTIES OR CONDITIONS OF ANY KIND, either express or implied.* See the License for the specific language governing permissions and* limitations under the License.*/#include <termios.h>#include <unistd.h>#include <sys/types.h>#include <sys/stat.h>#include <fcntl.h>#include <string.h>#include <jni.h>#include "SerialPort.h"#include "android/log.h"static const char *TAG="serial_port";#define LOGI(fmt, args...) __android_log_print(ANDROID_LOG_INFO, TAG, fmt, ##args)#define LOGD(fmt, args...) __android_log_print(ANDROID_LOG_DEBUG, TAG, fmt, ##args)#define LOGE(fmt, args...) __android_log_print(ANDROID_LOG_ERROR, TAG, fmt, ##args)static speed_t getBaudrate(jint baudrate){switch(baudrate) {case 0: return B0;case 50: return B50;case 75: return B75;case 110: return B110;case 134: return B134;case 150: return B150;case 200: return B200;case 300: return B300;case 600: return B600;case 1200: return B1200;case 1800: return B1800;case 2400: return B2400;case 4800: return B4800;case 9600: return B9600;case 19200: return B19200;case 38400: return B38400;case 57600: return B57600;case 115200: return B115200;case 230400: return B230400;case 460800: return B460800;case 500000: return B500000;case 576000: return B576000;case 921600: return B921600;case 1000000: return B1000000;case 1152000: return B1152000;case 1500000: return B1500000;case 2000000: return B2000000;case 2500000: return B2500000;case 3000000: return B3000000;case 3500000: return B3500000;case 4000000: return B4000000;default: return -1;}}/** Class: android_serialport_SerialPort* Method: open* Signature: (Ljava/lang/String;II)Ljava/io/FileDescriptor;*/JNIEXPORT jobject JNICALL Java_android_1serialport_1api_SerialPort_open(JNIEnv *env, jclass thiz, jstring path, jint baudrate, jint flags){int fd;speed_t speed;jobject mFileDescriptor;/* Check arguments */{speed = getBaudrate(baudrate);if (speed == -1) {/* TODO: throw an exception */LOGE("Invalid baudrate");return NULL;}}/* Opening device */{jboolean iscopy;const char *path_utf = (*env)->GetStringUTFChars(env, path, &iscopy);LOGD("Opening serial port %s with flags 0x%x", path_utf, O_RDWR | flags);fd = open(path_utf, O_RDWR | flags);LOGD("open() fd = %d", fd);(*env)->ReleaseStringUTFChars(env, path, path_utf);if (fd == -1){/* Throw an exception */LOGE("Cannot open port");/* TODO: throw an exception */return NULL;}}/* Configure device */{struct termios cfg;LOGD("Configuring serial port");if (tcgetattr(fd, &cfg)){LOGE("tcgetattr() failed");close(fd);/* TODO: throw an exception */return NULL;}cfmakeraw(&cfg);cfsetispeed(&cfg, speed);cfsetospeed(&cfg, speed);//此处设置校验位//cfg.c_cflag……if (tcsetattr(fd, TCSANOW, &cfg)){LOGE("tcsetattr() failed");close(fd);/* TODO: throw an exception */return NULL;}}/* Create a corresponding file descriptor */{jclass cFileDescriptor = (*env)->FindClass(env, "java/io/FileDescriptor");jmethodID iFileDescriptor = (*env)->GetMethodID(env, cFileDescriptor, "<init>", "()V");jfieldID descriptorID = (*env)->GetFieldID(env, cFileDescriptor, "descriptor", "I");mFileDescriptor = (*env)->NewObject(env, cFileDescriptor, iFileDescriptor);(*env)->SetIntField(env, mFileDescriptor, descriptorID, (jint)fd);}return mFileDescriptor;}/** Class: cedric_serial_SerialPort* Method: close* Signature: ()V*/JNIEXPORT void JNICALL Java_android_1serialport_1api_SerialPort_close(JNIEnv *env, jobject thiz){jclass SerialPortClass = (*env)->GetObjectClass(env, thiz);jclass FileDescriptorClass = (*env)->FindClass(env, "java/io/FileDescriptor");jfieldID mFdID = (*env)->GetFieldID(env, SerialPortClass, "mFd", "Ljava/io/FileDescriptor;");jfieldID descriptorID = (*env)->GetFieldID(env, FileDescriptorClass, "descriptor", "I");jobject mFd = (*env)->GetObjectField(env, thiz, mFdID);jint descriptor = (*env)->GetIntField(env, mFd, descriptorID);LOGD("close(fd = %d)", descriptor);close(descriptor);}
最后java在需要的地方调用
// JNIprivate native static FileDescriptor open(String path, int baudrate, int flags);public native void close();static {Log.i(TAG, "loadLibrary..............");System.loadLibrary("serial_port");}
串口通讯原理
使用到了linux系统函数,是相对底层的开发,所以一大堆标志位,位运算,看着有些晕,函数的具体使用方法需要查询手册
1、打开串口
fd = open(path_utf, O_RDWR | flags);
其中
O_RDWR 读写方式打开
O_NOCTTY 不允许进程管理串口
O_NDELAY 非阻塞
2、写串口
n = write(fd, "ATZ ", 4);
n实际写入个数
3、设置串口为非阻塞方式
fcntl(fd, F_SETFL, FNDELAY);
4、设置串口为阻塞方式:
fcntl(fd, F_SETFL, 0);
5、读串口:
res = read(fd,buf,len);
6、关闭串口
Close(fd);
注:示例代码中通过JAVA的FileDescriptor类包装了数据流,所以读写操作是在上层完成的。
/* Create a corresponding file descriptor */{jclass cFileDescriptor = (*env)->FindClass(env, "java/io/FileDescriptor");jmethodID iFileDescriptor = (*env)->GetMethodID(env, cFileDescriptor, "<init>", "()V");jfieldID descriptorID = (*env)->GetFieldID(env, cFileDescriptor, "descriptor", "I");mFileDescriptor = (*env)->NewObject(env, cFileDescriptor, iFileDescriptor);(*env)->SetIntField(env, mFileDescriptor, descriptorID, (jint)fd);}return mFileDescriptor;
关于校验位
示例代码默认是没有添加任何校验位的,一般情况设备的基础通讯协议都是
波特率:9600
校验位:无
数据位:8
停止位:1位
至于具体的指令协议,根据设备提供商文档自行写控制代码即可。
校验位设置代码如下:
No parity (8N1):
cfg.c_cflag &= ~PARENBcfg.c_cflag &= ~CSTOPBcfg.c_cflag &= ~CSIZE;cfg.c_cflag |= CS8;
Even parity (7E1):
cfg.c_cflag |= PARENBcfg.c_cflag &= ~PARODDcfg.c_cflag &= ~CSTOPBcfg.c_cflag &= ~CSIZE;cfg.c_cflag |= CS7;
Odd parity (7O1):
cfg.c_cflag |= PARENBcfg.c_cflag |= PARODDcfg.c_cflag &= ~CSTOPBcfg.c_cflag &= ~CSIZE;cfg.c_cflag |= CS7;
Space parity is setup the same as no parity (7S1):
cfg.c_cflag &= ~PARENBcfg.c_cflag &= ~CSTOPBcfg.c_cflag &= ~CSIZE;cfg.c_cflag |= CS8;//cfg.c_cflag |= PARENB | CS8 | CMSPAR;
Mark parity is simulated by using 2 stop bits (7M1):
cfg.c_cflag &= ~PARENB;cfg.c_cflag |= CSTOPB;cfg.c_cflag &= ~CSIZE;cfg.c_cflag |= CS7;//cfg.c_cflag |= PARENB | CS8 | CMSPAR |PARODD;
1.even 每个字节传送整个过程中bit为1的个数是偶数个(校验位调整个数)
2.odd 每个字节穿送整个过程中bit为1的个数是奇数个(校验位调整个数)
3.noparity没有校验位
4.space 校验位总为0
5.mark 校验位总为1;
HexString与Bytes的转换
默认情况下串口读出来的数据是byte[],有时候需要转换16进制的字符串进行指令识别
/*** Created by lixin(178078114@qq.com) on 2016/12/17.*/public class HexUtils {/*** 把字节数组转换成16进制字符串** @param bArray* @return*/public static String bytesToHexString(byte[] src) {StringBuilder stringBuilder = new StringBuilder("");if (src == null || src.length <= 0) {return null;}for (int i = 0; i < src.length; i++) {int v = src[i] & 0xFF;String hv = Integer.toHexString(v);if (hv.length() < 2) {stringBuilder.append(0);}stringBuilder.append(hv);}return stringBuilder.toString().toUpperCase();}/*** 把16进制字符串转换成字节数组** @param hex* @return*/public static byte[] hexStringToByte(String hex) {int len = (hex.length() / 2);byte[] result = new byte[len];char[] achar = hex.toCharArray();for (int i = 0; i < len; i++) {int pos = i * 2;result[i] = (byte) (toByte(achar[pos]) << 4 | toByte(achar[pos + 1]));}return result;}private static byte toByte(char c) {byte b = (byte) "0123456789ABCDEF".indexOf(c);return b;}}
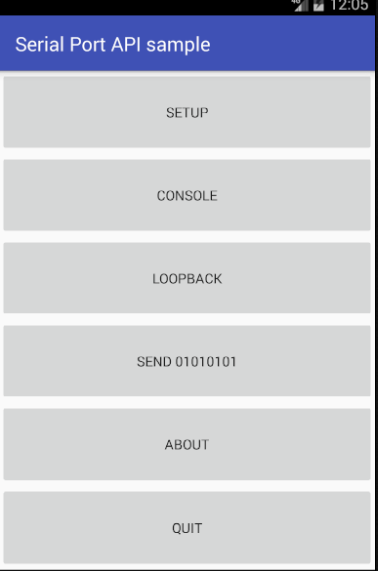
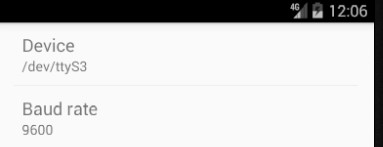
最终的demo如图,选择对了参数和串口设备,即可调试了!
参考
http://gqdy365.iteye.com/blog/2188906
http://wl9739.github.io/2016/09/21/%E5%9C%A8-Android-Studio-2-2-%E4%B8%AD%E6%84%89%E5%BF%AB%E5%9C%B0%E4%BD%BF%E7%94%A8-C-C-md/
demo示例:
链接:http://pan.baidu.com/s/1pLc1JVt 密码:h1zt
Android Studio的串口通讯开发的更多相关文章
- 在Android studio中进行NDK开发
在Android studio中进行NDK开发 分类: Android平台 软硬件环境 ubuntu kylin 14.04 红米note增强版 Android studio 0.8.6 ndk ...
- 如何将Android Studio与华为软件开发云代码仓库无缝对接(二)
上篇文章:如何将Android Studio与华为软件开发云代码仓库无缝对接(一) 上一章讲了,如何用Android Studio以软件开发云代码仓库为基础,新建一个项目.接下来,这一章继续讲建好项目 ...
- Android Studio入门(安装-->开发调试)
写在前面的话:本文来源:http://blog.csdn.net/yanbober/article/details/45306483 目标:Android Studio新手–>下载安装配置–&g ...
- 【android 开 发 】 - Android studio 下 NDK Jni 开发 简单例子
Android 开发了一段时间,一方面 ,感觉不留下点什么.有点对不起自己, 另一方面,好记性不如烂笔头,为了往后可以回头来看看,就当做是笔记,便决定开始写博客.废话不多说 ! 今天想搞一搞 ndk ...
- android studio下的NDK开发详解(一)
源地址:http://www.voidcn.com/blog/chengkaizone/article/p-5761016.html 好记性不如烂笔头,开始坚持写博客,学一点记一点,只为了生活更好. ...
- Android Studio搭建系统App开发环境
一.前言 在Android的体系中开发普通app使用Android Studio这一利器会非常的方便.但是开发系统app可能就会有些吃力,不过经过一些配置仍然会 很简单.我们知道系统app因为涉及到一 ...
- Android Studio Gradle配置工具开发
by 蔡建良 2019-3-9 QQ: 304125648 Android Studio导入项目经常出现卡死的情况.针对Gradle更新配置的问题,网上已经有详细的方法,但也很烦索,步骤也很多. 因此 ...
- Android studio ocr初级app开发问题汇总(含工程代码)
博客第一篇文章,稍作修改,增加文字介绍 开发目的 最近由于某些需求,需要在Android手机端实现OCR功能,大致为通过手机照相,识别出相片中的中文信息字段.但是由于新手光环+流程不熟悉,遇到了各种各 ...
- Android Studio & Butter Knife —— 快速开发
Butter Knife是一个Android的注解框架,可以帮助用户快速完成视图.资源与对象的绑定,完成事件的监听.(也就是少写findViewById()) 具体的介绍可以参考官方主页: http: ...
随机推荐
- 使用word写CSDN博客文章
目前大部分的博客作者在用Word写博客这件事情上都会遇到以下3个痛点: 1.所有博客平台关闭了文档发布接口,用户无法使用Word,Windows Live Writer等工具来发布博客.使用Word写 ...
- Unity NetWork
using UnityEngine; using System.Collections; public class NetworkTest : MonoBehaviour { ;//端口号 strin ...
- Android-下载网上图片
下载操作相关代码: package liudeli.async; import android.app.Activity; import android.app.ProgressDialog; imp ...
- 对路径“c:\windows\system32\inetsrv\syslog”的访问被拒绝。
win7 64 系统,在调试wcf的时候,出了这个错误,当时感觉iis的权限不够,iis搞了好长时间没解决.最后改了用到的应用程序池中的标识.标识改成 localSytem,之后问题解决. IIS-- ...
- Zeal - 开源离线开发文档浏览器
https://zealdocs.org/ win10上暂时安装版会crash,请用portalable的解压版
- [Cocos2d-x for WP8学习笔记] 一些基本概念,建立自己的启动界面
流程控制:场景是相对不变的游戏元素集合,游戏在场景间的切换就是流程控制. 场景.层和精灵:它们是不同层次的游戏元素.通常,场景包含层,层包含精灵,场景与层是其他游戏元素的容器,而精灵是展示给玩家的图形 ...
- linux网络NAT配置方式
NAT访问的权限如下: 外网不可以访问虚拟机,主机和虚拟机可以互访,网络和主机也可以互访: 1.打开虚拟机——编辑——虚拟网络编辑器——. 2. 3.进入虚拟机的linux系统点击网络 4. 5.点击 ...
- Linux下对于makefile的理解
什么是makefile呢?在Linux下makefile我们可以把理解为工程的编译规则.一个工程中源文件不计数,其按类型.功能.模块分别放在若干个目录中,makefile定义了一系列的规则来指定,那些 ...
- php 中将完整的年月日时分秒的时间转换成 年月日的形式
strtotime() 函数将任何英文文本的日期或时间描述解析为 Unix 时间戳(自 January 1 1970 00:00:00 GMT 起的秒数), 将完整的时间格式转换成时间撮的形式,再去进 ...
- [ActionSprit 3.0] FMS服务器带宽检测
package { import flash.display.Sprite; import flash.net.NetConnection; import flash.events.NetStatus ...
