Tsung运行环境安装(转)
转自:http://www.cnblogs.com/tsbc/p/4272974.html#_Toc372013359
tsung
Tsung运行环境安装
检查安装一下依赖包,以免在安装的时候报错.(操作系统的软件包完全安装时,这些包通常都会装进去,所有也可以跳过,此步骤,后面遇到问题时,少哪包再装哪个包,逐个解决。)
rpm -qa build-essential openssl openssl-devel unixODBC unixODBC-devel make gcc gcc-c++ kernel-devel m4 ncurses-devel
每个包系统盘或者镜像中都有。
安装 erlang、gnuplot、perl5
erlang :因为Tsung是基于erlang开发的,所以得先安装这个环境.安装软件
perl5:生成报表的脚本支持环境
gnuplot:报表统计图片生成工具
———————————————————————————————————————
|下面会介绍两种在线安装方式和一种离线手动安装工具方式,这是根据安装包的源决定的|
erlang安装:
方式一:
[root@tester~]#apt-get install erlang erlang-src
方式二:
[root@tester~]#yum install erlang erlang-src
方式三:(下载源码包手动编译安装|通常没有网络时只能选用这种方法,也是经常用到的方法。)
[root@tester~]#wget http://www.erlang.org/download/otp_src_R15B.tar.gz
[root@tester~]#tar -zvxf otp_src_R15B.tar.gz
[root@tester~]#cd otp_src_R15B
[root@tester~]# ./configure --prefix=/usr/local/erlang --without-javac
正常配置完成后会显示如下:
*********************************************************************
********************** APPLICATIONS DISABLED **********************
*********************************************************************
jinterface : Java compiler disabled by user
*********************************************************************
*********************************************************************
********************** APPLICATIONS INFORMATION *******************
*********************************************************************
wx : wxWidgets not found, wx will NOT be usable
*********************************************************************
*********************************************************************
********************** DOCUMENTATION INFORMATION ******************
*********************************************************************
documentation :
xsltproc is missing.
fop is missing.
The documentation can not be built.
[root@tester~]#make && make install
完成安装!
设置环境变量以便下一步安装Tsung时使用
[root@tester~]#export PATH=$PATH:/usr/local/erlang/bin/
验证erlang是否安装成功
[root@tester~]#erl
显示下面样子结果说明安装成功:
Erlang R15B (erts-5.9) [source] [smp:2:2] [async-threads:0] [hipe] [kernel-poll:false]
Eshell V5.9 (abort with ^G)
1>
gnuplot 、perl5安装:
方式一:
[root@tester~]#apt-get install perl5 gnuplot
方式二:
[root@tester~]#yum install perl5 gnuplot
方式三:(下载源码包手动编译安装)
[root@tester~]#wget http://heanet.dl.sourceforge.net/project/gnuplot/gnuplot/4.4.1/gnuplot-4.4.1.tar.gz
perl包通常在系统安装包里面都会有。
自己在网上下载安装也可以,安装不分先后。
如何验证是否安装成功?
安装系统的时候,也有可能已经安装过perl包 ,可以通过
[root@tester~]#perl –v
命令查看显示perl 当前版本信息。

[root@tester~]#gnuplot
命令查看gnuplot 的安装版本

Tsung安装
到官网下载安装包
http://tsung.erlang-projects.org/
[root@tester~]# wget http://tsung.erlang-projects.org/dist/tsung-1.4.2.tar.gz
解压缩安装包
[root@tester~]#chmod 755 tsung-1.4.2.tar.gz
[root@tester~]#tar –zvxf tsung-1.4.2.tar.gz
编译安装
[root@tester~]#cd tsung-1.4.2/
[root@tester~]#./configure --prefix=/usr/local/tsung
[root@tester~]#make
[root@tester~]#make install
验证是否安装成功,先做个软连接方便使用tsung命令
[root@tester~]#ln -s /usr/local/tsung/bin/tsung /usr/bin/
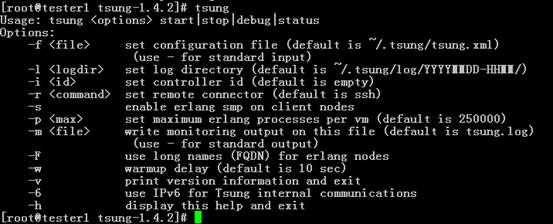
[root@tester~]#tsung
使用Tsung注册用户
从tsung例子中拷贝一份注册配置示例jabber_register.xml
[root@tester~]#cd /usr/local/tsung/share/doc/tsung/examples/

[root@tester~]#cp jabber_register.xml ~/test/
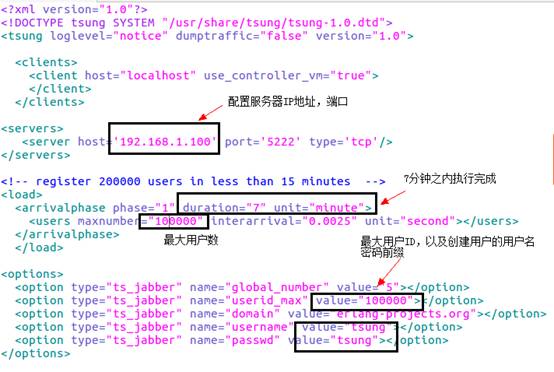
修改相关配置
[root@tester~]#vim tsung.xml
执行脚本
[root@tester~]#tsung –f tsung.xml start
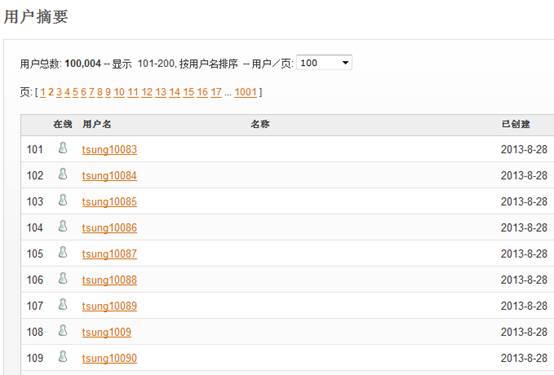
查看服务端后台新建用户
Openfire后台可以查看到用户不断的新建进去按 tsung1一直到tsung100000
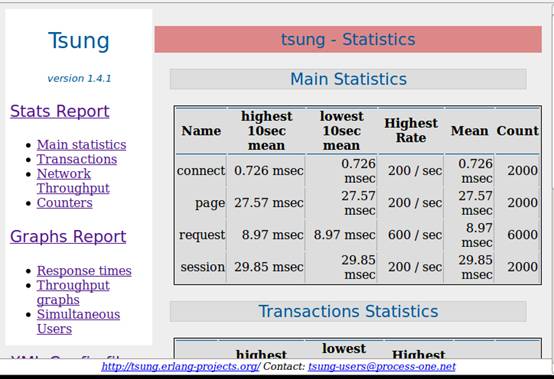
生成HTML报表
[root@tester~]#cd ~/.tsung/log/20131106-1754/
[root@tester~]#/usr/local/tsung/lib/tsung/bin/tsung_stats.pl
把生成的日志目录拷贝到windows系统使用IE打开。
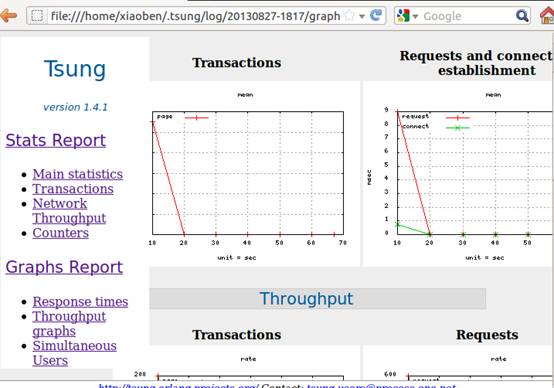
使用Tsung并发访问
从tsung/examples中拷贝一份jabber_roster.xml进行修改并执行

指定了最大用户并发数2000个。
[root@tester~]#tsung -f jabber_roster.xml start
运行后发现如下问题:

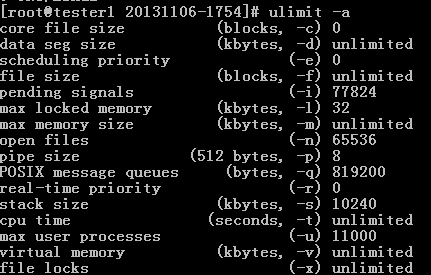
该问题是由于jabber_roster.xml配置中用户并发数超过了操作系统默认指定的最大进程数 d导致的。
修改操作系统最大进程数、最大文件打开数
查看系统最大进程数:
[root@tester~]#ulimit –a
编辑limits.conf (注意:修改前先备份原文件)
[root@tester~]#cp /etc/security/limits.conf /etc/security/limits.conf.old
[root@tester~]#vim /etc/security/limits.conf
添加下面配置
* soft nproc 11000
* hard nproc 11000
* soft nofile 8000
* hard nofile 8000
注:* 代表针对所有用户,soft 代表软设置,hard 代表硬设置,nproc代表最大进程数,nofile代表最大文件打开数。
保存后,不清楚怎么让它生效,于是重启了操作系统
系统启动后,设置生效了。
[root@tester~]#ulimit –a
在配置文件中添加 maxusers指定最大用户数
<clients>
<client host="localhost" use_controller_vm="true” maxusers="1000">
</client>
</clients>
<load>
<arrivalphase phase="1" duration="5" unit="minute">
<users maxnumber="1000" interarrival="0.1" unit="second"></users>
</arrivalphase>
</load>
具体配置说明查看后面配置说明
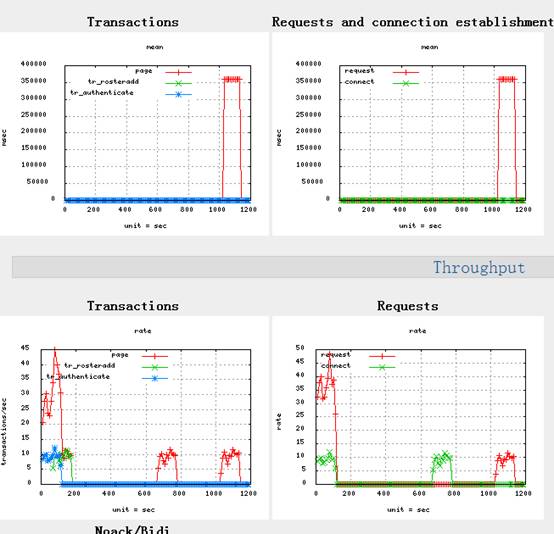
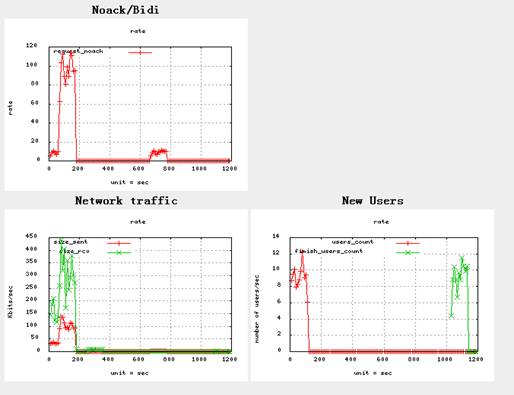
测试报告
执行脚本后,大概20分钟后运行结束
、
余留的问题
C2S - RECV (1448627863): <message id='201' to='tsung25@client-host' type='chat'><body>vtglimieyhemzlxc</body></message>
C2S - SENT (1448627863): <message id="201" to="tsung1@127.0.0.1/tsung" from="tsung25@client-host" type="error"><error code="404" type="cancel"><remote-server-not-found xmlns="urn:ietf:params:xml:ns:xmpp-stanzas"/></error></message>
发送消息到达不到 404错误
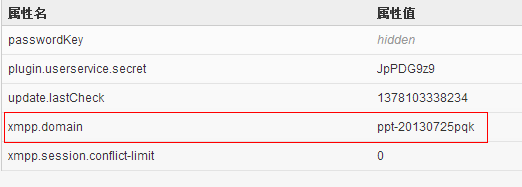
后续的研究发现该问题是因为配置文件中Options – domain的配置问题

该项的配置并不是随意的填写,应该填写真实服务器中的域名xmpp.domain
测试场景脚本配置详细分析
<?xml version="1.0"?>
<!DOCTYPE tsung SYSTEM "/usr/share/tsung/tsung-1.0.dtd">
<!-- loglevel日志级别,测试过程使用warning也就可以了-->
emergency
critical
error
warning
notice (default)
info
debug
<tsung loglevel="notice" version="1.0">
<!-- 客户端配置-->
host : 配置客户端地址
use_controller_vm : 是否使用虚拟控制器设置客户端最大连接数
maxusers : 客户端最大连接数
注: 如果use_controller_vm="false",那么每maxusers个连接后会创建一个新的erlangVM,
否则达到上限就不再创建连接,maxusers默认是800。
通常情况下我们会将use_controller_vm设置成true,然后设置maxusers来提高客户端最大连接数。
但是,前提是要打开操作系统的limits-最大进程数(limits.conf中修改),大多操作系统默认最大进程数为1024。
<clients>
<client host="localhost" use_controller_vm="true" maxusers="10000"></client>
</clients>
<!-- 服务端配置 -->
<servers>
<server host="192.168.1.100" port="5222" type="tcp"></server>
</servers>
<!—性能监控 -->
<monitoring>
<monitor host="192.168.1.5" type="snmp">
<snmp version="v1" community="public" port="161">
<!-- cpu空闲率 -->
<oid name="cpu_free" value="1.3.6.1.4.1.2021.11.11.0" ></oid>
<!--Mem Used-->
<oid name="Mem_Used" value=".1.3.6.1.2.1.25.2.3.1.6.2" ></oid>
<!-- 统计IO读,单位是blocks/s -->
<oid name="io_sent" value=".1.3.6.1.4.1.2021.11.5.0" ></oid>
<!-- 统计IO写,单位是blocks/s -->
<oid name="io_receive" value=".1.3.6.1.4.1.2021.11.6.0" ></oid>
</snmp>
</monitor>
</monitoring>
<!-- 计划加载用户-->
<arrivalphase> :阶段相位,可配置多个阶段
phase : 阶段序号
duration : 加载时间数
unit : 时间单位
<users> : 用户加载速度
interarrival/arrivalrate : 间隔interarrival unit加载一个用户/间隔1 unit加载arrivalrate个用户
unit : 时间单位
maxnumber : 用户最大加载数
例:<arrivalphase phase="1" duration="20" unit="second">
<users maxnumber="1500" interarrival="0.1" unit="second"></users>
</arrivalphase>
<arrivalphase phase="2" duration="10" unit="second">
<users arrivalrate="15" unit="second"></users>
</arrivalphase>
<arrivalphase phase="3" duration="10" unit="minute">
<users maxnumber="2500" interarrival="2" unit="second"></users>
</arrivalphase>
上述例子中,运行测试以后,会在第一阶段(20s)每间隔0.1s加载一个用户,最大加载1500个用户。
第二阶段(10s)没间隔1s加载15个用户。
第三阶段(10m)没间隔2s加载1个用户,最大加载数为2500。
3个阶段是按顺序加载的,总加载时间是 20s + 10s + 10m
注: 用户被加载后会立即执行测试场景,并不是在加载全部用户后才开始测试场景。
这在jabber服务端测试中,有涉及到用户之间发送消息的请求时应该注意保持用户在线,
否则将有可能部分用户接收不到消息
-->
<load>
<arrivalphase phase="1" duration="10" unit="second">
<users interarrival="0.1" unit="second"></users>
</arrivalphase>
</load>
<!-- JABBER服务端配置参数-->
global_number : 这个暂时不是很明白做什么用,猜测是用户保持同时在线的个数
userid_max : 可以加载的最大用户数,其实是用户最大ID数,前缀后面的ID
domain : 服务端的domain,并不是随便配置的,如果随便配置,做注册、连接、登录、roster不会有问题,
但是用户之间发送消息的时候服务端会报404错
username : 服务端用户名前缀
passwd : 密码前缀
-->
<options>
<option type="ts_jabber" name="global_number" value="50"></option>
<option type="ts_jabber" name="userid_max" value="100"></option>
<option type="ts_jabber" name="domain" value="PPT-20130725PQK"></option>
<option type="ts_jabber" name="username" value="tsung"></option>
<option type="ts_jabber" name="passwd" value="tsung"></option>
</options>
<!-- 测试场景-->
<sessions> : 可以同时配置多个测试场景
<session> : 测试场景
probability : 权重(用户可能执行到的概率)
name : 场景名称,任意写
type : 类型
<transaction> 事务,事务中可以包含多个请求
name : 事务名称,任意命名,该名称会在报告图表中以 ts_${name}的名称用来命名各个事务的相应时间,吞吐率等
<request> : 请求,可以被包含在一个事务中也可以单独出来,单独出来的请求的响应时间以及吞吐量,在报表中将被一起统计到page中
<jabber> : 具体的请求内容
type : 请求类型
ack : 是否需要确认消息,有以下三种情况
local:一旦客户端有接收到packet就当作该请求已经完成
no_ack:一旦客户端消息发送出去就当作该请求已经完成
global:在发送消息前会等待所有用户都连接上,这跟上面的<option global_number的配置是关联在一起的
<thinktime> : 等待时间,也就是模拟用户操作过程中,通常情况下的闲置时间,单位为:秒
比如,用户做登录操作--》修改心情,中间的等待时间就是thinktime
注: 配置多个测试场景的时候要注意probability权重的总和等于100。
一个用户只能随机执行一个测试场景,probability就是该场景被执行的概率,
比如说,有3个测试场景,权重分别20,50,30。有1000个用户,最终测试场景将分别被约等于 200,500,300个用户执行到,一个用户只会执行一个场景。
-->
<sessions>
<session probability="100" name="jabber-example"
type="ts_jabber">
<request>
<jabber type="connect" ack="no_ack"></jabber>
</request>
<thinktime value="2"></thinktime>
<!-- 用户验证 -->
<transaction name="authenticate">
<request>
<jabber type="auth_get" ack="local"></jabber>
</request>
<request>
<jabber type="auth_set_plain" ack="local"></jabber>
</request>
</transaction>
<!-- 更新上线状态 -->
<request>
<jabber type="presence:initial" ack="no_ack" />
</request>
<thinktime value="20"></thinktime>
<!-- 发送roster -->
<transaction name="roster">
<request>
<jabber type="iq:roster:get" ack="local"></jabber>
</request>
</transaction>
<thinktime value="30"></thinktime>
<!-- 任意对一个在线用户发送聊天消息 -->
<transaction name="online">
<request>
<jabber type="chat" ack="no_ack" size="16"
destination="online">
</jabber>
</request>
</transaction>
<thinktime value="30"></thinktime>
<!-- 退出 -->
<transaction name="close">
<request>
<jabber type="close" ack="no_ack"></jabber>
</request>
</transaction>
</session>
</sessions>
</tsung>
其它
http://tsung.erlang-projects.org/user_manual/index.html
http://www.blogjava.net/duanzhimin528/archive/2010/09/01/330582.html
http://my.oschina.net/pblack/blog/97677、
http://www.verydemo.com/tag/?kw=Tsung&p=1
http://blog.csdn.net/blade2001/article/details/9094307
http://www.bbtang.info/579.html
Tsung运行环境安装(转)的更多相关文章
- ECOS运行环境安装(一)
ECOS为上海商派公司研发的PHP电商框架.详情见 http://www.ec-os.net/doc.html 本文介绍CentOS6.x 64位下安装ECOS1.2运行环境的具体步骤: 1)需要准备 ...
- Windows上Kafka运行环境安装
1. 安装JDK 1.1 安装文件:http://www.oracle.com/technetwork/java/javase/downloads/index.html 下载JDK1.2 安装完成后需 ...
- python项目运行环境安装小结
安装最新即可,实际的版本号可能不一样 安装过程较复杂,建议用一台单独的vm安装,能做成docker image最好 基础软件 nginx-1.10.0: sudo apt-get install ng ...
- docker运行环境安装-centos(一)
在这里我们使用的是docker的社区版Docker CE,针对的是未安装docker的新的主机,如果安装过docker的早期版本,先卸载它们及关联的依赖资源,安装的版本为docker 18.03. 1 ...
- Java JDK 运行环境安装
1 Windows系统 1.1 安装包准备 安装包本文档讲解为64位系统,如果是32位系统需要下载32位系统安装包 1.1.1 下载方式 打开jdk官方下载地址,该文档提供jdk版本为1.8 http ...
- docker运行环境安装-后续步骤(二)
1.以非 root 用户身份管理 Docker [origalom@origalom ~]$ sudo groupadd docker # 创建docker用户组[origalom@origalom ...
- 在centos阿里云服务器上安装配置php运行环境 安装php7
http://blog.csdn.net/kesixin/article/details/72882469 单独安装php7 http://blog.csdn.net/tang05709/articl ...
- linux下lua运行环境安装
1.下载安装包: [root@H0f ~]# wget http://www.lua.org/ftp/lua-5.2.4.tar.gz http://www.lua.org/ftp/lua-5 ...
- windows安装React Native开发运行环境
React Native是什么 React Native是facebook开源的一个用于开发app的框架.React Native的设计理念:既拥有Native (原生) 的用户体验.又保留React ...
随机推荐
- Ext中的get、getDom、getCmp、getBody、getDoc的区别
Ext中的get.getDom.getCmp.getBody.getDoc的区别Ext中包含了几个以get开头的方法,这些方法可以用来得到文档中DOM.得到当前文档中的组件.得到Ext元素等,在使用中 ...
- DC-DC converter Control techniques
As shown in figure 3.4, PWM controller contains two main parts; voltage error-amplifier and voltage ...
- eclipse中配置struts2出现There is no Action mapped for namespace [/] and action name [Login] associated wi
下午在eclipse中配置struts2时报: There is no Action mapped for namespace [/] and action name [Login] associat ...
- pm2-web
A web based monitor for PM2. Multiple hosts With the release of 0.11 pm2 no longer uses TCP sockets ...
- Spring MVC一事务控制问题
在近期一个项目中用了Spring MVC作为控制层框架,但却出现了一个让人非常费解的问题:事务控制. Spring MVC的配置文件名称为:springMVC-servlet.xml,内容例如以下: ...
- Install Tomcat 7 on CentOS, RHEL, or Fedora
linux下的 Tomcat 安装: http://www.davidghedini.com/pg/entry/install_tomcat_7_on_centos
- [Android 源码] Android源码下载
Android源码下载 为了能够顺利的下载Android的源码,同时也为了避免在网络上再次搜寻如何下载源码的麻烦,我把下载过程记录在这篇文档中. 官网中也有详细的介绍: http://source.a ...
- C语言中register类型的变量有什么意义
int i; for(i=0; i<1000; i++){ // Some Code } 为了解决这个问题,可以将使用频繁的变量放在CPU的通用寄存器中,这样使用该变量时就不必访问内存,直接从寄 ...
- kubernetes基础概念
kubernetes是基于容器技术的分布式架构领先方案.具有完备的集群管理能力,包括多层次的安全防护和准入机制.多租户应用支撑能力.透明的服务注册和服务发现机制.内建智能负载均衡器.强大的故障发现和自 ...
- 高性能WEB开发:DOM编程
我们知道,DOM是用于操作XML和HTML文档的应用程序接口,用脚本进行DOM操作的代价很昂贵.有个贴切的比喻,把DOM和Javascript(这里指ECMscript)各自想象为一个岛屿,它们之间用 ...
