NVML查询显卡信息
前段时间做英伟达硬解得时候,显卡总是莫名挂掉,后来发现是因为显卡温度过高掉了。这几天找到CUDA中有NVML工具可以查看显卡信息,nvidia-smi也是基于这个工具包。
使用的CUDA版本为CUDA 8.0 。
1.给程序添加NVML
安装CUDA之后可以找到如下:
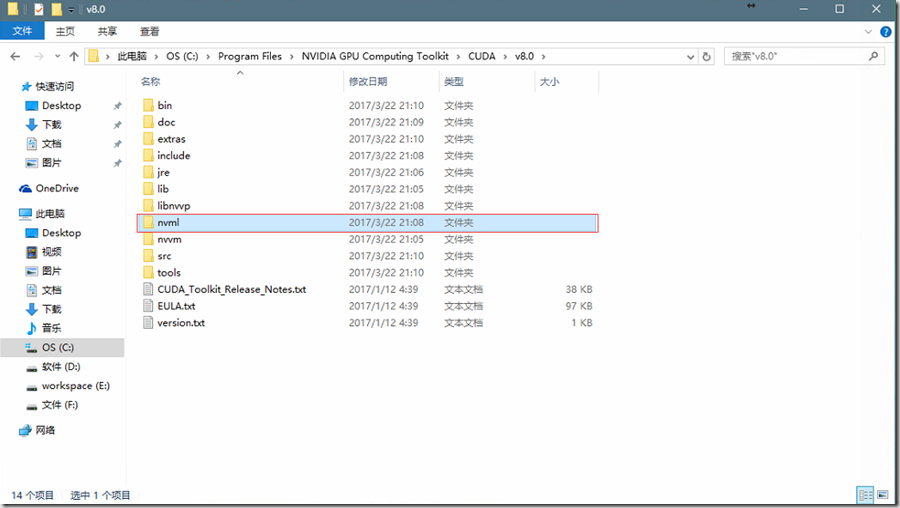
图1.NVML的例子
这里面包含的是NVML的一个例子。我的系统是64位的,可以找到NVML的lib和头文件如下:
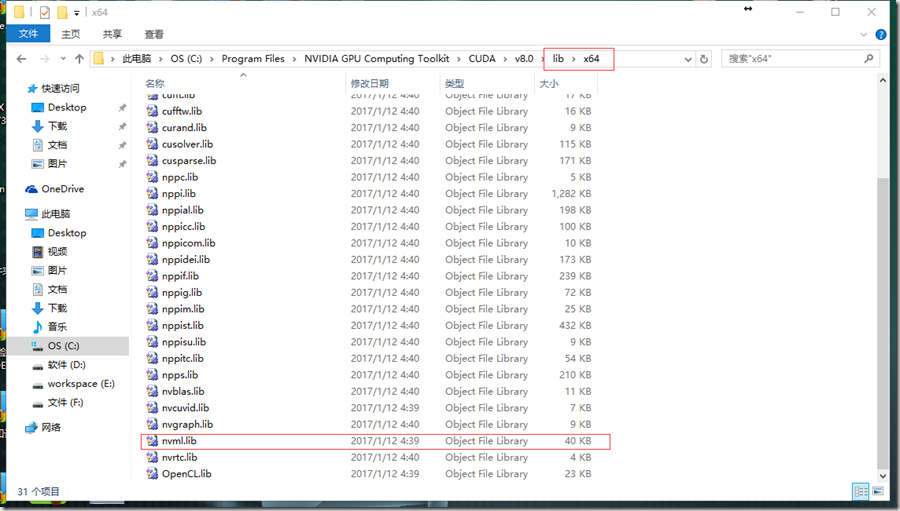
图2.NVML的lib文件
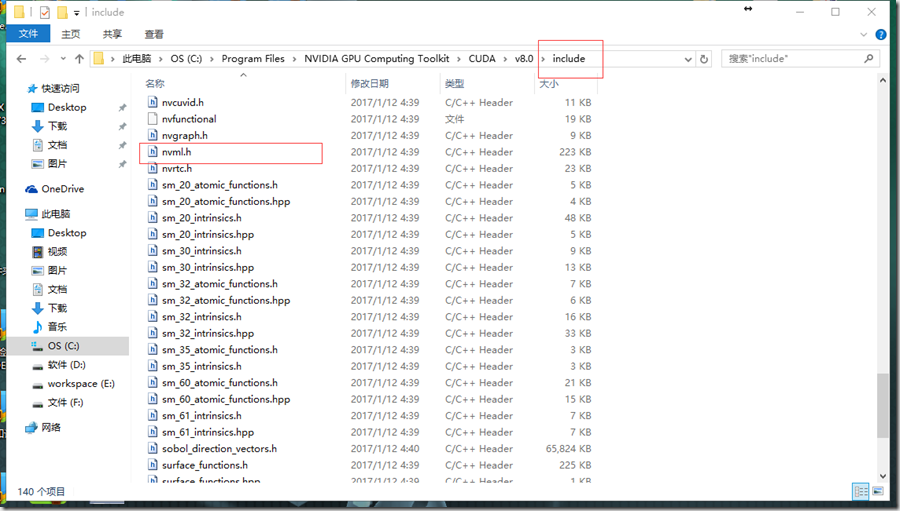
图3.NVML头文件
在工程中包含NVML。我是新建的CUDA 8.0 Runtime工程,因为NVML包含在CUDA中,建CUDA 8.0 Runtime工程可以省去CUDA的配置工作,工程建立方法参见VS2013 VC++的.cpp文件调用CUDA的.cu文件中的函数
,CUDA 8.0为默认安装,系统为win10 64位。
在程序中直接包含NVML的头文件和lib文件即可:
#include "nvml.h"

#pragma  comment(lib,"nvml.lib")
注意64位系统应该建立x64工程,因为在安装的CUDA中没有win32的nvml.lib。
2.NVML查询显卡信息
常用函数:
·nvmlInit()函数初始化NVML;
·nvmlDeviceGetCount(unsigned int *deviceCount)函数可以获得显卡数;
·nvmlDeviceGetHandleByIndex(unsigned int index, nvmlDevice_t *device)获取设备;
·nvmlDeviceGetName(nvmlDevice_t device, char *name, unsigned int length)查询设备的名称;
·nvmlDeviceGetPciInfo(nvmlDevice_t device, nvmlPciInfo_t *pci)获取PCI信息,对这个函数的重要性,例子中是这么说的
// pci.busId is very useful to know which device physically you're talking to
// Using PCI identifier you can also match nvmlDevice handle to CUDA device.
·nvmlDeviceGetComputeMode(nvmlDevice_t device, nvmlComputeMode_t *mode)得到显卡当前所处的模式,模式由以下:
typedef enum nvmlComputeMode_enum
{
NVML_COMPUTEMODE_DEFAULT = 0, //!< Default compute mode -- multiple contexts per device
NVML_COMPUTEMODE_EXCLUSIVE_THREAD = 1, //!< Support Removed
NVML_COMPUTEMODE_PROHIBITED = 2, //!< Compute-prohibited mode -- no contexts per device
NVML_COMPUTEMODE_EXCLUSIVE_PROCESS = 3, //!< Compute-exclusive-process mode -- only one context per device, usable from multiple threads at a time
// Keep this last
NVML_COMPUTEMODE_COUNT
} nvmlComputeMode_t;
·nvmlDeviceSetComputeMode(nvmlDevice_t device, nvmlComputeMode_t mode)可以修改显卡的模式;
·nvmlDeviceGetTemperatureThreshold(nvmlDevice_t device, nvmlTemperatureThresholds_t thresholdType, unsigned int *temp)查询温度阈值,具体有两种:
typedef enum nvmlTemperatureThresholds_enum
{
NVML_TEMPERATURE_THRESHOLD_SHUTDOWN = 0, // Temperature at which the GPU will shut down for HW protection
NVML_TEMPERATURE_THRESHOLD_SLOWDOWN = 1, // Temperature at which the GPU will begin slowdown
// Keep this last
NVML_TEMPERATURE_THRESHOLD_COUNT
} nvmlTemperatureThresholds_t;
当温度达到NVML_TEMPERATURE_THRESHOLD_SHUTDOWN 参数获取的温度时,显卡将自动关闭以保护硬件;当温度达到NVML_TEMPERATURE_THRESHOLD_SLOWDOWN参数获取的温度时,显卡的性能将下降。
·nvmlDeviceGetTemperature(nvmlDevice_t device, nvmlTemperatureSensors_t sensorType, unsigned int *temp)获取显卡当前温度;
·nvmlDeviceGetUtilizationRates(nvmlDevice_t device, nvmlUtilization_t *utilization)获取设备的使用率(原注释:Retrieves the current utilization rates for the device's major subsystems。不知道理解错了没有),使用率包括以下:
typedef struct nvmlUtilization_st
{
unsigned int gpu; //!< Percent of time over the past sample period during which one or more kernels was executing on the GPU
unsigned int memory; //!< Percent of time over the past sample period during which global (device) memory was being read or written
} nvmlUtilization_t;
·nvmlDeviceGetMemoryInfo(nvmlDevice_t device, nvmlMemory_t *memory) Retrieves the amount of used, free and total memory available on the device, in bytes。
·nvmlDeviceGetBAR1MemoryInfo(nvmlDevice_t device, nvmlBAR1Memory_t *bar1Memory) Gets Total, Available and Used size of BAR1 memory.(不知道这种与上一种有什么区别,有待后续学习)
·nvmlDeviceGetComputeRunningProcesses(nvmlDevice_t device, unsigned int *infoCount, nvmlProcessInfo_t *infos) Get information about processes with a compute context on a device。应该是获取当前在使用显卡的程序信息。
·nvmlDeviceGetMaxClockInfo(nvmlDevice_t device, nvmlClockType_t type, unsigned int *clock) Retrieves the maximum clock speeds for the device。包括以下:
typedef enum nvmlClockType_enum
{
NVML_CLOCK_GRAPHICS = 0, //!< Graphics clock domain
NVML_CLOCK_SM = 1, //!< SM clock domain
NVML_CLOCK_MEM = 2, //!< Memory clock domain
NVML_CLOCK_VIDEO = 3, //!< Video encoder/decoder clock domain
// Keep this last
NVML_CLOCK_COUNT //<! Count of clock types
} nvmlClockType_t;
·nvmlDeviceGetClockInfo(nvmlDevice_t device, nvmlClockType_t type, unsigned int *clock) Retrieves the current clock speeds for the device.上面是获取最大的,这个是获取当前的。
代码示例:
#include "cuda_kernels.h"

#include "nvml.h"

#include <stdio.h>

#include <windows.h>

#include <winbase.h>

#include <tlhelp32.h>

#include <psapi.h>   #pragma comment(lib,"kernel32.lib")

#pragma comment(lib,"advapi32.lib")

#pragma  comment(lib,"nvml.lib")

const char * convertToComputeModeString(nvmlComputeMode_t mode)

{

    switch (mode)

    {

    case NVML_COMPUTEMODE_DEFAULT:

        return "Default";

    case NVML_COMPUTEMODE_EXCLUSIVE_THREAD:

        return "Exclusive_Thread";

    case NVML_COMPUTEMODE_PROHIBITED:

        return "Prohibited";

    case NVML_COMPUTEMODE_EXCLUSIVE_PROCESS:

        return "Exclusive Process";

    default:

        return "Unknown";

    }

}

int main()

{

    cuAdd();

    nvmlReturn_t result;

    unsigned int device_count, i;

    // First initialize NVML library

    result = nvmlInit();

    if (NVML_SUCCESS != result)

    {

        printf("Failed to initialize NVML: %s\n", nvmlErrorString(result));

        printf("Press ENTER to continue...\n");

        getchar();

        return 1;

    }

    result = nvmlDeviceGetCount(&device_count);

    if (NVML_SUCCESS != result)

    {

        printf("Failed to query device count: %s\n", nvmlErrorString(result));

        goto Error;

    }

    printf("Found %d device%s\n\n", device_count, device_count != 1 ? "s" : "");

    printf("Listing devices:\n");

    while (true)

    {

        for (i = 0; i < device_count; i++)

        {

            nvmlDevice_t device;

            char name[NVML_DEVICE_NAME_BUFFER_SIZE];

            nvmlPciInfo_t pci;

            nvmlComputeMode_t compute_mode;

            // Query for device handle to perform operations on a device

            // You can also query device handle by other features like:

            // nvmlDeviceGetHandleBySerial

            // nvmlDeviceGetHandleByPciBusId

            result = nvmlDeviceGetHandleByIndex(i, &device);

            if (NVML_SUCCESS != result)

            {

                printf("Failed to get handle for device %i: %s\n", i, nvmlErrorString(result));

                goto Error;

            }

            result = nvmlDeviceGetName(device, name, NVML_DEVICE_NAME_BUFFER_SIZE);

            if (NVML_SUCCESS != result)

            {

                printf("Failed to get name of device %i: %s\n", i, nvmlErrorString(result));

                goto Error;

            }

            // pci.busId is very useful to know which device physically you're talking to

            // Using PCI identifier you can also match nvmlDevice handle to CUDA device.

            result = nvmlDeviceGetPciInfo(device, &pci);

            if (NVML_SUCCESS != result)

            {

                printf("Failed to get pci info for device %i: %s\n", i, nvmlErrorString(result));

                goto Error;

            }

            printf("%d. %s [%s]\n", i, name, pci.busId);

            // This is a simple example on how you can modify GPU's state

            result = nvmlDeviceGetComputeMode(device, &compute_mode);

            if (NVML_ERROR_NOT_SUPPORTED == result)

                printf("\t This is not CUDA capable device\n");

            else if (NVML_SUCCESS != result)

            {

                printf("Failed to get compute mode for device %i: %s\n", i, nvmlErrorString(result));

                goto Error;

            }

            else

            {

                // try to change compute mode

                printf("\t Changing device's compute mode from '%s' to '%s'\n",

                    convertToComputeModeString(compute_mode),

                    convertToComputeModeString(NVML_COMPUTEMODE_PROHIBITED));

                result = nvmlDeviceSetComputeMode(device, NVML_COMPUTEMODE_PROHIBITED);

                if (NVML_ERROR_NO_PERMISSION == result)

                    printf("\t\t Need root privileges to do that: %s\n", nvmlErrorString(result));

                else if (NVML_ERROR_NOT_SUPPORTED == result)

                    printf("\t\t Compute mode prohibited not supported. You might be running on\n"

                    "\t\t windows in WDDM driver model or on non-CUDA capable GPU.\n");

                else if (NVML_SUCCESS != result)

                {

                    printf("\t\t Failed to set compute mode for device %i: %s\n", i, nvmlErrorString(result));

                    goto Error;

                }

                else

                {

                    printf("\t Restoring device's compute mode back to '%s'\n",

                        convertToComputeModeString(compute_mode));

                    result = nvmlDeviceSetComputeMode(device, compute_mode);

                    if (NVML_SUCCESS != result)

                    {

                        printf("\t\t Failed to restore compute mode for device %i: %s\n", i, nvmlErrorString(result));

                        goto Error;

                    }

                }

            }

            printf("\n");

            printf("----- 温度 ----- \n");

            unsigned int temperature_threshold = 100;

            result = nvmlDeviceGetTemperatureThreshold(device, NVML_TEMPERATURE_THRESHOLD_SHUTDOWN, &temperature_threshold);

            if (NVML_SUCCESS != result)

            {

                printf("device %i Failed to get NVML_TEMPERATURE_THRESHOLD_SHUTDOWN: %s\n", i, nvmlErrorString(result));

            }

            else

                printf("截止温度: %d 摄氏度  (Temperature at which the GPU will shut down for HW protection)\n", temperature_threshold);

            result = nvmlDeviceGetTemperatureThreshold(device, NVML_TEMPERATURE_THRESHOLD_SLOWDOWN, &temperature_threshold);

            if (NVML_SUCCESS != result)

            {

                printf("device %i Failed NVML_TEMPERATURE_THRESHOLD_SLOWDOWN: %s\n", i, nvmlErrorString(result));

            }

            else

                printf("上限温度: %d 摄氏度  (Temperature at which the GPU will begin slowdown)\n", temperature_threshold);

            unsigned int temperature = 0;

            result = nvmlDeviceGetTemperature(device, NVML_TEMPERATURE_GPU, &temperature);

            if (NVML_SUCCESS != result)

            {

                printf("device %i NVML_TEMPERATURE_GPU Failed: %s\n", i, nvmlErrorString(result));

            }

            else

                printf("当前温度: %d 摄氏度 \n", temperature);

            //使用率

            printf("\n");

            nvmlUtilization_t utilization;

            result = nvmlDeviceGetUtilizationRates(device, &utilization);

            if (NVML_SUCCESS != result)

            {

                printf(" device %i nvmlDeviceGetUtilizationRates Failed : %s\n", i, nvmlErrorString(result));

            }

            else

            {

                printf("----- 使用率 ----- \n");

                printf("GPU 使用率: %lld %% \n", utilization.gpu);

                printf("显存使用率: %lld %% \n", utilization.memory);

            }

            //FB memory

            printf("\n");

            nvmlMemory_t memory;

            result = nvmlDeviceGetMemoryInfo(device, &memory);

            if (NVML_SUCCESS != result)

            {

                printf("device %i nvmlDeviceGetMemoryInfo Failed : %s\n", i, nvmlErrorString(result));

            }

            else

            {

                printf("------ FB memory ------- \n");

                printf("Total installed FB memory: %lld bytes \n", memory.total);

                printf("Unallocated FB memory: %lld bytes \n", memory.free);

                printf("Allocated FB memory: %lld bytes \n", memory.used);

            }

            //BAR1 memory

            printf("\n");

            nvmlBAR1Memory_t bar1Memory;

            result = nvmlDeviceGetBAR1MemoryInfo(device, &bar1Memory);

            if (NVML_SUCCESS != result)

            {

                printf("device %i  nvmlDeviceGetBAR1MemoryInfo Failed : %s\n", i, nvmlErrorString(result));

            }

            else

            {

                printf("------ BAR1 memory ------- \n");

                printf("Total BAR1 memory: %lld bytes \n", bar1Memory.bar1Total);

                printf("Unallocated BAR1 memory: %lld bytes \n", bar1Memory.bar1Free);

                printf("Allocated BAR1 memory: %lld bytes \n", bar1Memory.bar1Used);

            }

            //Information about running compute processes on the GPU

            printf("\n");

            unsigned int infoCount;

            nvmlProcessInfo_t infos[999];

            result = nvmlDeviceGetComputeRunningProcesses(device, &infoCount, infos);

            if (NVML_SUCCESS != result)

            {

                printf("Failed to get ComputeRunningProcesses for device %i: %s\n", i, nvmlErrorString(result));

            }

            else

            {

                HANDLE handle; //定义CreateToolhelp32Snapshot系统快照句柄

                handle = CreateToolhelp32Snapshot(TH32CS_SNAPPROCESS, 0);//获得系统快照句柄

                PROCESSENTRY32 *info; //定义PROCESSENTRY32结构字指

                //PROCESSENTRY32 结构的 dwSize 成员设置成 sizeof(PROCESSENTRY32)

                info = new PROCESSENTRY32;

                info->dwSize = sizeof(PROCESSENTRY32);

                //调用一次     Process32First 函数,从快照中获取进程列表

                Process32First(handle, info);

                //重复调用 Process32Next,直到函数返回 FALSE 为止

                printf("------ Information about running compute processes on the GPU ------- \n");

                for (int i = 0; i < infoCount; i++)

                {

                    printf("PID: %d  显存占用:%lld bytes   ", infos[i].pid, infos[i].usedGpuMemory);

                    while (Process32Next(handle, info) != FALSE)

                    {

                        if (info->th32ProcessID == infos[i].pid)

                        {

                            //printf("  %s\n", info->szExeFile);

                            HANDLE hProcess = NULL;

                            //打开目标进程

                            hProcess = OpenProcess(PROCESS_QUERY_INFORMATION | PROCESS_VM_READ, FALSE, info->th32ProcessID);

                            if (hProcess == NULL) {

                                printf("\nOpen Process fAiled:%d\n", GetLastError());

                                break;

                            }

                            char strFilePath[MAX_PATH];

                            GetModuleFileNameEx(hProcess, NULL, strFilePath, MAX_PATH);

                            printf(" %s\n", strFilePath);

                            CloseHandle(hProcess);

                            break;

                        }

                    }

                }

                delete info;

                CloseHandle(handle);

            }

            //BAR1 memory

            printf("\n");

            printf("------ Clocks ------- \n");

            unsigned int max_clock;

            result = nvmlDeviceGetMaxClockInfo(device, NVML_CLOCK_GRAPHICS, &max_clock);

            if (NVML_SUCCESS != result)

            {

                printf("device %i   nvmlDeviceGetMaxClockInfo Failed : %s\n", i, nvmlErrorString(result));

            }

            unsigned int clock;

            result = nvmlDeviceGetClockInfo(device, NVML_CLOCK_GRAPHICS, &clock);

            if (NVML_SUCCESS != result)

            {

                printf("Failed to get NVML_CLOCK_GRAPHICS info for device %i: %s\n", i, nvmlErrorString(result));

            }

            else

            {

                printf("GRAPHICS: %6d Mhz   max clock :%d  \n", clock, max_clock);

            }

            result = nvmlDeviceGetMaxClockInfo(device, NVML_CLOCK_SM, &max_clock);

            if (NVML_SUCCESS != result)

            {

                printf("Failed to get max NVML_CLOCK_SM for device %i: %s\n", i, nvmlErrorString(result));

            }

            result = nvmlDeviceGetClockInfo(device, NVML_CLOCK_SM, &clock);

            if (NVML_SUCCESS != result)

            {

                printf("Failed to get current NVML_CLOCK_SM for device %i: %s\n", i, nvmlErrorString(result));

            }

            else

            {

                printf("      SM: %6d Mhz   max clock :%d   \n", clock, max_clock);

            }

            result = nvmlDeviceGetMaxClockInfo(device, NVML_CLOCK_MEM, &max_clock);

            if (NVML_SUCCESS != result)

            {

                printf("Failed to get max NVML_CLOCK_MEM for device %i: %s\n", i, nvmlErrorString(result));

            }

            result = nvmlDeviceGetClockInfo(device, NVML_CLOCK_MEM, &clock);

            if (NVML_SUCCESS != result)

            {

                printf("Failed to get current NVML_CLOCK_MEM for device %i: %s\n", i, nvmlErrorString(result));

            }

            else

            {

                printf("     MEM: %6d Mhz   max clock :%d   \n", clock, max_clock);

            }

            result = nvmlDeviceGetMaxClockInfo(device, NVML_CLOCK_VIDEO, &max_clock);

            if (NVML_SUCCESS != result)

            {

                printf("Failed to get max NVML_CLOCK_VIDEO for device %i: %s\n", i, nvmlErrorString(result));

            }

            result = nvmlDeviceGetClockInfo(device, NVML_CLOCK_VIDEO, &clock);

            if (NVML_SUCCESS != result)

            {

                printf("Failed to get current NVML_CLOCK_VIDEO for device %i: %s\n", i, nvmlErrorString(result));

            }

            else

            {

                printf("   VIDEO: %6d Mhz   max clock :%d   \n", clock, max_clock);

            }

        }

        printf("-------------------------------------------------------------------- \n");

        Sleep(1000);

    }

Error:

    result = nvmlShutdown();

    if (NVML_SUCCESS != result)

        printf("Failed to shutdown NVML: %s\n", nvmlErrorString(result));

    system("pause");

    return 0;

}
虽然我已经把nvml.dll拷贝到运行目录,程序应该是可以正常运行了。也做一下nvidia-smi的环境配置,参考NVIDIA 显卡信息(CUDA信息的查看),我把他的复制到下面来:
1. nvidia-smi 查看显卡信息
nvidia-smi 指的是 NVIDIA System Management Interface;
在安装完成 NVIDIA 显卡驱动之后,对于 windows 用户而言,cmd 命令行界面还无法识别 nvidia-smi 命令,需要将相关环境变量添加进去。如将 NVIDIA 显卡驱动安装在默认位置,nvidia-smi 命令所在的完整路径应当为:
C:\Program Files\NVIDIA Corporation\NVSMI也即将上述路径添加进
Path系统环境变量中。2. 查看 CUDA 信息
- CUDA 的版本:
- 进入命令行:
nvcc -V
3.运行结果
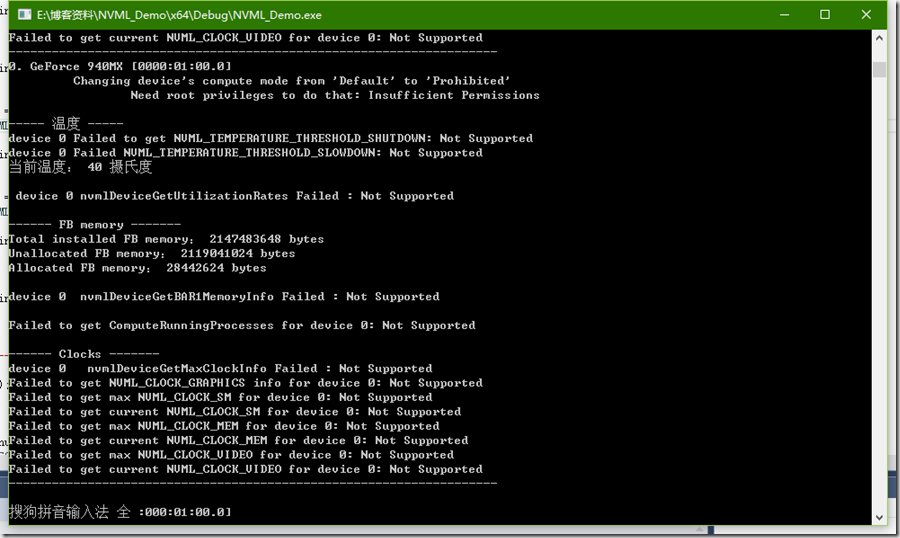
图4.GeForce 940M查询结果
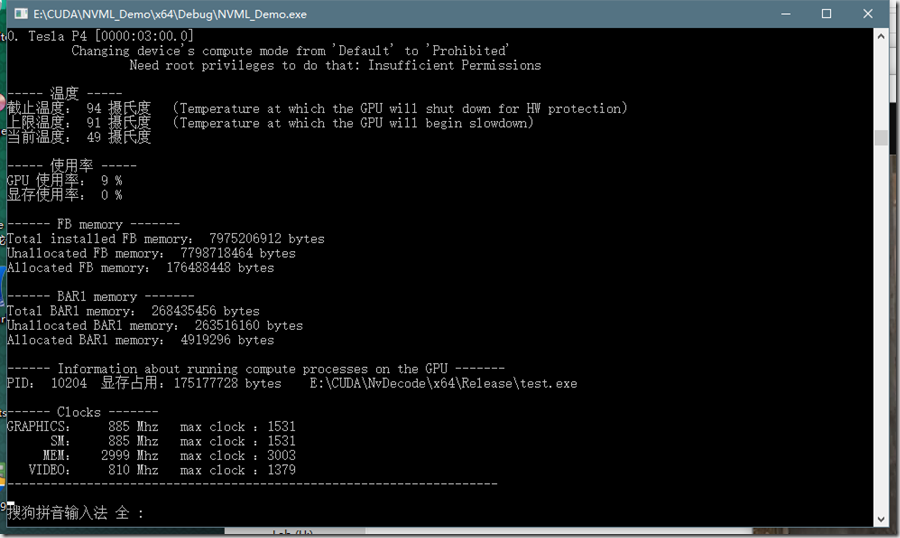
图5.Tesla P4查询结果
NVML对GeForce 940M的支持不怎么好,对Tesla P4支持得比较好。
工程源码:http://download.csdn.net/download/qq_33892166/9841800
NVML查询显卡信息的更多相关文章
- windows平台下 c++获取 系统版本 网卡 内存 CPU 硬盘 显卡信息<转>
GetsysInfo.h: #ifndef _H_GETSYSINFO #define _H_GETSYSINFO #pragma once #include <afxtempl.h> c ...
- SQL Server2016 新功能实时查询统计信息
SQL Server2016 新功能实时查询统计信息 很多时候有这样的场景,开发抱怨DBA没有调优好数据库,DBA抱怨开发写的程序代码差,因此,DBA和开发都成为了死对头,无法真正排查问题. DBA只 ...
- 16进制ascii码转化为对应的字符,付ipmitool查询硬件信息
最近工作需要在用ipmitool查询服务器硬件信息.ipmitool查询硬件信息 比如电源,使用命令: 获取PSU0信息:Ipmitool raw 0x3a 0x71 0x00: 获取PSU1信息:I ...
- 【Gerrit】Gerrit cmd query (gerrit命令行查询change信息)
本文仅展现个人使用情况和理解,英文原址:https://review.openstack.org/Documentation/cmd-query.html 基本使用格式: ssh -p <por ...
- Asp.Net MVC4入门指南(9):查询详细信息和删除记录
在本教程中,您将查看自动生成的Details和Delete方法. 查询详细信息和删除记录 打开Movie控制器并查看Details方法. public ActionResult Details(int ...
- WMI技术介绍和应用——查询硬件信息
//查询得到系统盘所在硬盘的ID SELECT DiskIndex FROM Win32_DiskPartition WHERE Bootable = TRUE //如何使用WMI查询系统盘所在硬盘的 ...
- SQL查询数据库信息, 数据库表名, 数据库表信息
SQL查询数据库信息, 数据库表名, 数据库表信息 ---------------------------------------------- -- 以下例子, 在sql_server 中可以直接运 ...
- 使用HQL语句的按照参数名字查询数据库信息的时候 “=:”和参数之间不能存在空格,否则会报错
问题描述: 今天在使用HQL的按照参数的名字查询数据库信息的时候报错如下: org.hibernate.QueryException: Space is not allowed after param ...
- hosts文件的作用 whois查询域名信息
Whois查询域名信息 在操作系统中的路径:Window98—在Windows目录下Windows 2000/XP—在C:\WINDOWS\system32\drivers\etc目录下 内容:包 ...
随机推荐
- 20165324 《Java程序设计》 第六周
学号 2016-2017-2 <Java程序设计>第六周学习总结 教材学习内容总结 第八章 常用实用类 String类 构造String对象:常量对象:String对象:引用String常 ...
- hdu3374 String Problem
地址:http://acm.hdu.edu.cn/showproblem.php?pid=3374 题目: String Problem Time Limit: 2000/1000 MS (Java/ ...
- git 移除某个文件的版本管理
1:最简单的,在项目刚创建的时候,在根目录的.gitignore,加入该文件的相对路径 2:已经被纳入到了版本控制,使用在当前目录下,打开cmd窗口 输入rm命令,加上文件的绝对路径(相对路径没试过) ...
- HTML5文件上传前本地预览
HTML5之FileReader的使用 HTML5定义了FileReader作为文件API的重要成员用于读取文件,根据W3C的定义,FileReader接口提供了读取文件的方法和包含读取结果的事件模型 ...
- C/C++之Qt正则表达式
引言 正则表达式(regular expression)就是用一个“字符串”来描述一个特征,然后去验证另一个“字符串”是否符合这个特征.比如 表达式“ab+” 描述的特征是“一个 'a' 和 任意个 ...
- Vuejs开发环境搭建及热更新
一.安装NPM 1.1最新稳定版本: npm install vue 二.命令行工具安装 国内速度慢,使用淘宝镜像: npm install -g cnpm --registry=https://re ...
- MLlib1.6指南笔记
MLlib1.6指南笔记 http://spark.apache.org/docs/latest/mllib-guide.html spark.mllib RDD之上的原始API spark.ml M ...
- ipythons 使用攻略
ipython是一个 python 的交互式 shell,比默认的 python shell 好用得多,支持变量自动补全,自动缩进,支持 bash shell 命令,内置了许多很有用的功能和函数. 安 ...
- JS变量比较陷阱
我们觉得JS简单是因为它是弱类型的语言,不像java那样对对类型那样敏感,但js也有其不尽人意的地方. 在java中我们无法将数字与字符串直接比较,而js能,而且能直接转换成数值比较,但是如果是字符串 ...
- 《Java程序设计》 第2周学习总结
20145318 <Java程序设计>第2周学习总结 教材学习内容总结 short,2字节:int,4字节:long,8字节:byte,1字节:float,4字节:double,8字节:c ...
