Android入门第十六篇之Style与Theme [转]
本文来自http://blog.csdn.net/hellogv/ ,引用必须注明出处!
越来越多互联网企业都在Android平台上部署其客户端,为了提升用户体验,这些客户端都做得布局合理而且美观.......Android的Style设计就是提升用户体验的关键之一。Android上的Style分为了两个方面:
- Theme是针对窗体级别的,改变窗体样式;
- Style是针对窗体元素级别的,改变指定控件或者Layout的样式。
Android系统的themes.xml和style.xml(位于/base/core/res/res/values/)包含了很多系统定义好的style,建议在里面挑个合适的,然后再继承修改。以下属性是在Themes中比较常见的,源自Android系统本身的themes.xml:
- <!-- Window attributes -->
- <item name="windowBackground">@android:drawable/screen_background_dark</item>
- <item name="windowFrame">@null</item>
- <item name="windowNoTitle">false</item>
- <item name="windowFullscreen">false</item>
- <item name="windowIsFloating">false</item>
- <item name="windowContentOverlay">@android:drawable/title_bar_shadow</item>
- <item name="windowTitleStyle">@android:style/WindowTitle</item>
- <item name="windowTitleSize">25dip</item>
- <item name="windowTitleBackgroundStyle">@android:style/WindowTitleBackground</item>
- <item name="android:windowAnimationStyle">@android:style/Animation.Activity</item>
<!-- Window attributes -->
<item name="windowBackground">@android:drawable/screen_background_dark</item>
<item name="windowFrame">@null</item>
<item name="windowNoTitle">false</item>
<item name="windowFullscreen">false</item>
<item name="windowIsFloating">false</item>
<item name="windowContentOverlay">@android:drawable/title_bar_shadow</item>
<item name="windowTitleStyle">@android:style/WindowTitle</item>
<item name="windowTitleSize">25dip</item>
<item name="windowTitleBackgroundStyle">@android:style/WindowTitleBackground</item>
<item name="android:windowAnimationStyle">@android:style/Animation.Activity</item>
至于控件的Style设计就范围大多了,看看Eclipse的Android控件属性编辑器[Properties]就大概知道有哪些条目,而Android内置的style.xml也只是定义每个控件的默认样式而已....不过控件的style不建议大改,耐看的style更能让用户长时间使用软件。另外,控件的Style在很多情况下都用到9.png,学习9.png就必须到/base/core/res/res/drawable-hdpi里面看看,里面有很多系统内置的9.png。
PS:为了研究Android的Style和Theme,强烈建议下载Android的base.git!
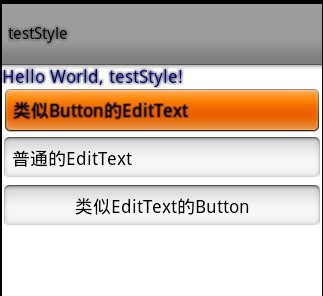
接下来看看本文程序的效果图:

本文程序的themes.xml代码如下,自定义了WindowTitle,:
<?xml version="1.0" encoding="UTF-8"?>
<resources>
<!--继承Android内置的Theme.Light,位于/base/core/res/res/values/themes.xml -->
<style name="Theme" parent="android:Theme.Light">
<item name="android:windowFullscreen">true</item>
<item name="android:windowTitleSize">60dip</item>
<item name="android:windowTitleStyle">@style/WindowTitle</item>
</style>
<style name="WindowTitle" parent="android:WindowTitle">
<item name="android:singleLine">true</item>
<item name="android:shadowColor">#BB000000</item>
<item name="android:shadowRadius">2.75</item>
</style>
</resources>
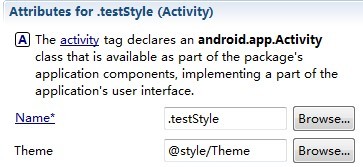
要为Activity使用theme,要么使用代码 setTheme(R.style.Theme),要么在Application Manifest里面设置 。
。
本文程序的styles.xml代码如下,background默认使用的是9.png,xml定义在/base/core/res/res/drawable/之下:
<?xml version="1.0" encoding="UTF-8"?>
<resources>
<style name="TextView">
<item name="android:textSize">18sp</item>
<item name="android:textColor">#008</item>
<item name="android:shadowColor">@android:color/black</item>
<item name="android:shadowRadius">2.0</item>
</style>
<style name="EditText">
<item name="android:shadowColor">@android:color/black</item>
<item name="android:shadowRadius">1.0</item>
<item name="android:background">@android:drawable/btn_default</item>
<item name="android:textAppearance">?android:attr/textAppearanceMedium</item>
</style>
<style name="Button">
<item name="android:background">@android:drawable/edit_text</item>
<item name="android:textAppearance">?android:attr/textAppearanceMedium</item>
</style>
</resources>
main.xml代码如下:
- <?xml version="1.0" encoding="utf-8"?>
- <LinearLayout xmlns:android="http://schemas.android.com/apk/res/android"
- android:orientation="vertical" android:layout_width="fill_parent"
- android:layout_height="fill_parent">
- <TextView android:layout_width="fill_parent"
- android:layout_height="wrap_content" android:text="@string/hello"
- style="@style/TextView" />
- <EditText android:id="@+id/EditText01" android:layout_height="wrap_content"
- style="@style/EditText" android:layout_width="fill_parent"
- android:text="类似Button的EditText"></EditText>
- <EditText android:id="@+id/EditText02" android:layout_height="wrap_content"
- android:layout_width="fill_parent" android:text="普通的EditText"></EditText>
- <Button android:id="@+id/Button01" android:layout_height="wrap_content"
- style="@style/Button" android:layout_width="fill_parent" android:text="类似EditText的Button"></Button>
- </LinearLayout>
Android入门第十六篇之Style与Theme [转]的更多相关文章
- CTF---Web入门第十六题 天下武功唯快不破
天下武功唯快不破分值:10 来源: 北邮天枢战队 难度:易 参与人数:10787人 Get Flag:2264人 答题人数:3373人 解题通过率:67% 看看响应头 格式:CTF{ } 解题链接: ...
- Spring入门第十六课
接上一次讲课 先看代码: package logan.spring.study.annotation.repository; public interface UserRepository { voi ...
- 跟我学SpringCloud | 第十六篇:微服务利剑之APM平台(二)Pinpoint
目录 SpringCloud系列教程 | 第十六篇:微服务利剑之APM平台(二)Pinpoint 1. Pinpoint概述 2. Pinpoint主要特性 3. Pinpoint优势 4. Pinp ...
- 解剖SQLSERVER 第十六篇 OrcaMDF RawDatabase --MDF文件的瑞士军刀(译)
解剖SQLSERVER 第十六篇 OrcaMDF RawDatabase --MDF文件的瑞士军刀(译) http://improve.dk/orcamdf-rawdatabase-a-swiss-a ...
- Python之路【第十六篇】:Django【基础篇】
Python之路[第十六篇]:Django[基础篇] Python的WEB框架有Django.Tornado.Flask 等多种,Django相较与其他WEB框架其优势为:大而全,框架本身集成了O ...
- Egret入门学习日记 --- 第十六篇(书中 6.10~7.3节 内容)
第十六篇(书中 6.10~7.3节 内容) 昨天搞定了6.9节,今天就从6.10节开始. 其实这个蛮简单的. 这是程序员模式. 这是设计师模式. 至此,6.10节 完毕. 开始 6.11节. 有点没营 ...
- Python自动化 【第十六篇】:JavaScript作用域和Dom收尾
本节内容: javascript作用域 DOM收尾 JavaScript作用域 JavaScript的作用域一直以来是前端开发中比较难以理解的知识点,对于JavaScript的作用域主要记住几句话,走 ...
- Struts2(十六篇)
(一)Struts2框架概述 (二)Struts2配置文件 (三)Struts2的Action(简单讲解版) (四)Struts2的Action(深入讲解版) (五)Struts2处理结果管理 (六) ...
- Android入门第六篇之ListView (一)
本文来自http://blog.csdn.net/hellogv/ ListView是一个经经常使用到的控件,ListView里面的每一个子项Item能够使一个字符串,也能够是一个组合控件.先说说Li ...
随机推荐
- Java中,当表单含有文件上传时,提交数据的如何读取
http://blog.csdn.net/lian_zhihui1984/article/details/6822201
- iOS多线程系列(2)
前面了iOS的NSThread方法来实现多线程,这篇就简单的讲讲NSOperation和NSOperationQueue. NSOperation是一个抽象类,定义一个要执行的任务.NSOperati ...
- netbean7.4 保存远程项目的时候老是跳警告框的解决方案
在任意位置新建一个空白文件,然后在 管理远程连接里面=>已知的主机文件=>点浏览就行了
- error LNK2019: 无法解析的外部符号
前些日子电脑系统崩了,重装了了下,原有的项目环境得重新搭建,总是在链接时提示:error LNK2019: 无法解析的外部符号………… 起初以为是库没包含全,可发现不是 有想了下可能是库的包含次序有问 ...
- 网易云课堂_程序设计入门-C语言_第六章:数组_1多项式加法
1 多项式加法(5分) 题目内容: 一个多项式可以表达为x的各次幂与系数乘积的和,比如: 现在,你的程序要读入两个多项式,然后输出这两个多项式的和,也就是把对应的幂上的系数相加然后输出. 程序要处理的 ...
- Dreamweaver PHP代码护眼配色方案
结果展示 [1]主菜单选择编辑->首选项.在分类中选择"字体".设置代码视图的字体为Courier New [2]在分类中选择 "代码颜色",点击 &qu ...
- #import和#include的区别 关键字@class的作用
一.#import和#include的区别当我们在代码中使用两次#include的时候会报错:因为#include相当于拷贝头文件中的声明内容,所以会报重复定义的错误但是使用两次#import的话,不 ...
- 套接字编程(VC_Win32)
简介(源于维基) Berkeley套接字(也作BSD套接字应用程序接口)刚开始是4.2BSD Unix操作系统(于1983发布)的一套应用程序接口.然而,由于AT&T的专利保护着UNIX,所以 ...
- MySQL:Error : Tablespace for table '`database`.`temp`' exists. Please DISCARD the tablespace before IMPORT.解决办法
今天在navicat上操作mysql数据库表,突然没有响应了.随后重启,mysql服务也终止了.随后启动服务,检查表,发现一张表卡没了,就重新添加一张表.报了一个错: Error : Tablespa ...
- ScrollView属性fillViewport解决android布局不能撑满全屏的问题
转:http://blog.sina.com.cn/s/blog_6cf2ea6a0102v61f.html 开发项目中遇到一个问题,布局高度在某些国产酷派小屏幕手机上高度不够全部显示,于是使用了Sc ...
