SpringSecurity原理
一、认证的两种方式的介绍
1. 基于Session的认证方式
在之前的单体架构时代,我们认证成功之后都会将信息存入到Session中,然后响应给客户端的是对应的Session中数据的key,客户端会将这个key存储在cookie中,之后都请求都会携带这个cookie中的信息,结构图如下

但是随着技术的更新迭代,我们在项目架构的时候更多的情况下会选择前后端分离或者分布式架构,那么在这种情况下基于session的认证方式就显露了很多的不足,列举几个明显的特点:
- cookie存储的内容有限制4k
- cookie的有效范围是当前域名下,所以在分布式环境下或者前后端分离的项目中都不适用,及时要用也会很麻烦
- 服务端存储了所有认证过的用户信息
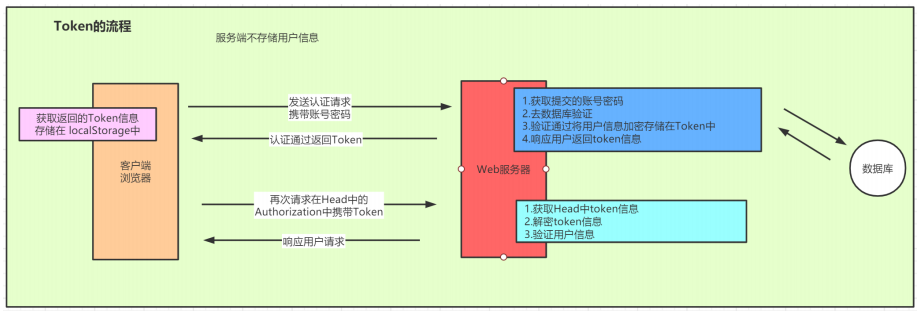
2.基于Token的认证方式
相较于Session对需求的兼容,基于Token的方式便是我们在当下项目中处理认证和授权的实现方式的首先了,Token的方式其实就是在用户认证成功后便把用户信息通过加密封装到了Token中,在响应客户端的时候会将Token信息传回给客户端,当下一次请求到来的时候在请求的Http请求的head的Authentication中会携带token
二、SSO和OAuth2.0流程浅析
前面介绍了下认证信息的实现方式,接下来看下我们在分布式环境下会经常碰到的两种解决方案SSO和OAuth2.0
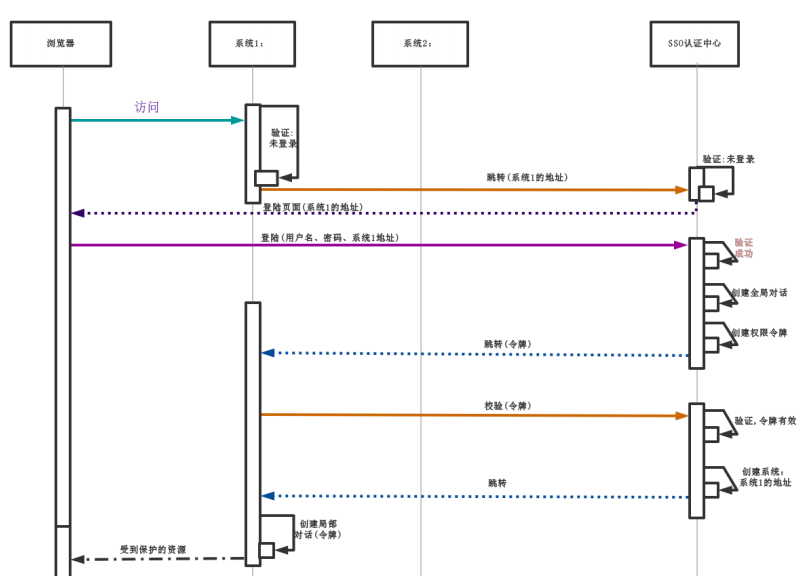
1.SSO
SSO也就是我们经常听到的单点登录,是我们在分布式环境下认证实现的解决方案,具体流程如下
2.OAuth2.0
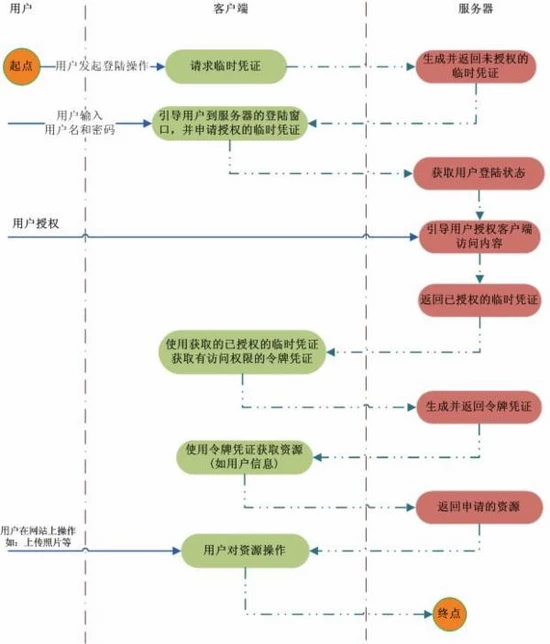
单点登录解决的分布式系统中统一认证的问题,还有一种情况是一个新的系统用户就需要去注册一个账号,用户管理的账号越多越麻烦,为了解决这个问题,当前系统就期望使用你的其他系统的资料来作为认证的信息,比如 微信,QQ,微博等,这时候就该OAuth2.0,实现流程如下
三、SpringSecurity介绍
1.基础环境准备
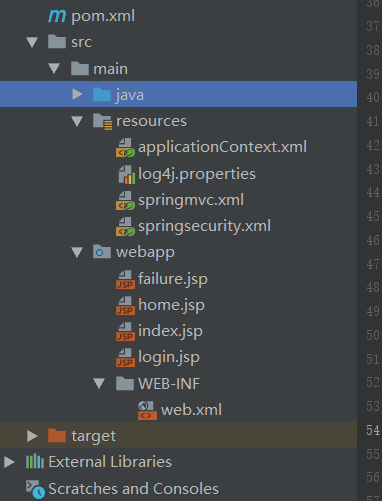
1.1基于XML文件的方式构建项目
pom.xml
- <?xml version="1.0" encoding="UTF-8"?>
- <project xmlns="http://maven.apache.org/POM/4.0.0" xmlns:xsi="http://www.w3.org/2001/XMLSchema-instance"
- xsi:schemaLocation="http://maven.apache.org/POM/4.0.0 http://maven.apache.org/xsd/maven-4.0.0.xsd">
- <modelVersion>4.0.0</modelVersion>
- <groupId>org.example</groupId>
- <artifactId>SpringSecurityDemo</artifactId>
- <version>1.0-SNAPSHOT</version>
- <packaging>war</packaging>
- <name>GpSpringSecurityDemo Maven Webapp</name>
- <!-- FIXME change it to the project's website -->
- <url>http://www.example.com</url>
- <properties>
- <project.build.sourceEncoding>UTF-8</project.build.sourceEncoding>
- <maven.compiler.source>1.7</maven.compiler.source>
- <maven.compiler.target>1.7</maven.compiler.target>
- </properties>
- <dependencies>
- <dependency>
- <groupId>org.springframework</groupId>
- <artifactId>spring-webmvc</artifactId>
- <version>5.2.1.RELEASE</version>
- </dependency>
- <dependency>
- <groupId>javax.servlet</groupId>
- <artifactId>servlet-api</artifactId>
- <version>2.5</version>
- <scope>provided</scope>
- </dependency>
- <dependency>
- <groupId>org.slf4j</groupId>
- <artifactId>slf4j-log4j12</artifactId>
- <version>1.7.25</version>
- </dependency>
- <dependency>
- <groupId>junit</groupId>
- <artifactId>junit</artifactId>
- <version>4.11</version>
- <scope>test</scope>
- </dependency>
- <dependency>
- <groupId>org.springframework.security</groupId>
- <artifactId>spring-security-config</artifactId>
- <version>5.1.5.RELEASE</version>
- </dependency>
- <dependency>
- <groupId>org.springframework.security</groupId>
- <artifactId>spring-security-taglibs</artifactId>
- <version>5.1.5.RELEASE</version>
- </dependency>
- </dependencies>
- <build>
- <finalName>GpSpringSecurityDemo</finalName>
- <plugins>
- <plugin>
- <groupId>org.apache.tomcat.maven</groupId>
- <artifactId>tomcat7-maven-plugin</artifactId>
- <version>2.2</version>
- <configuration>
- <port>8080</port> <!-- 访问端口-->
- <path>/</path> <!-- 访问路径-->
- </configuration>
- </plugin>
- </plugins>
- <pluginManagement><!-- lock down plugins versions to avoid using Maven defaults (may be moved to parent pom) -->
- <plugins>
- <plugin>
- <artifactId>maven-clean-plugin</artifactId>
- <version>3.1.0</version>
- </plugin>
- <!-- see http://maven.apache.org/ref/current/maven-core/default-bindings.html#Plugin_bindings_for_war_packaging -->
- <plugin>
- <artifactId>maven-resources-plugin</artifactId>
- <version>3.0.2</version>
- </plugin>
- <plugin>
- <artifactId>maven-compiler-plugin</artifactId>
- <version>3.8.0</version>
- </plugin>
- <plugin>
- <artifactId>maven-surefire-plugin</artifactId>
- <version>2.22.1</version>
- </plugin>
- <plugin>
- <artifactId>maven-war-plugin</artifactId>
- <version>3.2.2</version>
- </plugin>
- <plugin>
- <artifactId>maven-install-plugin</artifactId>
- <version>2.5.2</version>
- </plugin>
- <plugin>
- <artifactId>maven-deploy-plugin</artifactId>
- <version>2.8.2</version>
- </plugin>
- </plugins>
- </pluginManagement>
- </build>
- </project>
WEB.XML
- <!DOCTYPE web-app PUBLIC
- "-//Sun Microsystems, Inc.//DTD Web Application 2.3//EN"
- "http://java.sun.com/dtd/web-app_2_3.dtd" >
- <web-app version="2.5" id="WebApp_ID" xmlns="http://java.sun.com/xml/ns/javaee"
- xmlns:xsi="http://www.w3.org/2001/XMLSchema-instance"
- xsi:schemaLocation="http://java.sun.com/xml/ns/javaee
- http://java.sun.com/xml/ns/javaee/web-app_2_5.xsd">
- <display-name>Archetype Created Web Application</display-name>
- <!-- 初始化spring容器 -->
- <context-param>
- <param-name>contextConfigLocation</param-name>
- <param-value>classpath:applicationContext.xml</param-value>
- </context-param>
- <listener>
- <listener-class>org.springframework.web.context.ContextLoaderListener</listener-class>
- </listener>
- <!-- post乱码过滤器 -->
- <filter>
- <filter-name>CharacterEncodingFilter</filter-name>
- <filter-class>org.springframework.web.filter.CharacterEncodingFilter</filter-class>
- <init-param>
- <param-name>encoding</param-name>
- <param-value>utf-8</param-value>
- </init-param>
- </filter>
- <filter-mapping>
- <filter-name>CharacterEncodingFilter</filter-name>
- <url-pattern>/*</url-pattern>
- </filter-mapping>
- <!-- 前端控制器 -->
- <servlet>
- <servlet-name>dispatcherServletb</servlet-name>
- <servlet-class>org.springframework.web.servlet.DispatcherServlet</servlet-class>
- <!-- contextConfigLocation不是必须的, 如果不配置contextConfigLocation,
- springmvc的配置文件默认在:WEB-INF/servlet的name+"-servlet.xml" -->
- <init-param>
- <param-name>contextConfigLocation</param-name>
- <param-value>classpath:springmvc.xml</param-value>
- </init-param>
- <load-on-startup>1</load-on-startup>
- </servlet>
- <servlet-mapping>
- <servlet-name>dispatcherServletb</servlet-name>
- <!-- 拦截所有请求jsp除外 -->
- <url-pattern>/</url-pattern>
- </servlet-mapping>
- <!-- 配置过滤器链 springSecurityFilterChain名称固定-->
- <filter>
- <filter-name>springSecurityFilterChain</filter-name>
- <filter-class>org.springframework.web.filter.DelegatingFilterProxy</filter-class>
- </filter>
- <filter-mapping>
- <filter-name>springSecurityFilterChain</filter-name>
- <url-pattern>/*</url-pattern>
- </filter-mapping>
- </web-app>
login.jsp
- <%@ page contentType="text/html;charset=UTF-8" language="java" isELIgnored="false" %>
- <html>
- <head>
- <title>Title</title>
- </head>
- <body>
- <h1>登录管理</h1>
- <form action="/login" method="post">
- 账号:<input type="text" name="username"><br>
- 密码:<input type="password" name="password"><br>
- <input type="submit" value="登录"><br>
- </form>
- </body>
- </html>
springsecurity.xml
- <?xml version="1.0" encoding="UTF-8"?>
- <beans xmlns="http://www.springframework.org/schema/beans"
- xmlns:context="http://www.springframework.org/schema/context"
- xmlns:p="http://www.springframework.org/schema/p"
- xmlns:aop="http://www.springframework.org/schema/aop"
- xmlns:security="http://www.springframework.org/schema/security"
- xmlns:xsi="http://www.w3.org/2001/XMLSchema-instance"
- xsi:schemaLocation="http://www.springframework.org/schema/beans
- http://www.springframework.org/schema/beans/spring-beans-4.2.xsd
- http://www.springframework.org/schema/context http://www.springframework.org/schema/context/spring-context-4.2.xsd
- http://www.springframework.org/schema/aop http://www.springframework.org/schema/aop/spring-aop-4.2.xsd
- http://www.springframework.org/schema/util http://www.springframework.org/schema/util/spring-util-4.2.xsd
- http://www.springframework.org/schema/security http://www.springframework.org/schema/security/spring-security-4.2.xsd">
- <!--
- auto-config="true" 表示自动加载SpringSecurity的配置文件
- use-expressions="true" 使用Spring的EL表达式
- -->
- <security:http auto-config="true" use-expressions="true">
- <security:intercept-url pattern="/login.jsp" access="permitAll()"></security:intercept-url>
- <!--<security:intercept-url pattern="/login.do" access="permitAll()"></security:intercept-url>-->
- <!--
- 拦截资源
- pattern="/**" 拦截所有的资源
- access="hasAnyRole('role1')" 表示只有role1这个角色可以访问资源
- -->
- <security:intercept-url pattern="/**" access="hasAnyRole('ROLE_USER')"></security:intercept-url>
- <!--
- 配置认证信息
- login-page="/login.jsp" 自定义的登录页面
- login-processing-url="/login" security中处理登录的请求
- default-target-url="/home.jsp" 默认的跳转地址
- authentication-failure-url="/failure.jsp" 登录失败的跳转地址
- <security:form-login
- login-page="/login.jsp"
- login-processing-url="/login"
- default-target-url="/home.jsp"
- authentication-failure-url="/failure.jsp"
- />-->
- <!-- 配置退出的登录信息
- <security:logout logout-url="/logout"
- logout-success-url="/login.jsp" />
- <security:csrf disabled="true"/>-->
- </security:http>
- <!-- 设置认证用户来源 noop:SpringSecurity中默认 密码验证是要加密的 noop表示不加密 -->
- <security:authentication-manager>
- <security:authentication-provider>
- <security:user-service>
- <security:user name="zhang" password="{noop}123" authorities="ROLE_USER"></security:user>
- <security:user name="lisi" password="{noop}123" authorities="ROLE_ADMIN"></security:user>
- </security:user-service>
- </security:authentication-provider>
- </security:authentication-manager>
- </beans>
springmvc.xml
- <?xml version="1.0" encoding="UTF-8"?>
- <beans xmlns="http://www.springframework.org/schema/beans"
- xmlns:context="http://www.springframework.org/schema/context" xmlns:p="http://www.springframework.org/schema/p"
- xmlns:aop="http://www.springframework.org/schema/aop"
- xmlns:xsi="http://www.w3.org/2001/XMLSchema-instance"
- xsi:schemaLocation="http://www.springframework.org/schema/beans http://www.springframework.org/schema/beans/spring-beans-4.2.xsd
- http://www.springframework.org/schema/context http://www.springframework.org/schema/context/spring-context-4.2.xsd
- http://www.springframework.org/schema/aop http://www.springframework.org/schema/aop/spring-aop-4.2.xsd
- http://www.springframework.org/schema/util http://www.springframework.org/schema/util/spring-util-4.2.xsd">
- <!-- 配置扫描路径-->
- <context:component-scan base-package="com.ghy.security.controller"
- use-default-filters="false">
- <context:include-filter type="annotation"
- expression="org.springframework.stereotype.Controller" />
- </context:component-scan>
- </beans>
- log4j.properties
- log4j.rootCategory=debug, stdout
- log4j.appender.stdout=org.apache.log4j.ConsoleAppender
- log4j.appender.stdout.layout=org.apache.log4j.PatternLayout
- log4j.appender.stdout.layout.ConversionPattern=[GP] %p [%t] %C.%M(%L) | %m%n
applicationContext.xml
- <?xml version="1.0" encoding="UTF-8"?>
- <beans xmlns="http://www.springframework.org/schema/beans"
- xmlns:context="http://www.springframework.org/schema/context"
- xmlns:p="http://www.springframework.org/schema/p"
- xmlns:aop="http://www.springframework.org/schema/aop"
- xmlns:xsi="http://www.w3.org/2001/XMLSchema-instance"
- xsi:schemaLocation="http://www.springframework.org/schema/beans
- http://www.springframework.org/schema/beans/spring-beans-4.2.xsd
- http://www.springframework.org/schema/context http://www.springframework.org/schema/context/spring-context-4.2.xsd
- http://www.springframework.org/schema/aop http://www.springframework.org/schema/aop/spring-aop-4.2.xsd
- http://www.springframework.org/schema/util http://www.springframework.org/schema/util/spring-util-4.2.xsd">
- <import resource="classpath:springsecurity.xml"/>
- </beans>
2.原理分析
- 系统启动springSecurity做了啥
- 页面是怎么出来的
- 认证流程是怎么实现的
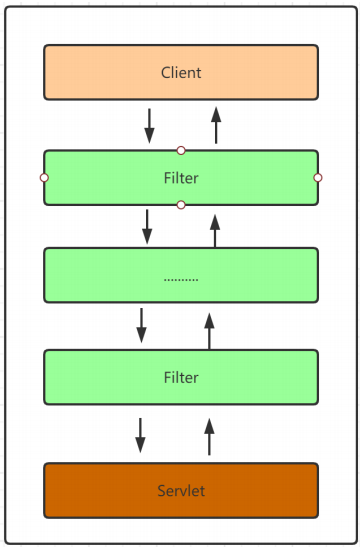

有了这个基本的认知后我们就可以来具体的分析SpringSecurity的核心原理了,为了便于大家的理解,我们先从客户端发送请求开始到显示登陆界面这条流程开始来分析。
2.1.第一次请求的流程梳理
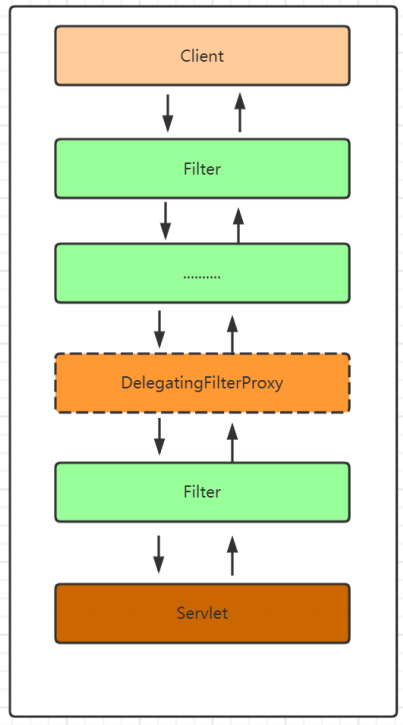
基于XML的方式分析DelegatingFilterProxy
当我们在浏览器地址栏发送http://localhost:8080/index.html的时候在服务端会被 web.xml 中配置的DelegatingFilterProxy这个过滤器拦截
- <!-- 配置过滤器链 springSecurityFilterChain名称固定-->
- <filter>
- <filter-name>springSecurityFilterChain</filter-name>
- <filter-class>org.springframework.web.filter.DelegatingFilterProxy</filter-class>
- </filter>
- <filter-mapping>
- <filter-name>springSecurityFilterChain</filter-name>
- <url-pattern>/*</url-pattern>
- </filter-mapping>
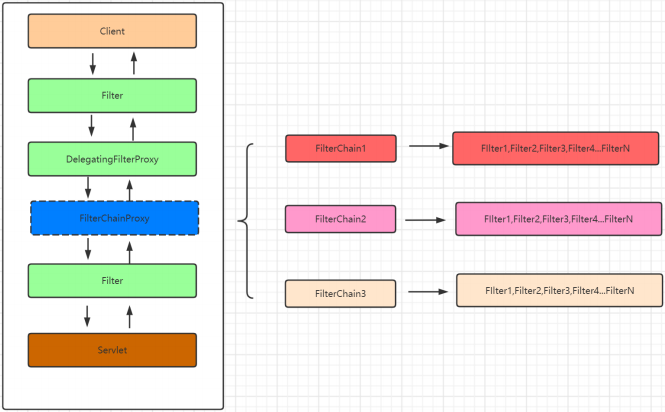
所以请求的流程图应该是这样的
- public final void init(FilterConfig filterConfig) throws ServletException {
- Assert.notNull(filterConfig, "FilterConfig must not be null");
- this.filterConfig = filterConfig;
- PropertyValues pvs = new GenericFilterBean.FilterConfigPropertyValues(filterConfig, this.requiredProperties);
- if (!pvs.isEmpty()) {
- try {
- BeanWrapper bw = PropertyAccessorFactory.forBeanPropertyAccess(this);
- ResourceLoader resourceLoader = new ServletContextResourceLoader(filterConfig.getServletContext());
- Environment env = this.environment;
- if (env == null) {
- env = new StandardServletEnvironment();
- }
- bw.registerCustomEditor(Resource.class, new ResourceEditor(resourceLoader, (PropertyResolver)env));
- this.initBeanWrapper(bw);
- bw.setPropertyValues(pvs, true);
- } catch (BeansException var6) {
- String msg = "Failed to set bean properties on filter '" + filterConfig.getFilterName() + "': " + var6.getMessage();
- this.logger.error(msg, var6);
- throw new NestedServletException(msg, var6);
- }
- }
- this.initFilterBean();
- if (this.logger.isDebugEnabled()) {
- this.logger.debug("Filter '" + filterConfig.getFilterName() + "' configured for use");
- }
- }
- protected void initFilterBean() throws ServletException {
- synchronized(this.delegateMonitor) {
- if (this.delegate == null) {
- if (this.targetBeanName == null) {
- this.targetBeanName = this.getFilterName();
- }
- WebApplicationContext wac = this.findWebApplicationContext();
- if (wac != null) {
- this.delegate = this.initDelegate(wac);
- }
- }
- }
- }
上面的方法首先获取在web.xml中配置的FilterName的值也就是 springSecurityFilterChain,然后再获取Spring的IoC容器对象,如果容器对象不为空,然后执行this.initDelegate(wac);方法
- protected Filter initDelegate(WebApplicationContext wac) throws ServletException {
- String targetBeanName = this.getTargetBeanName();
- Assert.state(targetBeanName != null, "No target bean name set");
- Filter delegate = (Filter)wac.getBean(targetBeanName, Filter.class);
- if (this.isTargetFilterLifecycle()) {
- delegate.init(this.getFilterConfig());
- }
- return delegate;
- }

通过上面这个流程init()初始化过程就结束了,通过上面源码的解析我们能够发现DelegatingFilterProxy这个过滤器在初始的时候从Spring容器中获取了 FilterChainProxy 这个过滤器链的代理对象,并且把这个对象保存在了DelegatingFilterProxy的delegate属性中。那么当请求到来的时候会执行DelegatingFilterProxy的doFilter方法,那么我们就可以来看下这个方法里面又执行了什么
- public void doFilter(ServletRequest request, ServletResponse response, FilterChain filterChain) throws ServletException, IOException {
- Filter delegateToUse = this.delegate;
- if (delegateToUse == null) {
- synchronized(this.delegateMonitor) {
- delegateToUse = this.delegate;
- if (delegateToUse == null) {
- WebApplicationContext wac = this.findWebApplicationContext();
- if (wac == null) {
- throw new IllegalStateException("No WebApplicationContext found: no ContextLoaderListener or DispatcherServlet registered?");
- }
- delegateToUse = this.initDelegate(wac);
- }
- this.delegate = delegateToUse;
- }
- }
- this.invokeDelegate(delegateToUse, request, response, filterChain);
- }
invokeDelegate是doFilter中的核心代码,字面含义就是调用委托对象。从具体源码来看也确实如此
- protected void invokeDelegate(Filter delegate, ServletRequest request, ServletResponse response, FilterChain filterChain) throws ServletException, IOException {
- delegate.doFilter(request, response, filterChain);
- }
通过上面的代码分析我们发现,当一个请求到来的时候先通过DelegatingFilterProxy来拦截,但是DelegatingFilterProxy不处理具体的逻辑,而是将具体的处理操作交给了delegate过滤器来处理也就是FilterChainProxy来处理。
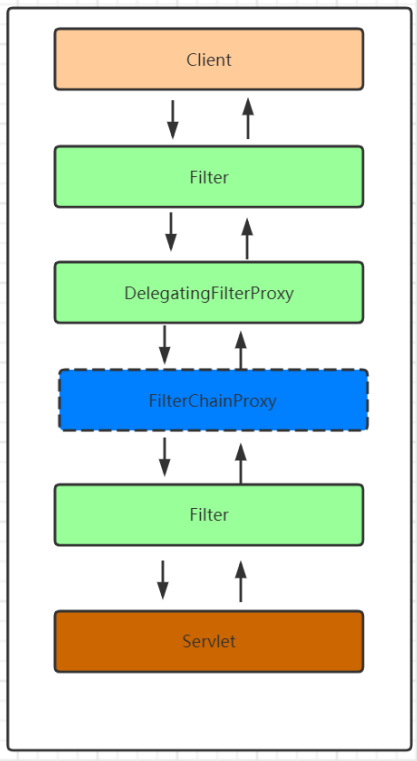
至于FilterChainProxy怎么来的会在介绍系统初始化的时候会介绍到这块儿的内容的。对于FilterChainProxy怎么处理请求的,根据上面的内容我们知道我们可以直接看doFilter方法即可
- public void doFilter(ServletRequest request, ServletResponse response, FilterChain chain) throws IOException, ServletException {
- boolean clearContext = request.getAttribute(FILTER_APPLIED) == null;
- if (clearContext) {
- try {
- request.setAttribute(FILTER_APPLIED, Boolean.TRUE);
- this.doFilterInternal(request, response, chain);
- } finally {
- SecurityContextHolder.clearContext();
- request.removeAttribute(FILTER_APPLIED);
- }
- } else {
//跟进- this.doFilterInternal(request, response, chain);
- }
- }
- private void doFilterInternal(ServletRequest request, ServletResponse response, FilterChain chain) throws IOException, ServletException {
- FirewalledRequest fwRequest = this.firewall.getFirewalledRequest((HttpServletRequest)request);
- HttpServletResponse fwResponse = this.firewall.getFirewalledResponse((HttpServletResponse)response);
- List<Filter> filters = this.getFilters((HttpServletRequest)fwRequest);
- if (filters != null && filters.size() != 0) {
- FilterChainProxy.VirtualFilterChain vfc = new FilterChainProxy.VirtualFilterChain(fwRequest, chain, filters);
- vfc.doFilter(fwRequest, fwResponse);
- } else {
- if (logger.isDebugEnabled()) {
- logger.debug(UrlUtils.buildRequestUrl(fwRequest) + (filters == null ? " has no matching filters" : " has an empty filter list"));
- }
- fwRequest.reset();
- chain.doFilter(fwRequest, fwResponse);
- }
- }
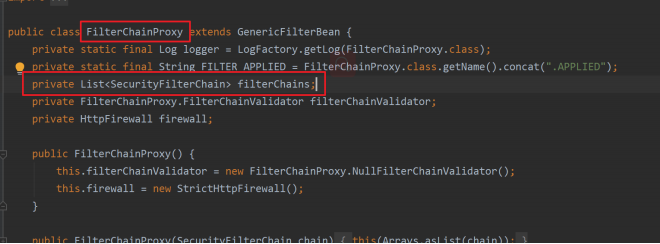
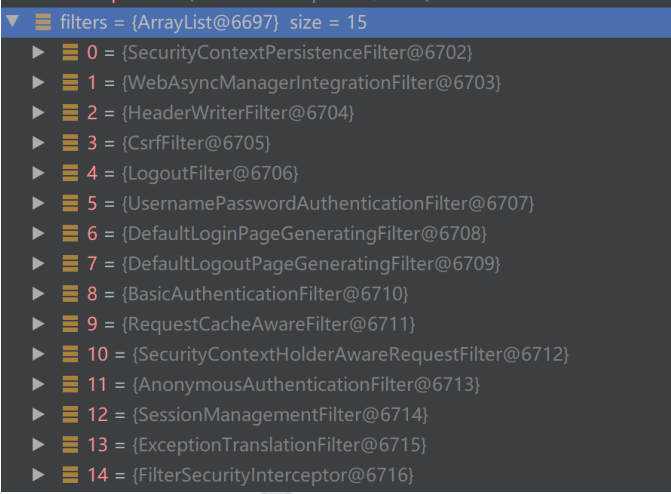
上面方法中的核心代码第一个是this.getFilters((HttpServletRequest)fwRequest);在这个方法要注意一个概念就是在SpringSecurity中可以存在多个过滤器链,而每个过滤器链又可以包含多个过滤器
- public void doFilter(ServletRequest request, ServletResponse response) throws IOException, ServletException {
- if (this.currentPosition == this.size) {
- if (FilterChainProxy.logger.isDebugEnabled()) {
- FilterChainProxy.logger.debug(UrlUtils.buildRequestUrl(this.firewalledRequest) + " reached end of additional filter chain; proceeding with original chain");
- }
- this.firewalledRequest.reset();
- this.originalChain.doFilter(request, response);
- } else {
- ++this.currentPosition;
- Filter nextFilter = (Filter)this.additionalFilters.get(this.currentPosition - 1);
- if (FilterChainProxy.logger.isDebugEnabled()) {
- FilterChainProxy.logger.debug(UrlUtils.buildRequestUrl(this.firewalledRequest) + " at position " + this.currentPosition + " of " + this.size + " in additional filter chain; firing Filter: '" + nextFilter.getClass().getSimpleName() + "'");
- }
- nextFilter.doFilter(request, response, this);
- }
- }
- }
在整个过滤器链中,ExceptionTranslationFilter是倒数第二个执行的过滤器,它的作用是通过catch处理下一个Filter【也就是FilterSecurityInterceptor】或应用逻辑产生的异常
- public void doFilter(ServletRequest req, ServletResponse res, FilterChain chain) throws IOException, ServletException {
- HttpServletRequest request = (HttpServletRequest)req;
- HttpServletResponse response = (HttpServletResponse)res;
- try {
- chain.doFilter(request, response);
- this.logger.debug("Chain processed normally");
- } catch (IOException var9) {
- throw var9;
- } catch (Exception var10) {
- Throwable[] causeChain = this.throwableAnalyzer.determineCauseChain(var10);
- RuntimeException ase = (AuthenticationException)this.throwableAnalyzer.getFirstThrowableOfType(AuthenticationException.class, causeChain);
- if (ase == null) {
- ase = (AccessDeniedException)this.throwableAnalyzer.getFirstThrowableOfType(AccessDeniedException.class, causeChain);
- }
- if (ase == null) {
- if (var10 instanceof ServletException) {
- throw (ServletException)var10;
- }
- if (var10 instanceof RuntimeException) {
- throw (RuntimeException)var10;
- }
- throw new RuntimeException(var10);
- }
- if (response.isCommitted()) {
- throw new ServletException("Unable to handle the Spring Security Exception because the response is already committed.", var10);
- }
- this.handleSpringSecurityException(request, response, chain, (RuntimeException)ase);
- }
- }
- private void handleSpringSecurityException(HttpServletRequest request, HttpServletResponse response, FilterChain chain, RuntimeException exception) throws IOException, ServletException {
- if (exception instanceof AuthenticationException) {
- this.logger.debug("Authentication exception occurred; redirecting to authentication entry point", exception);
- this.sendStartAuthentication(request, response, chain, (AuthenticationException)exception);
- } else if (exception instanceof AccessDeniedException) {
- Authentication authentication = SecurityContextHolder.getContext().getAuthentication();
- if (!this.authenticationTrustResolver.isAnonymous(authentication) && !this.authenticationTrustResolver.isRememberMe(authentication)) {
- this.logger.debug("Access is denied (user is not anonymous); delegating to AccessDeniedHandler", exception);
- this.accessDeniedHandler.handle(request, response, (AccessDeniedException)exception);
- } else {
- this.logger.debug("Access is denied (user is " + (this.authenticationTrustResolver.isAnonymous(authentication) ? "anonymous" : "not fully authenticated") + "); redirecting to authentication entry point", exception);
- this.sendStartAuthentication(request, response, chain, new InsufficientAuthenticationException(this.messages.getMessage("ExceptionTranslationFilter.insufficientAuthentication", "Full authentication is required to access this resource")));
- }
- }
- }
- protected void sendStartAuthentication(HttpServletRequest request, HttpServletResponse response, FilterChain chain, AuthenticationException reason) throws ServletException, IOException {
- SecurityContextHolder.getContext().setAuthentication((Authentication)null);
- this.requestCache.saveRequest(request, response);
- this.logger.debug("Calling Authentication entry point.");
- this.authenticationEntryPoint.commence(request, response, reason);
- }
- public void commence(HttpServletRequest request, HttpServletResponse response, AuthenticationException authException) throws IOException, ServletException {
- String redirectUrl = null;
- if (this.useForward) {
- if (this.forceHttps && "http".equals(request.getScheme())) {
- redirectUrl = this.buildHttpsRedirectUrlForRequest(request);
- }
- if (redirectUrl == null) {
- String loginForm = this.determineUrlToUseForThisRequest(request, response, authException);
- if (logger.isDebugEnabled()) {
- logger.debug("Server side forward to: " + loginForm);
- }
- RequestDispatcher dispatcher = request.getRequestDispatcher(loginForm);
- dispatcher.forward(request, response);
- return;
- }
- } else {
- redirectUrl = this.buildRedirectUrlToLoginPage(request, response, authException);
- }
- this.redirectStrategy.sendRedirect(request, response, redirectUrl);
- }
sendRedirect
- public void sendRedirect(HttpServletRequest request, HttpServletResponse response, String url) throws IOException {
- String redirectUrl = this.calculateRedirectUrl(request.getContextPath(), url);
- redirectUrl = response.encodeRedirectURL(redirectUrl);
- if (this.logger.isDebugEnabled()) {
- this.logger.debug("Redirecting to '" + redirectUrl + "'");
- }
- response.sendRedirect(redirectUrl);
- }
此处重定向的地址是 .../login 该请求会被DefaultLoginPageGeneratingFilter过滤器拦截,具体看下面对DefaultLoginPageGeneratingFilter的介绍
- public void doFilter(ServletRequest request, ServletResponse response, FilterChain chain) throws IOException, ServletException {
- FilterInvocation fi = new FilterInvocation(request, response, chain);
- this.invoke(fi);
- }
decide方法在做投票选举,第一次的时候回抛出AccessDeniedException异常,而抛出的异常会被ExceptionTranslationFilter中的catch语句块捕获,进而执行handleSpringSecurityException方法。
- private void init(UsernamePasswordAuthenticationFilter authFilter, AbstractAuthenticationProcessingFilter openIDFilter) {
- this.loginPageUrl = "/login";
- this.logoutSuccessUrl = "/login?logout";
- this.failureUrl = "/login?error";
- if (authFilter != null) {
- this.formLoginEnabled = true;
- this.usernameParameter = authFilter.getUsernameParameter();
- this.passwordParameter = authFilter.getPasswordParameter();
- if (authFilter.getRememberMeServices() instanceof AbstractRememberMeServices) {
- this.rememberMeParameter = ((AbstractRememberMeServices)authFilter.getRememberMeServices()).getParameter();
- }
- }
- if (openIDFilter != null) {
- this.openIdEnabled = true;
- this.openIDusernameParameter = "openid_identifier";
- if (openIDFilter.getRememberMeServices() instanceof AbstractRememberMeServices) {
- this.openIDrememberMeParameter = ((AbstractRememberMeServices)openIDFilter.getRememberMeServices()).getParameter();
- }
- }
- }
然后在doFilter方法中有判断请求的地址是否是'/login',如果是的话就拦截,否则就放过
- public void doFilter(ServletRequest req, ServletResponse res, FilterChain chain) throws IOException, ServletException {
- HttpServletRequest request = (HttpServletRequest)req;
- HttpServletResponse response = (HttpServletResponse)res;
- boolean loginError = this.isErrorPage(request);
- boolean logoutSuccess = this.isLogoutSuccess(request);
- if (!this.isLoginUrlRequest(request) && !loginError && !logoutSuccess) {
- chain.doFilter(request, response);
- } else {
- String loginPageHtml = this.generateLoginPageHtml(request, loginError, logoutSuccess);
- response.setContentType("text/html;charset=UTF-8");
- response.setContentLength(loginPageHtml.getBytes(StandardCharsets.UTF_8).length);
- response.getWriter().write(loginPageHtml);
- }
- }
3.基于SpringBoot方式的分析
基于配置文件的方式我们清楚了DelegatingFilterProxy是如何处理的,下面分析下在SpringBoot中也是如何处理的
- <dependency>
- <groupId>org.springframework.boot</groupId>
- <artifactId>spring-boot-starter-security</artifactId>
- </dependency>
- <dependency>
- <groupId>org.springframework.boot</groupId>
- <artifactId>spring-boot-starter-web</artifactId>
- </dependency>

其中有三个我们需要关注的会自动装配的配置类
- org.springframework.boot.autoconfigure.security.servlet.SecurityAutoConfiguratio n,\
org.springframework.boot.autoconfigure.security.servlet.UserDetailsServiceAutoCo nfiguration,\
org.springframework.boot.autoconfigure.security.servlet.SecurityFilterAutoConfig uration,\
这三个中和DelegatingFilterProxy有关系的是第三个 SecurityFilterAutoConfiguration 所以我们就直接先来看这个
- @Bean
- @ConditionalOnBean(name = DEFAULT_FILTER_NAME)
- public DelegatingFilterProxyRegistrationBean securityFilterChainRegistration(
- SecurityProperties securityProperties) {
//这段代码和前面讲的拦截器比较类似,我们可以点进去看下做了啥- DelegatingFilterProxyRegistrationBean registration = new DelegatingFilterProxyRegistrationBean(
- DEFAULT_FILTER_NAME);
- registration.setOrder(securityProperties.getFilter().getOrder());
- registration.setDispatcherTypes(getDispatcherTypes(securityProperties));
- return registration;
- }
进去之后看下结构,我们发现有个ServletContextInitializer,这个是上下文初始化的接口,我们进入看下
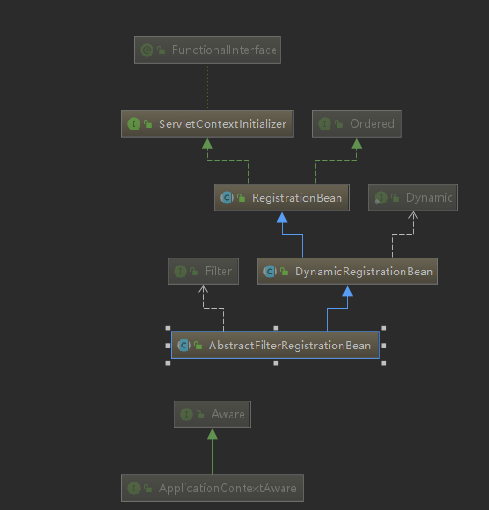
进入发现只有一个入口onStartup,先他的RegistraitonBean实现
- @FunctionalInterface
- public interface ServletContextInitializer {
- void onStartup(ServletContext servletContext) throws ServletException;
- }
- public final void onStartup(ServletContext servletContext) throws ServletException {
- String description = this.getDescription();
- if (!this.isEnabled()) {
- logger.info(StringUtils.capitalize(description) + " was not registered (disabled)");
- } else {
- this.register(description, servletContext);
- }
- }
- protected final void register(String description, ServletContext servletContext) {
- D registration = this.addRegistration(description, servletContext);
- if (registration == null) {
- logger.info(StringUtils.capitalize(description) + " was not registered (possibly already registered?)");
- } else {
- this.configure(registration);
- }
- }
- protected Dynamic addRegistration(String description, ServletContext servletContext) {
- Filter filter = this.getFilter();
- return servletContext.addFilter(this.getOrDeduceName(filter), filter);
- }
然后再看getFilter方法,可以看到真实的创建了一个DelegatingFilterProxy对象并且指定的名声是springSecurityFilterChain也就是DelegatingFilterProxy代理的Spring容器的Filter的名称
- public DelegatingFilterProxy getFilter() {
- //这个过滤器名称就是外面写死的那个
//这new的玩意其实就和前面XML文件配置的springSecurityFilterChain过滤器一样
- return new DelegatingFilterProxy(this.targetBeanName, this.getWebApplicationContext()) {
- protected void initFilterBean() throws ServletException {
- }
- };
- }
找到过滤器后我们向上返回一级,servletContext.addFilter(this.getOrDeduceName(filter), filter);把过滤器加载到上下文中去,然后再向上返一级看下this.configure(registration)方法,注意这个方法我们要进入AbstractFilterRegistrationBean中查看
- protected void configure(Dynamic registration) {
- super.configure(registration);
- EnumSet<DispatcherType> dispatcherTypes = this.dispatcherTypes;
- if (dispatcherTypes == null) {
- T filter = this.getFilter();
- if (ClassUtils.isPresent("org.springframework.web.filter.OncePerRequestFilter", filter.getClass().getClassLoader()) && filter instanceof OncePerRequestFilter) {
- dispatcherTypes = EnumSet.allOf(DispatcherType.class);
- } else {
- dispatcherTypes = EnumSet.of(DispatcherType.REQUEST);
- }
- }
- Set<String> servletNames = new LinkedHashSet();
- Iterator var4 = this.servletRegistrationBeans.iterator();
- while(var4.hasNext()) {
- ServletRegistrationBean<?> servletRegistrationBean = (ServletRegistrationBean)var4.next();
- servletNames.add(servletRegistrationBean.getServletName());
- }
- servletNames.addAll(this.servletNames);
- if (servletNames.isEmpty() && this.urlPatterns.isEmpty()) {
- registration.addMappingForUrlPatterns(dispatcherTypes, this.matchAfter, DEFAULT_URL_MAPPINGS);
- } else {
- if (!servletNames.isEmpty()) {
- registration.addMappingForServletNames(dispatcherTypes, this.matchAfter, StringUtils.toStringArray(servletNames));
- }
- if (!this.urlPatterns.isEmpty()) {
- registration.addMappingForUrlPatterns(dispatcherTypes, this.matchAfter, StringUtils.toStringArray(this.urlPatterns));
- }
- }
- }

至此我们看到了在SpringBoot中是通过DelegatingFilterProxyRegistrationBean 帮我们创建了一个DelegatingFilterProxy过滤器并且指定了拦截的地址,默认是 /* ,之后的逻辑就和前面介绍的XML中的就是一样的了,请求会进入FilterChainProxy中开始处理
4.SpringSecurity初始化到底经历了什么
通过对 第一次请求的流程梳理 会看到一个FilterChainProxy 至于他是啥时候创建的及默认的过滤器链和过滤器是怎么来的,下面就看下SpringSecurity初始化的时候到底做了哪些事情,基于XML的初始化阶段其实就是各种解析器对标签的解析,过程比较繁琐这里我们就不去分析了,我们直接在SpringBoot项目中来分析,在SpringBoot项目中分析SpringSecurity的初始化过程显然我们需要从 spring.factories 中的SecurityAutoConfiguration开始
- @Configuration(proxyBeanMethods = false)
@ConditionalOnClass(DefaultAuthenticationEventPublisher.class)
@EnableConfigurationProperties(SecurityProperties.class)
@Import({ SpringBootWebSecurityConfiguration.class, WebSecurityEnablerConfiguration.class,
SecurityDataConfiguration.class })
public class SecurityAutoConfiguration {
   @Bean
   @ConditionalOnMissingBean(AuthenticationEventPublisher.class)
   public DefaultAuthenticationEventPublisher authenticationEventPublisher(ApplicationEventPublisher publisher) {
      return new DefaultAuthenticationEventPublisher(publisher);
   }

}
- @Configuration(
- proxyBeanMethods = false
- )
- @ConditionalOnClass({WebSecurityConfigurerAdapter.class})
- @ConditionalOnMissingBean({WebSecurityConfigurerAdapter.class})
- @ConditionalOnWebApplication(
- type = Type.SERVLET
- )
- public class SpringBootWebSecurityConfiguration {
- public SpringBootWebSecurityConfiguration() {
- }
- @Configuration(
- proxyBeanMethods = false
- )
- @Order(2147483642)
- static class DefaultConfigurerAdapter extends WebSecurityConfigurerAdapter {
- DefaultConfigurerAdapter() {
- }
- }
- }
- @Configuration(
- proxyBeanMethods = false
- )
- @ConditionalOnBean({WebSecurityConfigurerAdapter.class})
- @ConditionalOnMissingBean(
- name = {"springSecurityFilterChain"}
- )
- @ConditionalOnWebApplication(
- type = Type.SERVLET
- )
- @EnableWebSecurity
- public class WebSecurityEnablerConfiguration {
- public WebSecurityEnablerConfiguration() {
- }
- }
- @Retention(RetentionPolicy.RUNTIME)
- @Target({ElementType.TYPE})
- @Documented
- @Import({WebSecurityConfiguration.class, SpringWebMvcImportSelector.class, OAuth2ImportSelector.class})
- @EnableGlobalAuthentication
- @Configuration
- public @interface EnableWebSecurity {
- boolean debug() default false;
- }
- public Filter springSecurityFilterChain() throws Exception {
- boolean hasConfigurers = this.webSecurityConfigurers != null && !this.webSecurityConfigurers.isEmpty();
- if (!hasConfigurers) {
- WebSecurityConfigurerAdapter adapter = (WebSecurityConfigurerAdapter)this.objectObjectPostProcessor.postProcess(new WebSecurityConfigurerAdapter() {
- });
- this.webSecurity.apply(adapter);
- }
- return (Filter)this.webSecurity.build();
- }
SpringSecurity原理的更多相关文章
- SpringSecurity原理解析以及CSRF跨站请求伪造攻击
SpringSecurity SpringSecurity是一个基于Spring开发的非常强大的权限验证框架,其核心功能包括: 认证 (用户登录) 授权 (此用户能够做哪些事情) 攻击防护 (防止伪造 ...
- SpringSecurity原理剖析与权限系统设计
Spring Secutity和Apache Shiro是Java领域的两大主流开源安全框架,也是权限系统设计的主要技术选型.本文主要介绍Spring Secutity的实现原理,并基于Spring ...
- spring-security原理学习
spring security使用分类: 如何使用spring security,相信百度过的都知道,总共有四种用法,从简到深为:1.不用数据库,全部数据写在配置文件,这个也是官方文档里面的demo: ...
- SpringSecurity过滤器原理
SpringSecurity原理 主要过滤器链 SpringSecurity的功能主要是由一系列的过滤器链相互配合完成的.验证一个过滤器之后放行到下一个过滤器链,然后到最后. 认证流程 过滤器作用 S ...
- Spring Security OAuth2 完全解析 (流程/原理/实战定制) —— Client / ResourceServer 篇
一.前言 本文假设读者对 Spring Security 本身原理有一定程度的了解,假设对 OAuth2 规范流程.Jwt 有基础了解,以此来对 SpringSecurity 整合 OAuth2 有个 ...
- DelegatingFilterProxy干了什么?
org.springframework.web.filter.DelegatingFilterProxy 一般情况,创建一个Filter是交给自己来实现的.基于servlet规范,在web.xml中配 ...
- spring security整体流程
spring-security原理 图片中各个类的作用: 1JwtUser类:实现Springsecurity的UserDetails类,此类必须有三个属性 private String userna ...
- JavaSSM-总结
Spring框架技术 SSM(Spring+SpringMVC+Mybatis)阶段的学习,也算是成功出了Java新手村. 前面我们已经学习过Mybatis了. 从这里开始,很多的概念理解起来就稍微有 ...
- springSecurity安全框架的学习和原理解读
最近在公司的项目中使用了spring security框架,所以有机会来学习一下,公司的项目是使用springboot搭建 springBoot版本1.59 spring security 版本4.2 ...
随机推荐
- Unity中的枚举和标志
译林军 宿学龙|2014-04-10 08:56|9007次浏览|Unity(377)0 枚举和标志 今天的主题是枚举,它是C#语言中的一个很有帮助的工具,可以增强代码的清晰度以及准确性. 枚举一系列 ...
- Eclipse的安装和配置
1. 下载Eclipse 前往Eclipse官网(https://www.eclipse.org/downloads/packages/)下载Eclipse: 这里下载的版本为: 这里给出该版本的百度 ...
- 11_IO多路复用
1.IO概述 input 和 output: 是在内存中存在的数据交换操作 内存和磁盘交换: 文件读写, 打印 内存和网络交换: recv send recvfrom, sendto IO密集型程序: ...
- 跟着兄弟连系统学习Linux-【day02】
day02-20200528 p6.vmvare安装与使用 官网下载安装包,个人学习的时候要求不高,所以不用安装最新版本,用不到那么多的功能,保证稳定版本就好了,然后傻瓜式安装.注意安 ...
- [业界方案] 用SOFATracer学习分布式追踪系统Opentracing
[业界方案] 用SOFATracer学习分布式追踪系统Opentracing 目录 [业界方案] 用SOFATracer学习分布式追踪系统Opentracing 0x00 摘要 0x01 缘由 &am ...
- vue-devtools-4.1.4_0.crx及Vue.js not detected的问题
谷歌-更多工具-扩展程序 Vue.js not detected的问题
- Ajax跨域解决方案大全
题纲 关于跨域,有N种类型,本文只专注于ajax请求跨域(,ajax跨域只是属于浏览器"同源策略"中的一部分,其它的还有Cookie跨域iframe跨域,LocalStorage跨 ...
- python应用 曲线拟合03
问题 有许多待拟合的曲线,需批量拟合. 解决 写一个类 # -*- coding: utf-8 -*- """ @author: kurrrr ""& ...
- NOIP2017 Day1 T1 小凯的疑惑
题目描述 小凯手中有两种面值的金币,两种面值均为正整数且彼此互素.每种金币小凯都有 无数个.在不找零的情况下,仅凭这两种金币,有些物品他是无法准确支付的.现在小凯想知道在无法准确支付的物品中,最贵的价 ...
- pycharm2020.2破解版教程激活码支持Windows Linux Mac系统-中关村老大爷
听说很多朋友想要PyCharm专业版2020.2的破解教程.现在来了,亲测破解成功.支持mac linux windows系统.本教程提供官方安装包.激活码和注册补丁. 本教程仅供学习和讨论,禁止商业 ...
