Spring3.0实现REST实例
关于REST是什么东西,在这里我就不再多说,大家可以去http://blog.csdn.net/pilou5400/archive/2010/12/24/6096861.aspx看看介绍,直接切入主题:

这是一个rest风格的访问,Spring从3.0开始将全面支持rest。不得不感叹Spring的强悍。
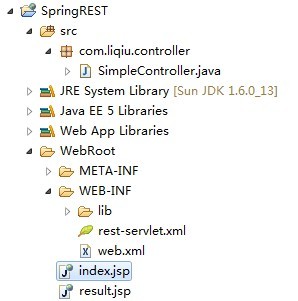
项目结构:
第一步永远是配置,使用框架永远都是先有配置,在web.xml中的配置:
- <?xml version="1.0" encoding="UTF-8"?>
- <web-app version="3.0"
- xmlns="http://java.sun.com/xml/ns/javaee"
- xmlns:xsi="http://www.w3.org/2001/XMLSchema-instance"
- xsi:schemaLocation="http://java.sun.com/xml/ns/javaee
- http://java.sun.com/xml/ns/javaee/web-app_3_0.xsd">
- <display-name></display-name>
- <context-param>
- <!--rest配置文件的路径,貌似不配置也是加载这个地址,这个地方有点疑问,大家指点指点-->
- <param-name>contextConfigLocation</param-name>
- <param-value>/WEB-INF/rest-servlet.xml</param-value>
- </context-param>
- <listener>
- <listener-class>org.springframework.web.context.ContextLoaderListener</listener-class>
- </listener>
- <servlet>
- <!-- 配置一个Servlet,有这个Servlet统一调度页面的请求 -->
- <servlet-name>rest</servlet-name>
- <servlet-class>org.springframework.web.servlet.DispatcherServlet</servlet-class>
- <load-on-startup>2</load-on-startup>
- </servlet>
- <servlet-mapping>
- <!-- 映射路径,不要写成了/*那样会拦截所有的访问,连JSP页面都访问不了 -->
- <servlet-name>rest</servlet-name>
- <url-pattern>/</url-pattern>
- </servlet-mapping>
- <welcome-file-list>
- <welcome-file>/index.jsp</welcome-file>
- </welcome-file-list>
- </web-app>
第二步:配置rest-servlet.xml这个文件
- <?xml version="1.0" encoding="UTF-8"?>
- <beans xmlns="http://www.springframework.org/schema/beans"
- xmlns:xsi="http://www.w3.org/2001/XMLSchema-instance" xmlns:jee="http://www.springframework.org/schema/jee"
- xmlns:tx="http://www.springframework.org/schema/tx" xmlns:context="http://www.springframework.org/schema/context"
- xmlns:aop="http://www.springframework.org/schema/aop"
- xsi:schemaLocation="http://www.springframework.org/schema/beans http://www.springframework.org/schema/beans/spring-beans-2.5.xsd http://www.springframework.org/schema/tx http://www.springframework.org/schema/tx/spring-tx-2.5.xsd http://www.springframework.org/schema/jee http://www.springframework.org/schema/jee/spring-jee-2.5.xsd http://www.springframework.org/schema/aop http://www.springframework.org/schema/aop/spring-aop-2.5.xsd http://www.springframework.org/schema/context http://www.springframework.org/schema/context/spring-context-2.5.xsd"
- default-lazy-init="true">
- <description>Spring公共配置</description>
- <!--检测注解-->
- <context:component-scan base-package="com.liqiu" />
- <bean class="org.springframework.web.servlet.mvc.annotation.DefaultAnnotationHandlerMapping" />
- <bean class="org.springframework.web.servlet.mvc.annotation.AnnotationMethodHandlerAdapter" />
- <!-- 注册视图解析器,说白了就是根据返回值指定到某个页面 -->
- <bean id="viewResolver" class="org.springframework.web.servlet.view.InternalResourceViewResolver">
- <property name="viewClass" value="org.springframework.web.servlet.view.JstlView" />
- <property name="prefix" value="/"></property> <!--页面文件的路径,在根目录下-->
- </bean>
- </beans>
第三步:具体实现类
- package com.liqiu.controller;
- import java.io.IOException;
- import javax.servlet.http.HttpServletRequest;
- import javax.servlet.http.HttpServletResponse;
- import org.springframework.stereotype.Controller;
- import org.springframework.web.bind.annotation.PathVariable;
- import org.springframework.web.bind.annotation.RequestMapping;
- import org.springframework.web.bind.annotation.RequestMethod;
- @Controller
- @RequestMapping("/simple")
- public class SimpleController {
- //映射路径/simple/index当访问这个路径时,执行这个方法
- @RequestMapping("/index")
- public String index(HttpServletRequest request ,HttpServletResponse response){
- //response,request会自动传进来
- request.setAttribute("message", "Hello,This is a example of Spring3 RESTful!");
- return "index.jsp";
- }
- //根据ID获取不同的内容,通过@PathVariable 获得属性
- @RequestMapping(value="/{id}",method=RequestMethod.GET)
- public String get(@PathVariable String id,HttpServletRequest request ,HttpServletResponse response) throws IOException{
- request.setAttribute("message", "Hello,This is a example of Spring3 RESTful!<br/>ID:"+id+"");
- //response.getWriter().write("You put id is : "+id);
- return "index.jsp";
- //return null;
- }
- }
index.jsp页面:
- <%@ page language="java" pageEncoding="UTF-8"%>
- <html>
- <head>
- <title>Spring3 RESTful</title>
- </head>
- <body>
- ${message}
- </body>
- </html>
在浏览器中输入:http://localhost:8080/SpringREST/simple/index/,就可以看到效果。
也可以在页面输入不同的参数,获得不同的内容,输入地址:http://localhost:8080/SpringREST/simple/88888,这次执行的就是get方法,通过注解获取ID值,效果:

关于Spring rest 对于Ajax的支持,其实响应Ajax就是通过response返回一个字符串到页面,既然能获得response对象,那问题就迎刃而解了,我们改造下get方法:
- @RequestMapping(value="/{id}",method=RequestMethod.GET)
- public String get(@PathVariable String id,HttpServletRequest request ,HttpServletResponse response) throws IOException{
- //request.setAttribute("message", "Hello,This is a example of Spring3 RESTful!<br/>ID:"+id+"");
- response.getWriter().write("You put id is : "+id);
- //return "index.jsp";
- return null;
- }
改造index.jsp页面:
- <%@ page language="java" pageEncoding="UTF-8"%>
- <html>
- <head>
- <title>Spring3 RESTful</title>
- <SCRIPT TYPE="text/javascript">
- function go(value){
- var url = "/SpringREST/simple/"+value+"/";
- var request = new XMLHttpRequest();
- request.open("GET", url, true);
- request.setRequestHeader("Content-Type","application/x-javascript;");
- request.onreadystatechange = function() {
- if (request.readyState == 4) {
- if (request.status == 200){
- if (request.responseText) {
- document.getElementById("text").innerHTML = request.responseText;
- }
- }
- }
- };
- request.send(null);
- }
- </SCRIPT>
- </head>
- <body>
- ${message}
- <br>
- Input the id of you will access object:<input id="id" type="text" size="7"><input type="button" value="Go" onclick="go(document.getElementById('id').value)">
- <div id="text"></div>
- </body>
- </html>
访问http://localhost:8080/SpringREST/simple/index/,在页面里的输入框中输入值,可以看到返回的数据:

Spring3.0实现REST实例的更多相关文章
- Spring3.0 与 MyBatis框架 整合小实例
本文将在Eclipse开发环境下,采用Spring MVC + Spring + MyBatis + Maven + Log4J 框架搭建一个Java web 项目. 1. 环境准备: 1.1 创建数 ...
- Jbpm4.4+hibernate3.5.4+spring3.0.4+struts2.1.8整合例子(附完整的请假流程例子,jbpm基础,常见问题解决)
Jbpm4.4+hibernate3.5.4+spring3.0.4+struts2.1.8 整合例子(附完整的请假流程例子). 1.jbpm4.4 测试环境搭建 2.Jbpm4.4+hibernat ...
- 开发基础框架:mybatis-3.2.8 +hibernate4.0+spring3.0+struts2.3
一:项目下载地址(点击 Source code(zip)) https://github.com/fzxblgong/frame_2014-12-15/releases 版本:v1.2大小:20M 二 ...
- 《Spring3.0就这么简单》
第一章 认识Spring 1.Spring提供的IOC容器,是Spring大杀器之一.容器将对象之间的依赖关系交给Spring进行控制,采用配制的方式对依赖关系进行描述,由Ioc容器负责依赖类之间的创 ...
- Jbpm4.4+hibernate3.5.4+spring3.0.4+struts2.1.8 整合例子
转自:http://www.blogjava.net/wangxinsh55/archive/2011/07/24/354925.html Jbpm4.4+hibernate3.5.4+sprin ...
- Oracle 11.2.0.4单实例打PSU,OJVM PSU补丁快速参考
写在前面: 1.Oracel打每个补丁的操作有时存在差异,所以不管多熟悉,都应该在打任何补丁之前阅读新补丁中附带的readme. 2.Oracle每季度都会更新一个最新的PSU,本文最新指的是当前最新 ...
- 模块化之Spring3.0 web fragment和gradle构建项目
1.背景 模块化开发很久以前就开始普及的概念.但是到了企业实际情况中,真正把模块化作为系统架构的核心的不多.或者说对模块化有这个意识,但是具体到底该如何实现,有些模糊,同时也许因为项目紧.任务中. ...
- spring3.0使用annotation完全代替XML(三)
很久之前写过两篇博客: spring3.0使用annotation完全代替XML spring3.0使用annotation完全代替XML(续) 用java config来代替XML,当时还遗留下一些 ...
- spring3.0使用annotation完全代替XML
@Service与@Component有什么不同?那天被问到这个问题,一时之间却想不起来,就利用这篇文章来纪录spring3.0中常用的annotation. 从spring2.5开始,annotat ...
随机推荐
- Timer wheel etc.
http://code.google.com/p/hierarchal-wheel-timer/ 最小堆的实现(C 语言版) 最小堆的实现(java) Linux 下定时器的实现方式分析 更快bobh ...
- 使用c#检测文件正在被那个进程占用 判断文件是否被占用的两种方法
C# 判断文件是否被占用的三种方法 using System.IO; using System.Runtime.InteropServices; [DllImport("kernel32.d ...
- 问题记录-Activity跳转后显示空白界面
前两天写一个简易安卓记事本,从主界面跳转到添加内容界面总是显示空白. 明明有setContentView xml文件在可视化开发环境下也正常显示.后经前辈指点,原来是复写onCreate函数时出现了问 ...
- JS实现浏览器的title闪烁
经常可以看见的title里面的消息提示,下面是JS的一种实现方法:主要是通过setTimeout方法设置一个定时器,切换消息提示,从而达title到消息提示的闪烁. <html> < ...
- python 逻辑运算符与比较运算符的差别
文章内容摘自:http://www.cnblogs.com/vamei/archive/2012/05/29/2524376.html 逻辑运算符 and, or, not 比较运算符 ==, !=, ...
- python去掉空行
#用strip(),split()两个方法都可以判断空行 infile=open('/.../','r') outfile=open('/.../','w') for li in infile.rea ...
- LINUX开启允许对外访问的网络端口
LINUX开启允许对外访问的网络端口 LINUX通过下面的命令可以开启允许对外访问的网络端口: /sbin/iptables -I INPUT -p tcp --dport 8000 -j ACCE ...
- JavaScript 组件化开发之路(一)
*:first-child{margin-top: 0 !important}.markdown-body>*:last-child{margin-bottom: 0 !important}.m ...
- 菜鸟学习Spring——60s利用JoinPoint获取参数的值和方法名称
一.概述 AOP的实现方法在上两篇博客中已经用了两种方法来实现现在的问题来了虽然我们利用AOP,那么客户端如何信息传递?利用JoinPoint接口来实现客户端给具体实现类的传递参数. 二.代码演示. ...
- oracle 日志文件管理
OS: [root@b28-122 ~]# more /etc/oracle-releaseOracle Linux Server release 5.7 DB: SQL> select * f ...